With the MCP integration (Model Context Protocol) you let your AI assistant, Claude or ChatGPT for example, look and work directly inside your Autorespond environment: looking up contacts, preparing campaigns, checking automations. That is extremely handy, but your CRM is full of personal data belonging to your customers. As soon as your AI assistant looks in, that data goes to the servers of the AI supplier, and under the GDPR you are responsible for what happens with it. If you work calmly through the steps below one by one, you will arrange it properly: the legal basis first (steps 1 to 3), then the technical set-up with limited rights (steps 4 to 7), and finally your GDPR records (steps 8 to 10).
The MCP integration in Autorespond is based on FluentCRM, included in your package. Read the English documentation
Important: your responsibility, not legal advice. This guide helps you on your way, but it is general information and not legal advice. As an entrepreneur you are and remain responsible yourself for complying with the GDPR and other laws and regulations in your own situation. So always do your own research: read the current terms of your AI supplier, consult the Dutch Data Protection Authority and, if in doubt, call in a lawyer or privacy adviser, certainly if you work with sensitive data. Autorespond accepts no liability for the way you use this integration.
In brief: the three golden rules #
- Never use a free or personal AI account for customer data. Only a business subscription with a data processing agreement.
- Give the AI a user of its own with as few rights as possible, never your administrator account.
- Let the AI make suggestions, and send things yourself. Do not give the AI account sending rights, unless you choose that very deliberately.
Part A: the legal basis #
Step 1: choose a business AI subscription #
The GDPR requires you to have a data processing agreement (DPA) with every party that processes personal data on your behalf. Free and personal AI subscriptions do not offer one. Worse still: they use your conversations to train the AI model by default. At the end of 2025 the Dutch Data Protection Authority explicitly warned about data breaches caused by employees pasting customer data into free chatbots (the authority’s warning).
- Choose one of these options:
- Claude (Anthropic): a Claude for Work / Team subscription or the API. The data processing agreement is automatically part of the commercial terms; Anthropic contractually does not train on your data.
- ChatGPT (OpenAI): a Team or Enterprise subscription or the API. Sign the data processing agreement through the DPA portal. OpenAI also offers EU data storage on business subscriptions; ask about that when you sign up.
- Keep (a copy of) the data processing agreement in your records.
- Do not: use your private account “just this once”. Claude Free/Pro/Max and ChatGPT Free/Plus train on your conversations by default and have no data processing agreement.
Step 2: check the privacy settings of your AI account #
- Check that model training is switched off for your environment. On business subscriptions this is arranged that way by default; check it in the settings of your workspace all the same.
- Switch off features such as “share conversations for improvement”.
- Limit who in your AI workspace may use the CRM integration: only staff who are allowed to work with customer data.
Step 3: decide what the AI may and may not see #
The GDPR calls for data minimisation: only give the AI access to what is needed for the purpose.
- Write down in one sentence what you use the integration for. For example: “The AI assistant helps us look up contact information and prepare campaign copy.”
- Do you work with sensitive data, health notes as a coach or therapist for example? Then do not put those in fields the AI can reach, or give the AI no access to contacts at all. Special categories of personal data (health, religious belief, and so on) should not travel through this integration.
- Decide now which profile suits you, which makes step 5 easier:
- Read only (recommended to start with): the AI can read, you do everything that changes or sends anything.
- Working along: the AI may also update and tag contacts, but not delete them and not email directly (note: tags can start automations, see step 5).
- Full (for advanced users only): the AI may also send emails. Read the “Worth knowing” section at the bottom of this article first.
Part B: the technical set-up #
Step 4: create a separate user for the AI #
The integration works with the rights of the user you create it with. If you use your own administrator account, the AI can do everything, including sending campaigns to your entire list and deleting contacts permanently. That is why you create a separate user with minimal rights.
- In your administration environment, go to Administration → Users → Add user.
- Enter a username (
ai-assistant, for example) and an email address of its own ([email protected], for example). - Under Role, choose Subscriber. That is the lowest role and exactly right; you arrange the CRM rights separately in step 5.
- Click Add user.
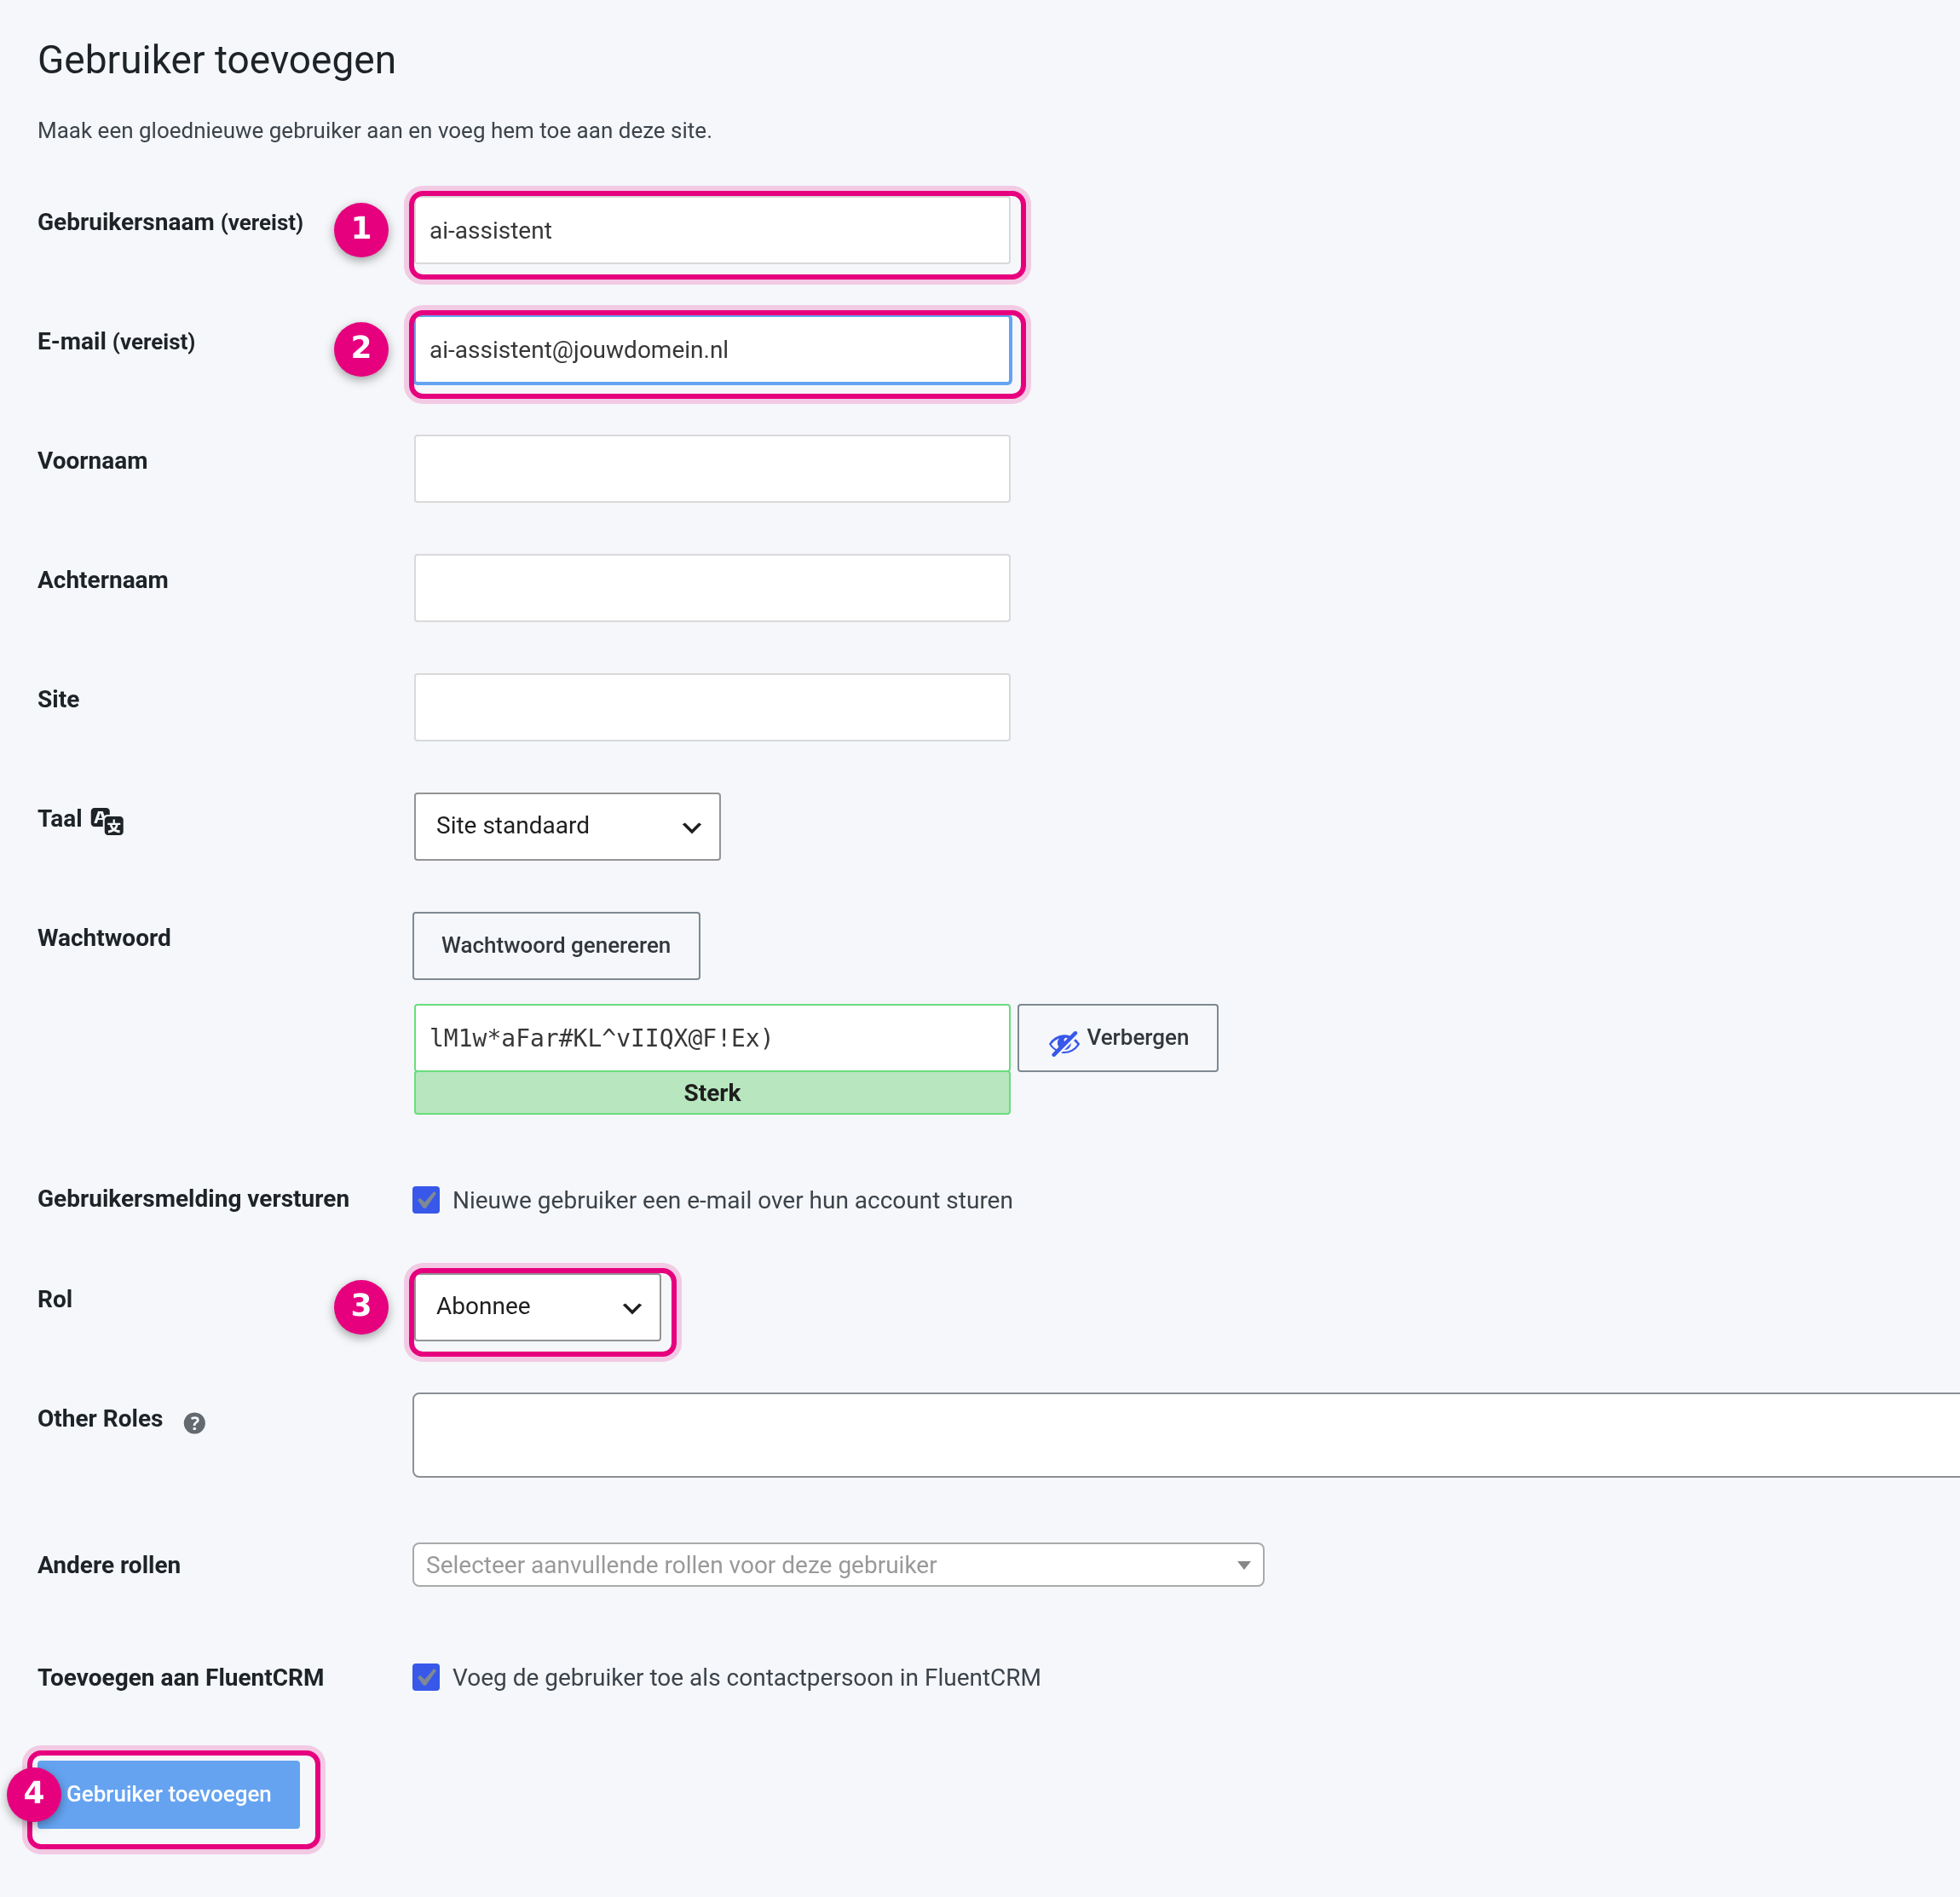
- Username (required): choose a recognisable name,
ai-assistantfor example. You need this name again in step 7. - Email (required): an address of its own for this account,
[email protected]for example. Every account needs a unique email address. - Role: choose Subscriber, the role with the fewest rights.
- Add user: this creates the account for good.
Worth knowing on this screen: the tick box Send user notification can stay off, an AI account does not need a welcome email. Do you see the tick box Add to FluentCRM (add the user as a contact) at the bottom? Switch that off, because this helper account does not belong among your customer contacts.
Step 5: give that user limited CRM rights #
The CRM has a rights system of its own, separate from the ordinary user roles. Here you decide very precisely what the AI may do.
- Go to CRM & Emails → Settings (the cog in the top right) → CRM managers.
- Click Add manager and enter the email address of the user from step 4.
- Under Permissions, tick only the rights that belong to the profile you chose (see below).
- Click Save.
The “Read only” profile (recommended): tick only these four:
- CRM Dashboard
- View contacts
- View emails
- View automations
The “Working along” profile: everything above, plus Add/update/import contacts and Create or update contact tags/lists/companies/segments. Deliberately leave Delete contacts and Write/send emails switched off.
Watch out with “Working along”: do you have automations that start as soon as someone gets a particular tag or list? Then with this profile the AI can still set emails in motion indirectly: applying a tag to a contact simply starts that automation, including every email in it. So go through your automations before you let the AI manage tags, or stay with “Read only”.
The “Full” profile: only if you understand the risk (see the “Worth knowing” section at the bottom), plus Write/send emails.
Why this works: every function of the integration checks the matching CRM right on the server. Without “Write/send emails” the AI cannot send any mail itself, whatever it tries (mail can only go out indirectly through tag-triggered automations, see the box above). Without “Delete contacts” nothing can be deleted. This is your most important safeguard.
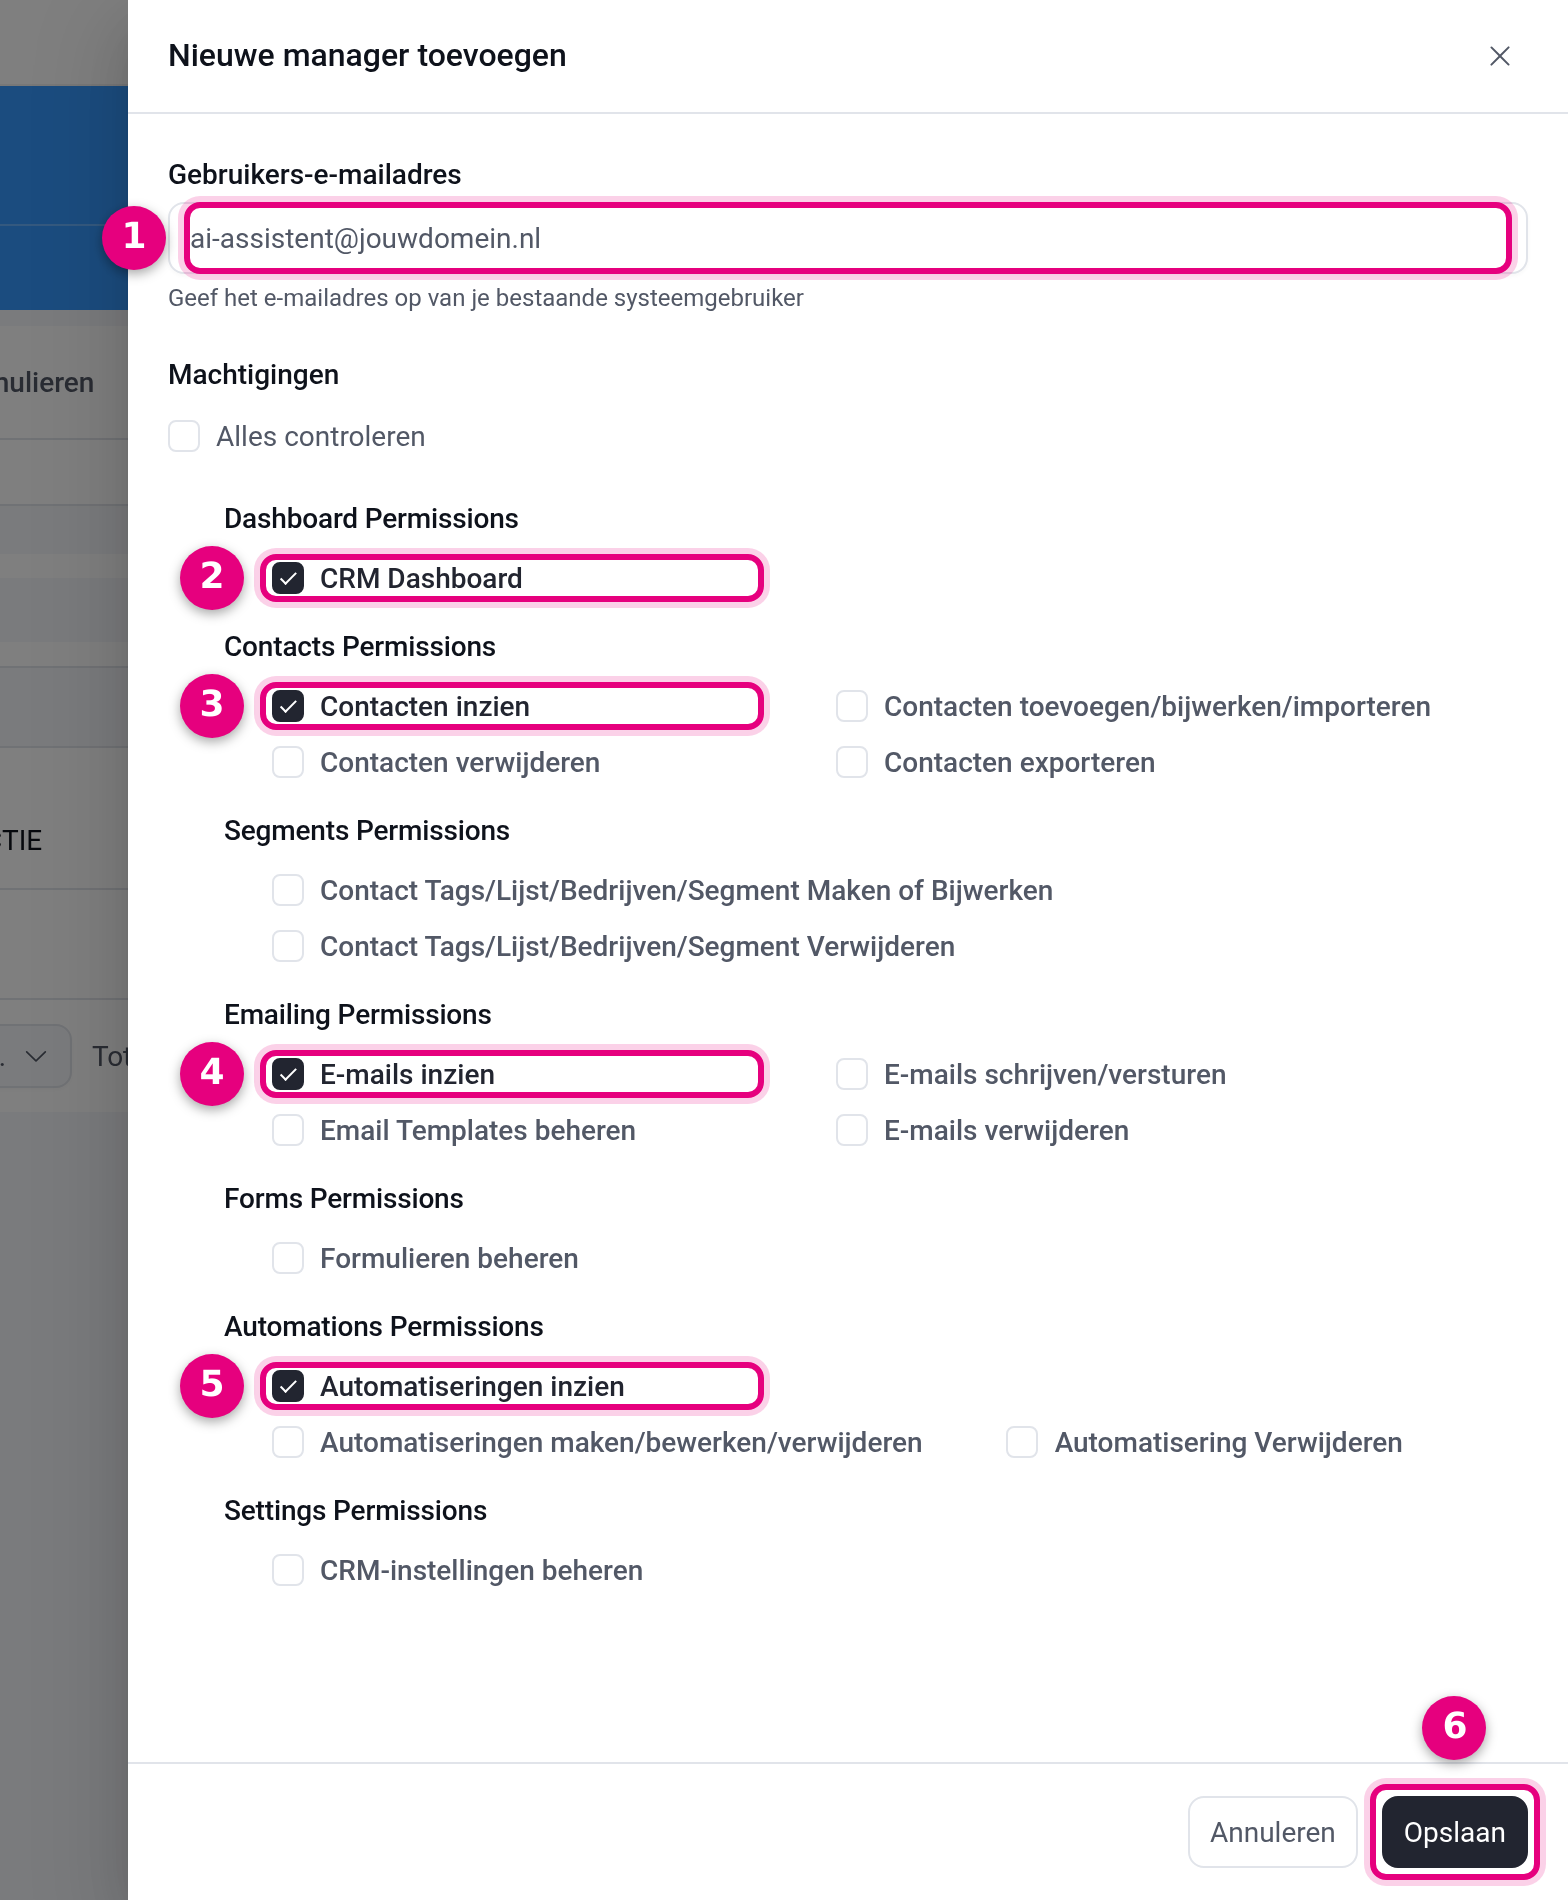
- User email address: the email address of the AI user you created in step 4.
- CRM Dashboard: the AI may view the dashboard with general figures.
- View contacts: reading contacts only. You leave the boxes for adding, deleting and exporting switched off.
- View emails: reading campaigns and emails only. You deliberately leave “Write/send emails” switched off.
- View automations: reading automations only, not editing or deleting them.
- Save: this grants the rights. So do not use “Check all” at the top, which would switch on every right at once.
Step 6: create an application password #
The AI does not log in with an ordinary password, but with an application password: a separate key you can revoke at any moment without anything else changing.
- Go to Administration → Users, click the AI user and scroll to the heading Application passwords.
- Give the password a recognisable name,
Claude-integrationfor example. - Click Add application password and copy the code straight away, it is only shown once.
- Treat this code like a password: do not email it, do not put it in a shared document. Only enter it in your AI program itself (step 7).
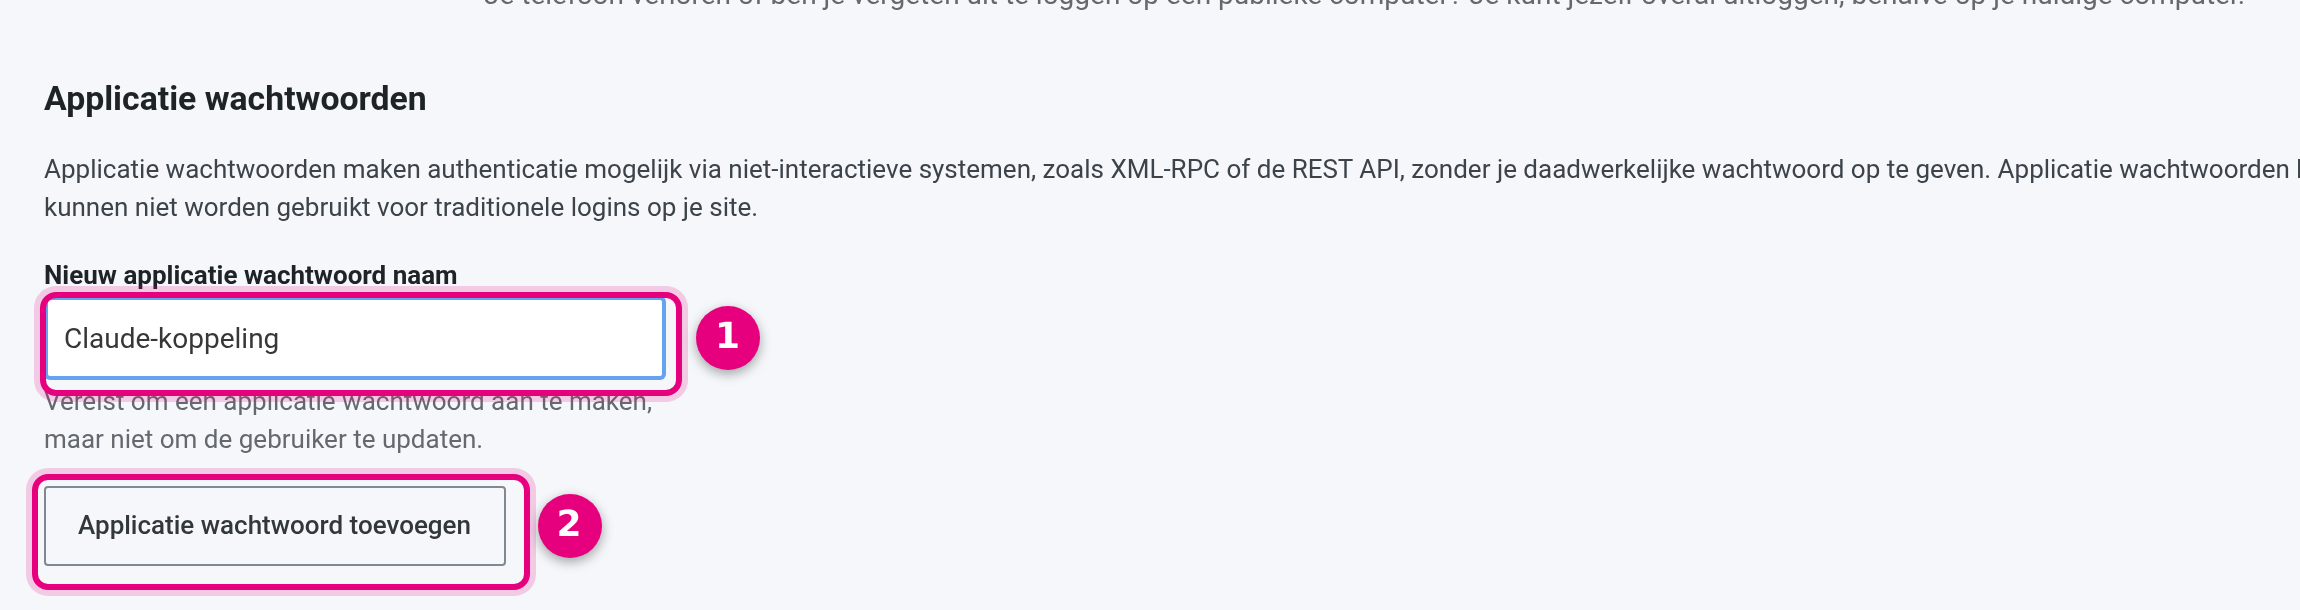
- New application password name: a recognisable name, so that you know later which key belongs to which integration.
- Add application password: creates the key and shows the code once. After this, a list of existing keys appears here as well, each with a button to revoke it.
Step 7: connect your AI assistant #
- Go to CRM & Emails → Settings → AI configuration → MCP for AI agents.
- Check that the switch Enable MCP for AI agents is on. Under Status you also see the Endpoint URL of your integration; it ends in
/wp-json/fluent-crm/mcp. - Under Connect a client, enter the username from step 4 and the application password from step 6.
- Choose the tab of your AI program. Ready-made instructions are waiting for Claude Code, Claude Desktop and Cursor, among others.
- Copy the completed snippet, follow the instructions for your AI program and restart the program.
- Test the connection with a harmless question, for example: “How many contacts are there in my CRM?”
- Test the safeguards straight away as well: ask the AI for something it is not allowed to do, for example “delete test contact X”. You then get a polite “Permission denied”, and that is exactly the intention.
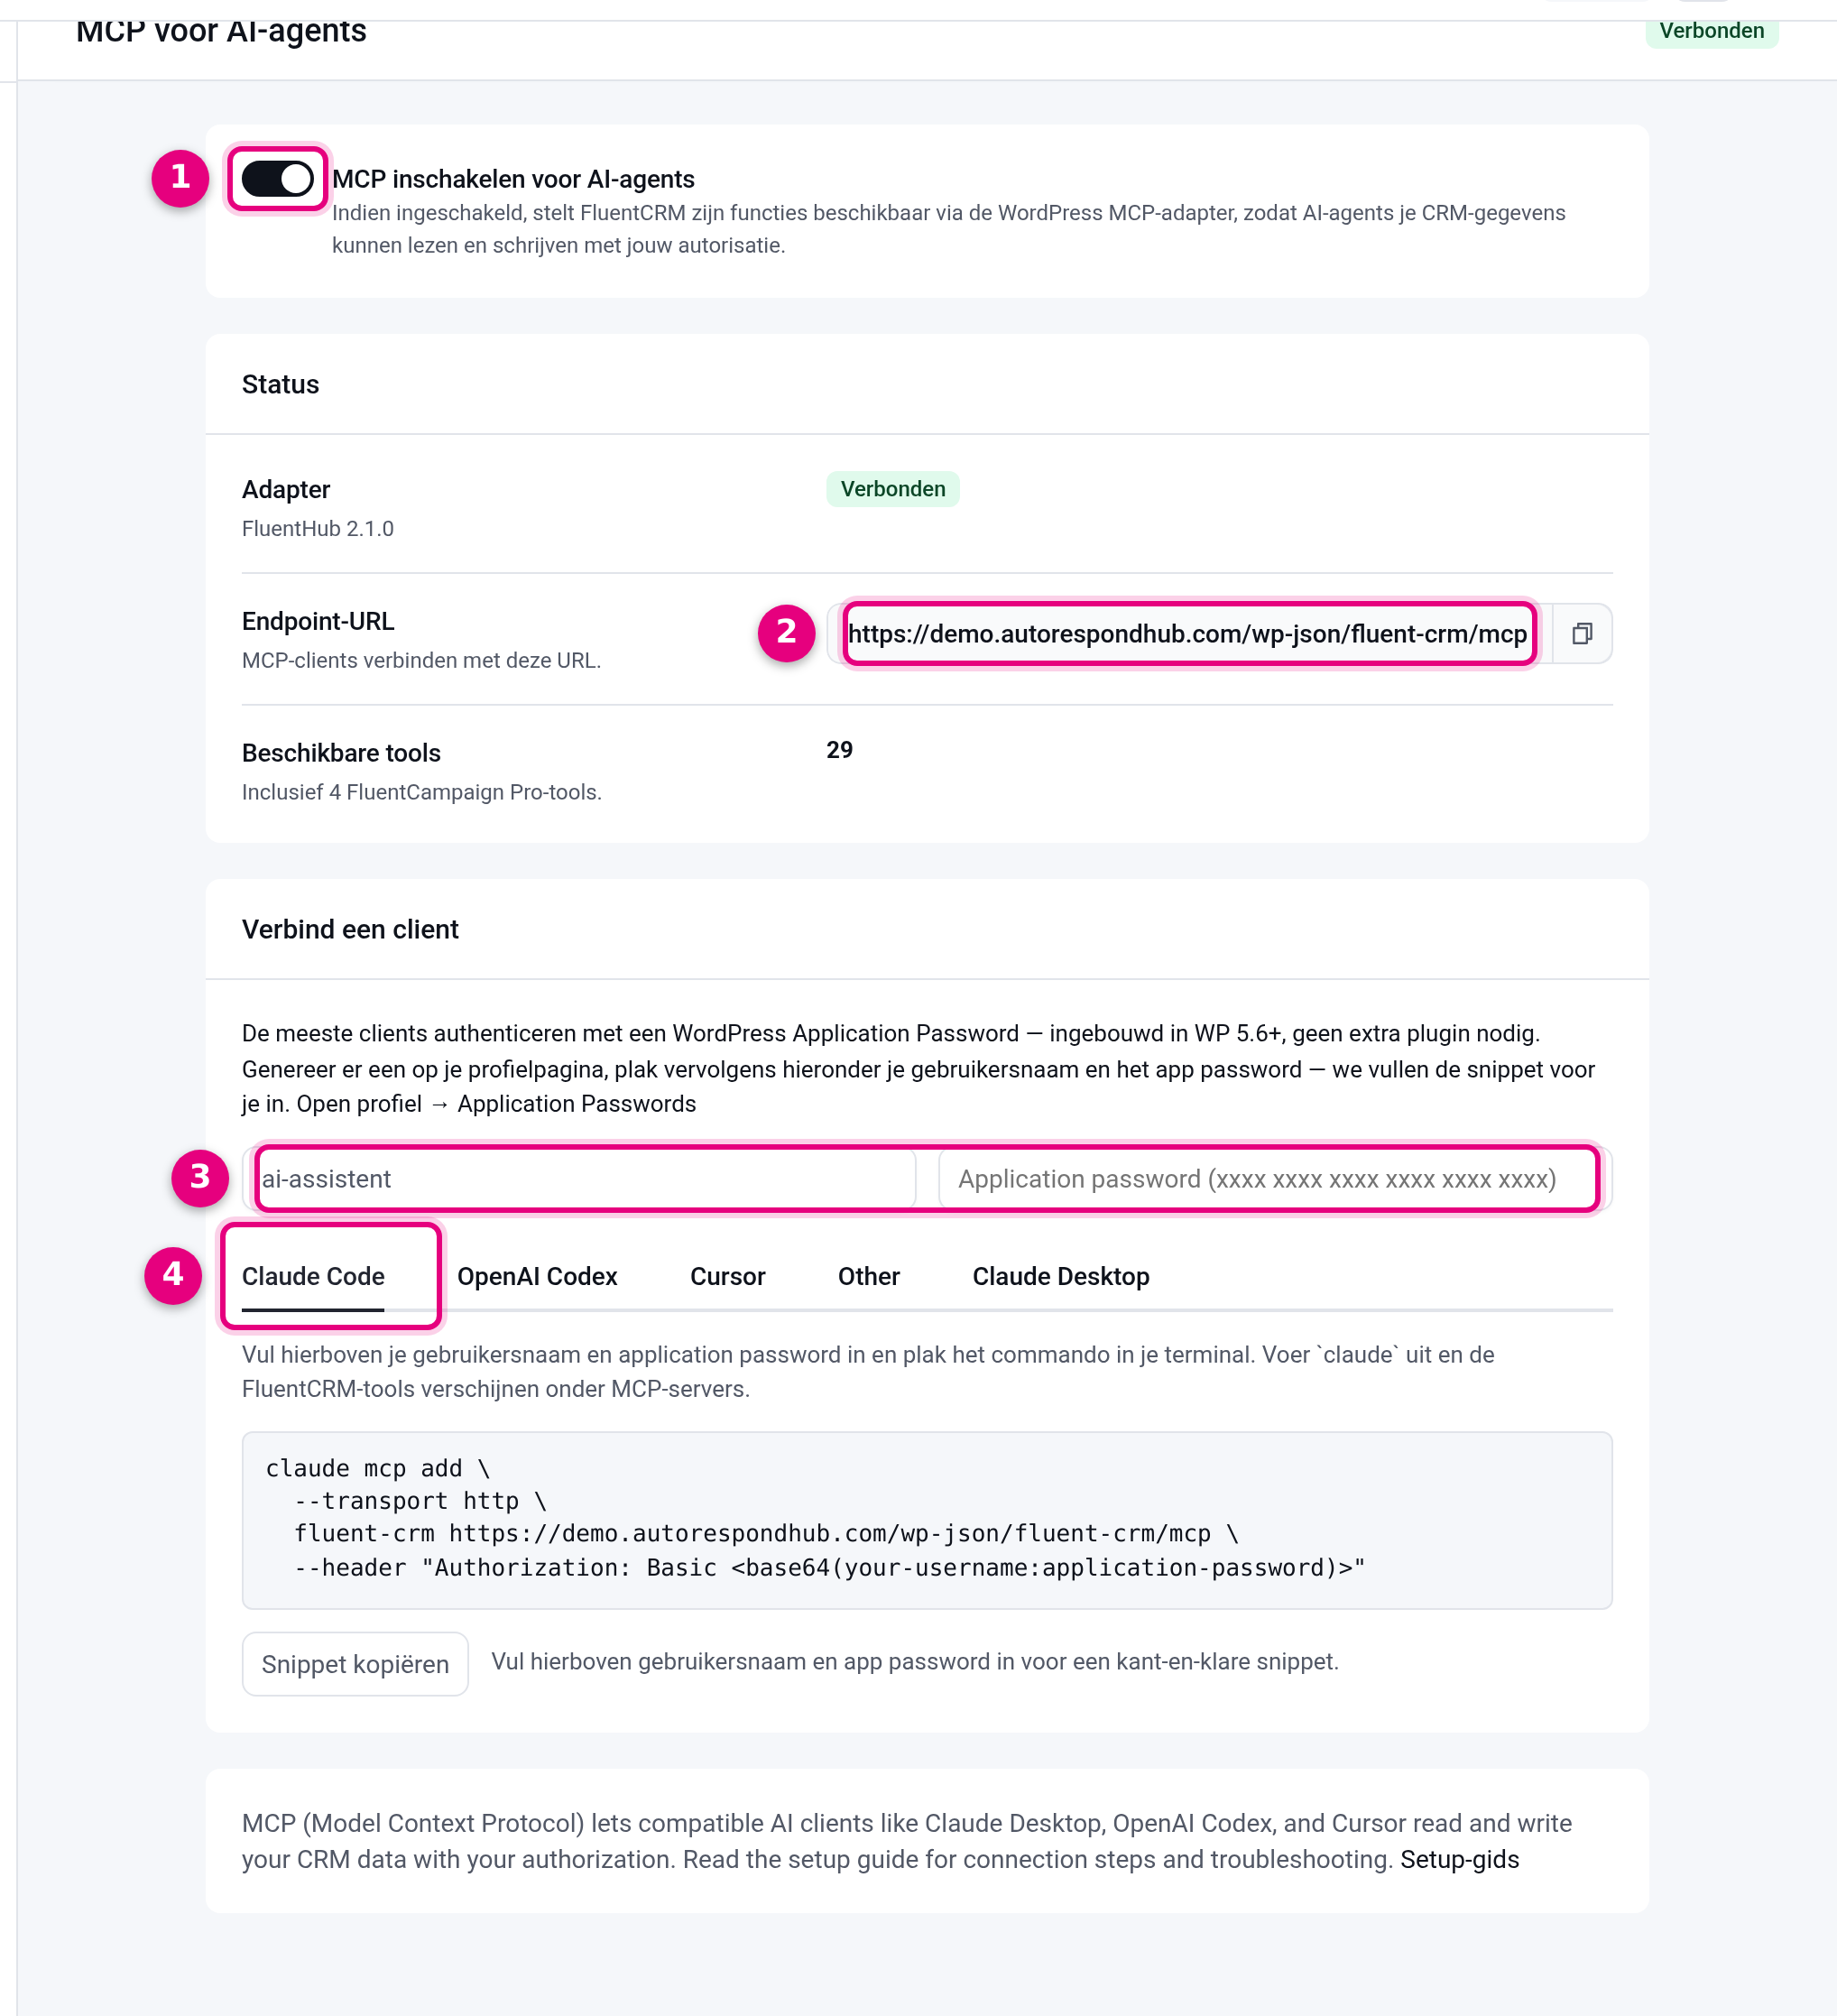
- Enable MCP for AI agents: the main switch of the integration. If it is off, no AI connection works at all.
- Endpoint URL: the address AI programs connect to. On your environment this shows the address of your own site, ending in
/wp-json/fluent-crm/mcp. - Username and application password: enter the details of the AI user here; the snippet below is then filled in for you automatically.
- Client choice: choose the tab of your AI program; the instructions and the snippet below adapt to it.
Tip: going on holiday, or not using the integration for a while? Feel free to switch off the switch at the top of this page. Switching it back on is one click.
Part C: your GDPR records #
Step 8: add to your record of processing activities #
Add the new processing activity to your record of processing activities (article 30 GDPR). You may copy this example row and adapt it:
| Item | Entry |
|---|---|
| Processing activity | AI assistance with customer management and marketing (AI assistant connected to the CRM) |
| Purpose | Support with looking up customer information and preparing campaigns |
| Categories of data subjects | Customers, newsletter subscribers, leads |
| Categories of data | Name, email address, tags/lists, campaign interaction (no special categories of personal data) |
| Recipients/processors | [AI supplier, e.g. Anthropic], data processing agreement dated [date] |
| Transfer outside the EU | USA, on the basis of standard contractual clauses (SCCs) in the data processing agreement |
| Retention period | Conversations held by the AI supplier: [30 days / as per contract] |
| Security | Separate user with minimal rights, revocable application password, no sending or deletion rights |
Step 9: update your privacy statement #
Add a paragraph to your privacy statement. Example text you may copy:
Use of AI tools. To manage our customer relationships and prepare our emails we use an AI assistant from [supplier, e.g. Anthropic]. In doing so, limited customer data (such as name and email address) may be processed on the servers of this supplier, possibly in the United States. We have concluded a data processing agreement with standard contractual clauses for this; the supplier does not use this data to train AI models. Questions? Get in touch with us at [email address].
Step 10: record your assessment (pre-DPIA) and brief your team #
- Short risk assessment (pre-DPIA). Answer these in writing for yourself, half a page of A4 is enough:
- Which data can the AI see, and is that the minimum for my purpose?
- Am I processing sensitive data (health, vulnerable groups)? If so: carry out a full DPIA or take advice. The Dutch Data Protection Authority regards AI as “innovative technology”, which makes a DPIA compulsory quite quickly.
- What is the worst that could go wrong, and which measure covers that?
Use the Generative AI and the GDPR tool from the Dutch Data Protection Authority (July 2026) as a guide.
- Instructions for your team. This also covers the AI literacy obligation from the AI Act, which is enforced from 2 August 2026. You will find example text below.
- Data breach procedure. Agree in advance: if something does go wrong (customer data pasted into the wrong or a private AI account, or an application password leaked, for example), treat it as a possible data breach. Revoke the application password immediately (Administration → Users → AI user → Application passwords → Revoke), record what happened, and assess within 72 hours whether a report to the data protection authority is needed.
Working agreements for the AI assistant
- We only use the company’s business AI account, never private accounts.
- The AI may look and make suggestions; sending, deleting and publishing we always do ourselves, after checking.
- Do not put health data or other sensitive information to the AI.
- Always check AI answers before you act on them towards a customer, because AI can get things wrong.
- Not sure whether something is allowed? Discuss it with [name] first.
Worth knowing: what can go wrong, and how have you covered it? #
| Risk | How you cover it |
|---|---|
| The AI sends a mailing to your whole list without being asked | Do not give the AI account the right “Write/send emails”. Without that right the server refuses every attempt to send. |
| The AI deletes contacts (permanently, including email history) | Do not give it the right “Delete contacts”. |
| Customer data ends up with the AI supplier | That is inherent in the integration. Hence: a business subscription, a data processing agreement and data minimisation (part A). |
| Someone finds your application password | It can be revoked immediately and only works for this integration; your ordinary password is unaffected. |
| The AI “makes something up” or follows hidden instructions in a contact field | Keep a human in the loop: the AI suggests, you check and carry out. Start with the “Read only” profile. |
Are you choosing the “Full” profile after all (with sending rights)? Then know that the AI can send emails and complete campaigns on its own with it, without any extra confirmation from the server. Some AI programs ask for confirmation of such actions themselves, but you cannot rely on that blindly. Our advice: leave sending rights switched off, and only extend the rights of the AI account once you have been working comfortably and without mistakes with the integration for a few weeks. Even then: keep checking every send instruction yourself.
Related articles #
- Connecting your AI assistant to Autorespond: all the integrations in a row
- Connect your knowledge base to your AI assistant (BetterDocs MCP)
- Connect your projects and tasks to your AI assistant (FluentBoards MCP)
- Switching on two-factor authentication (2FA) for your admin environment
- Setting up an outgoing webhook to Zapier
- Setting up an outgoing webhook to Make
- Setting up automation triggers


