A personality quiz is an extremely strong lead magnet: the visitor answers a few questions and gets a personal outcome, for example “Which type of painter are you?”. In this article you build that quiz from start to finish: switching on the quiz module, linking questions to outcomes, and automatically generating a personal PDF report for each participant that arrives as a download link in the confirmation email. Every participant receives a report that is genuinely about them.
The quiz function in Autorespond is based on the Quiz Module of Fluent Forms Pro, included in your package. Read the English documentation
This article builds on the basic PDF flow. Have you never created a PDF feed before? Then first read Generating and sending a free PDF automatically after a form sign-up; the PDF steps are explained there in more detail.
How does a personality quiz work in Autorespond? #
The quiz module has two types of quiz. In a score quiz answers are right or wrong and the participant is awarded points, a grade or a percentage. In a personality test there is no right or wrong: every answer counts towards one of your outcomes (types), and the outcome chosen most often wins. It is the second form we use here. The screenshots show, by way of example, a quiz from a painting academy with three outcomes; for your own quiz you are free to choose more outcomes and more questions.
Step 1: switch on the quiz module #
The quiz module is off by default and you switch it on once. Go to Forms and click Integrations at the top. You arrive at the Modules tab with all Fluent Forms modules.
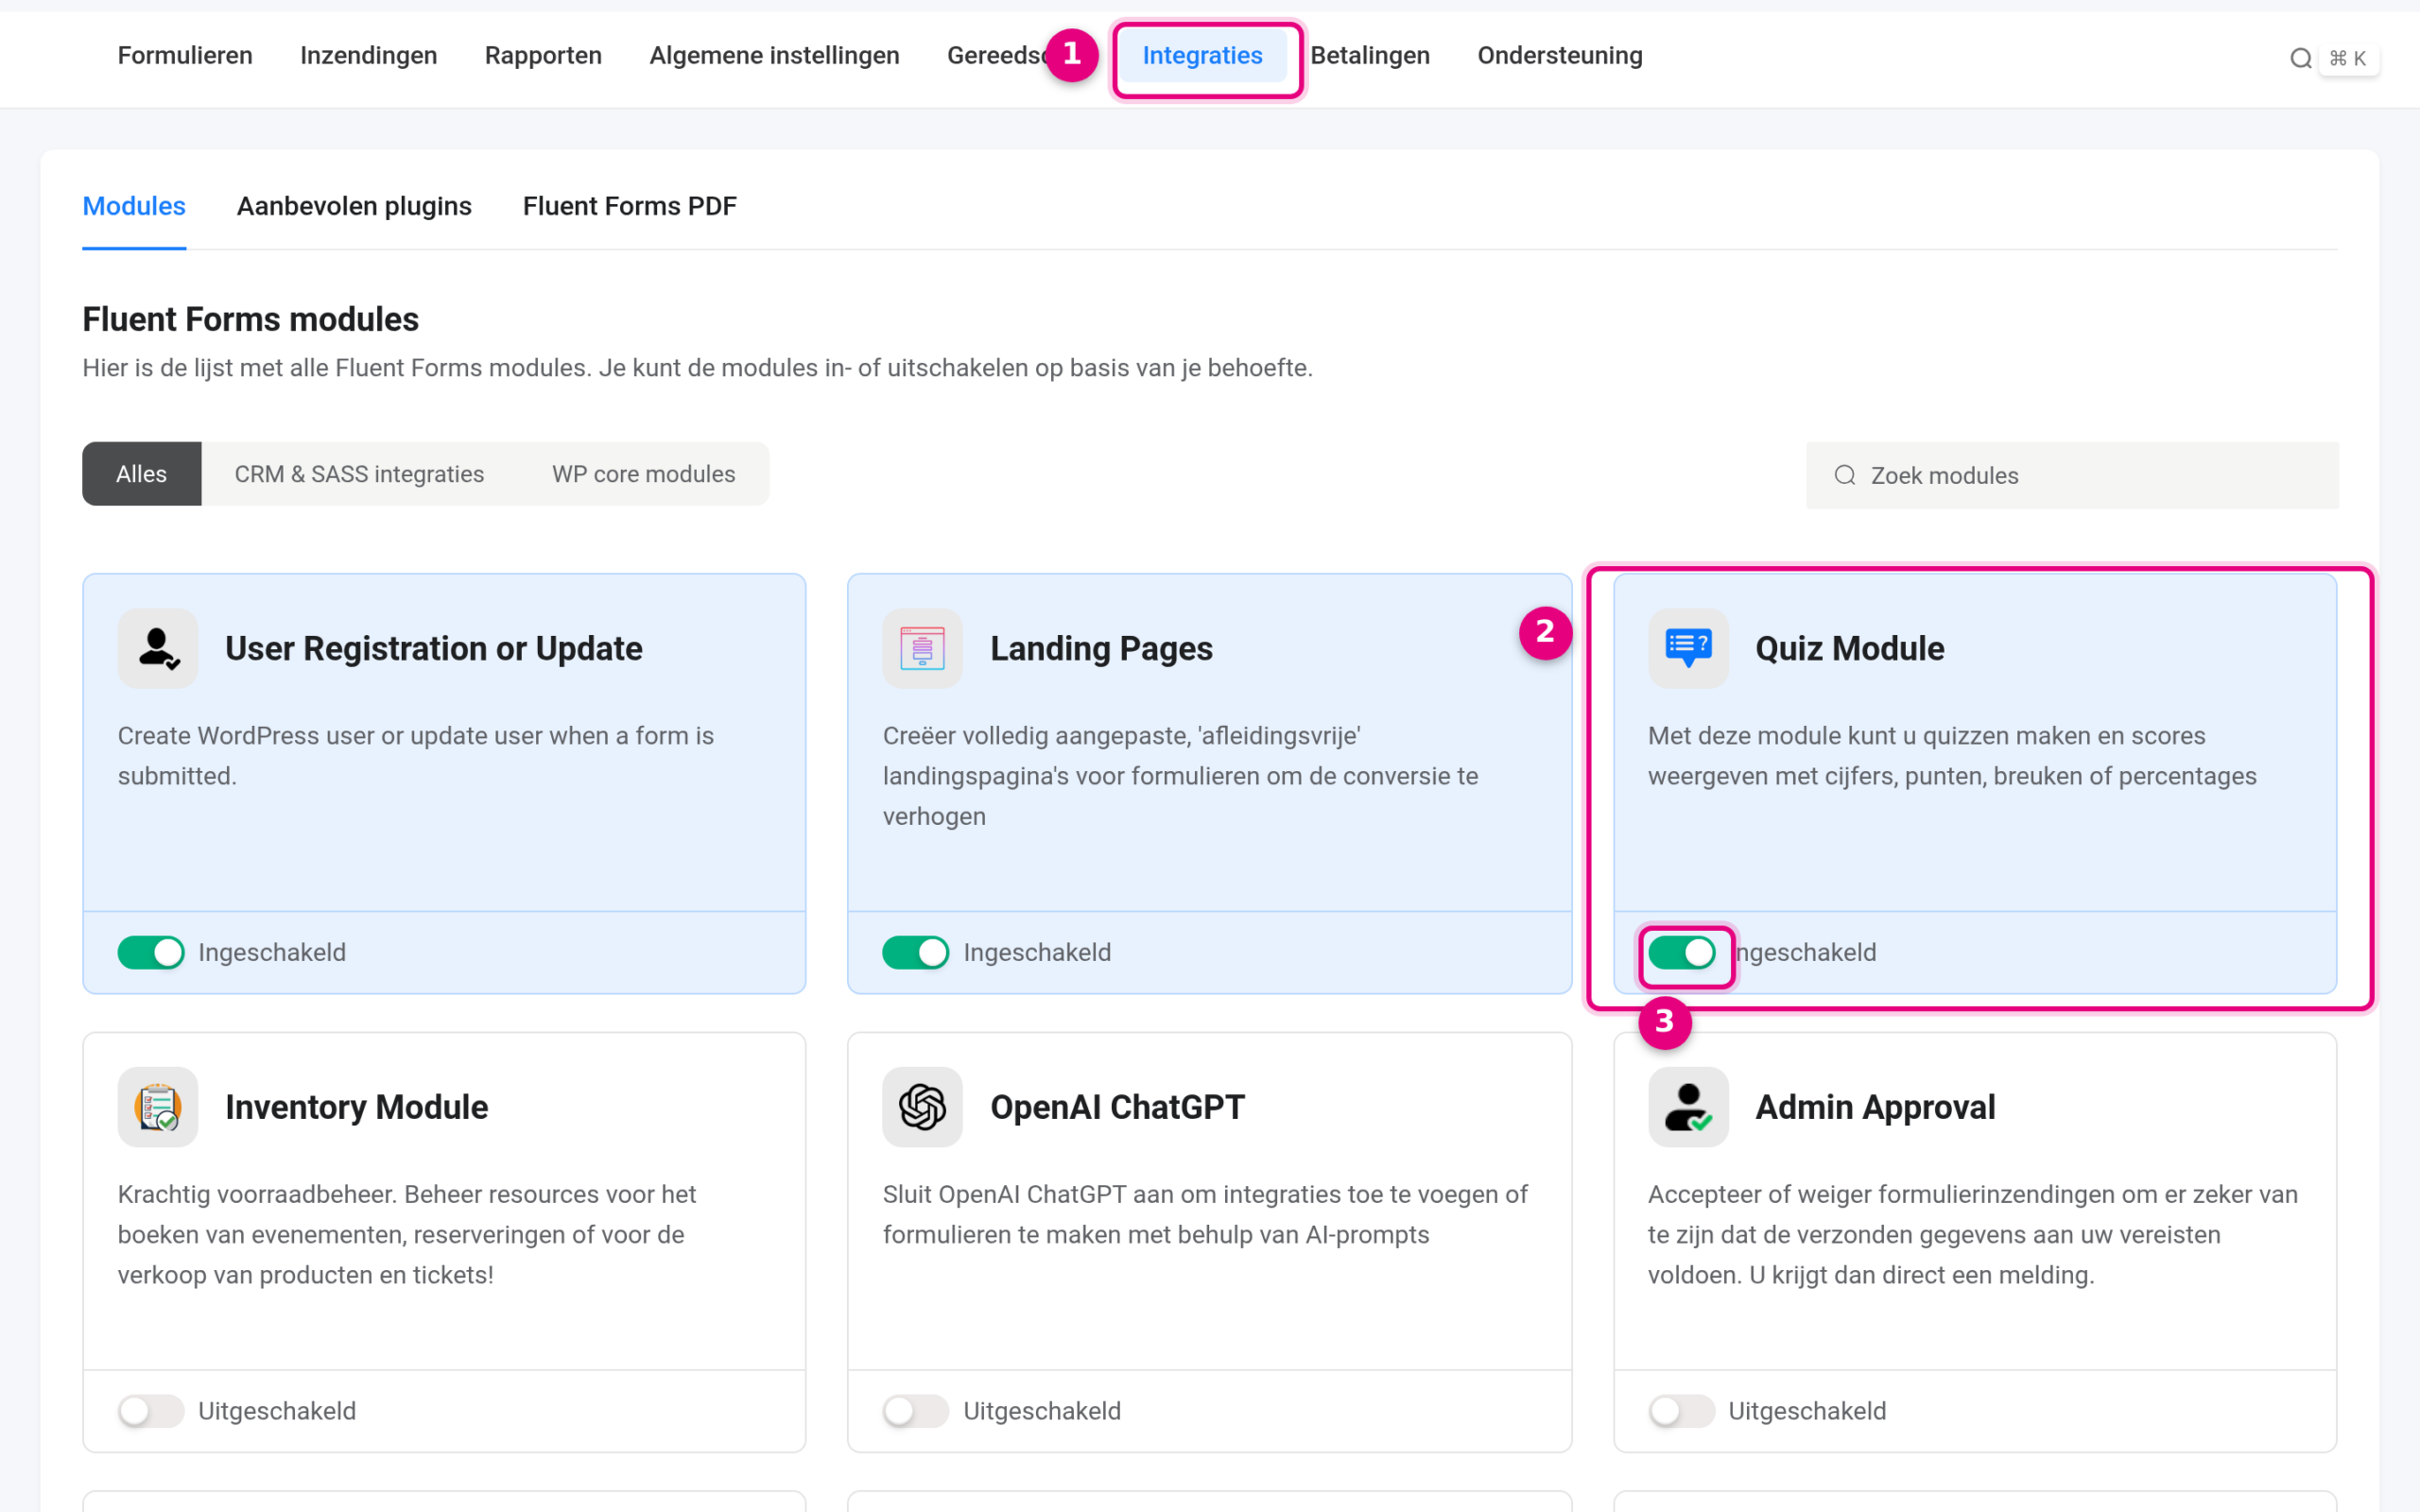
- Integrations: this tab at the top of the Forms screen opens the module page.
- Quiz Module: the card with the description “This module allows you to create quizzes and display scores as grades, points, fractions or percentages”.
- The toggle at the bottom left of the card: click it so that it reads Enabled. A brief message appears at the bottom right confirming that the status has been updated. From now on every form shows the extra menu item Quiz settings.
Step 2: build the quiz form with outcome values #
Create a new form with a name field, an email field and your quiz questions as a Radio Button field (see Adding radio buttons). Now comes the most important trick of the whole quiz: first decide on your outcomes (in the example: The Calm Landscape Painter, The Bold Experimenter and The Fine Detail Painter) and give each answer exactly the name of the matching outcome as its value. The label is what the participant sees (“I start with a calm horizon”), the value behind it is the outcome that answer produces. To do this, tick Show values in the field settings so that you can fill in labels and values side by side.
Step 3: add the Quiz Score field as a personality test #
Drag the Quiz Score field from the Advanced fields category into your form. This is a hidden field: the participant does not see it, but after submission it calculates the outcome automatically. Click the field to configure it.
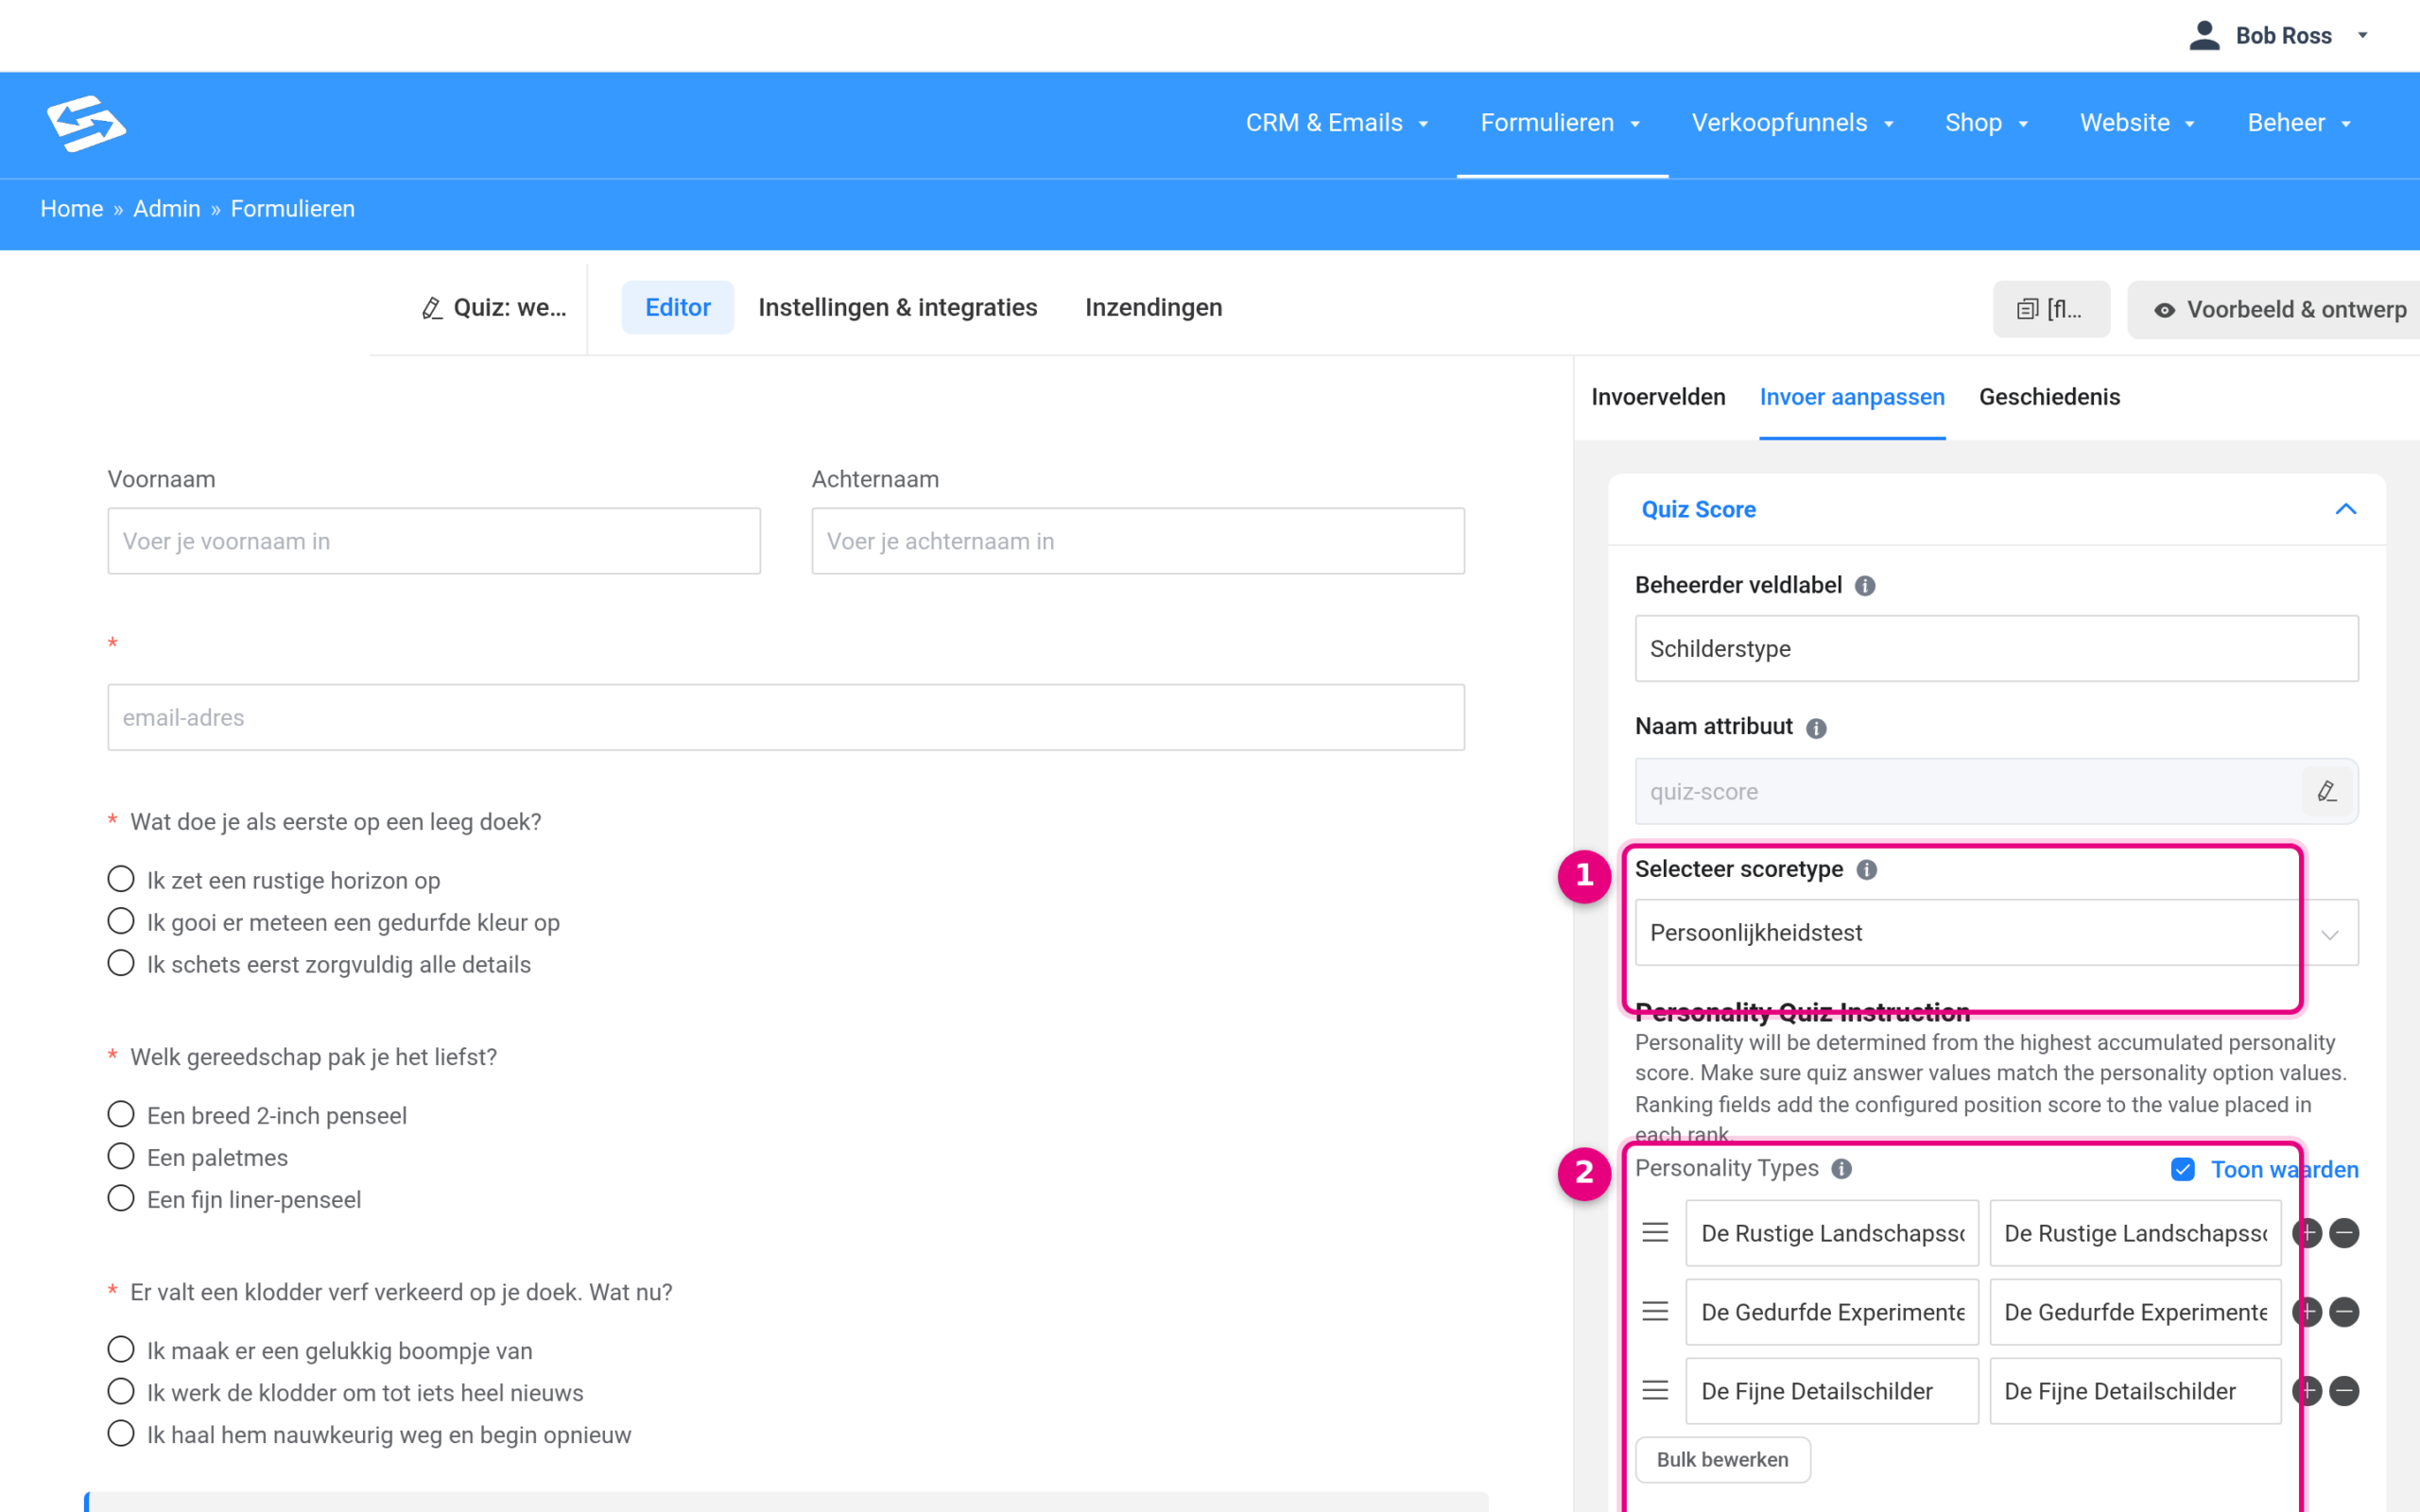
- Select score type: choose Personality test here. The other options are score-based (total points, number correct, fraction, grade or percentage) and belong to a quiz with right and wrong answers.
- Personality Types: enter your outcomes here, with a label and a value on each line (switch Show values on). These values must match the answer values from step 2 exactly, otherwise the quiz cannot link the answers to an outcome. Use Bulk edit to paste them all in one go. In the Admin field label field above it you give the field a recognisable name for your submissions overview, and Name attribute (quiz-score by default) is the name you will use in shortcodes later on.
Step 4: switch on the quiz in the form settings #
Go to Settings & integrations for your form and click Quiz settings in the left-hand menu.
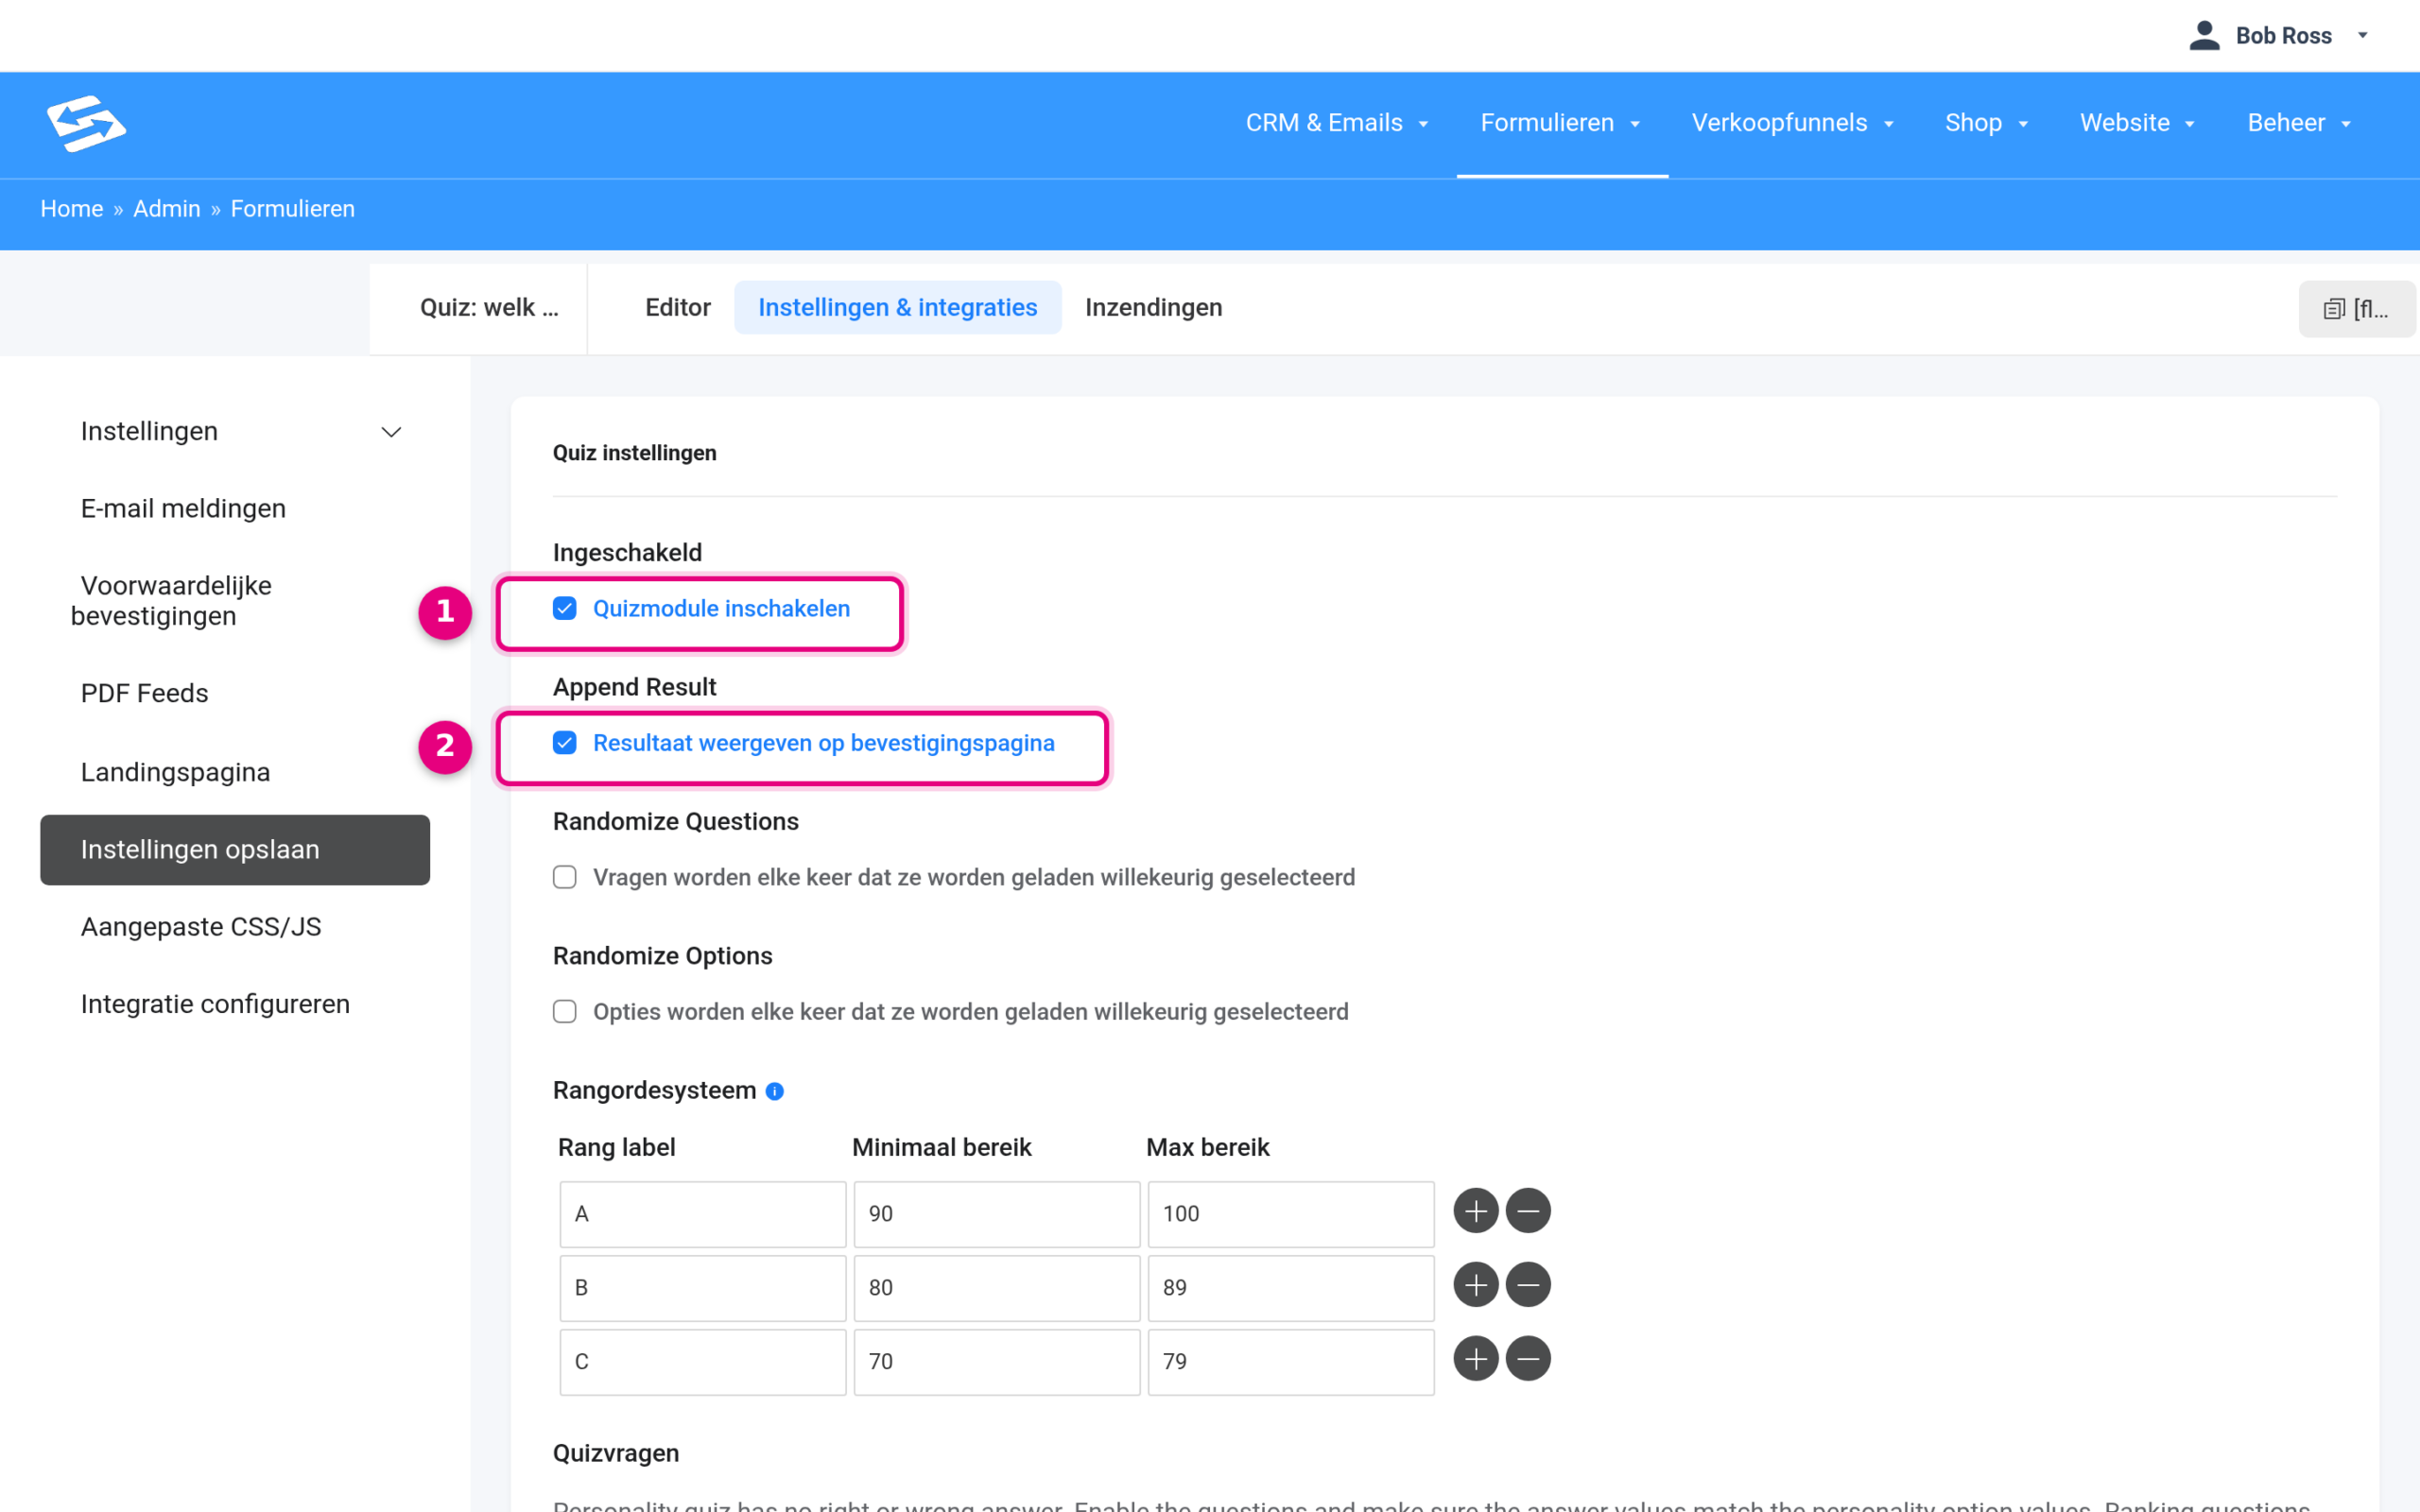
- Enable quiz module: this tick box activates the quiz for this form.
- Show result on the confirmation page: with this tick box the participant sees the outcome on screen immediately after submitting. The Randomize Questions and Randomize Options settings shuffle the order of questions and answers; the ranking system (the table with rank A, B, C) applies only to score quizzes with a grade and can be ignored for a personality test.
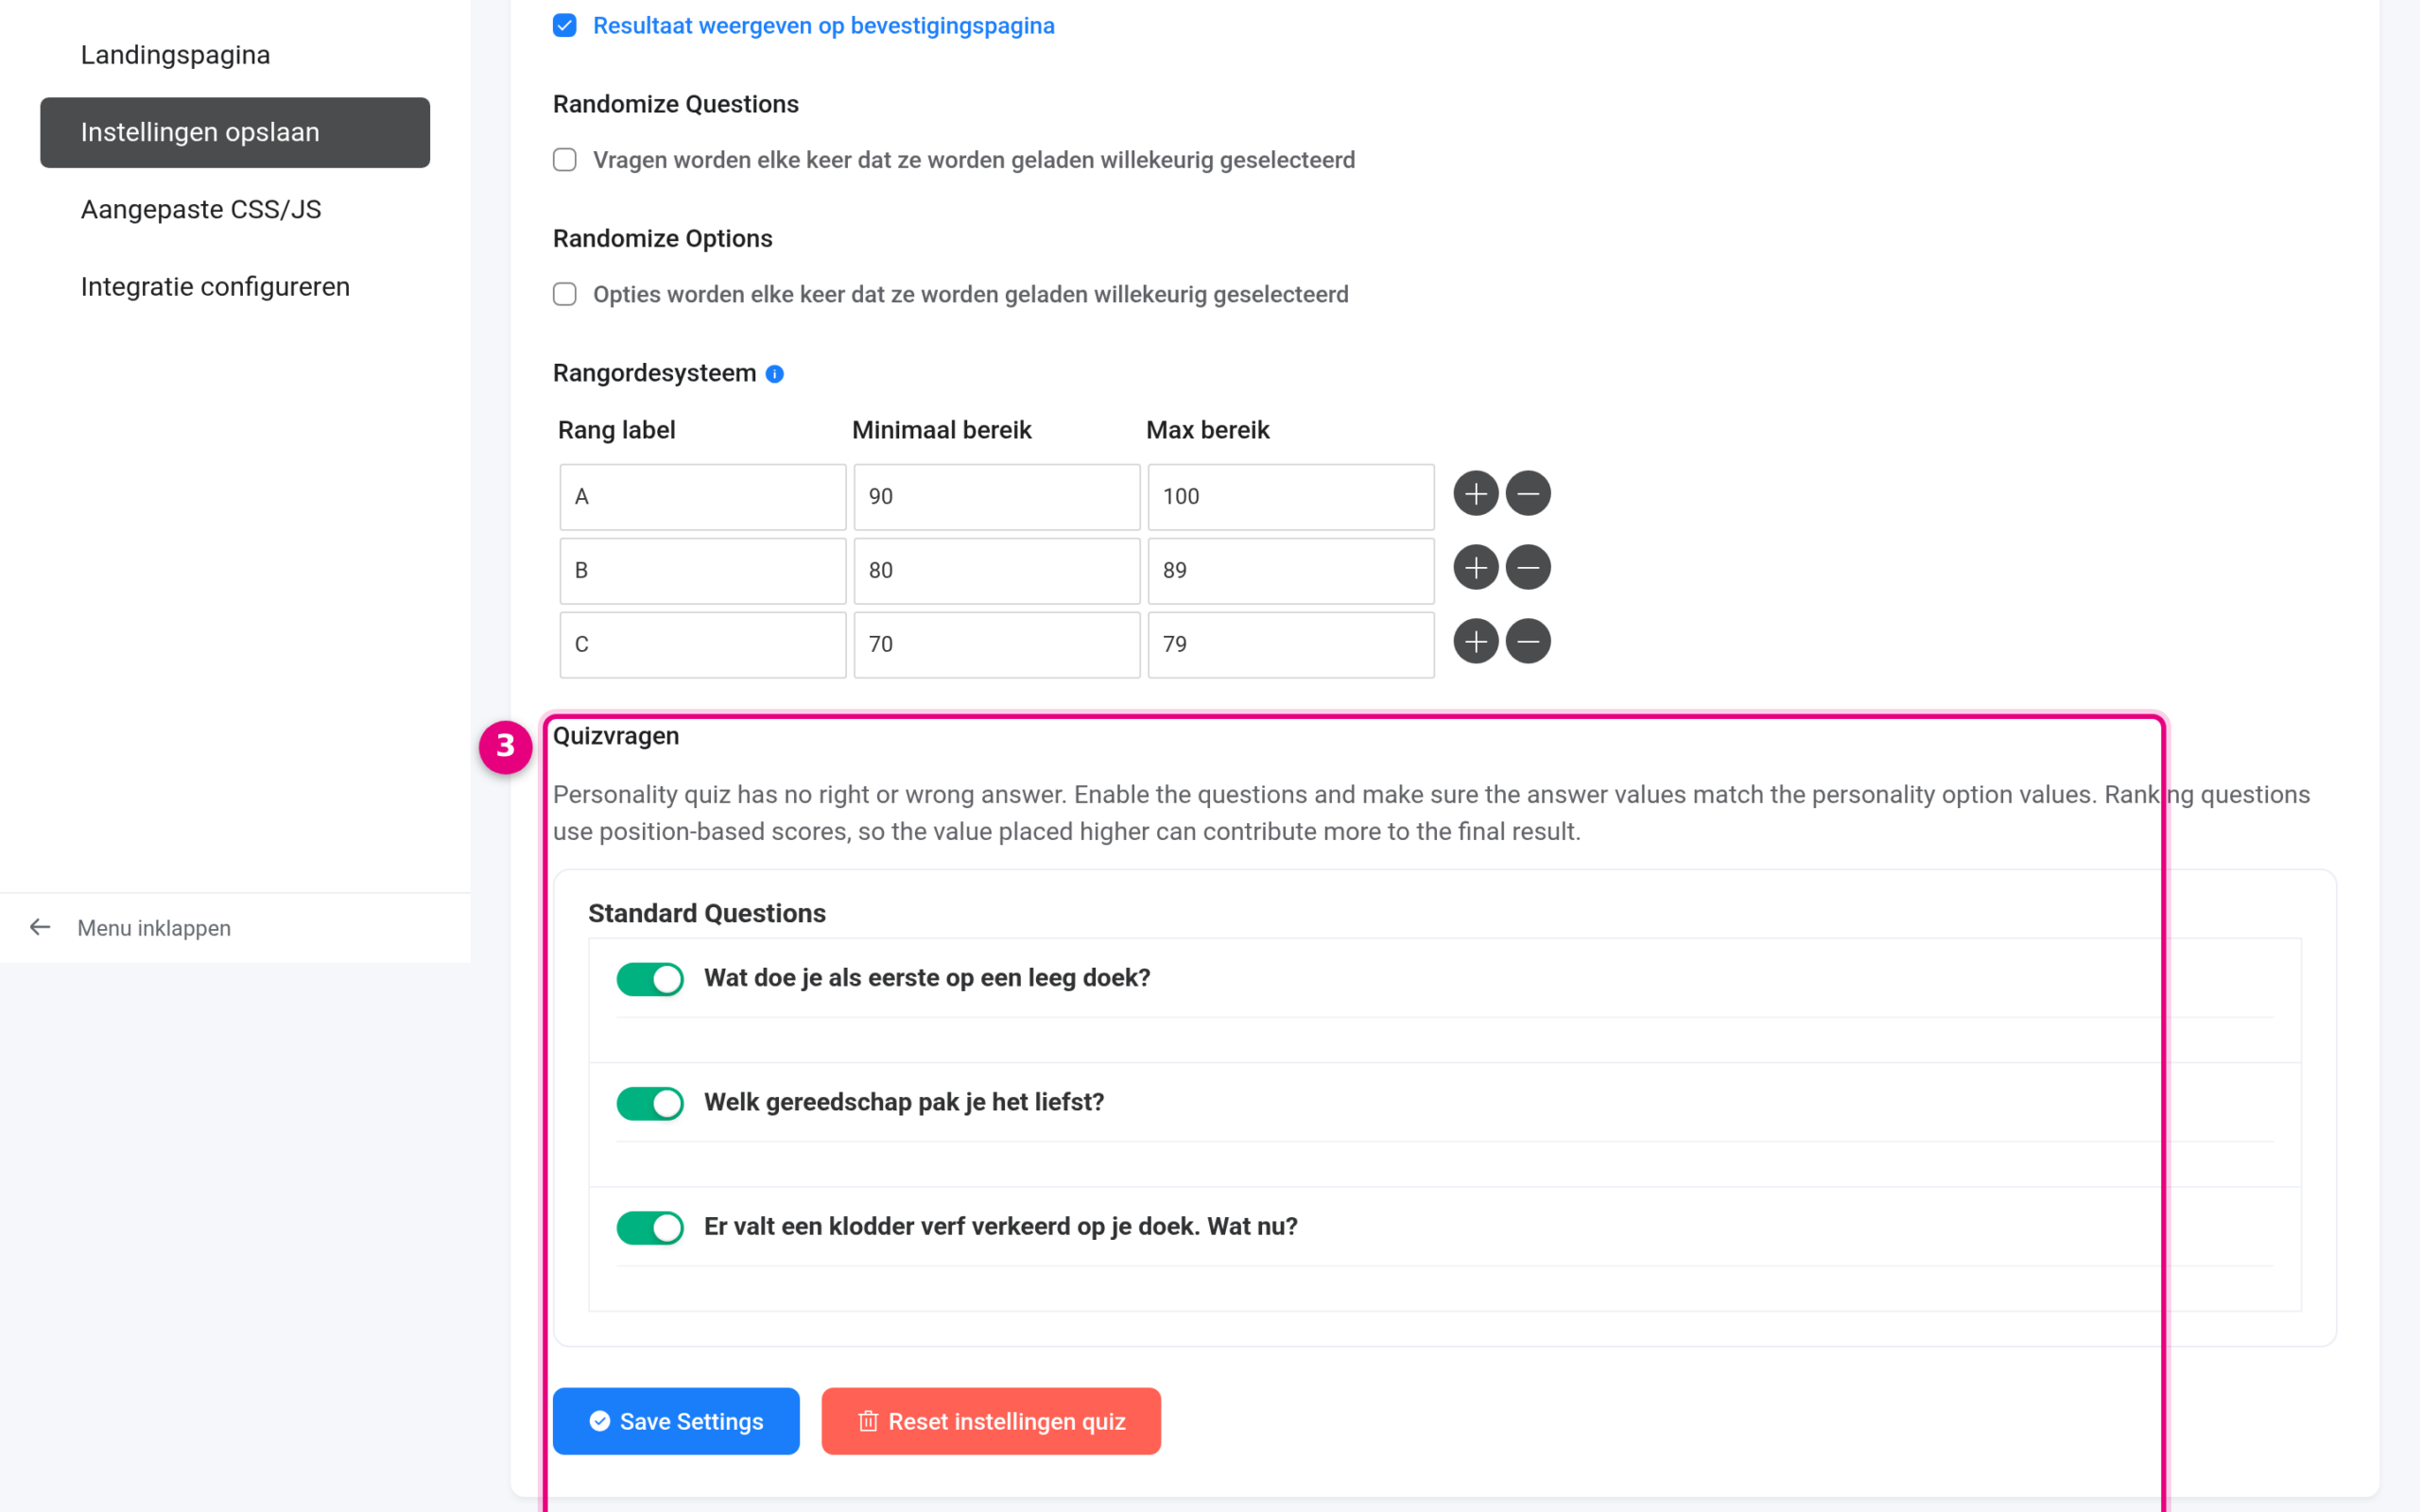
- Quiz questions: switch on the toggle for every question that should count. The explanation above it confirms the principle of the personality test: there is no right or wrong answer, as long as the answer values match the values of your Personality Types. Then click Save Settings.
Step 5: create the personal PDF report #
Create a PDF feed for this form via Settings & integrations → PDF Feeds (the basic steps are in the article about the free PDF). The personal touch lies in three shortcodes that you use in the PDF Body Content:
{inputs.quiz-score}is replaced by the participant’s outcome, for example “The Fine Detail Painter”. If you use a different Name attribute for your Quiz Score field, adjust the shortcode accordingly.- A conditional block lets you show a piece of text for one outcome only:
. Create such a block for each outcome, containing its own description and, for instance, a suitable exercise or tip. {quiz_result}shows a tidy table with all the questions, the answers given and the outcome at the bottom (the Personality heading).
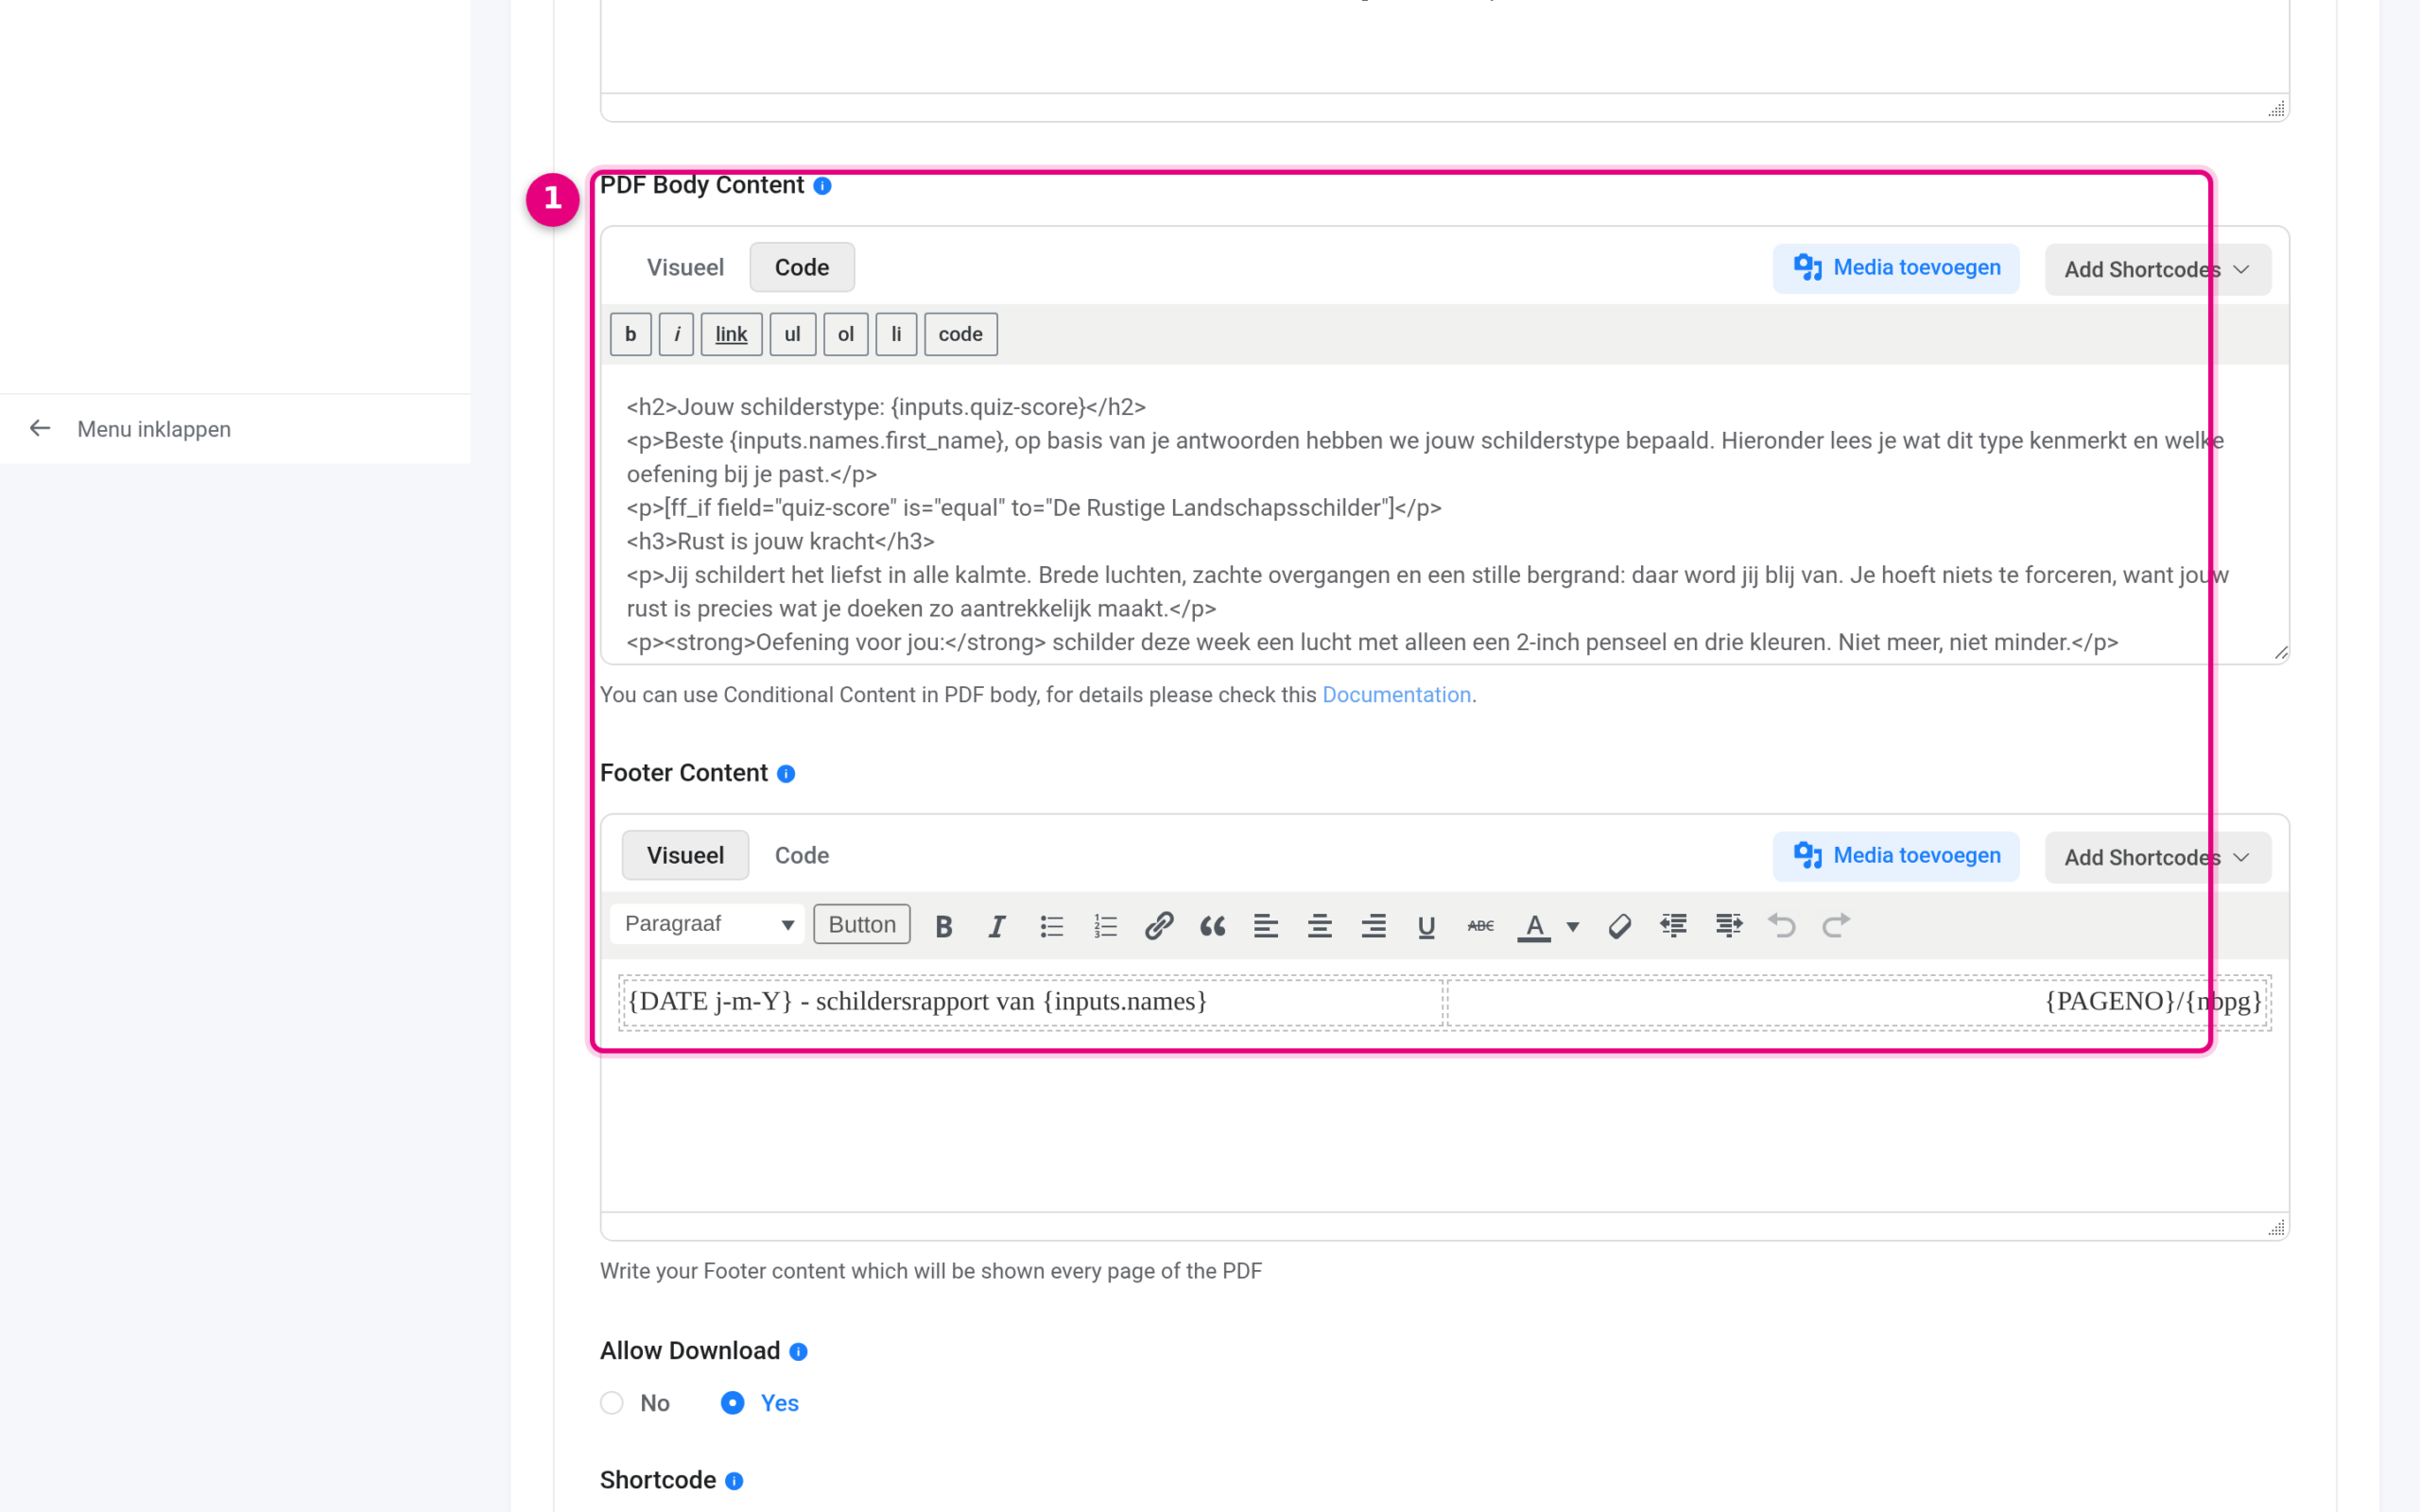
- PDF Body Content in the Code view (click Code next to Visual): you see the heading with
{inputs.quiz-score}, a personal salutation with{inputs.names.first_name}and the start of the first conditional block. Below it is the Footer Content with the date and page number. Do not forget to set Allow Download to Yes at the bottom of the feed and to copy the Shortcode of the feed.
Step 6: the email with the personal outcome and download link #
Create a notification to the participant under Email notifications. The quiz shortcodes work here as well: use as the subject, for instance, “Your painter’s report: {inputs.quiz-score}“, mention the outcome in the body text and add a download button with the feed shortcode (for example {pdf.download_link.254}; copy the exact number from the Shortcode field of your own feed).
Step 7: test with two different sets of answers #
You always test a personality quiz at least twice, with answers that lead to different outcomes. Put the form on a page, fill it in twice in an incognito window and check via Admin → SMTP/Mail settings → Email logs whether both emails have their own subject and report.
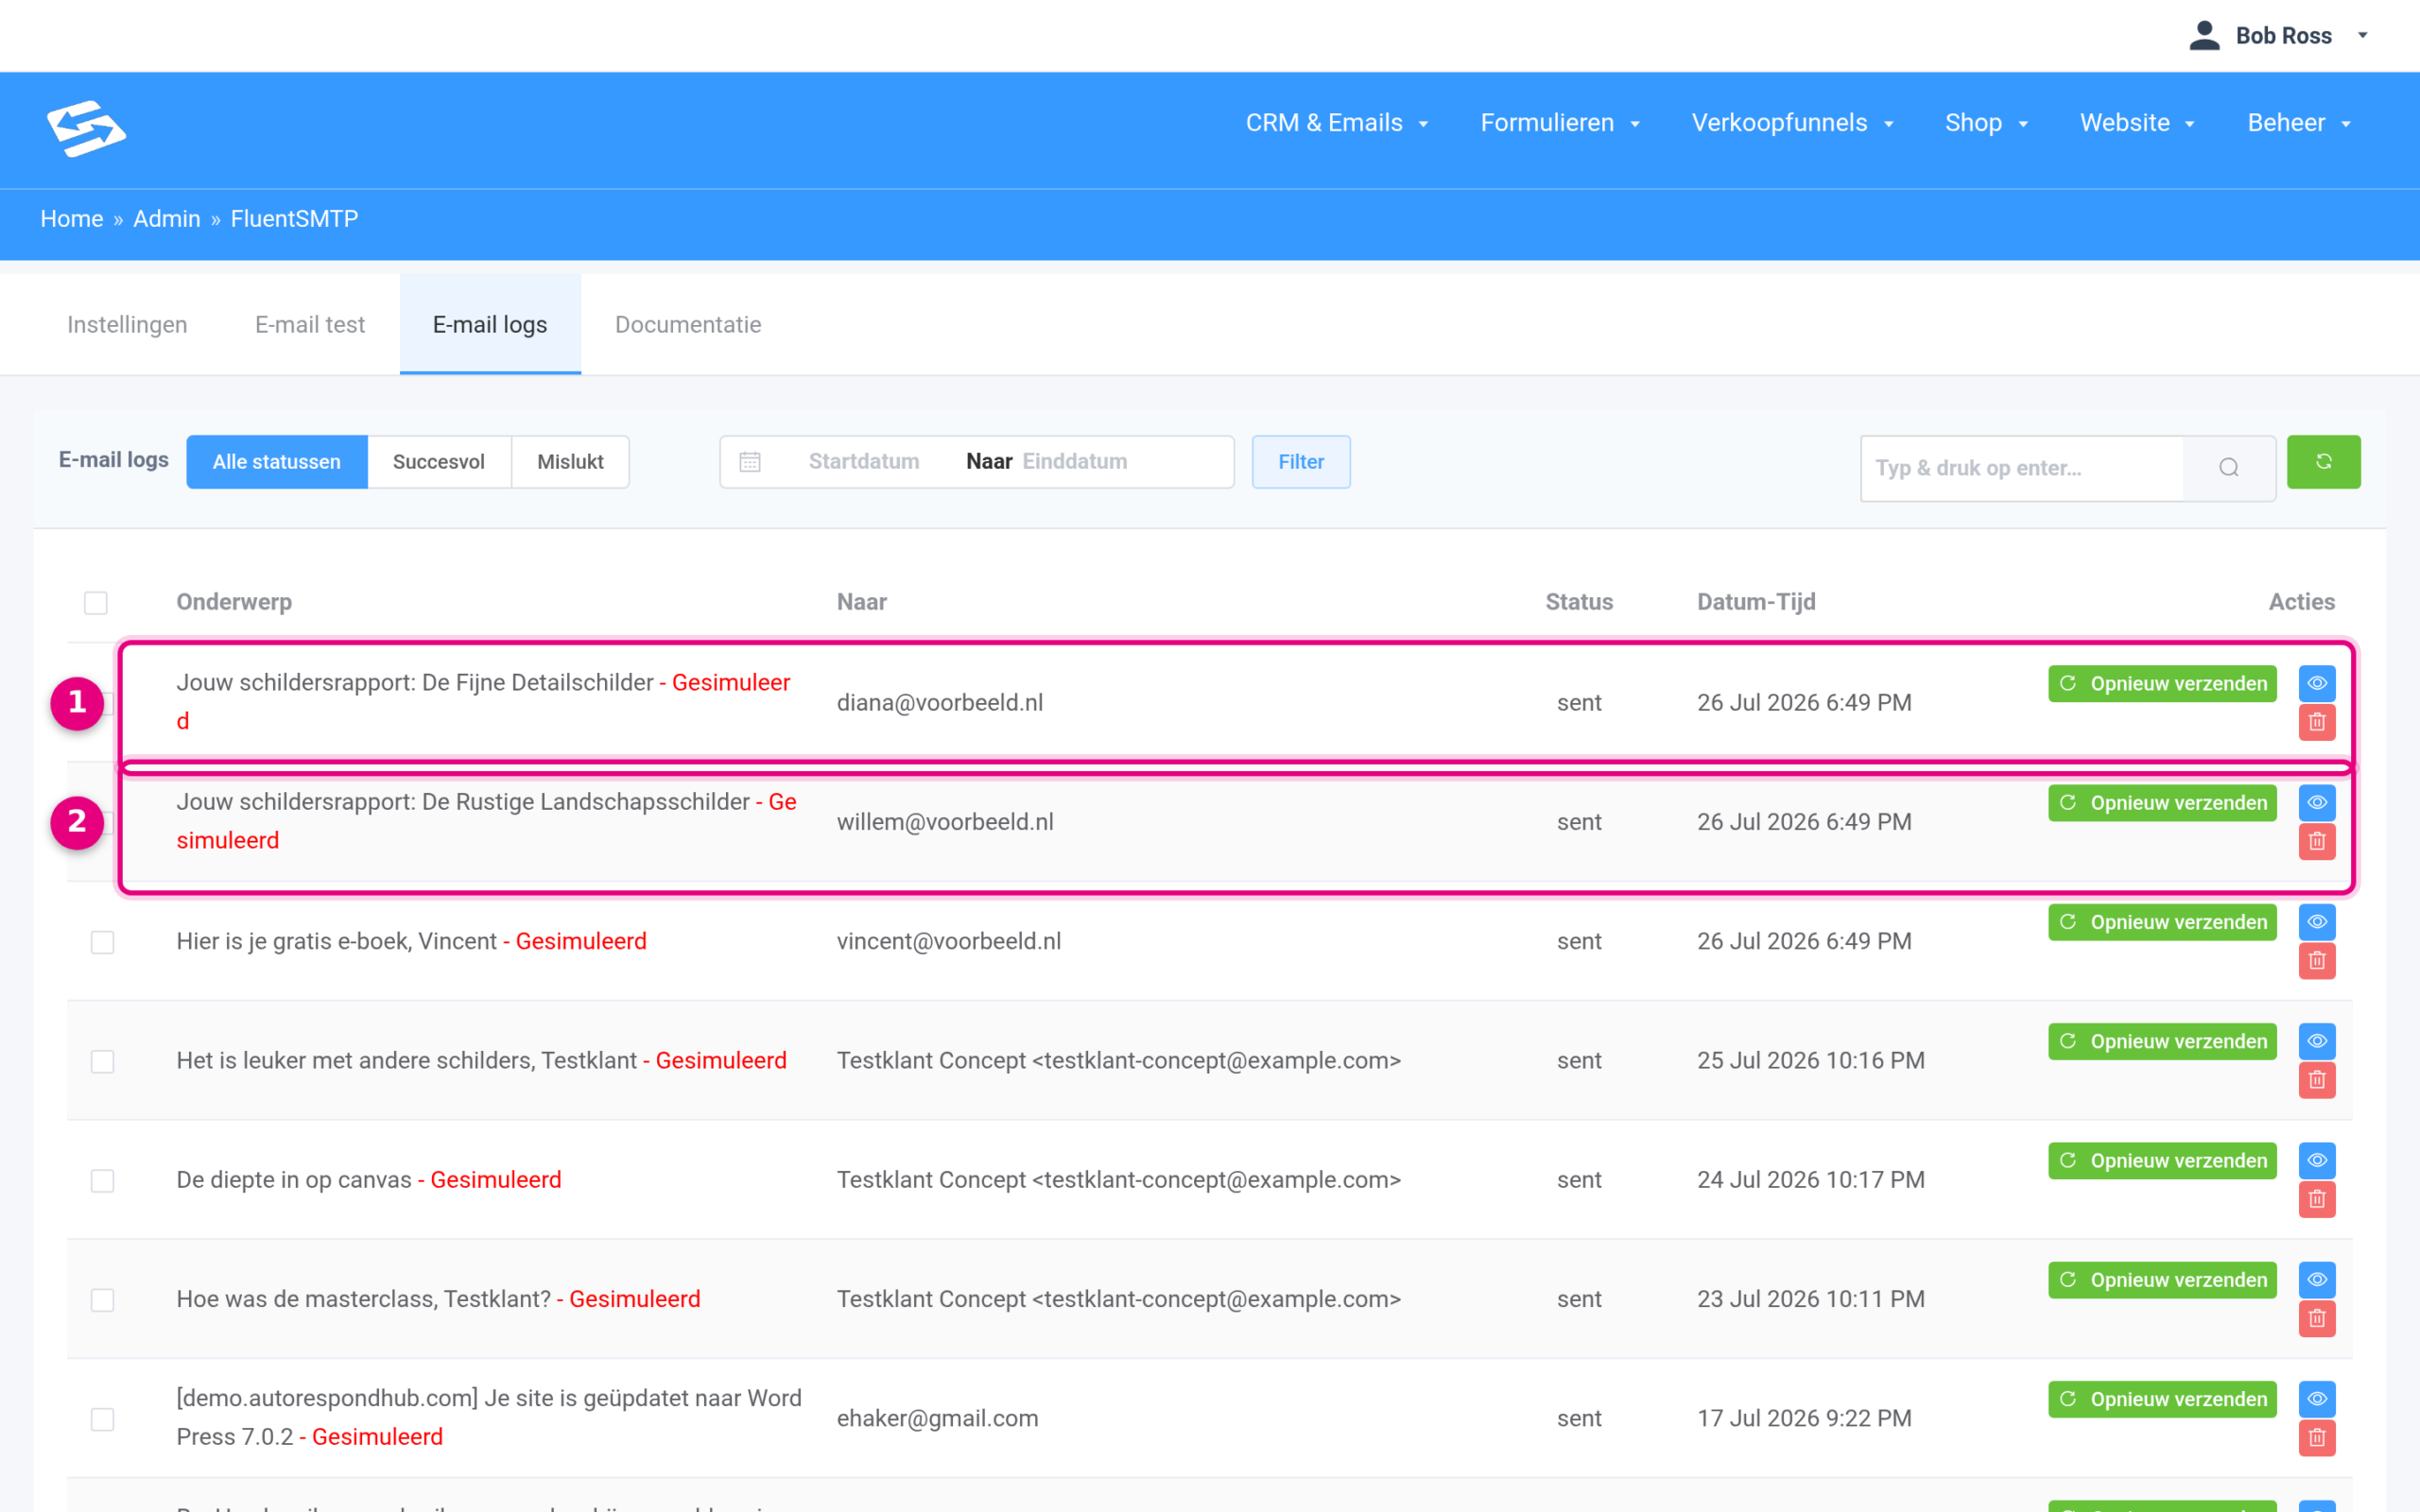
- The first test submission produced the outcome The Fine Detail Painter; the subject of the email followed automatically.
- The second test submission, with different answers, produced The Calm Landscape Painter. Two participants, two personal emails, without you having to do anything.
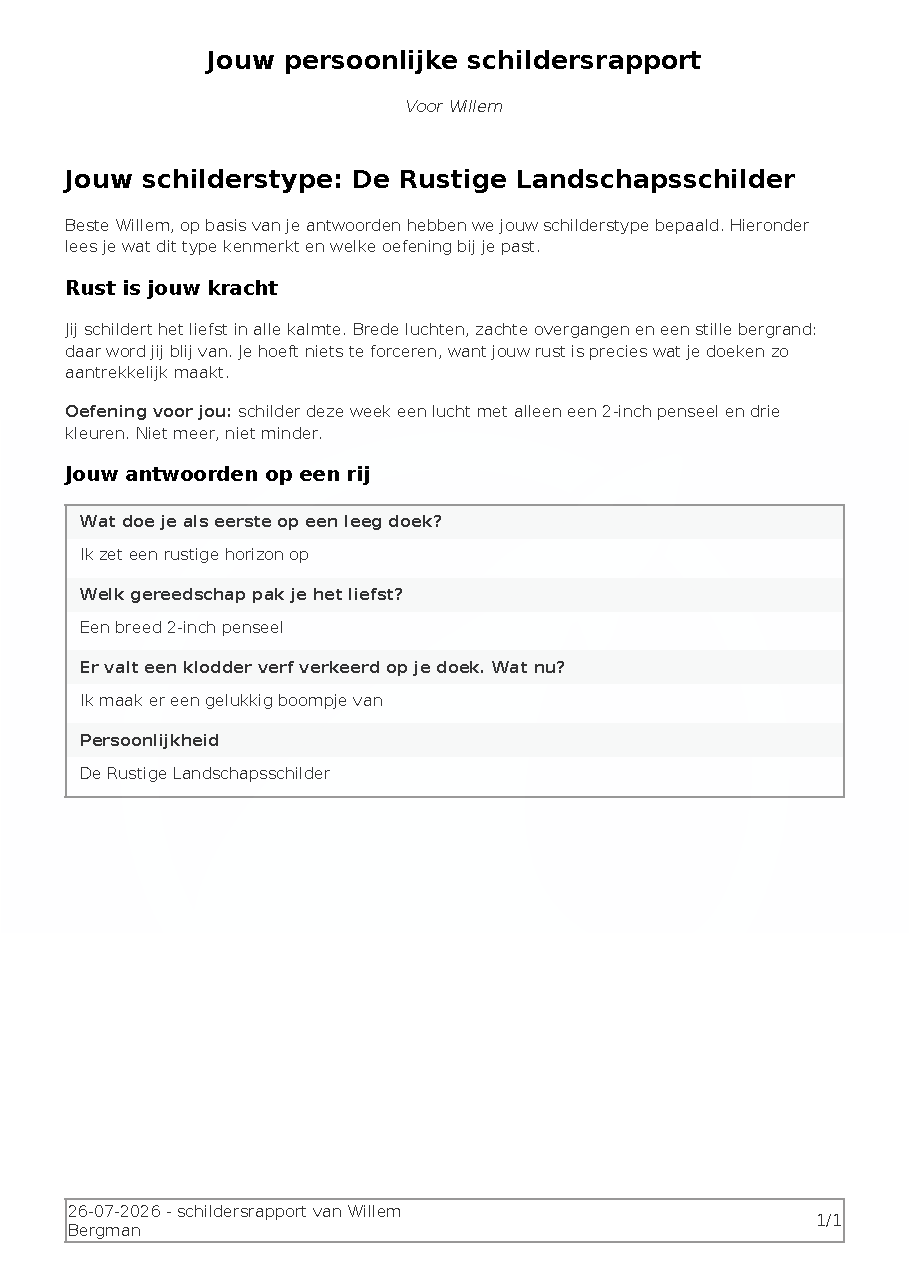
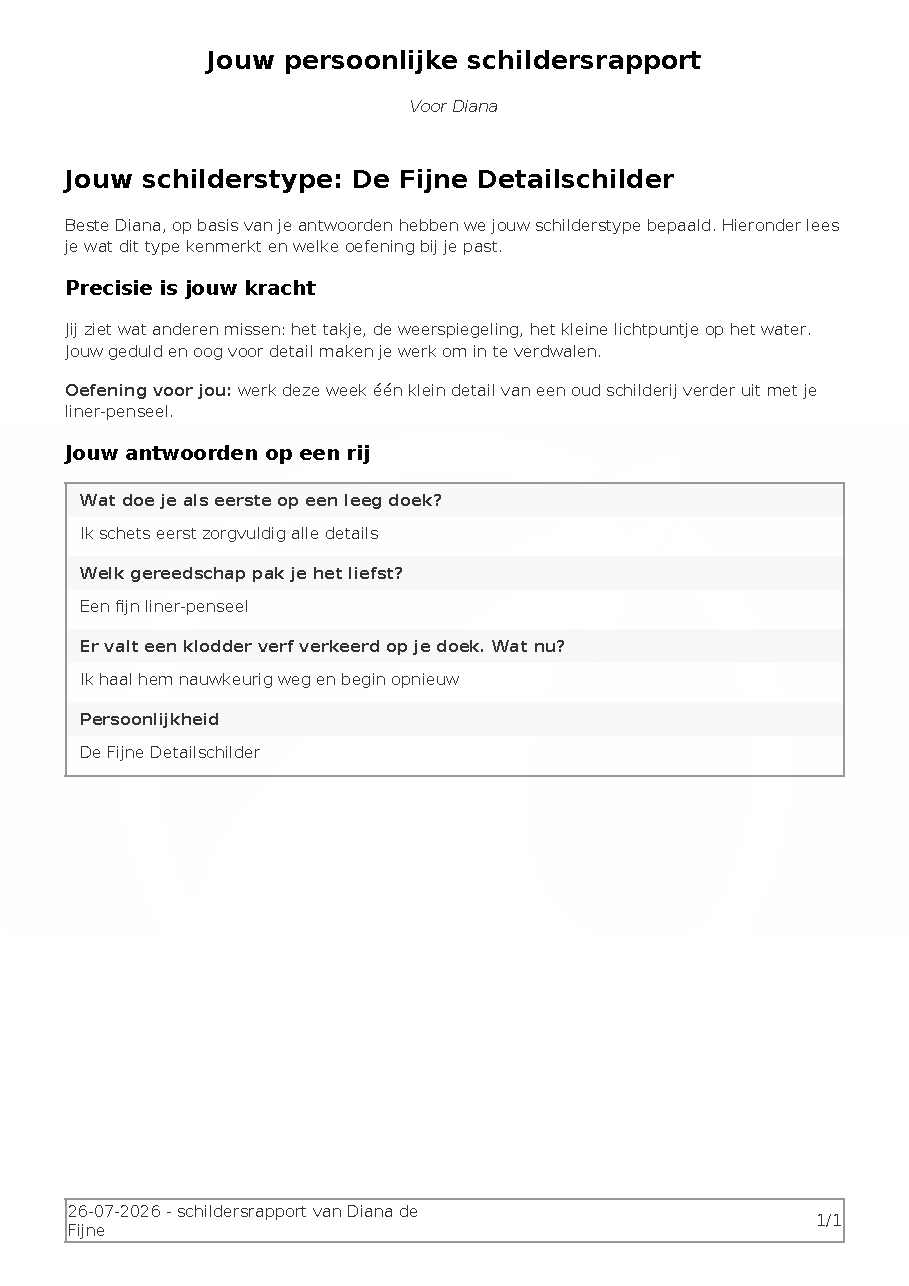
Download the report from both emails and place them side by side: the heading, the description and the answers table differ per participant.
Good to know #
- The outcome is determined by the outcome value that was chosen most often. Preferably use an odd number of questions, which makes a tie less likely.
- Besides radio buttons you can also use dropdowns, check boxes and ranking fields as quiz questions; the principle of the values stays the same.
- Do you want to follow participants up automatically after the quiz with an email series per outcome? Then combine the quiz with an automation, see Creating automations with the automation editor.


