The strength of a community lies in levels: free members get a taste of the atmosphere, paying members get access to more spaces and courses. In Autorespond you arrange that with tags: you link every space or course to a tag, and whoever has the tag gets access automatically, and loses it again automatically when the tag is removed (for example after a cancellation). In this article you set up that link and turn restricted content into a sales opportunity with lock screens.
The community and course features in Autorespond are based on FluentCommunity, included in your package. Read the English documentation
1. Work out your levels first #
Work from a simple model with one tag per level. A proven set-up with three levels:
- Free member (tag: member-free), access to the public spaces and one free taster course. This is your introduction level.
- Paying member (tag: member-basic), everything from free, plus the private spaces and your main courses.
- Premium member (tag: member-premium), everything from paying, plus coaching, live sessions and masterclasses, for example.
Create these tags first under CRM & Emails → Tags. Use recognisable, consistent names; you will come across them in many places.
2. Set the privacy per space #
Every space has its own privacy level. Open the space in the portal, click the settings of the space and choose:
- Public, everyone can see the space and (depending on your portal settings) read along. Use this for your free level and announcements.
- Private, the space is visible in the overview, but the content is only accessible to members of that space. Perfect for paid levels: non-members do see that the space exists (and the lock screen, see step 4).
- Secret, the space is completely invisible to non-members. Use this sparingly, for example for a mastermind: what nobody sees does not sell either.
3. Link tags to spaces and courses (Access control) #
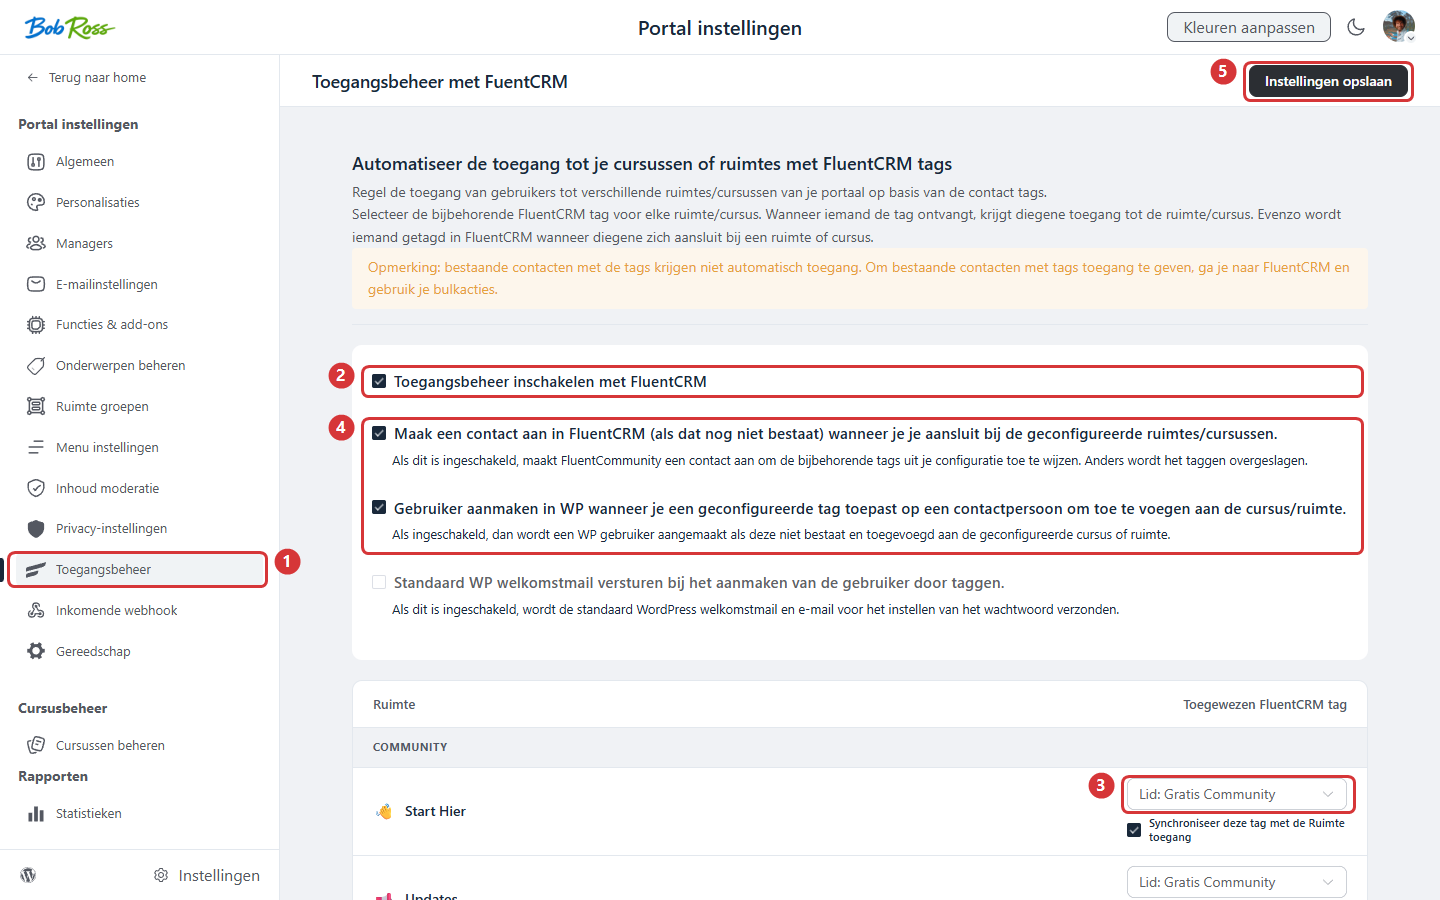
- Open the portal and go to Settings → Access control.
- Switch the link on.
- For every space and every course, link the tag of the right level: all basic spaces to member-basic, all premium spaces to member-premium, and so on.
- Check the options for automatically creating contacts and user accounts, so that someone who exists only as a CRM contact also gets an account and access automatically once they receive a tag.
- Save.
The link works in two directions. If a contact receives the tag (after a purchase, through an automation or manually), they automatically become a member of the linked spaces and are enrolled in the linked courses. If the tag is removed (for example after a cancellation or refund), the access lapses automatically. The reverse applies too: anyone who joins a space themselves receives the associated tag in your CRM, which is handy for emailing each level specifically.
4. Turn restricted content into a sales opportunity (lock screens) #
When a non-member clicks a private space or restricted course, you can show a lock screen instead of a bare message: a page with an explanation, an image and a button to your sales page. That way every click on restricted content becomes a miniature sales conversation.
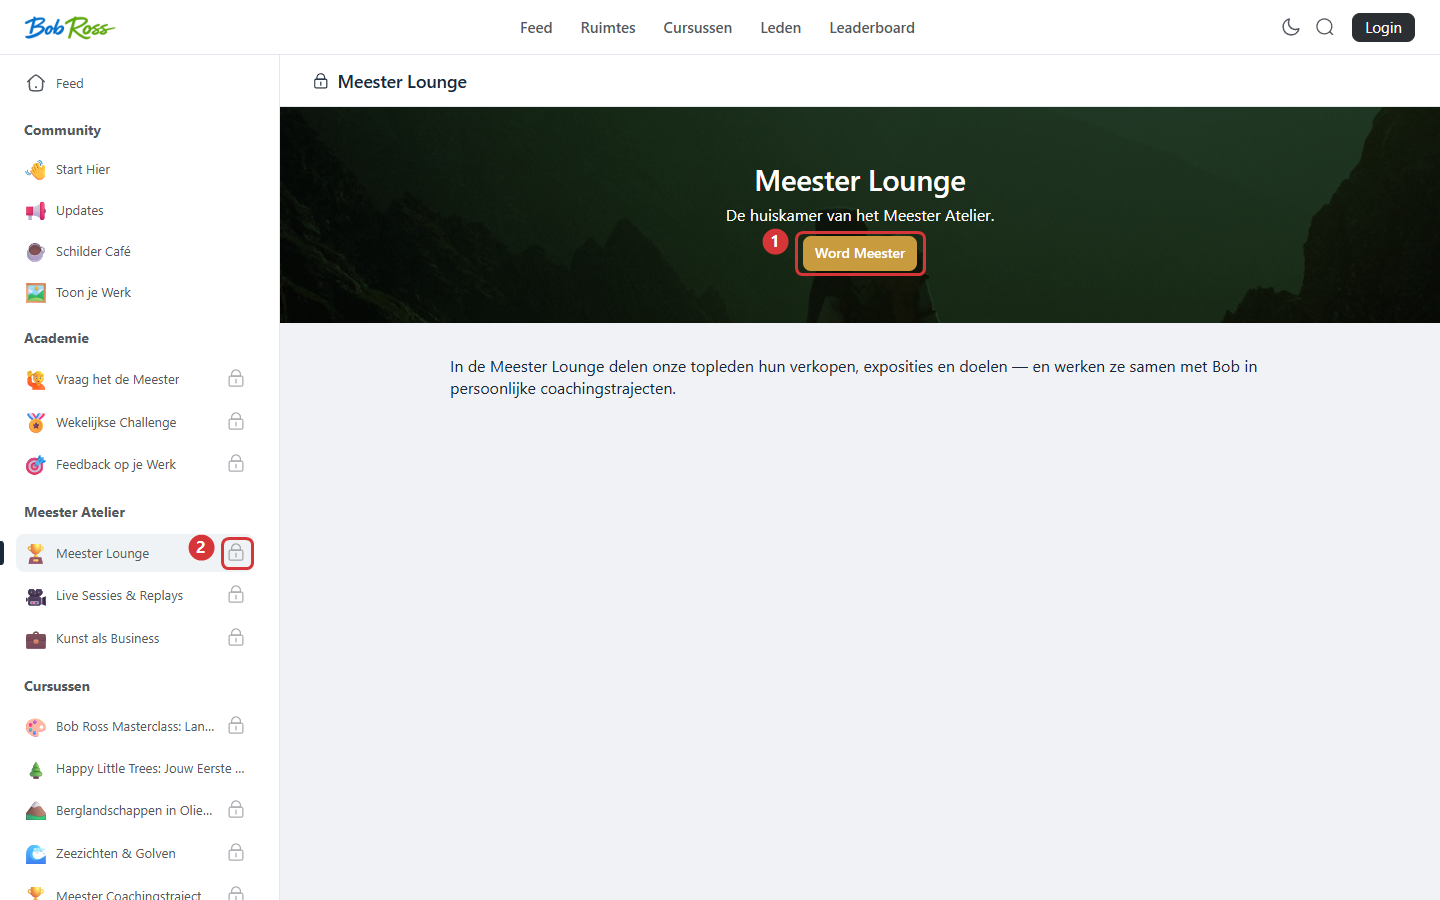
In the screenshot: 1) the button to your sales page · 2) restricted spaces are recognisable by the padlock.
- Open the settings of the space or course and switch on the custom lock screen.
- Fill in the heading and the description: say what the member gets inside the space or course, not just that it is restricted.
- Set the button with a clear action (“Become a member”) and the link to your sales page, for example https://yourwebsite.com/membership/.
- For courses: also show the lesson overview as a teaser, so visitors see exactly which lessons they get after buying.
- Check the result in an incognito window (logged out), so you see the lock screen the way a visitor does.
5. Link the tags to your payment #
The final piece: make sure a purchase applies the right tag automatically. Create an automation per product with a completed order as the trigger and adding the level tag as the action. From that moment the whole chain is automatic: purchase → tag → access, and exactly the other way round on a cancellation. The precise steps are in Granting access only after payment; the broader principle of access through tags is covered in Controlling access to pages and content with tags.
Frequently asked questions #
What happens to existing members when I switch the link on? #
The link works from the moment you switch it on, for new events (tag added, tag removed, a member joins). Existing members keep their current access; if you want to manage them through tags as well, give them the right tag once.
Can one space belong to several levels? #
Work with cumulative levels: alongside member-premium, also give a premium member the underlying tags (that can happen automatically in the same automation). That way every space belongs to exactly one tag and your model stays clear.
Does someone lose their progress if access lapses? #
No. Course progress is retained. If the member regains access later (for example after subscribing again), they continue where they left off.
Can I also give someone access manually? #
Yes: simply give the contact the right tag in your CRM and access follows automatically. That is also the tidy route for free access you give away, for example: one tag, and everything is in order.


