Two kinds of email go out from Autorespond: your newsletters and other CRM emails from your own sender address, and the system and shop emails (order confirmations, invoices, password resets, form confirmations) from a fixed noreply address. Each kind has its own mail connection, so the reputation of your newsletter address stays separate from the busy traffic of your shop and site. In this article you can read how those connections are set up, what you can change yourself and how to add extra sender addresses that you can then choose in the CRM.
Mail connections in Autorespond are based on FluentSMTP, included in your package. Read the FluentSMTP documentation
Two mail routes, one screen #
You’ll find the mail connections under Administration → Mail Settings. The overview shows three connections, each with its own job:
- Amazon SES with your own sender address (for example [email protected]). All emails from the CRM go through this connection: campaigns, email sequences, automations and the confirmation email for new sign-ups.
- SMTP2GO with the address [email protected]. This is the default connection for all other email: shop and order emails, invoices, form confirmations, password resets and other system messages.
- SendGrid with the address [email protected]. This is the backup connection: if SMTP2GO is temporarily unavailable, SendGrid takes over automatically, so an order confirmation is never left waiting.
Which connection an email uses is determined by that email’s sender address. An email from [email protected] goes through Amazon SES; an email from [email protected] goes through SMTP2GO. You don’t need to set anything up for this.
What you can change yourself and what is fixed #
The setup of the connections is part of your Autorespond environment and is managed by Autorespond. This means you can’t accidentally redirect your order emails or delete a connection. This is what you can change yourself:
- The sender name of each connection, including the name your shop and system emails are sent with.
- The part before the @ of your newsletter sender address on the Amazon SES connection, for example from info@ to news@ or contact@.
- Extra sender addresses on your own domain (up to five), which you can then choose as the sender in the CRM, for example a personal address for each team member or a separate address for course emails.
This is fixed: the noreply addresses of SMTP2GO and SendGrid, which connection is the default or the backup, and the number of connections. Want to send email from a domain other than your environment’s domain, or do you need an extra connection? Then contact support; a second sender domain is available as an extra service.
Changing your newsletter sender address #
- Go to Administration → Mail Settings and click the pencil icon (Edit) on the Amazon SES connection.
- Under From Email, change the part before the @. The domain after the @ stays the same; it has been set up for your environment at Amazon SES, so you don’t need to change anything for your domain or DNS.
- Change the From Name as well if you like, and click Save Connection Settings.
Everything that used the old address as the sender automatically moves to the new address: your campaigns, email sequences, automations, emails that are already scheduled and the default sender in the CRM settings. The message you see after saving tells you exactly what has been updated. Sent campaigns stay unchanged in your archive. So you don’t need to change anything in the CRM.
Please note: replies from readers and notifications about undelivered email arrive at the sender address. So make sure the new address is an existing mailbox, or set a separate reply-to address in the CRM under CRM & Emails → Settings → Email settings.
Adding extra sender addresses #
Want to send some emails from a different address on your domain, for example news@ for the newsletter and anna@ for personal follow-up emails? Then add that address to the Amazon SES connection. It uses the same secure connection; no second connection is added.
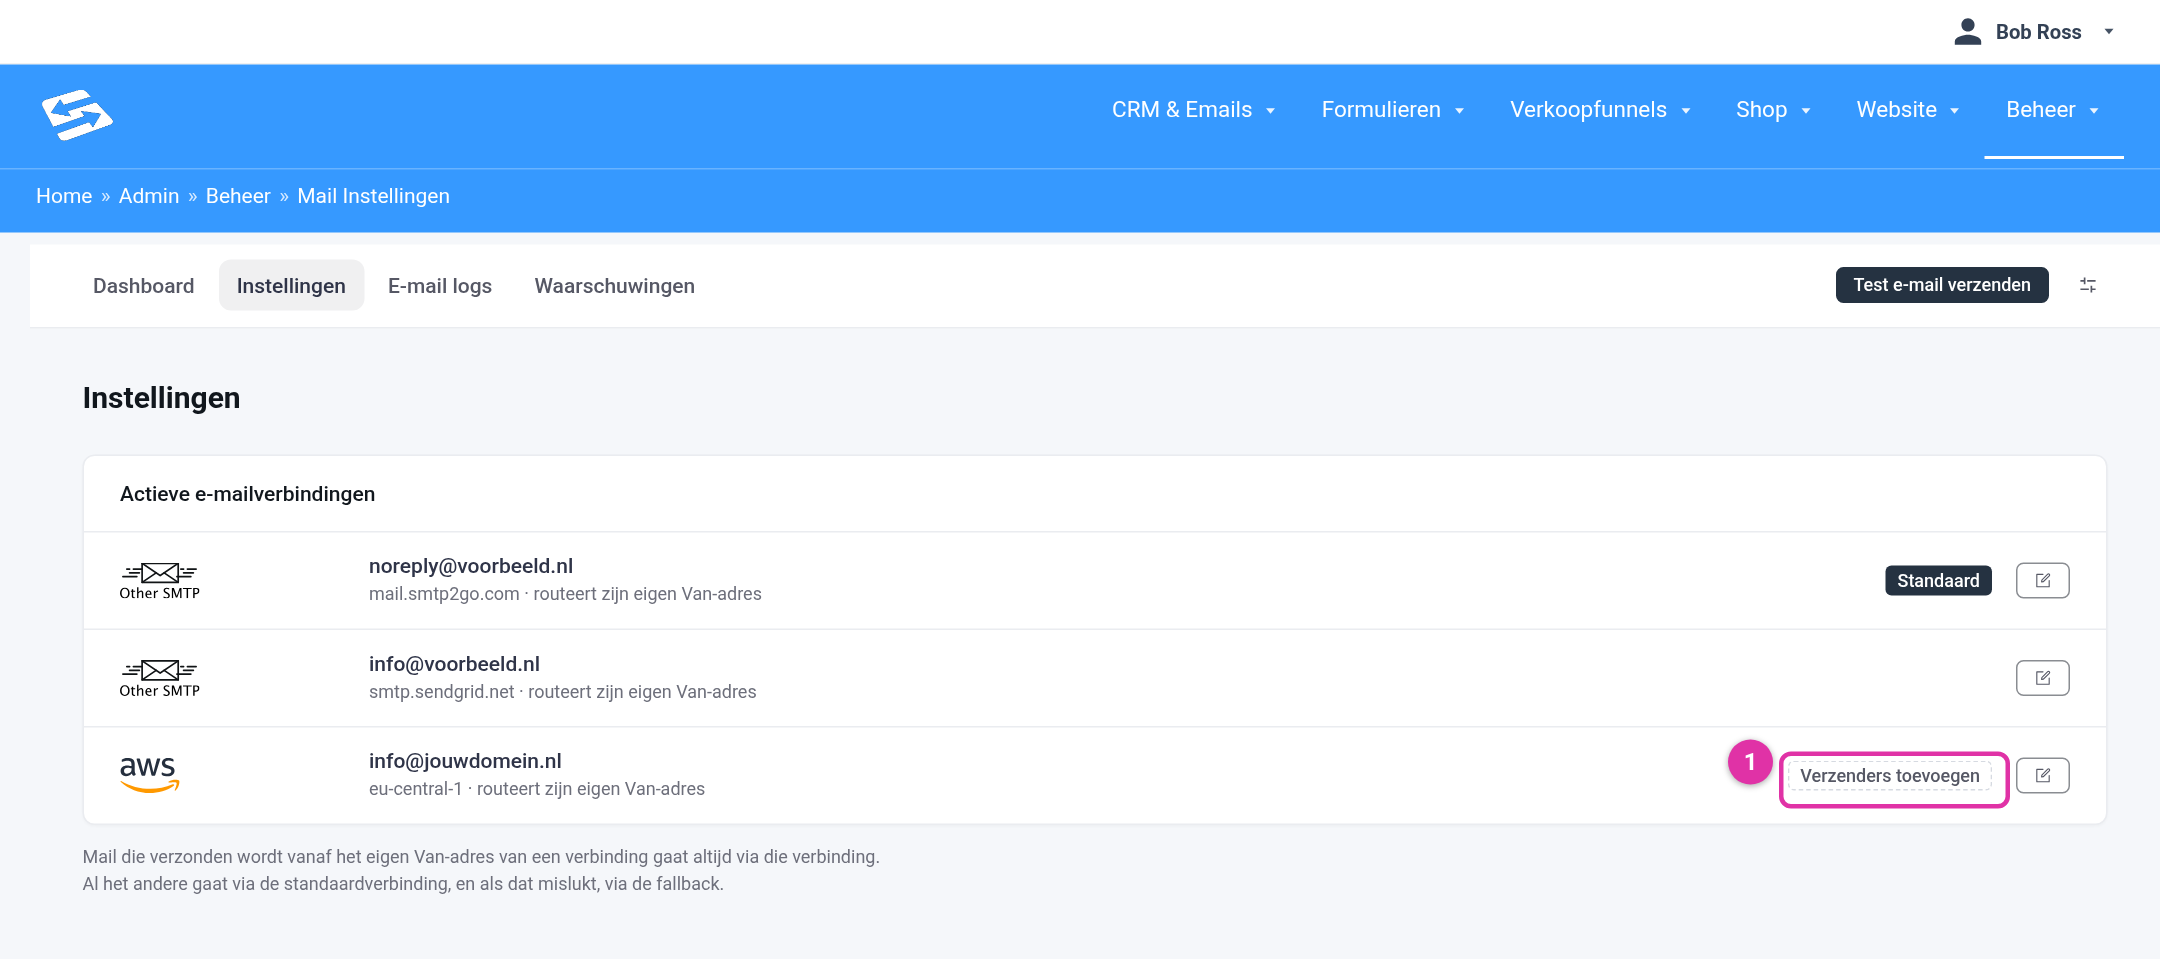
- Go to Administration → Mail Settings, Settings tab, and click Add senders (1) on the Amazon SES connection. If you already have extra addresses, the button shows the number, for example “+1 senders”.
- In the Manage extra senders window, enter the new address (2) and click Add (3). Only addresses on your own domain are possible; the address appears straight away in the Verified senders list (4).
- Then choose the address in the CRM: as the default sender under CRM & Emails → Settings → Email settings, or per campaign, sequence or automation step in the email settings of that email. Without this step the CRM keeps using your main address.
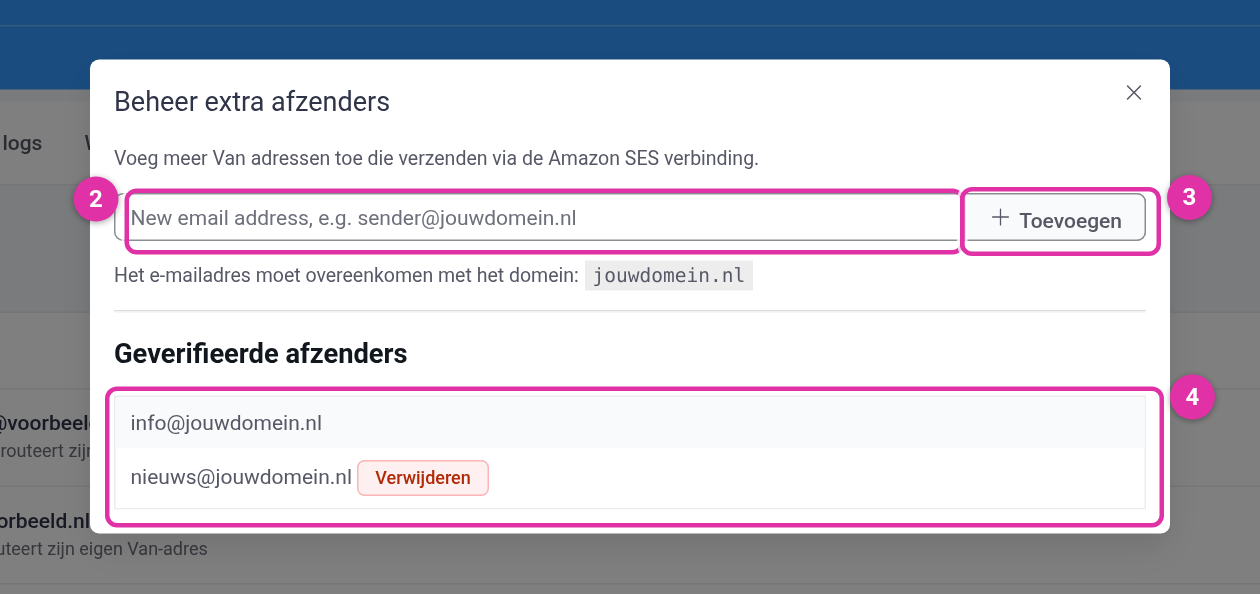
You can add up to five extra addresses next to your main address. Here too: use addresses whose mailbox exists, or set a reply-to address.
Removing an extra sender address #
In the Manage extra senders window, each extra address has a Remove button (see 4 in the image above). If the address is still used as a sender somewhere, you first get a message telling you in which campaigns, sequences or automations that is, and that those emails will be sent from your main address after removal. If you click remove again within five minutes, the address is removed and those emails are switched over automatically. You cannot remove the main address itself: one sender address must always remain set for your CRM emails. Want a different main address? Change the part before the @ as described above.
Choosing a sender in the CRM #
The drop-down list for the sender address in the CRM only contains the addresses of your Amazon SES connection: your main address and the extra addresses you have added. If you type in a different address, for example the noreply address or an address on another domain, it is rejected with a message when you save. That way a newsletter can never go out through the shop email route by accident, and the reputation of your newsletter address stays protected.
Frequently asked questions #
Why can’t I change the noreply address? #
The noreply address is the fixed sender of your shop and system emails. That route is set up so that order confirmations, invoices and password resets always arrive, even if something goes wrong with another connection. You can change the sender name of those emails with the pencil icon on the connection.
Do I need to set anything up for my domain or DNS if I change my sender address? #
No. Your environment’s domain has been set up and verified at Amazon SES. Every address on that domain works straight away, without DNS changes and without a verification email.
Do I need to change anything in the CRM after changing my sender address? #
No. If you change the main address through Mail Settings, the default sender in the CRM and all your campaigns, sequences and automations move along automatically. Only an extra address has to be chosen in the CRM yourself, because otherwise the CRM doesn’t know you want to use that address.
What happens to emails that are already scheduled? #
They move to the new address. An email sequence that sends an email in two weeks’ time will do so from your new sender address. Emails that have already been sent don’t change, of course.
Can I send email from a second domain? #
Yes, as an extra service. Contact support; the second domain is then set up as a separate Amazon SES connection and appears in your overview. After that you can also change the part before the @ and add extra addresses on that domain yourself.
I see a message in the CRM that my sender address cannot be used. #
Then the address you entered is not an address of your Amazon SES connection. Choose an address from the drop-down list, or first add the address through Administration → Mail Settings as described above.


