Reusable text blocks in your emails (patterns) #
Do you use the same text in several emails, for example a sentence with a date in every email of a funnel? With a pattern you create that text block once and manage it in one central place. If you change the pattern later, every email that contains it uses the new version automatically. You do not have to edit the emails one by one.
Patterns in Autorespond are based on FluentCRM, which is included in your package.
Important to know beforehand: patterns only work in emails you build with the block editor (the “Default (Gutenberg)” editor). There is no pattern option for emails you build with the Visual builder. If you use the Visual builder, look at the global footer later in this article: that route works in all emails, whichever editor you use.
What a pattern is and when to use one #
A pattern is a reusable email section: a piece of content (text, but also headings, buttons or images) that you insert into several emails. The content of the pattern is only filled in at the moment an email is actually sent. So if you change the pattern, the new version appears automatically in everything sent after that. This is the answer to what other email programs sometimes call “message variables”. Useful for:
- A sentence with a date that recurs in every email of a funnel and changes occasionally.
- A fixed text block about your current offer that you use in every newsletter.
- A standard sign-off or PS line that you want to refresh now and then.
Creating a pattern #
- In the top menu, go to CRM & Emails.
- Click emails in the navigation and open the Patterns tab.
- Click Add pattern at the top right.
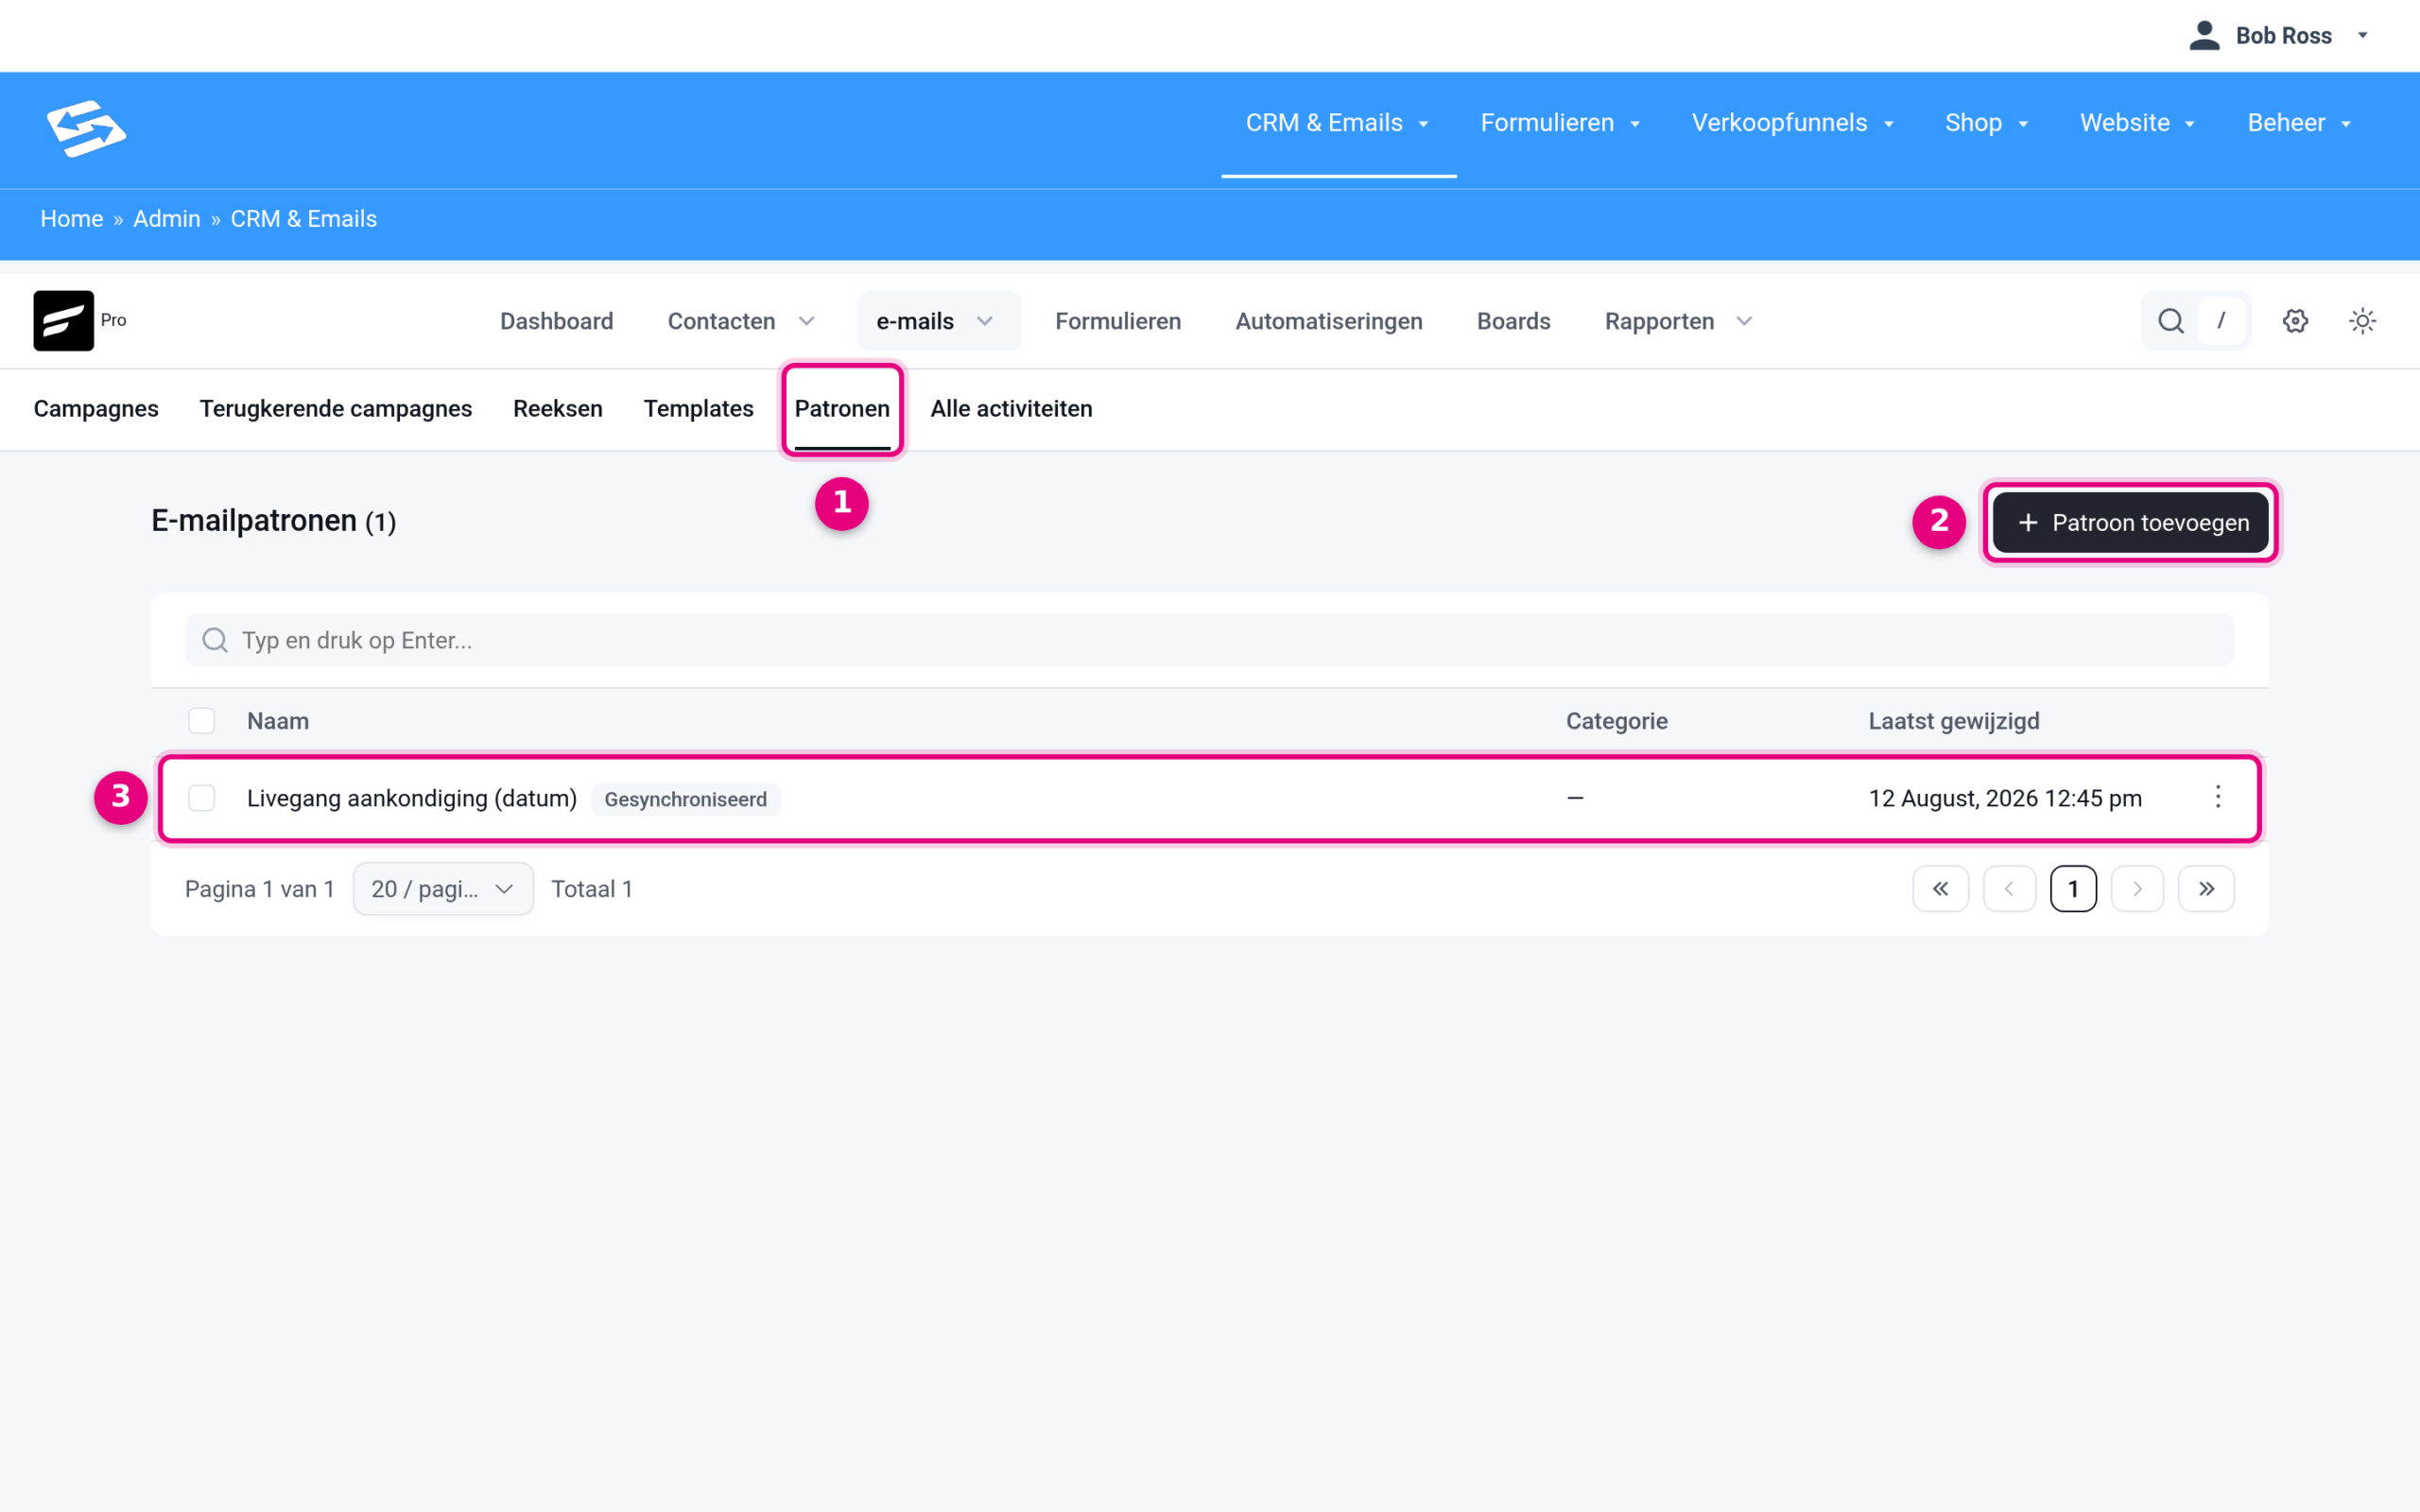
- The Patterns tab, next to Campaigns, Recurring campaigns, Sequences, Templates and All activities.
- Add pattern creates a new pattern.
- Each pattern appears as a row in the list, with the label Synced if changes carry through automatically, any category, and the date it was last changed. Click the name to open the pattern.
You now arrive at the edit page of the pattern:
- Give the pattern a recognisable name under Pattern name, for example “Launch announcement (date)”.
- Tick Synced pattern. This is the heart of the feature: the explanation next to the box says it already, “Changes here update all emails that use this pattern”. If you leave the box unticked, the pattern is inserted as a separate copy and a later change does not carry through.
- Type the content of the pattern into the editor. This works exactly like the block editor of an email: text, headings, buttons and images are all possible.
- Click Save pattern at the top right.
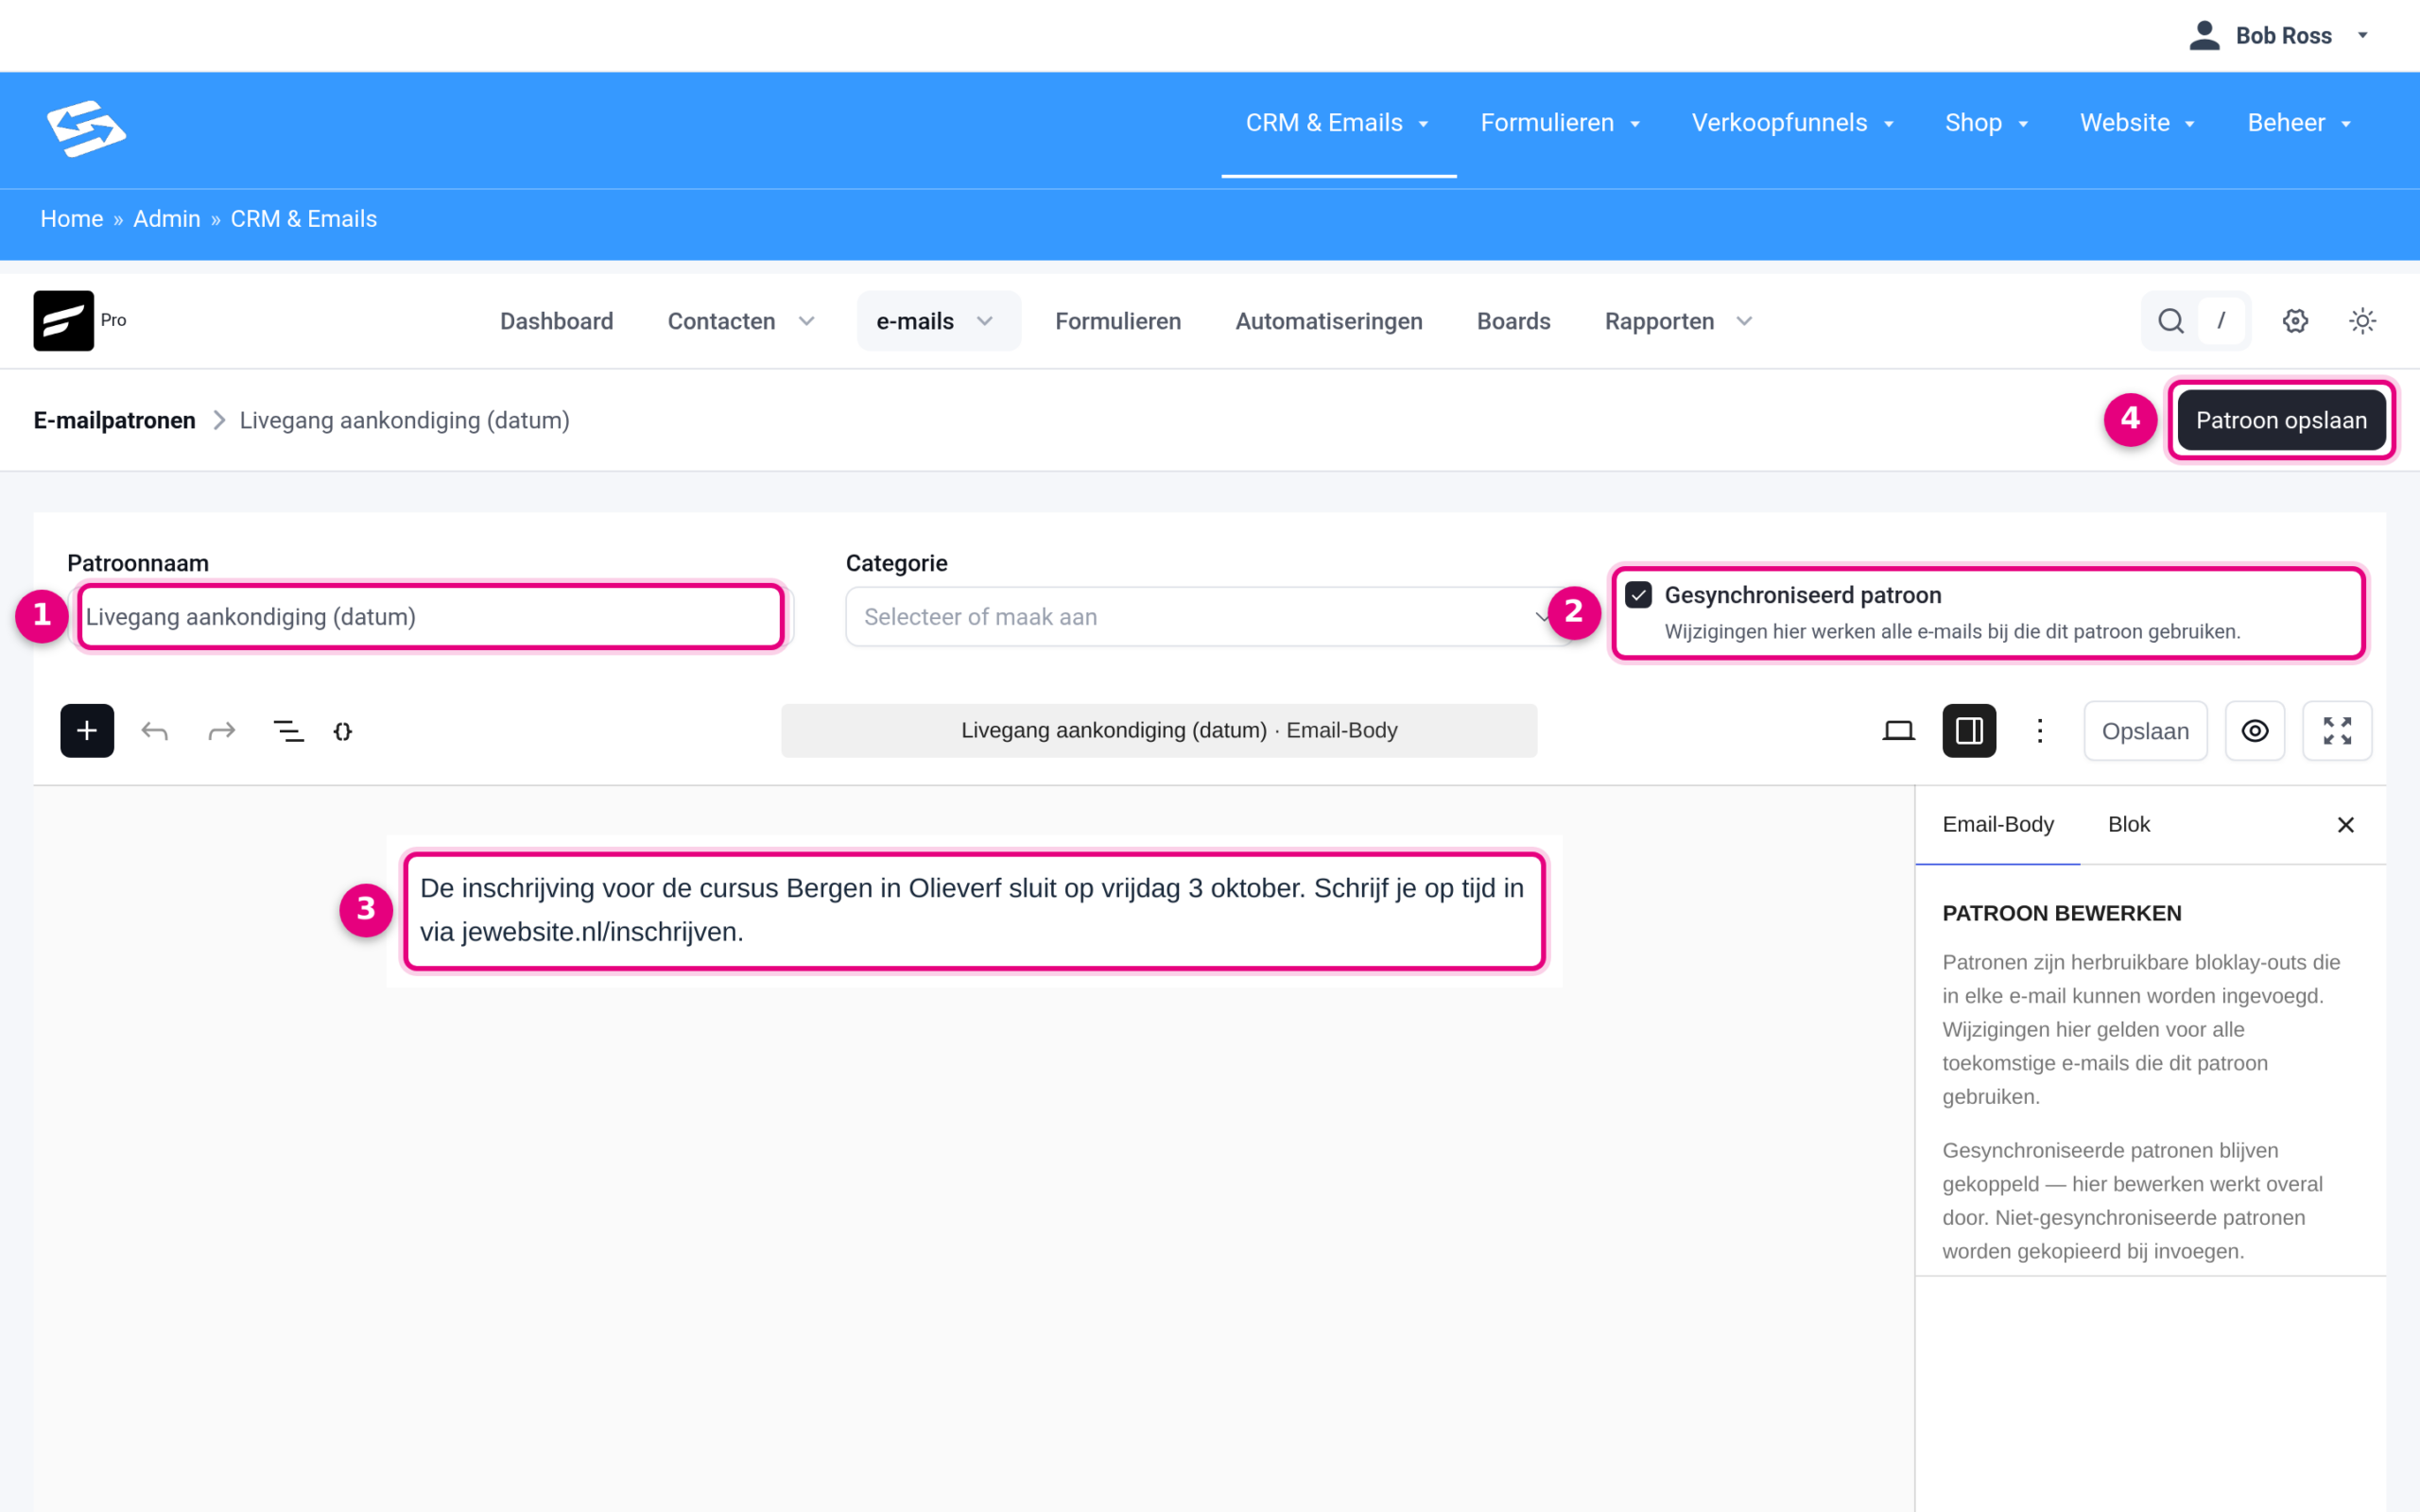
- The Pattern name field. Next to it, under Category, you can optionally choose or create a category to organise patterns.
- The Synced pattern box, ticked here: changes to this pattern carry through to every email that uses it.
- The content of the pattern in the block editor.
- Save pattern saves the name, the settings and the content.
Inserting the pattern into an email #
You insert a pattern through the block inserter of the block editor. That works in any email you build with the block editor: a campaign, an email in a sequence or an email in an automation.
- Open the email in the block editor. If you are creating a new campaign, choose the editor Default (Gutenberg) in the “Create campaign” window.
- Click the block inserter at the top left (the plus button, which turns into a cross while the panel is open).
- Open the Patterns tab and click My patterns.
- Click the pattern or drag it to the right place in your email.
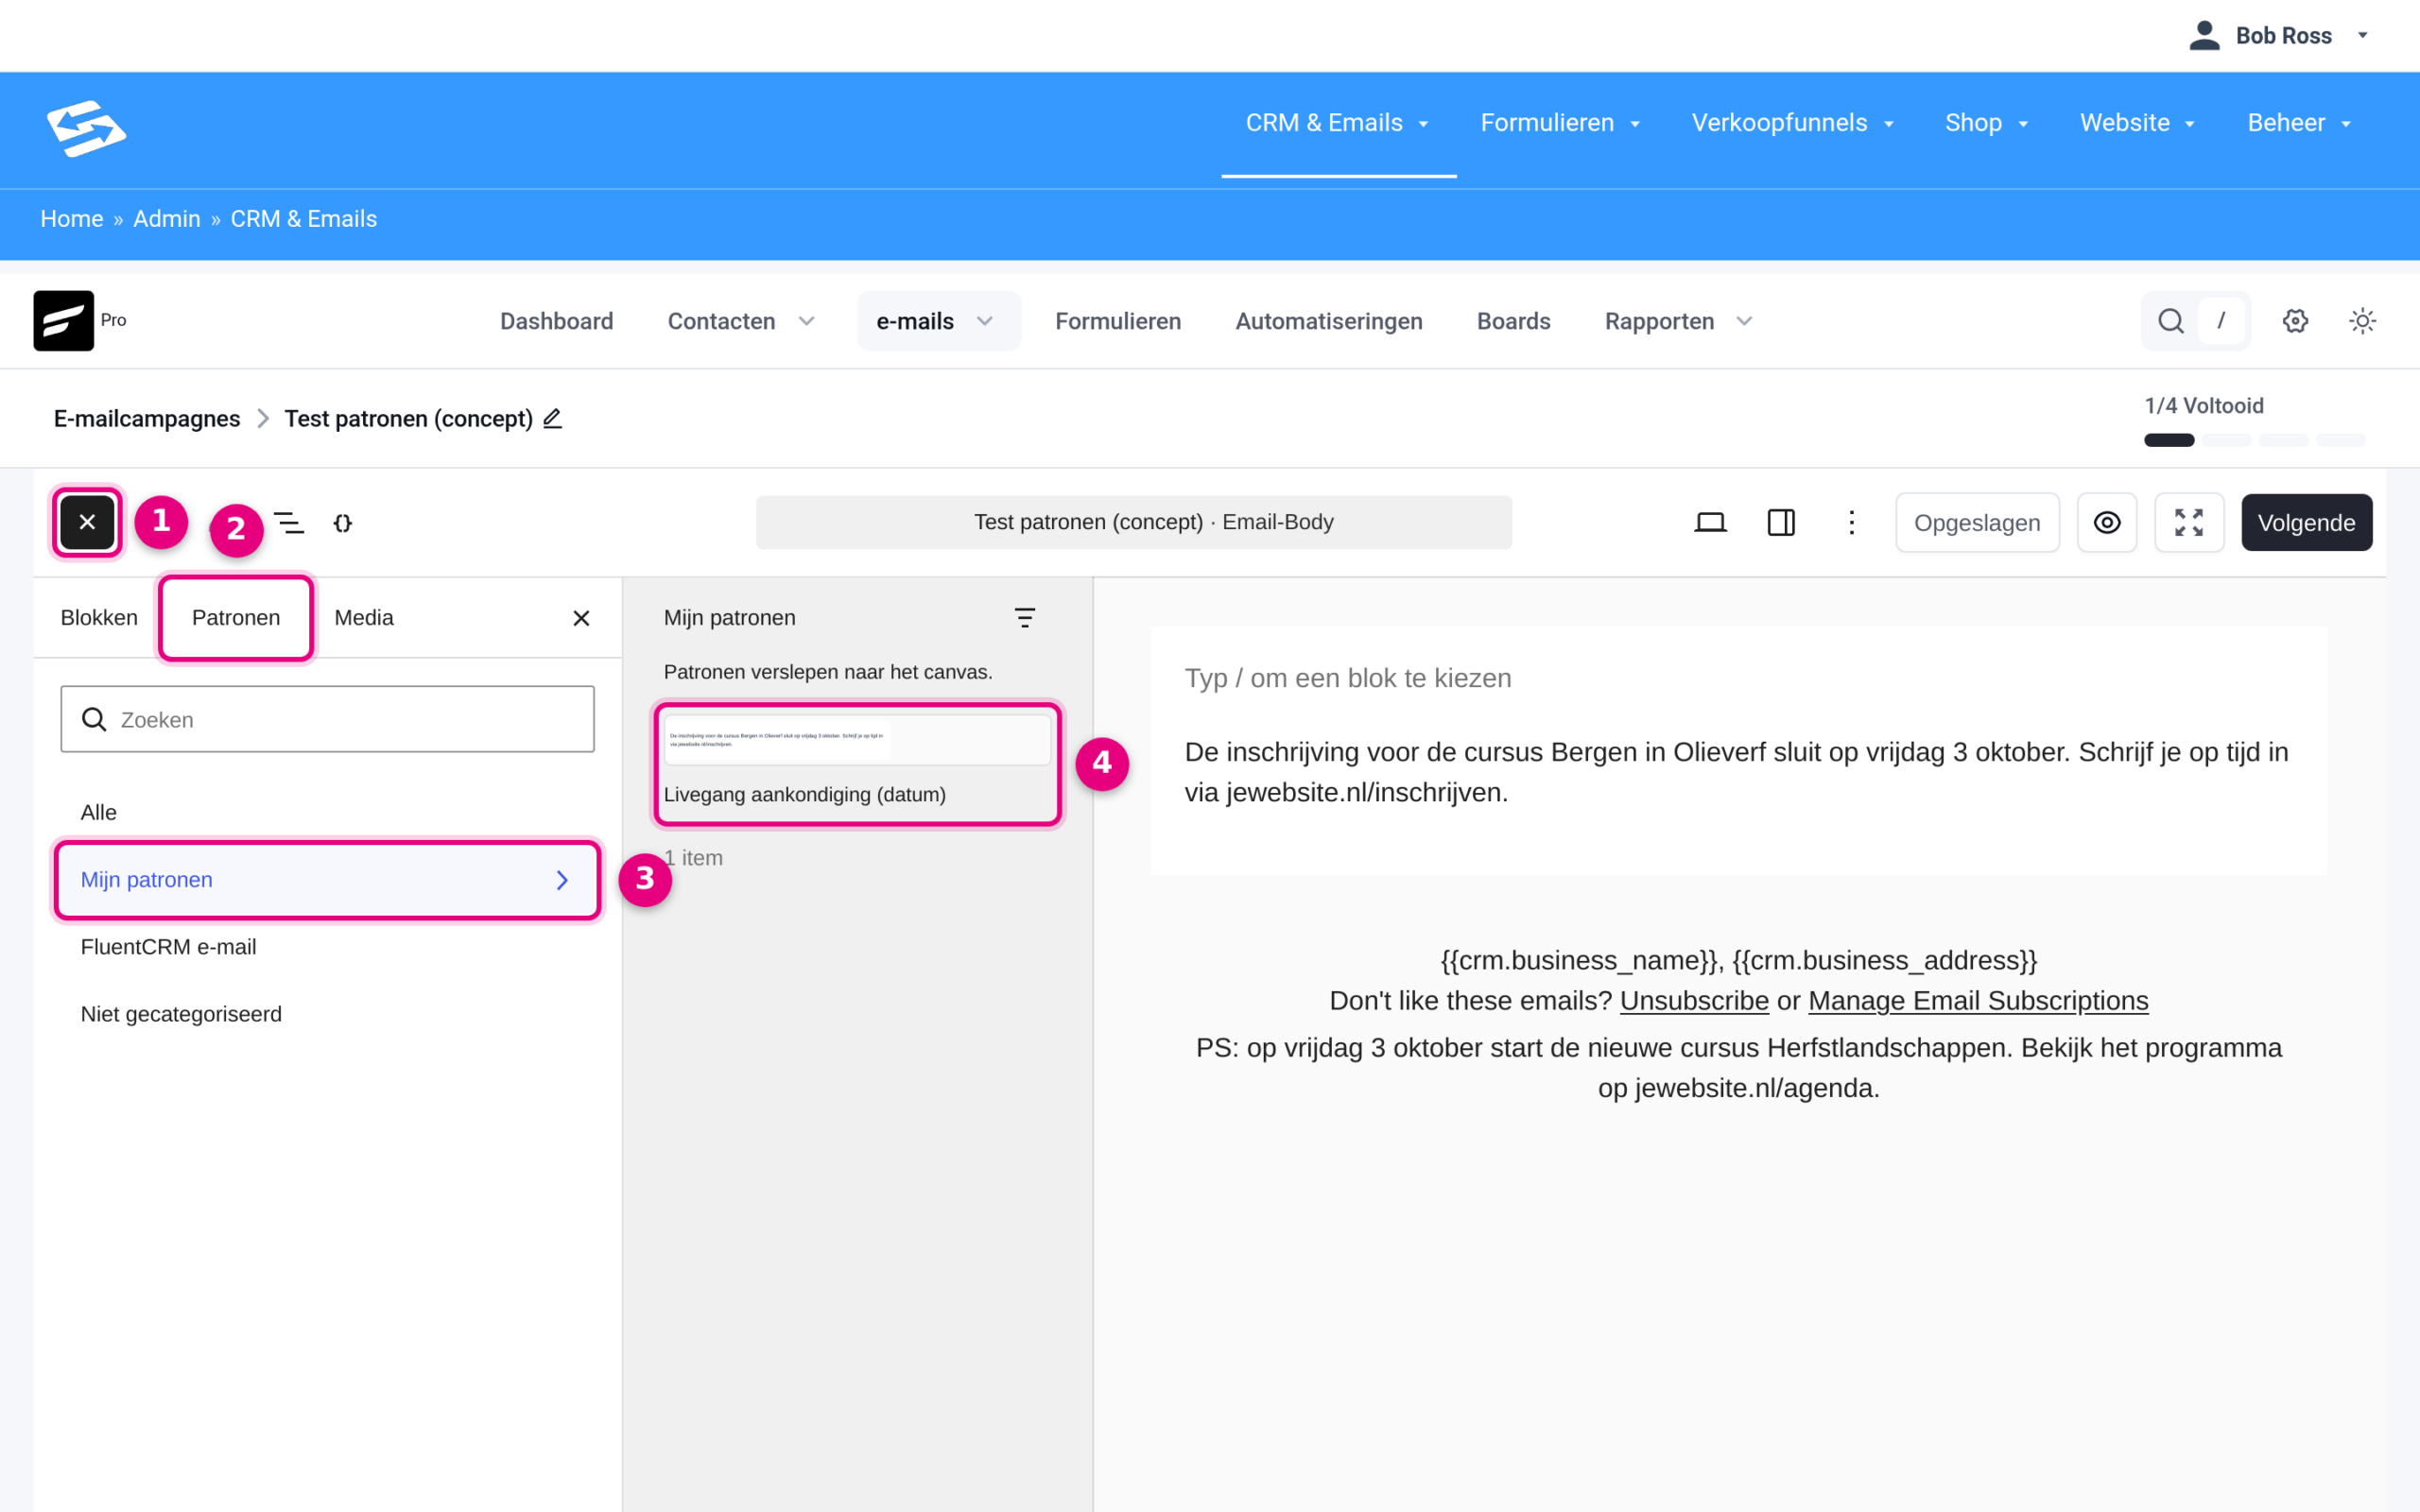
- The block inserter at the top left of the editor.
- The Patterns tab (next to Blocks and Media).
- The category My patterns with your own patterns. You also find them under All and Uncategorised, and FluentCRM email contains ready-made example sections from the supplier.
- The pattern itself: click it or drag it onto the canvas. You see the result appear straight away in the email on the right.
Changing the pattern: edit once, updated everywhere #
Do you want to adjust the text, for example because the date has changed? Open CRM & Emails → emails → the Patterns tab, click the pattern, change the content and click Save pattern. Every email that contains the pattern and is still to be sent uses the new text from that moment on. That also applies to campaigns that are already scheduled, because the content of the pattern is only filled in at the moment of sending.
One caveat: emails that are already in the sending queue, for example an automation email already prepared for a specific contact, keep the old version. Everything prepared and sent after that gets the new version.
The alternative for all emails: the global footer #
Do you (also) work with the Visual builder, or do you want one piece of text under every email? Then use the global email footer. It is managed centrally and filled into every email at the moment of sending. By default it holds your company name, address and the unsubscribe link, but you can also add an extra piece of text to it temporarily, such as an announcement or an invitation (“PS: the new course starts on Friday 3 October, take a look at the programme”). That text then goes out automatically in all outgoing emails, and as soon as you remove it, it disappears everywhere too.
Here is how to change the global footer:
- Go to CRM & Emails → Settings and click Global email settings in the menu.
- Scroll to the Email footer settings section.
- Adjust the text in the Email footer field. Leave the lines with the company details and the unsubscribe link in place, they are required for marketing emails.
- Click Save at the top right.
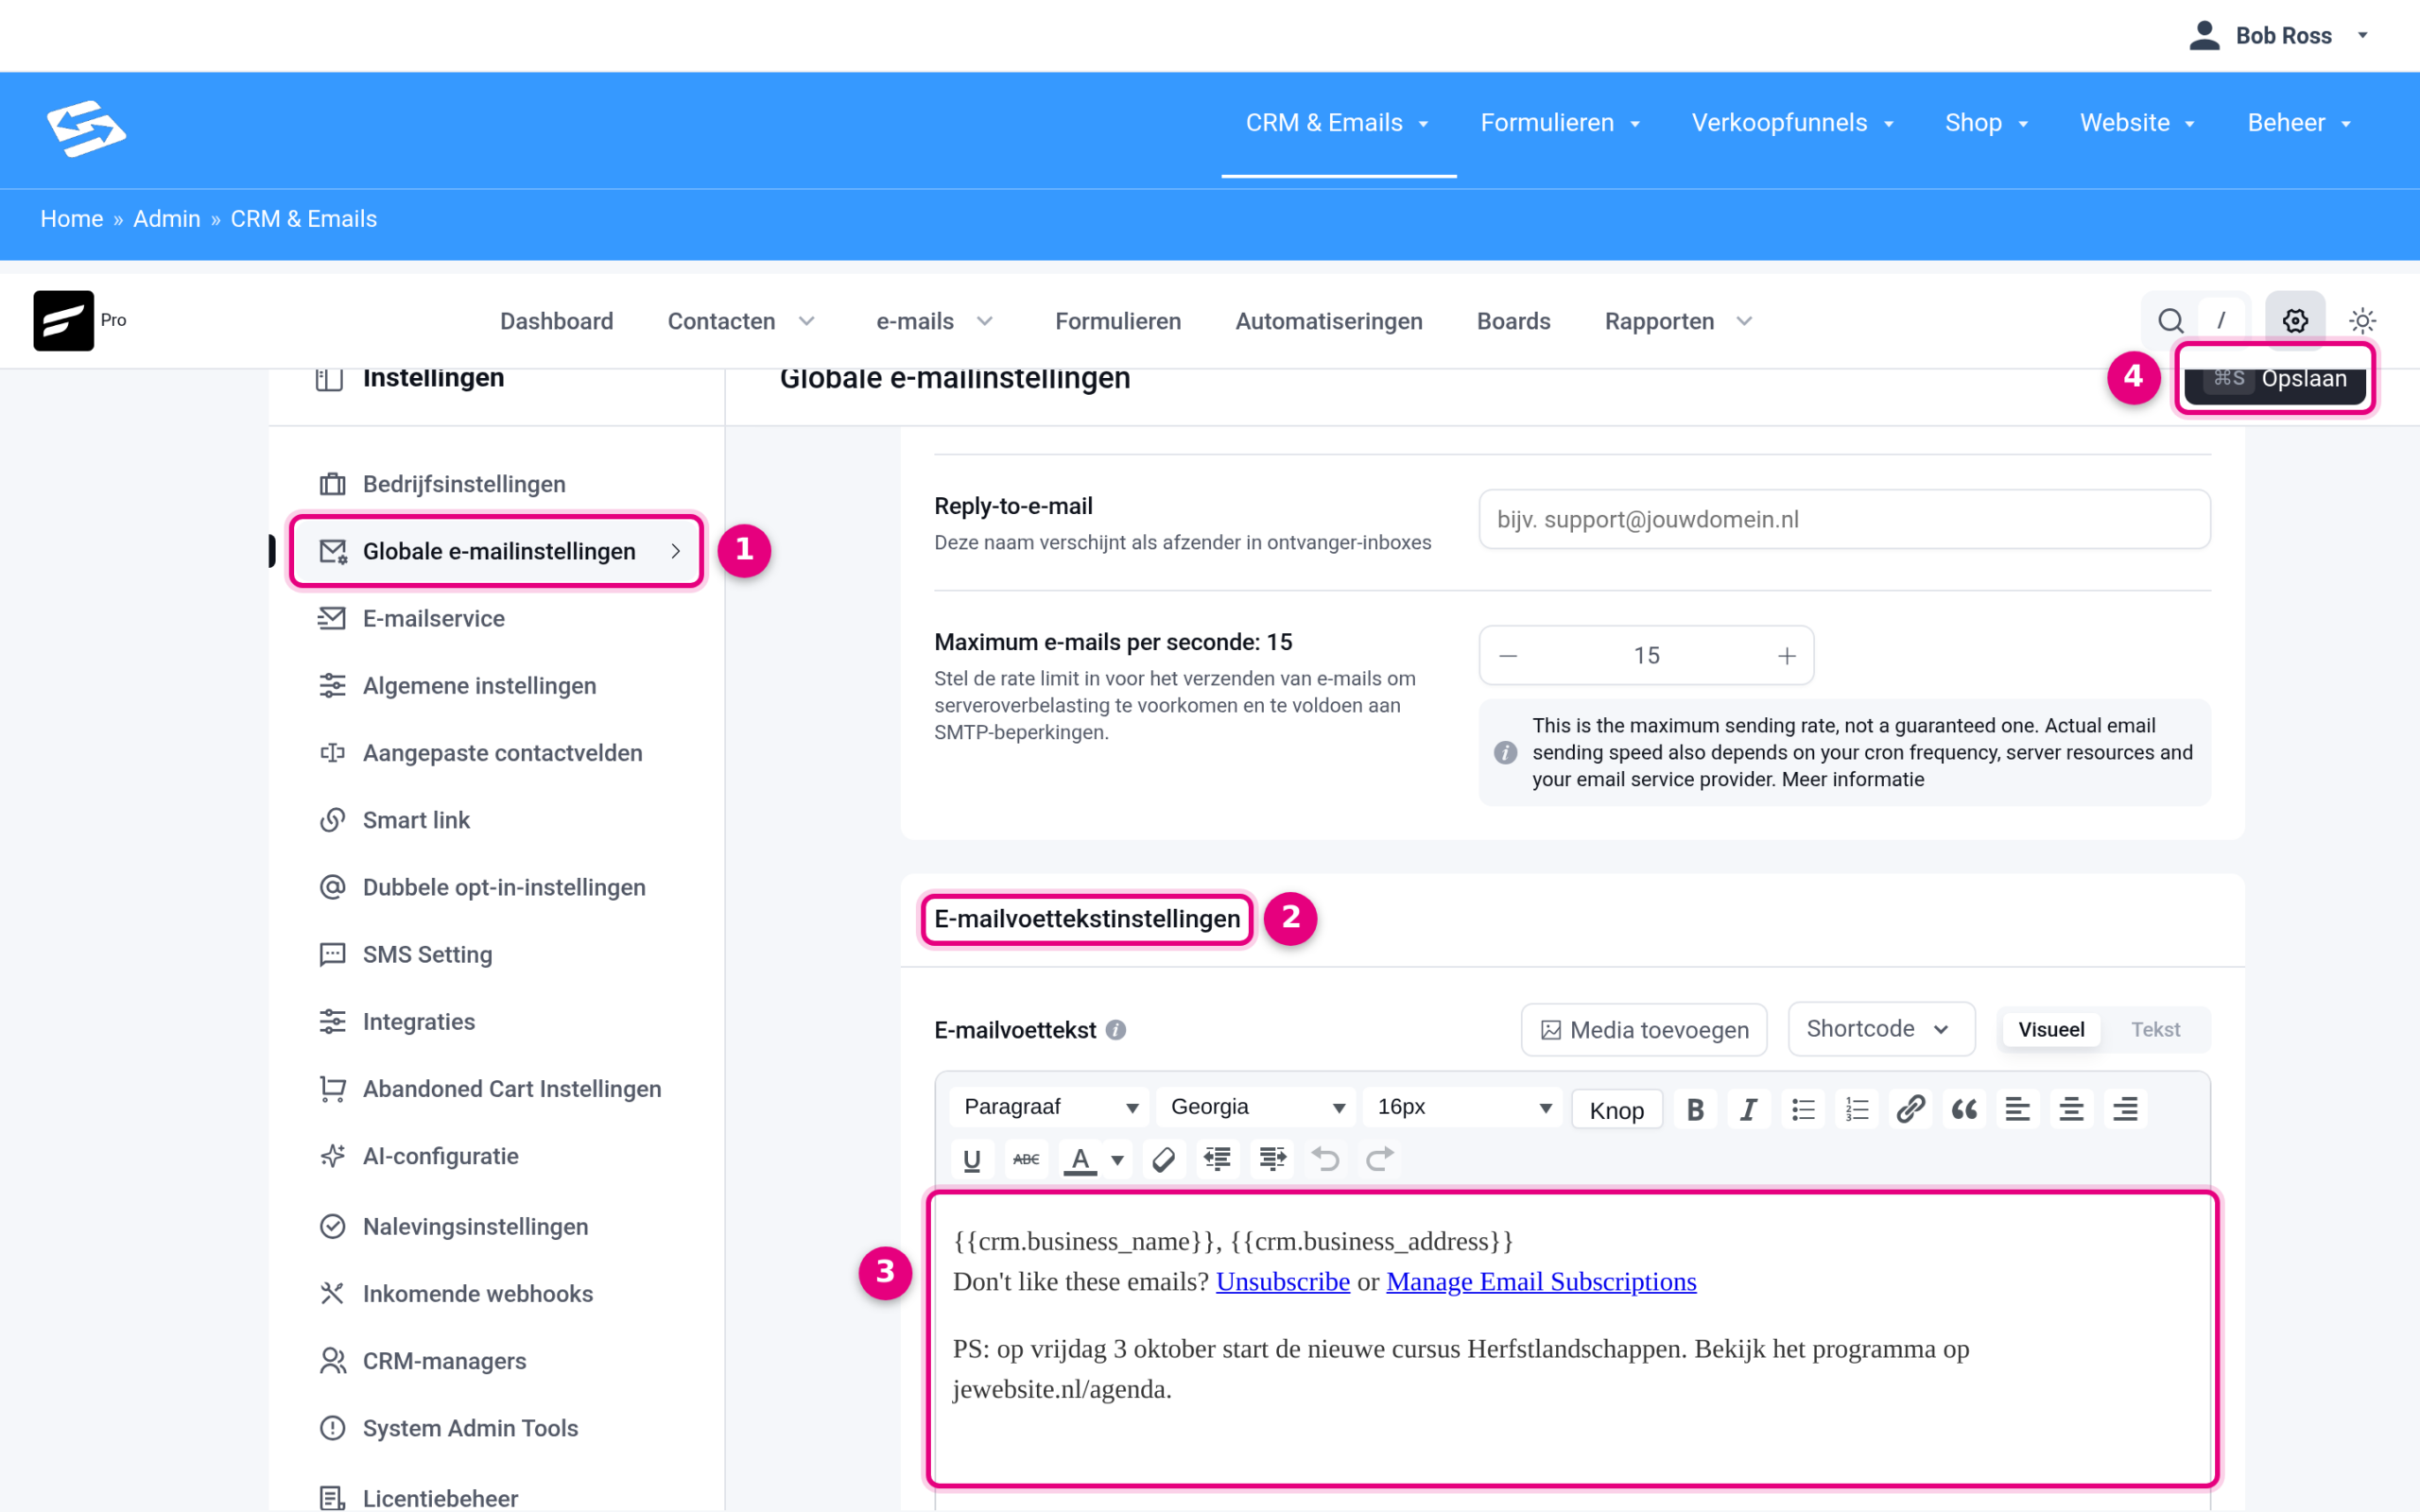
- The menu item Global email settings within Settings.
- The Email footer settings section.
- The Email footer field, here with a temporary PS line below the standard company details and unsubscribe links. Below the field, the screen explains which smart codes you can use, such as {{crm.business_name}} for your company name.
- Once you click Save, the new footer applies straight away to every email sent from that moment on.
In emails from the block editor this footer appears at the bottom automatically. In emails from the Visual builder the footer appears where the shortcode {{crm_global_email_footer}} sits in the design. If it is not there yet, add it as ordinary text at the bottom of your design. How that shortcode and the unsubscribe links work exactly is explained in Unsubscribe links in email templates: how shortcodes and footers work.


