By connecting WebinarGeek to Autorespond with a webhook, you record automatically which contacts sign up for your webinars. This integration makes sure webinar sign-ups arrive in your CRM automatically, including information about which webinars they attended. You switch the integration on yourself via Administration → Integrations, and the CRM field you need is created for you automatically at the same time.
The webhook functionality in Autorespond is based on FluentCRM Pro, included in your package.
Step 1: switch the WebinarGeek integration on #
First switch the integration on in your administration environment:
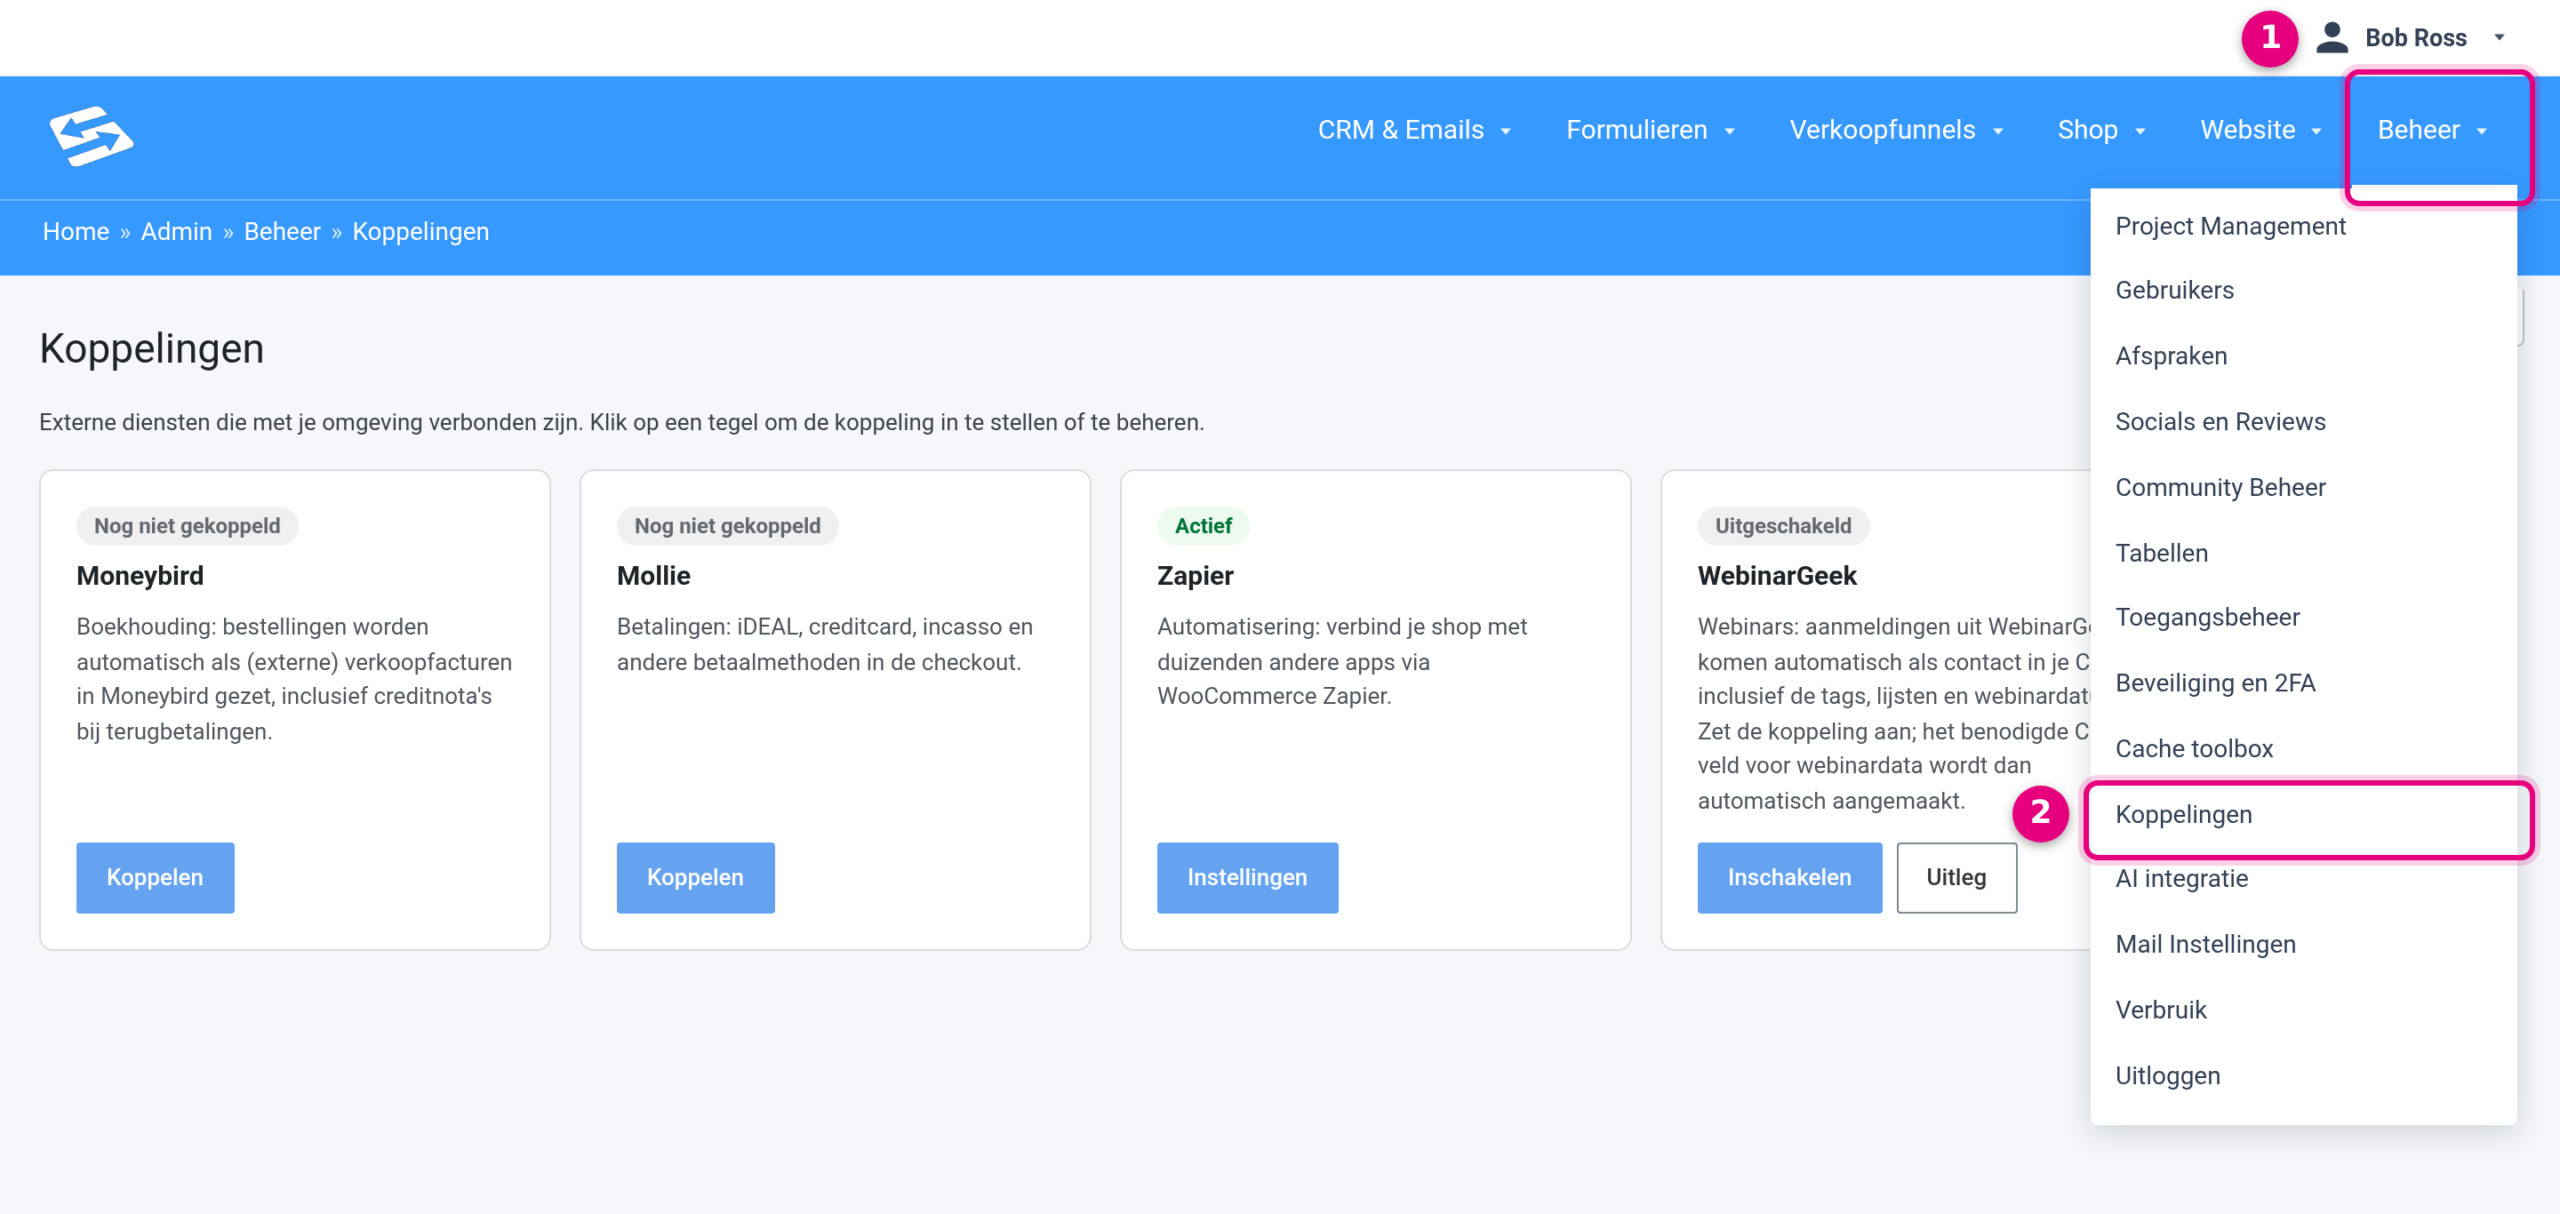
- Go to Administration → Integrations (1 and 2 in the image below)
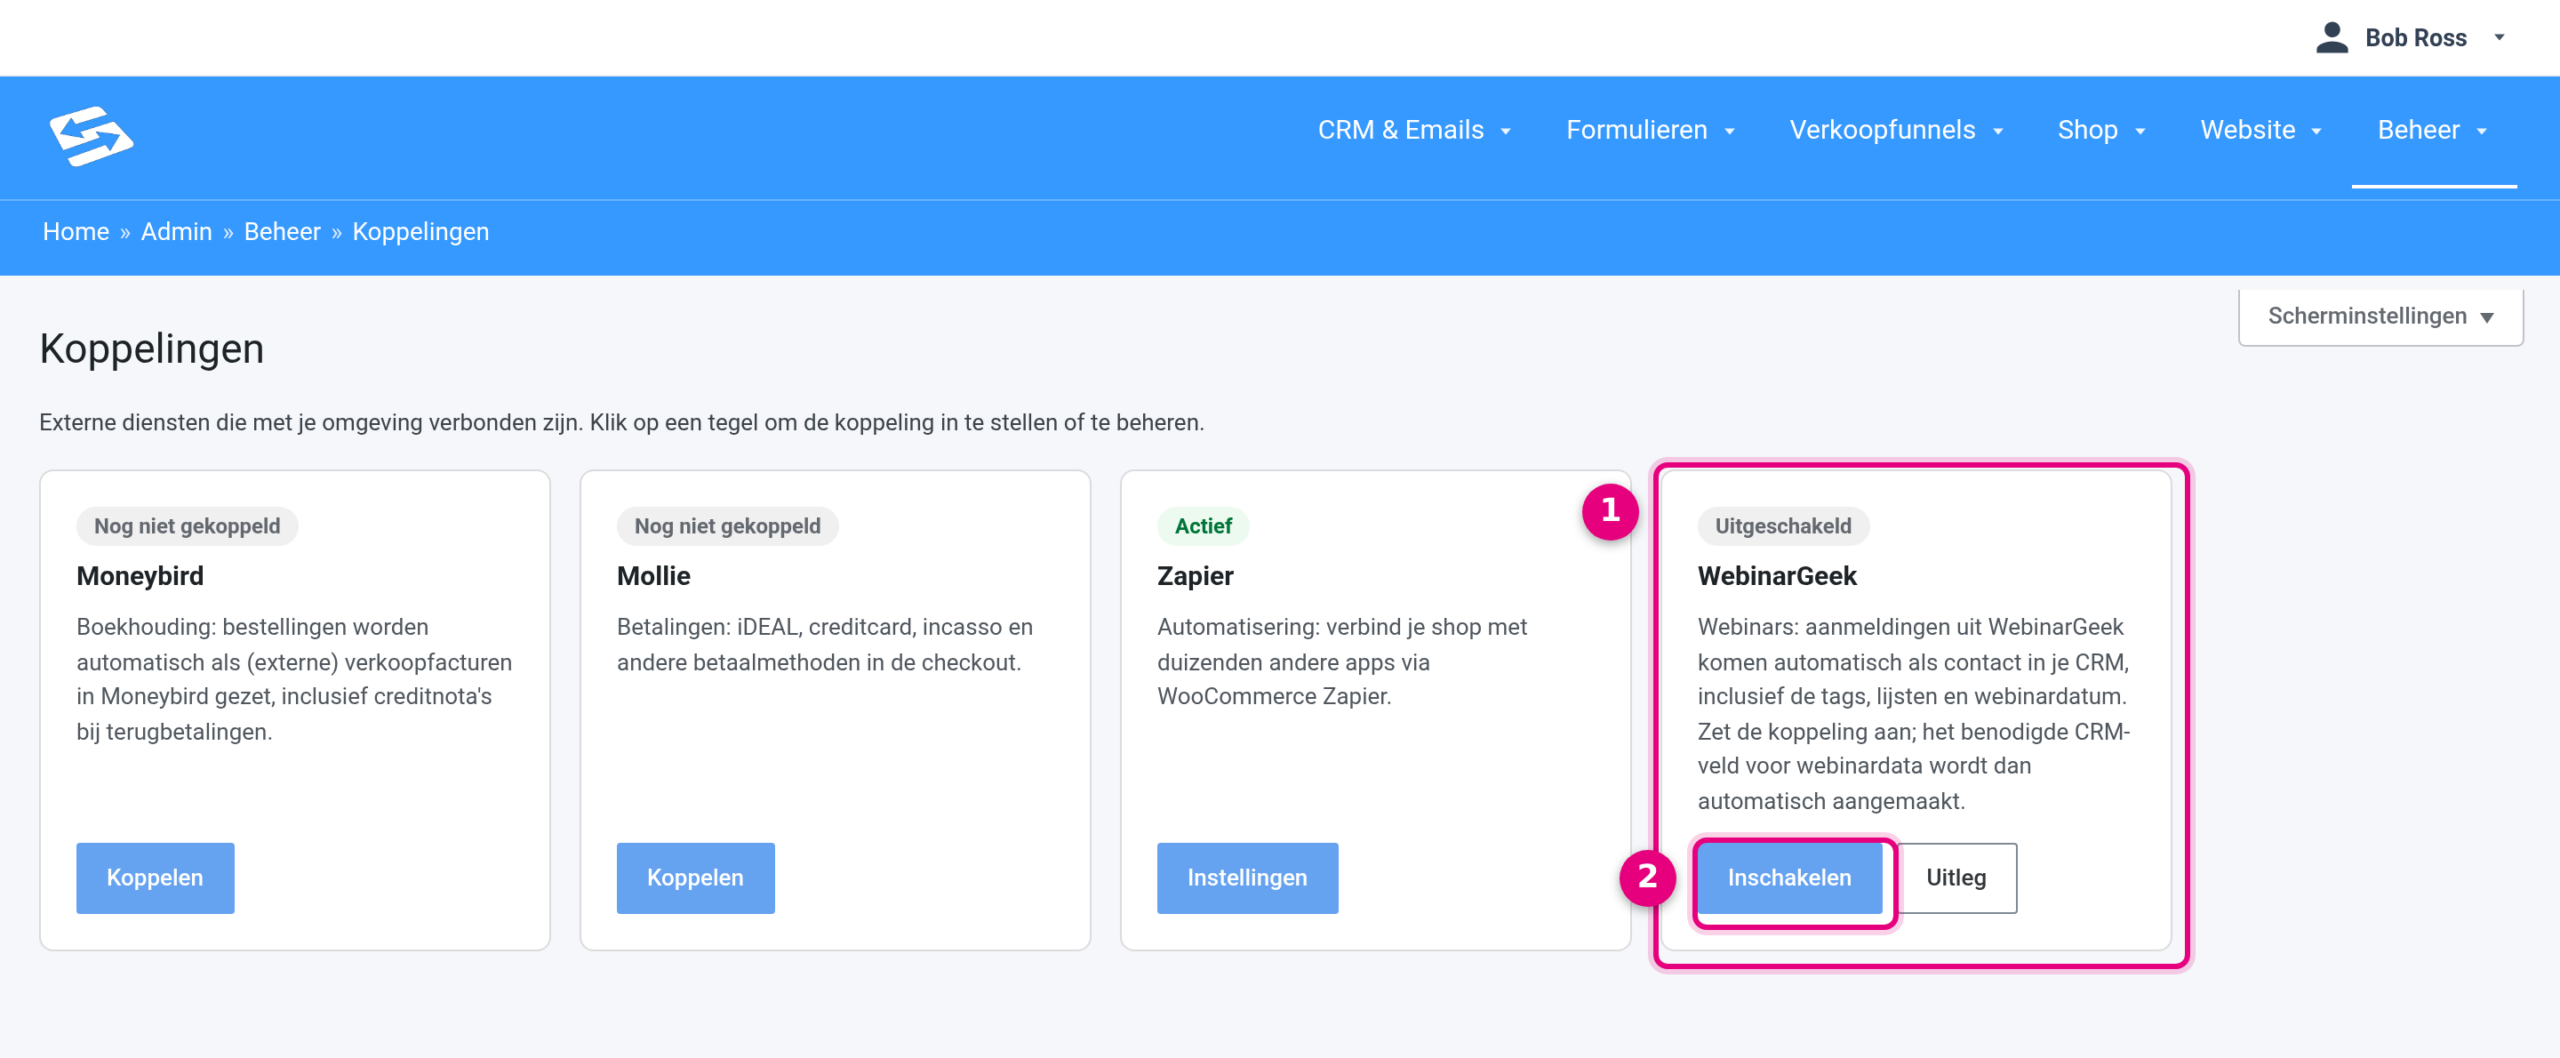
- Find the ‘WebinarGeek’ tile on the page
- Click the ‘Enable’ button
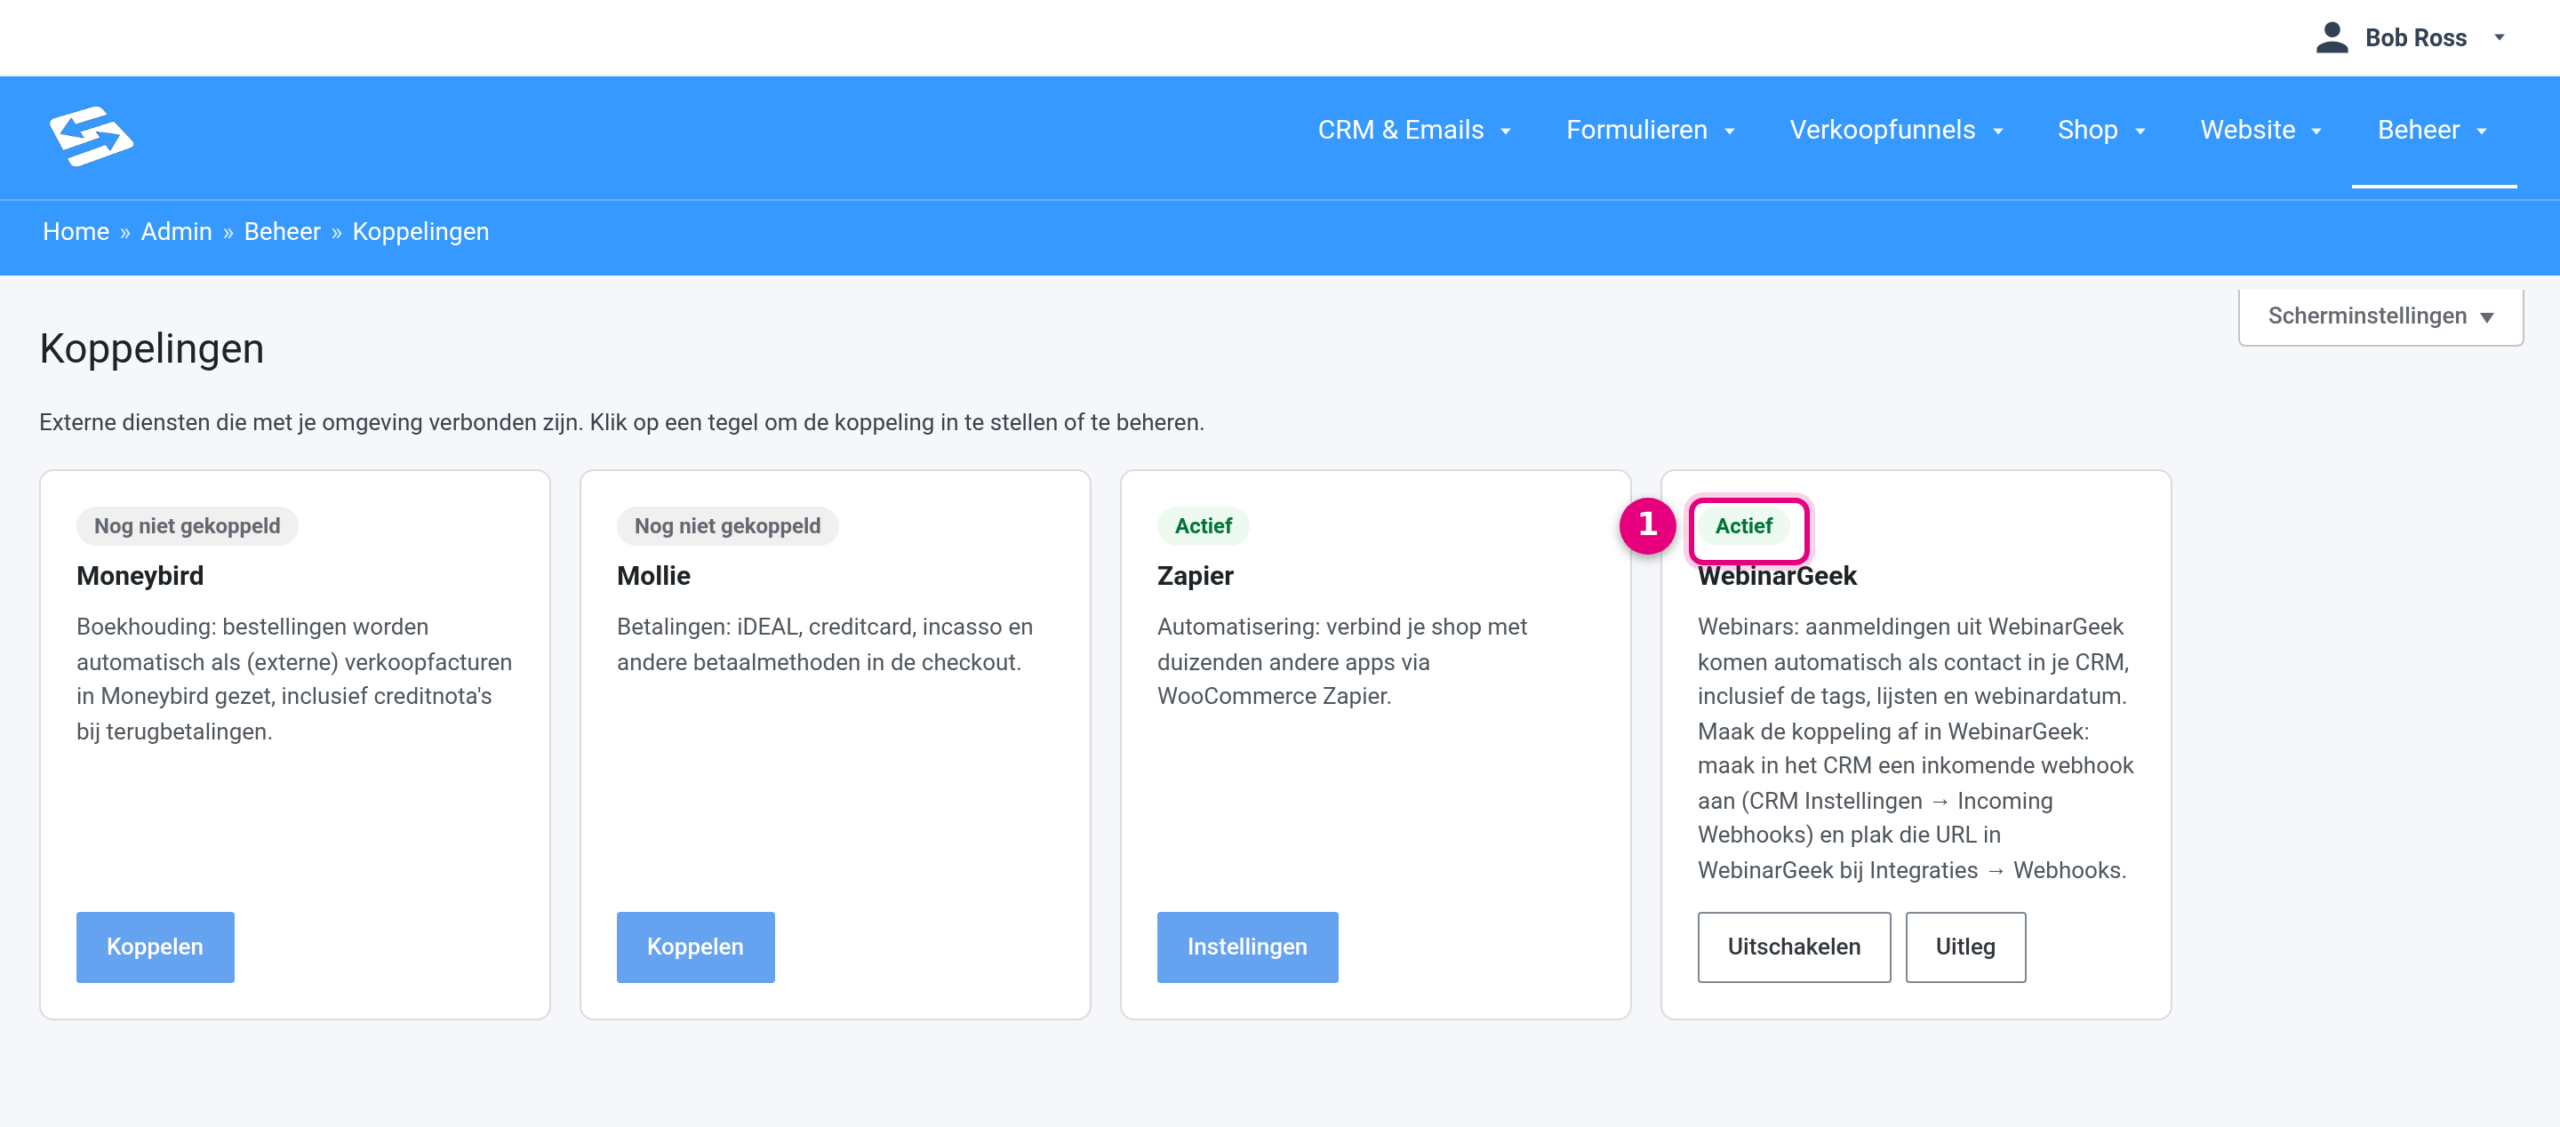
- The status of the tile changes to ‘Active’
When you switch it on, the custom field ‘webinargeek-dates’ is created automatically in your CRM. This field stores the webinar titles and dates per contact, with every new sign-up added on its own line. So you do not have to create this field yourself. If you want to check it, you will find it via CRM & Emails → CRM Settings → Custom fields.
Step 2: set up the incoming webhook in Autorespond #
Now create the webhook that receives the data from WebinarGeek:
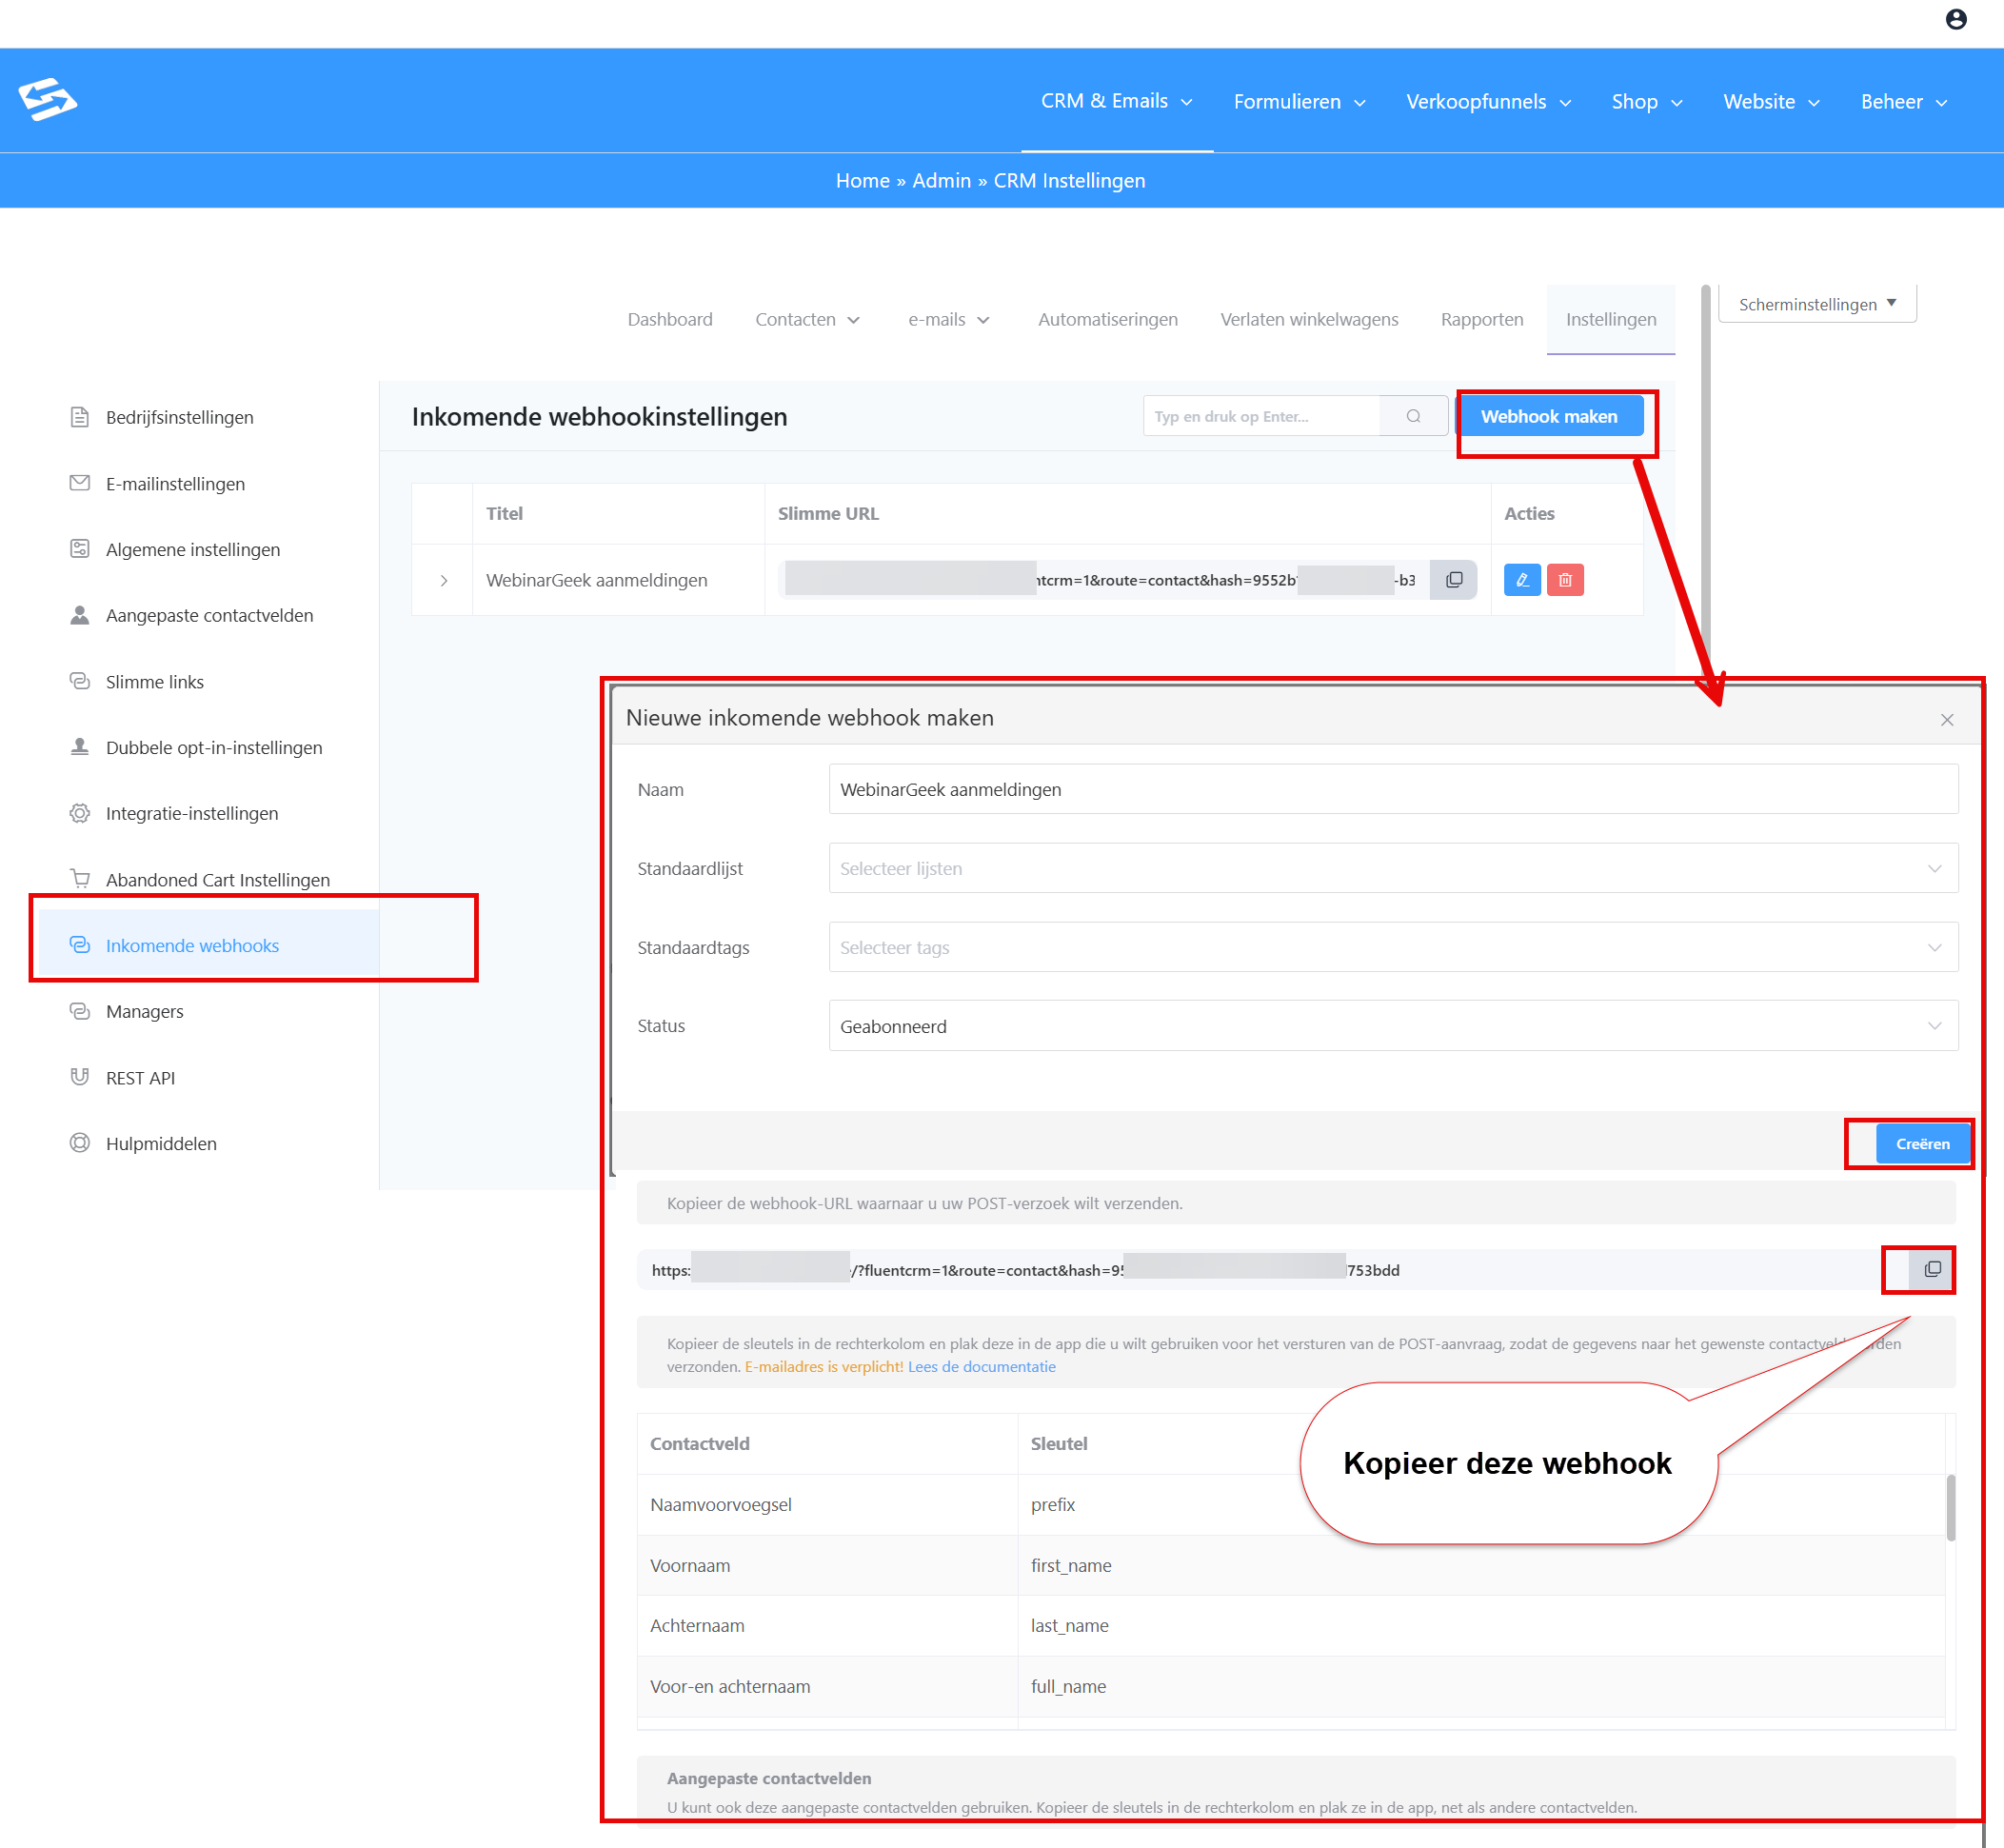
- Go to CRM & Emails → CRM Settings → Incoming webhooks
- Click ‘Add webhook’
- Fill in the webhook settings:
- Webhook name: WebinarGeek sign-ups
- Status: Active
- Default contact status: Subscribed
- Under ‘Lists and tags’ you add:
- List: create a new list called ‘WebinarGeek’. That way you can see later which contacts came in through this route.
- Tag: create a tag called ‘webinargeek-signup’. This tag is applied again with every sign-up and will shortly be the trigger of your automation (see the section ‘Automations based on webinar attendance’ below).
- Click ‘Save webhook’
- Copy the generated webhook URL, you need it in WebinarGeek
Step 3: configure the webhook in WebinarGeek #
Log in to your WebinarGeek account and set the webhook up. At the time this doc was written, this was the link: https://app.webinargeek.com/admin/integrations
- Go to Settings → Advanced → Integrations
- Click ‘New trigger’
- Select ‘Webhook’ from the list of integrations
- Configure the webhook:
- Name: Autorespond webhook
- URL: paste the webhook URL from step 2 here
- For which webinars: All webinars
- When: On sign-up
- Save the settings
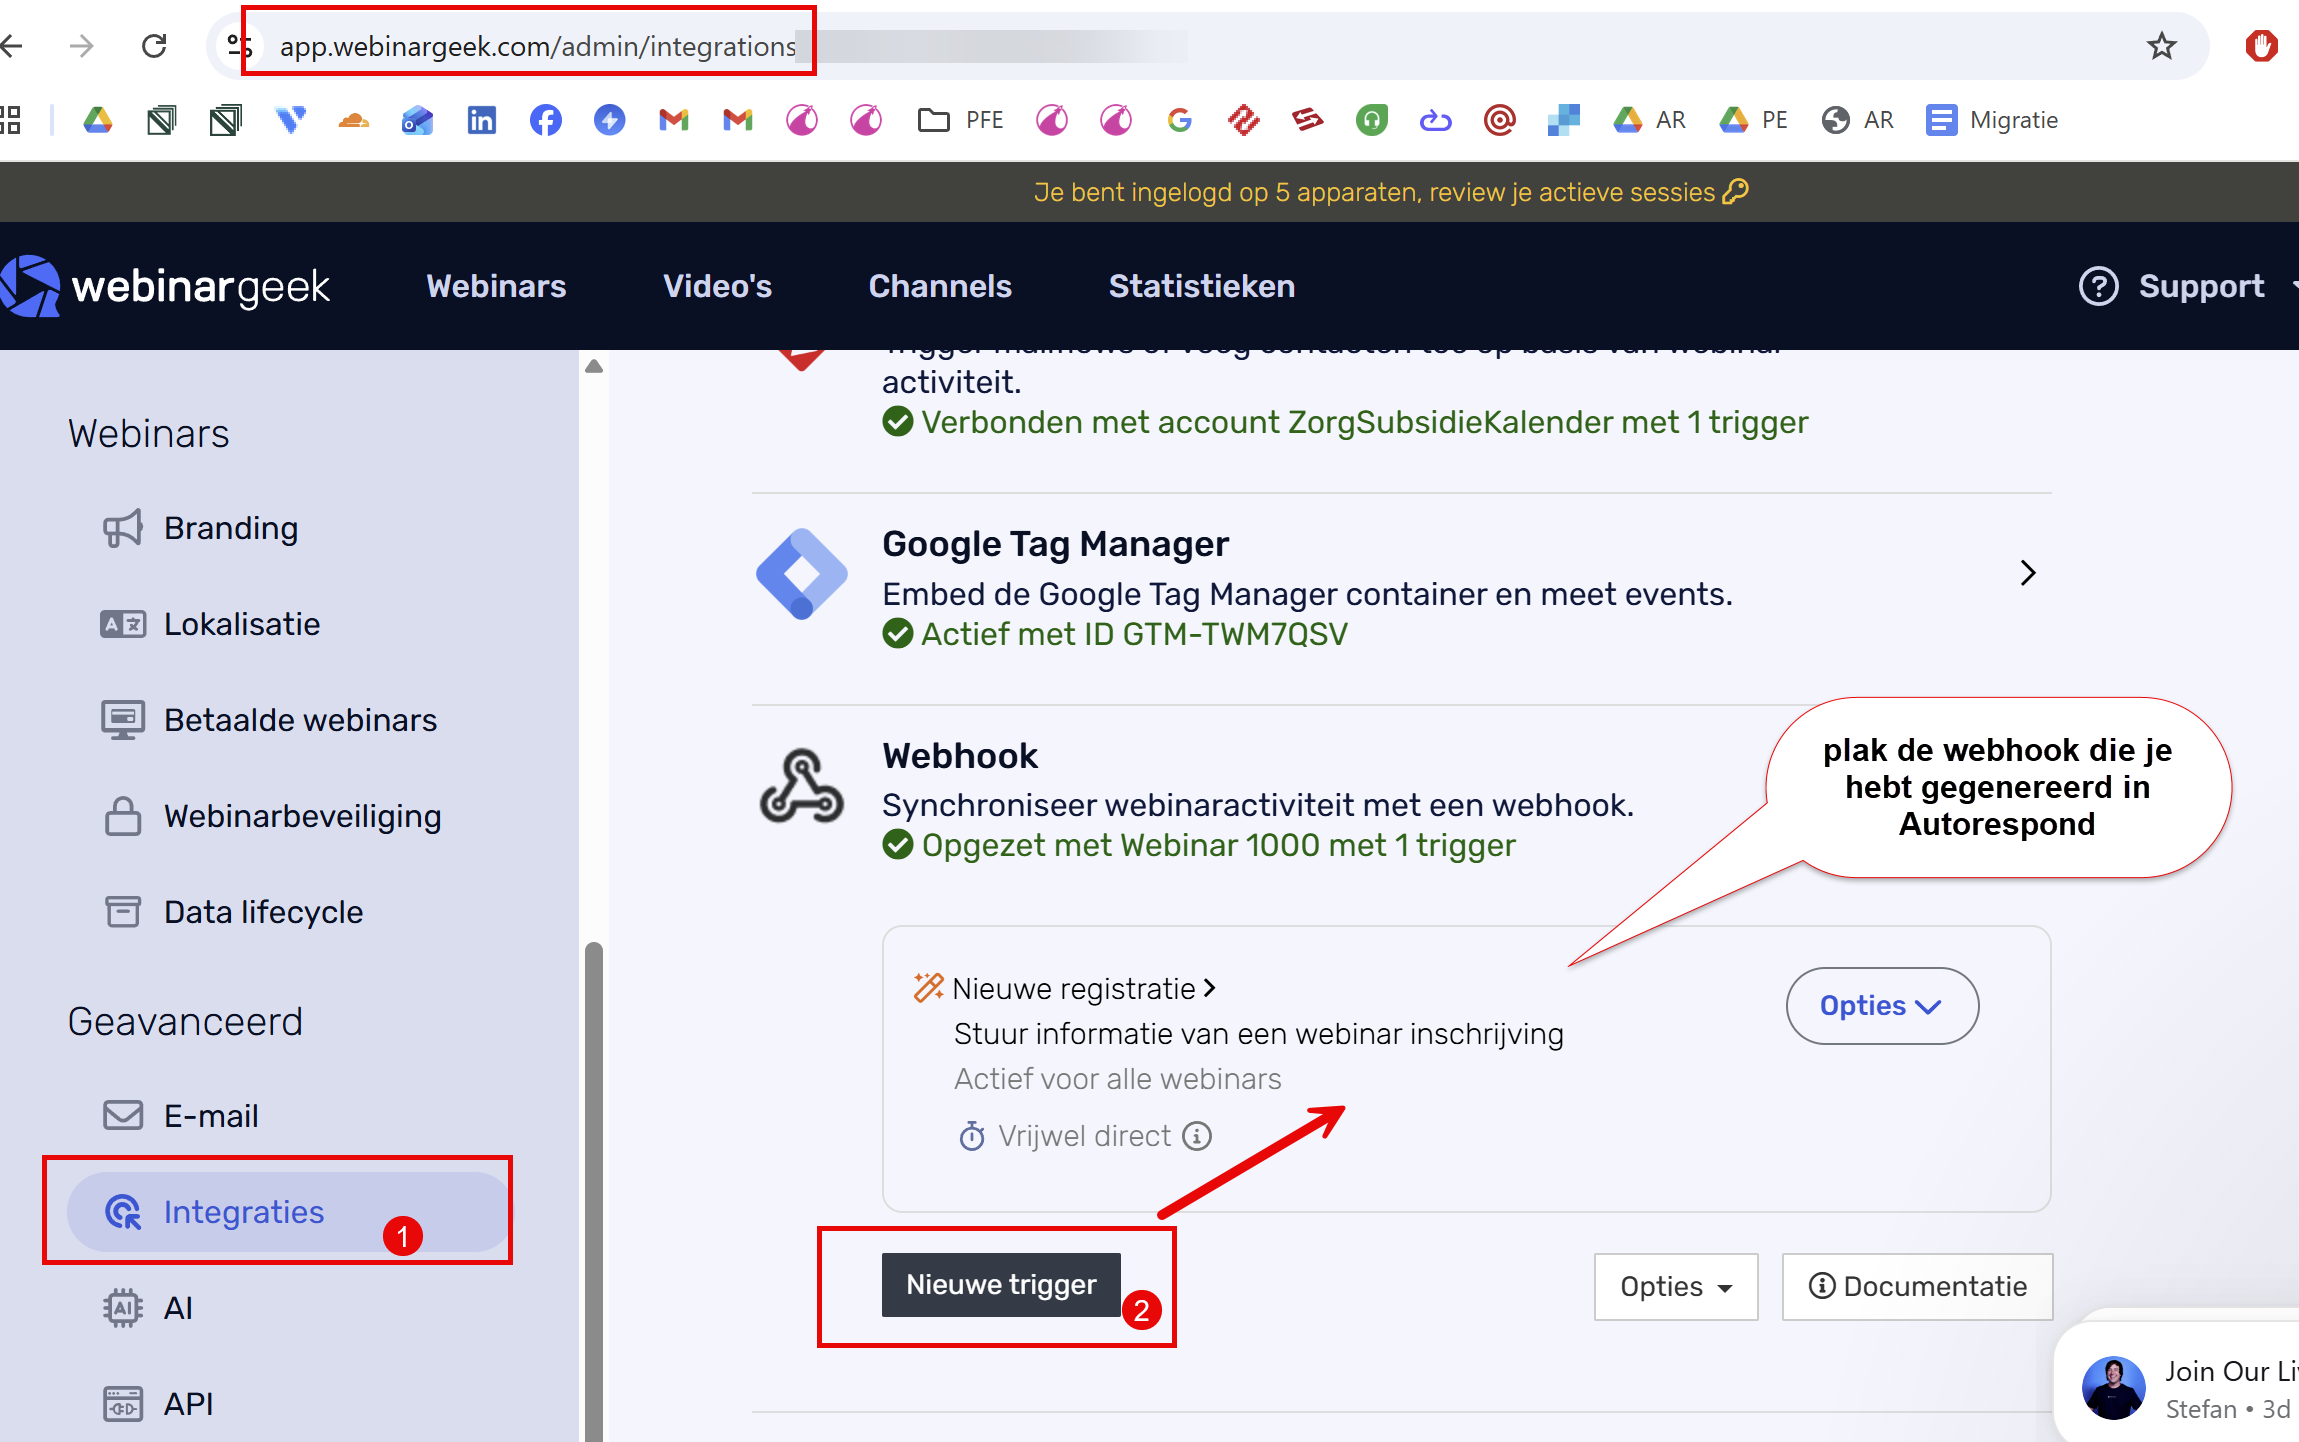
From now on all new webinar sign-ups are forwarded to your Autorespond CRM automatically.
Filtering contacts by webinar attendance #
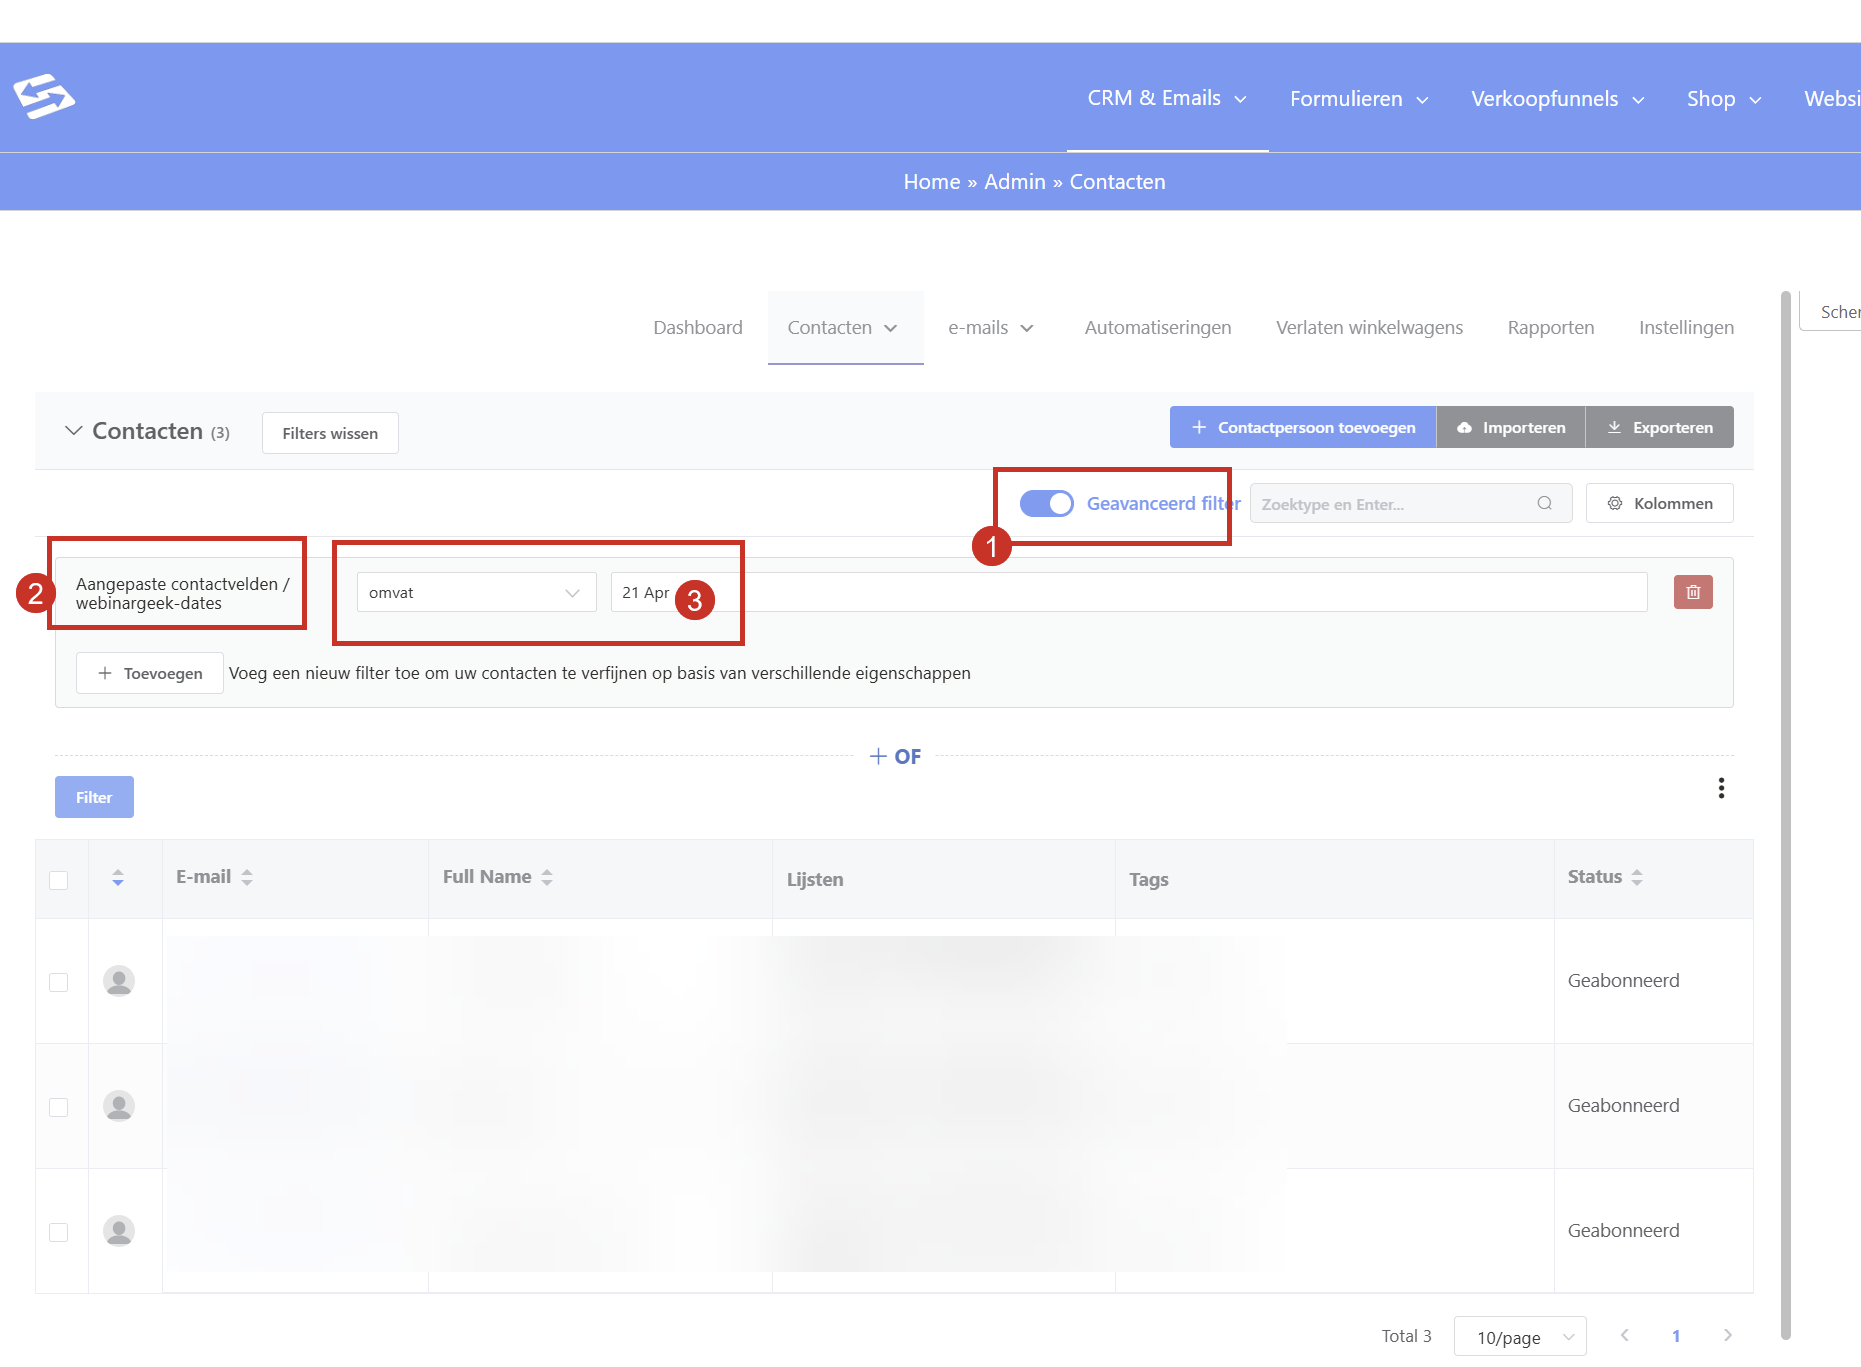
Once the integration is in place you can easily filter contacts by webinar attendance:
- Go to CRM & Emails → Contacts
- Click ‘Advanced filter’
- Choose ‘Contact’ → ‘Custom fields’
- Select the field ‘webinargeek-dates’
- Set the filter condition (‘contains’ + a specific webinar title, for example)
You can also filter on the list ‘WebinarGeek’ to see all the contacts created through this integration.
Automations based on webinar attendance #
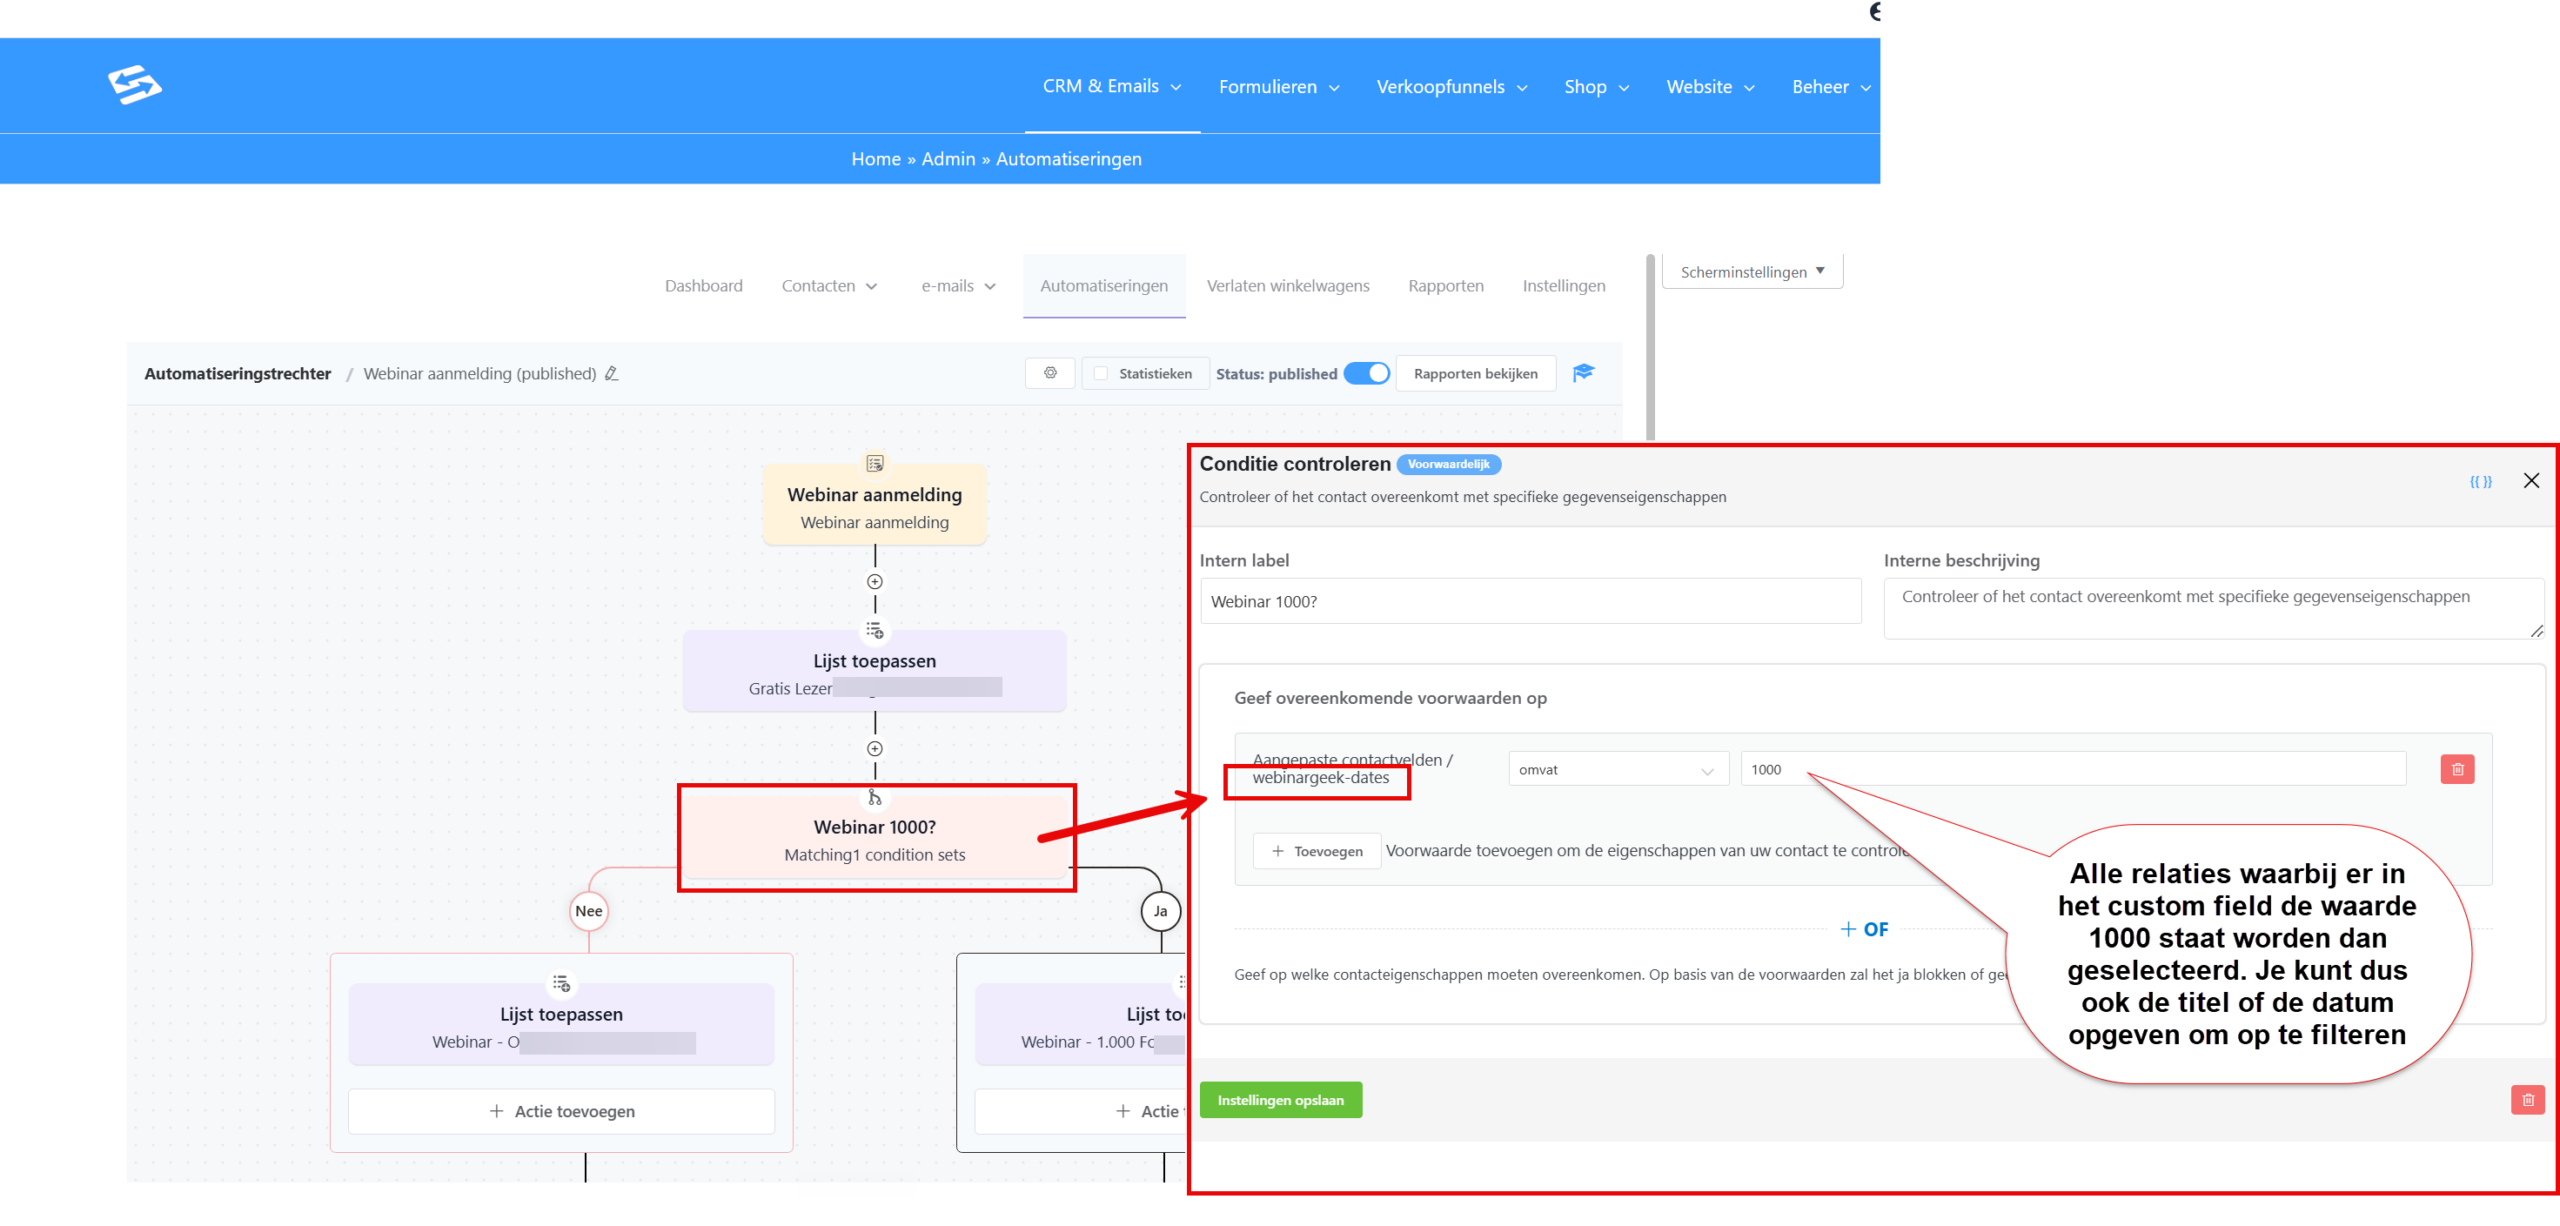
Do you want to give the participants of a particular webinar their own tag, send them a thank-you email or put them in an email sequence? Then you build one automation that starts on the tag the webhook applies, and that then checks per webinar which title is in the field ‘webinargeek-dates’. So you do not need a separate webhook for each webinar, and there is no trigger on a custom field either: the tag from the webhook is the start.
- First check that your incoming webhook applies a tag (step 2, ‘webinargeek-signup’ for example). If you do not have that tag yet, open the webhook via CRM & Emails → CRM Settings → Incoming webhooks and add it under ‘Lists and tags’.
- Go to CRM & Emails → Automations and click ‘New automation’.
- Choose ‘Tag applied’ as the trigger and select the tag from the webhook (‘webinargeek-signup’). Tick ‘Run the automation multiple times’, so that someone who signs up for a later webinar goes through the automation again.
- Add the step ‘Check condition’. For the condition, choose ‘Custom contact fields’ → the field ‘webinargeek-dates’ → ‘contains’ → and enter the title of the webinar exactly as it appears in WebinarGeek (‘October webinar’, for example).
- In the Yes branch, put the actions for that webinar: ‘Apply tag’ with a tag per webinar (such as ‘web-oct2026’), a thank-you email or an email sequence, for example.
- Do you run several webinars? Then put another ‘Check condition’ under the No branch with the title and the tag of the next webinar, and so on. One automation handles all your webinars this way.
- Finish the automation with the action ‘Remove tag’ for the trigger tag (‘webinargeek-signup’). A tag a contact already has does not start the automation again, so by removing it at the end it is applied again at the next sign-up and the automation starts once more.
- Set the automation to ‘Published’ and test it with a sign-up of your own through WebinarGeek.
That way every participant automatically gets the tag of the webinar they signed up for, and you can follow up in a targeted way per webinar.
How the data is stored #
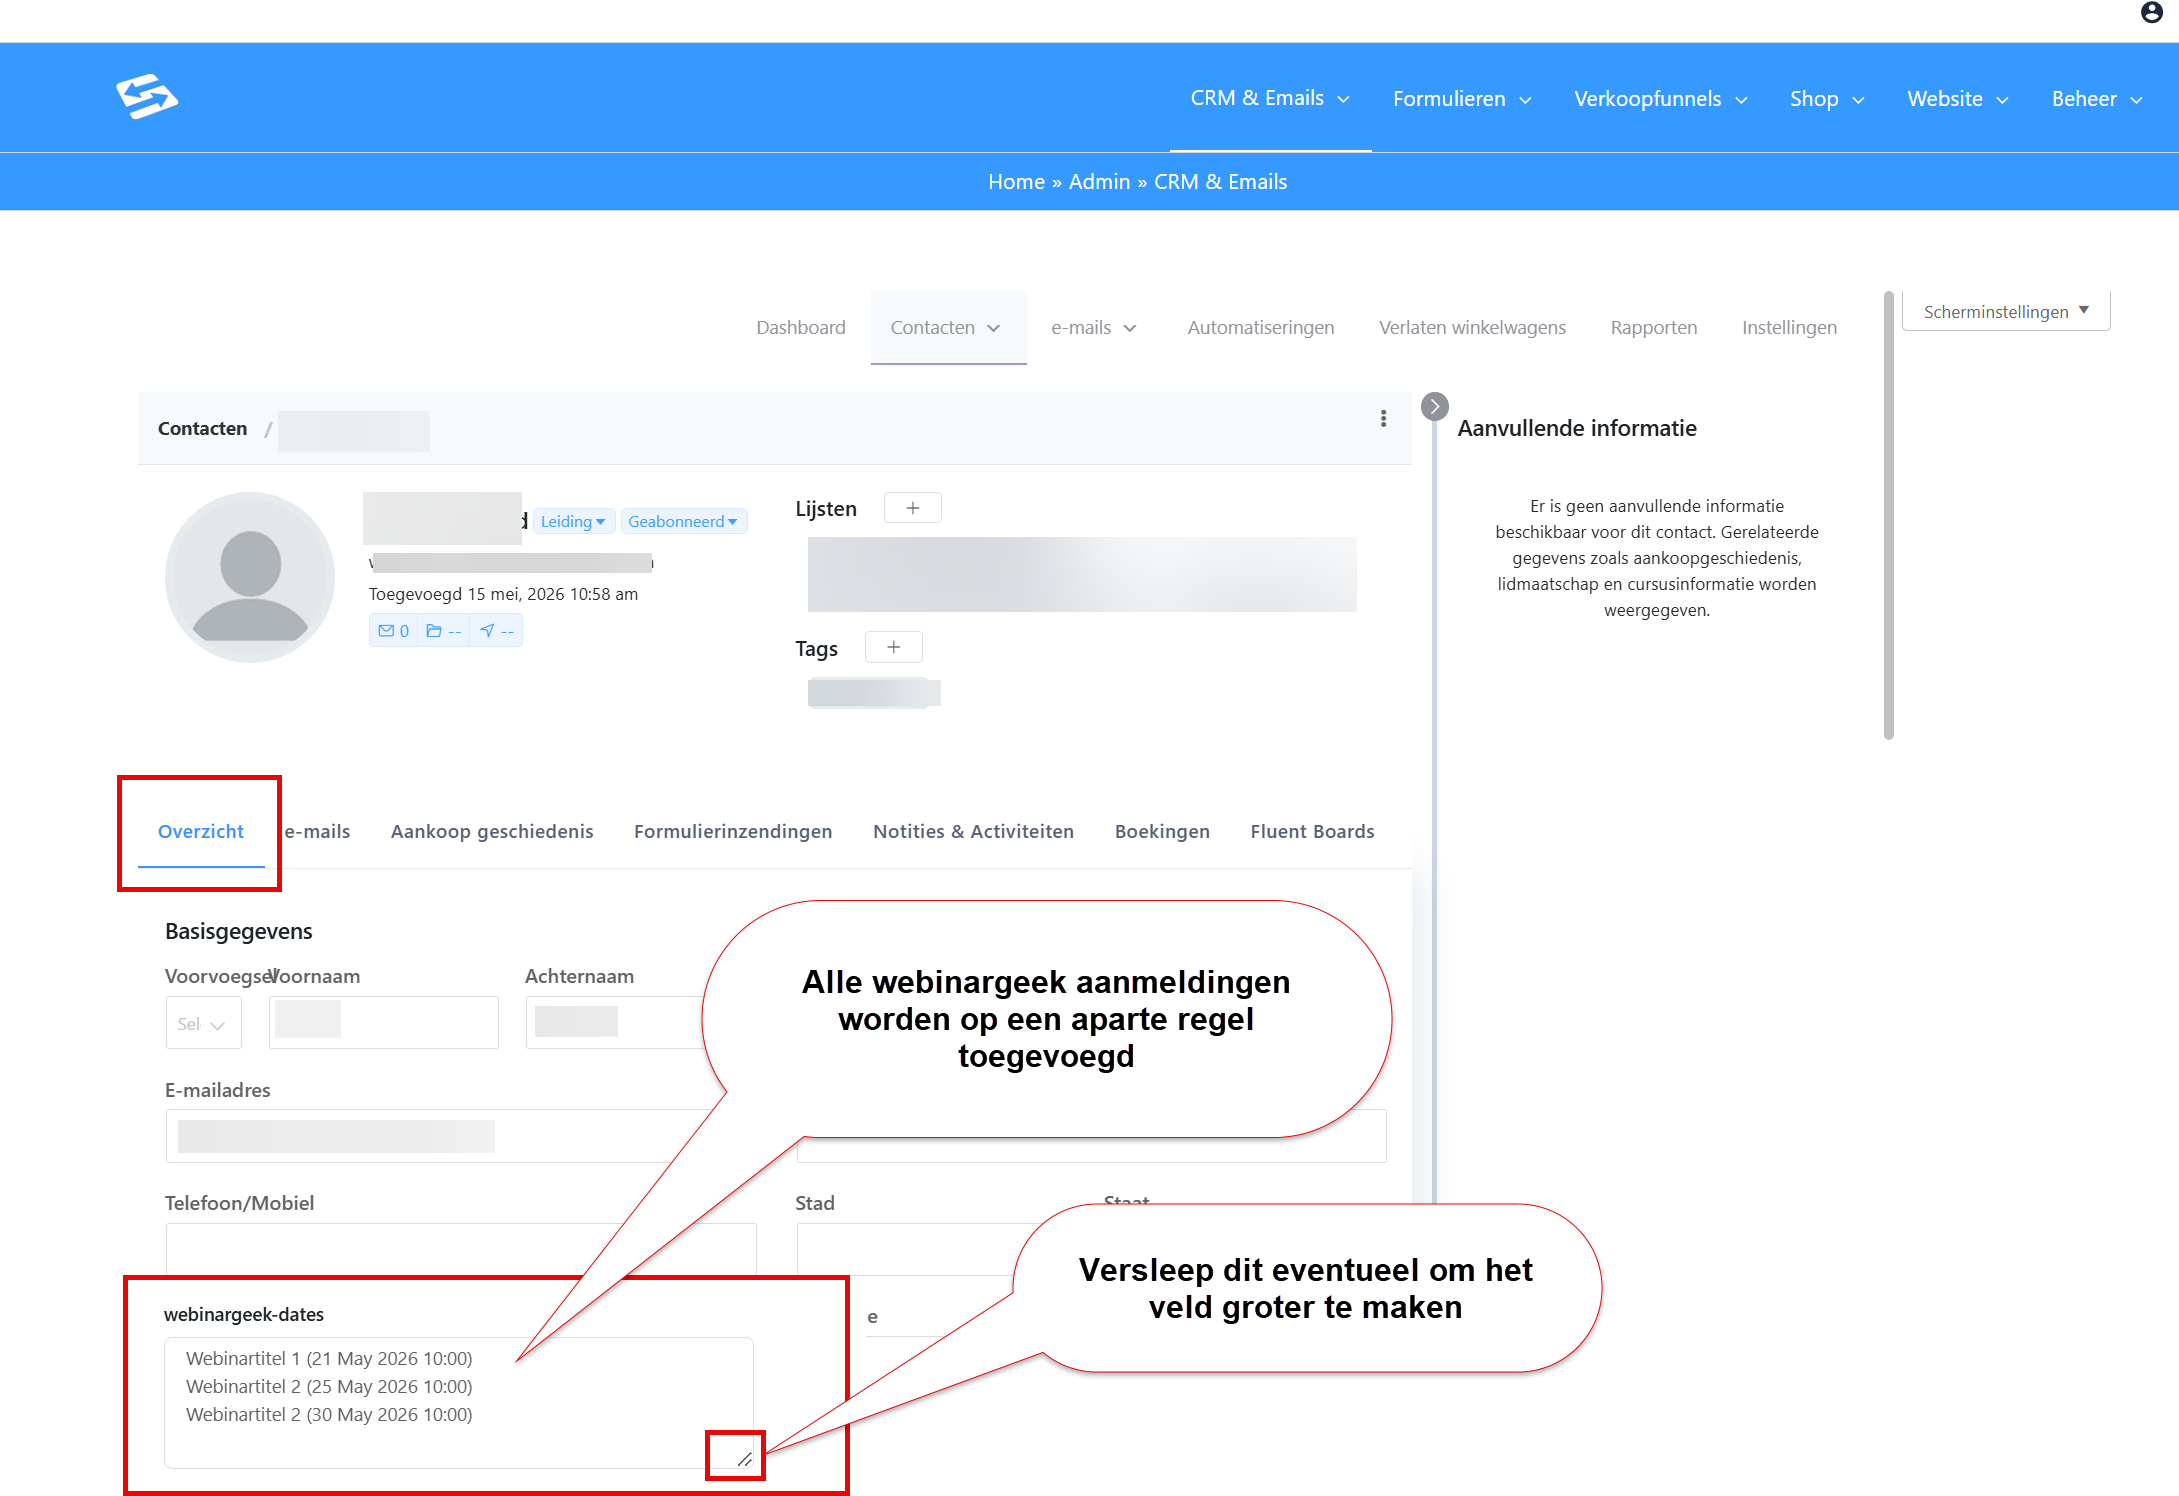
With every webinar sign-up the following data is added to the contact:
- The webinar title and date are put on a new line in the field ‘webinargeek-dates’
- The contact is added to the list ‘WebinarGeek’
- Existing contact details are updated if the email address is already known
This way you keep a complete history of all the webinars each contact has taken part in.
Related articles #
For more information about the topics in this article, see also:
Frequently asked questions #
Do I have to create the field ‘webinargeek-dates’ myself? #
No. When you switch the integration on via Administration → Integrations, this field is created automatically with the right settings. You will find it under CRM & Emails → CRM Settings → Custom fields.
Are existing contacts updated if they sign up again? #
Yes, if an existing contact signs up for a new webinar, the webinar information is added to the existing contact profile. The new webinar data goes on a separate line in the field ‘webinargeek-dates’.
Can I test the integration before I run a real webinar? #
Yes, you can create a test webinar in WebinarGeek and sign yourself up. Then check in Autorespond whether your contact has been created correctly with the right data in the custom field.
The tile says ‘Active via snippet’, what does that mean? #
It means the integration is still running on your environment through an earlier installation method. The integration works as normal; the switch on the tile appears by itself once that old installation has been converted.
What happens if the webhook temporarily stops working? #
If the webhook connection is temporarily interrupted, sign-ups are lost. Check regularly that new webinar sign-ups are arriving correctly in Autorespond. If there are problems, check the webhook settings again.


