Do you sell your programmes, courses or memberships through your Autorespond environment while your community or learning environment sits in Huddle? Then you do not want to create someone in Huddle by hand after every order. With an outgoing webhook your environment passes that access on by itself: the customer pays and the account is ready in Huddle within a few seconds. You do not need an extra plugin or a middleman such as Zapier for it.
Automations in Autorespond are based on FluentCRM, included in your package. Read the English documentation
How does the integration work? #
The integration consists of two parts. Huddle supplies an address (a URL) that you may send your new members to. That address holds two fixed details: your API key and the ID of the access level someone has to receive. When an event happens, a purchase for example, your Autorespond environment automatically sends the name and the email address to that address. Huddle creates the account and sends the participant the login details itself.
The traffic goes one way: from your environment to Huddle. Nothing in your webshop is ever changed from Huddle. You create one automation per access level. If you sell three programmes that each give a different level in Huddle, you build that automation three times, each time with a different URL.
What you need #
Two details from your Huddle environment:
- Your API key. You will find it in the Huddle admin area under Settings → Integrations → Webhooks. It is a code along the lines of 2HRA-PESSH-44889-DD55T.
- The ID of the access level the customer has to receive. That is the number shown with the access level in question in Huddle, 11244 for example. In the Huddle documentation this is also called the SKU or the Zapier ID.
Cannot find your way around Huddle? Huddle has its own documentation about it in the Integrations section of their help centre. Keep both details to hand, you need them in the next step.
Step 1: build your webhook URL #
Put the two details into this address:
https://members.yourwebsite.com/membership/create/API-KEY/ACCESS-LEVEL-ID?provider=autorespondFilled in, that looks something like this:
https://members.yourwebsite.com/membership/create/2HRA-PESSH-44889-DD55T/11244?provider=autorespondWatch out for three things:
- Replace members.yourwebsite.com with the address of your own Huddle environment.
- The part /membership/create/ always stays the same. After it comes your API key first and then the ID of the access level.
- You must not leave out ?provider=autorespond. It tells Huddle that the registration comes from your Autorespond environment. Without that part the request is not processed properly.
Have the complete URL ready, in a notepad for example. You paste it in step 5.
Step 2: create a new automation #
In your environment, go to CRM & Emails → Automations.
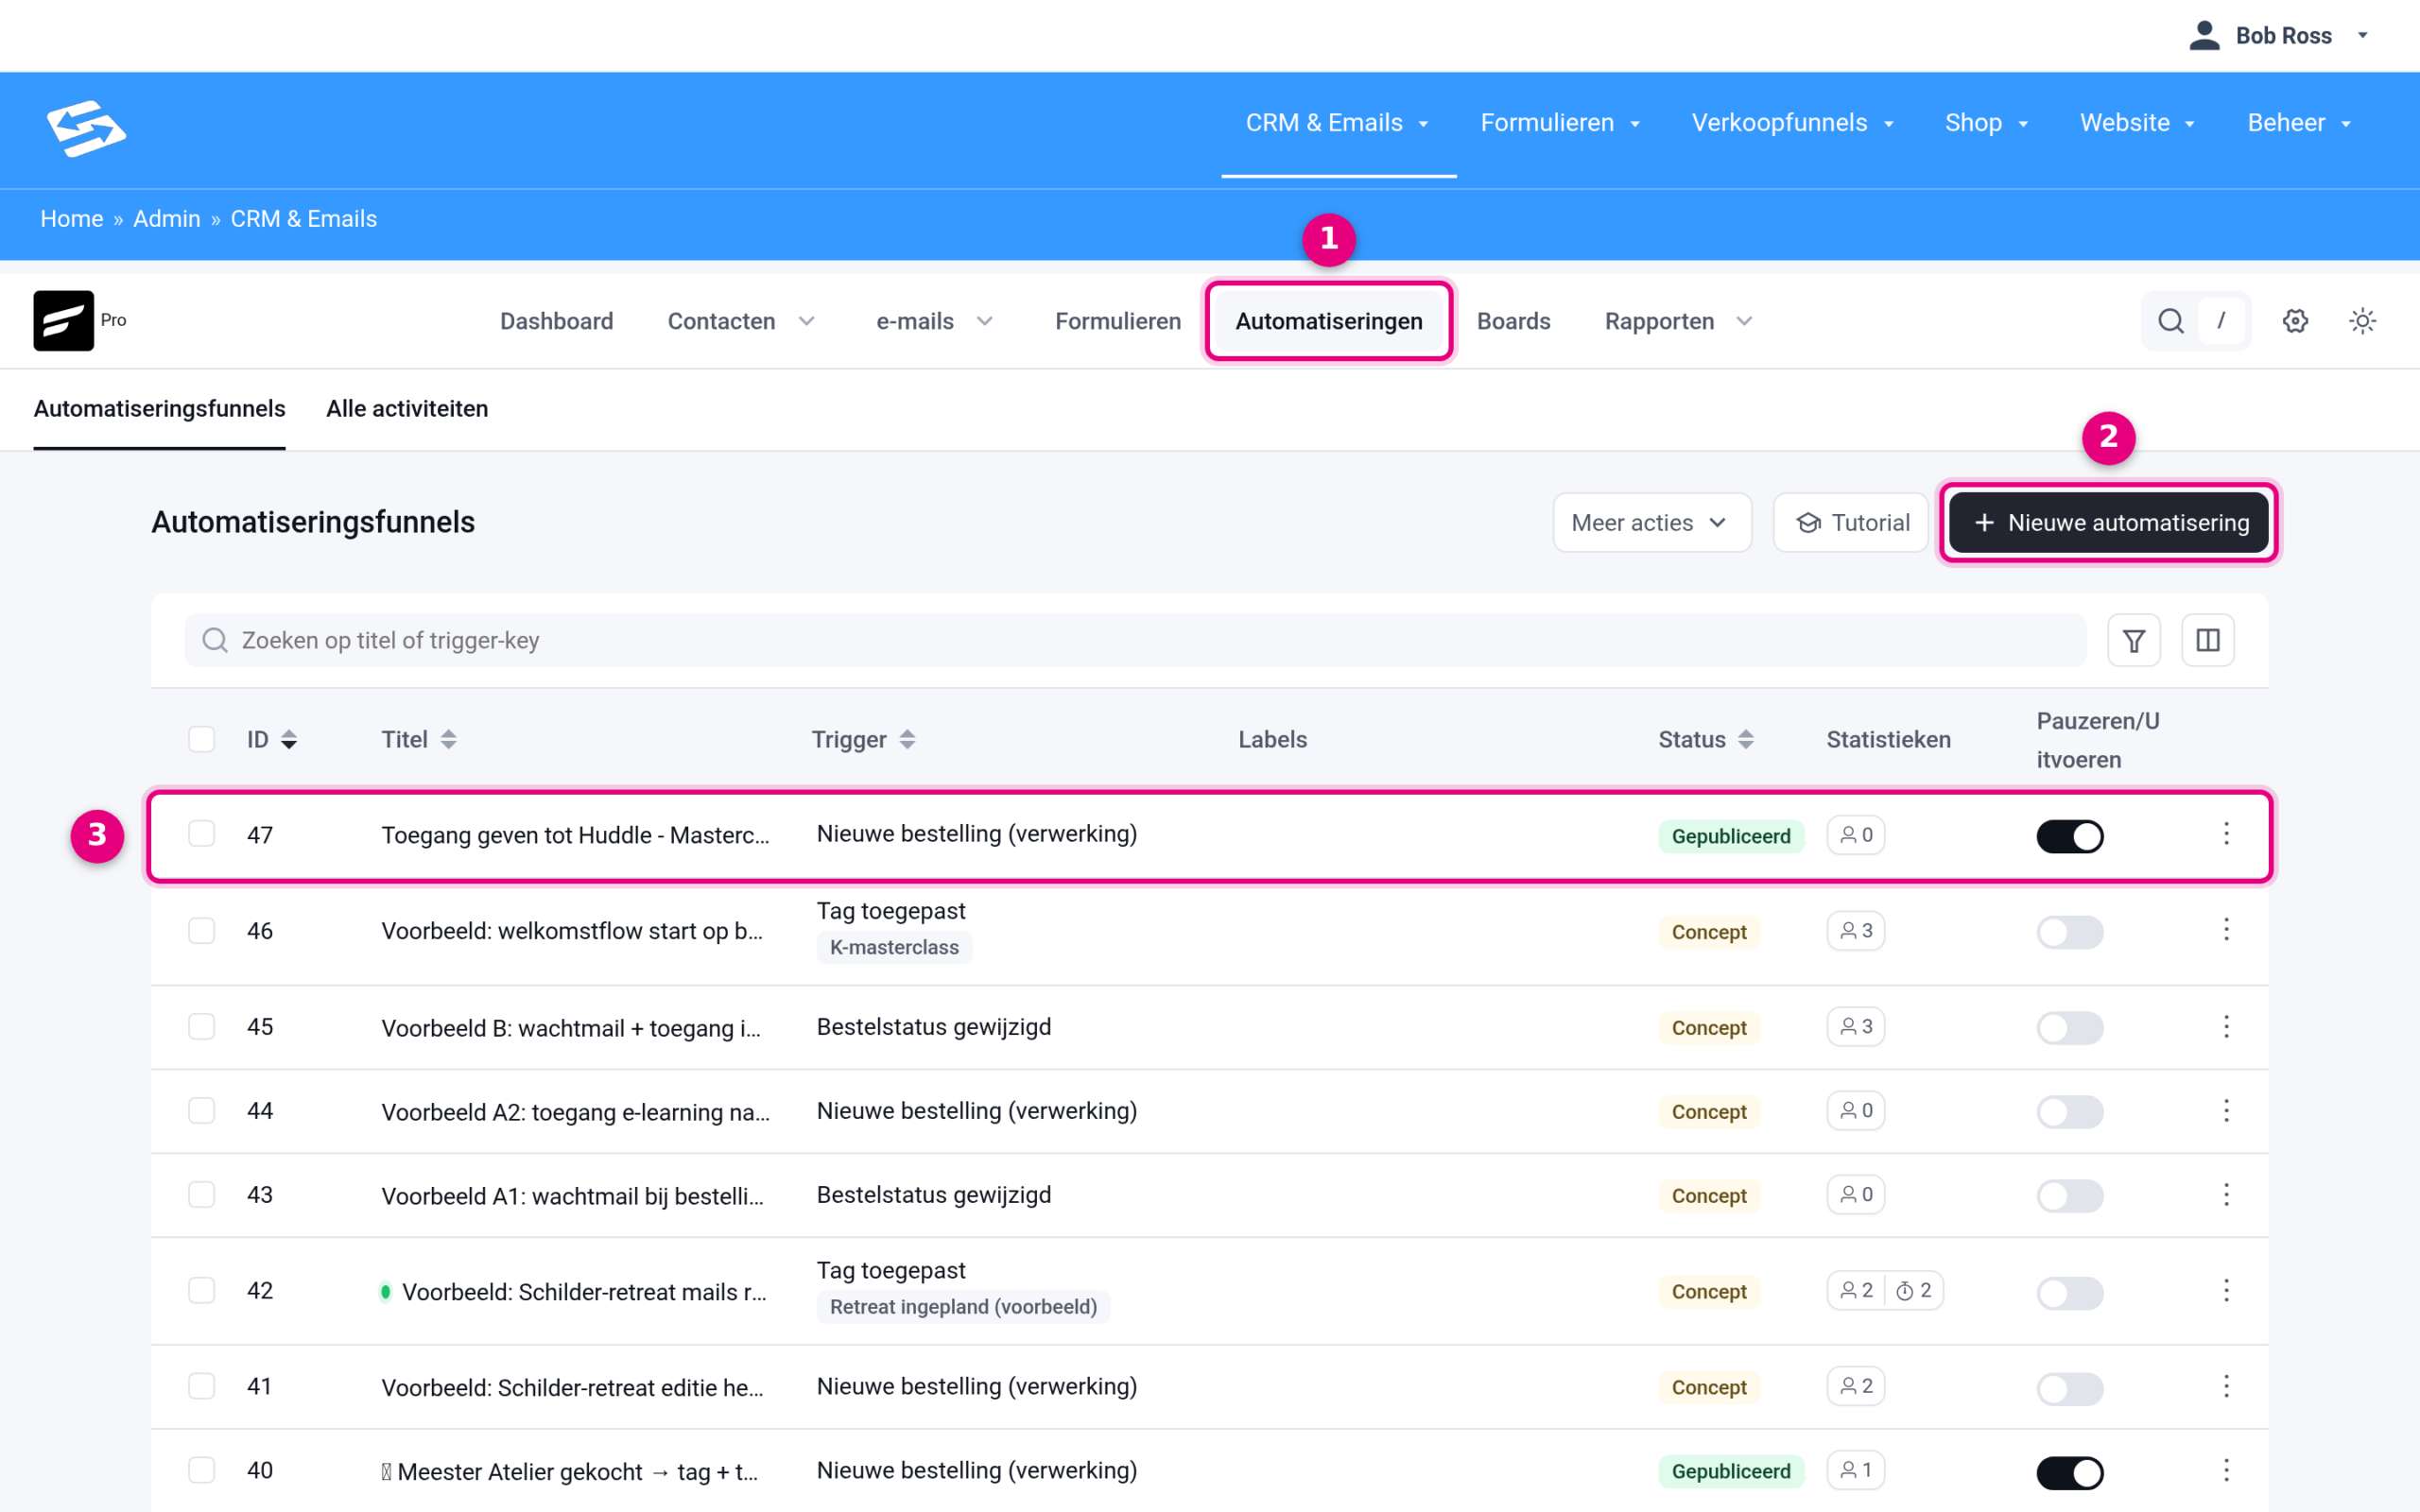
- Automations is the tab where you manage all your automatic processes. Everything that is “if this happens, then do that” is built here.
- With New automation you start a new one. Click it.
- This is what an existing automation looks like in the overview. At a glance you see the trigger it starts on, the status (Draft or Published) and how many contacts have gone through it. With the switch on the right you turn it on or off temporarily.
Step 3: choose what the automation starts on #
After clicking New automation you choose the trigger: the event that sets the automation in motion.
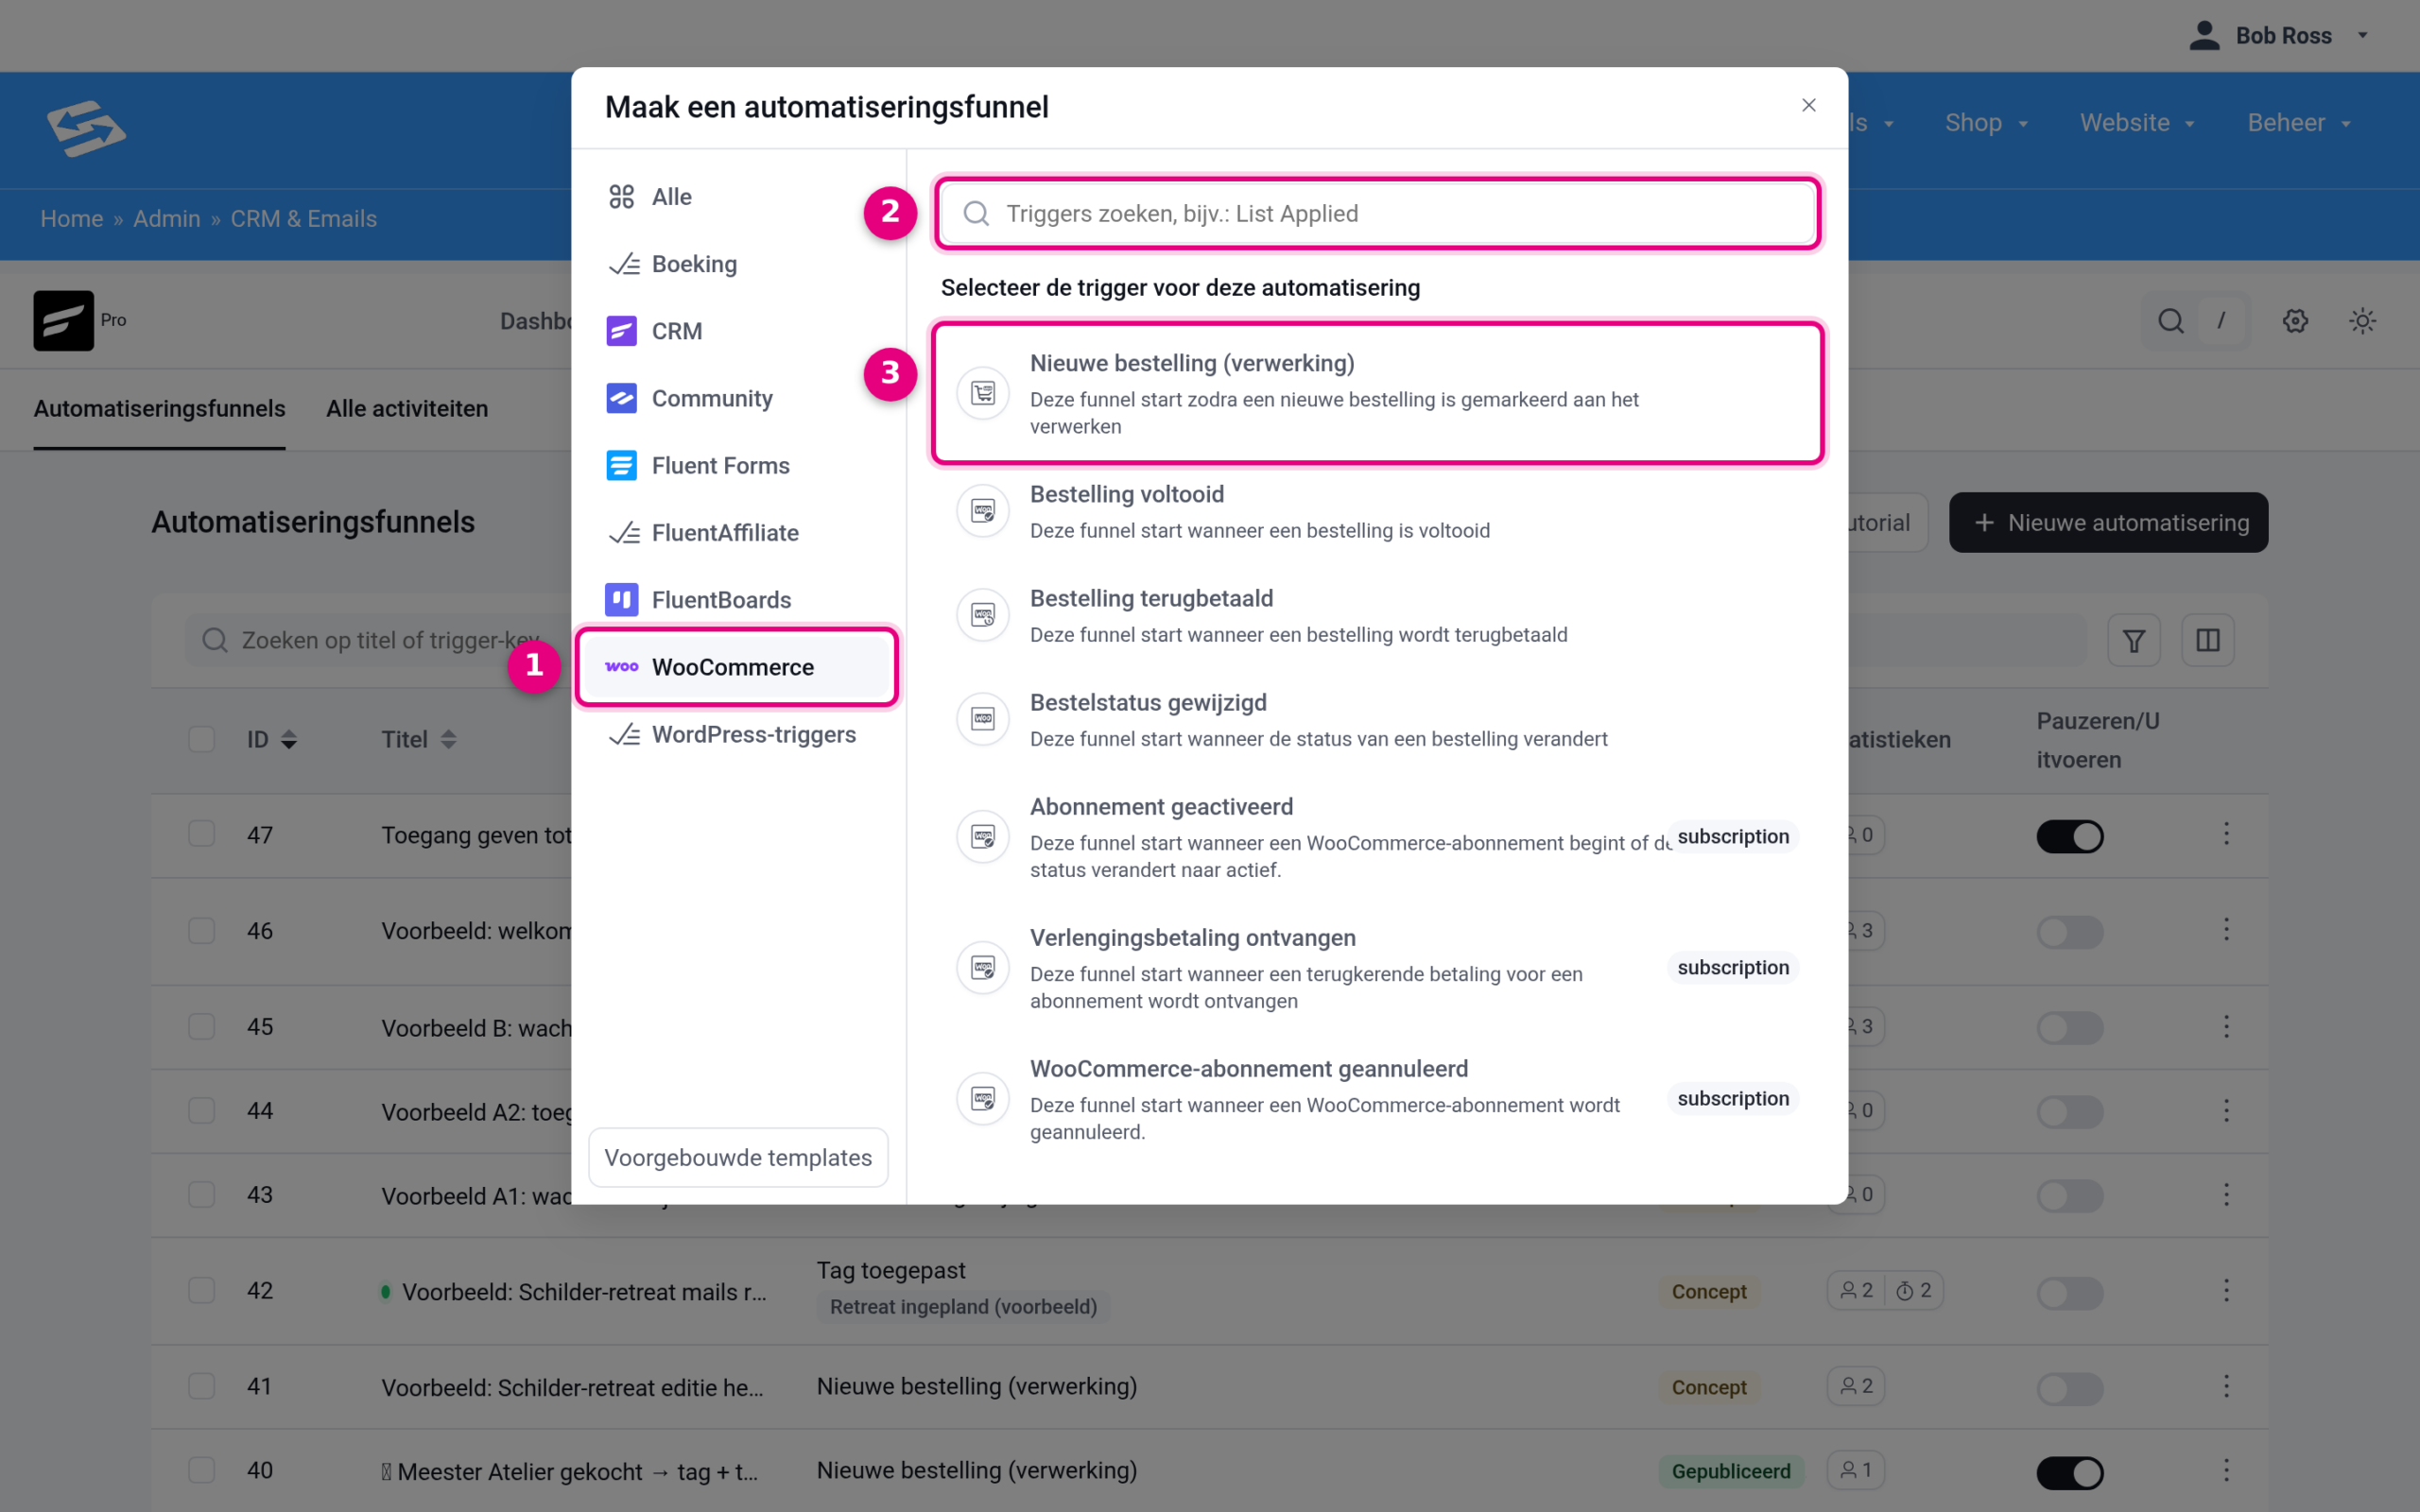
- The categories are on the left. If you give access after a purchase in your own webshop, choose WooCommerce.
- Do you already know the name of your trigger? Then type it in the search field.
- Choose New order (processing). That starts as soon as an order has been paid. This is usually what you want: someone pays and gains access straight away.
Other triggers that can make sense with this integration:
- Tag applied (CRM category): handy if you do not want to tie the access to one product, but decide yourself who gets it. Everyone who receives the tag, through an order, a form or by hand, enters the automation.
- New form submission (Fluent Forms category): for free sign-ups through a registration form.
- Subscription activated (WooCommerce category): if the access belongs to a running subscription.
You can read more about choosing a trigger in Setting up automation triggers.
Step 4: decide who the automation applies to #
You now arrive at the settings screen of the trigger. Here you set out exactly which purchase it concerns.
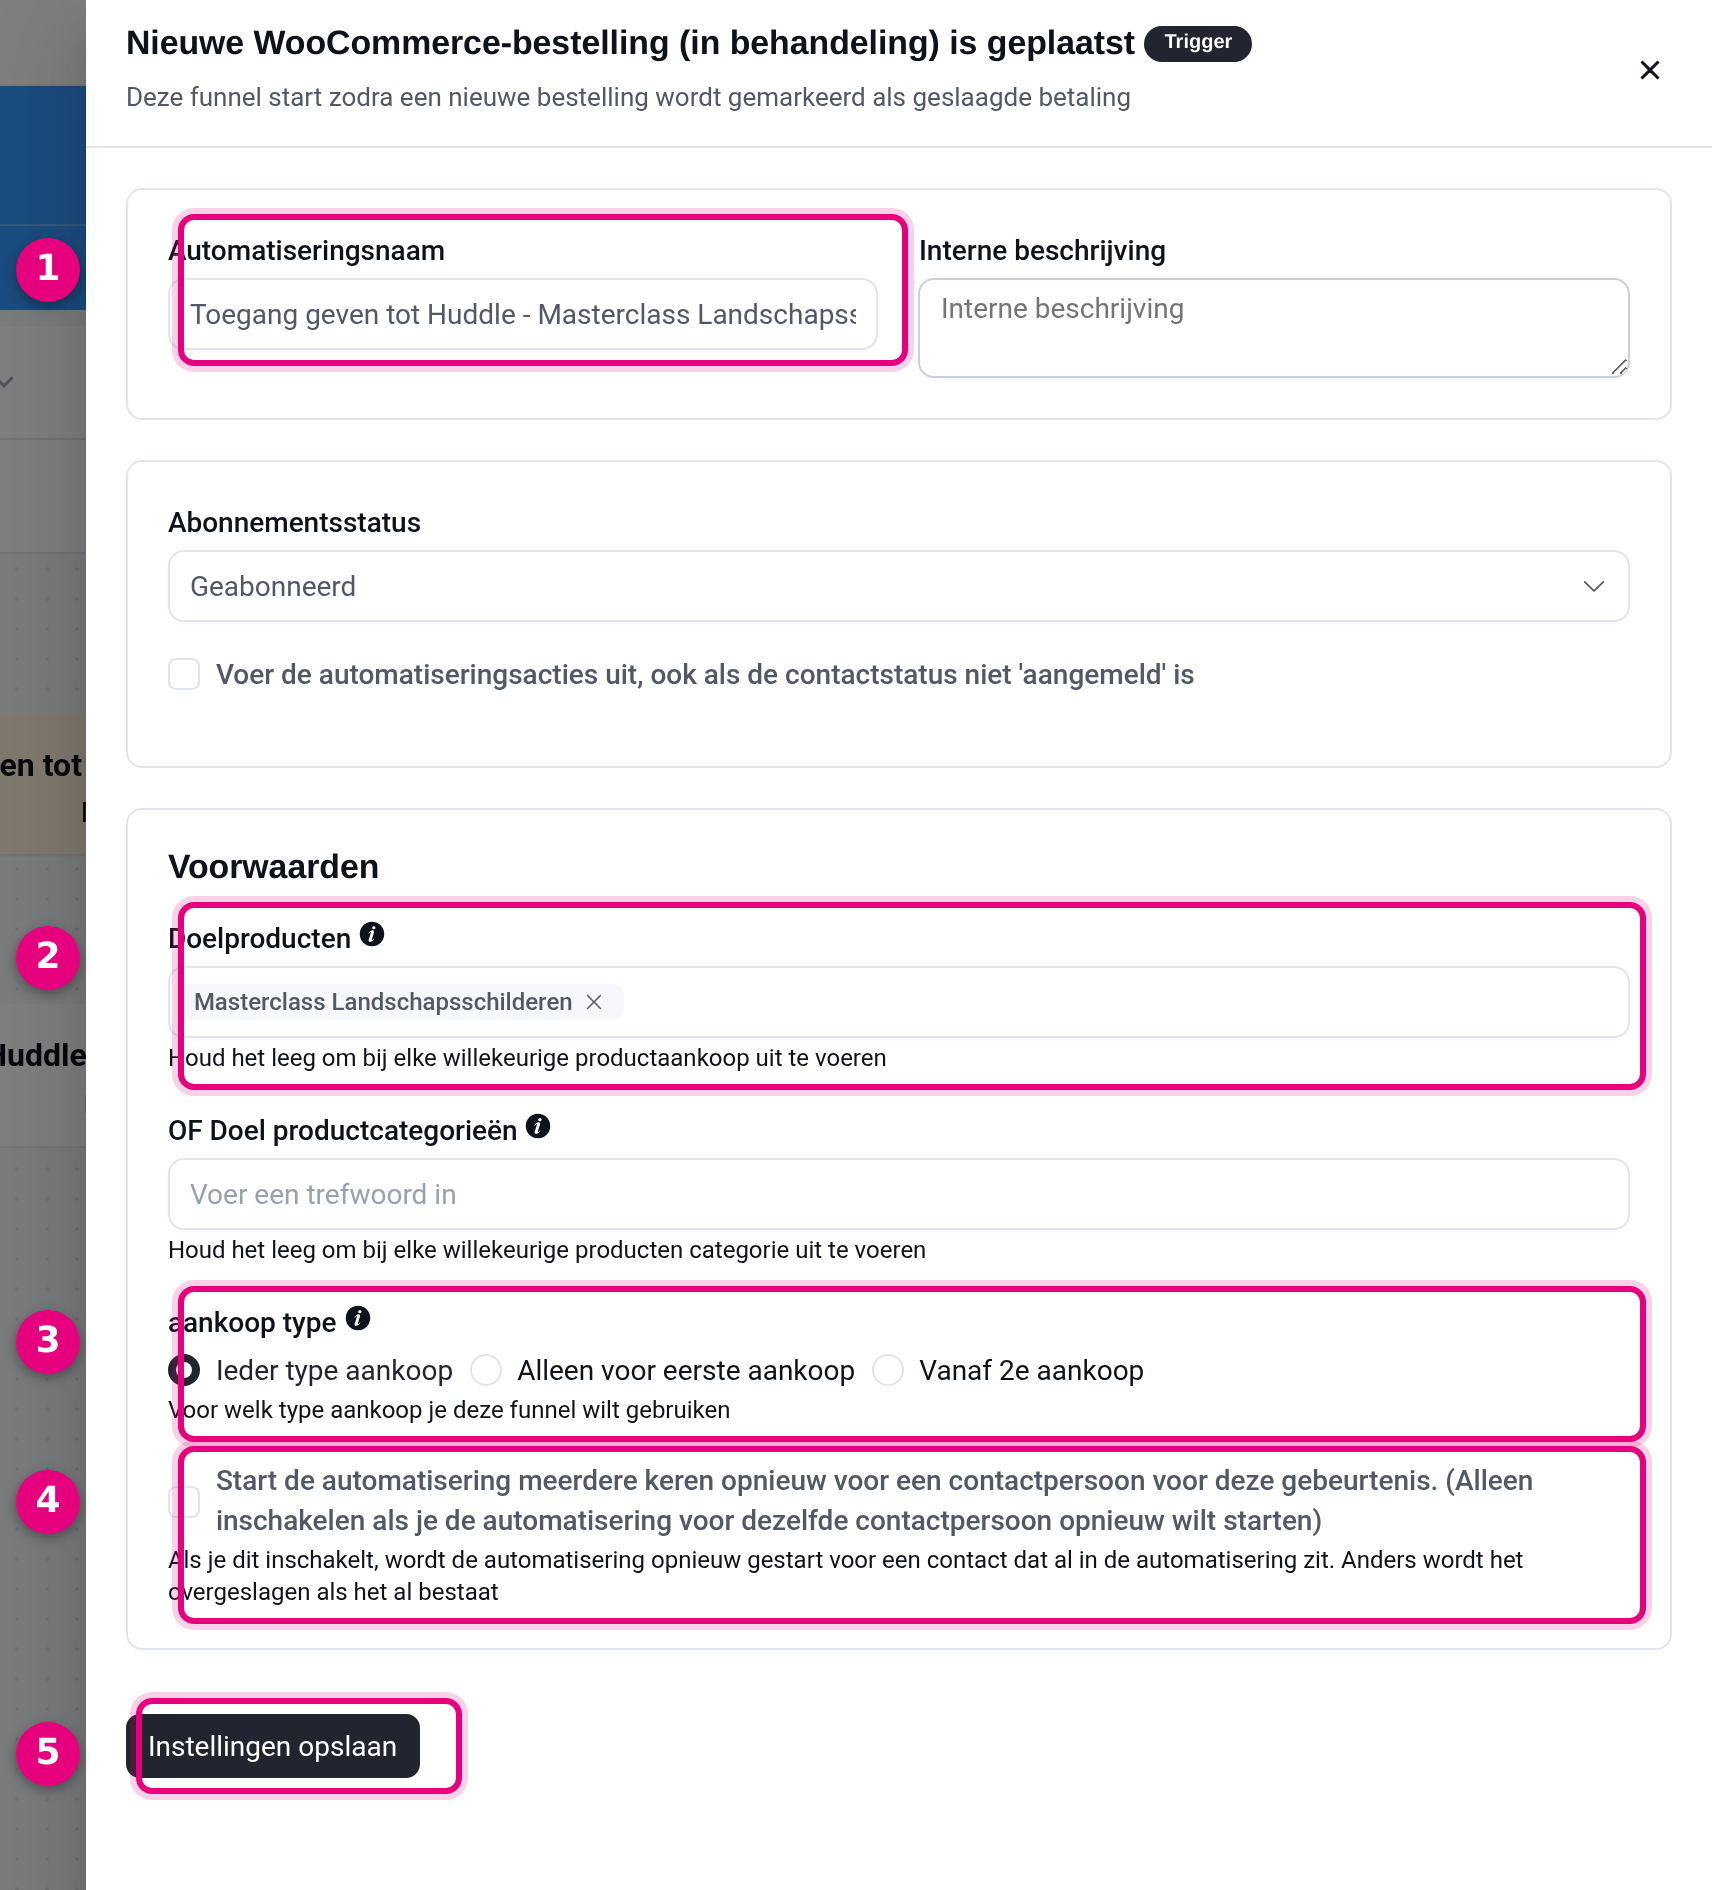
- Give the automation a name you will recognise later, for example “Give access to Huddle – Masterclass”. This name is for you alone.
- Under Target products you choose the product that grants the access. This is the most important setting: if you leave it empty, every order in your shop enters this automation and everyone gains access to Huddle. So always choose your product deliberately.
- Under purchase type you leave “Any type of purchase” as it is. Only if you want to give access exclusively to new customers do you choose something else.
- Run the automation more than once for a contact. This box is unticked by default, and that is precisely why a returning customer sometimes gets nothing on their second order: anyone who has already been through this automation once is skipped. If you sell something the same person can buy more than once, separate modules or a renewal for example, tick this box.
- Click Save settings.
You leave the Subscription status option above it on “Subscribed”. That puts the buyer in your CRM as a subscribed contact straight away.
Step 5: add the webhook action #
You now see your automation as a diagram: the trigger at the top, and below it a plus button with which you add steps. Click that plus button below the trigger.
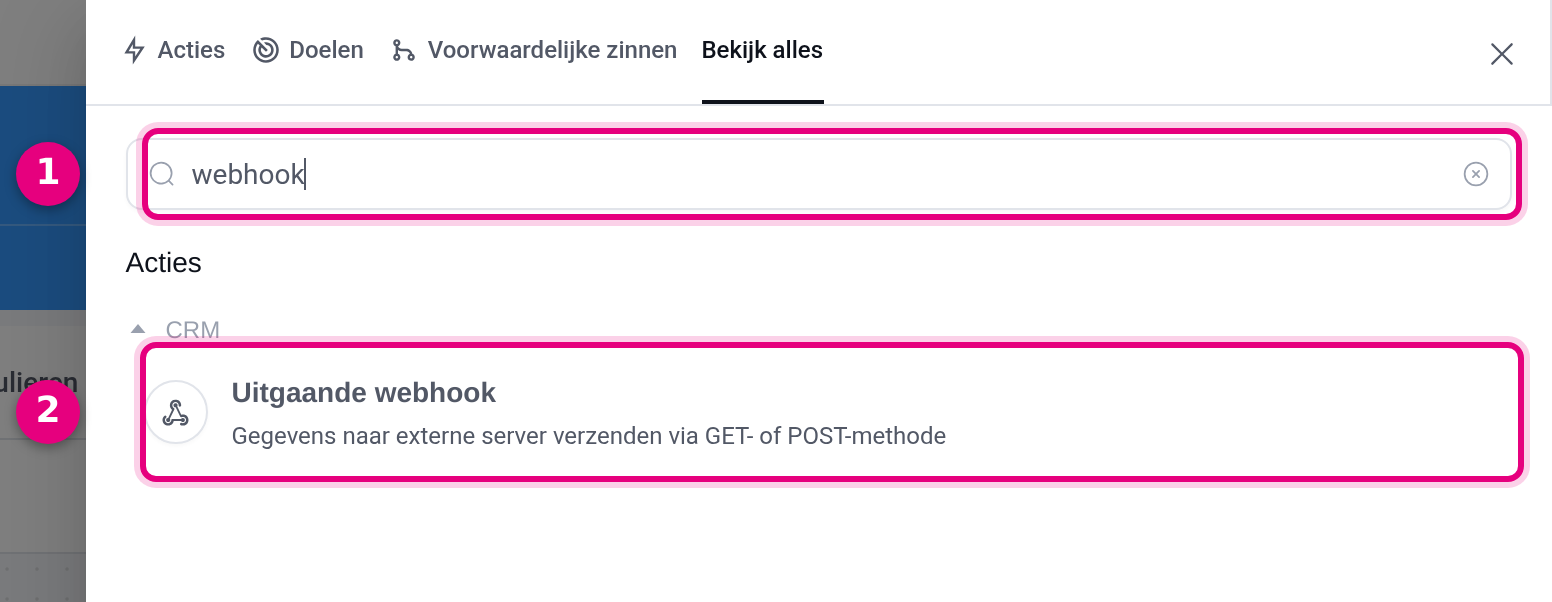
- Type webhook in the search field. That saves you scrolling through the whole list of actions.
- Choose the block Outgoing webhook (“Send data to an external server using the GET or POST method”). This is the block that sends the data to Huddle.
Step 6: fill in the webhook settings #
This is the heart of the integration. Copy the settings exactly as below.
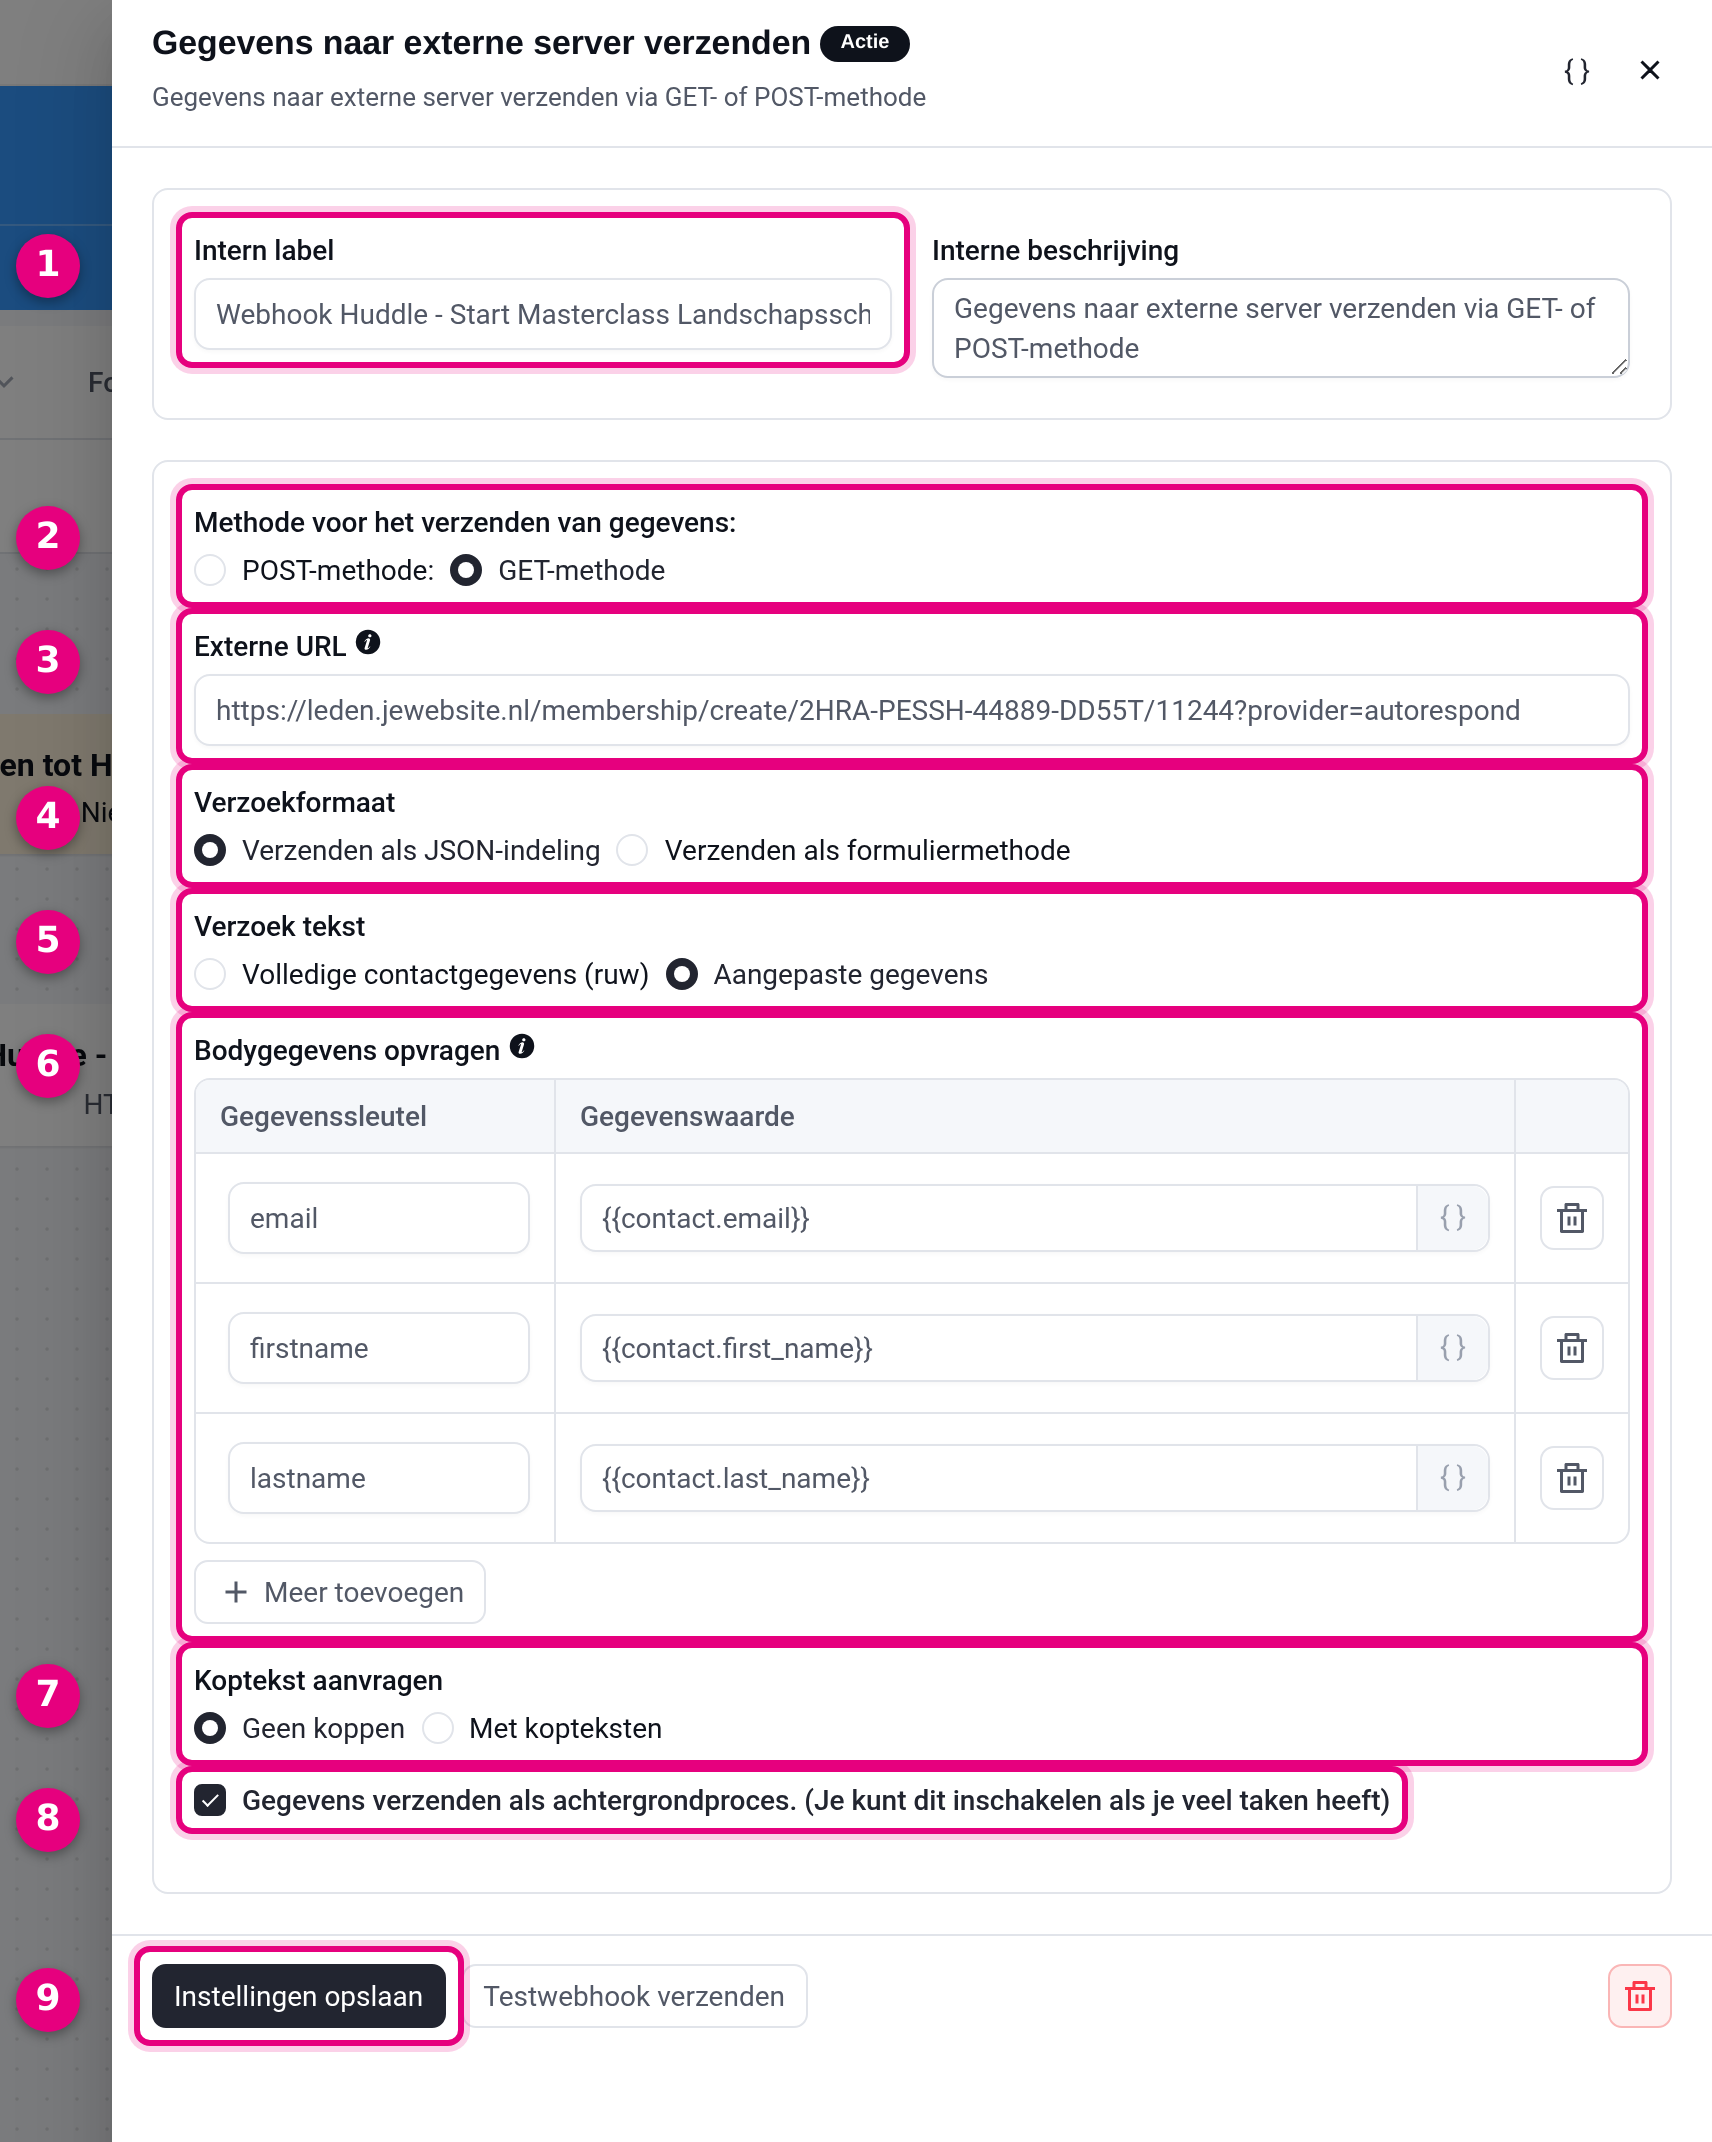
- Internal label: a recognisable name for this step, for example “Webhook Huddle – Start Masterclass”. Purely for you, the customer never sees it.
- Method for sending data: choose GET method. Huddle expects the data this way.
- External URL: paste the complete URL you built in step 1 here, including ?provider=autorespond.
- Request format: leave it on “Send as JSON format”.
- Request body: choose Custom data. With the other option (“Full contact data (raw)”) you send the whole contact profile along, and Huddle cannot use that.
- Request body data: here you decide which fields are sent along. On each line, enter the name of the field on the left and the matching merge code on the right. See the table below this list. With Add more you create extra lines.
- Request headers: leave it on “No headers”. Huddle does not need any extra headers.
- Send data as a background process: leave this box ticked. Your customer then does not have to wait for Huddle during checkout.
- Click Save settings. Next to that button is Send test webhook, with which you send a test request straight away. See the next step.
| Data key | Data value | Needed? |
|---|---|---|
| {{contact.email}} | Required | |
| firstname | {{contact.first_name}} | Required |
| lastname | {{contact.last_name}} | Optional |
Without an email address Huddle cannot create an account, and without a first name Huddle cannot address the participant properly. The last name is optional, but it does make things complete. Copy the merge codes exactly as they appear in the table, with double curly brackets, or click the curly bracket icon after the field and choose the code from the list.
Step 7: testing and switching on #
Test first, and only then open it up to your customers.
- In the webhook screen, click Send test webhook. Then check in Huddle whether a user has been added, and delete that test user again.
- Do you want to test the whole route, from order to Huddle? Then temporarily put a test product under Target products (step 4) that only you can order, place an order yourself and check the result. Put the real product back afterwards. Do not do this with the automation on Draft: an automation that is not published does nothing at all, so you cannot test it then either.
- Finally, set the automation to Published in the top right.
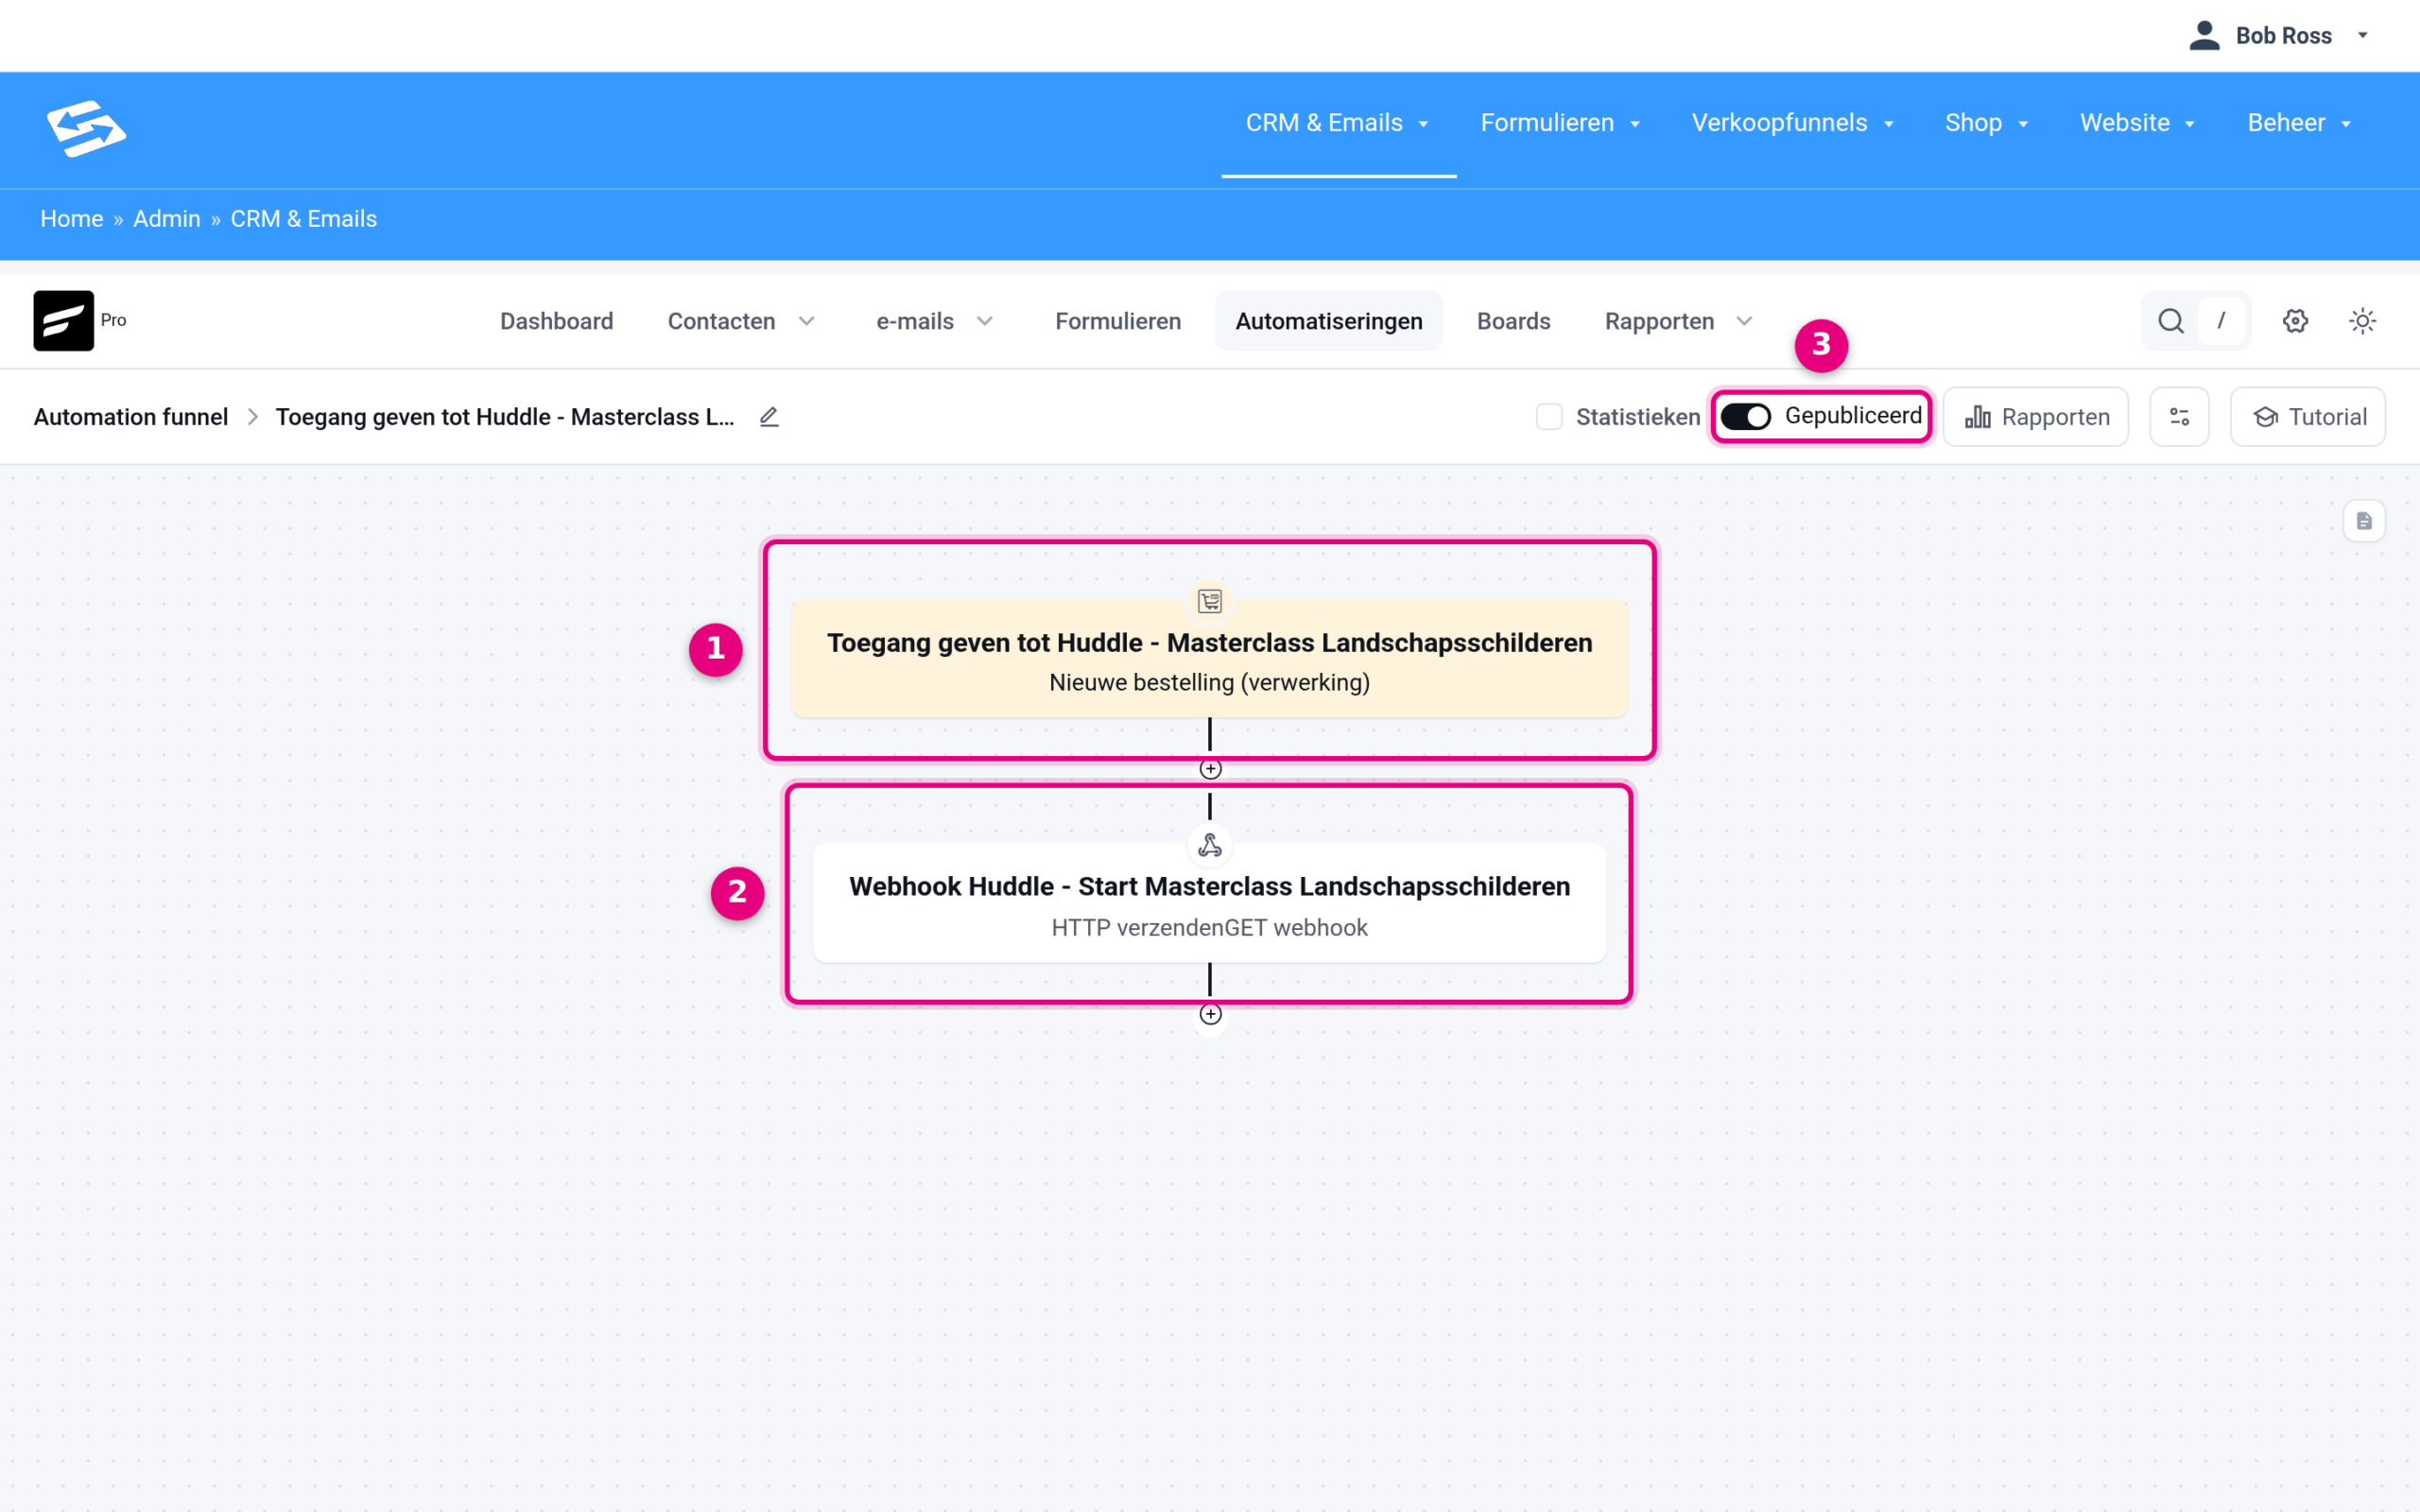
- The trigger: the order that starts the automation.
- The webhook action: the step that sends the data to Huddle. Click it to open the settings again.
- The status Published. If it is on Draft, nothing happens. So do not forget this switch.
From now on it runs by itself. Under Reports, top right in the automation, you see how many customers have gone through it.
Would you rather keep everything inside Autorespond? #
Are you not working with Huddle yet, or are you thinking about moving your community and courses? Autorespond has an extension of its own for that: Community & courses. With it, your members, your community and your course material sit in the same environment as your webshop, your contacts and your emails.
In practice that saves you three things:
- No integration needed any more. In your automation you then do not choose a webhook, but the ready-made actions Enrol in courses or Add to space from the Community category. All the other steps in this guide stay the same.
- One login for your customer. Your participant logs in at the same place where they ordered, and does not have to remember a second account.
- Everything visible in one place. What someone has bought, which lessons they complete and which emails they receive are all in the same contact profile. You can start automations on that as well, a follow-up offer as soon as someone completes a course, for example.
Do you want to know whether this suits your programme, or what a move would look like? Send us a message through the support button in your environment and we will take a look with you.
Frequently asked questions #
No user is appearing in Huddle. What now? #
Check these points in this order. Is the automation actually set to Published? That is by far the most common cause. Is the URL completely right, including ?provider=autorespond and without a space or full stop copied along at the end? Is the right product under Target products? Is Request body set to Custom data and are email and firstname in the table? If everything is right and still nothing happens, check in Huddle whether the API key is still valid.
A returning customer orders again and gets nothing #
That is almost always down to one tick box. Open the trigger of your automation and look at the bottom for Run the automation more than once for a contact for this event. It is unticked by default, which means someone who has already been through this automation is skipped on a following order. The webhook is then not sent and Huddle receives nothing. Tick the box if the same person has to go through this automation more than once.
The customer is not getting an email from Huddle. Has the access failed? #
Not necessarily. Huddle only sends the email with login details when a new account is created. If your customer already had a Huddle account, from an earlier purchase for example, the access level is added to that existing account and no email follows. Check in Huddle whether the level is listed with that user. If you do want to send such a person something, add an email of your own below the webhook action in the same automation.
The user is created, but gets the wrong access #
Check these three things. First: is the number in the URL really the ID of the access level (in Huddle the Zapier ID or the SKU, found in the settings of that access level) and not the number of a course, module or product? Second: is that access level linked to the right modules or lesson pages in Huddle? That is a separate setting there, and a level that is not attached to anything feels like no access at all. Third: did the customer already have an account with a different level? Then the new level has been added alongside rather than replacing it. If you give several levels, create a separate automation with its own URL for each level.
Can I send the access level or the course along as a field? #
You can add extra lines under Request body data; with the GET method those are simply added to the URL. Huddle determines the access level from the number in the URL itself, though, not from a separate field. So for every access level you use a URL of its own, and therefore an automation of its own. Courses work through access levels in Huddle: you link the course or module to a level there, and you pass that level on with this webhook.
Can I see what Huddle sent back? #
Yes. Autorespond stores the response from Huddle with the webhook step of that contact. Open the automation, look at the contacts that have gone through it and hover over the webhook step in their progress. If something went wrong, the error message is there. If you cannot work it out, forward that message to us through the support button.
Can I revoke access on a refund or cancellation as well? #
This guide only describes creating access. Huddle also has addresses of its own for removing access again. If that works with the same set-up for you, create a second automation for it with the trigger Order refunded or WooCommerce subscription cancelled, for example, and a second outgoing webhook.
What is the difference with an incoming webhook? #
An outgoing webhook sends data from Autorespond to another program, as in this guide. An incoming webhook works the other way round: an external program sends data to Autorespond to create or tag a contact there, for example. See the article Incoming webhooks.
My customers pay by bank transfer. Do they get access straight away as well? #
No, and that is exactly the intention. With a bank transfer the order is first set to On hold, and the trigger New order (processing) only starts once you confirm the payment. You can read how to arrange a tidy holding email for that in Only grant access after payment.


