With an outgoing webhook you automatically send a contact’s details to Zapier as soon as something happens in Autorespond. Zapier can then trigger an action in thousands of other programmes, such as adding a row in Google Sheets, creating a task in your project management system or sending a message to Slack. The automation in Autorespond is the starting point: as soon as a contact joins a list, receives a tag or sets off another trigger, the data is on its way.
Automations in Autorespond are based on FluentCRM, which is included in your package. Read the English documentation
When do you use an outgoing webhook? #
Use an outgoing webhook when Autorespond is the starting point: something happens in Autorespond and that has to set off an action in another programme. Think of a contact subscribing to a newsletter, receiving a tag after a purchase, or going through an automation.
Do you want the opposite, another programme doing something in Autorespond, such as creating a contact or assigning a tag? Then you need an incoming webhook. See the article setting up incoming webhooks.
Do you only want to trigger actions based on a sale in your webshop? Then use the built-in webshop Zapier integration. It is simpler and built specifically for orders. See the article setting up the Zapier integration for WooCommerce.
Step 1: create the webhook in Zapier #
Start in Zapier, so that you have a webhook URL to enter in Autorespond.
- Create a new Zap in Zapier.
- Choose Webhooks by Zapier as the trigger and Catch Hook as the event.
- Click through until Zapier generates a webhook URL.
- Copy that URL, you need it in the next step.
For more on creating webhook triggers, see Zapier’s own explanation.
Step 2: add the outgoing webhook to your automation #
Open the automation that should act as the starting point, or create a new one with the trigger you want. Then add the outgoing webhook as an action.
- In the dashboard, go to CRM & Emails → Automations and open the automation you need.
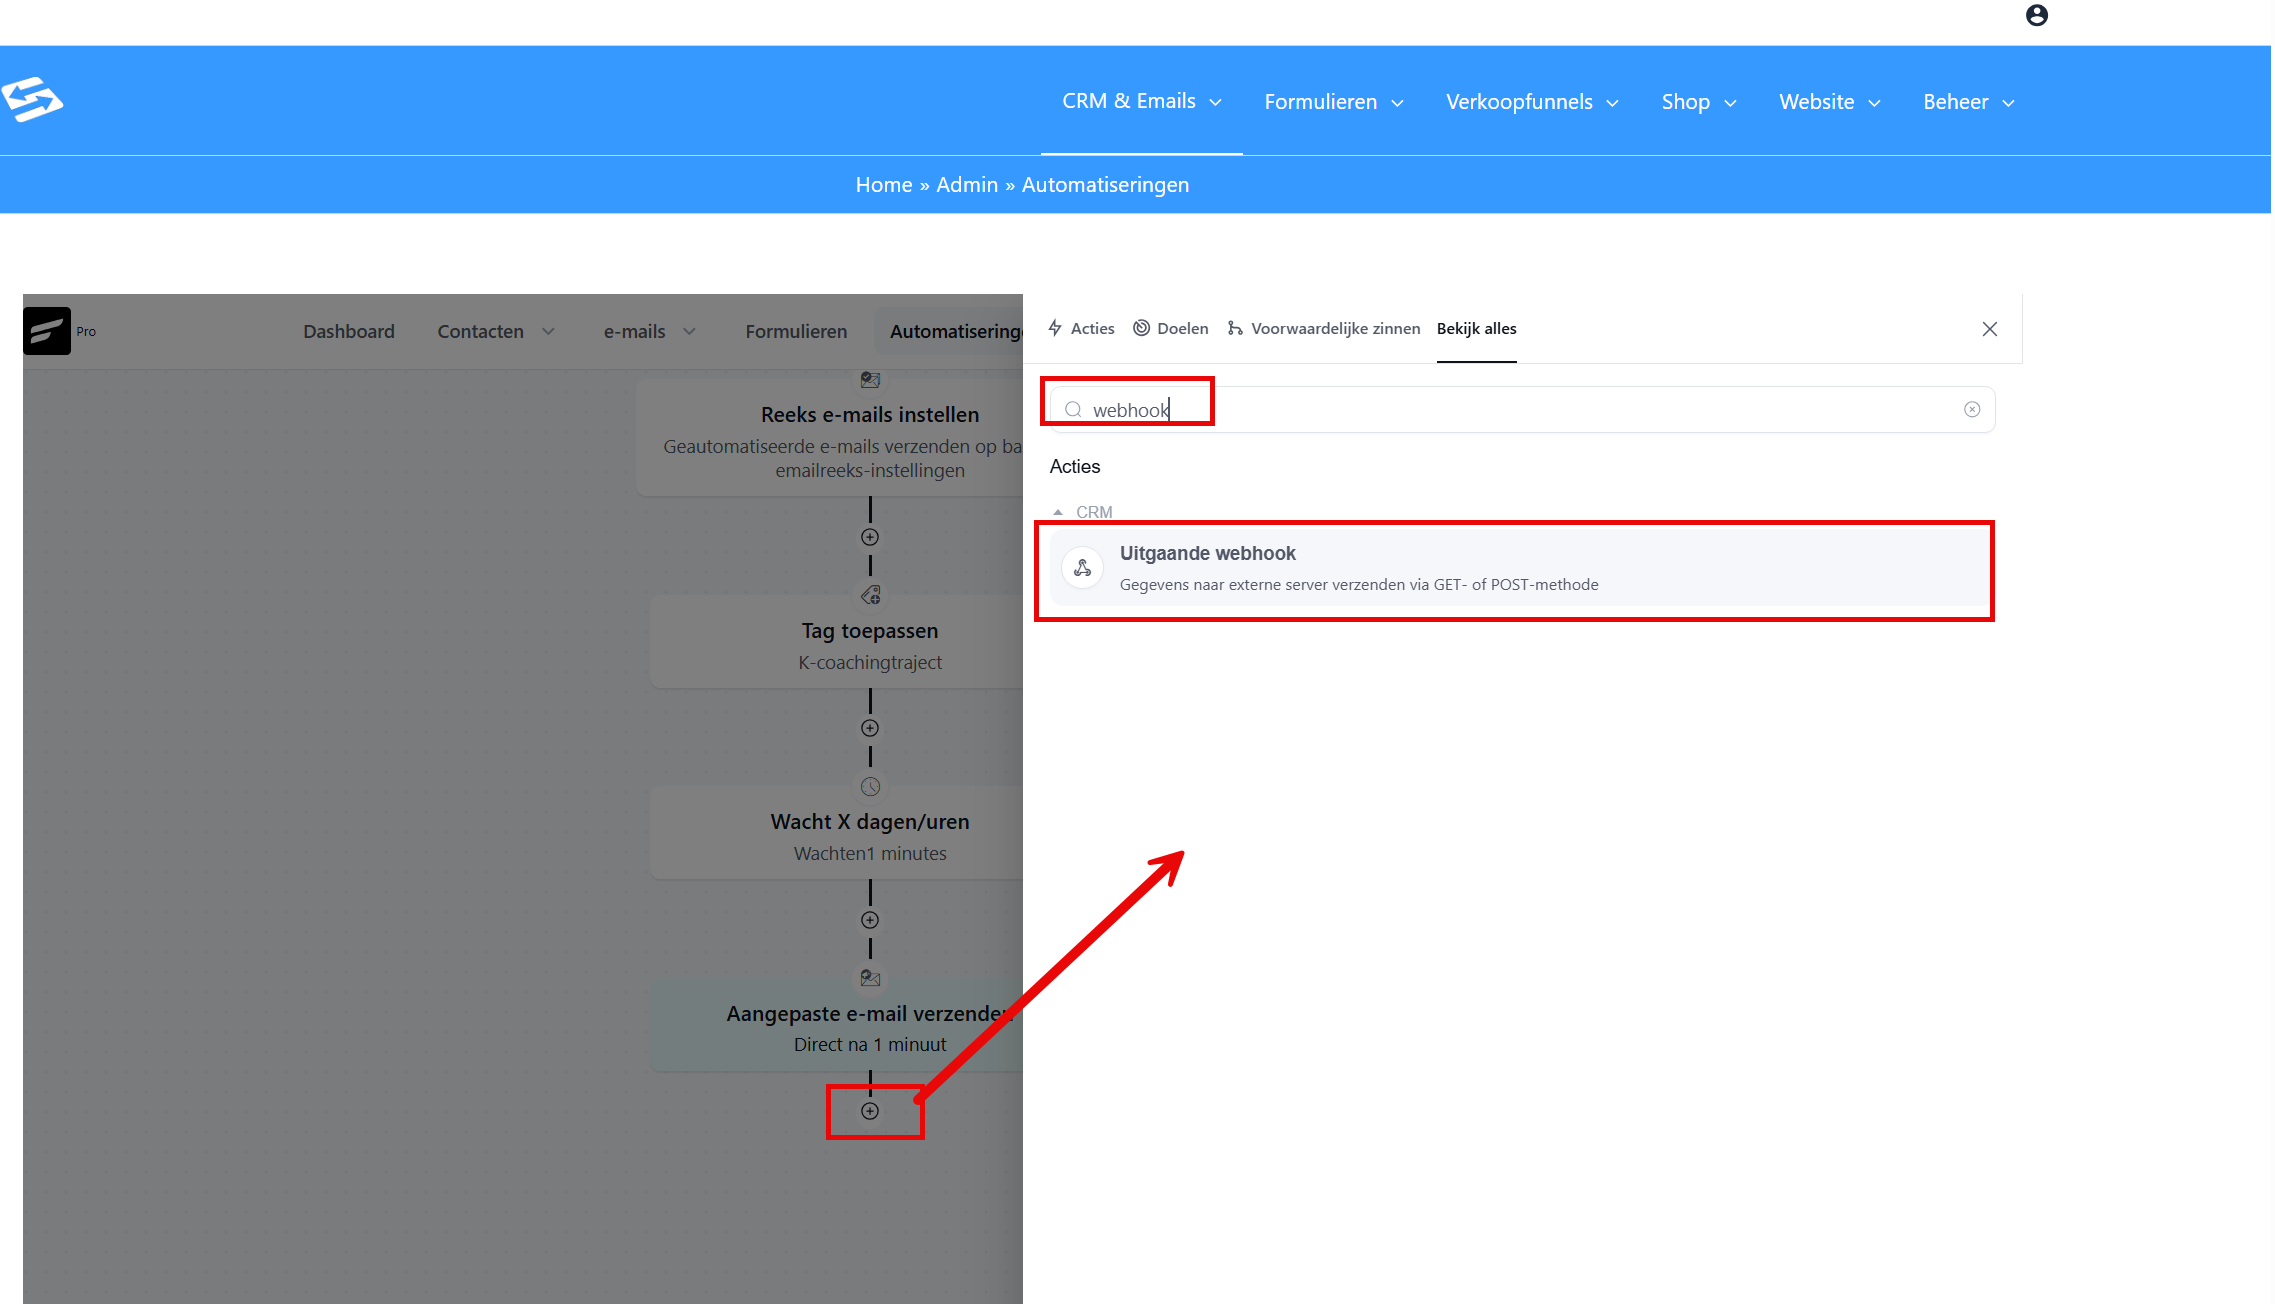
- Click + to add a new action and choose Send data to an external server.
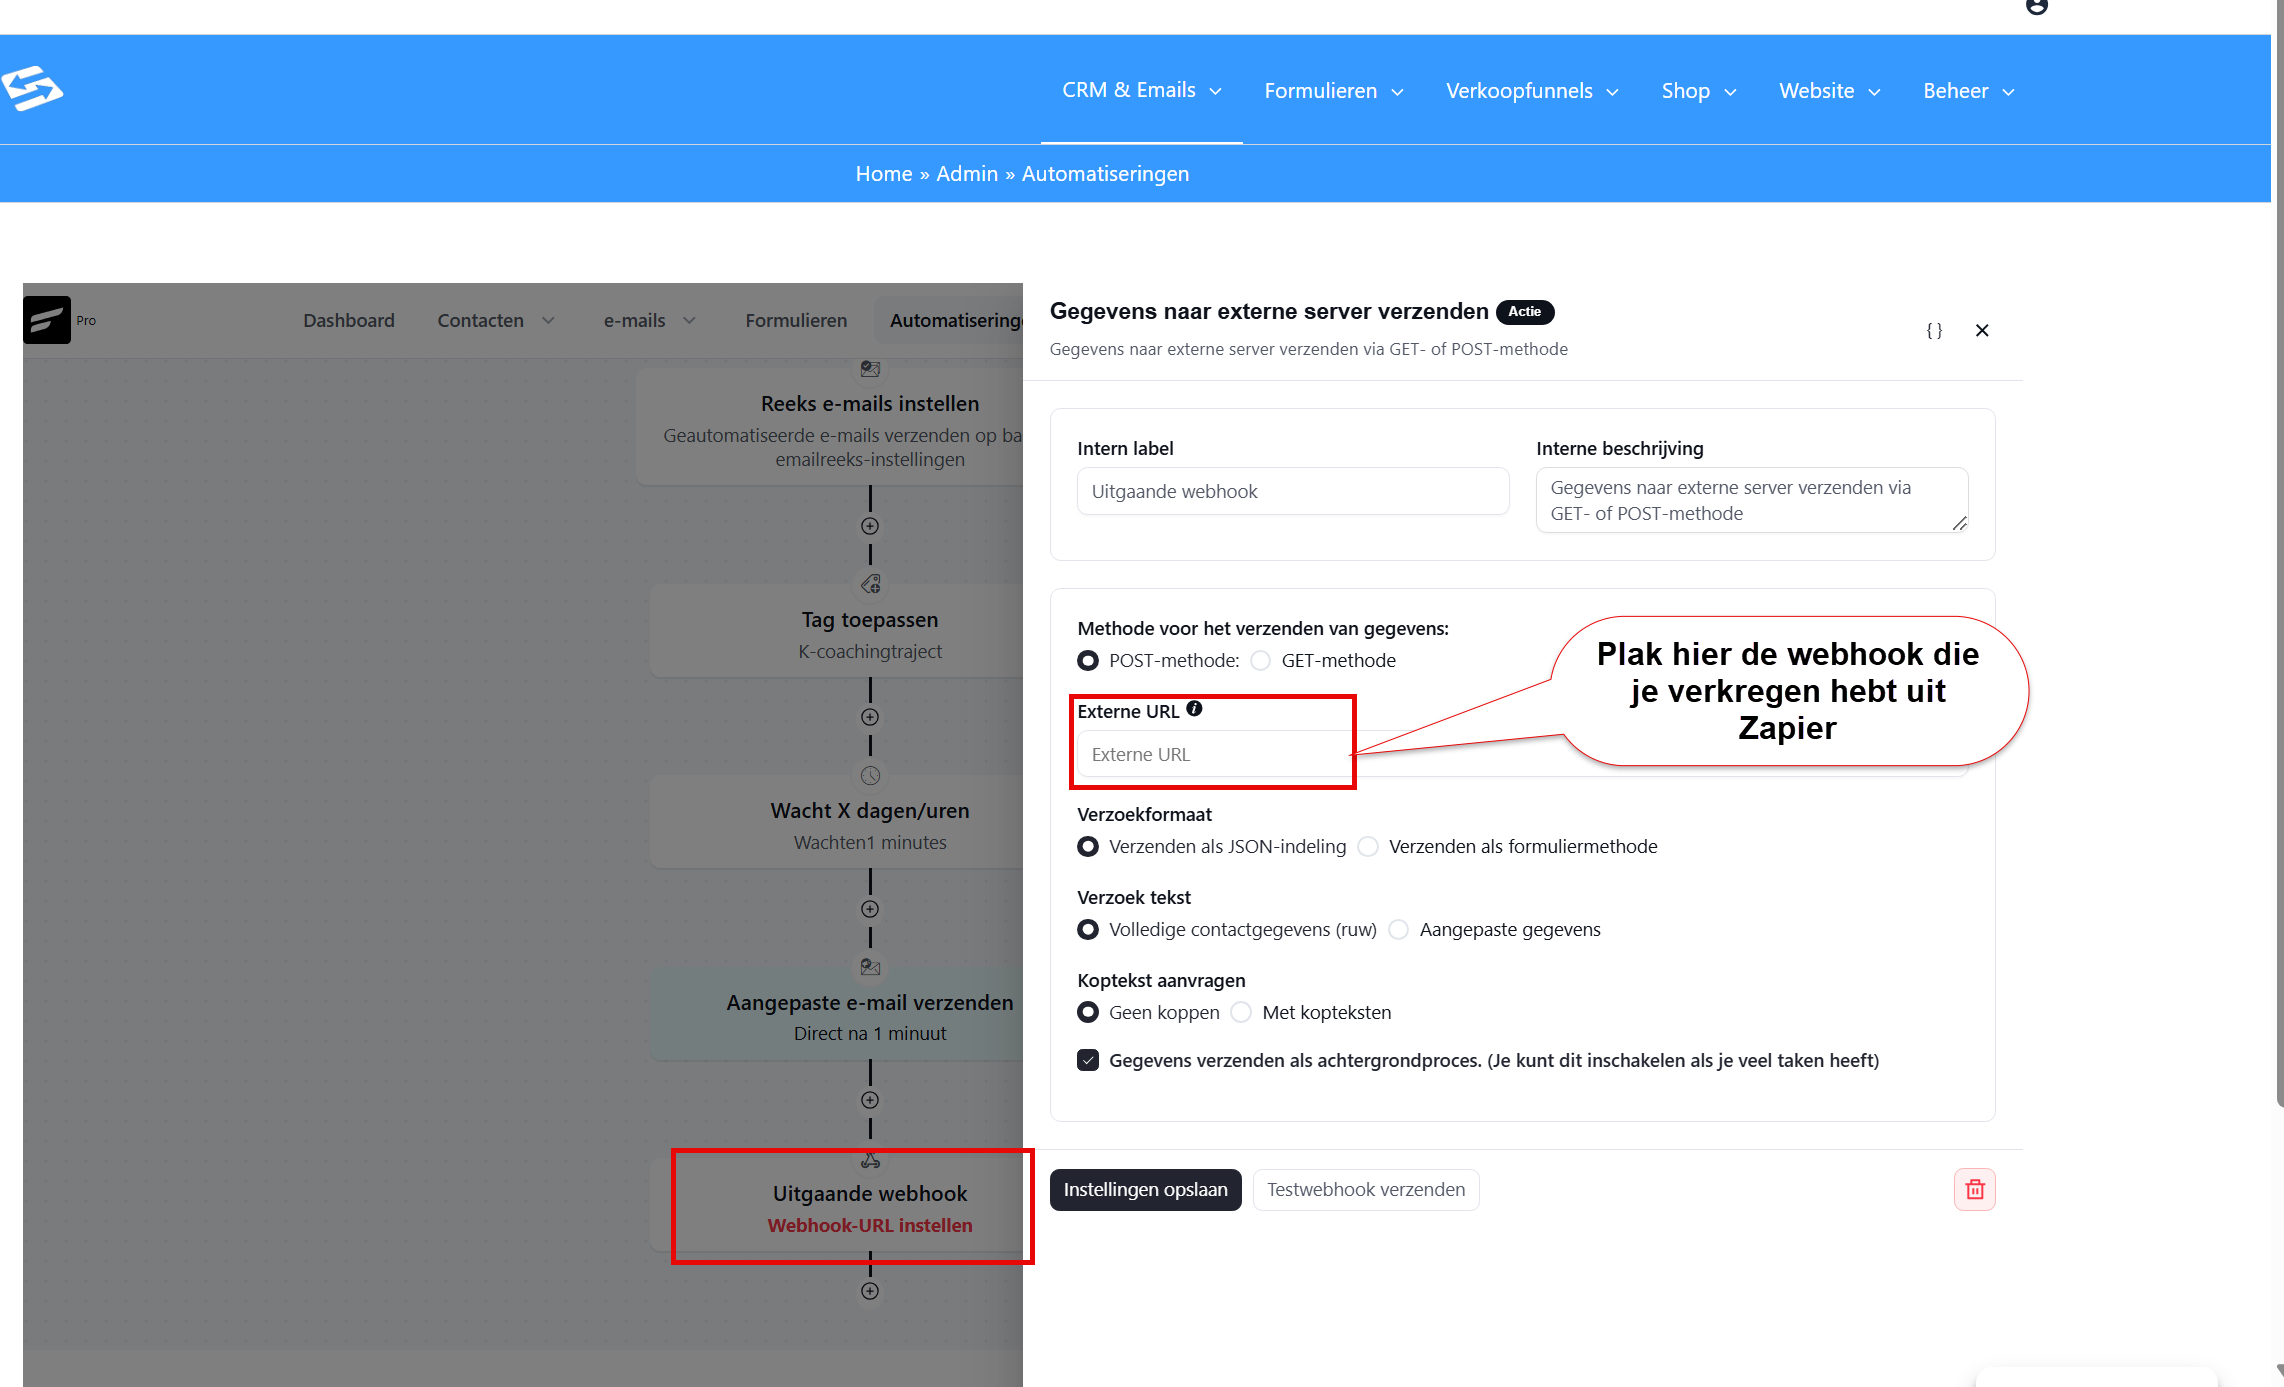
- Set up the action with the following fields:
- Method for sending data: POST method
- Remote URL: paste the webhook URL you copied in Zapier here
- Request format: send as JSON format
- Request body: choose Full contact data (raw) to send all contact details, or choose Custom data if you only want to send specific fields
- Request headers: no headers
- Optional: tick Send data as a background process if your automation processes a lot of contacts at once.
- Click Save settings and publish the automation.
Step 3: test the connection #
Before you build out the Zap any further, it is wise to check that Zapier is receiving the data correctly.
- In the dashboard, go to CRM & Emails → Contacts and open a test contact.
- Add the contact to the automation with the Add to automation button. You can also use the Send test webhook button in the action settings to send a test message straight away, without running through the whole automation.
- Go back to Zapier and click Test trigger. Zapier now fetches the data it received, so you can use the individual fields, such as first name, email address and tags, in the next step.
Step 4: set up the follow-up action in Zapier #
- In the same Zap, add an action step for the programme where you want something to happen, for example Google Sheets, Asana or Slack.
- Map the fields from Autorespond to the right fields in that programme. Zapier shows the fields it received during the test.
- Test the complete Zap and publish it once everything is right.
From then on, every time the automation runs, Autorespond sends the contact details to Zapier automatically, after which Zapier carries out the action you set up in the other programme.
See also the article setting up automation workflows for more on building an automation.
More information #
Do you want to go deeper into the technical options and see more examples? Have a look at the original documentation with screenshots.
Frequently asked questions #
What is the difference between an outgoing and an incoming webhook? #
An outgoing webhook sends data from Autorespond to an external programme as soon as something happens in an automation. An incoming webhook works the other way round: an external programme sends data to Autorespond to trigger an action there, such as creating or tagging a contact.
Which contact details are sent to Zapier? #
If you choose Full contact data (raw), Autorespond sends every available field of the contact, including first name, last name, email address, tags and custom fields. If you only want to send certain fields, choose Custom data and set per field what you send.
Can I set up a webhook without an active automation? #
No, an outgoing webhook in Autorespond always works as an action inside an automation. So you always need a trigger that starts the automation, after which the webhook action sends the data. Want to know more about setting up an automation? See the article setting up automation workflows.
Does this method also work for forwarding order details? #
Yes, but for actions that should only start on the basis of an order in the webshop, the built-in webshop Zapier integration is simpler and more specific. That integration offers more order-specific triggers and fields. See the article setting up the Zapier integration for WooCommerce.


