Exporting contacts to files #
The export function lets you export all contact details from your Autorespond CRM to a CSV file. This is useful for backups, analyses in external programmes, or transferring data to other systems. You can choose which fields you export and apply filters to export only specific groups of contacts.
When to use the export function #
There are several situations in which exporting contacts is useful:
- Making a backup: A safety copy of your complete contact database for your own archive
- Running analyses: Importing data into Excel, Google Sheets or other analysis tools
- Creating reports: Putting together overviews for management or customers
- Preparing a migration: Transferring contact details to another system
- Sharing lists: Passing specific contact selections on to colleagues or partners
- Marketing analyses: Analysing segments based on tags, lists or custom fields
Exporting contacts step by step #
Step 1: Open the export function #
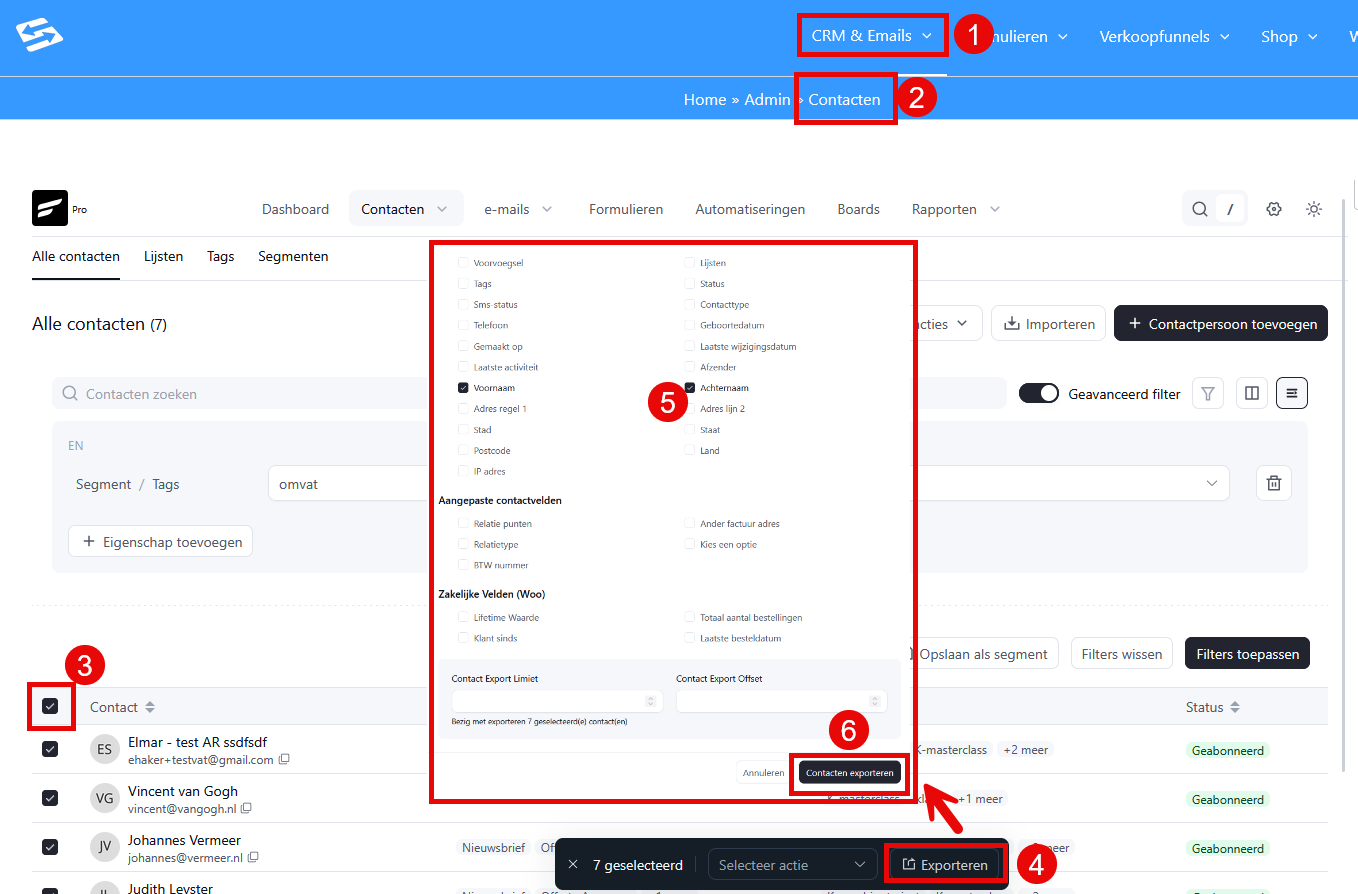
In your Autorespond admin, go to CRM & Emails → Contacts (1) and (2). Select the contacts you want (3). Click the “Export” button right at the bottom (4). A new screen now opens where you can indicate which fields you want to export (5). Finally, click ‘Export contacts’ (6).
Step 2: Select contacts #
You have two options for selecting contacts in step (3) above:
- All contacts: Exports your complete contact database
- Filtered contacts: First apply filters in the contacts overview (based on tags, lists or contact status, for example) and then export only the results shown
If you want to export filtered contacts, first set your filters with the filter buttons above the contacts overview. The export will only include the contacts that are visible in the list at that moment.
Everything about setting filters is covered in ‘Segmenting and filtering contacts‘
Step 3: Choose the export settings #
In the export window you can set the following options:
- Fields to export: Select which contact fields you want to include in the file. The most important fields are selected by default, but you can add custom fields or leave out fields you do not need
Step 4: Start the export #
Click “Export contacts” to start the process. A CSV file is now generated and downloaded. Depending on the number of contacts, this can take a few seconds to a few minutes. You get a notification when the export is finished.
Step 5: Download the file #
As soon as the export is complete, the file is saved in your Downloads folder.
Tips for exporting effectively #
Large contact databases #
With more than 10,000 contacts the export can take a little longer. Do not plan it just before an important deadline and check that your internet connection is stable during the process.
Privacy considerations #
The exported file contains personal data of your contacts. Make sure that you:
- Store the file securely and do not share it unprotected
- Delete old export files regularly
- Take GDPR regulations into account when sharing data
Using filters wisely #
Use the filter functions to export only relevant contacts:
- Filter on contact status to include only active contacts
- Use tags to export specific target groups
- Filter on creation date to export only new contacts from the past month, for example
Using the exported file #
You can open the exported CSV file in various programmes:
- Microsoft Excel: For extensive analyses and calculations
- Google Sheets: For collaboration and online analyses
- Other CRM systems: For importing data (mind the correct column order)
- Email marketing tools: For importing lists into external systems
Frequently asked questions #
Are custom fields exported as well? #
Yes, every custom field you have set up in CRM & Emails → CRM Settings → Custom fields is shown as an option in the export. In step (5) above you choose yourself which fields to include.
Can I automate the export? #
The standard export function is manual. For automatic exports you can use the REST API functionality, but this requires technical knowledge.
What if the export fails? #
If large exports cause problems, try exporting the file in smaller parts by using filters. Contact support if the problem persists.
To import contact details back in you can use the import function, which performs exactly the reverse process.
Exporting contacts in Autorespond is based on FluentCRM, included in your package. Read the FluentCRM documentation


