Do you sell a workshop, training course or other event and send a confirmation email after the purchase with a link to the practical information? Shortly before the event you often want to send a reminder, but only to the people who have not clicked that link yet. Anyone who already read the information does not need another email. In this article you build exactly that, with a smart link that applies a tag when clicked, and a condition block in your automation that checks whether that tag is missing.
Automations and smart links in Autorespond are based on FluentCRM, which is included in your package. Read the English documentation
How it works #
The setup has three parts that together decide who receives the reminder:
- The link in your confirmation email is a smart link: a special link that recognises the contact and applies a tag automatically when clicked. The reader notices nothing and simply arrives on the page you set.
- The automation then waits until the reminder moment, for example until a week before the event.
- A condition block then checks whether the contact has the click tag. Only contacts without that tag, who therefore have not clicked yet, receive the reminder email.
Step 1: create the smart link #
Go to CRM & Emails, click the cog icon (Settings) at the top right and choose Smart link in the menu on the left. You see the Smart links overview. Click + Add smart link at the top right and fill in the form:
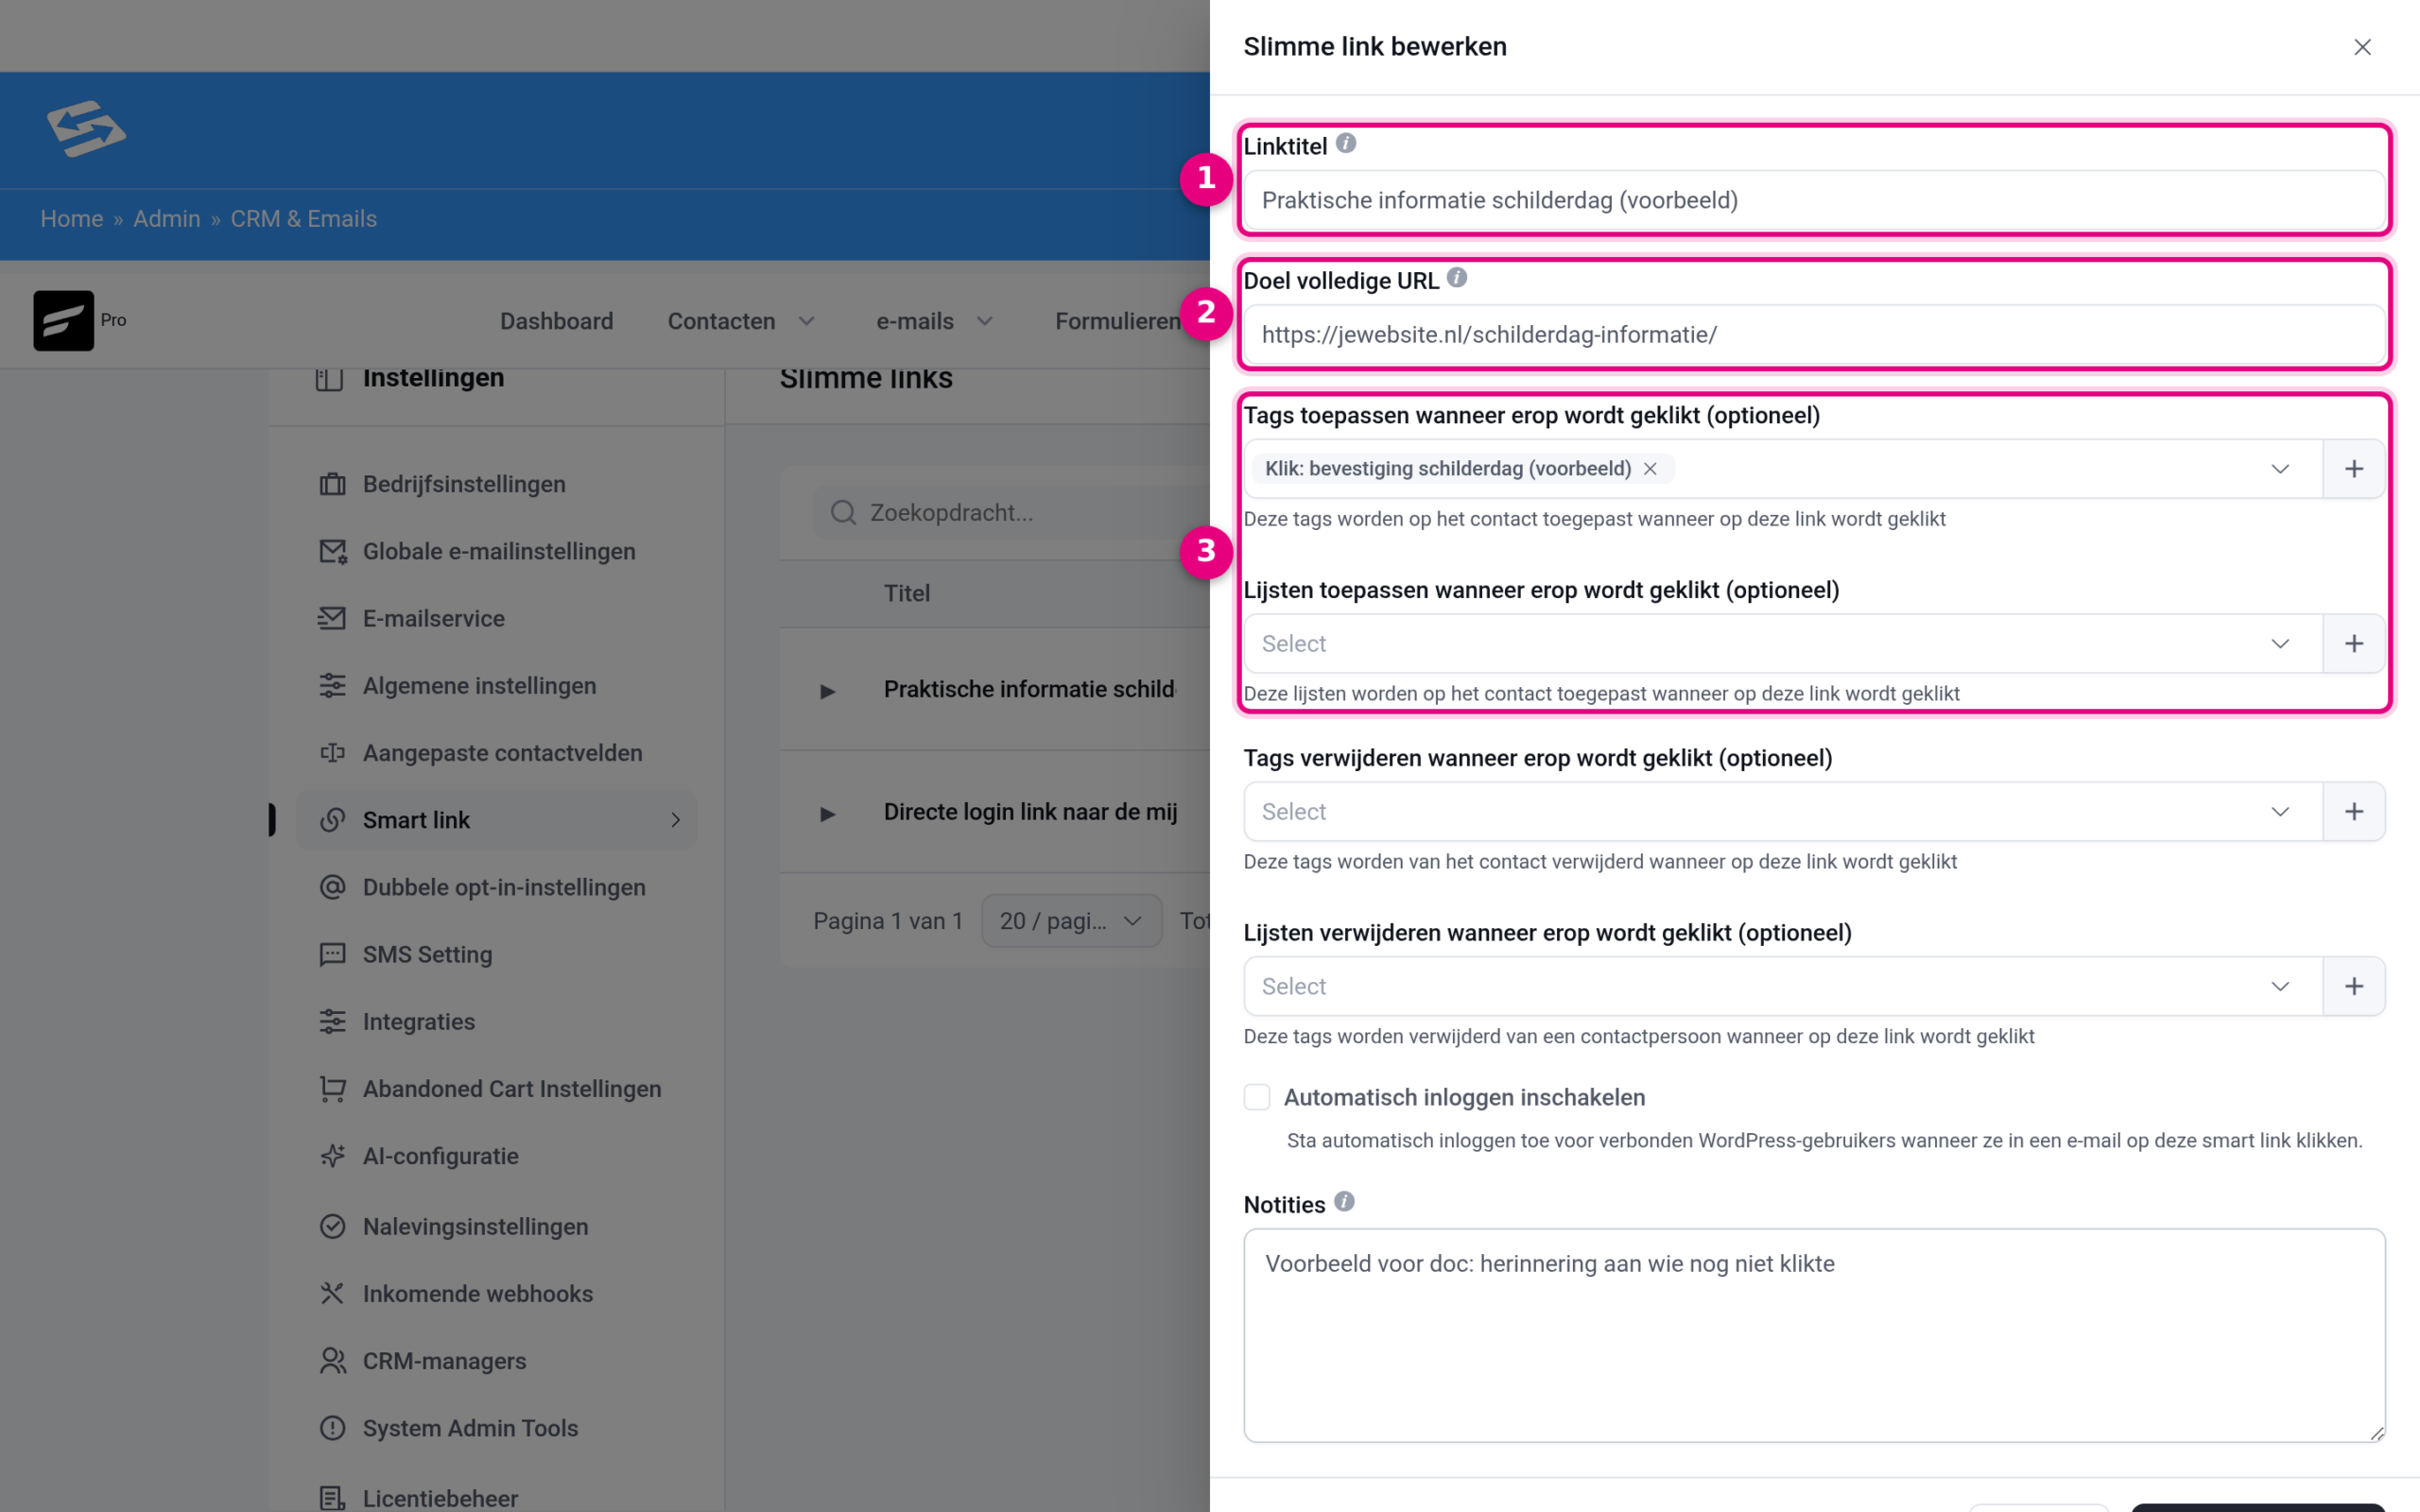
- Link title: the internal name of the link, for example “Practical information painting day”. Your customer does not see this name.
- Target full URL: the page the reader lands on after clicking, for example the page with the practical information about your event. Use the full URL including https://.
- Apply tags when clicked: choose the click tag here, for example “Click: confirmation painting day”. Type a new name to create a new tag straight away. Below that you can also apply lists, but for this scenario the tag is enough.
Click the save button at the bottom. The overview now shows a Smart URL column: copy that URL with the copy button next to it. You use this URL as the link in your email in the next step.
Step 2: the confirmation email with the smart link #
Go to CRM & Emails → Automations and click New automation. Choose the trigger that fits your situation. If you sell the event as a product in your shop, the trigger Tag applied with the product tag is a reliable starting point, because that tag is only applied once the order is paid. How to set up such a product tag is explained in the article Applying a product tag after payment.
Then use the plus icon below the trigger to add the Send custom email block (Actions tab, Email group). Write your confirmation email here. Select the text that should become clickable, turn it into a link and paste the copied Smart URL as the link address:
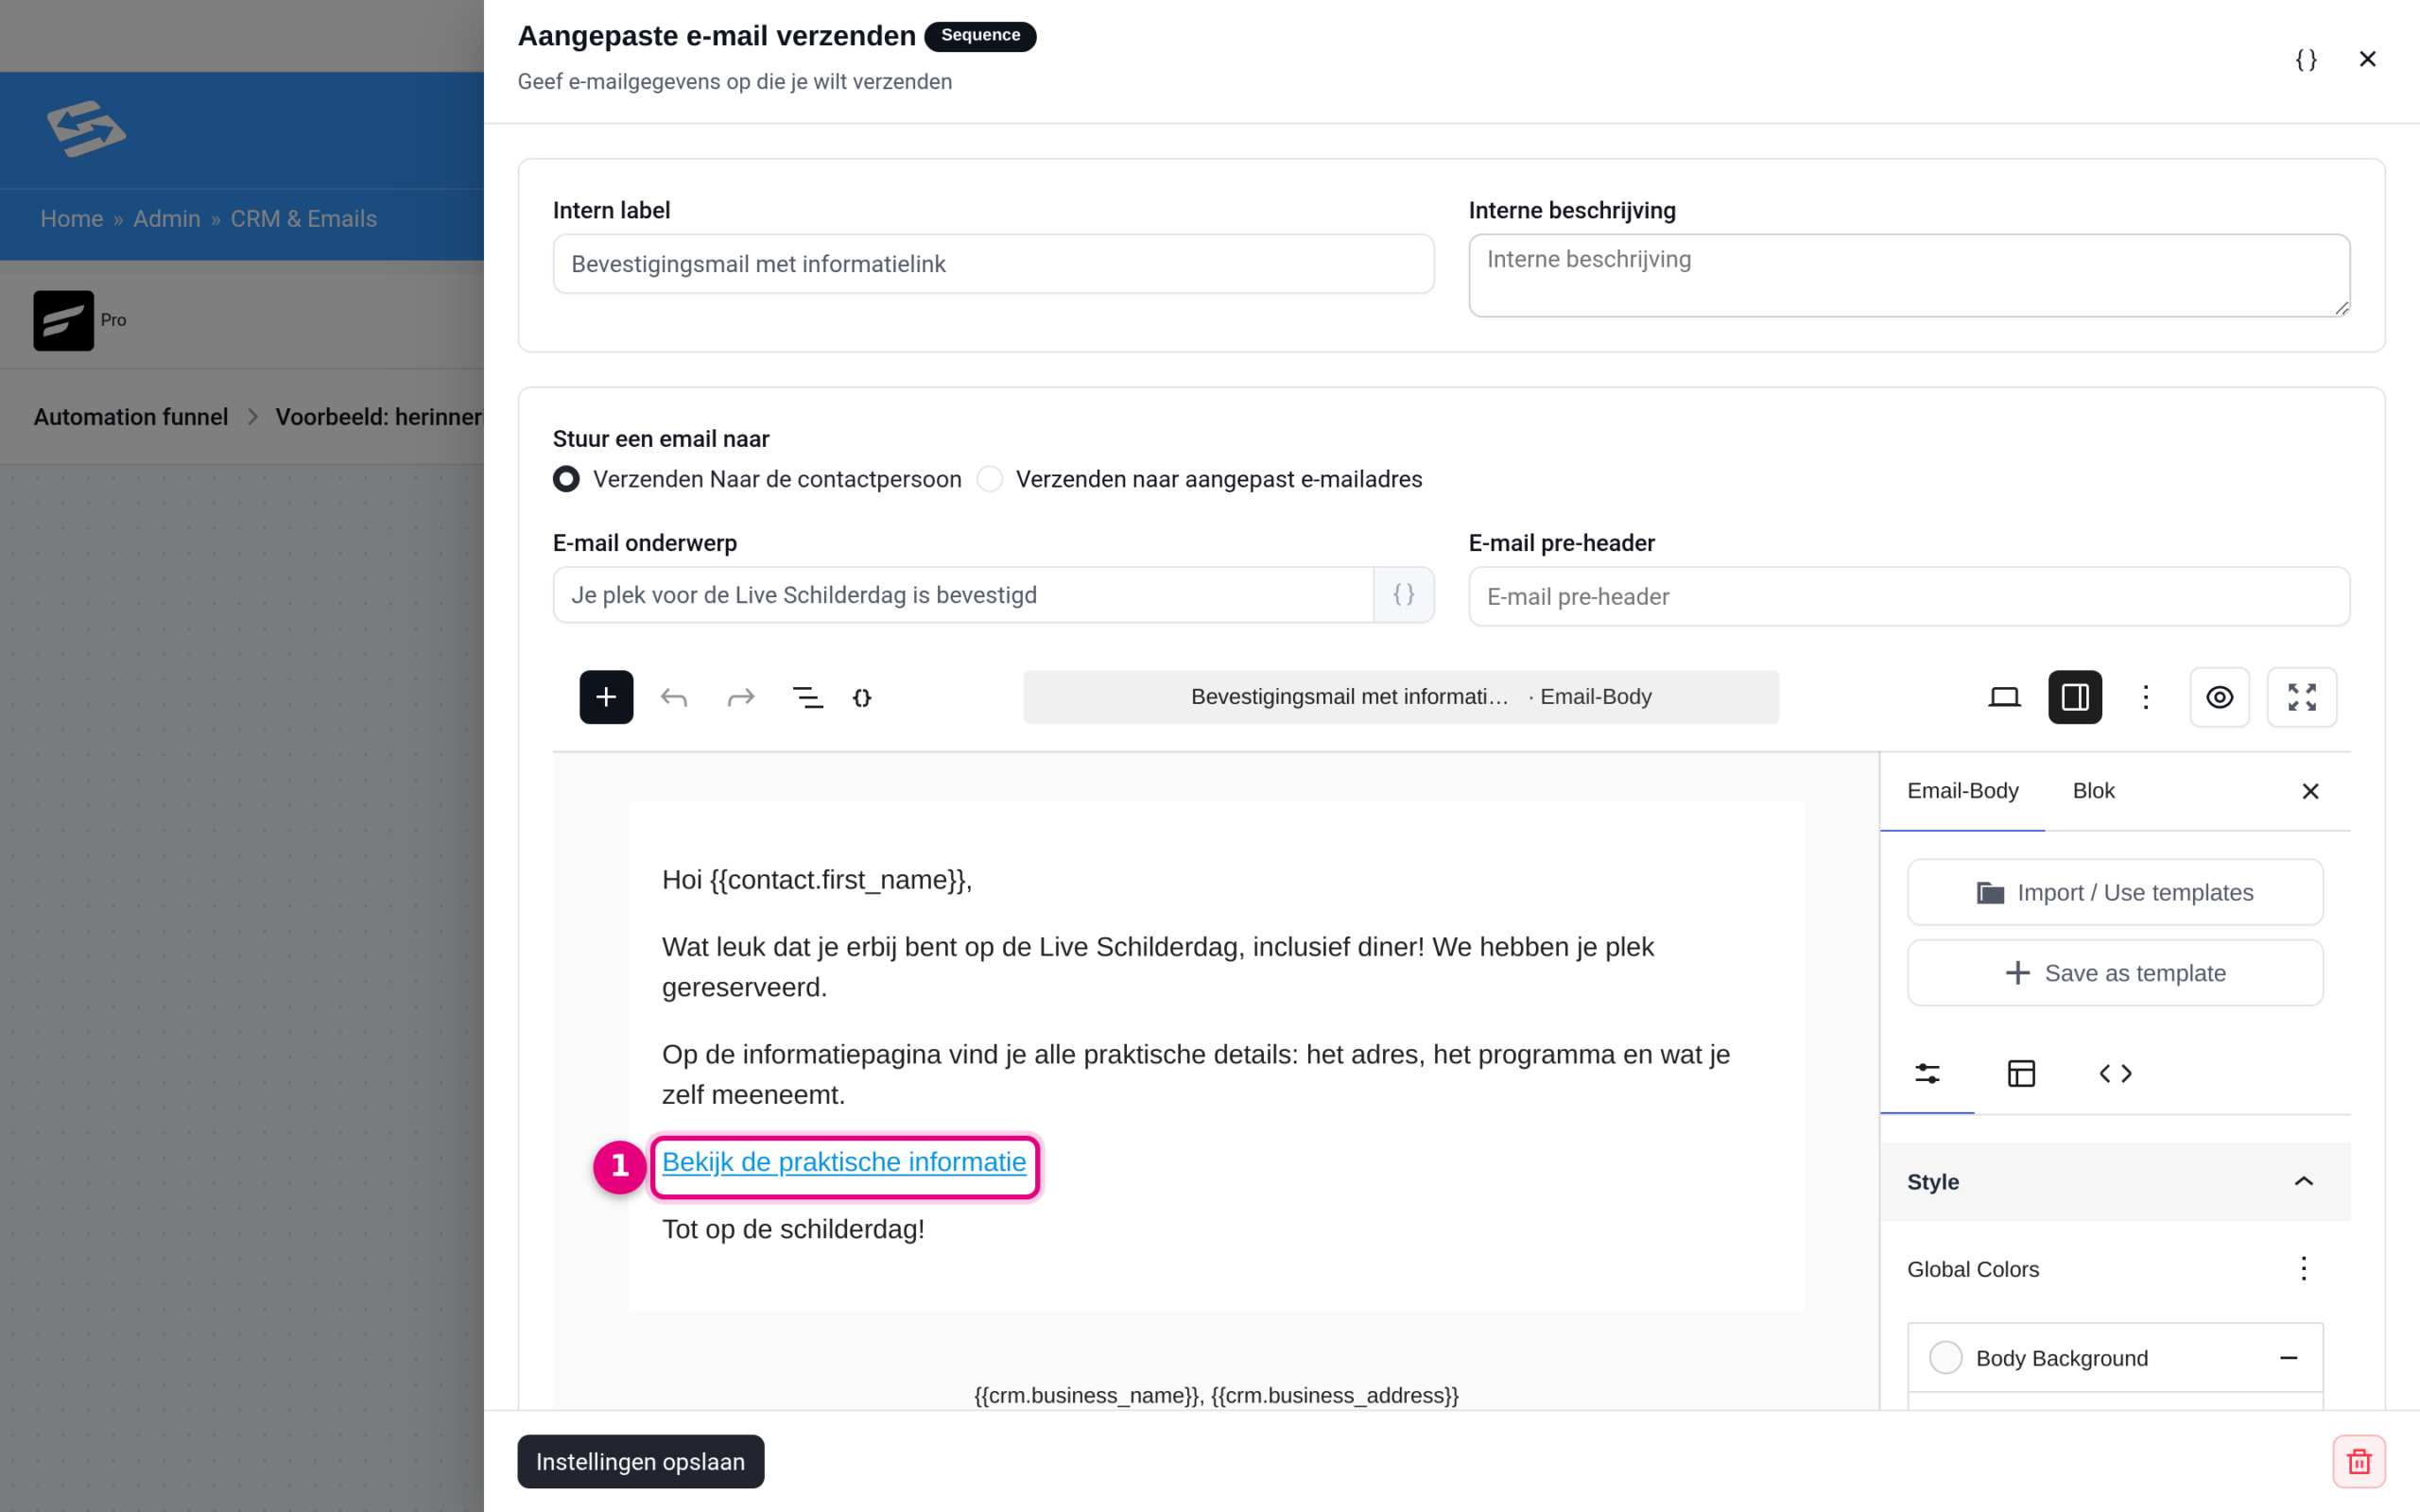
- The link in the email text: this is the smart link. As soon as a contact clicks it, they get the click tag and continue to the information page. Emails you send from an automation recognise the contact automatically.
Step 3: the wait step #
Below the confirmation email, add the block Wait X days/hours (Actions tab, CRM group). Set the waiting time up to the reminder moment here, for example the number of days until a week before the event. You can also wait until a fixed date in this block. If you work with recurring events and an event date per contact, read the article Recurring events: emails timed around the event date.
Step 4: the condition block with the reminder email #
After the wait step, add a block through the plus icon and choose the tab Conditional statements → Check condition. Set the condition so that only contacts without the click tag continue:
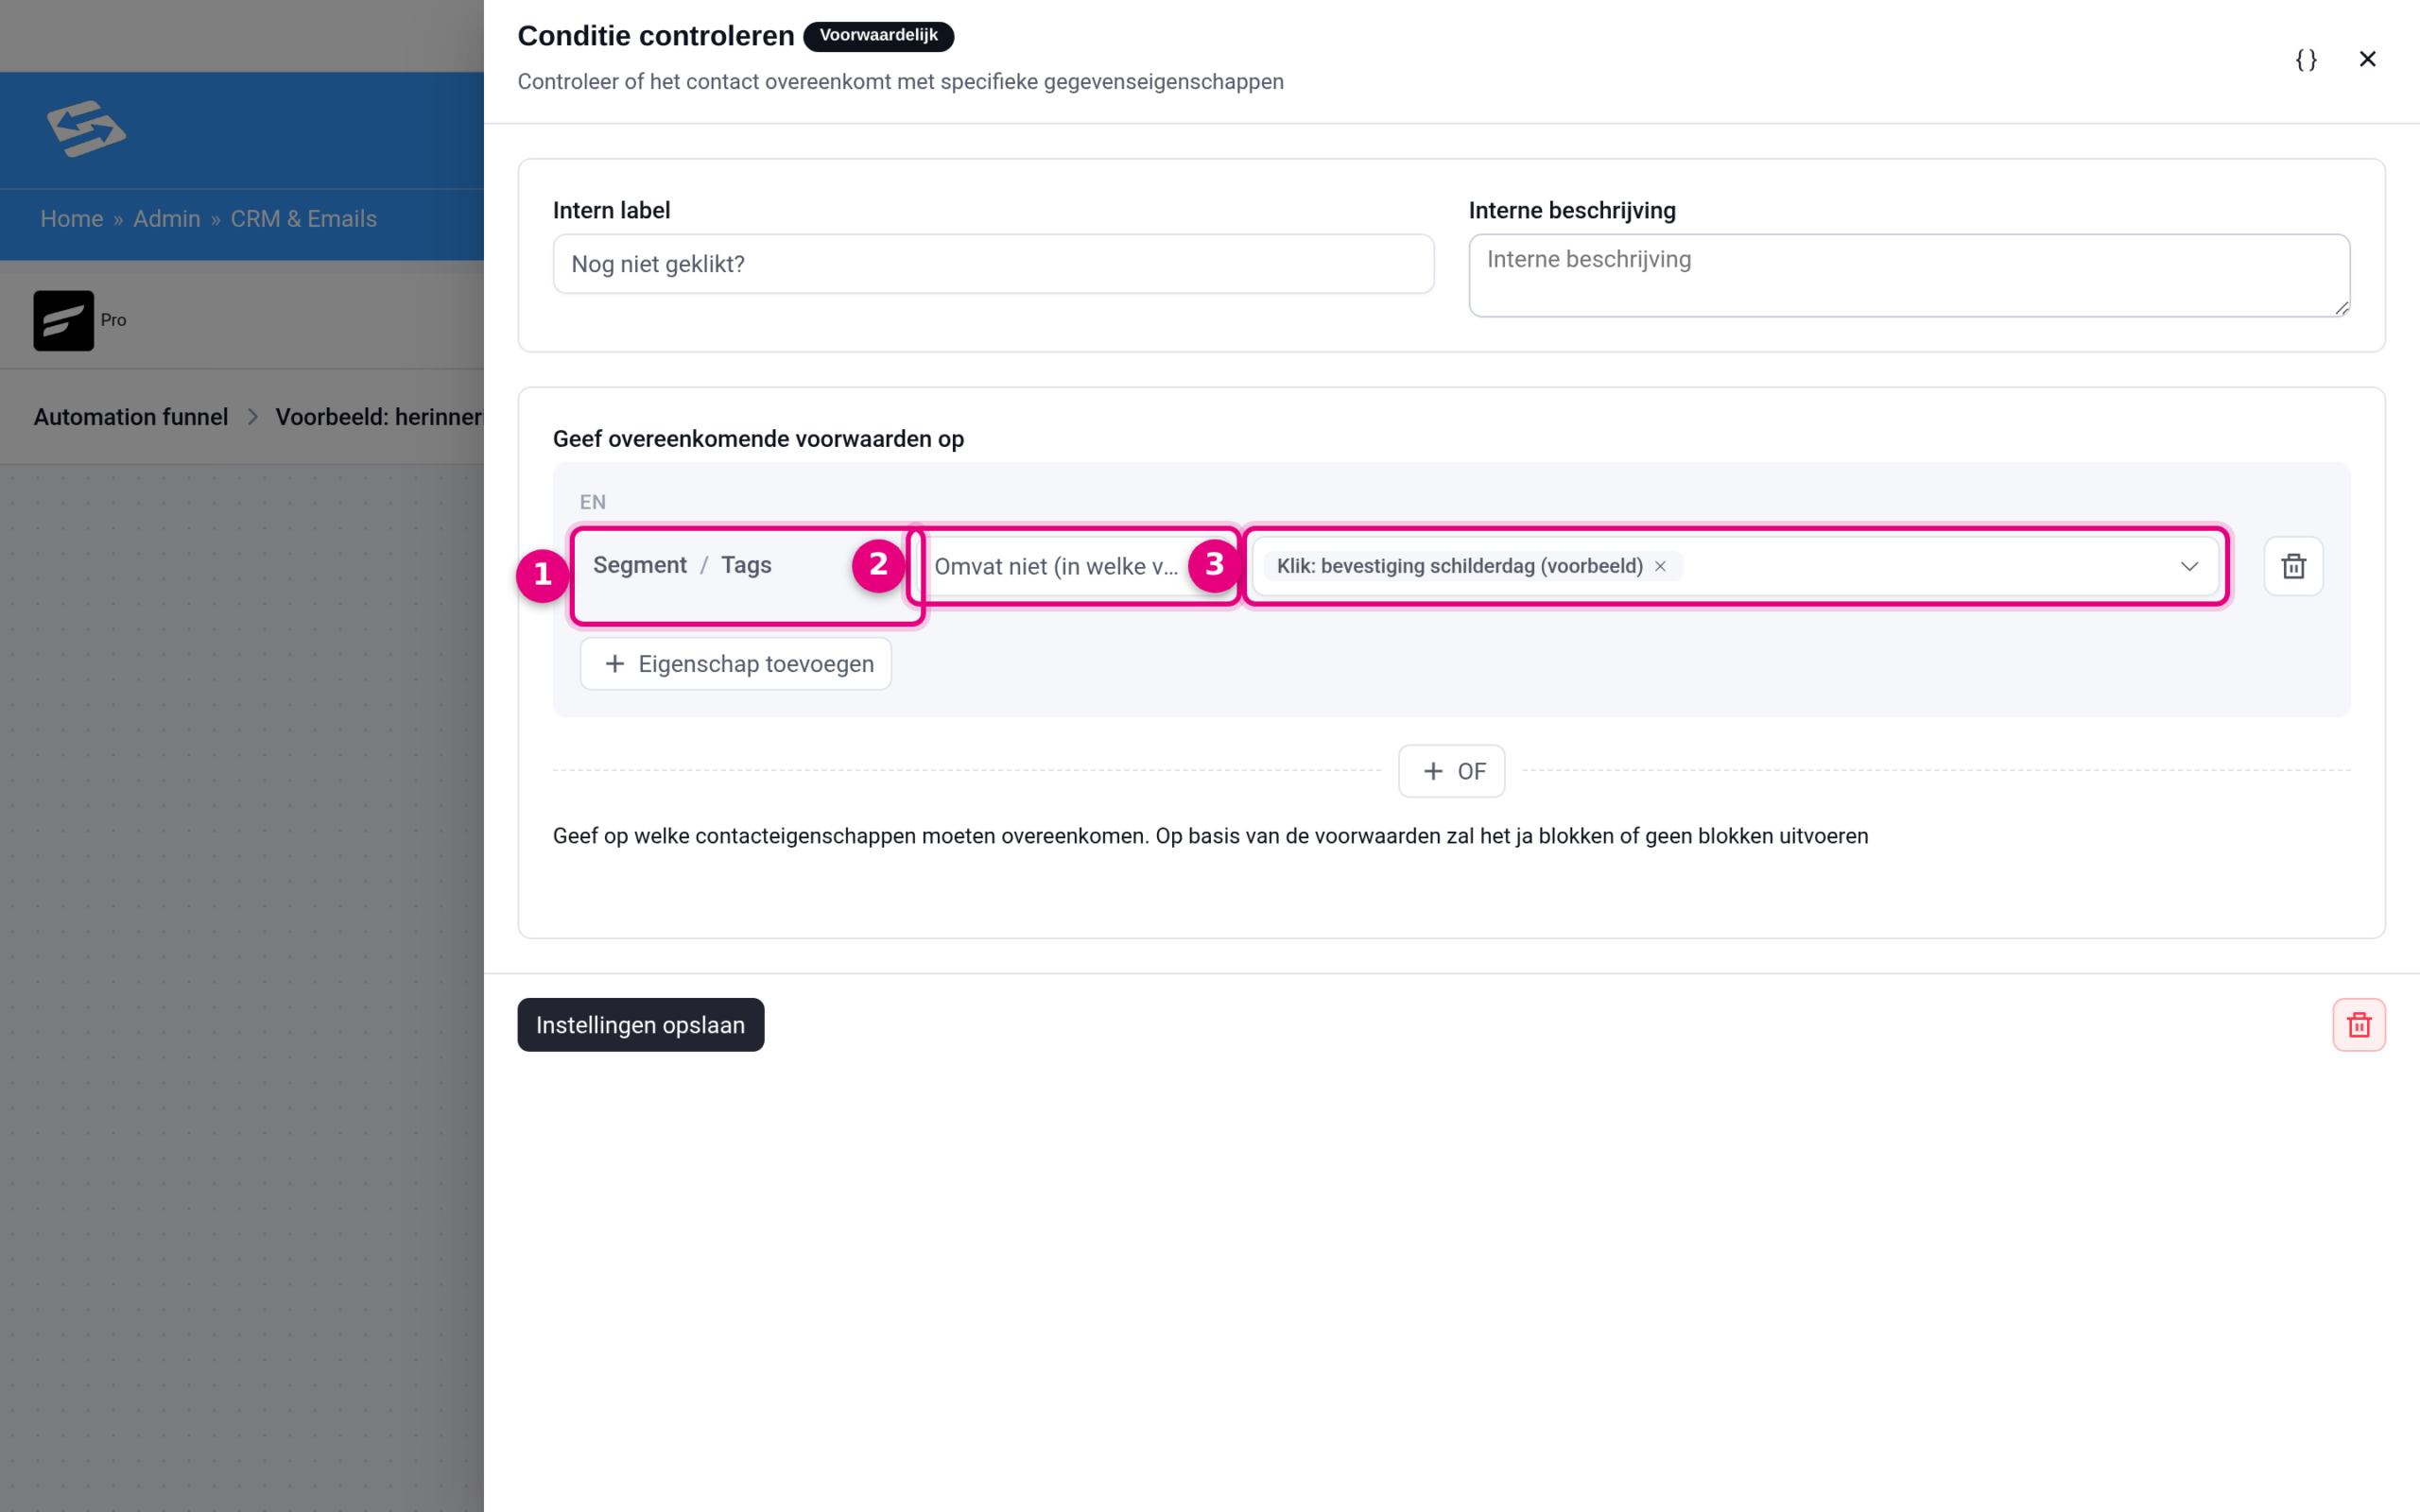
- The property: click Add property and choose Contact Segment → Tags. The block then shows the choice as “Segment / Tags”.
- The comparison: choose Does not include (in any form). The condition is then true for contacts who do not have the tag.
- The tag: choose the click tag from step 1 here, for example “Click: confirmation painting day”.
Click Save settings. Two branches appear below the condition block: Yes and No. In the Yes branch (matches the condition, so does not have the tag) add a Send custom email block with your reminder email. Put the smart link in it again, so the reader can still reach the information page with one click. Leave the No branch empty: anyone who already clicked gets nothing extra.
The end result #
The complete automation looks like this:
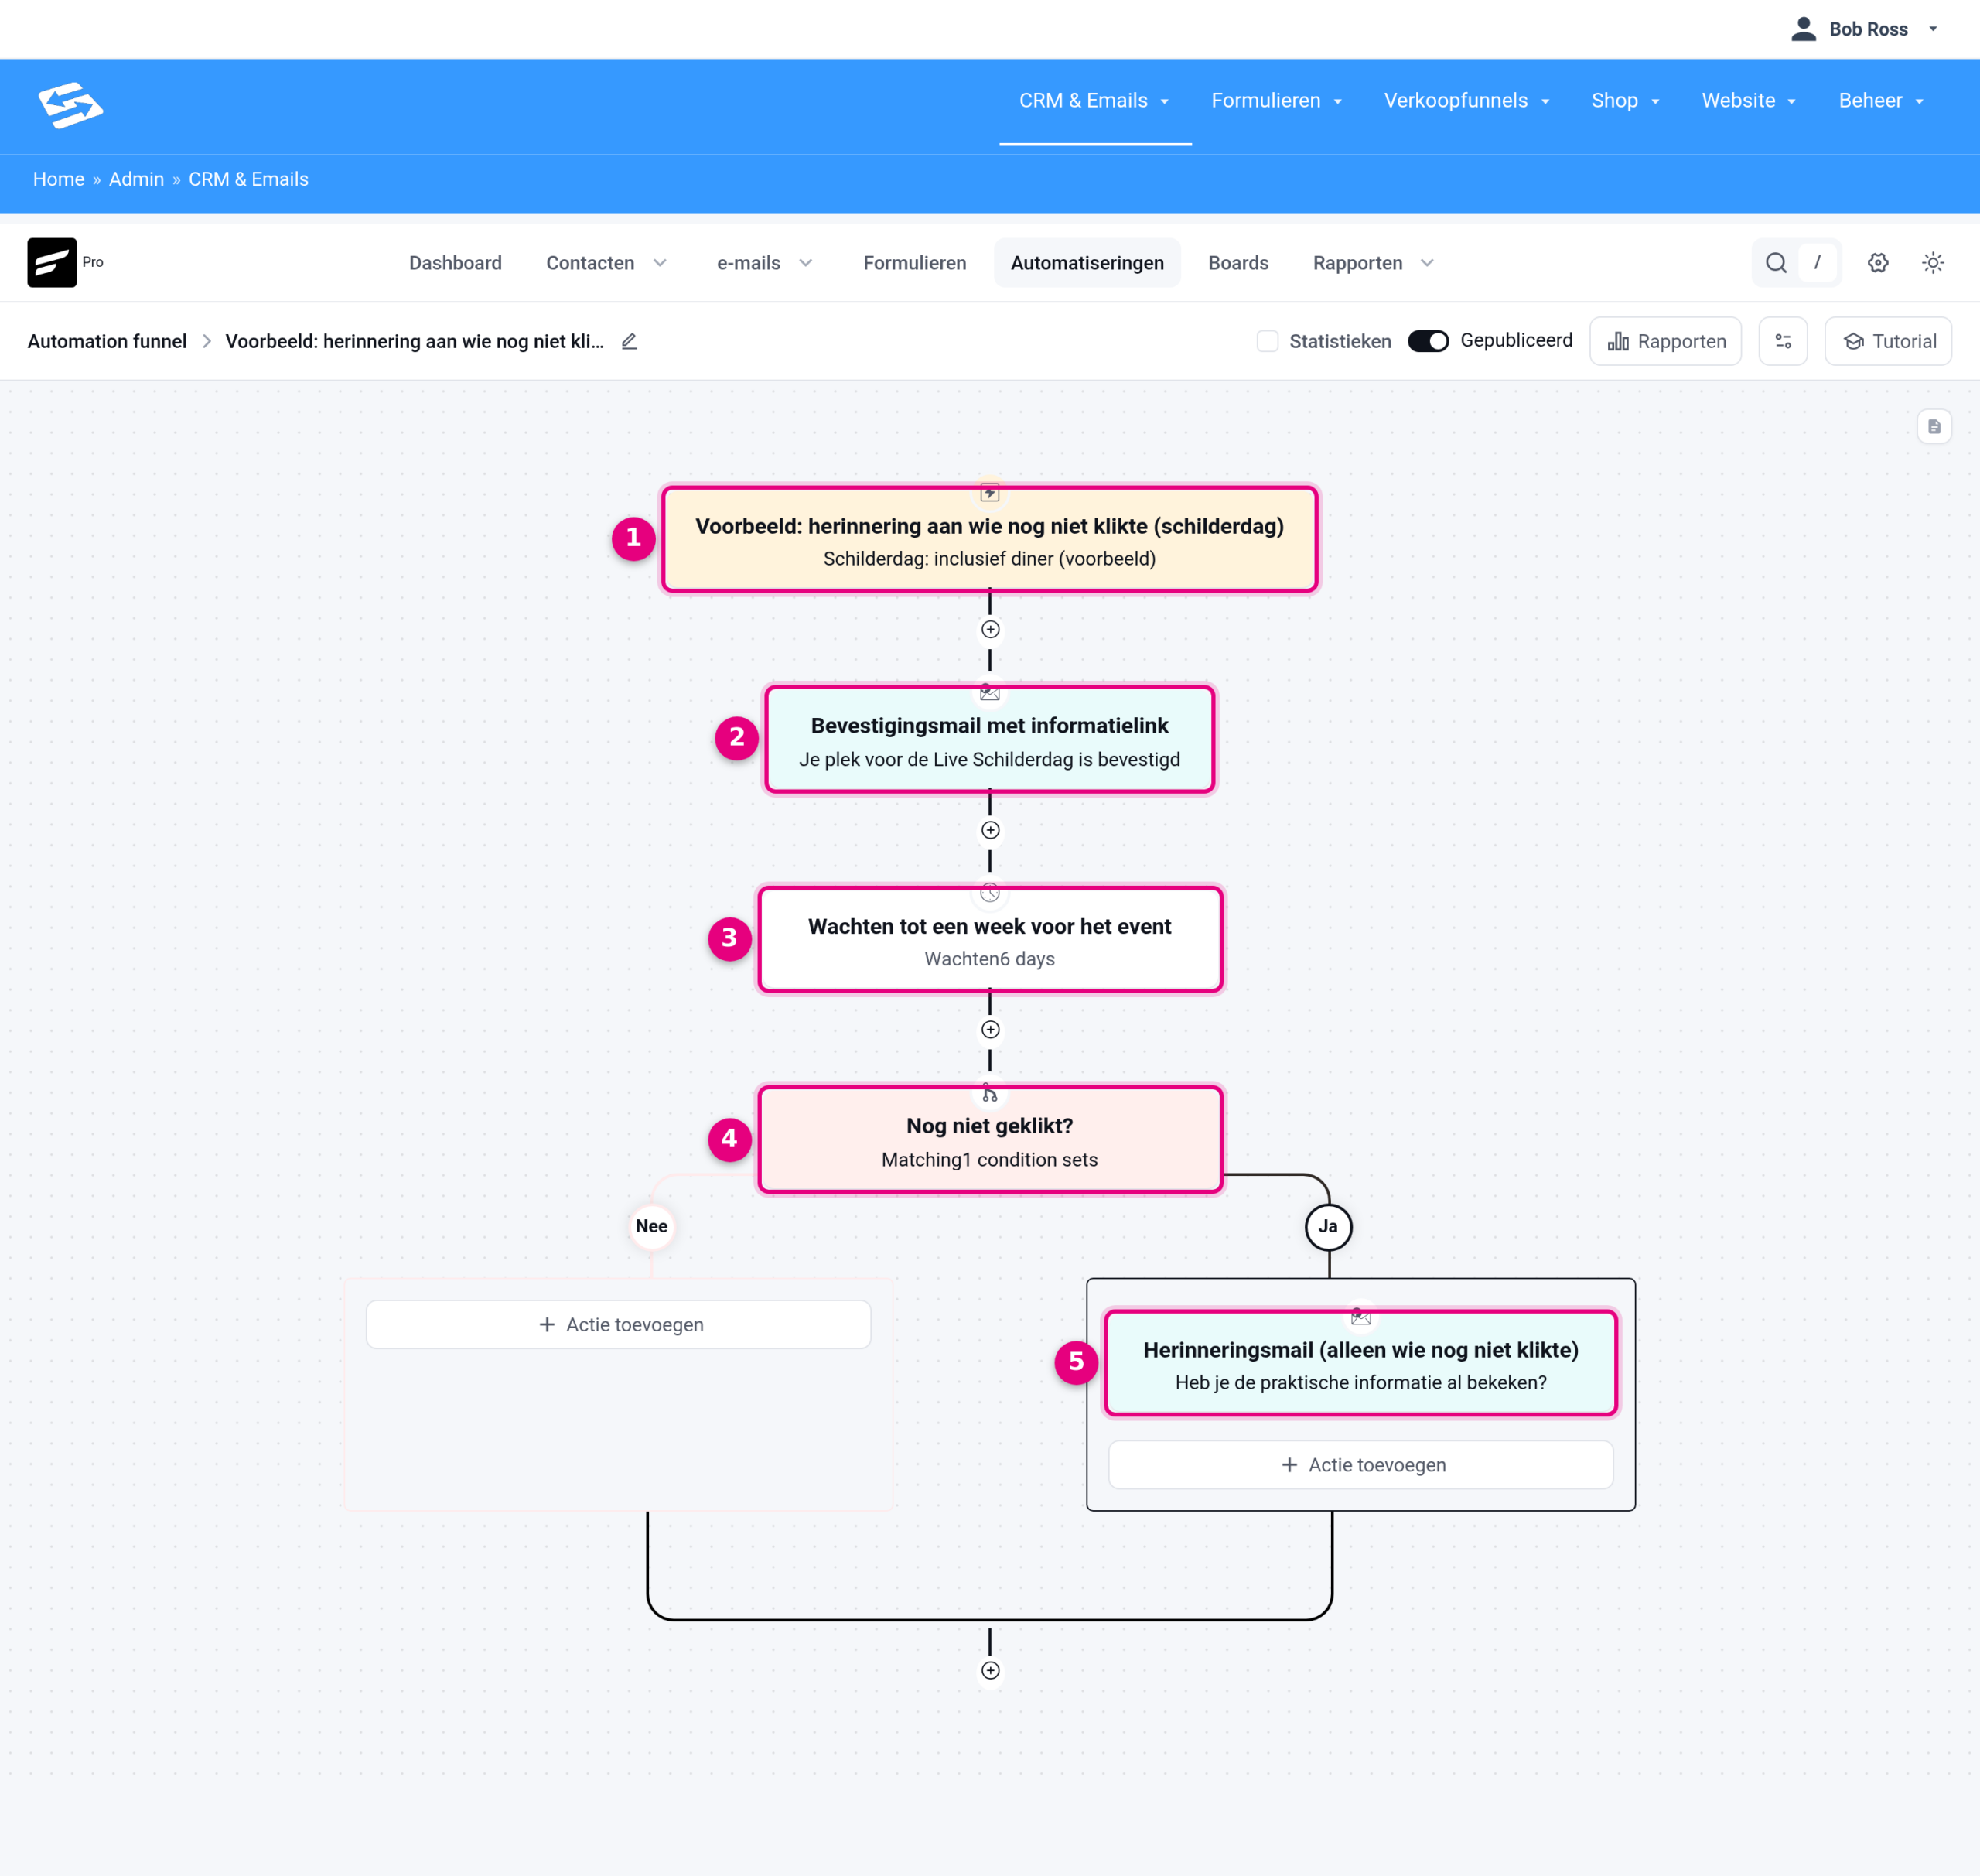
- The trigger: this is where the automation starts, in this example as soon as the contact gets the product tag of the event, so after payment.
- The confirmation email with the smart link to the practical information.
- The wait step until the reminder moment, for example a week before the event.
- The condition block that checks whether the contact still does not have the click tag.
- The reminder email in the Yes branch: only contacts without the click tag receive it.
Set the automation to Published at the top right to make it active.
Good to know #
- The click tag stays on the contact. You can segment on it later, for example to see who did or did not view the information page.
- The condition block also has a condition Contact Activities → Last clicked in email. That only looks at the date of the last click in any email, not at a specific link. For this scenario the smart link is therefore the right route.
- The Goals tab also offers the goal step Link Click, with its own generated link: contacts who click then jump straight to that point in the automation. That works too, but the route in this article is easier to follow and also gives you a reusable tag.
- If you sell the event as a variable product with several options (with or without dinner, for example), you can apply a separate tag per variation and start an automation like this per variation. You find the tag field on the product under Product data → Variations: expand the variation and fill in the field “Apply these labels in FluentCRM when purchased”.


