You sell a service, for example a workshop or training course on a fixed date, and you want every customer who orders to automatically receive the right tag or list and a follow-up email. In this article you walk through the complete path: creating the product as a service (virtual), optionally setting a maximum number of places, having the tag assigned directly in the product screen and, only if you also want to send emails yourself, building an automation for the follow-up email.
The webshop in Autorespond is based on WooCommerce and the automations on FluentCRM, included in your package. Read the WooCommerce documentation
Coming from the old Autorespond? These are the terms now #
- A product (or service) is still called a product. You find products under Shop → Products.
- A group is now a tag or a list. You manage tags and lists in the CRM under CRM & Emails. A tag after purchase is set directly in the product screen, so you do not need an automation for that.
- The follow-up email after an order is arranged with an automation under CRM & Emails → Automations. Longer email series are built with email sequences.
Step 1: create the product (your service) and switch Virtual on #
In the menu, go to Shop → Products and click Add new product at the top. You arrive in the product screen. For a service, so anything that does not have to be shipped physically, you tick Virtual:
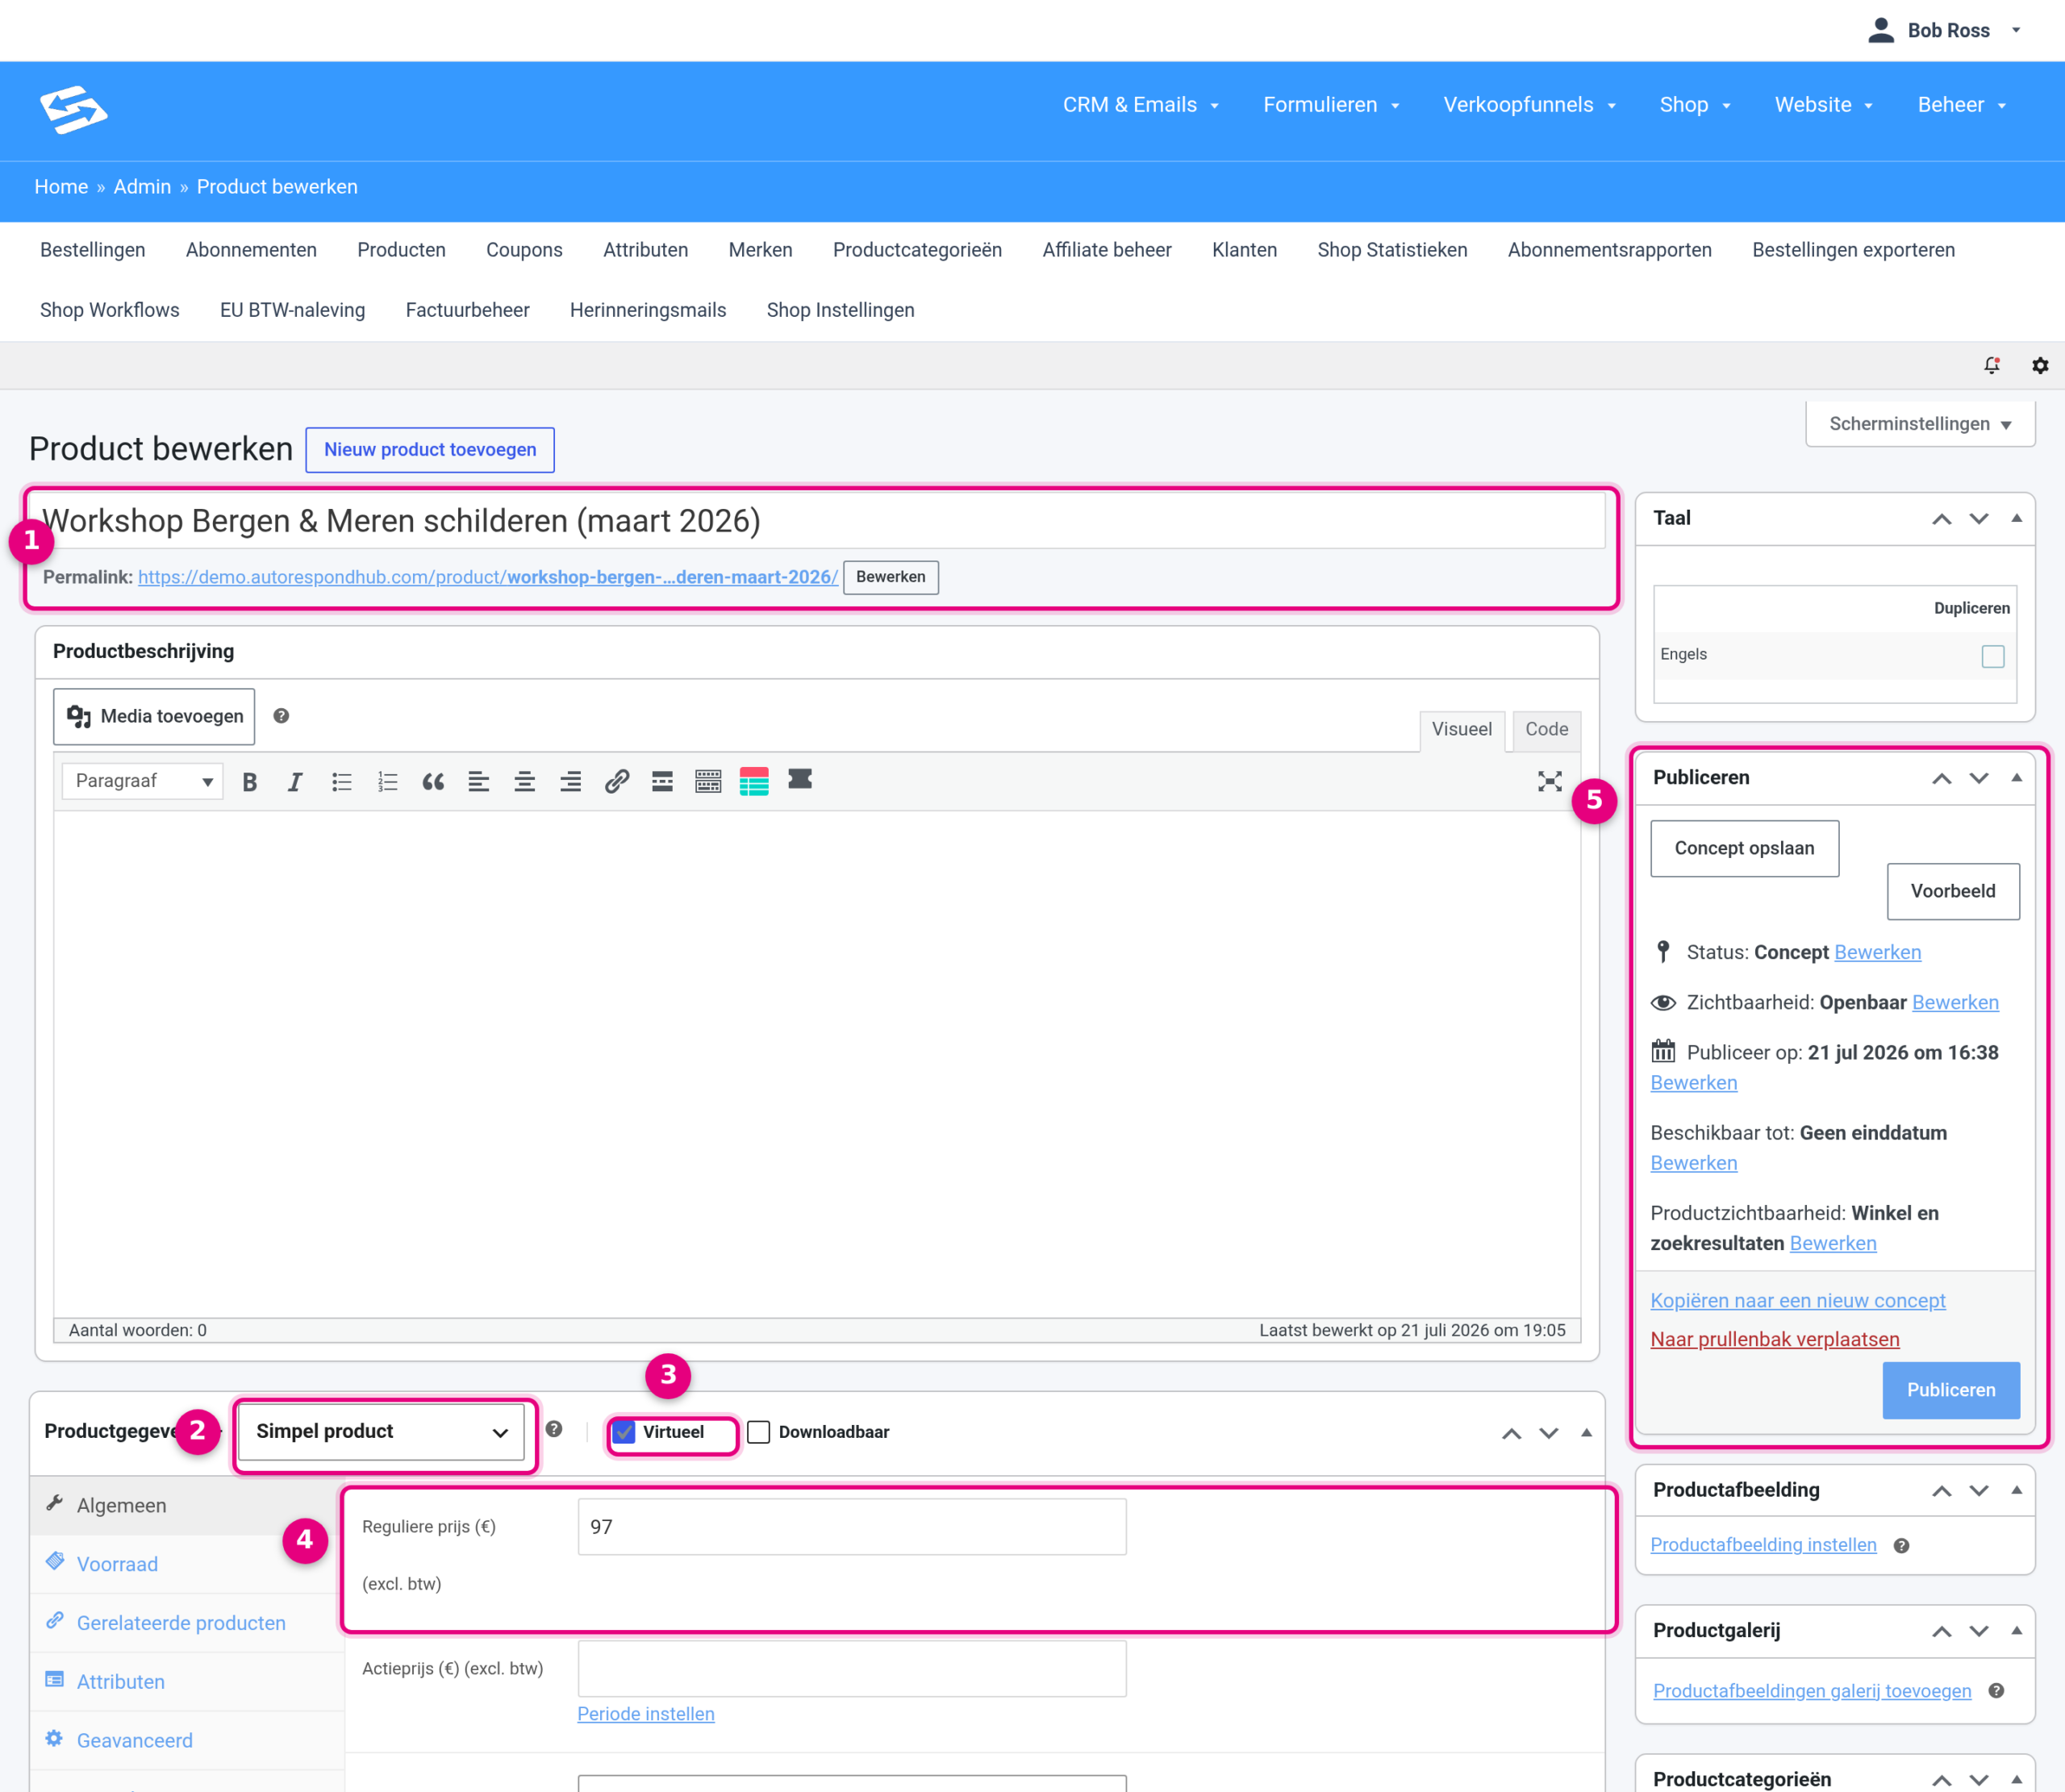
- Product name: give your service a clear name. The permalink, the web address of the product page, appears directly under the name.
- Product type: leave this on Simple product.
- Virtual: tick this. A service does not have to be shipped; the customer pays no shipping costs and the Shipping tab disappears from the list on the left. The Inventory tab simply stays.
- Regular price: enter the price on the General tab (excl. VAT). If you want to offer a temporary discount, use the Sale price field with an optional period.
- Publish: with Save draft you keep the product without it being visible yet, with Preview you view the product page and with Publish you take the product live. The field “Available until” belongs to scheduled sales, see further on in this article.
In the right-hand column you also set the Product image and, if you wish, a Product category. After publishing you can share the product page or use a direct order link on your landing page, see Generating order links for products.
Optional: a maximum number of sales (stock management) #
Stock management is really meant for physical products that you ship. You may also use it to sell a maximum number, for example the number of places in a workshop. If you choose that, leave Virtual off, as in the screenshot below. In the product screen, open the Inventory tab:
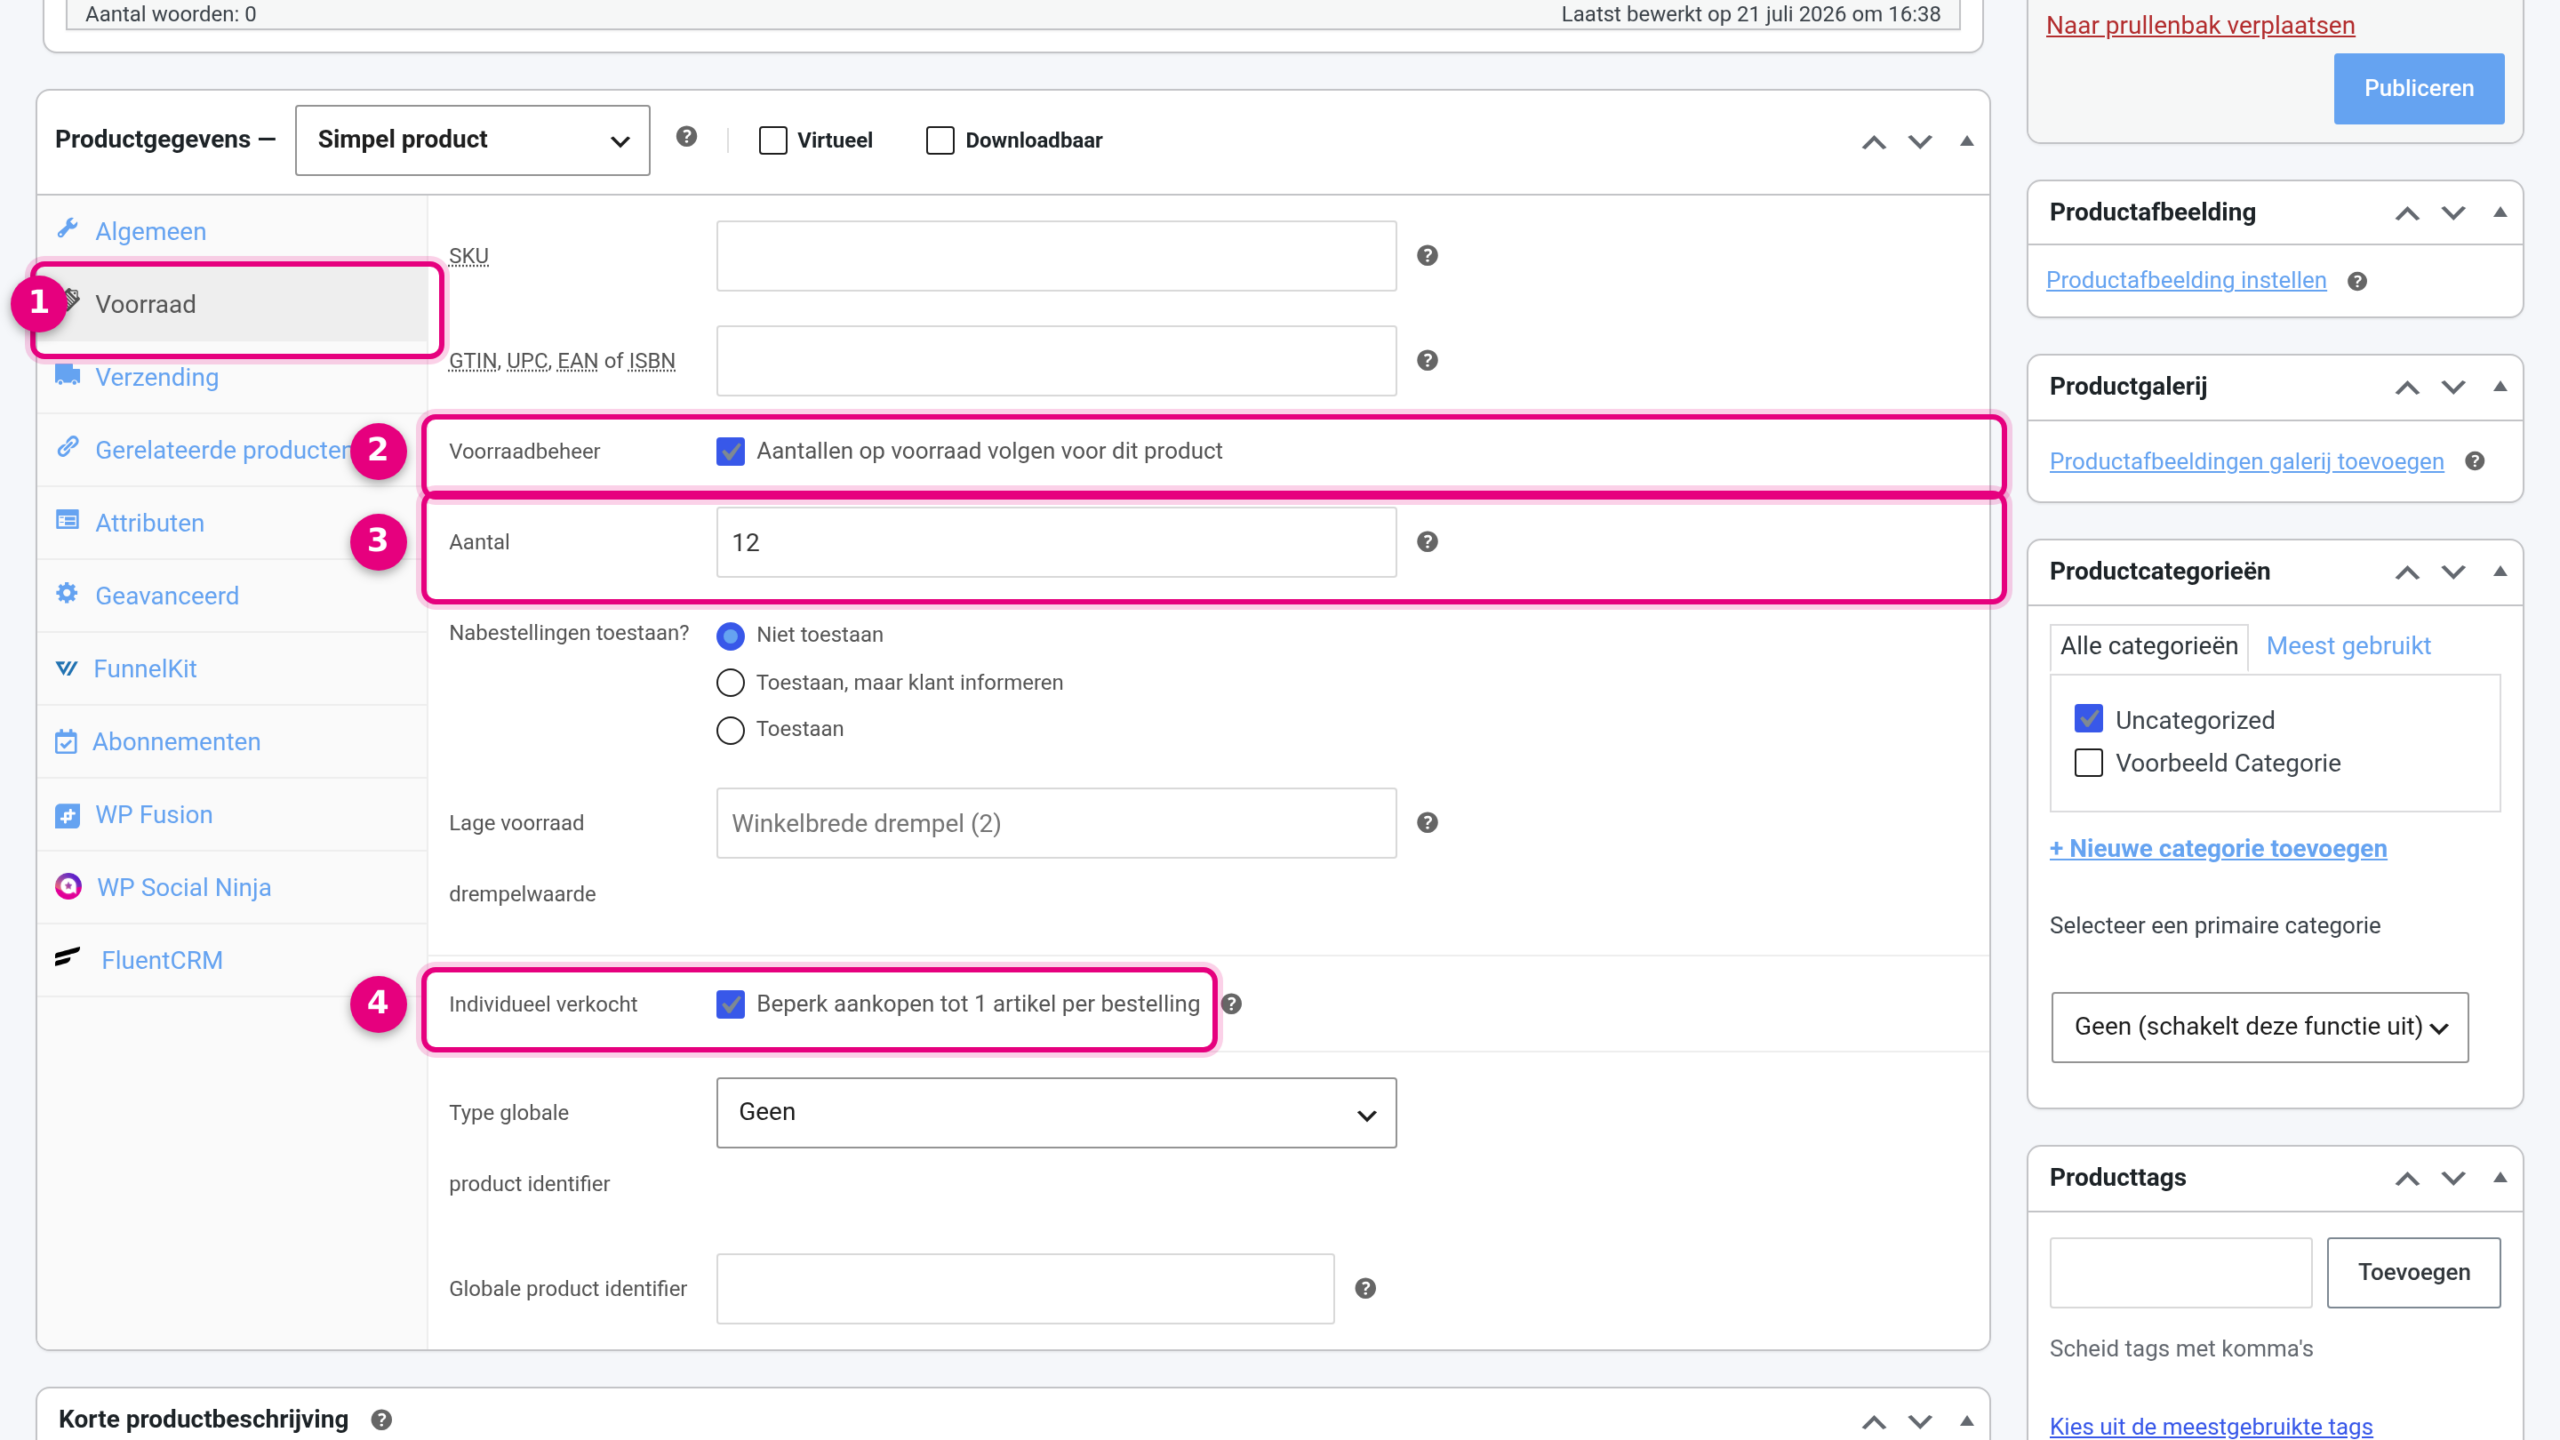
- Inventory tab: all settings for quantities are here.
- Stock management: tick “Track stock quantity for this product” to work with a fixed number.
- Quantity: the total number of places or items, for example 12. At “Allow backorders?” you choose Do not allow; the product is then automatically sold out as soon as the stock runs out.
- Sold individually: tick this to limit purchases to 1 item per order. Useful if every participant has to order separately.
Good to know: there is no separate field for a maximum order quantity per customer. You steer with two controls: the stock limits the total and Sold individually limits it to 1 per order. If you leave Sold individually off, the customer chooses the quantity themselves (until the stock runs out). You can read more details in Setting up stock management for products.
Service on a fixed date? Two useful routes #
- Scheduled sale: let the sale stop automatically on an end date, for example the day before the workshop. You can read how to set that up in Setting up scheduled sales for products.
- Recurring dates: products that already have orders on them cannot simply be deleted. So for a next edition, rather than creating a pile of new products, change the date in the existing product or work with variations. That keeps your shop clear and keeps the order history correct.
Step 2: give the customer a tag automatically, directly in the product screen #
If you only want every buyer to receive a tag automatically (the successor to the old “group”), you do not need an automation for that. You set it in the product screen itself, on the WP Fusion tab (part of access control):
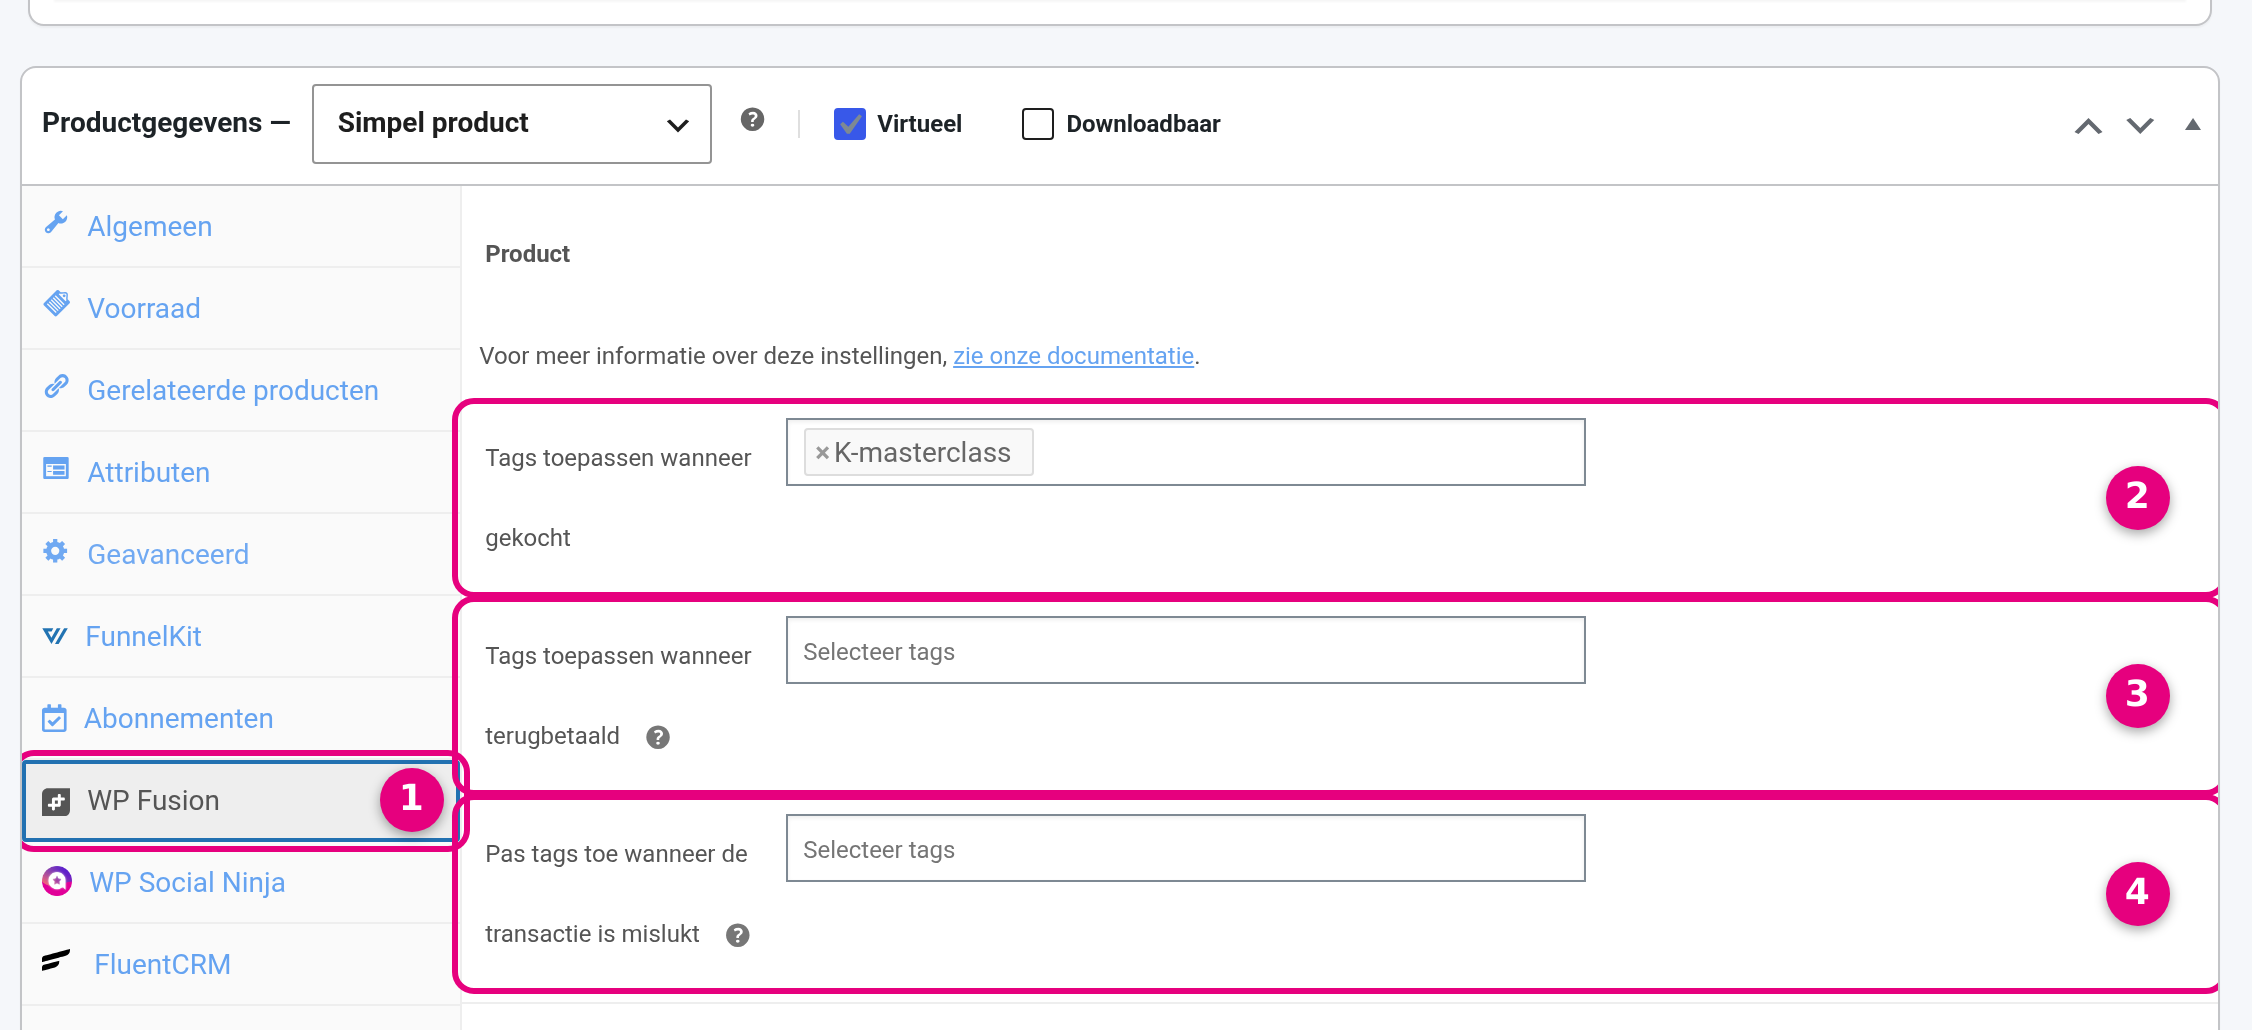
- WP Fusion tab: this tab is at the bottom of the list of Product data tabs.
- Apply tags when purchased: choose one or more tags the customer receives automatically as soon as the order has been paid, for example a tag with the name of your workshop. If the tag does not exist yet, create it in the CRM first.
- Apply tags when refunded: optional. With this, the system assigns an extra tag on a refund, for example a tag “Refunded” for your own records.
- Apply tags when the transaction has failed: optional, the same idea but for payments that fail.
The tag is assigned as soon as the order has been paid (status “Processing” or “Completed”). If a customer pays by bank transfer, the order is first “On hold” and they therefore do not receive the tag yet; that follows at the moment you set the order to paid.
A big advantage of this tab: on a full refund the purchase tag is automatically withdrawn again, and you do not have to set anything up for that. If you use the same tag to give access to restricted pages, community sections or courses, that access therefore lapses automatically on a refund. See also the explanation in this documentation: Controlling access to pages and content with tags
At the bottom of the tabs there is also a FluentCRM tab with comparable tag fields. The difference: a tag you set there simply stays in place on a refund. So use the WP Fusion tab by preference.
This tab works with tags; if you want to put the customer on a list, you do that with the action “Apply list” in an automation (see step 3). For most situations a tag is enough: in the new system, tags and lists are both ways to group contacts and select them for mailings.
Step 3: sending follow-up emails with an automation #
You need an automation as soon as you want more than a tag: for example sending your own welcome email straight away, putting the customer on a list or scheduling a series of emails. Before you choose the trigger, it is useful to know what happens to the status of an order:
- If the customer pays online straight away (for example with iDeal), the order gets the status Processing.
- Exception: if the product is Virtual and Downloadable (for example an e-book), the shop puts the order on Completed straight away. The status “Processing” is then skipped.
Choose your trigger accordingly: for a service where only Virtual is switched on (the main scenario of this article) you use New order (processing); that starts as soon as the order reaches “Processing”. If you have also ticked Downloadable, choose Order completed: the order then skips “Processing”, so the processing trigger does not start.
Go to CRM & Emails → Automations and click New automation at the top right. Then choose the trigger, the starting point of the automation:
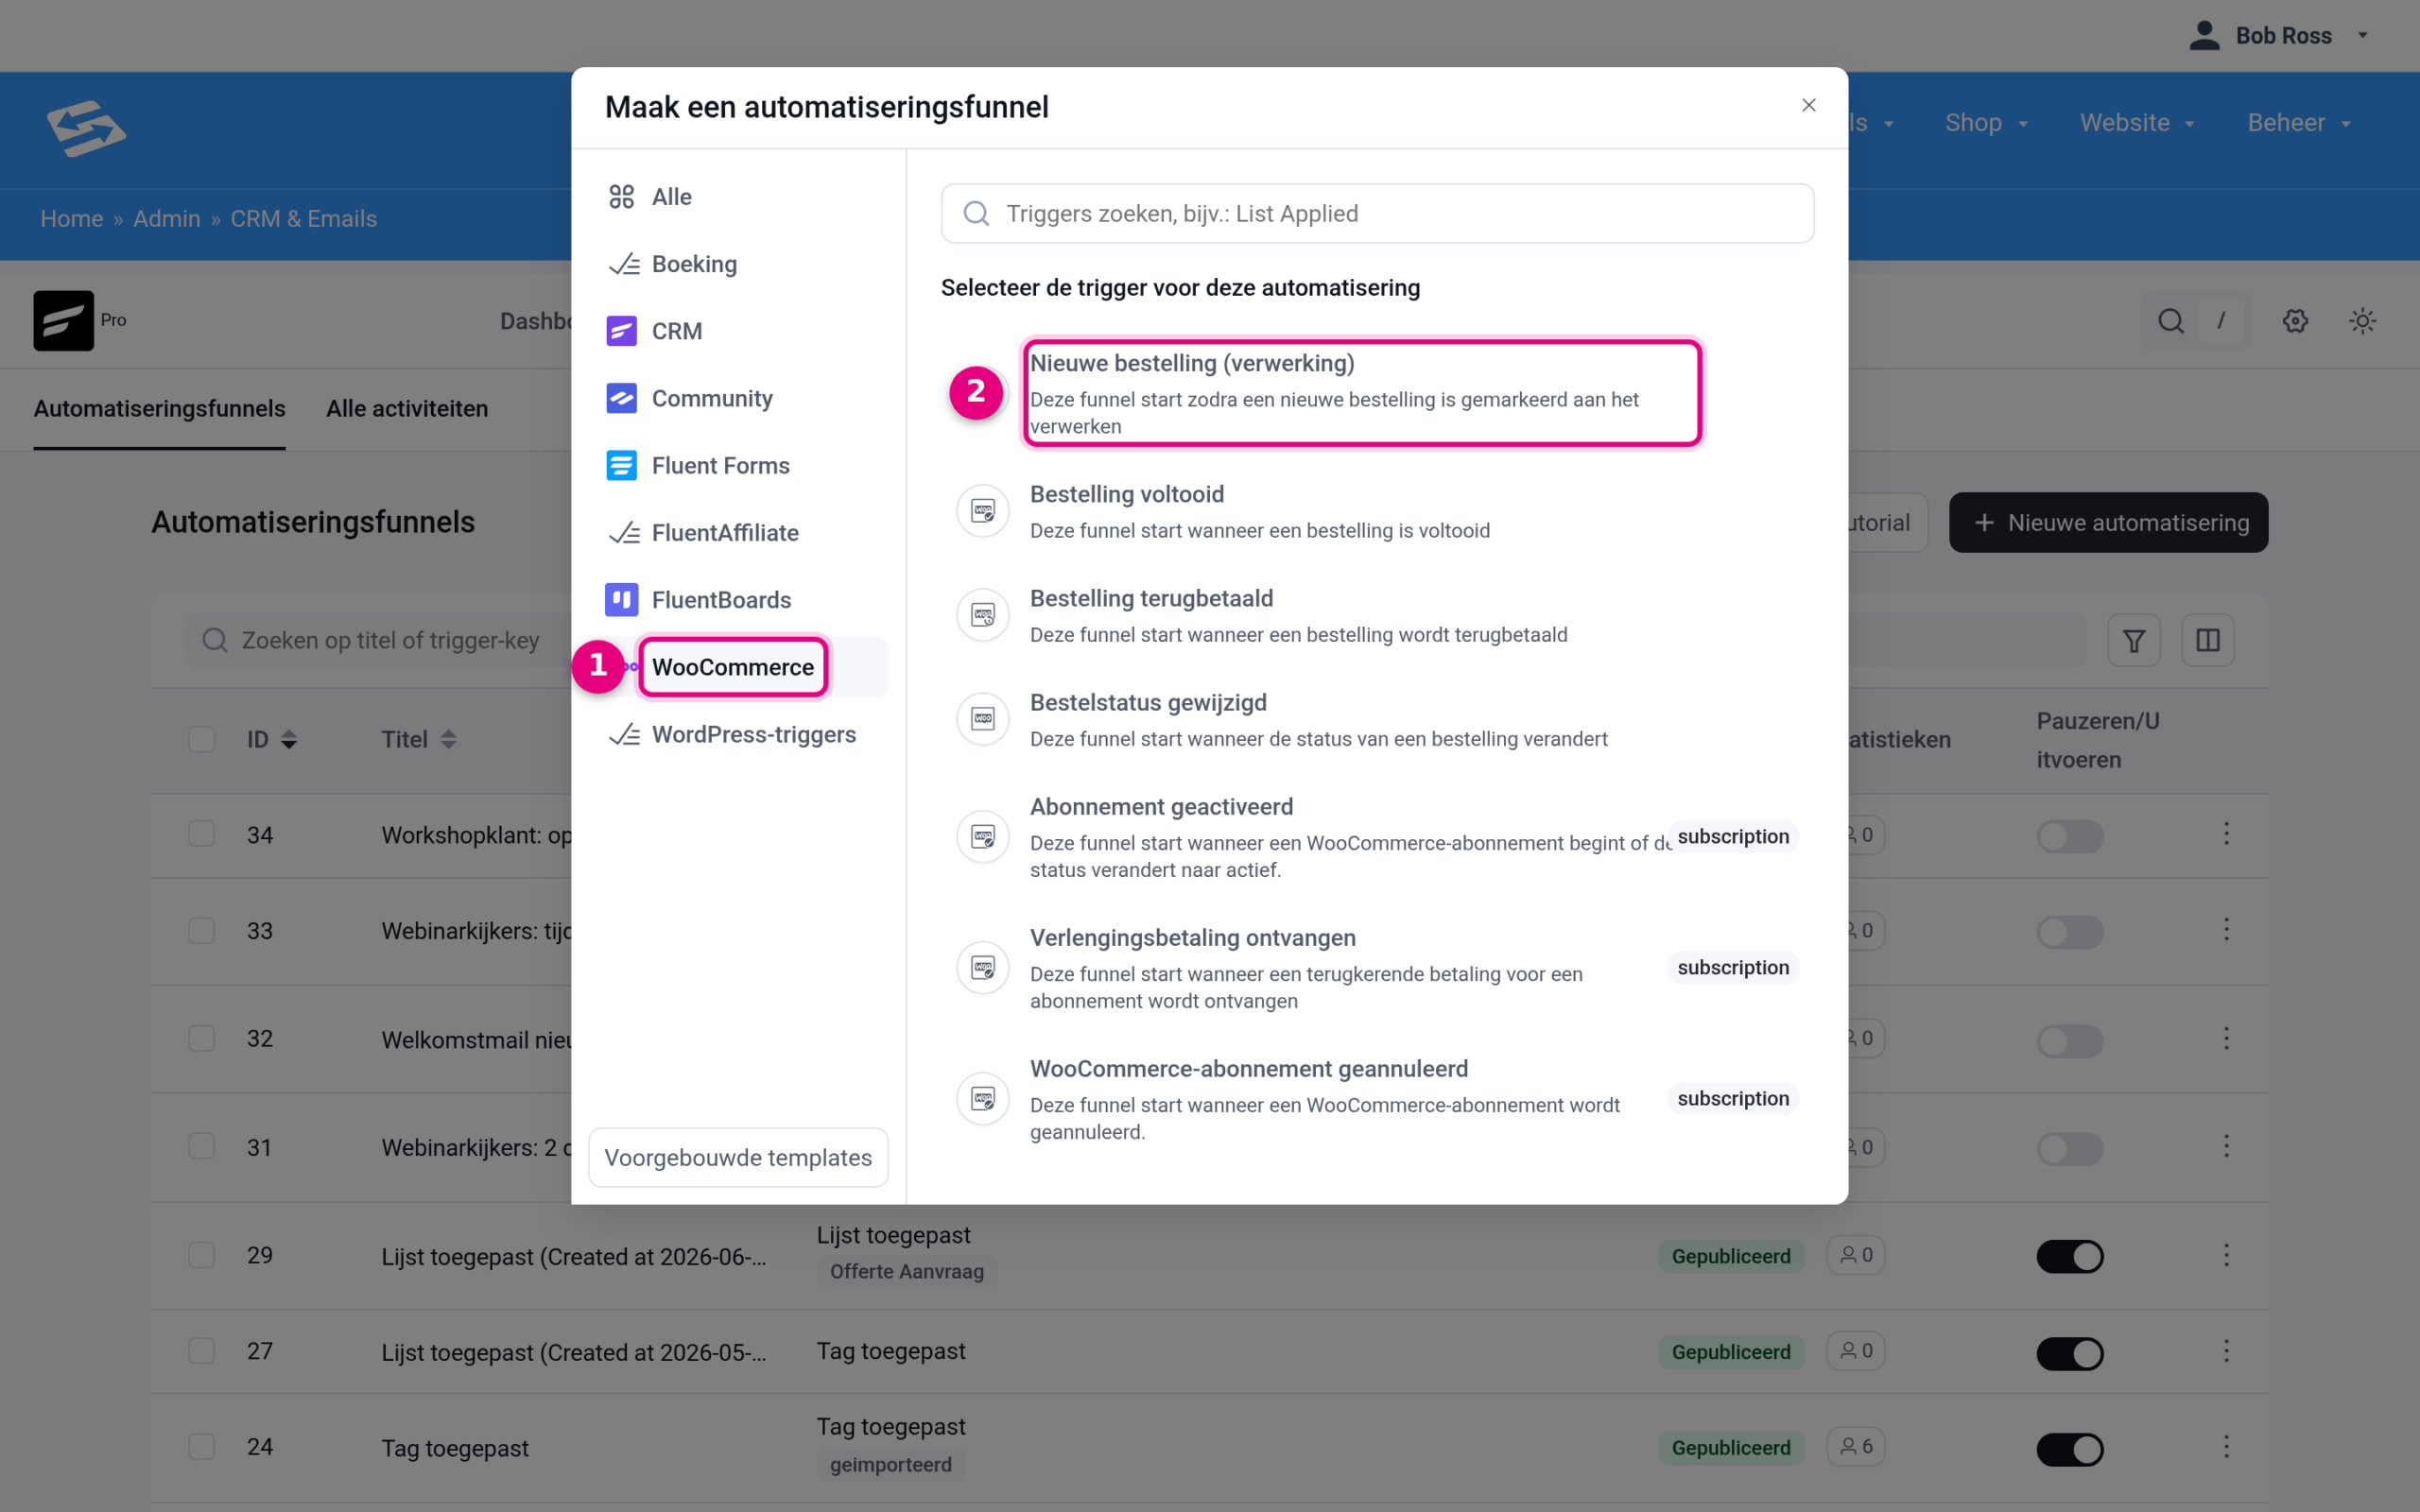
- WooCommerce category: all triggers that have to do with your shop are here.
- New order (processing): the right choice for a service that is only Virtual. The alternative Order completed starts when the order is completed: automatically for a virtual and downloadable product, otherwise at the moment you complete the order yourself.
After choosing the trigger, the automation editor opens. Click the trigger at the top to open the settings: at Target products you select your product, so that the automation only runs for people who buy this product. If you leave the field empty, the automation applies to every purchase. You will find more explanation in Setting up automation triggers and Building automations with the automation editor.
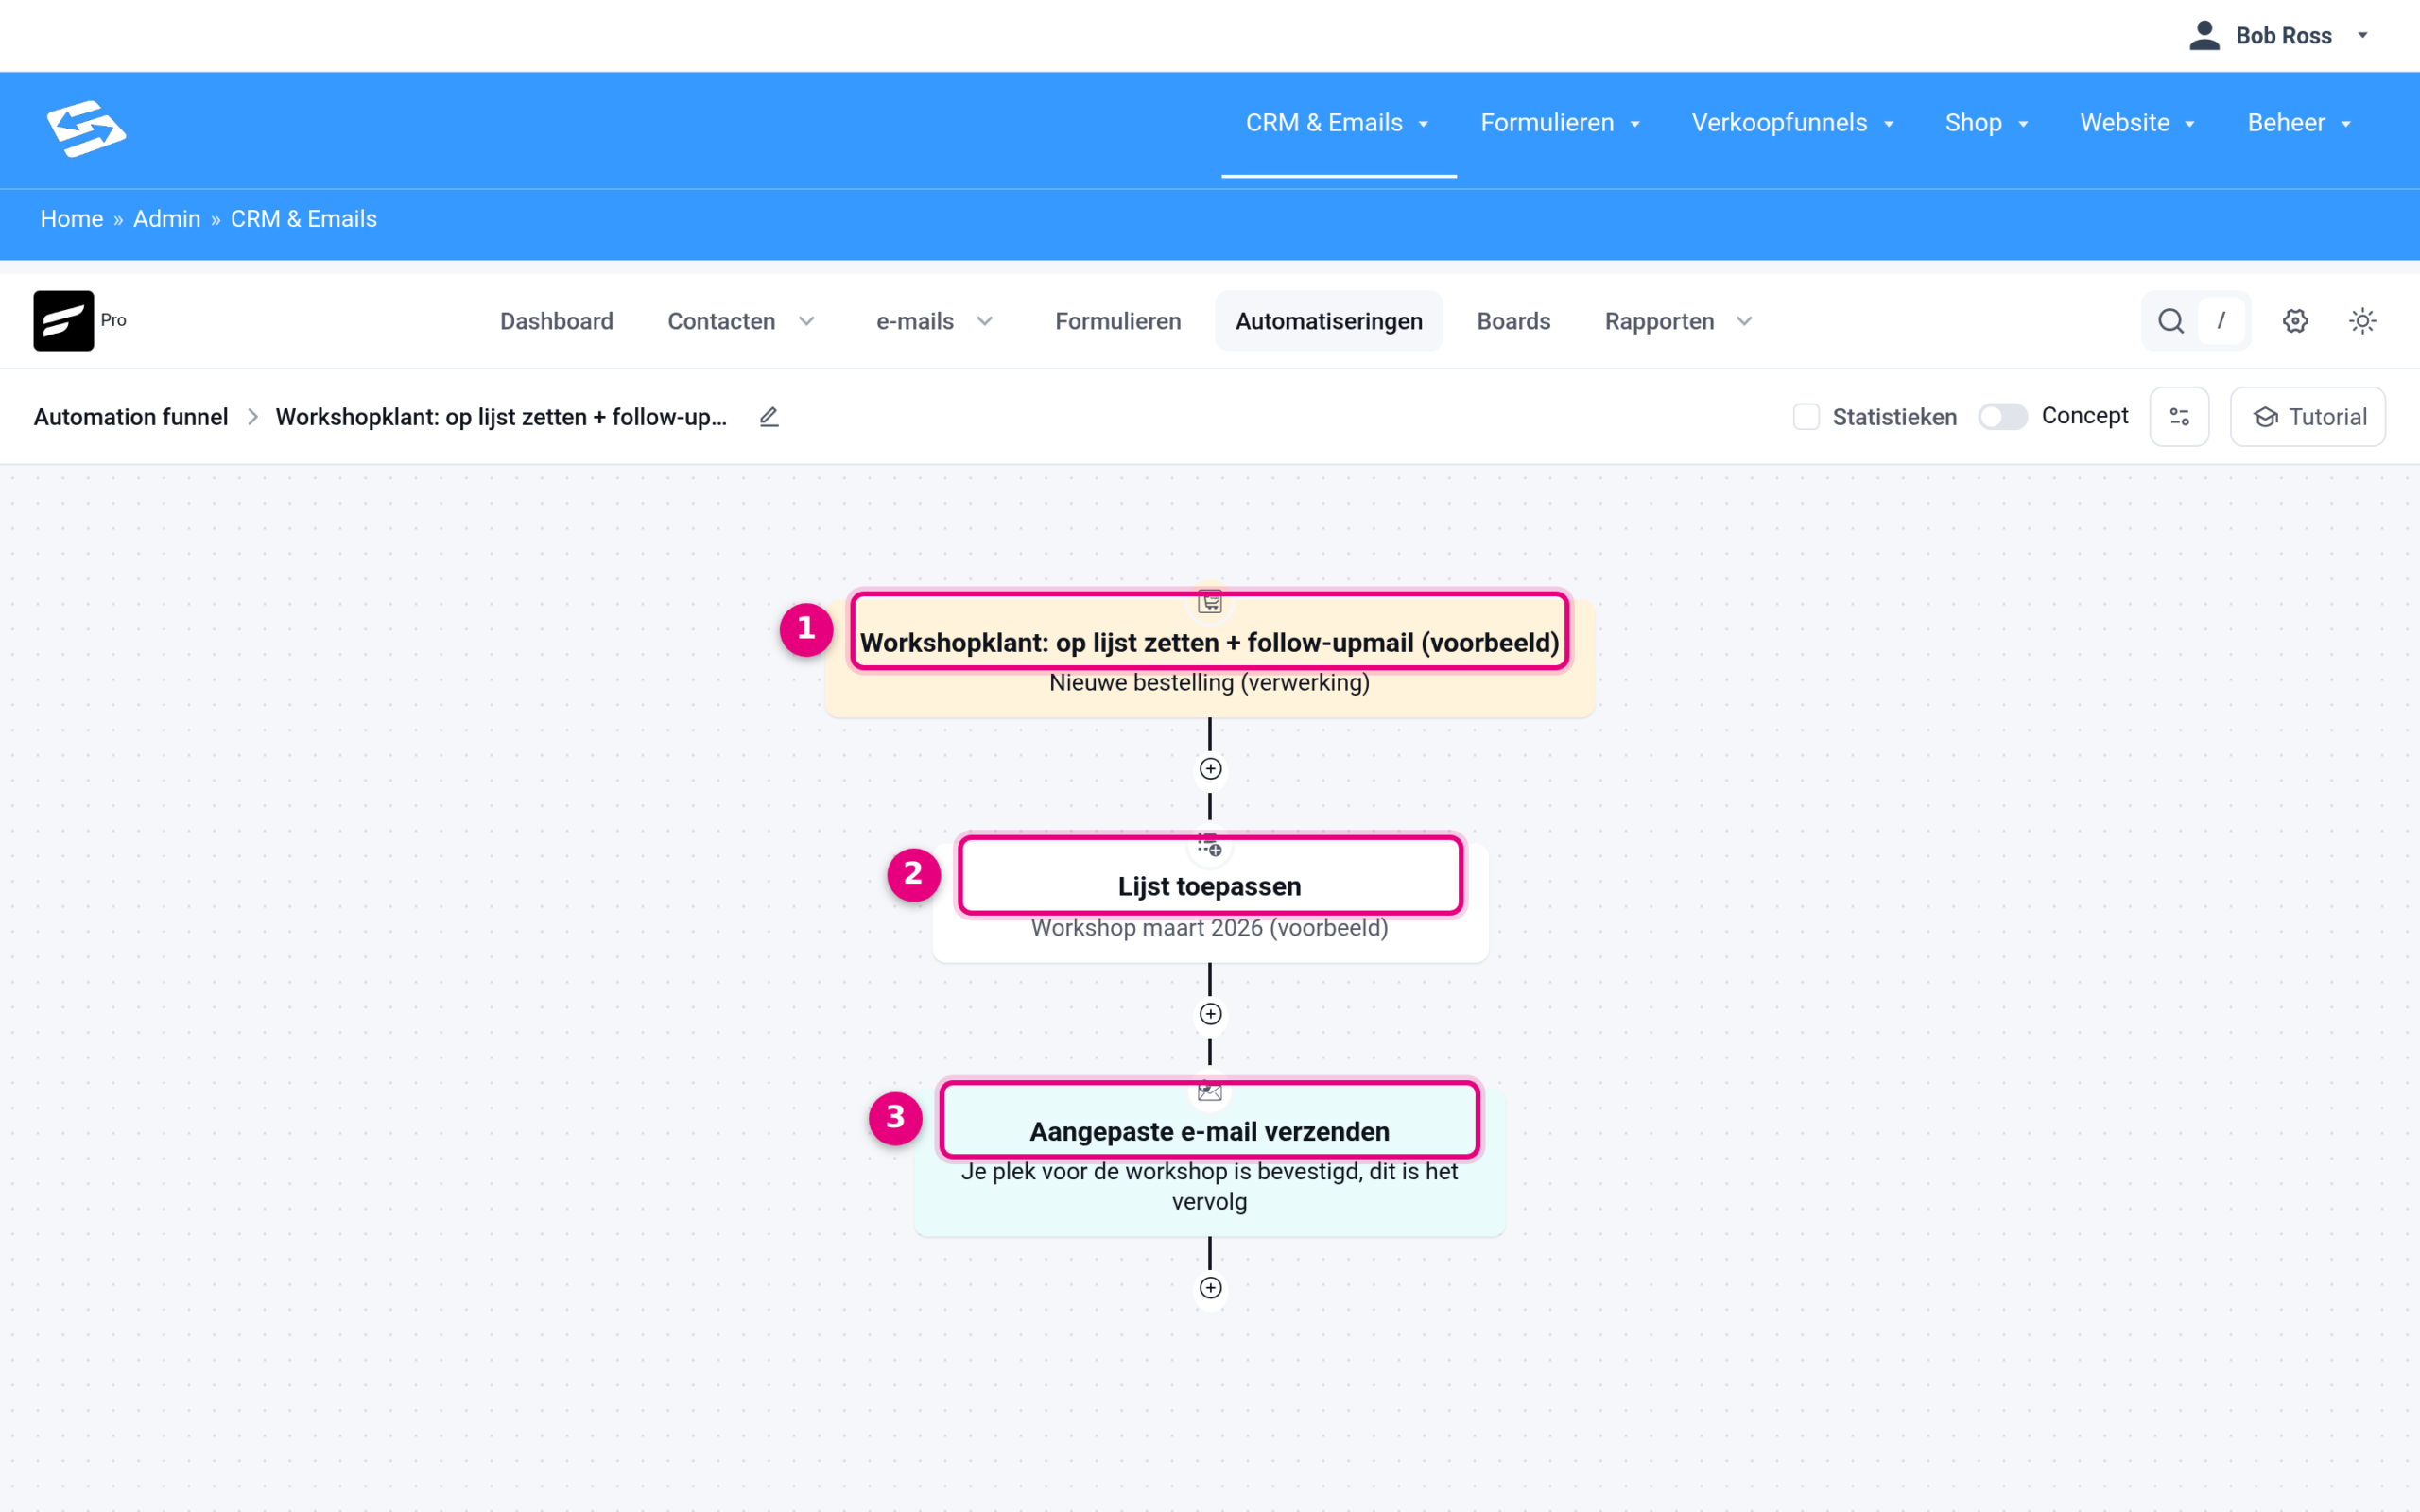
- The trigger: every paid order of your product starts here.
- Apply list: this step puts the customer on a list. If you have already arranged the tag through the WP Fusion tab of the product (step 2) and you do not need a list, you can leave this step out.
- Send custom email: this step sends the follow-up email straight away.
With the round plus button between the steps you add new actions.
Putting the customer on a list (optional) #
If you want to work with a list instead of (or alongside) the tag from step 2, use the plus button to add the action Apply list and click the step to open the settings:
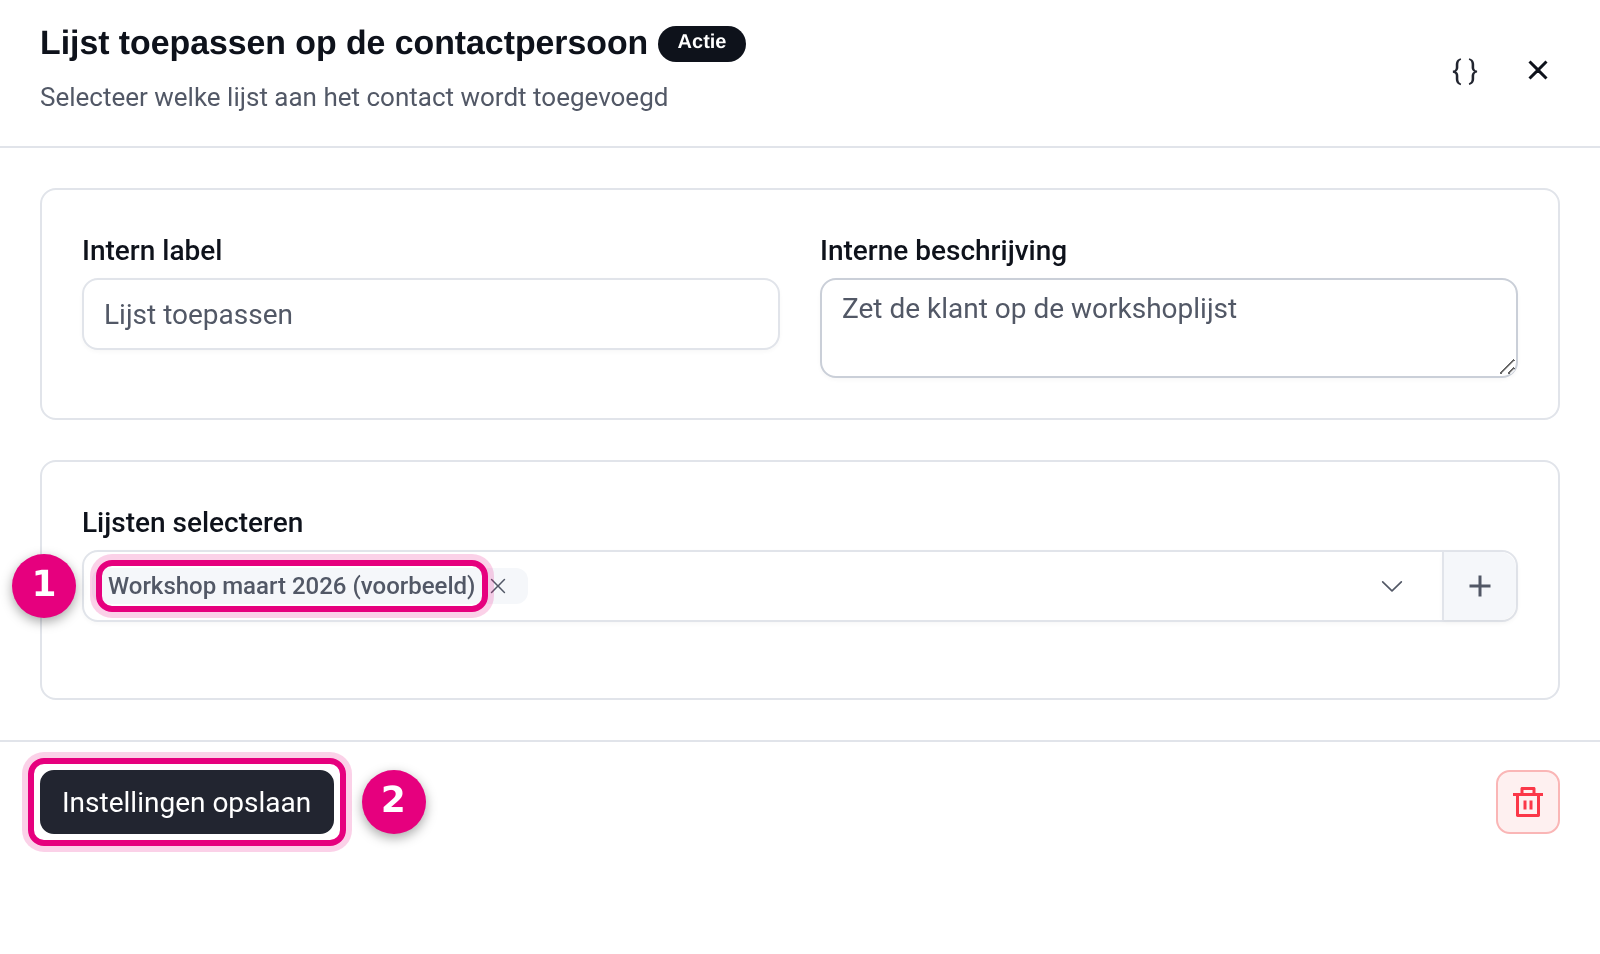
- Select lists: choose the list the customer should be added to. If the list does not exist yet, create it directly with the plus button to the right of this field.
- Save settings: do not forget to save before you close the step.
There is also an action Apply tag, which works in the same way. You only need that if you do not already assign the tag through the WP Fusion tab of the product. You will find an overview of all actions in Configuring automation actions.
The follow-up email the customer receives straight away #
As the next step, add the action Send custom email:
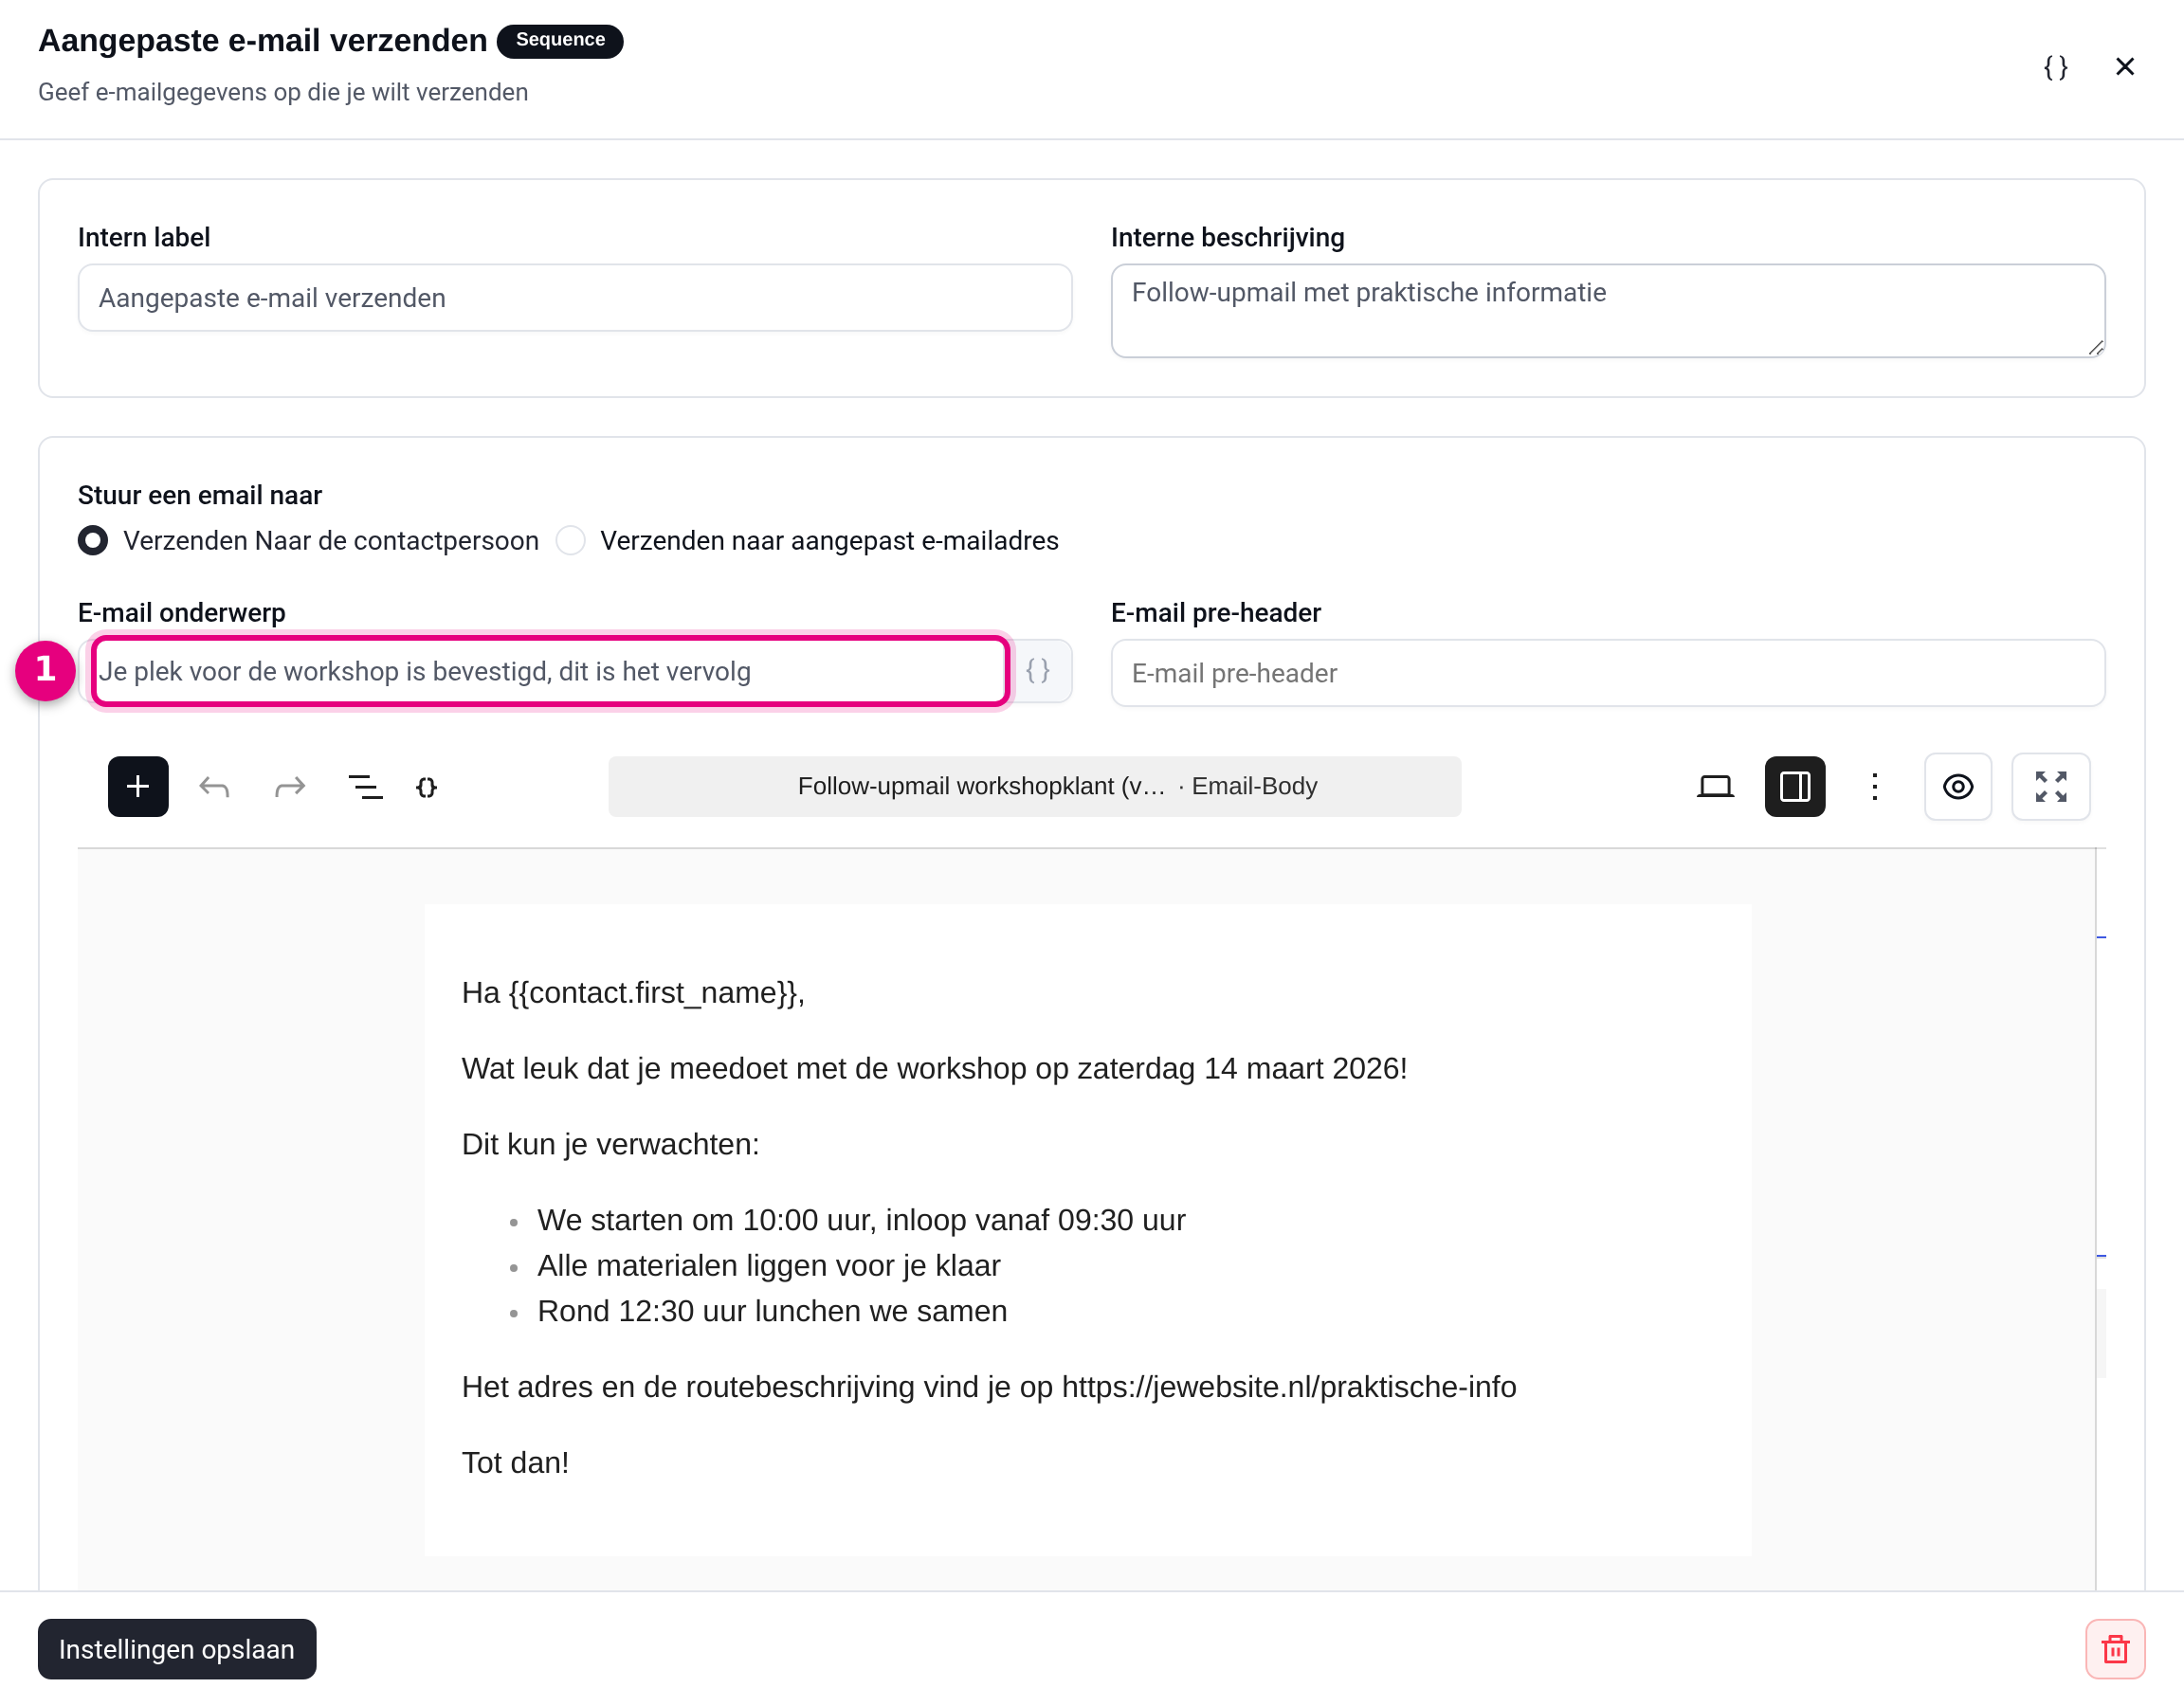
- Email subject: the subject the customer sees in the inbox. Below that you write the content of the email in the editor. With merge fields such as {{contact.first_name}} you address the customer personally; you insert them through the curly brace icon next to the subject.
Do you want to send more emails, for example a reminder just before the workshop? Then put a Wait X days/hours step between the emails, or link a complete email sequence with the action “Set email sequence”.
What does the customer already receive after an order anyway? #
By default the shop sends an order confirmation with the order details straight away as soon as the payment comes in. So you do not have to build that yourself. The follow-up email from your automation comes on top of that and is entirely yours: practical information, a word of welcome or the first steps. If you want to adjust the standard shop emails, read Adjusting WooCommerce emails and alternatives.
Pay immediately or afterwards? #
In the standard checkout the customer pays online straight away. The order then immediately gets the status “Processing” (or “Completed” for a virtual and downloadable product) and your tag and automation are applied straight away. If you also offer an offline method, such as direct bank transfer, the order stays “On hold” until you have received the payment and update the status manually; only at that moment are the tag and the automation applied. You manage the payment methods through Shop → Shop Settings on the Payments tab. All the options are listed in Payment options in the shop checkout and for manual orders.
Testing without a real customer #
An automation only runs if it is set to active; the tag from the WP Fusion tab always works as soon as the product has been published. You test it like this: limit the trigger through Target products to your (test) product, set the automation to active and place an order yourself with your own email address. If you pay with an offline method such as direct bank transfer, set the order manually to “Processing” through Shop → Orders (or to “Completed” if your automation uses the Order completed trigger). Then check whether your contact has received the tag and whether the email has arrived, and set the automation back to draft until everything may go live.
Related articles #
- Assigning a product tag after payment: starting automations and withdrawing access automatically
- Controlling access to pages and content with tags
- Generating order links for products and using them on landing pages
- Setting up stock management for products
- Setting up scheduled sales for products
- Payment options in the shop checkout and for manual orders
- Setting up automation triggers
- Configuring automation actions
- Building automations with the automation editor
- Setting up email sequences again after migrating from the old Autorespond
- Adjusting WooCommerce emails and alternatives


