Setting your availability: working hours, buffers, minimum notice period and daily maximum #
The Appointments module is an optional extension you can add to your Autorespond package. This module lets people book appointments online, comparable to Calendly. More information about this module
As soon as your first booking type is online, everyday practice takes over: someone books at a moment when you are teaching, two conversations run straight into each other without a break, or someone books a nine o’clock appointment at a quarter to nine that same morning. You do not solve that in your calendar, but in the settings of the Appointments module. In this article you will see where you record your working hours, how you handle holidays and exceptional days, and how you use buffers, a minimum notice period and daily maximums to decide exactly which times a visitor still gets to see.
1. The two places where availability is arranged #
Availability sits at two levels in the module, and that explains why you sometimes change something without anything changing on the booking page. Go to Manage → Appointments. At the top you will see the tabs Dashboard, Calendars, Bookings, Availability and Settings.
- The Availability tab of the module. Here you create and manage schedules: reusable sets of working hours with their own name and time zone. One schedule can be linked to several booking types. If you change the schedule, every linked booking type moves with it.
- The Availability tab inside a booking type. Here you decide per service which schedule is used, or you set separate hours for that one booking type that apply nowhere else. The same screen also shows how far ahead someone may book.
The rule of thumb is simple. If you work with fixed hours that apply to almost all your services, use a schedule and link it to all your booking types. If one service has a different rhythm, for example an introductory call you only do on Tuesday mornings, choose custom hours for that one booking type. Do bear in mind that custom hours only exist within that booking type: you will not find them in the list of schedules and you cannot reuse them.
2. Viewing your schedules and creating a new one #
Click the Availability tab. You will see the description “Set the times when you are available for bookings” and below it the schedules that already exist.
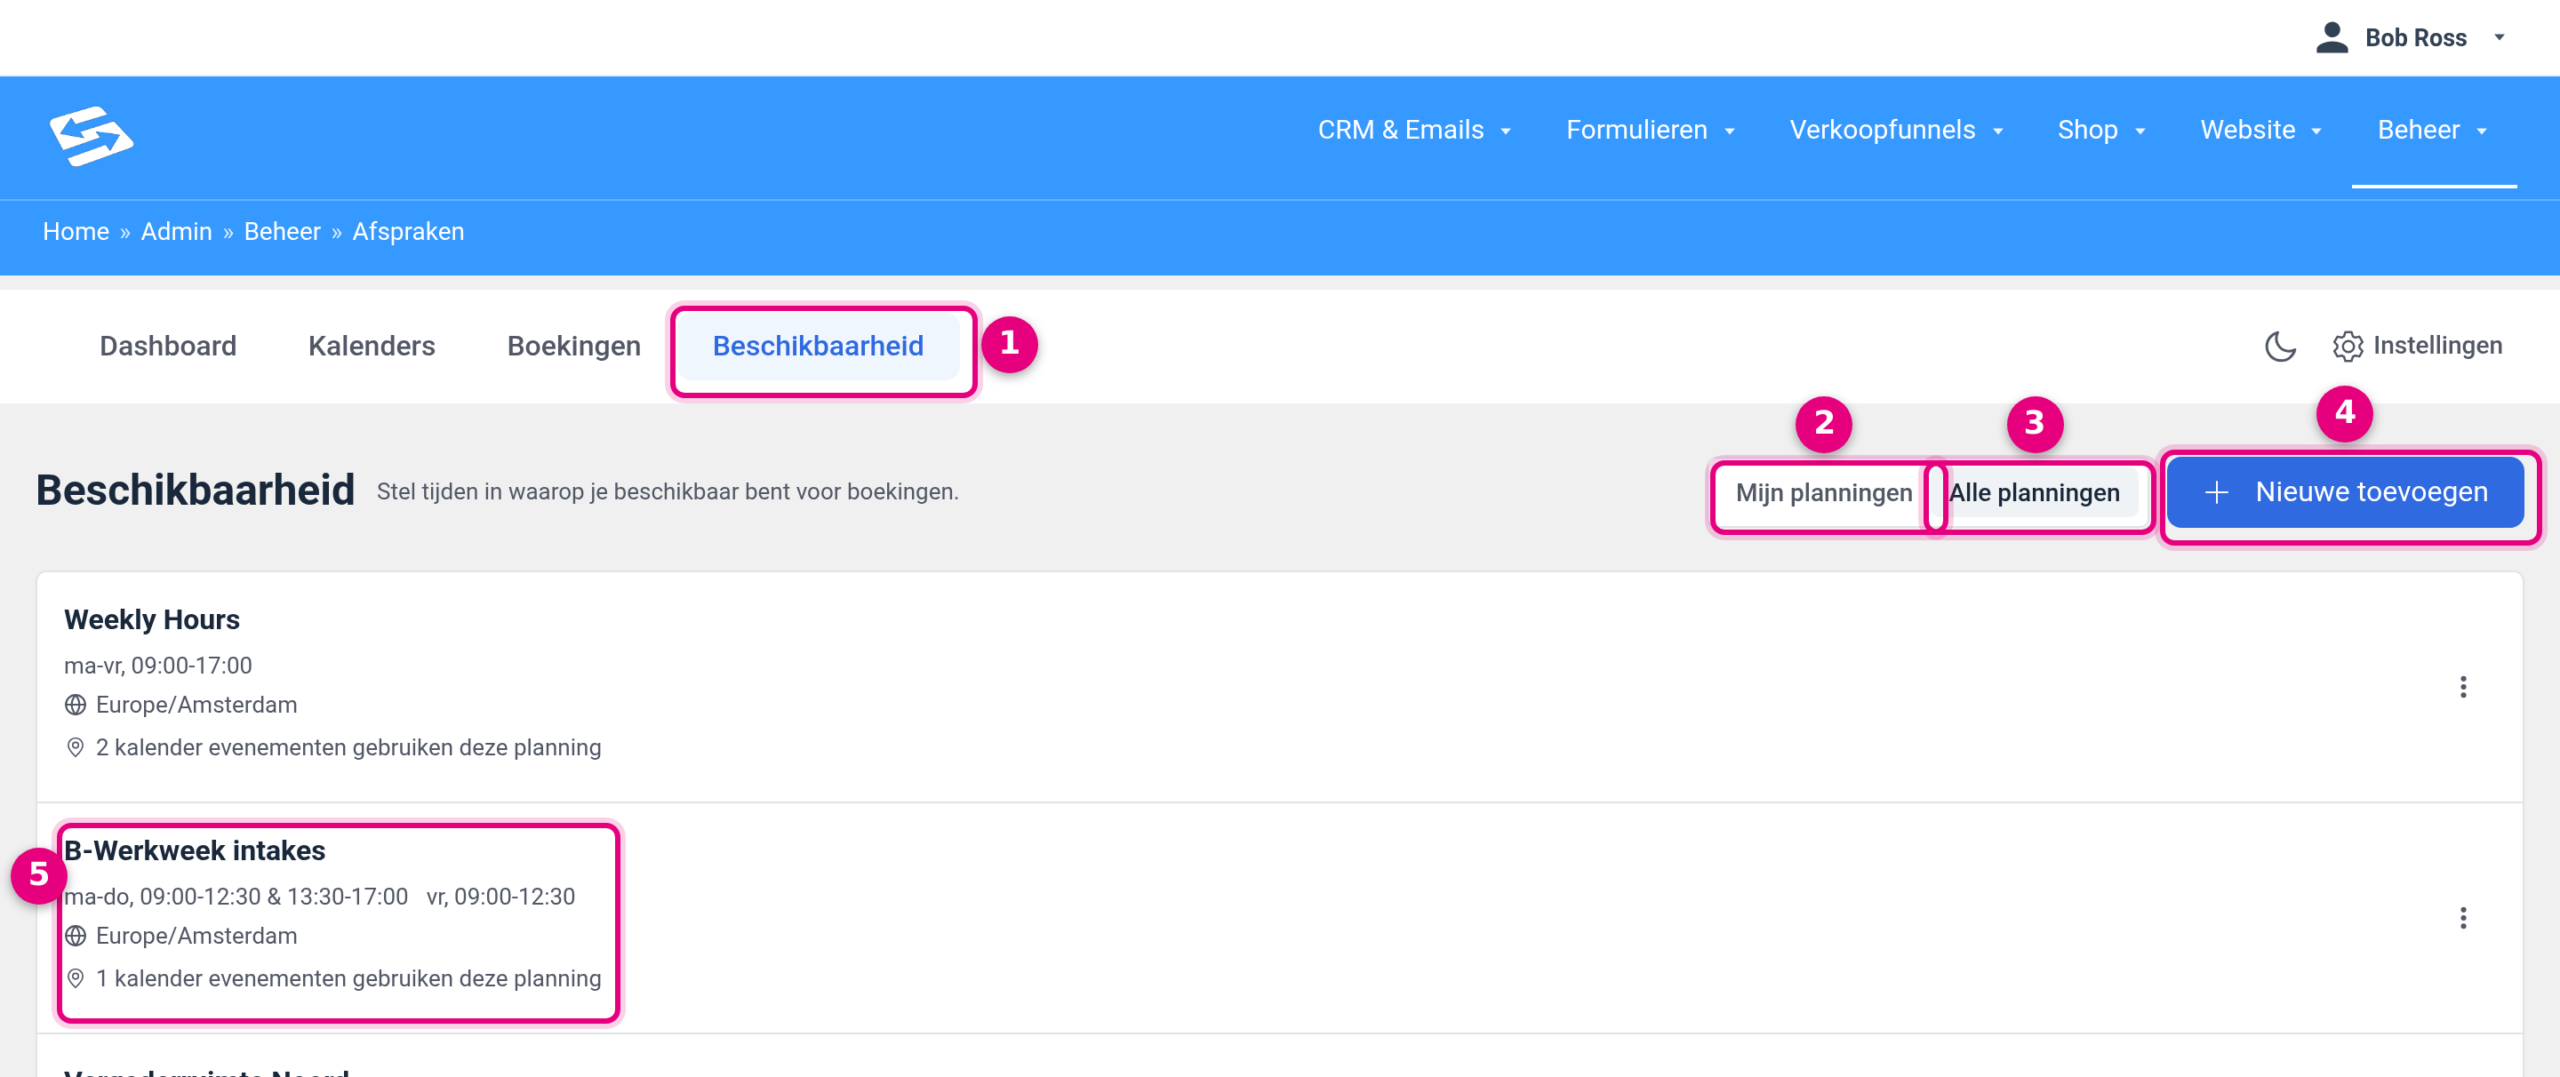
- Availability: the tab of the module where all schedules come together. This is separate from the Calendars and Bookings tabs.
- My schedules: only the schedules that belong to your own user. Useful when you work with several colleagues in the same environment.
- All schedules: every schedule in the environment, including those of colleagues or of a shared room. If you cannot find a schedule you expected, look here.
- Add new: opens the window Add new availability schedule. There you fill in Schedule title (for example Working week intakes or Evening hours) and Select your time zone. Then click Add new schedule, after which you land straight in the edit screen of the new schedule.
- The card of a schedule: at a glance it shows the summary of the working hours (for example Mon-Thu, 09:00-12:30 & 13:30-17:00 and Fri, 09:00-12:30), the time zone and how many booking types use this schedule. That last line is your warning: if it says three events use this schedule, one change affects all three. Click the card to edit the schedule; through the three dots on the right you can also duplicate or delete a schedule.
Every environment starts with one default schedule named Weekly Hours, filled with Monday to Friday from 09:00 to 17:00. You are free to change and rename it. You can also delete it, but only once no booking type uses it any more.
3. Setting weekly hours: days on or off and several blocks per day #
Open a schedule by clicking it. The edit screen is where you draw out your working week.
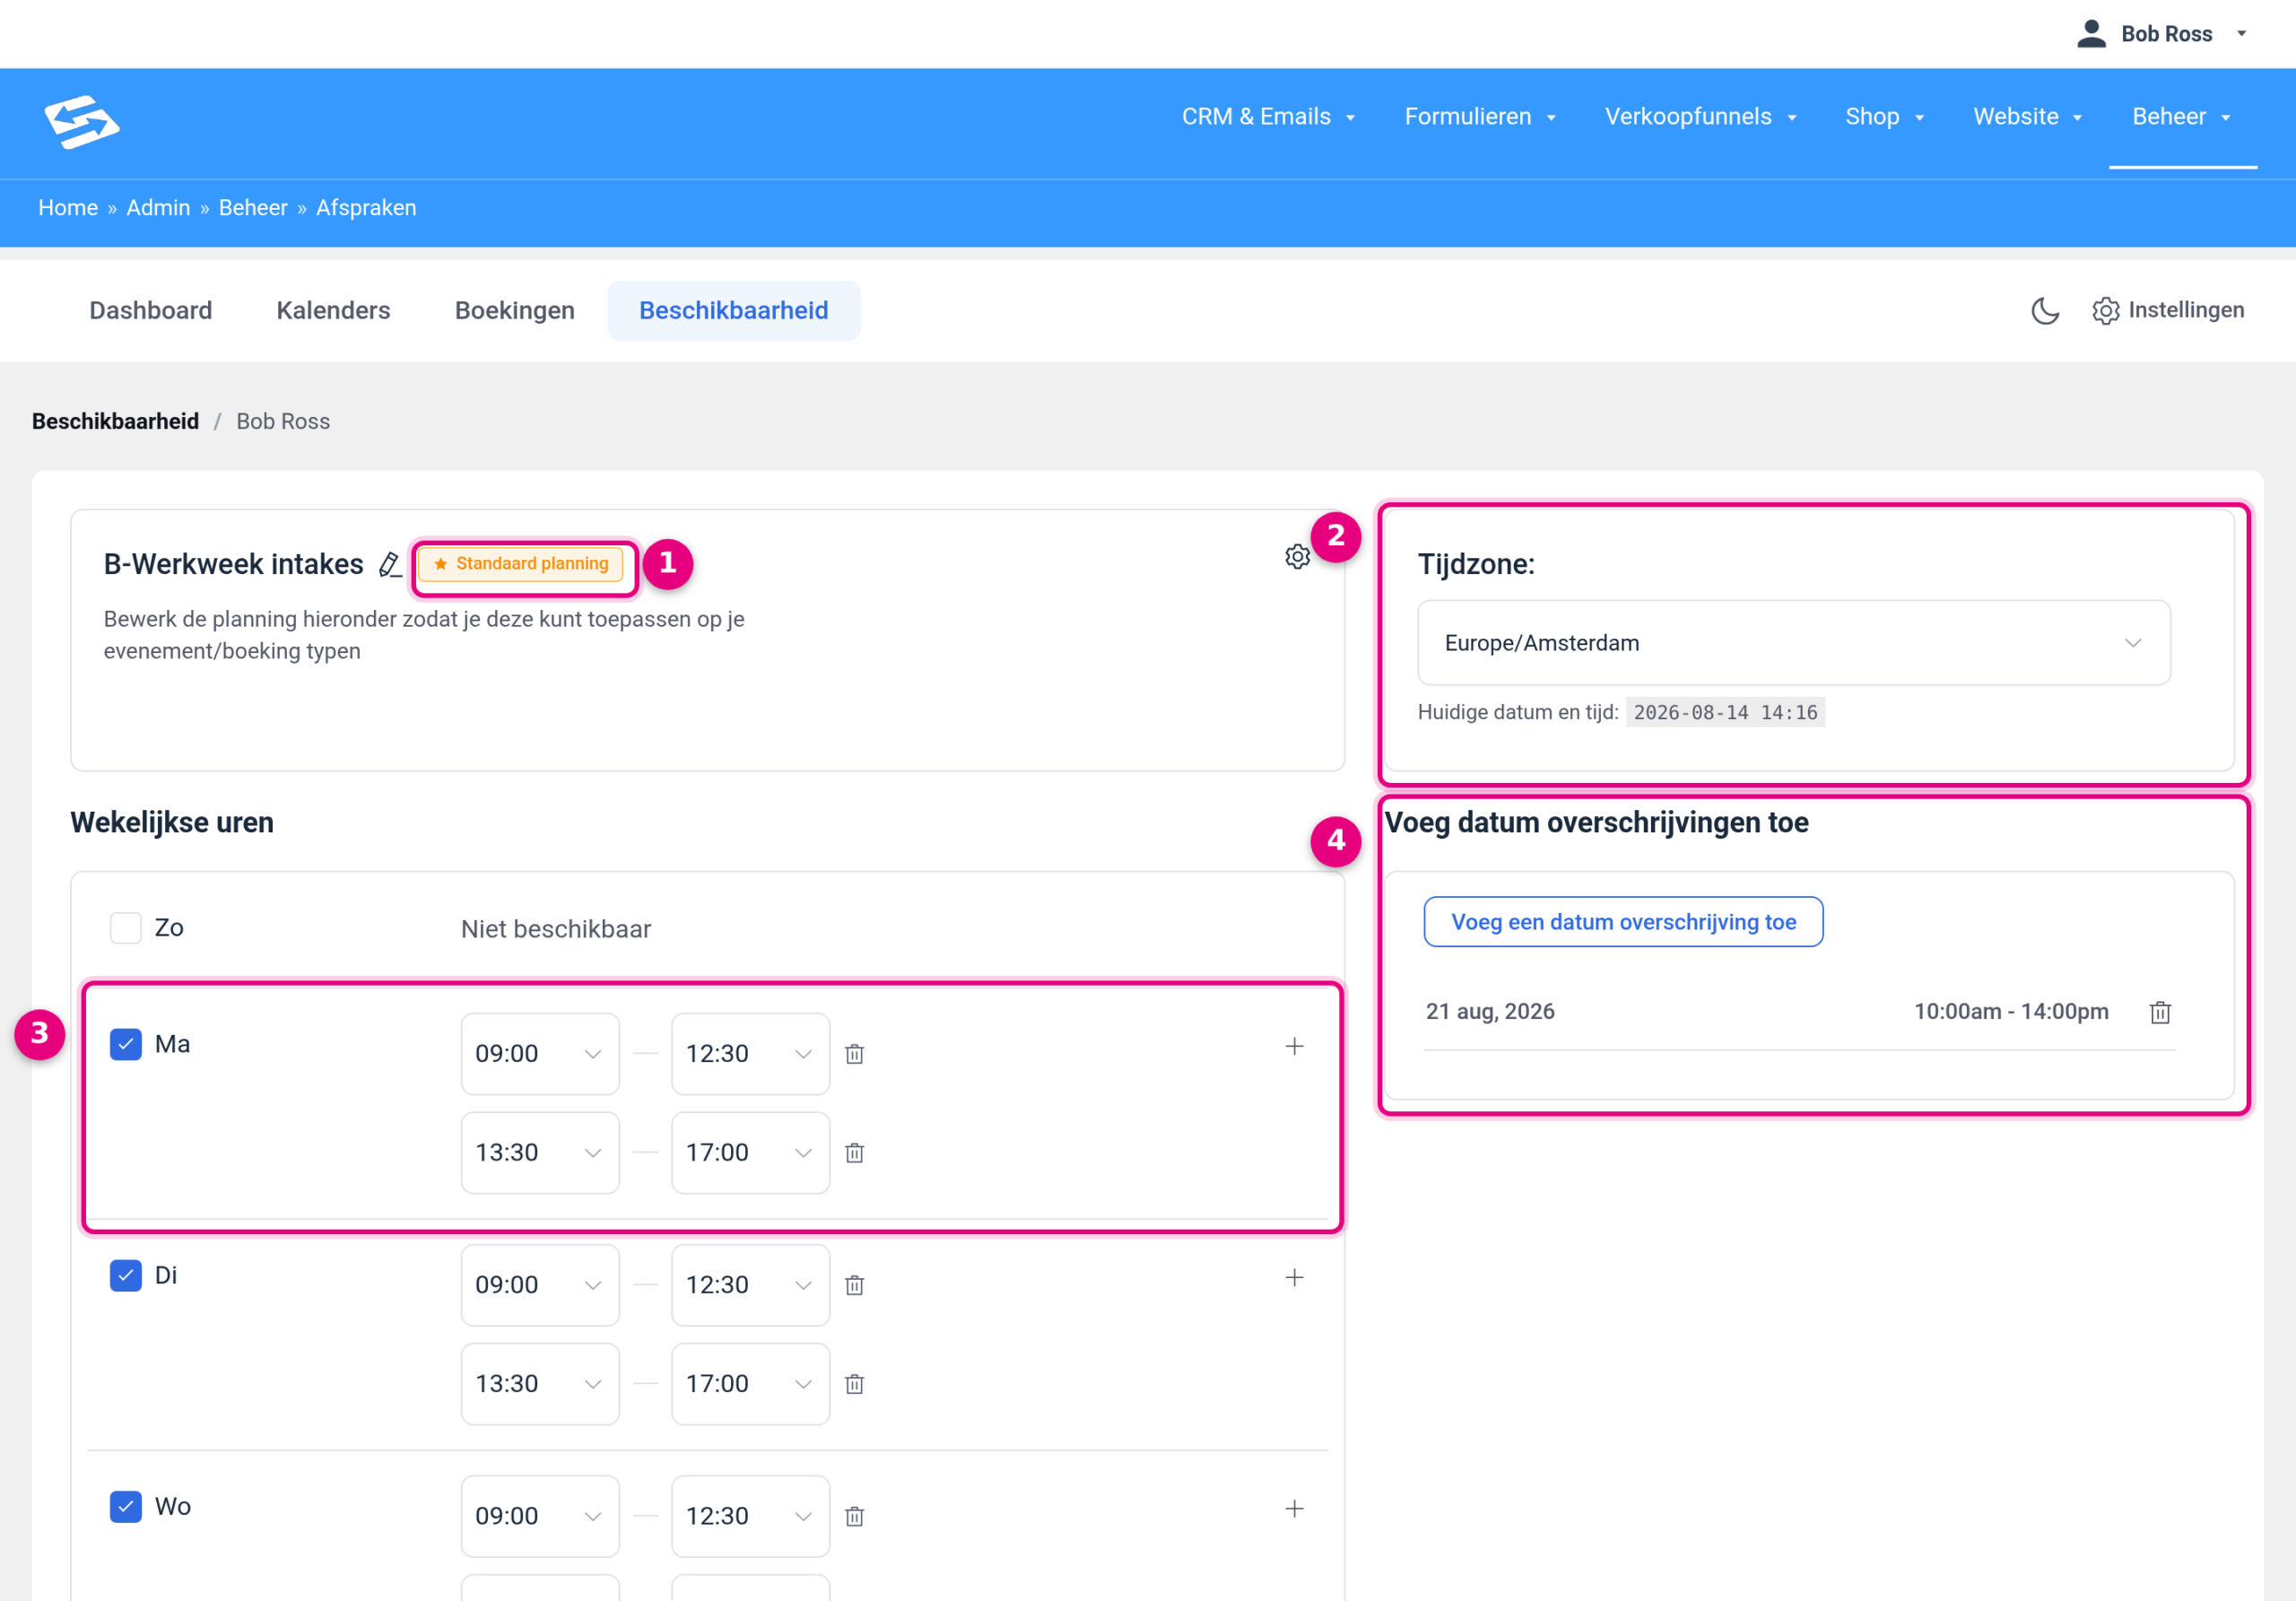
- Default schedule: the label next to the name shows that this is the schedule automatically proposed for new booking types. If you click the cog at the top right of this block, the options Set as default and Delete appear.
- Time zone: all times in this schedule are read in this time zone. Set it to your own time zone (for the Netherlands Europe/Amsterdam). Below the field you will see Current date and time, so you can check straight away whether the time zone matches the clock on your own screen. A visitor from another country automatically sees your times converted to their own time zone.
- Weekly hours: for each day from Sun to Sat you switch the tick box on or off. If a day is off, the text Unavailable appears and that day cannot be clicked on the booking page. If a day is on, you choose a Start and an End time. With the plus sign to the right of the row you add a second block on the same day: that way you keep lunch between 12:30 and 13:30 free, for example, by setting 09:00-12:30 and 13:30-17:00. The bin icon removes a block again. You can put several blocks on one day; just make sure they do not overlap.
- Add date overrides: the exceptions to your fixed week. How that works is covered in the next step.
Always click Save changes at the bottom. Right at the bottom there is also the Usage list block, showing the booking types that use this schedule. Check that list before you make major changes, so you know exactly which services you are affecting.
4. Date overrides for holidays and exceptional days #
Your weekly hours describe an average week. For everything that deviates from it you use a date override: a single day with its own times, or a day that closes completely. Think of a holiday week, a public holiday, a conference or a morning when you are running late.
- In the edit screen of the schedule, click Add a date override. A window with a month calendar opens.
- Use the arrows to browse to the right month and click the date. For a holiday of several days, repeat these steps for each day.
- Below the calendar What hours are you available? appears with a Start and an End time. Fill in the deviating times there, for example 10:00 to 14:00 on a day when you have another commitment in the morning.
- If the day closes completely, tick Mark as unavailable instead of filling in times.
- Click Apply and then Save changes. The date then appears as a separate line in the overrides block, with the times behind it. The bin icon removes an override again.
Two things to know. The month calendar in this window shows the month name and the day abbreviations in English, while the saved line appears in your own language afterwards. And overrides belong to the schedule, not to a single booking type: if you mark a week as holiday in the schedule that is attached to all your services, that week is immediately closed for all of those services. Which is usually exactly what you want.
5. The availability of a single booking type #
Go to Manage → Appointments → Calendars, click Edit next to the booking type you want and choose the Availability tab in the left-hand column.
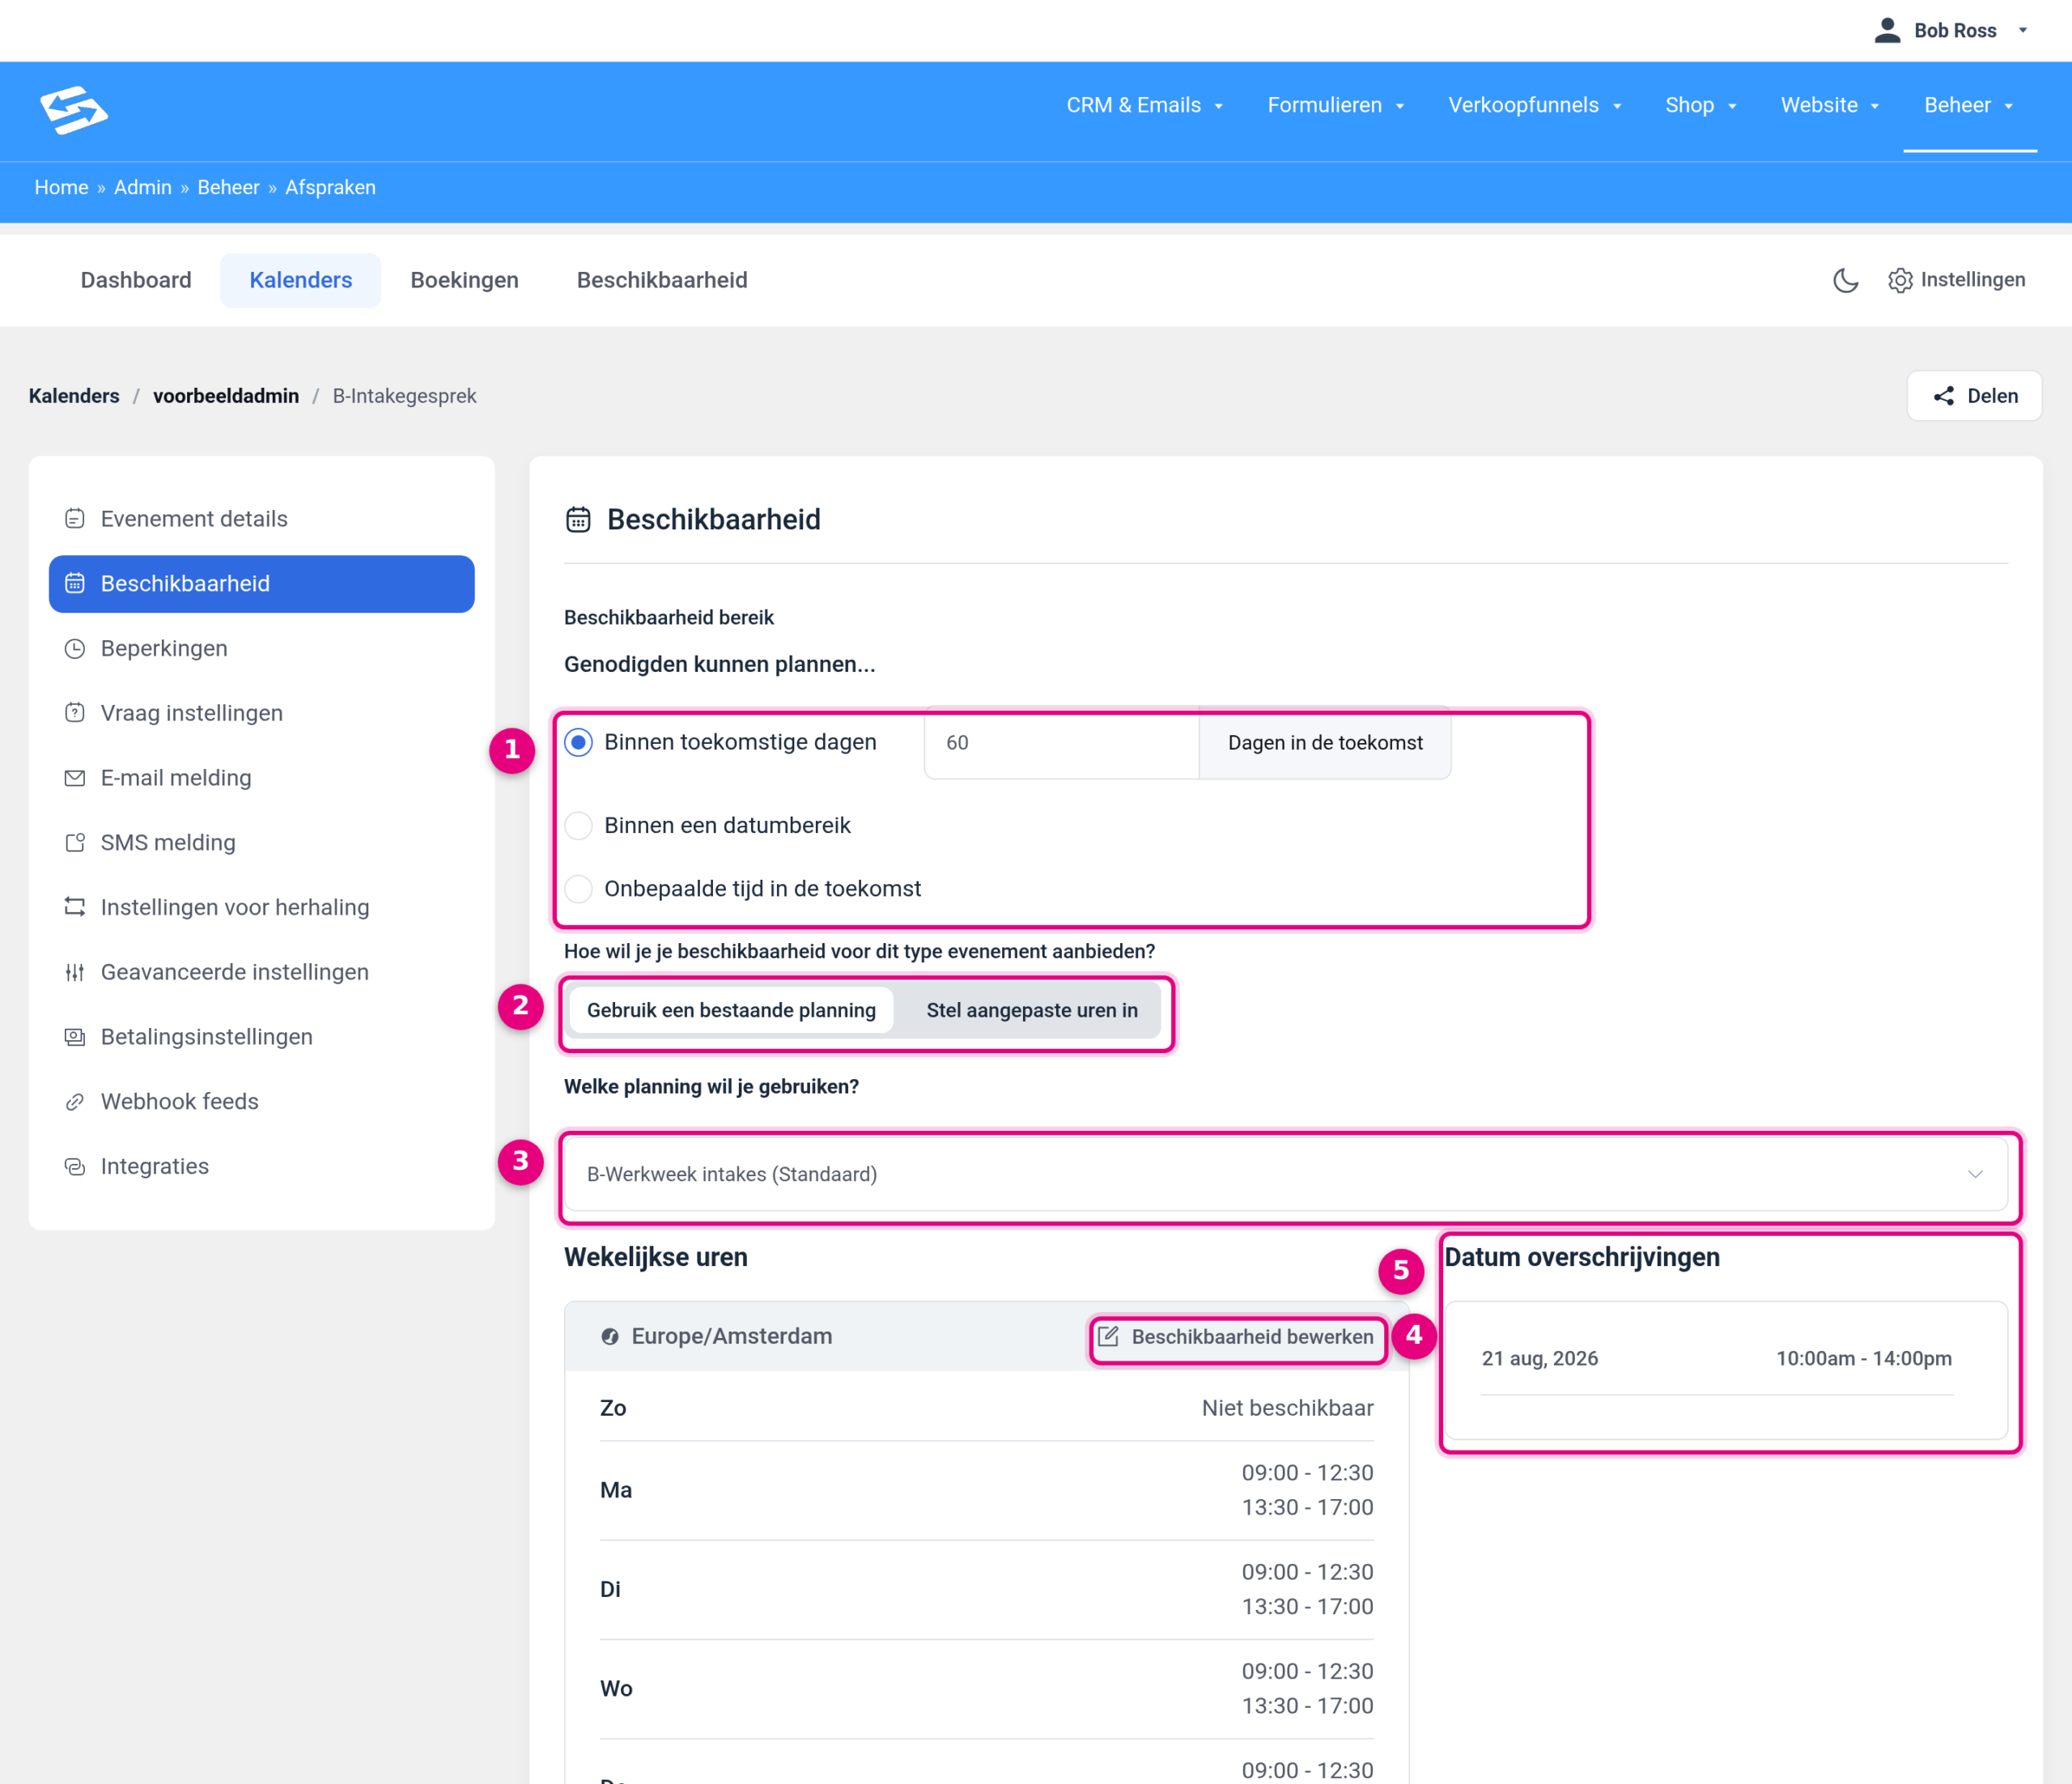
- Availability range under the heading Invitees can schedule…: this determines how far ahead your calendar is open. You choose between Within future days with a number of Days into the future next to it (60 by default), Within a date range for a fixed start and end date, and Indefinitely into the future. A short window of 30 days, for example, keeps your calendar flexible; a date range is useful for a temporary offer that should no longer be bookable after a certain date.
- How do you want to offer your availability for this event type?: the choice between Use an existing schedule and Set custom hours. If you choose custom hours, you get the same week layout with tick boxes, time blocks and date overrides as in a schedule, but only for this one booking type.
- Which schedule do you want to use?: the drop-down list with all available schedules. The word Default appears behind the default schedule. If you switch schedules, the week overview below it changes immediately.
- Edit availability: jumps to the edit screen of the linked schedule. Note that this changes the schedule itself, so also for every other booking type attached to it.
- Date overrides: the exceptions coming from the linked schedule, so you can see at a glance which days deviate. If there are none, it says that no specific overrides were found for dates in this schedule.
Under the heading Weekly hours you will find the complete week overview with the time zone next to it: a readable check of what really applies to this service right now. Finish with Save changes.
6. The Limits tab: buffers, minimum notice period, time slots and maximums #
Your working hours say when you can in principle. The Limits tab in the same booking type says how bookings may be made within those hours. This is the place where most practical irritations are solved.
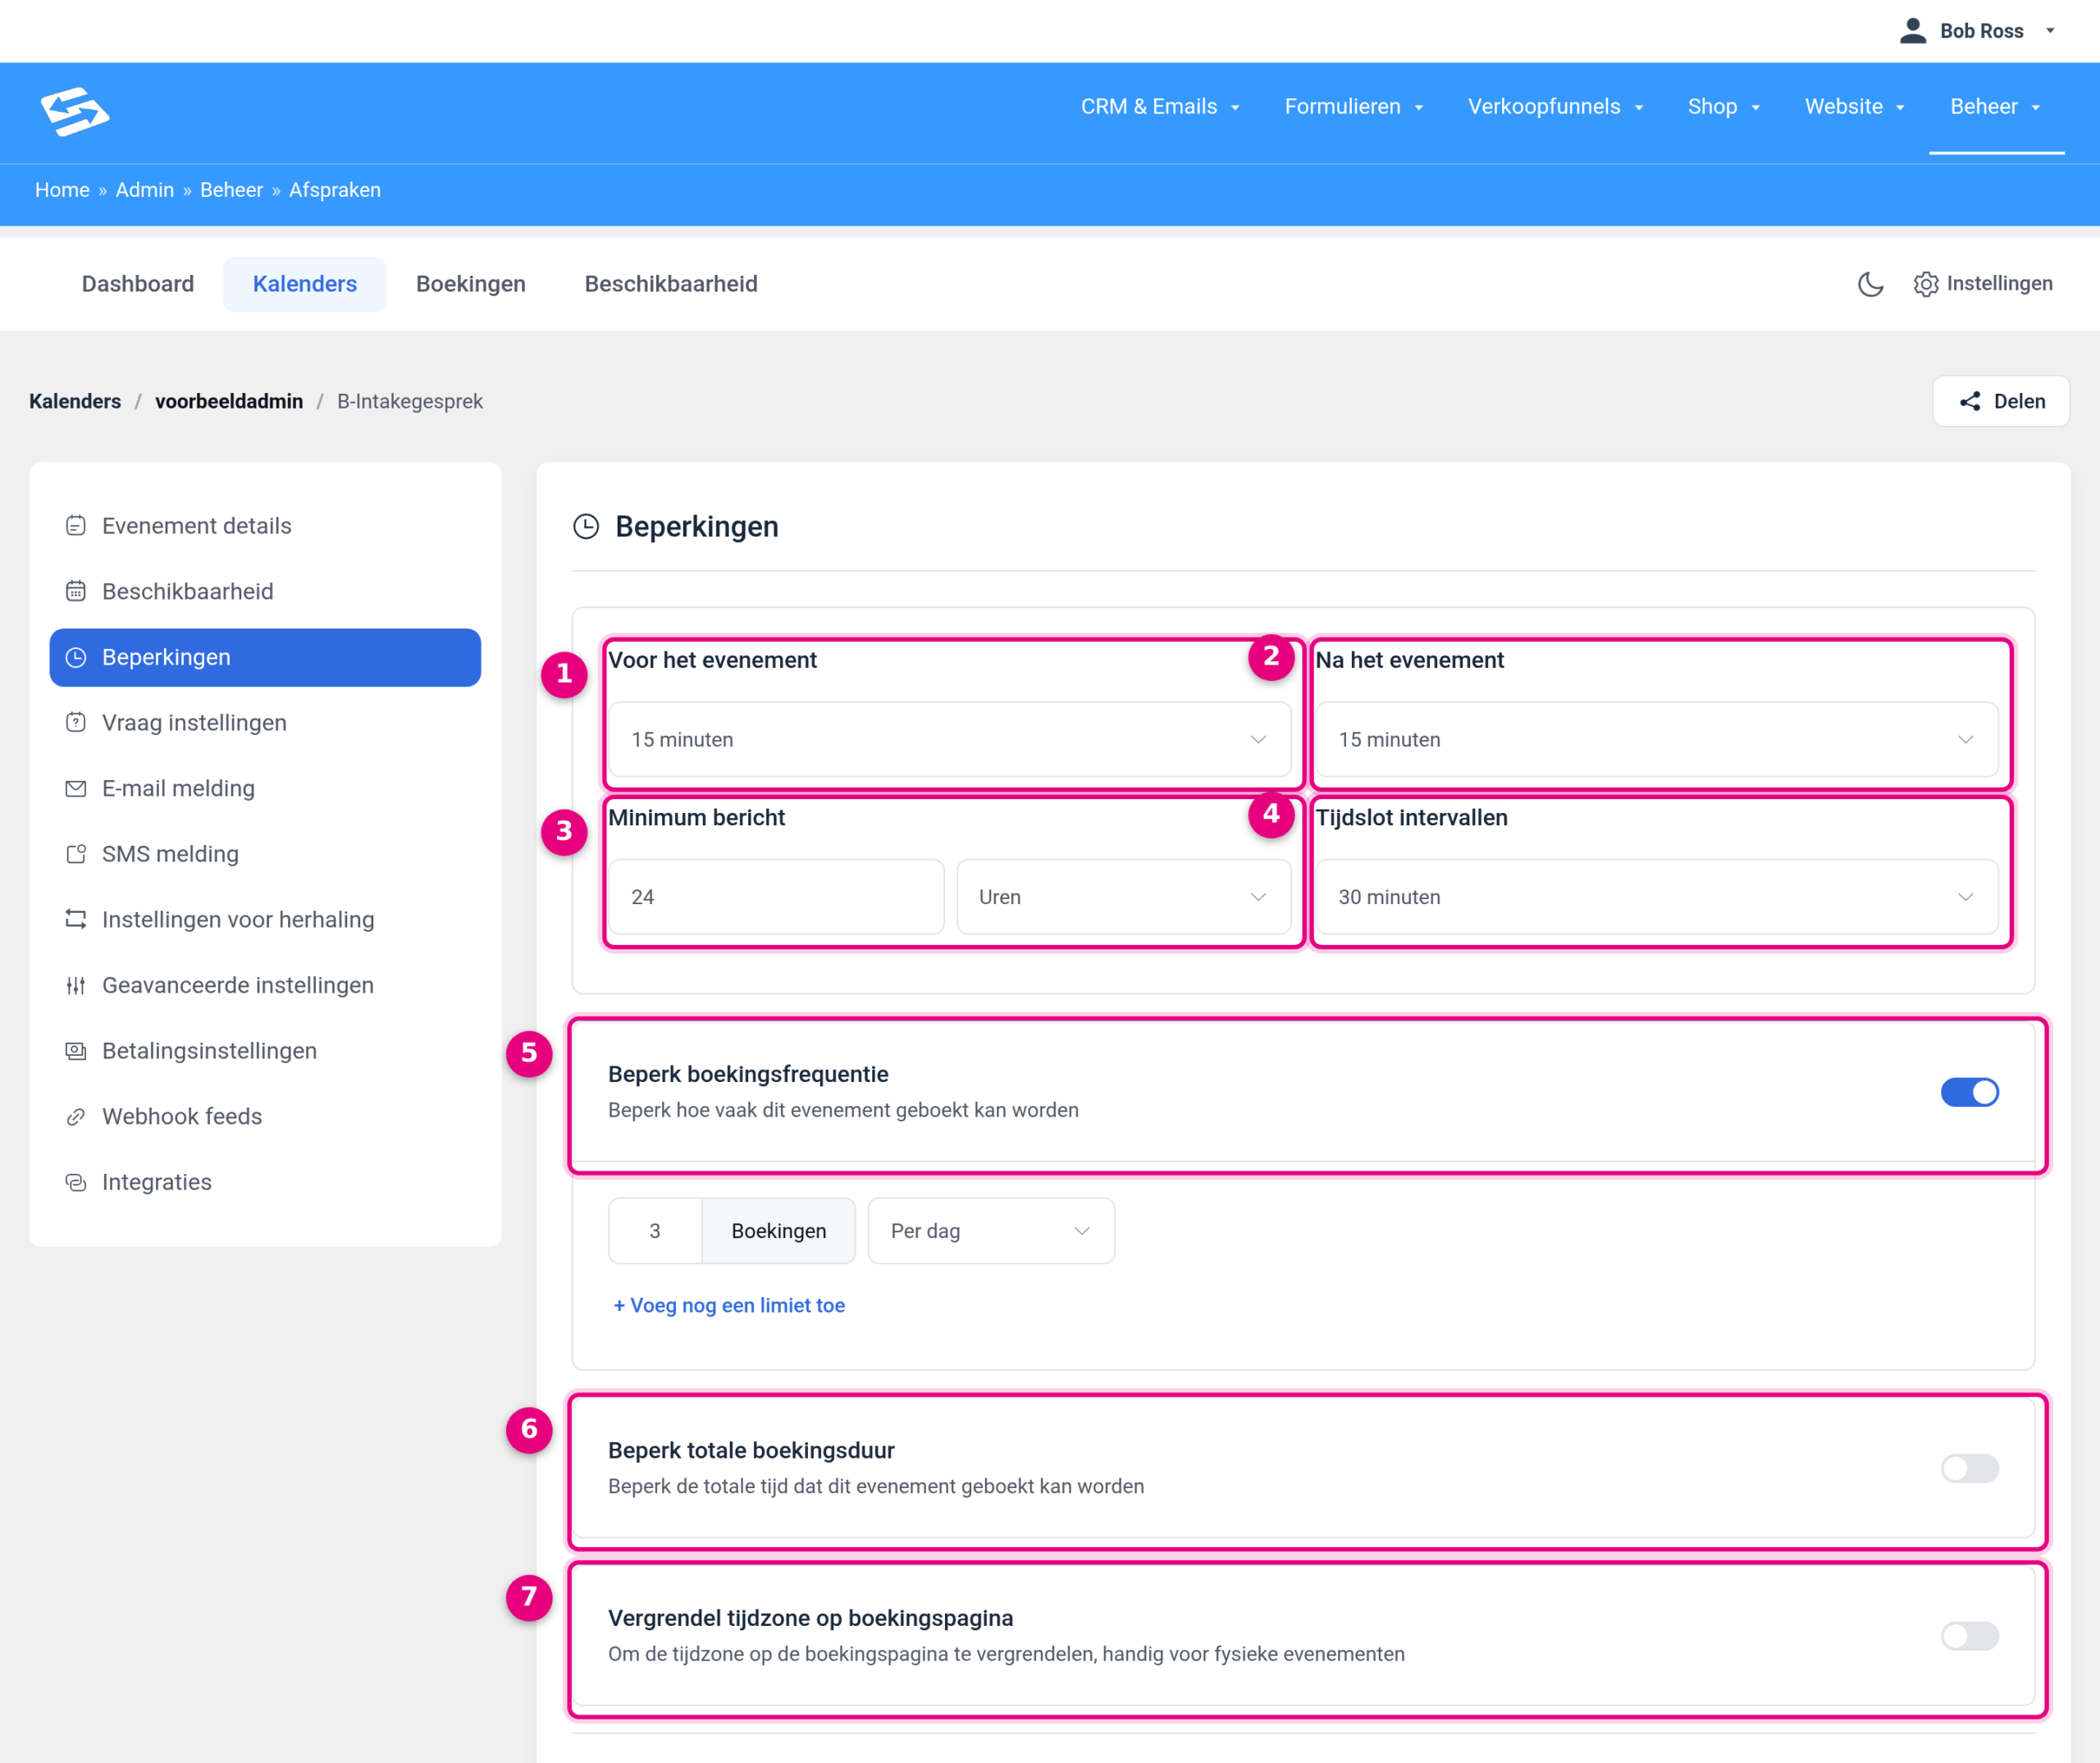
- Before the event: the buffer time before every appointment, to be chosen from No buffer time up to 120 minutes. Solves: visitors booking an appointment that runs straight on from something else, leaving you not a minute to prepare or set up your screen. Set 15 minutes here and the quarter of an hour before a booked appointment stays free of other bookings.
- After the event: the same drop-down list, but for the time after an appointment. Solves: conversations stuck back to back, leaving you no room to overrun, make notes or fetch a coffee. Often you set both to 10 or 15 minutes.
- Minimum notice: the minimum notice period, in other words how far in advance a booking must be made. You enter a number and choose the unit Minutes, Hours or Days. Solves: that quarter to nine booking for nine o’clock the same morning. With 24 hours, all times falling within a day automatically disappear from the booking page. For a short phone call 4 hours is often enough; for an intake or a session you need to prepare for, 1 or 2 days works better.
- Time slot intervals: determines the clock times on which start times fall. By default this is set to Use event length (default), which makes the slots as long as the appointment itself. If you choose 30 minutes for a 30 minute conversation, for example, you get tidy start times on the hour and the half hour. Solves: untidy times such as 09:20 and 10:05 that appear as soon as duration and buffers do not add up neatly. Note that a small interval actually gives more moments to choose from and can therefore fill your calendar further.
- Limit booking frequency with the description “Limit how often this event can be booked”: switch it on and enter a number of Bookings followed by Per day, Per week or Per month. Solves: five intakes on one day when you can handle two. As soon as the maximum is reached, the remaining times for that day disappear by themselves. With + Add another limit you stack rules, for example a maximum of 3 per day and a maximum of 8 per week.
- Limit total booking duration with the description “Limit the total time this event can be booked”: the same idea, but in minutes instead of numbers. Solves: services of different lengths where the total time rather than the number is the problem. You specify a number of minutes per day, week or month, and here too you can stack several limits.
- Lock time zone on booking page with the description “To lock the time zone on the booking page, useful for physical events”: normally a visitor sees the times in their own time zone and can switch it themselves. Switch this on and you choose one fixed time zone that applies to everyone. Solves: confusion about an appointment on location, where 14:00 simply means 14:00 on your clock. For online conversations with attendees from several countries, leave it off.
Click Save changes once you are done. All settings on this tab apply only to this one booking type, so you can run a strict policy for your intakes and be more relaxed about a short introductory call.
7. Check the result on your own booking page #
Availability is addition and subtraction: working hours minus buffers, minus minimum notice period, minus existing appointments, minus the daily maximums. What is left you only really see on the booking page itself. So always open that page in your browser, preferably in a private window so you see it the way a visitor does. You will find the link to your booking page through the Share button on the booking type; how that works exactly is covered in Sharing your booking link: one service or all your services on one page.
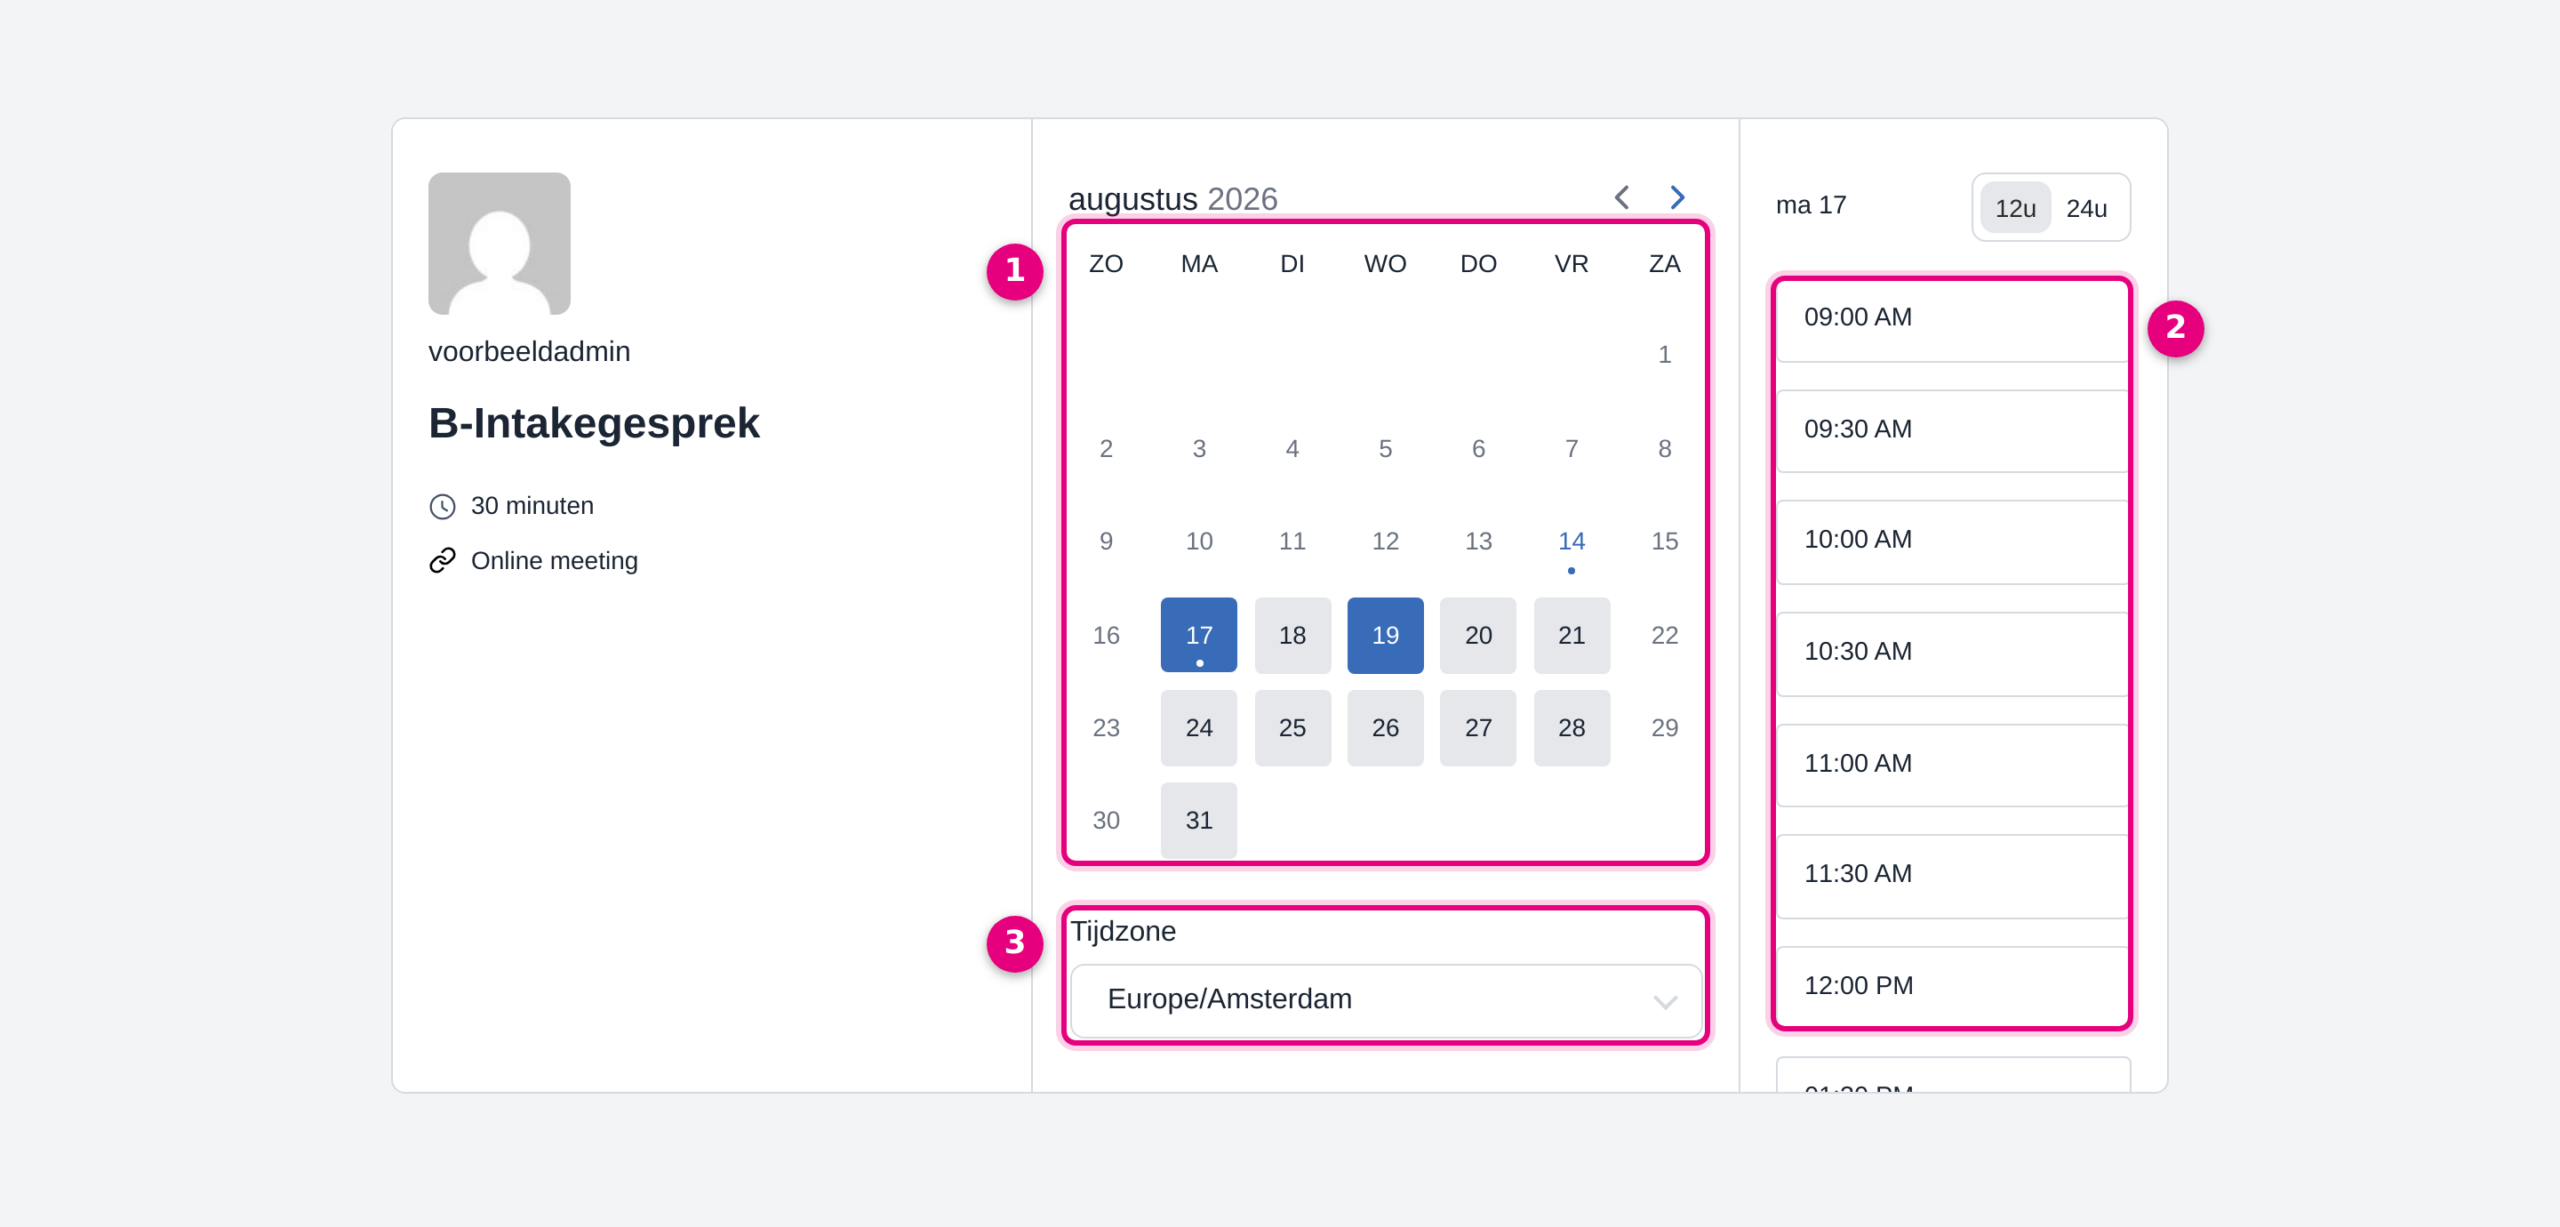
- The month calendar: only days with a grey background can be clicked. Weekend days are empty here because Saturday and Sunday are switched off in the schedule, and the next few days are skipped because of the minimum notice period. If you see a day that should be closed, first check the tick boxes under Weekly hours and then your date overrides.
- The times for the selected day: click a date and the available start times appear next to it. Here you see in practice what you have set up: tidy start times thanks to the time slot interval, a gap around midday because the day consists of two blocks, and a final start time positioned so that the appointment still fits within your working hours. With the 12h and 24h buttons you switch the display between 12 and 24 hour notation.
- Time zone: the time zone in which the visitor sees the times. If you have switched on Lock time zone on booking page, the fixed time zone appears here and the visitor can no longer change it.
If nothing is left, or far too little, work through this order: is the day switched on in the schedule, does this booking type really use that schedule, does the day fall within the availability range, is the minimum notice period not too long, and do the buffers together with the duration perhaps make the time slot too large for your working block. With a block from 09:00 to 12:30, an appointment of 30 minutes and 15 minutes of buffer on either side, the last conversation simply no longer fits at 12:15.
8. Good to know #
- A connected calendar removes busy times automatically. Appointments already in your Google or Outlook calendar block the corresponding times as soon as you have connected that calendar. See Connecting your calendar to the appointment scheduler.
- If you offer one service in several lengths, buffers and time slots work slightly differently per chosen duration. How to set that up is covered in Setting up multiple booking durations in the Appointments module.
- With group appointments, it is not only your availability but also the number of places that determines when a time is full. See Setting up group events in the Appointments module and, for rooms with a maximum, Making several meeting rooms bookable with a maximum capacity.
- An appointment that falls outside your normal hours does not have to be made possible with an override. You can also schedule it yourself, see Adding appointments manually in the Appointments module.
- If you change a schedule that is already in use, existing bookings simply remain. The change only applies to times that can still be booked. If you want to get rid of an appointment that has already been booked, move or cancel it through Manage → Appointments → Bookings.
Related articles #
- Sharing your booking link: one service or all your services on one page
- Connecting your calendar to the appointment scheduler
- Setting up multiple booking durations in the Appointments module
- Setting up group events in the Appointments module
- Making several meeting rooms bookable with a maximum capacity
- Adding appointments manually in the Appointments module
- Setting up paid appointments with automatic checkout
- Connecting Zoom to the Appointments module for automatic meetings
- Connecting appointments to the CRM: creating contacts automatically on a booking


