Setting up confirmation and reminder emails for your appointments #
The Appointments module is an optional extension you can add to your Autorespond package. This module lets people book appointments online, comparable to Calendly. More information about this module
Around every appointment, the Appointments module sends a series of emails: a confirmation as soon as someone books, a message when something is cancelled or rescheduled, and a reminder just before the appointment starts. That reminder is exactly the message that prevents most no-shows, and it is the one that is switched off by default. In this article you will see which emails exist per booking type, how to switch the reminder on and have it go out at the right moment, how to adjust the wording using variables, and where you set the sender, the reply-to address and the footer for all of these emails.
1. Where to find the emails of a booking type #
The emails belong to a booking type, not to your whole calendar. So every booking type (your introductory call and your advice call, for example) has its own set of emails with its own wording and its own reminders. If you switch a reminder on for one type, that does not automatically apply to the other.
- Go to Manage → Appointments and open the Calendars tab.
- Under the right host, find the card of the booking type you want to change and click Edit.
- In the left-hand column, click the Email notification tab. You then land on the Email notification settings screen.
If you are not sure which card belongs to which service, first have a look at Sharing your booking link: one service or all your services on one page. That article explains how the hosts and booking types relate to each other.
2. Which emails exist per booking type #
On the Email notification tab, all messages are listed below each other, split across two blocks: Notification settings for the normal course of events, and Other notifications for appointments that have to be approved first. Each line has a switch (on or off) and an Edit button to open the content. If a message is switched off, you see the word Disabled in the line.
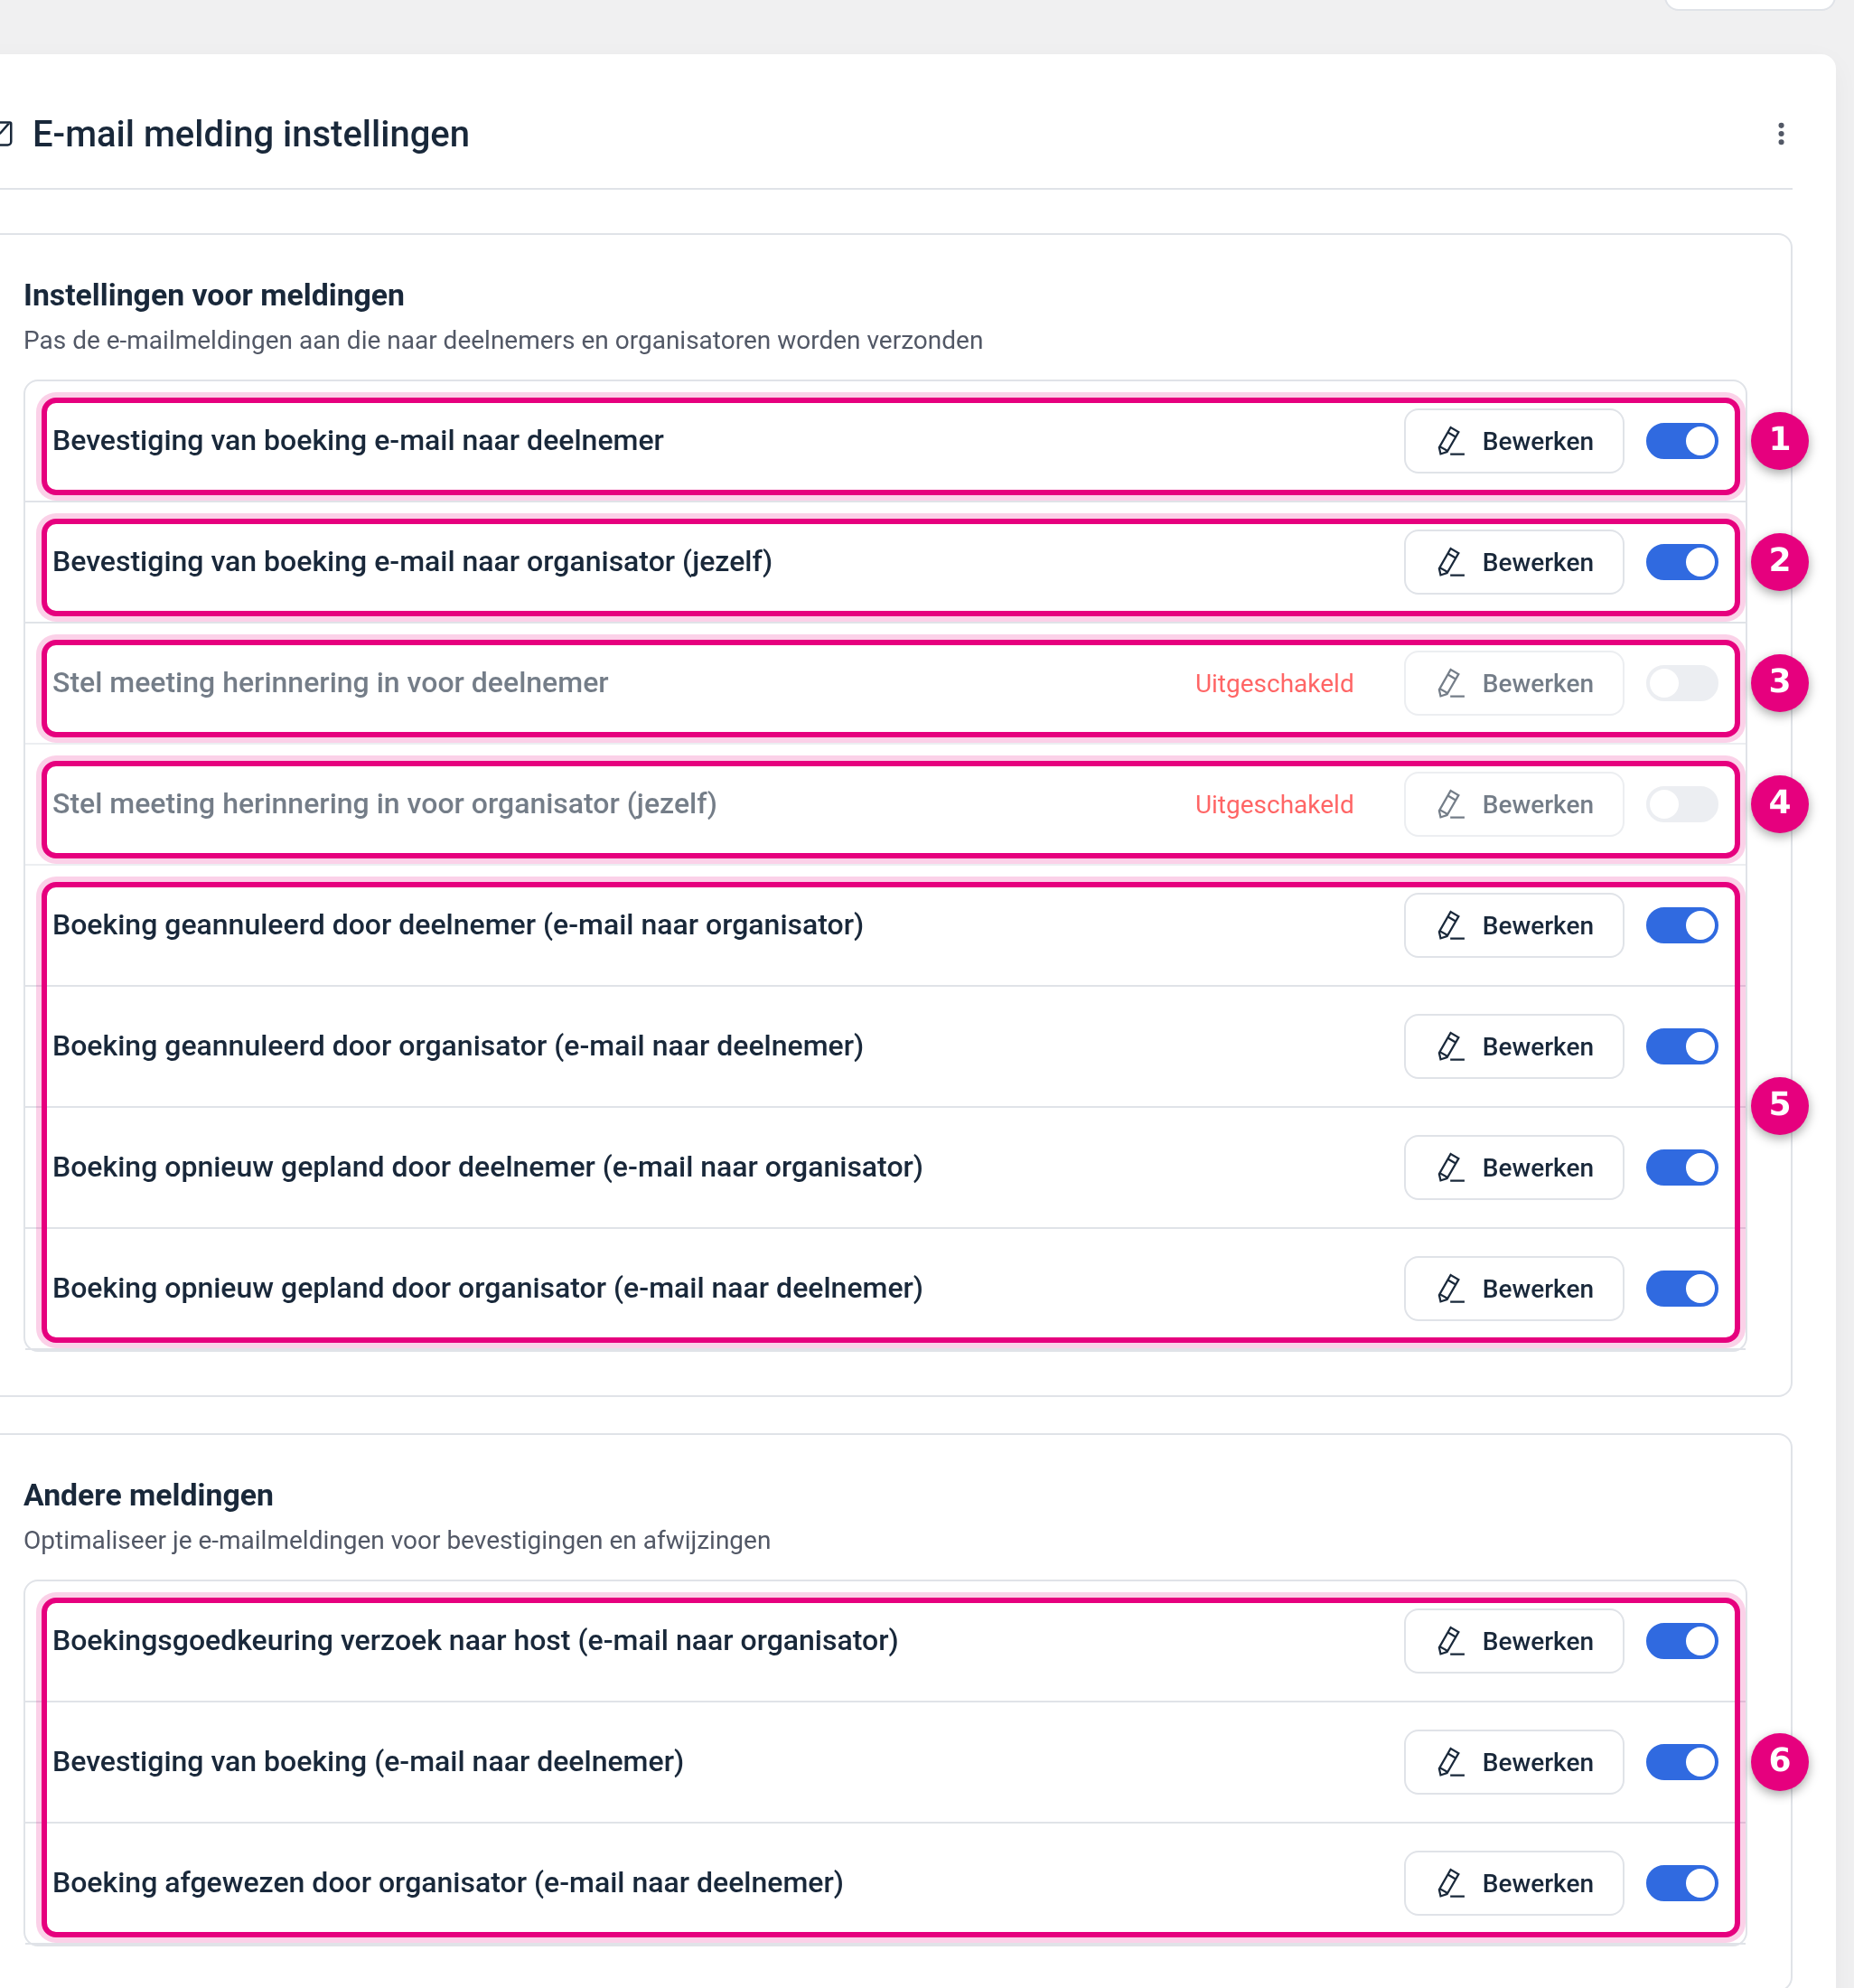
- Booking confirmation email to attendee. The message your attendee receives immediately after booking, with the name of the appointment, the time in the attendee’s time zone, the location, any notes and the links to cancel or reschedule the appointment. This message is switched on by default.
- Booking confirmation email to organiser (yourself). Your own alert that a booking has been made, with the attendee’s details and a link to the booking in your admin area. In this message you can add extra email addresses under Additional recipients; they are added as CC. Useful when a colleague or assistant needs to keep an eye on things. Switched on by default.
- Set meeting reminder for attendee. The reminder before the appointment, sent to your attendee. This one is set to Disabled by default, so as long as you do nothing here, nobody receives a reminder. This is the setting that generates the most questions.
- Set meeting reminder for organiser (yourself). The same reminder, but for you. This one is also set to Disabled by default.
- The cancellation and reschedule emails. Four messages that go out automatically as soon as someone cancels or moves the appointment: Booking cancelled by attendee (email to organiser), Booking cancelled by organiser (email to attendee), Booking rescheduled by attendee (email to organiser) and Booking rescheduled by organiser (email to attendee). All four are switched on by default, so both sides are always kept informed.
- The approval emails under Other notifications. These belong to appointments that you have to approve yourself first: Booking approval request to host (email to organiser) asks you for a decision, Booking confirmation (email to attendee) lets the attendee know the request has come in, and Booking rejected by organiser (email to attendee) goes out if you refuse the request. In section 8 you can read when this route becomes active.
3. Switching a reminder on and choosing the moment #
In the Set meeting reminder for attendee line, click Edit. A window opens with the title Edit: Set meeting reminder for attendee, where you arrange the wording, the moment and the status in one go.
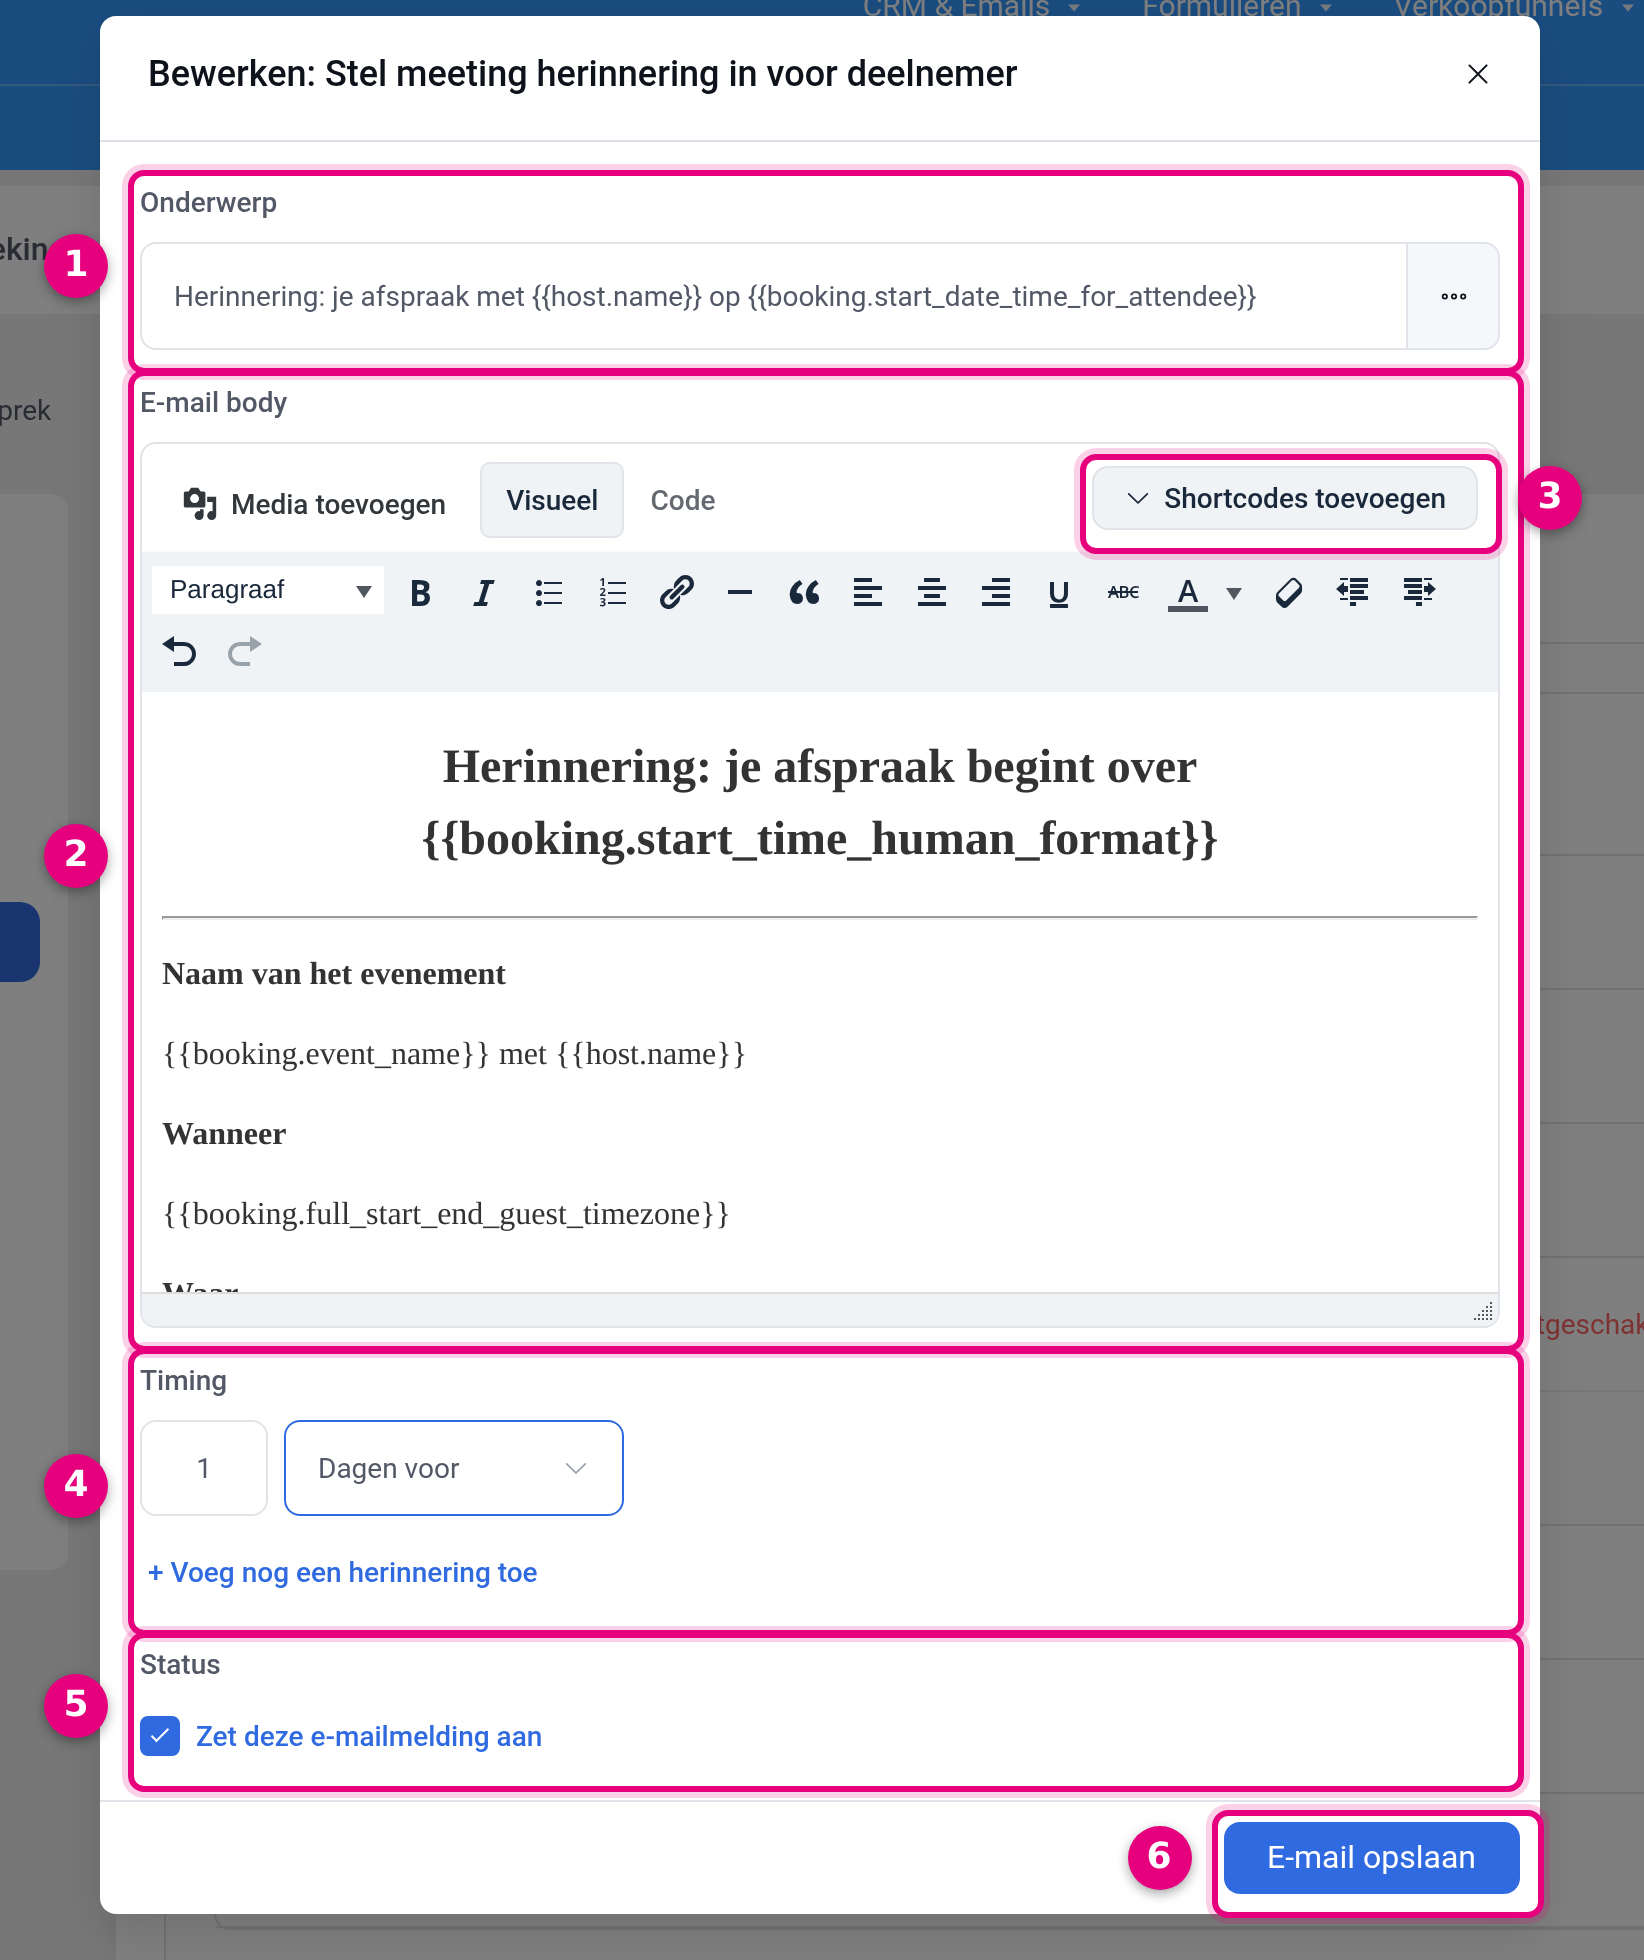
- Subject. The subject line of the email. You may use variables here, for example
{{host.name}}for your own name and{{booking.start_date_time_for_attendee}}for the time in the attendee’s time zone. - Email body. The content of the message in an ordinary text editor. With Visual you type as you would in a word processor, with Code you edit the HTML directly, and via Add media you place an image from your media library into the email.
- Add shortcodes. Opens the list of available variables. Click a variable to insert it at the position of your cursor in the text. Section 6 shows everything that is in that list.
- Timing. Here you determine when the reminder goes out: a number in the first field and a unit in the second. You choose between Minutes before, Hours before and Days before. The default is 15 and Minutes before; in the example above this has become 1 and Days before. With + Add another reminder you add a second moment.
- Status. Tick Enable this email notification. This is the step that actually activates the reminder; without this tick nothing changes, even if you have filled in a moment.
- Save email. Stores the whole setting. After saving, the word Disabled has gone from the line and the switch on the right is on.
A small share of your visitors book at the last minute. If you set the reminder to 1 Days before, an appointment booked this morning for this afternoon falls outside that window. A second, shorter reminder catches those.
4. Several reminders and the reminder for yourself #
- Several moments in one email. In the edit window, click + Add another reminder and fill in a second line, for example 1 Days before and next to it 2 Hours before. The same wording is then sent at both moments.
- A reminder for yourself. Repeat the steps from section 3 at Set meeting reminder for organiser (yourself). This window has the same fields, plus the Additional recipients field: the email addresses you enter there are added as CC to this notification.
- Set it separately per booking type. If you have several services, work through them one by one. A cloned booking type also needs its own check, because it holds the settings of the original at the moment of copying.
5. Adjusting the content of an email #
You open every message from section 2 in the same way: click Edit in the line, adjust Subject and Email body and finish with Save email. A few things that help along the way:
- Write in the language of your audience. The default wording is a starting point, not an end point. Put your own tone into it and mention practical matters where needed, such as what someone should have ready or how you can be reached.
- Leave the variables in place. Blocks such as
{{booking.event_name}}and{{booking.full_start_end_guest_timezone}}are replaced by the real details when the email is sent. If you delete them, that information disappears from the email. - Keep the cancellation and reschedule links in. The confirmation email contains
##booking.cancelation_url##and##booking.reschedule_url##. With those, your attendee arranges a change themselves, without emailing you. - Switch between Visual and Code. If you paste formatting from another programme, check the result on the Code tab. That way you see straight away whether any clutter has come along.
6. The variables (shortcodes) you can use #
In the edit window, click Add shortcodes. A list opens with four groups; you click a line to place that variable into your text.
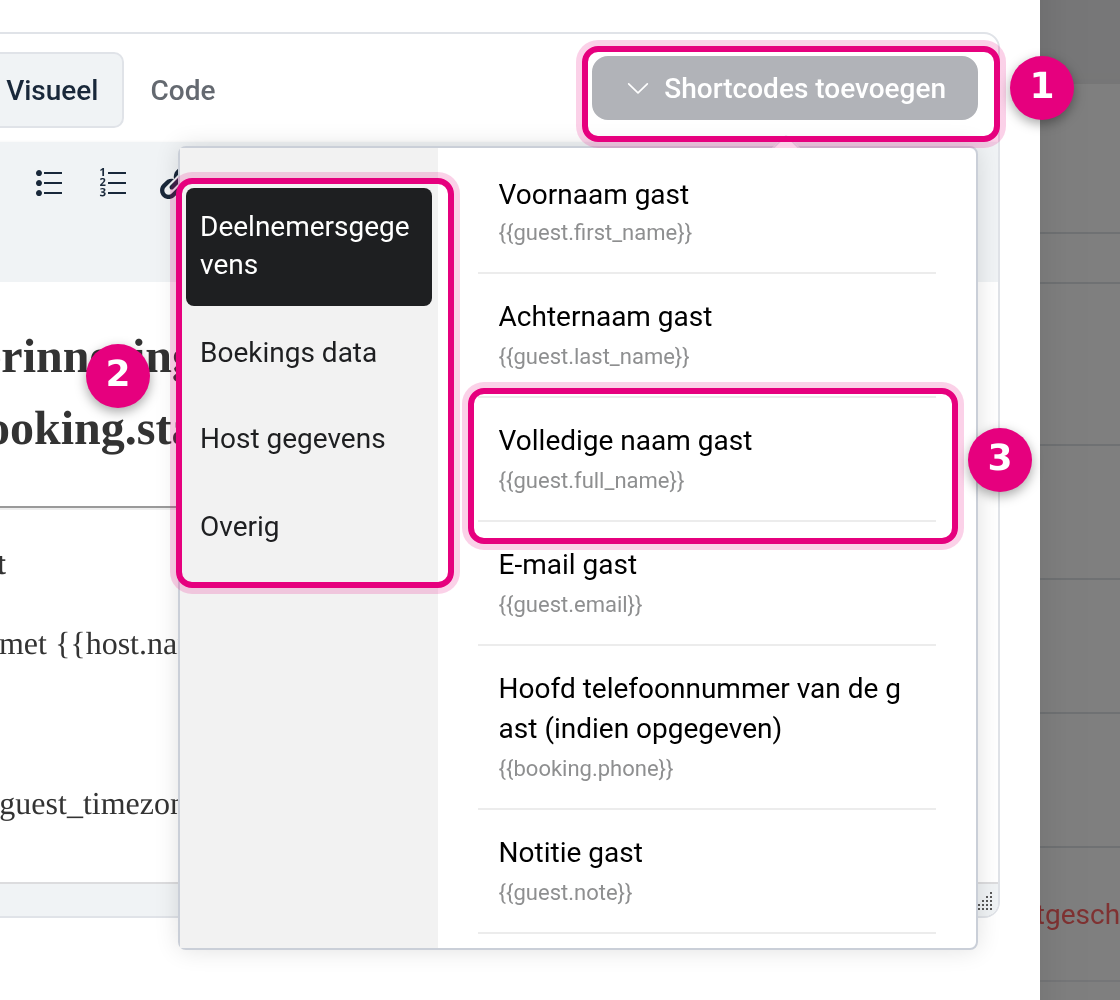
- Add shortcodes. The button at the top right of the text editor. First place your cursor at the spot in the text where the variable should go, and only then click a line in the list.
- The four groups. On the left you choose between Attendee details, Booking data, Host details and Other. The list on the right jumps to the matching block.
- The lines themselves. The description in plain language is at the top, with the code that ends up in your text below it, for example Guest full name with
{{guest.full_name}}underneath.
These are the variables you will come across in the list, per group:
- Attendee details. Guest first name
{{guest.first_name}}, Guest last name{{guest.last_name}}, Guest full name{{guest.full_name}}, Guest email{{guest.email}}, Guest note{{guest.note}}, Main phone number of the guest{{booking.phone}}, Guest time zone{{guest.timezone}}and Total number of guests{{guest.total_guest}}. - Booking data. Among others Event name
{{booking.event_name}}, Event description{{booking.description}}, Booking title{{booking.booking_title}}, Additional guests{{booking.additional_guests}}, the times in the time zone of the guest or of the host (such as{{booking.full_start_end_guest_timezone}}and{{booking.start_date_time_for_host}}), Event location details{{booking.location_details_text}}, Event start time in plain language{{booking.start_time_human_format}}, Reason for cancellation{{booking.cancel_reason}}, Reason for rescheduling{{booking.reschedule_reason}}, the UTM fields and the links##booking.cancelation_url##,##booking.reschedule_url##and##booking.admin_booking_url##. - Host details. Host name
{{host.name}}, Host email{{host.email}}and Host time zone{{host.timezone}}. - Other. Event ID
{{event.id}}, Calendar ID{{calendar.id}}, Event title{{event.title}}, Calendar title{{calendar.title}}, Calendar description{{calendar.description}}and Add booking to calendar{{add_booking_to_calendar}}.
Watch the difference between the two time zone variants. A variable with guest shows the time as your attendee sees it, a variable with host shows your own time. So in an email to the attendee you use the guest variant, and in an email to yourself the host variant.
7. Sender, reply-to address, ICS file and footer #
You arrange the wording per booking type, but the sender and the footer apply to all emails from the Appointments module. You find those via Manage → Appointments → Settings → General, in the Email settings block with the description “Configure your email settings for booking related emails”.
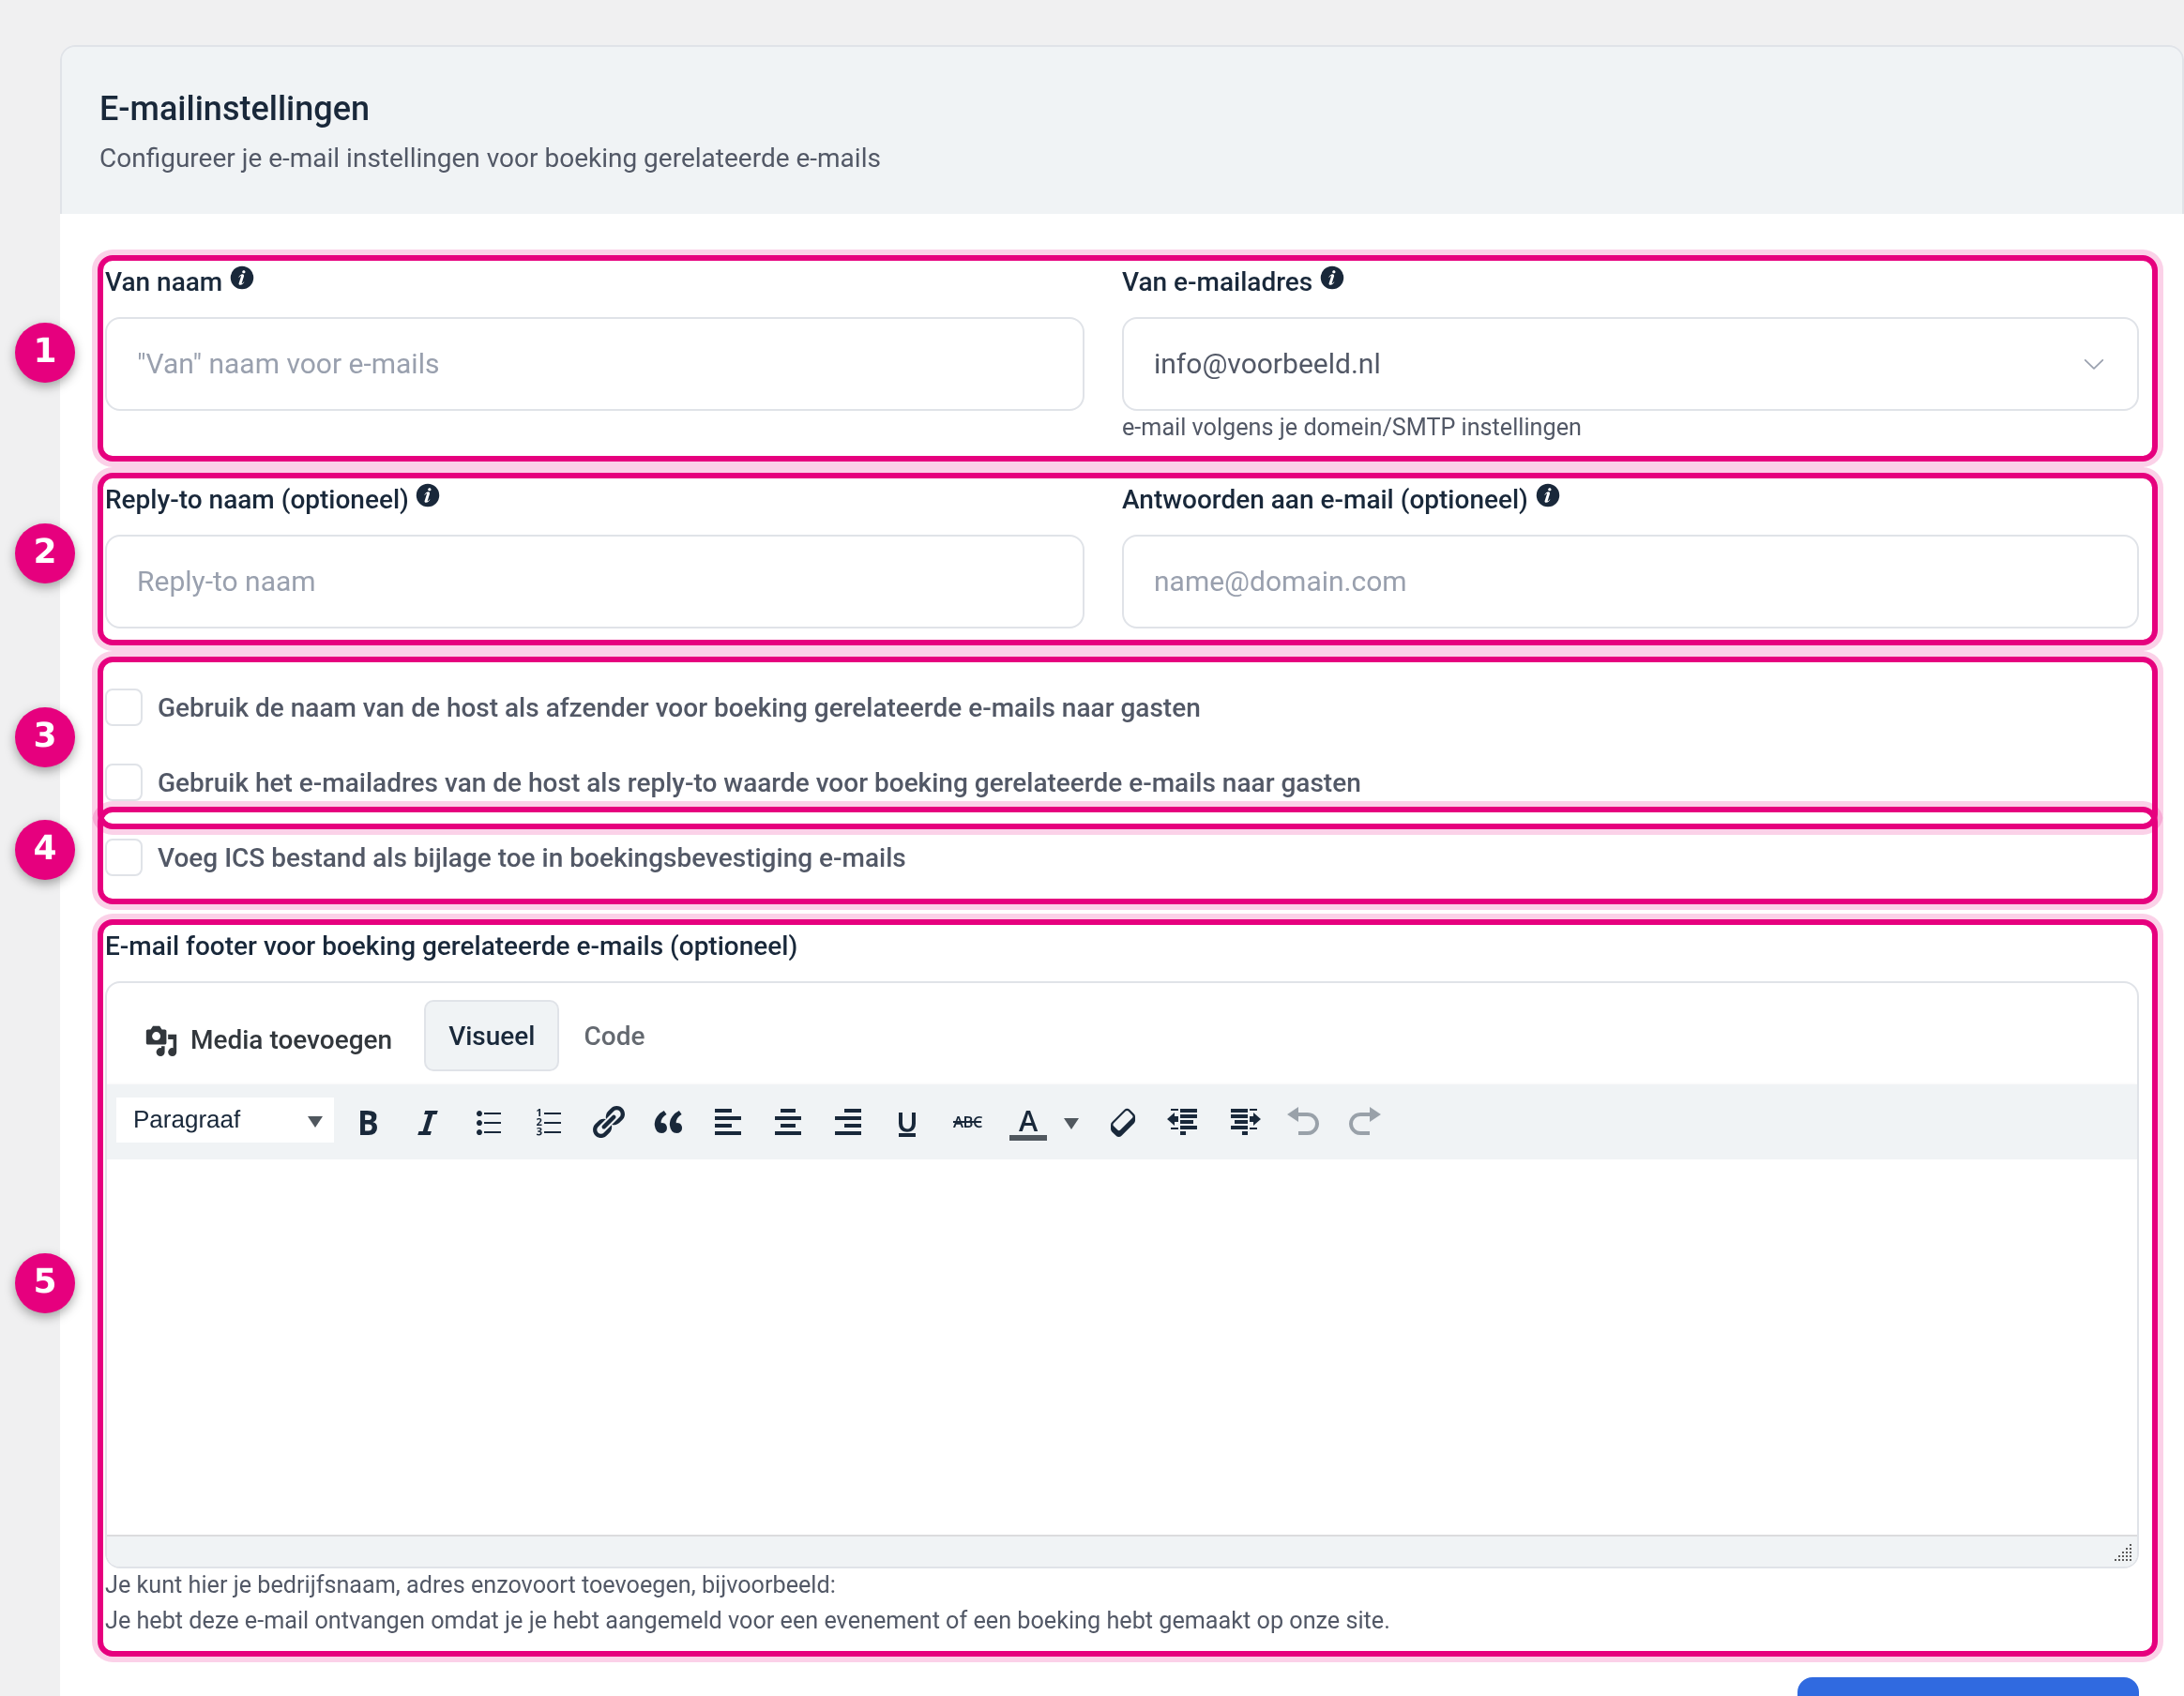
- From name and From email address. The name and the address the booking emails go out with. From email address is a dropdown; underneath the field is the note “email according to your domain/SMTP settings”. So choose an address that your environment is actually allowed to use.
- Reply-to name (optional) and Reply-to email (optional). These determine where a reply from your attendee ends up. If you leave them empty, a reply goes to the sender address. If you enter an address here that you read daily, the response comes in at the right place straight away.
- Use the host name as sender for booking related emails to guests and Use the host email address as reply-to value for booking related emails to guests. Two tick boxes that make things more personal when you have several hosts: the email then goes out in the name of the person who was booked, and a reply goes straight to that person.
- Attach ICS file to booking confirmation emails. If you switch this on, the attendee receives a calendar file with the confirmation, which puts the appointment in their own calendar in one click.
- Email footer for booking related emails (optional). The fixed footer under all of these emails. Underneath the field is the suggestion to put your company name and address here, plus a sentence explaining why someone is receiving the email.
Finish with Save settings below the block. A few things to keep in mind regarding the sender address:
- The sending itself runs via the mail settings of your environment. That is where the connections and the addresses your environment may send from are kept. So at From email address, choose an address that exists there; an address your environment may not use will not hold up when sending.
- Do you want a different sender? Arrange that in the mail settings first. Changing the sender name for marketing emails explains where to find those connections and what you should and should not change about them.
- Replies do not have to go to the sender address. If you want responses to come in with a specific person, use the Reply-to email (optional) field or the tick box for the host’s email address.
A little higher up on this same screen, in the General settings block, there is also Summary email with the tick box Enable booking summary notification. With that you receive a summary overview of your bookings, separate from the confirmations per appointment.
8. The approval emails: when are they sent #
The three messages under Other notifications belong to booking types where you give your approval first. You switch that route on at the booking type itself, on the Advanced settings tab, with the Requires confirmation option. The note there reads: the booking has to be confirmed manually before it is sent to the integrations and a confirmation email is sent.
- If Requires confirmation is off, a booking is final straight away and your attendee receives the ordinary Booking confirmation email to attendee from section 2.
- If Requires confirmation is on, a request goes to you first (Booking approval request to host) and a receipt message goes to the attendee (Booking confirmation (email to attendee)). If you reject it, Booking rejected by organiser (email to attendee) follows.
- On the same tab you also find Attendee cannot cancel and Attendee cannot reschedule. With those you determine whether your attendee may take those steps themselves from the links in the confirmation email.
9. Good to know #
- During the setup phase, no email goes out yet. As long as your environment is not live, sending email is switched off. So you can prepare the reminders and wording at your leisure, but a real test booking only produces an email after your go-live. The order of that process is described in the step-by-step migration guide with go-live checklist.
- Test with a real booking after go-live. Book your own booking type with an email address you can open yourself and temporarily set the reminder to a few minutes before the appointment. That way you see both the confirmation and the reminder come in. Afterwards you set the moment back to the value you really want to use.
- A reminder is scheduled at the moment the booking is made. If you switch the reminder on today, it applies to the bookings that come in after that. Appointments that were booked earlier do not receive that email after the fact. If such an older appointment is rescheduled, the reminder is scheduled during the rescheduling after all.
- Do you want the attendee in your CRM as well? That is a separate connection, with its own options for tags and automations. It is described in Connecting appointments to the CRM: creating contacts automatically on a booking.
- Group events and paid appointments have the same emails. There too you find the Email notification tab with the same set-up, so work through those booking types as well if you want to send reminders.
Related articles #
- Sharing your booking link: one service or all your services on one page
- Connecting appointments to the CRM: creating contacts automatically on a booking
- Connecting your calendar to the appointment scheduler
- Setting up multiple booking durations in the Appointments module
- Setting up group events in the Appointments module
- Setting up paid appointments with automatic checkout
- Adding appointments manually in the Appointments module
- Connecting Zoom to the Appointments module for automatic meetings
- Making several meeting rooms bookable with a maximum capacity


