Would you like customers to be able to sign up for your newsletter with a single tick while they are paying? You can do that with a checkbox on your checkout. As soon as a customer ticks the box and completes the order, the contact is automatically added to the list and tags you choose, with double opt-in if you want. In this article we switch the feature on step by step: first the setting in the CRM, then the box itself on your checkout pages.
The newsletter sign-up on the checkout in Autorespond is based on FluentCRM and the checkout editor of FunnelKit, included in your package.
Step 1: Switch the setting on in the CRM #
Go to CRM & Emails → Settings → General settings and scroll to the WooCommerce Checkout Subscription Field section.
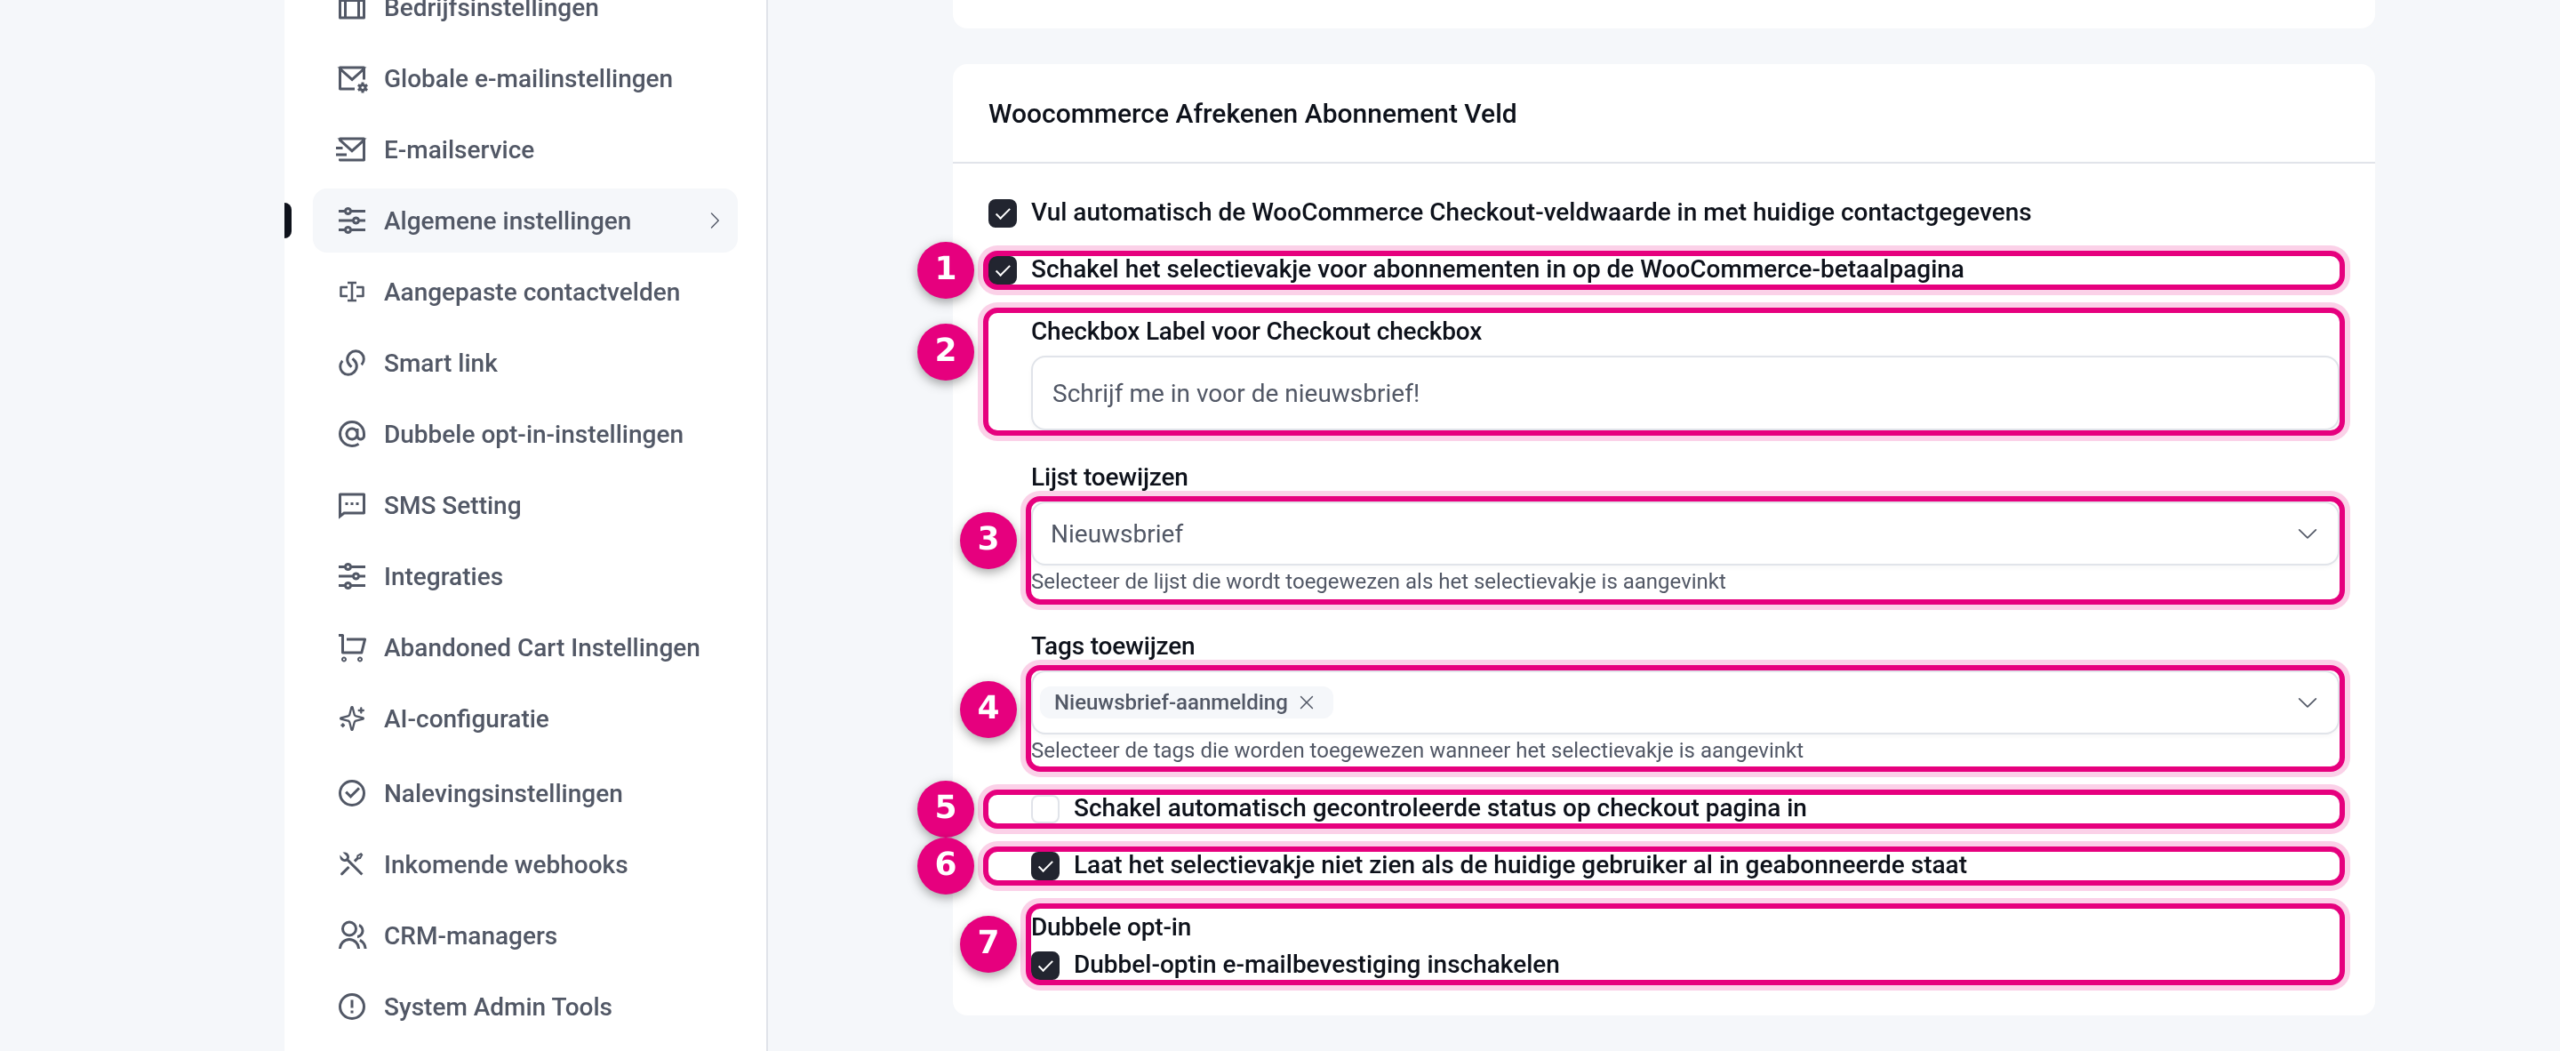
- Enable the subscription checkbox on the WooCommerce checkout page: the main switch. Tick this to activate the feature.
- Checkbox Label for Checkout checkbox: the text the customer sees next to the box, for example “Sign me up for the newsletter!”.
- Assign list: the list the contact is added to once the box has been ticked on an order, for example your newsletter list.
- Assign tags: one or more tags the contact also receives. Useful if you want to start an automation for new sign-ups: use this tag as the start trigger.
- Enable automatically checked status on the checkout page: this pre-ticks the box on the checkout. For a newsletter sign-up we advise leaving this off: a sign-up is then always a deliberate choice by the customer, which is also the safe route for the GDPR.
- Do not show the checkbox if the current user is already subscribed: hides the built-in box for logged-in customers who are already listed as Subscribed in your CRM. See also “Good to know” at the bottom of this article.
- Enable double opt-in email confirmation (we advise not ticking this): with this tick on, a new contact first receives a confirmation email and the sign-up only counts after a click on the confirmation link. Further on you can read exactly how that works. We advise leaving this tick off: you normally arrange double opt-in through the form settings, and if somebody ticks the box during the purchase they do not need to go through a double opt-in
Above the section there is one more tick box, Automatically fill the WooCommerce Checkout field value with current contact details: this pre-fills checkout fields with known contact details. It is separate from the newsletter sign-up and you can simply leave it on. Once you have set everything, click Save at the top right.
Step 2: Show the box on your checkout #
The checkout pages of Autorespond (the store checkout and the checkout pages of individual sales funnels) decide for themselves which fields are in the form. The newsletter box therefore does not appear by itself after step 1: you add it once as a field to every checkout where you want to show it.
Open the checkout editor via Sales funnels → Store Checkout → Checkout page → Design tab (for your general store checkout) or via Sales funnels → Individual Funnels → your funnel → Checkout page → Design tab (for a funnel checkout). Scroll to the Checkout Form Fields block and click Add New Field at the bottom right of the field palette.
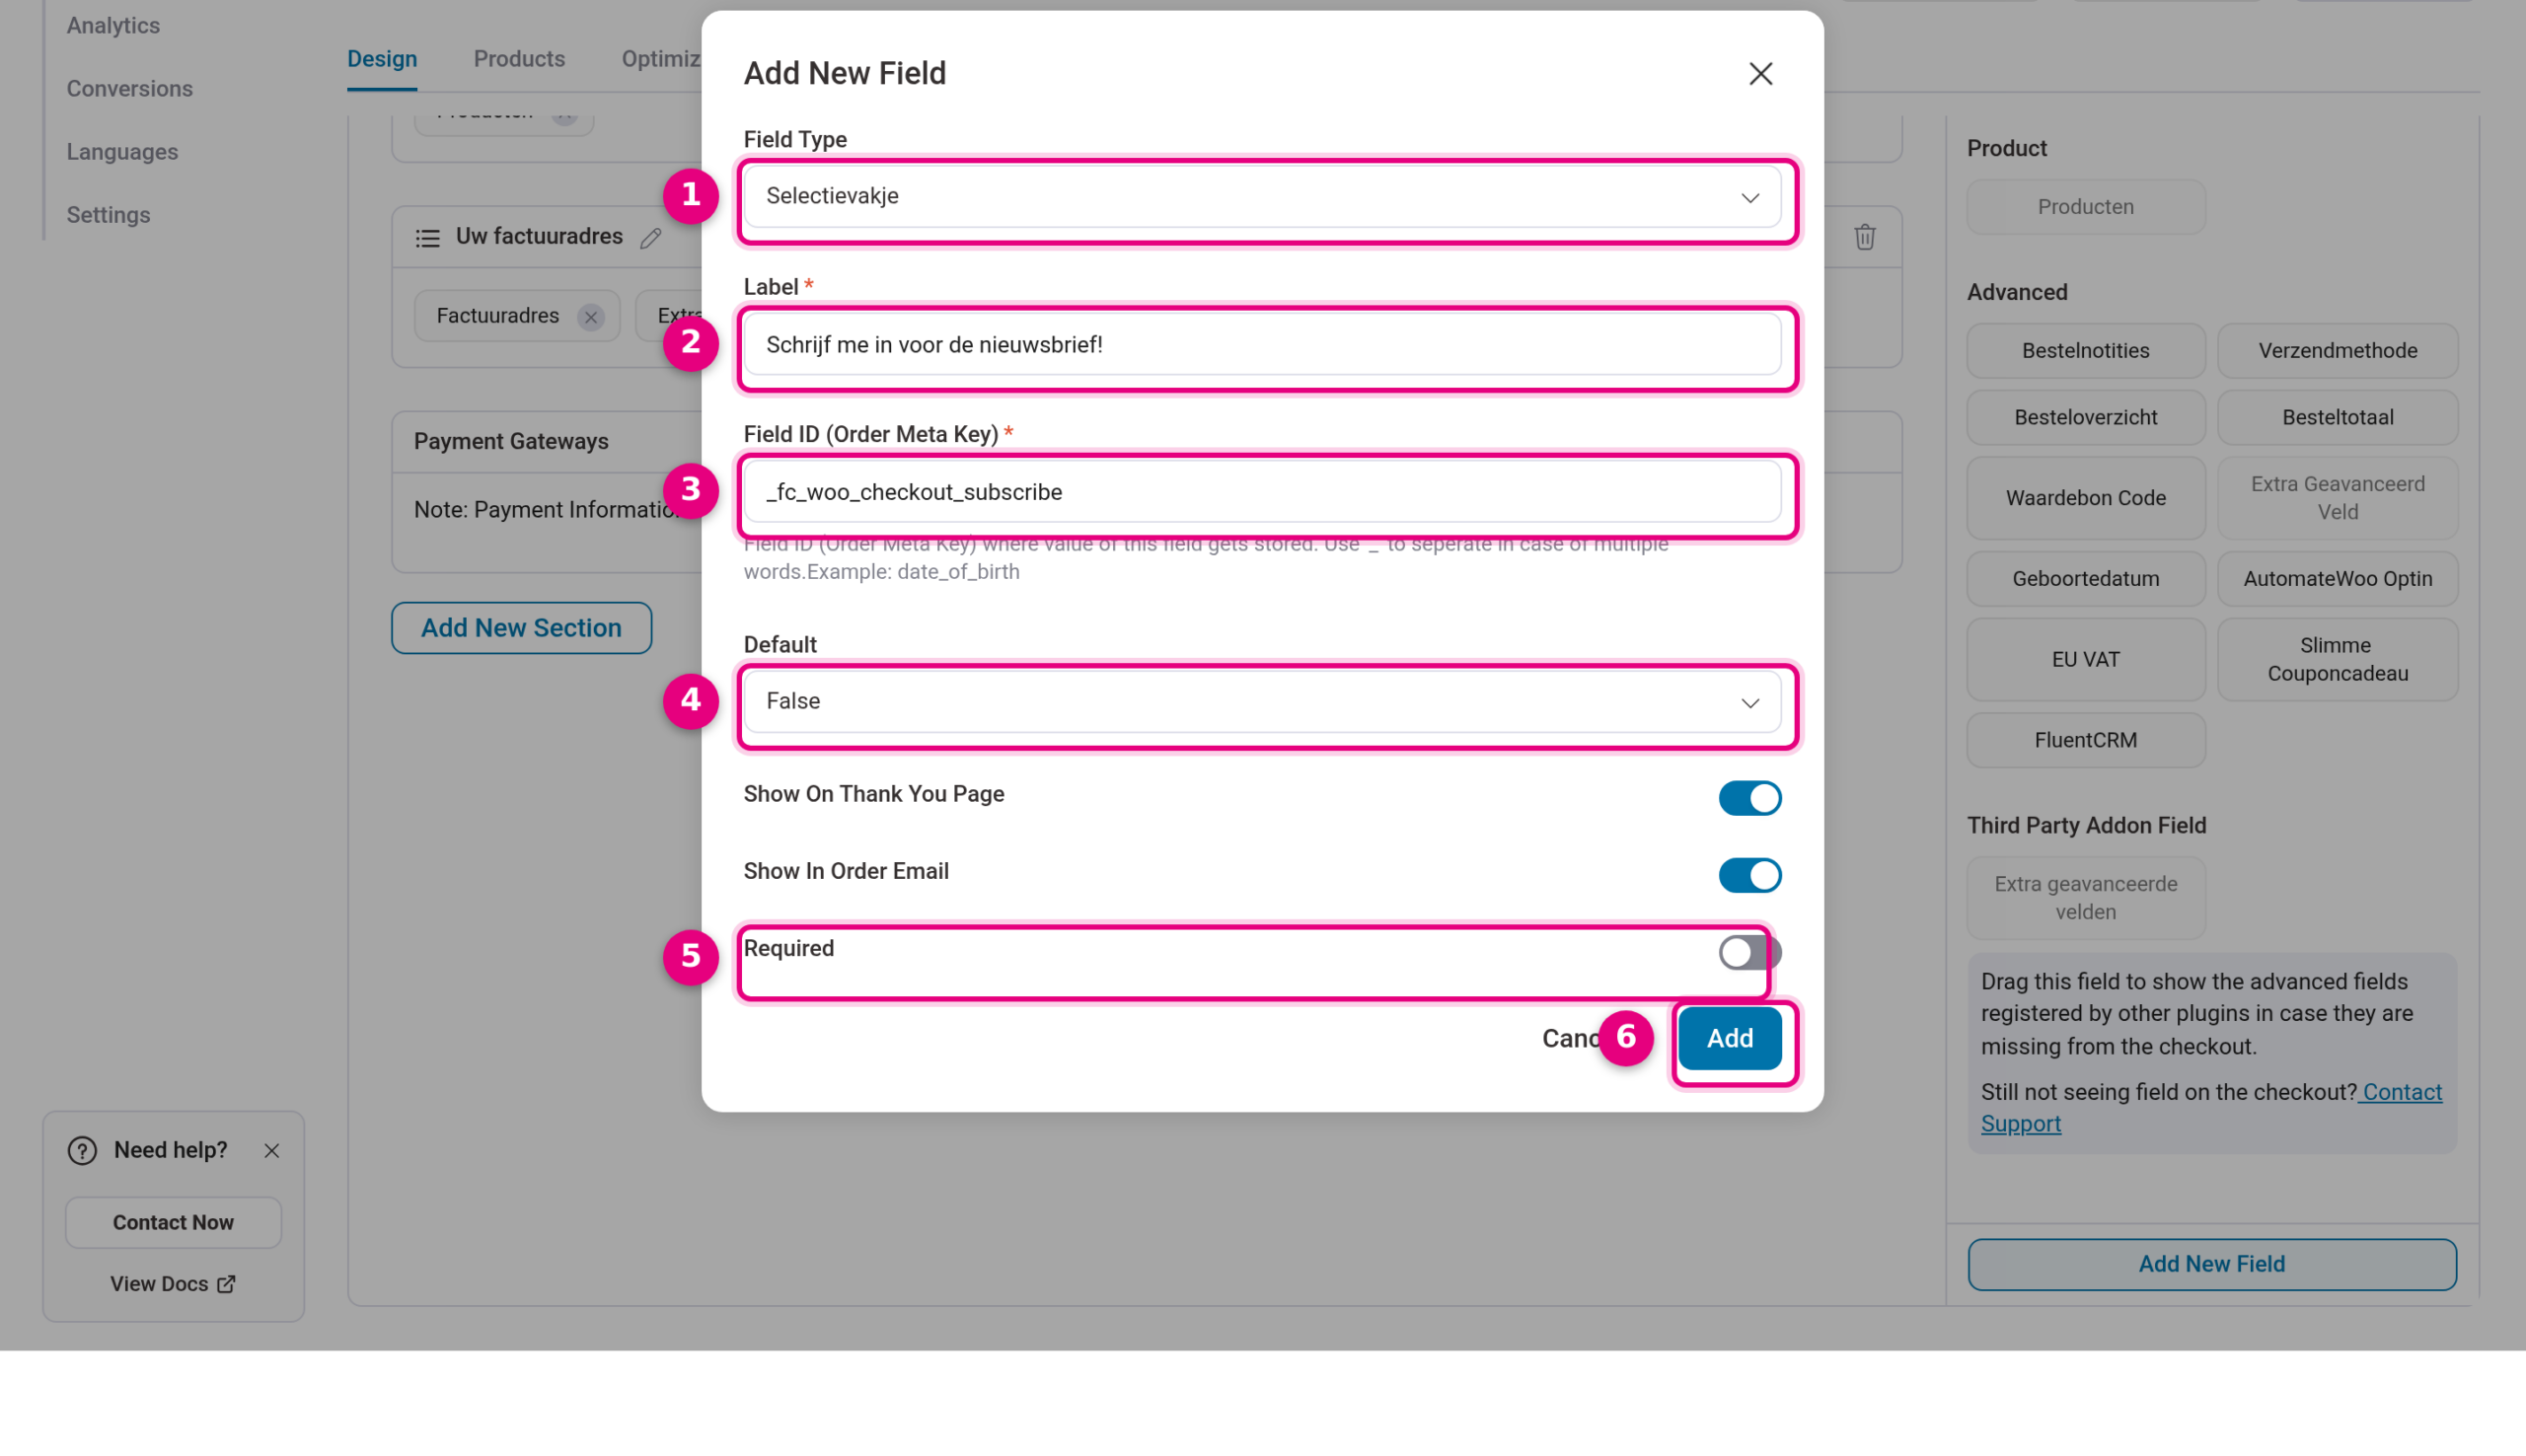
- Field Type: choose Checkbox.
- Label: the text next to the box. Use the same text as in step 1, for example “Sign me up for the newsletter!”.
- Field ID (Order Meta Key): enter exactly _fc_woo_checkout_subscribe here. This Field ID is the link with the setting from step 1: only with precisely this value are the list, tags and double opt-in from the CRM applied.
- Default: choose False, so the box is not ticked by default.
- Required: switch this off. A newsletter sign-up is optional; the customer must be able to pay without ticking the box too.
- Click Add. The field is now in the field palette on the right.
Note: after Add, the field is only in the palette. Drag the field from the palette to the place you want in a form section (for example directly below the email address) and click Save at the top right. Only then is the box really on the checkout.
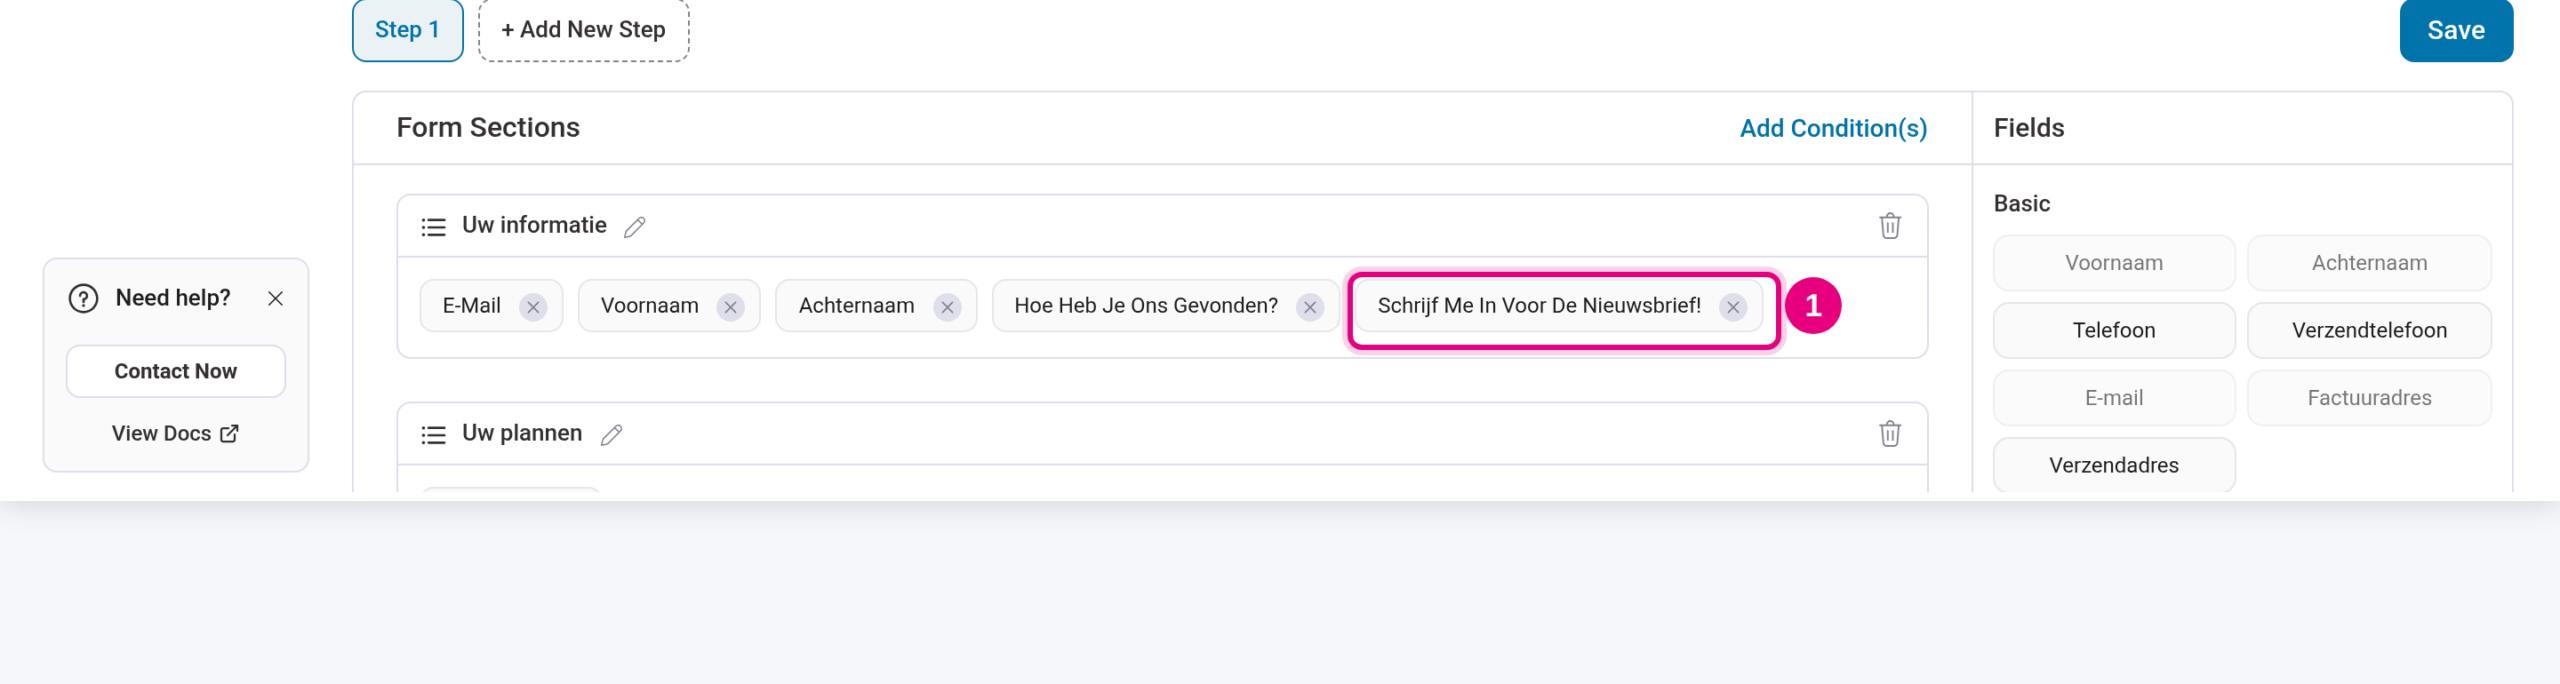
Under Advanced the field palette also holds a ready-made field named FluentCRM. Do not use that field for the newsletter sign-up: it does show the box, but the sign-up is not processed. The route via Add New Field with the Field ID _fc_woo_checkout_subscribe is the right one.
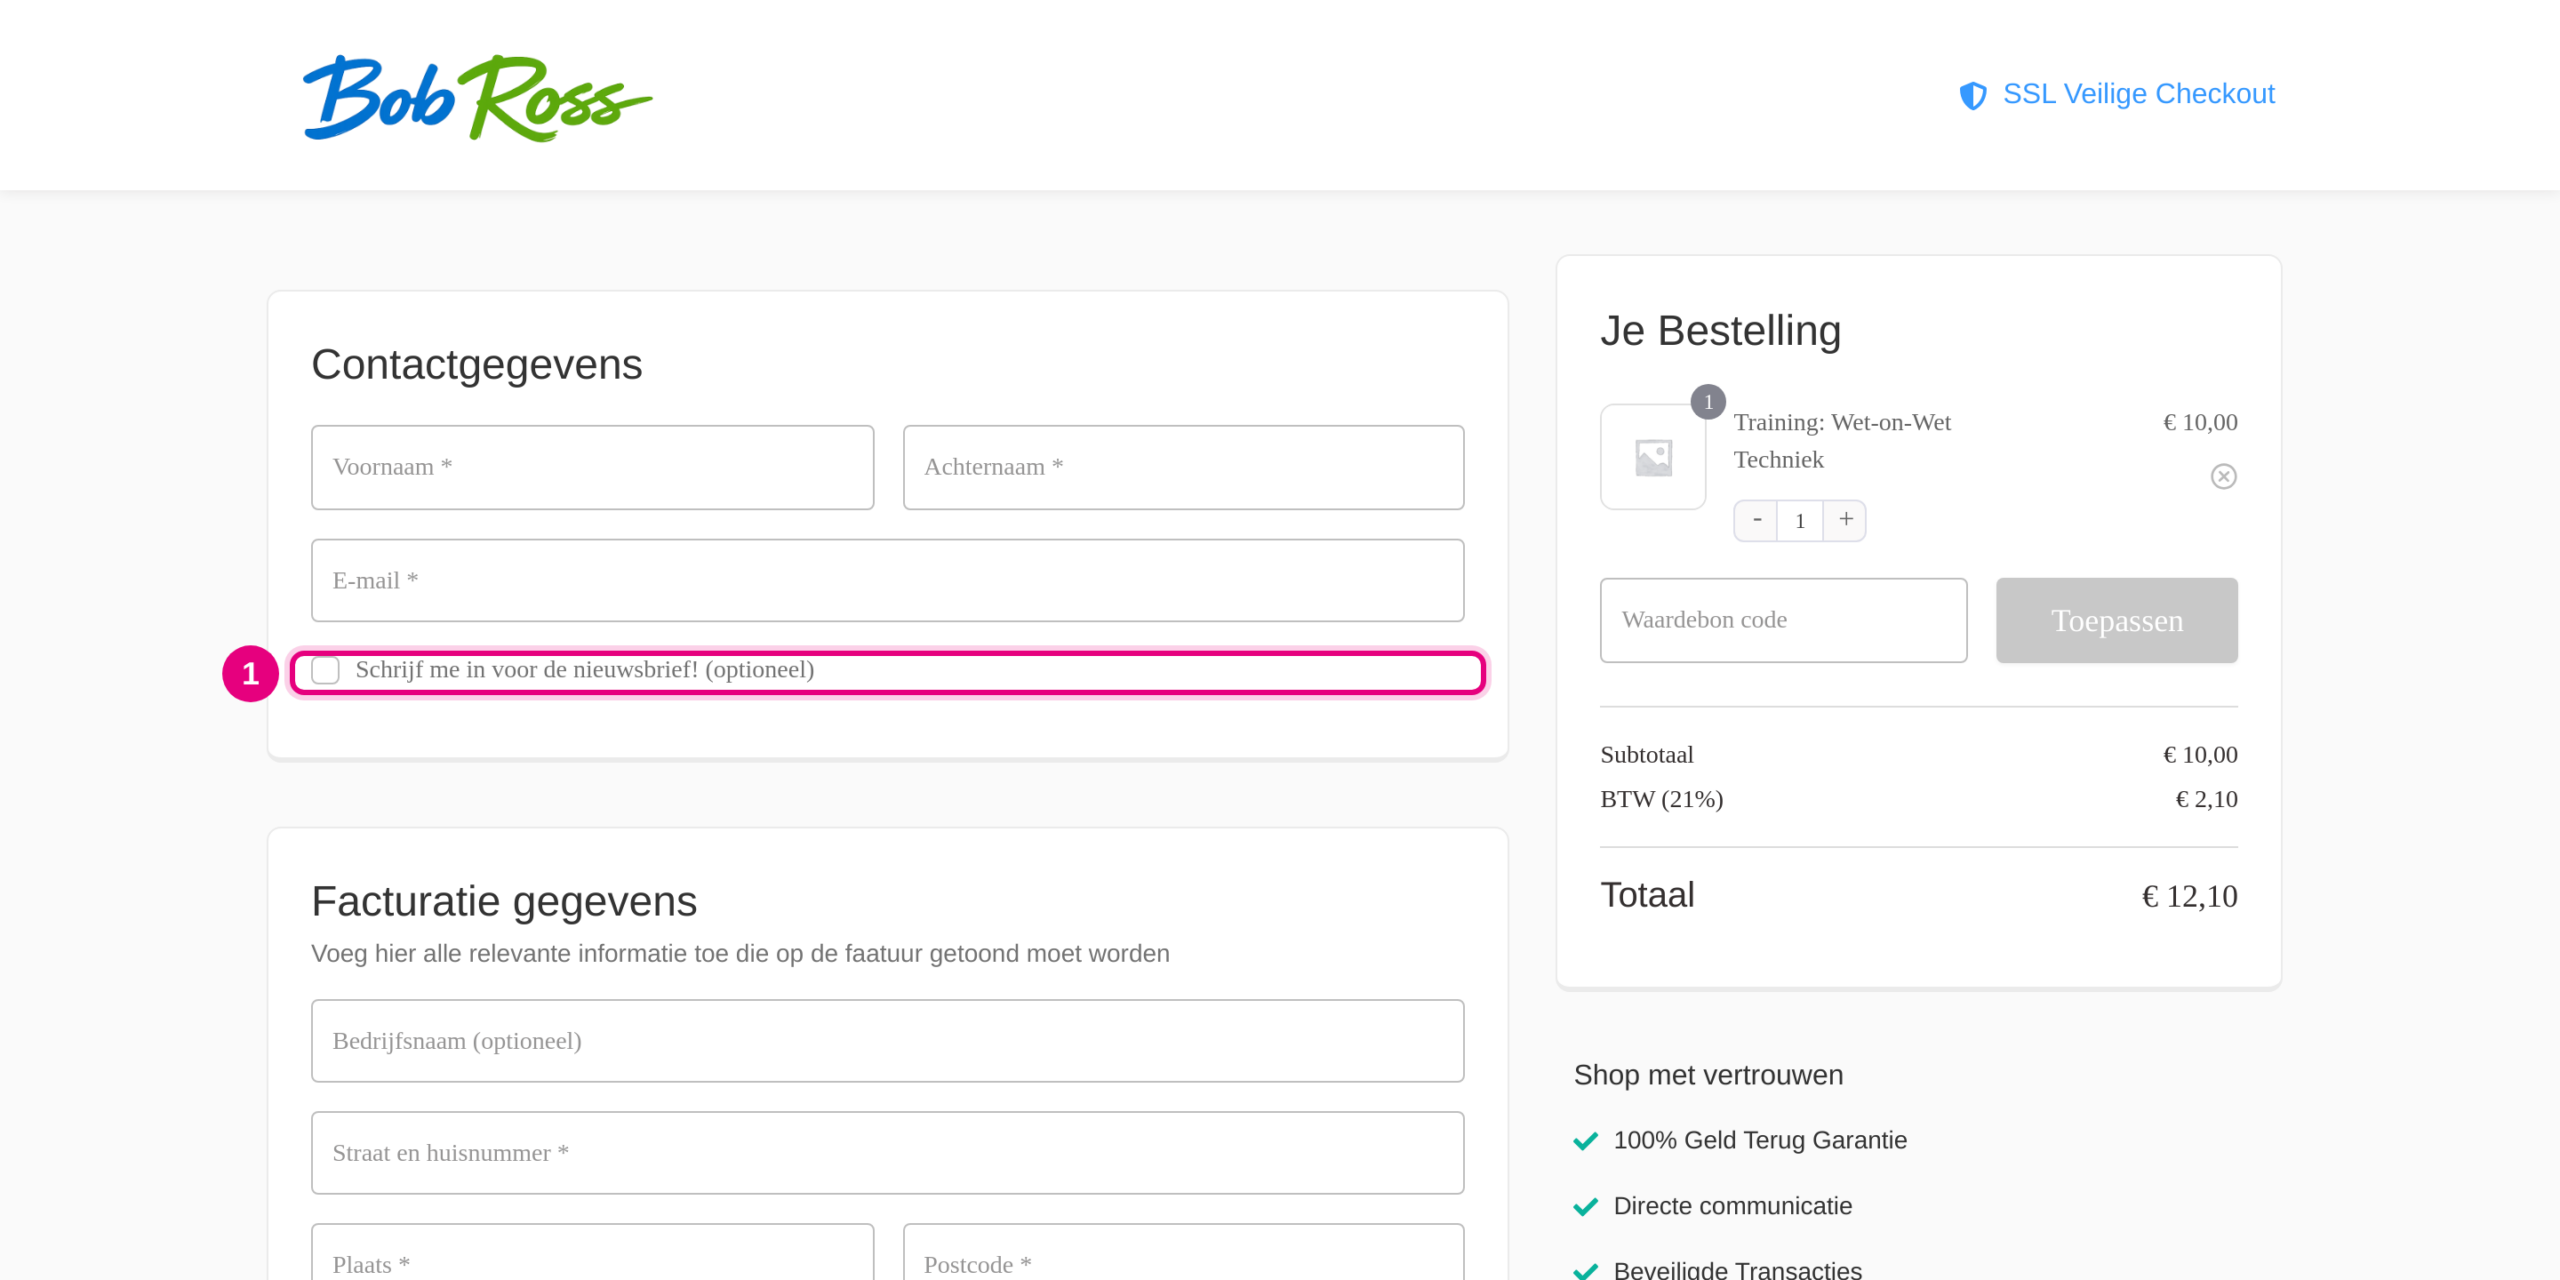
Repeat step 2 for every checkout where you want to show the box: the store checkout and the checkout page of each individual funnel. This is how the box looks to your customers:
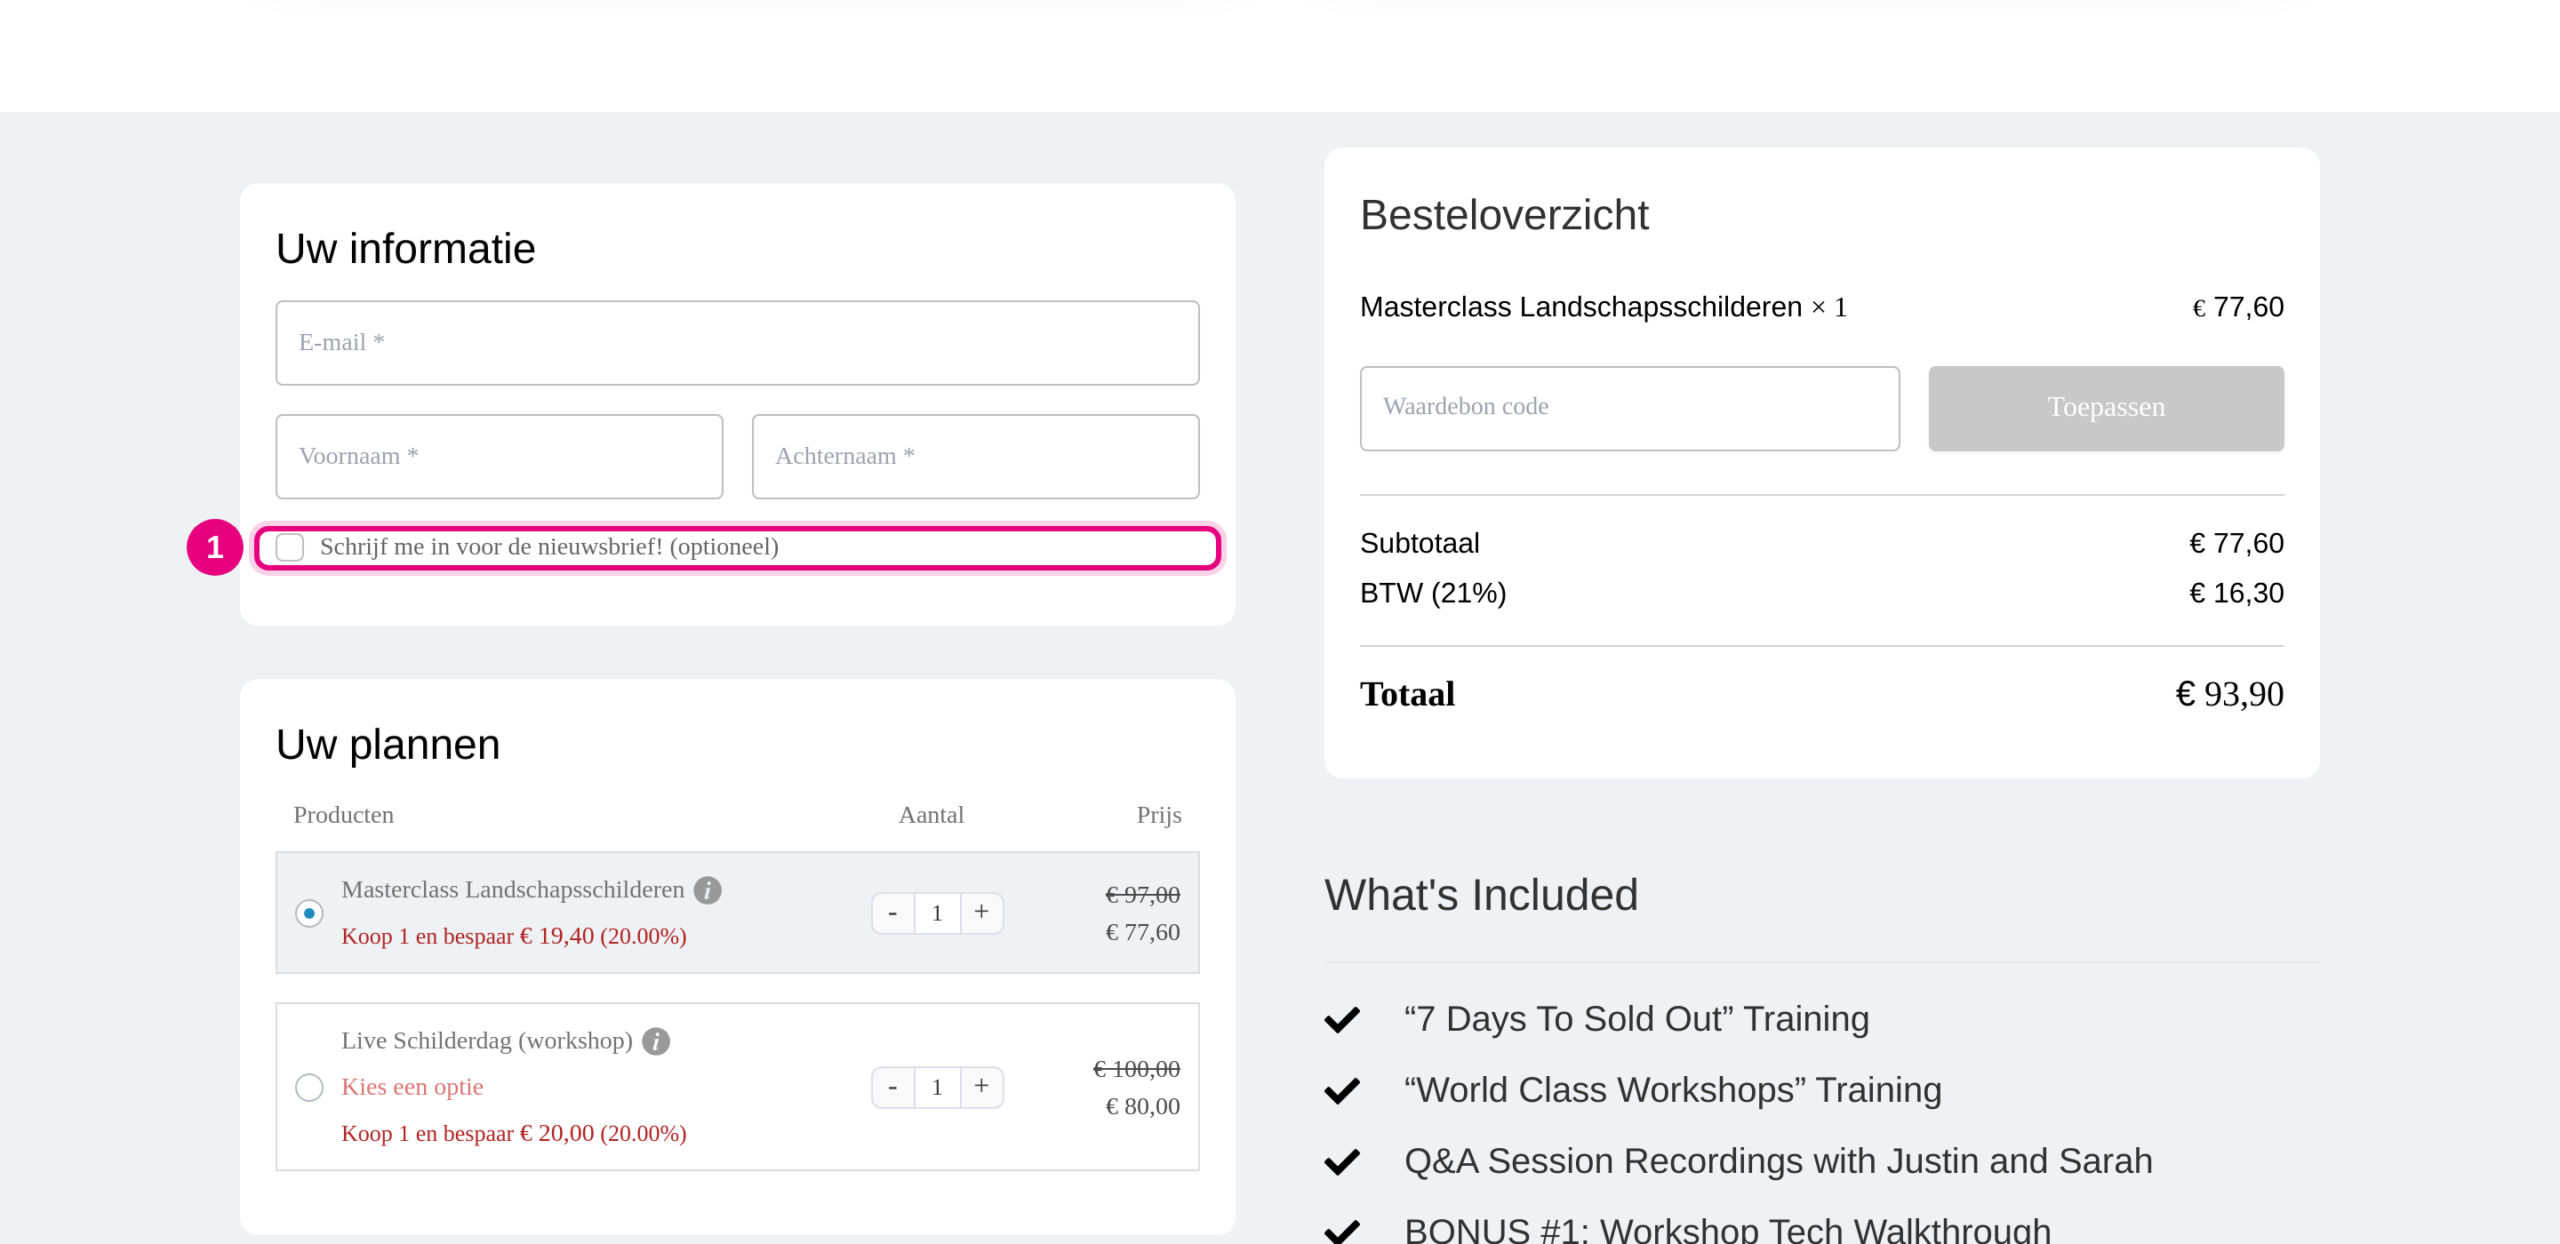
What happens after the payment #
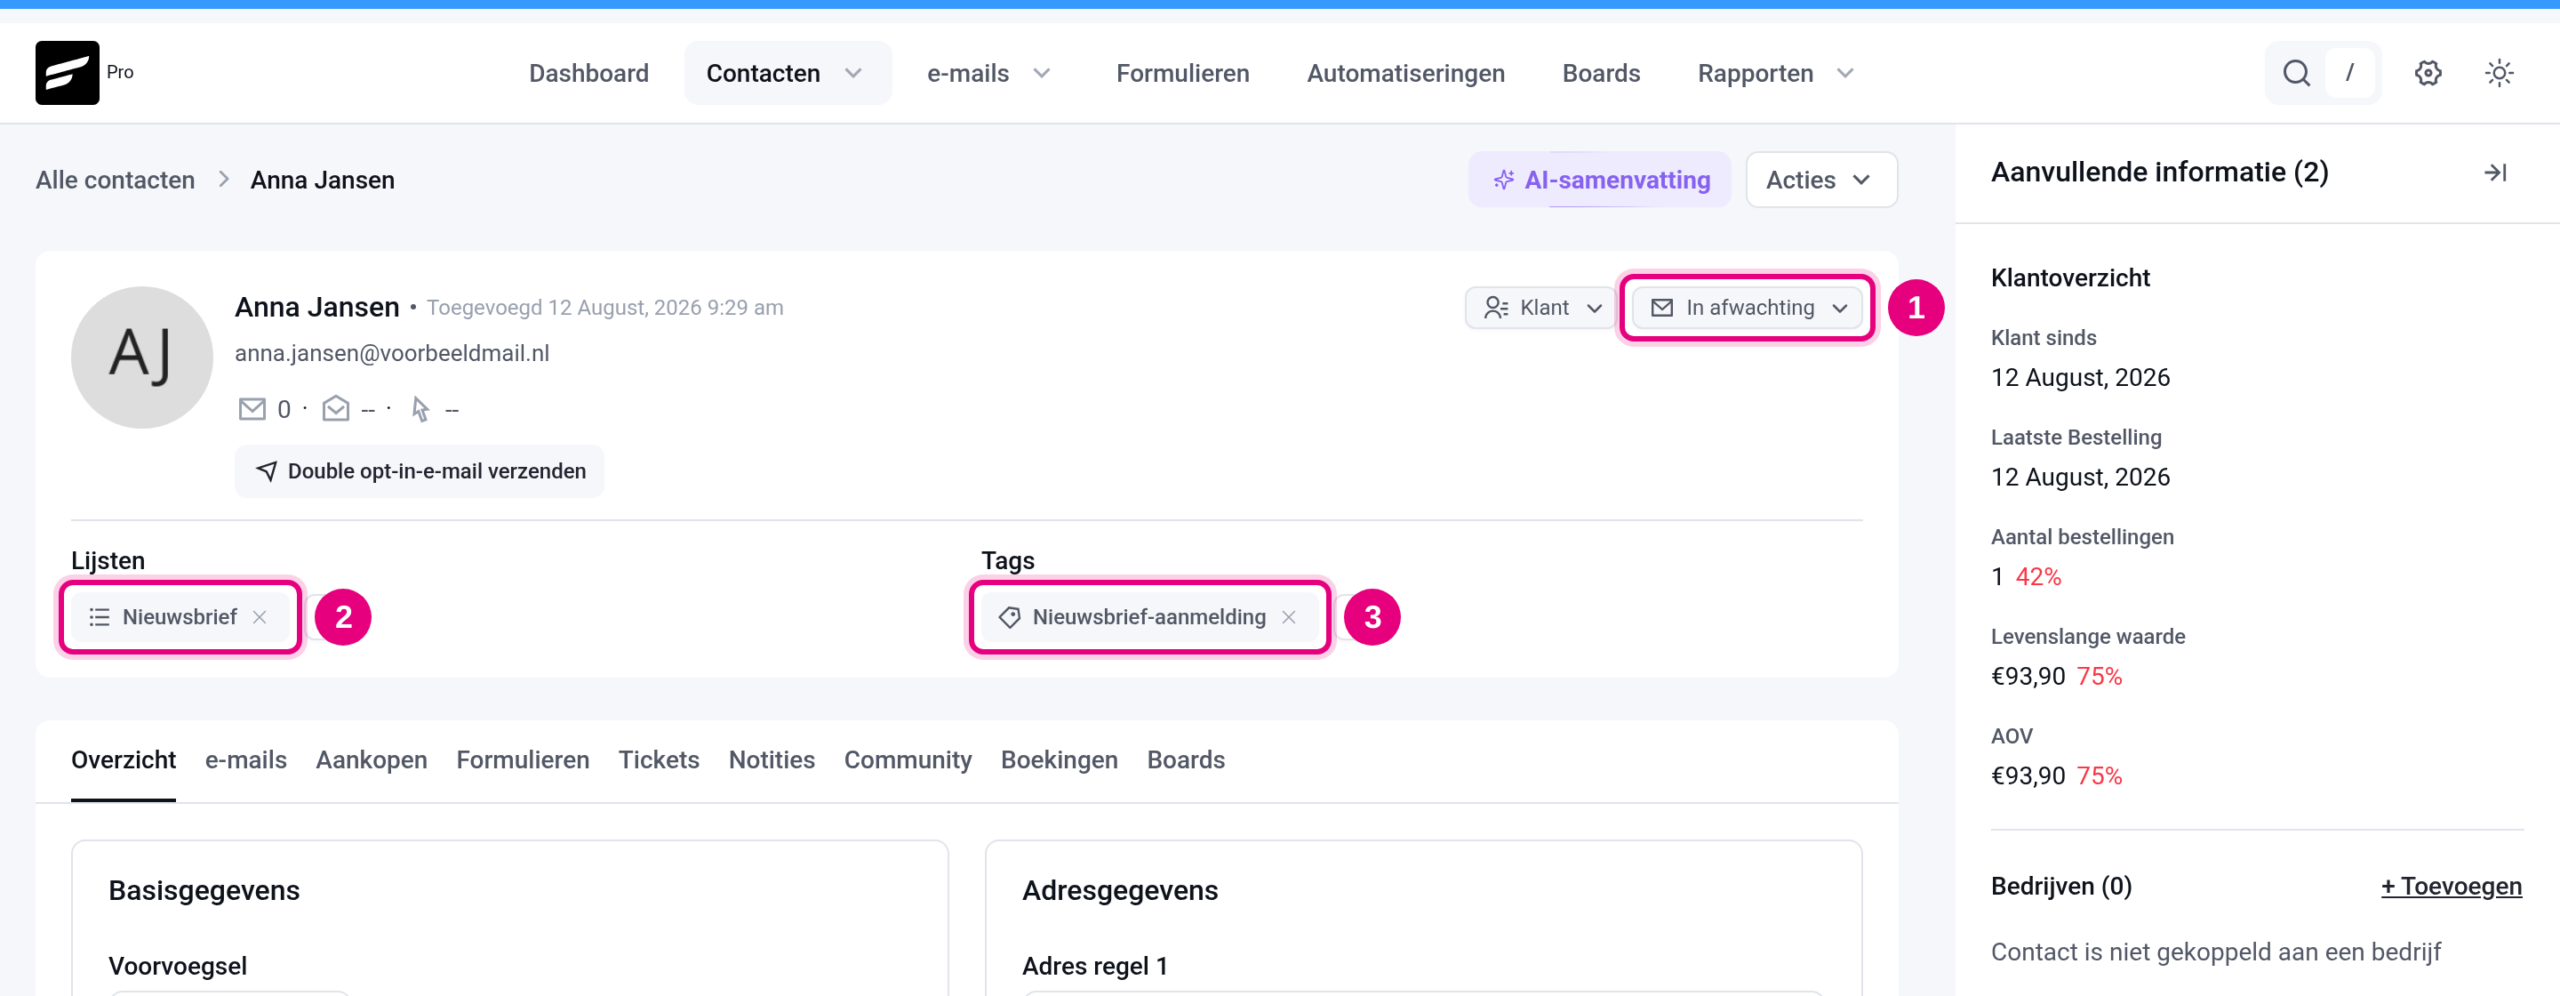
If a customer pays with the box ticked, the contact is added to the chosen list straight away and receives the chosen tags. With double opt-in on it works like this:
- A new contact is created in the CRM. If the tick for double opt-in is on (we advise switching it off, see above), the contact is first added to the CRM with the status Pending and automatically receives the confirmation email (“Confirm your sign-up”). Only after a click on the confirmation link does the status become Subscribed and does the contact start receiving your newsletters. If you simply leave double opt-in off, they are subscribed straight away.
- A contact that is already listed as Subscribed in your CRM gets the list and tags added straight away. No new confirmation email is sent and the status stays Subscribed.
- If the customer pays without ticking the box, nothing happens with the newsletter list. The contact is of course still created in your CRM by the order itself, but without the newsletter list and tags.
Are you testing the double opt-in yourself and does the confirmation email appear not to arrive? Then read Double opt-in does not work during testing – these are the causes.
Removing the text “(optional)” after the label #
Because the box is not required (Required is off), the checkout automatically puts the text (optional) after the label. That happens with every non-required field and cannot be switched off per field. If you would rather show the label without that addition, you arrange it with one line of CSS on the checkout page:
- Open the same Checkout page as in step 2 and click the Settings tab at the top (next to Design).
- Open the Custom CSS section and paste this line there:
.wfacp_main_form span.optional { display: none; }- Click Save at the top right and look at your checkout: the text (optional) has gone, both for this box and for any other non-required fields on this checkout page, which immediately looks calmer.
- Are you using the box on the checkout page of an individual funnel as well? Then repeat this there: every checkout has its own Custom CSS.
Good to know #
- The setting “Do not show the checkbox if the current user is already subscribed” only works for the built-in box on a standard WooCommerce checkout. The box you add via the checkout editor in step 2 is always shown. That is not a problem: if a customer who is already subscribed ticks it, only the list and tags are added and no extra confirmation email is sent.
- Do you want a box that customers must tick, for example agreement to your terms or the right of withdrawal? Use your own field with Required on for that; see Adding a required agreement checkbox to the checkout.
- Do you want a separate checkout page with its own fields per product? Then read Creating an individual sales funnel.


