Do you sell an online course or e-learning programme, and can your customers pay by bank transfer? Then you do not want anyone to get access before the payment has arrived. In this article you set that up safely with two automations: a holding email for orders that have not been paid yet, and an automation that arranges access only after payment.
Automations in Autorespond are based on FluentCRM, which is included in your package. Read the English documentation
How the order statuses work #
To choose the right starting moment, it helps to know what each order status means:
- Pending payment: the order has been created, but the payment has not started or has not been completed.
- On hold: the order is waiting for confirmation of the payment. This is where orders with the Direct bank transfer payment method end up. So payment has not been made yet.
- Processing: the payment has been received.
- Completed: the order has been fully handled. Every Autorespond site has a shop workflow switched on by default that moves paid orders straight to this status. So this is the moment to grant access.
Please note: the name “Processing” suggests that something still has to happen, but in the webshop this status means the payment has arrived. When you see a transfer appear in your bank account, you set the order to “Processing” yourself through Shop → Orders. Because of the standard workflow Order status ‘Completed’ after payment, that order then moves on to Completed by itself. How to switch on Direct bank transfer as a payment method is explained in the article Payment options in the shop checkout. What each status means is covered in The order statuses of your shop explained, and what the workflow does exactly in Completing paid orders automatically (standard workflow).
First recommendation: use a product tag #
Before you build the automations below: in most situations a product tag is the simplest and most complete solution. On the product you set a tag through the WP Fusion tab that is only applied once the order has been paid. That tag is a reliable starting point for an automation (with the Tag applied trigger), can grant access to restricted pages, community spaces and courses straight away, and is withdrawn automatically on a refund, so access stops by itself. How to set that up is explained in Applying a product tag after payment. The two automations below remain useful for the emails around the payment: a holding email for as long as payment has not been made, and the messages that follow afterwards.
Step 1: an automation for the holding email (not paid yet) #
Go to CRM & Emails → Automations and click New automation. In the window on the left, choose the WooCommerce category.
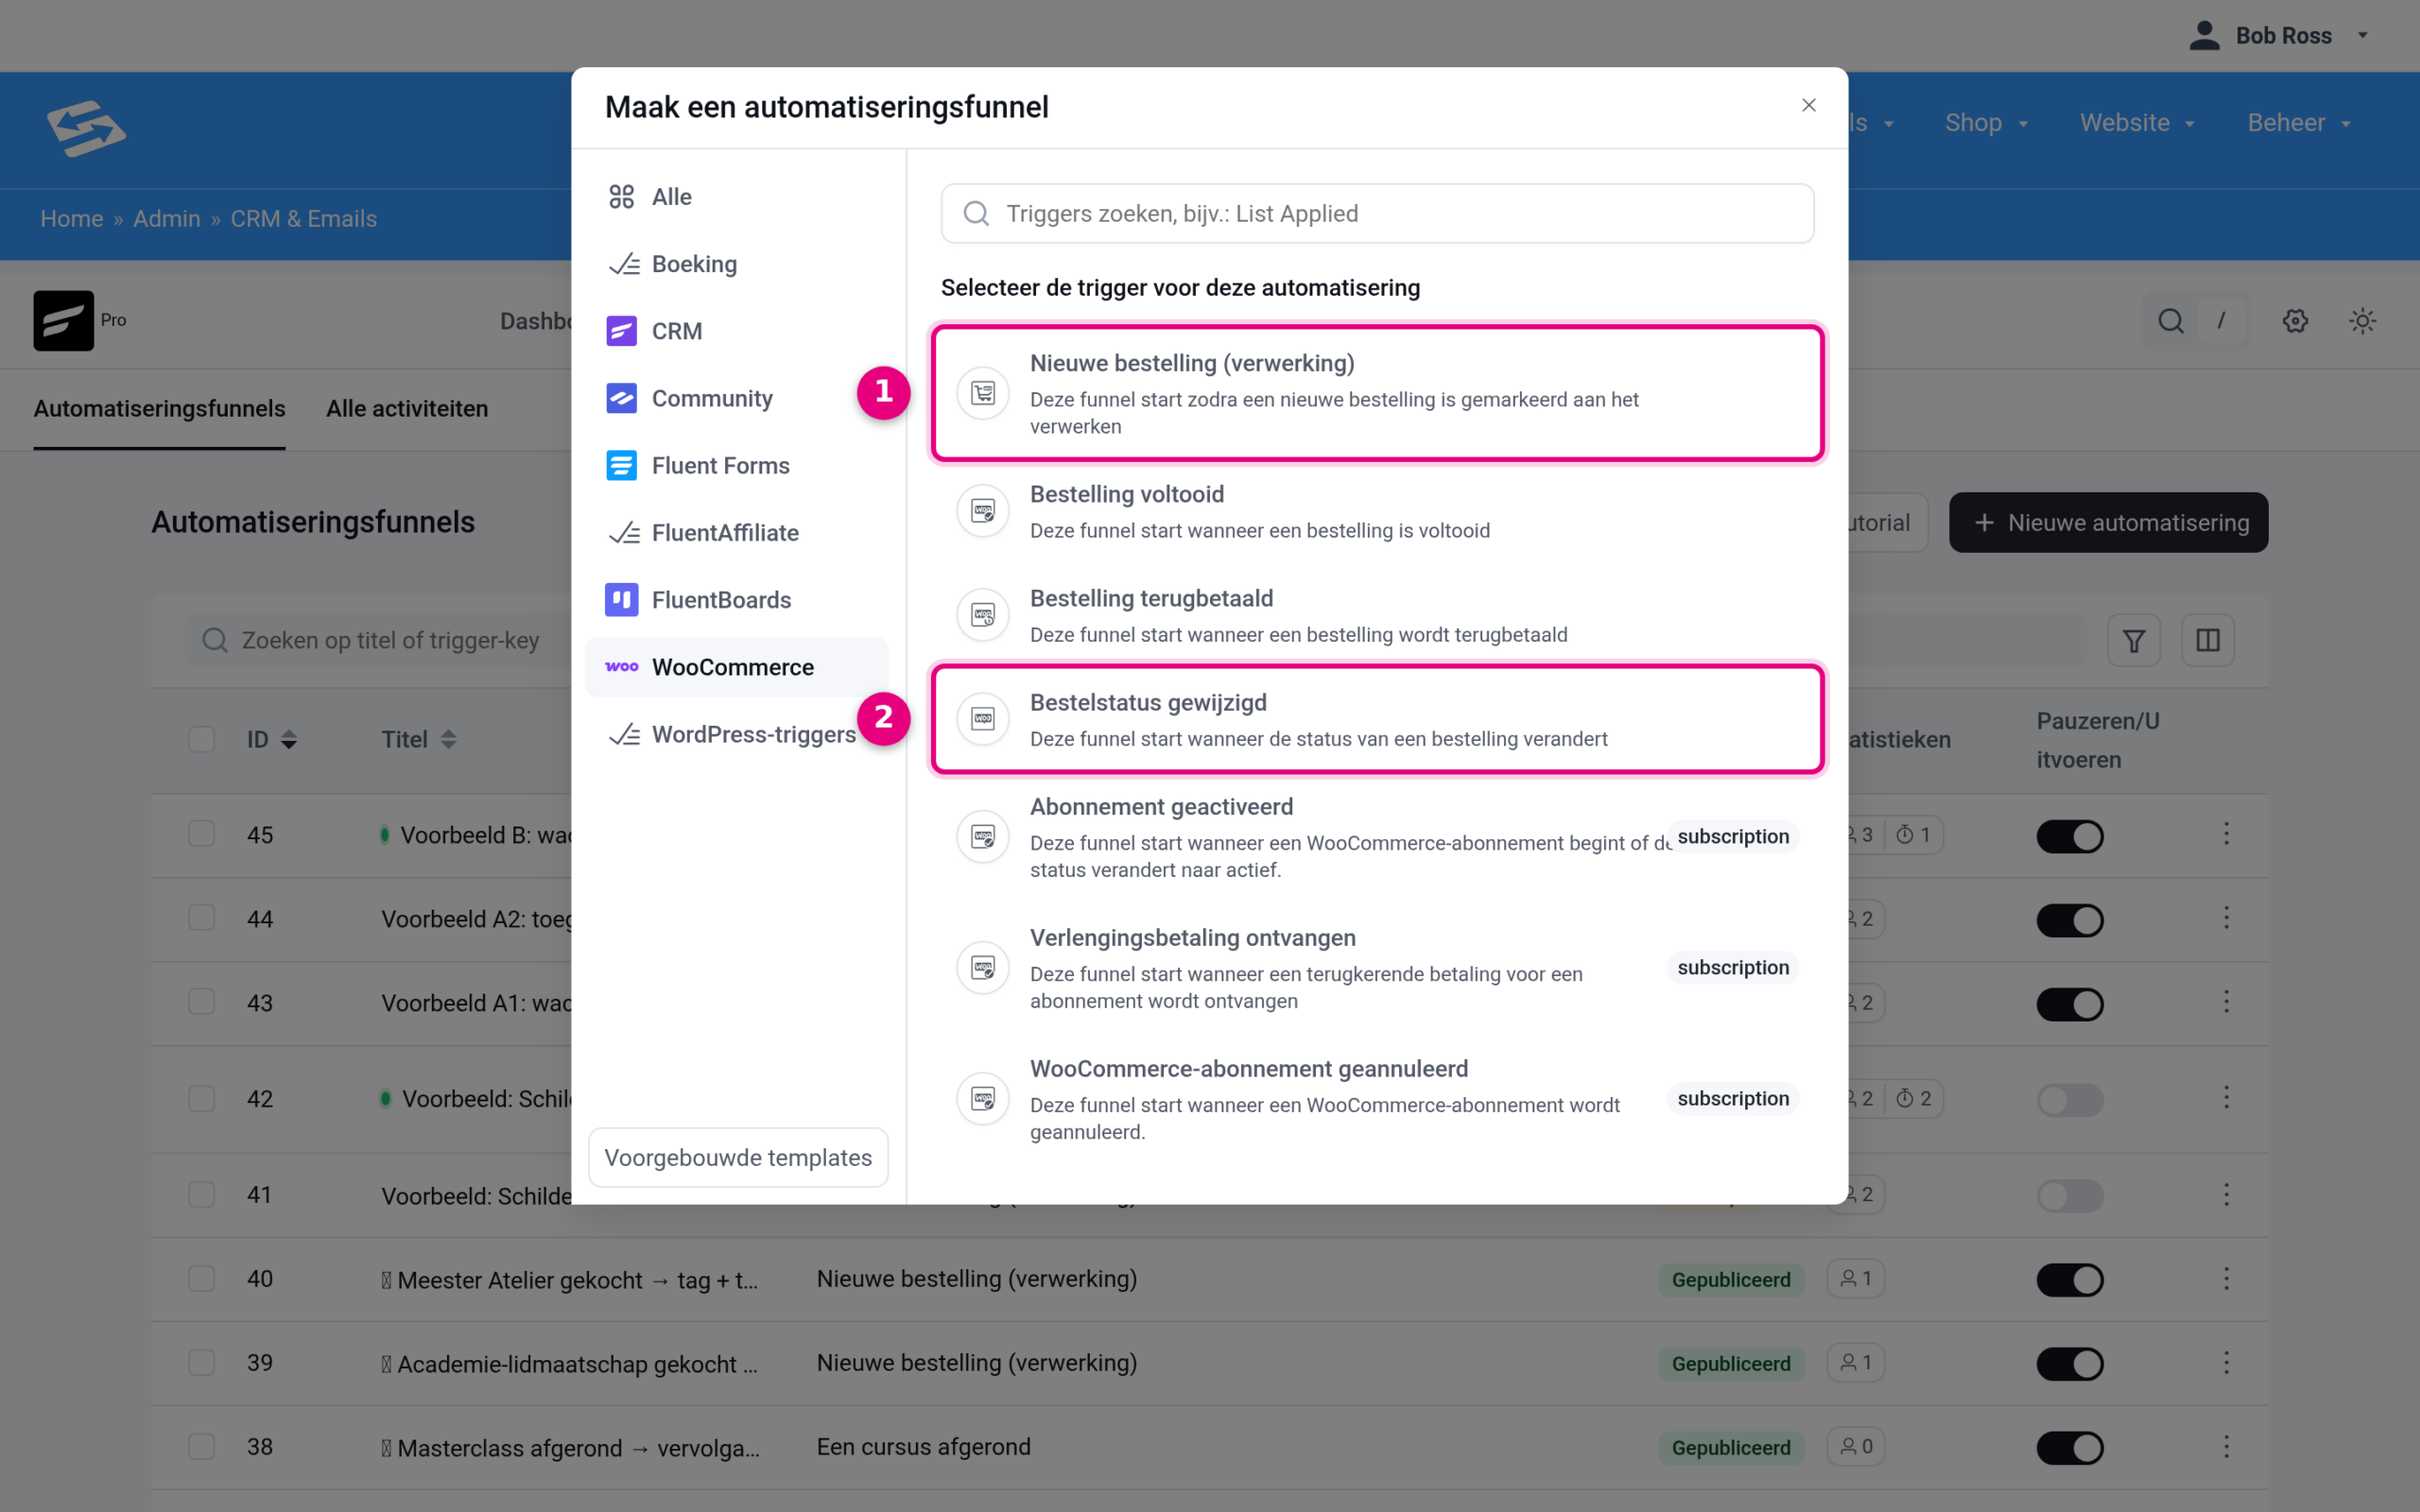
- New order (processing): this trigger starts as soon as an order gets the status Processing, so as soon as the payment has arrived.
- Order status changed: this trigger starts on every status change and can be set specifically to the status On hold. This is the one you choose for the holding email.
In the same list you also see Order completed (starts on the status Completed, which is the trigger you use in step 2), Order refunded and three subscription triggers for recurring payments. For the holding email, choose Order status changed and click Continue. Then set the trigger up like this:
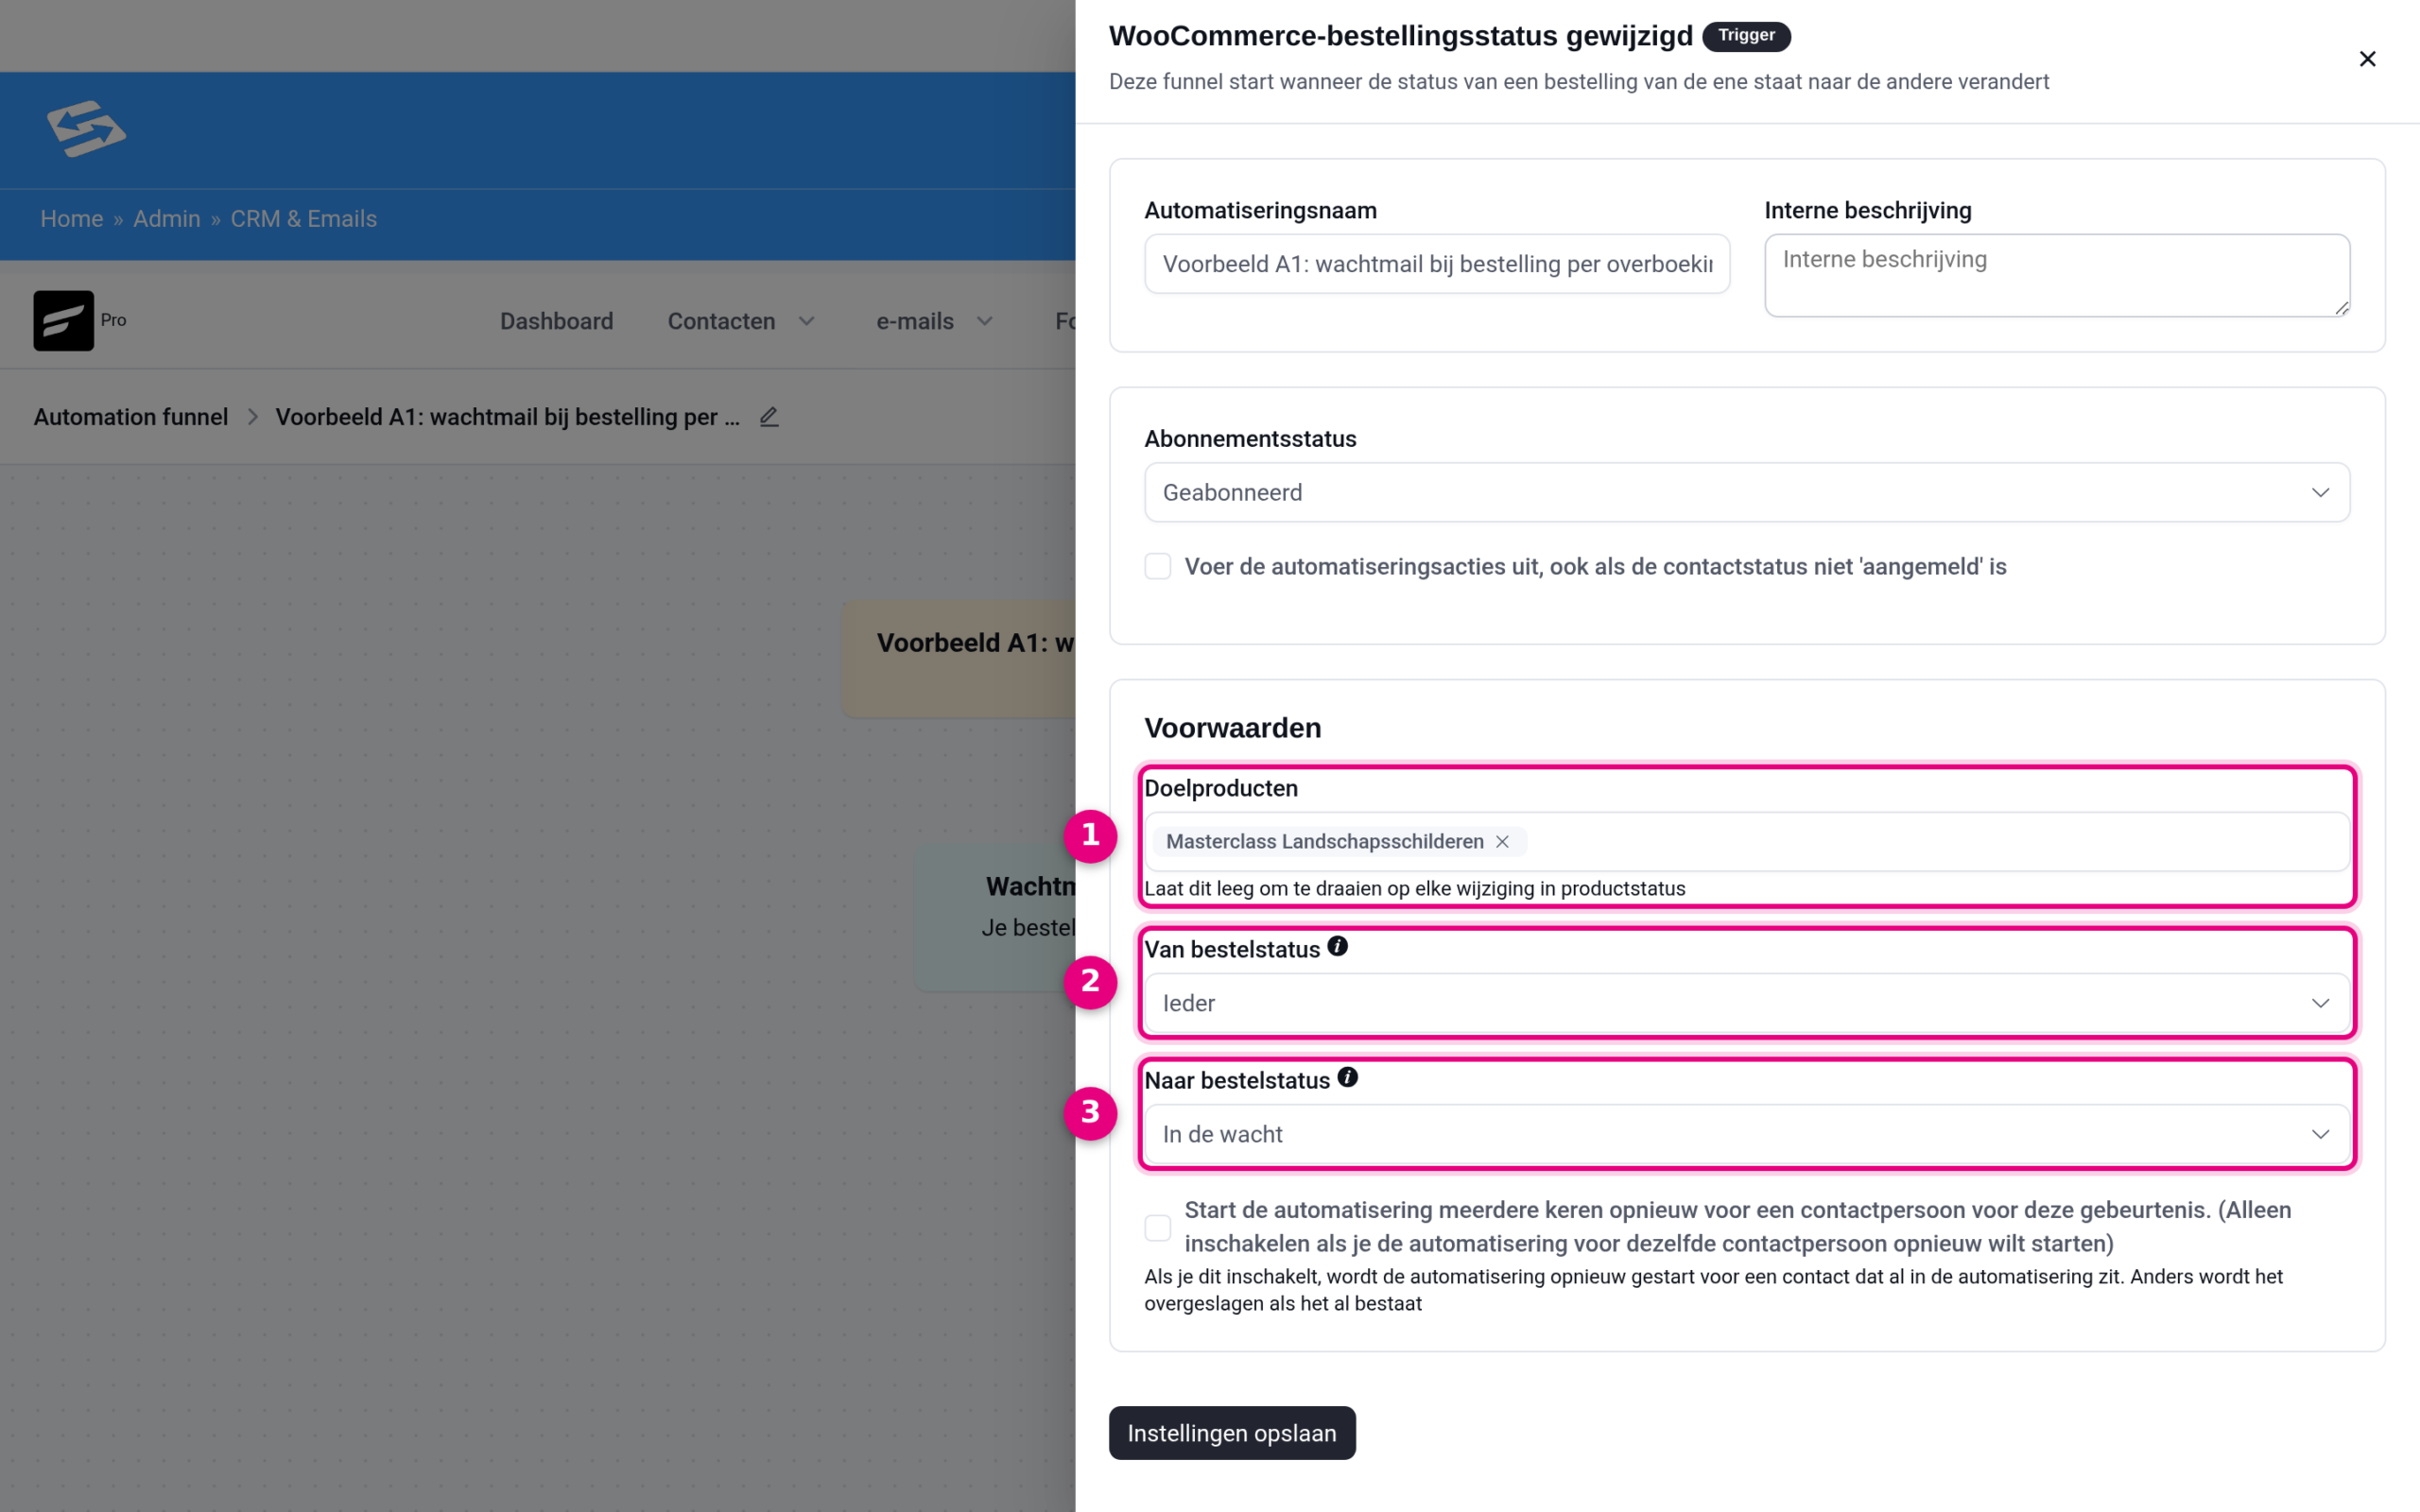
- Target products: choose the product this applies to, your course product for example. If you leave this empty, the automation applies to every product in your webshop.
- From order status: leave this on Any, it does not matter which status the order comes from.
- To order status: choose On hold. The automation then starts at exactly the moment an order by bank transfer comes in.
Give the automation a recognisable name at the top. Under Subscription status you decide whether the contact is signed up as Subscribed for your emails. Only tick Restart the automation multiple times if the same customer can order this product more than once, by default the automation starts once per contact. Click Save settings.
Then use the plus button below the trigger to add the action Send custom email. Write your holding email there, for example: “Thank you for your order. As soon as your payment has arrived, you will automatically receive an email with access to the course.”
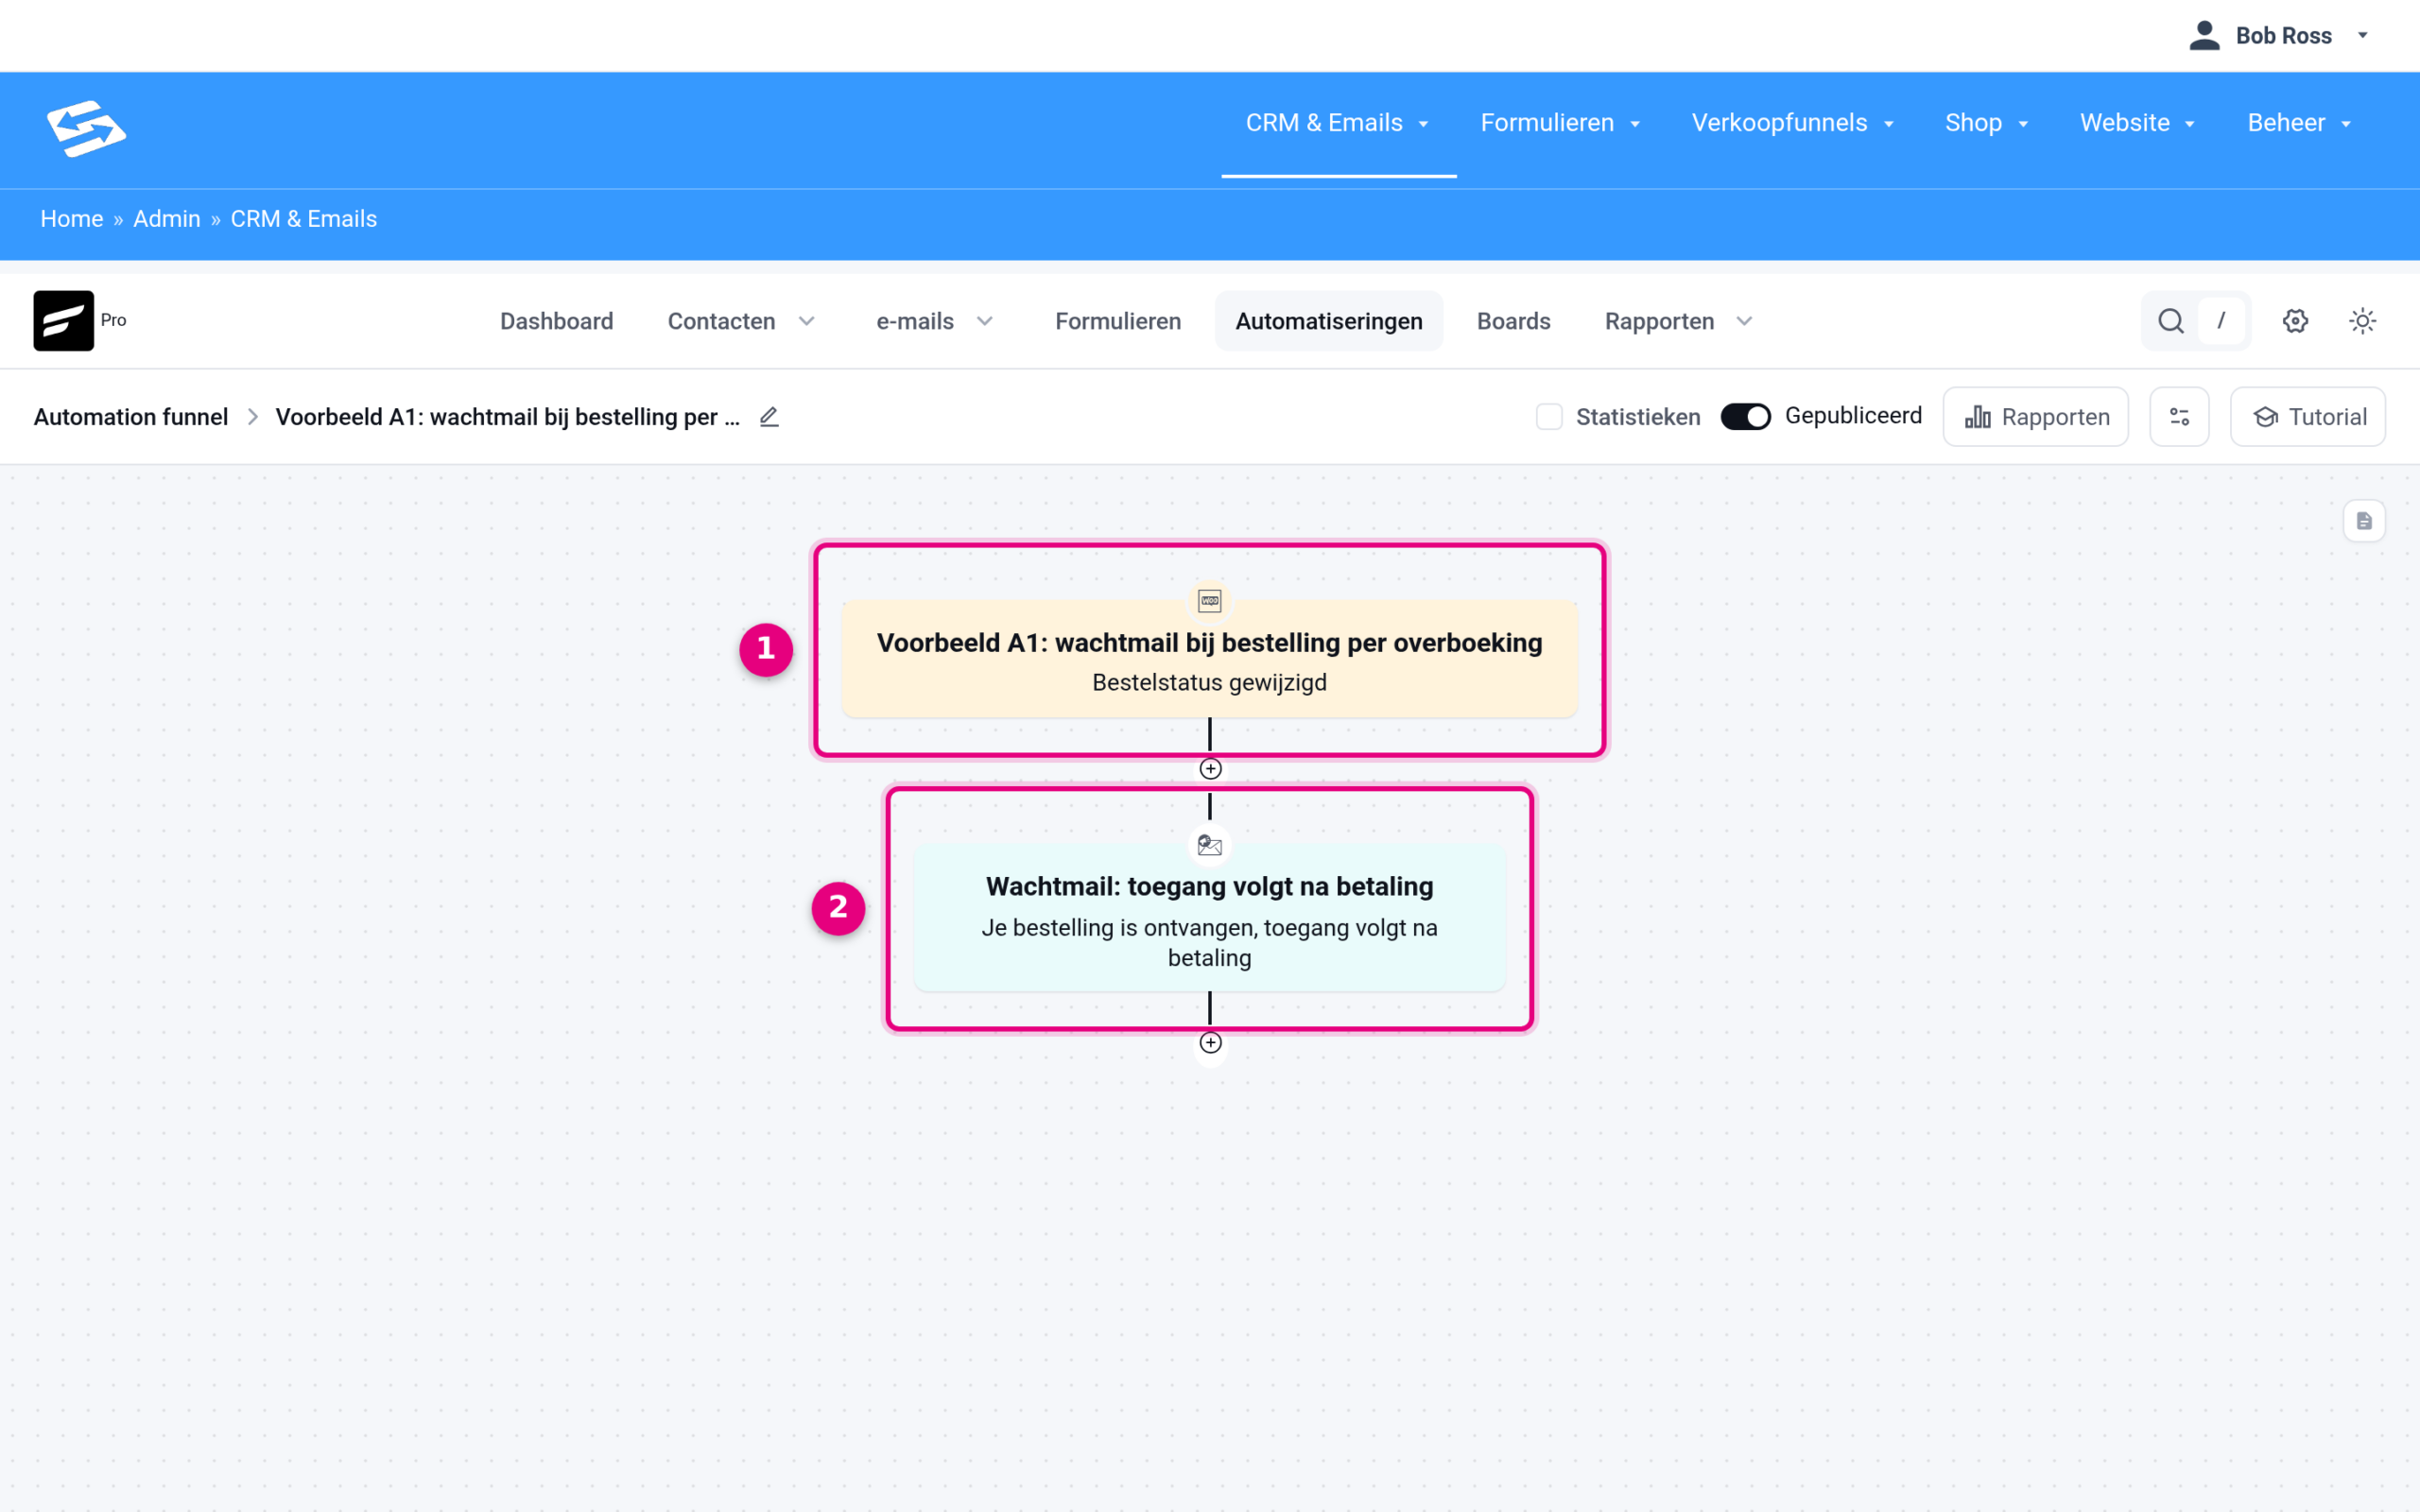
- The trigger: starts as soon as an order gets the status On hold.
- The holding email: a Send custom email step explaining that access follows as soon as the payment has arrived. With the plus button below it you can add more steps if you want.
Set the automation to Published in the top right.
Tip: you can let this holding email automation send reminders automatically. Add a Wait step after the holding email (three days, for example) and then a reminder email. Finish with a goal step, and the reminders stop by themselves as soon as payment has been made. You can see what such a structure looks like in the alternative further down this article.
Step 2: an automation that grants access after payment #
Create a second automation in the same way, this time with the trigger Order completed. That starts as soon as an order reaches the final status Completed. Every Autorespond site has the shop workflow Order status ‘Completed’ after payment switched on by default, which moves every paid order straight to Completed. With an online payment such as iDEAL that happens immediately after the payment, and with a bank transfer at the moment you set the order to Processing, because the workflow completes it then as well. So this automation starts at the same moment for every payment method: as soon as the money has arrived. What that workflow does and which emails your customer receives is explained in Completing paid orders automatically (standard workflow).
Under Target products, choose your course product again and then add the access email. The structure stays small: the start trigger with the email underneath it.
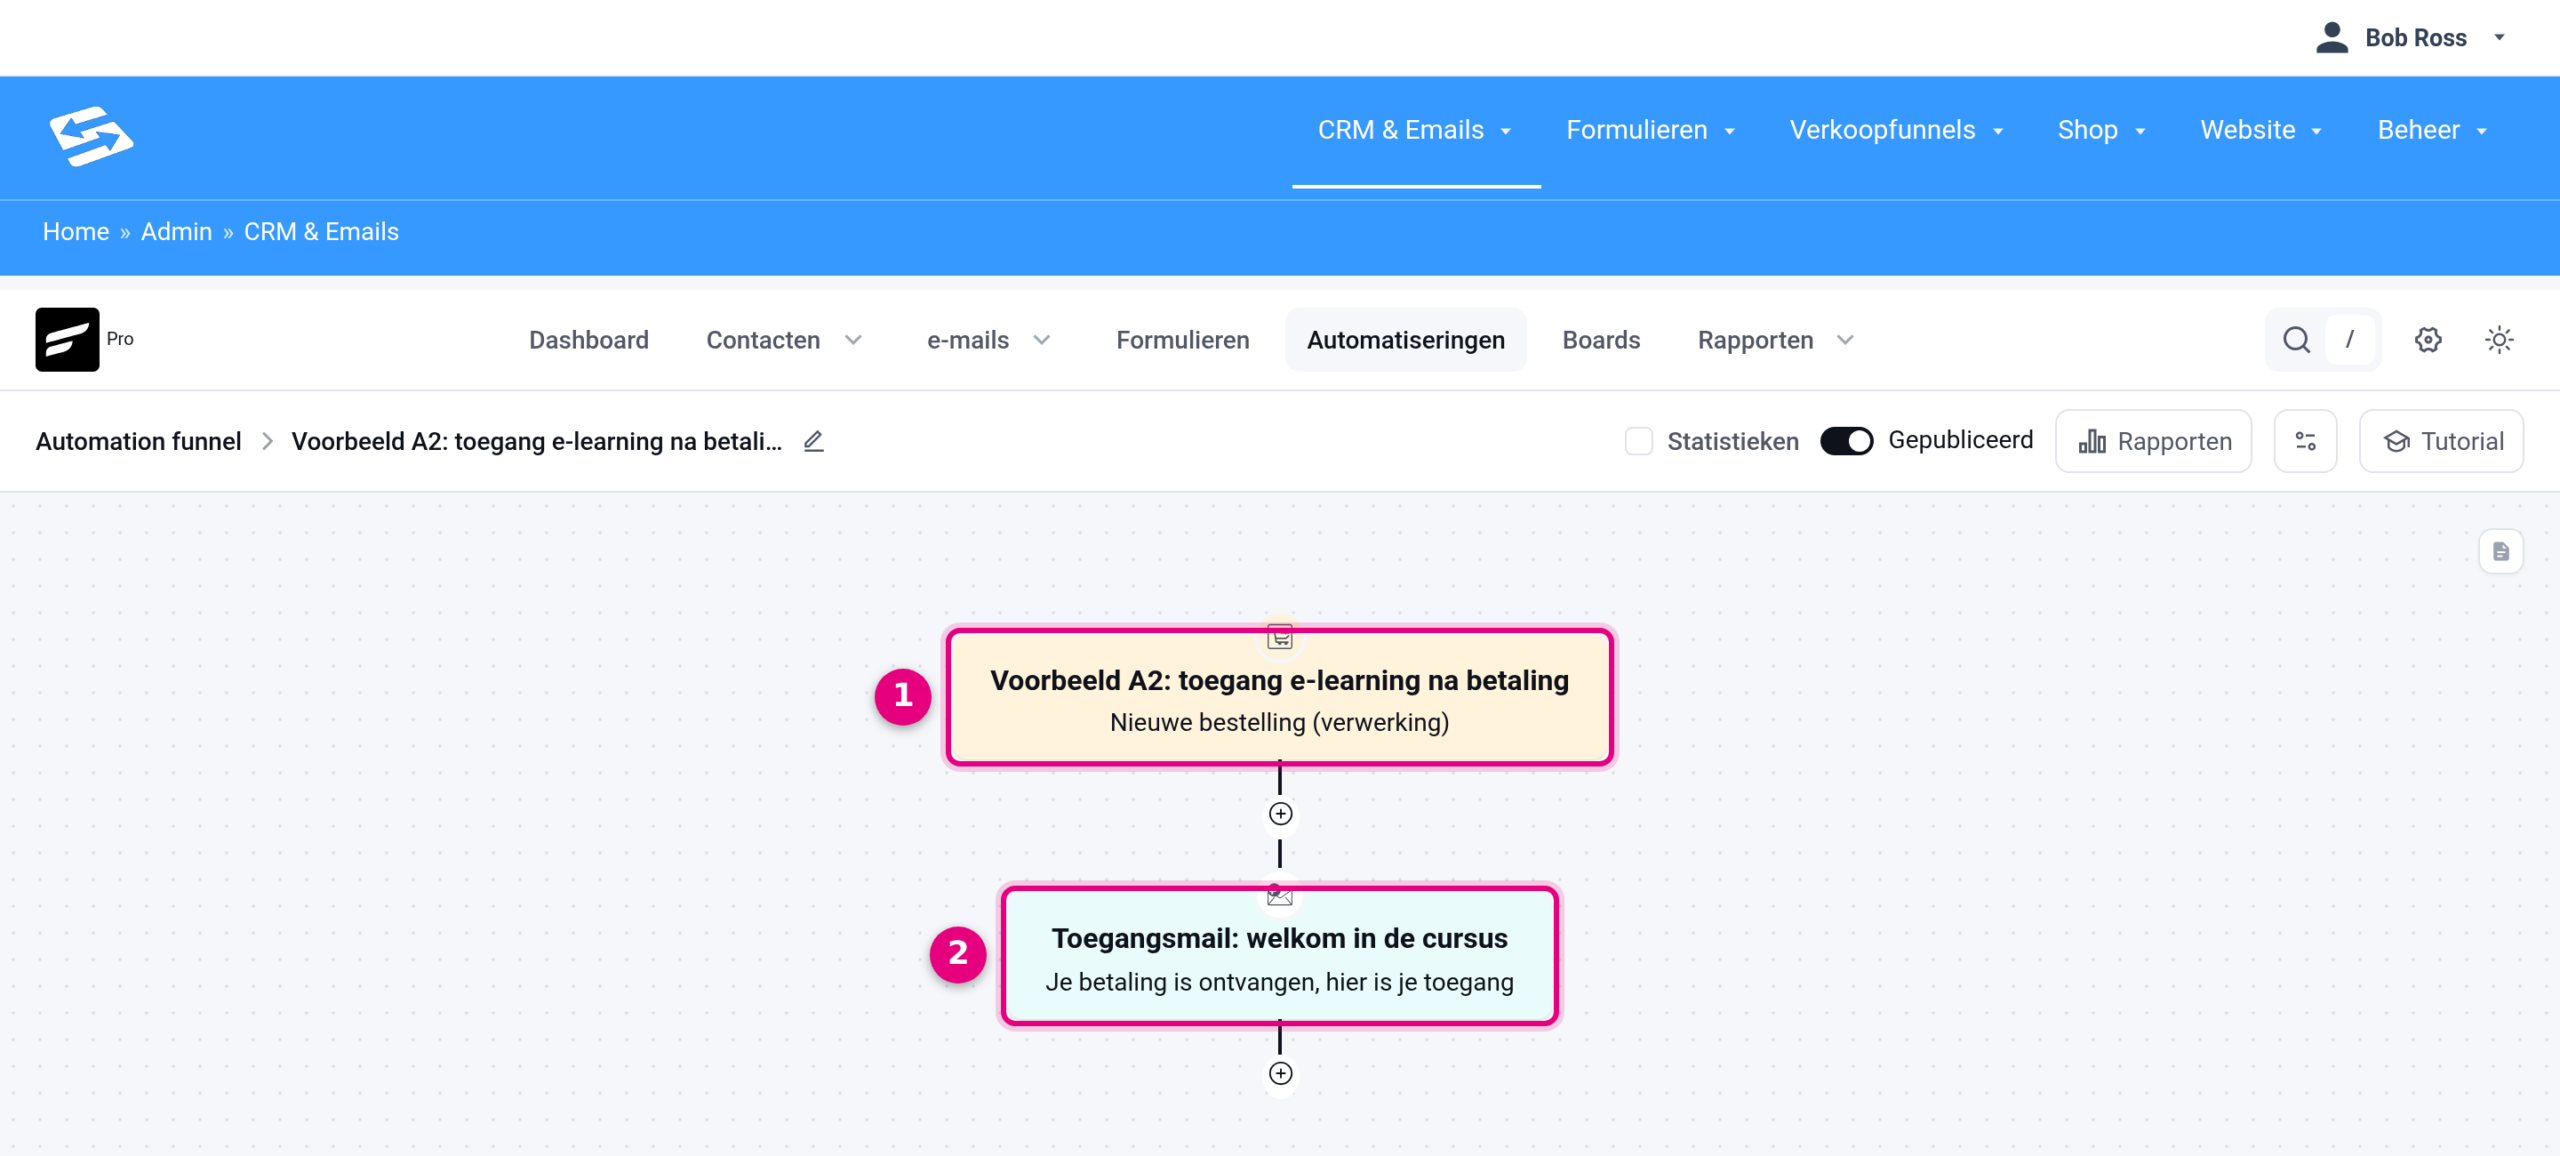
- The start trigger: only starts for orders that have been paid for. An order that was On hold first still starts this automation as soon as you set it to Processing and the workflow completes it.
- Access email: the welcome email with the access link or login details for your course.
In this automation you put everything that may only happen after payment. You can, for example, set up an external webhook that only runs after payment (see as an example: granting access to Huddle automatically after a purchase), or, if you use the community and courses module, add contacts straight to the right spaces and courses.
When to choose New order (processing) after all #
The trigger New order (processing) starts one step earlier, namely as soon as an order gets the status Processing. That is the exception, and you choose it in these cases:
- You have deliberately switched off the workflow Order status ‘Completed’ after payment. Orders then stay on Processing and only reach Completed if you complete them yourself.
- You sell physical products that you only set to Completed after you have shipped them, while the access email has to go out at the moment of payment.
Always pick one of the two. If the standard workflow is switched on and you build an automation with the same content on both New order (processing) and Order completed, the same customer runs through both routes shortly after one another and receives everything twice. Which other triggers exist, and how to switch the start trigger of an existing automation without rebuilding it, is explained in Setting up automation triggers.
How this set-up behaves #
This is what happens in the various situations:
- The customer pays immediately (with iDEAL, for example): no holding email, but the access email straight away.
- The customer chooses Direct bank transfer: only the holding email at first. As soon as you set the order to Processing, the access email follows.
- The customer never pays: only the holding email, no access is granted.
Alternative: everything in one automation with a goal step #
You can also combine the holding email and the access in a single automation with a goal step. A goal is an intermediate step at which the automation waits for an event to take place. In this case you use the goal Order received in WooCommerce, which is reached as soon as the order has been paid. If you work with a product tag, you can also use the goal Tag applied with your payment tag: that goal is reached as soon as the tag is applied after the payment. The example below shows that variant, including an automatic payment reminder.
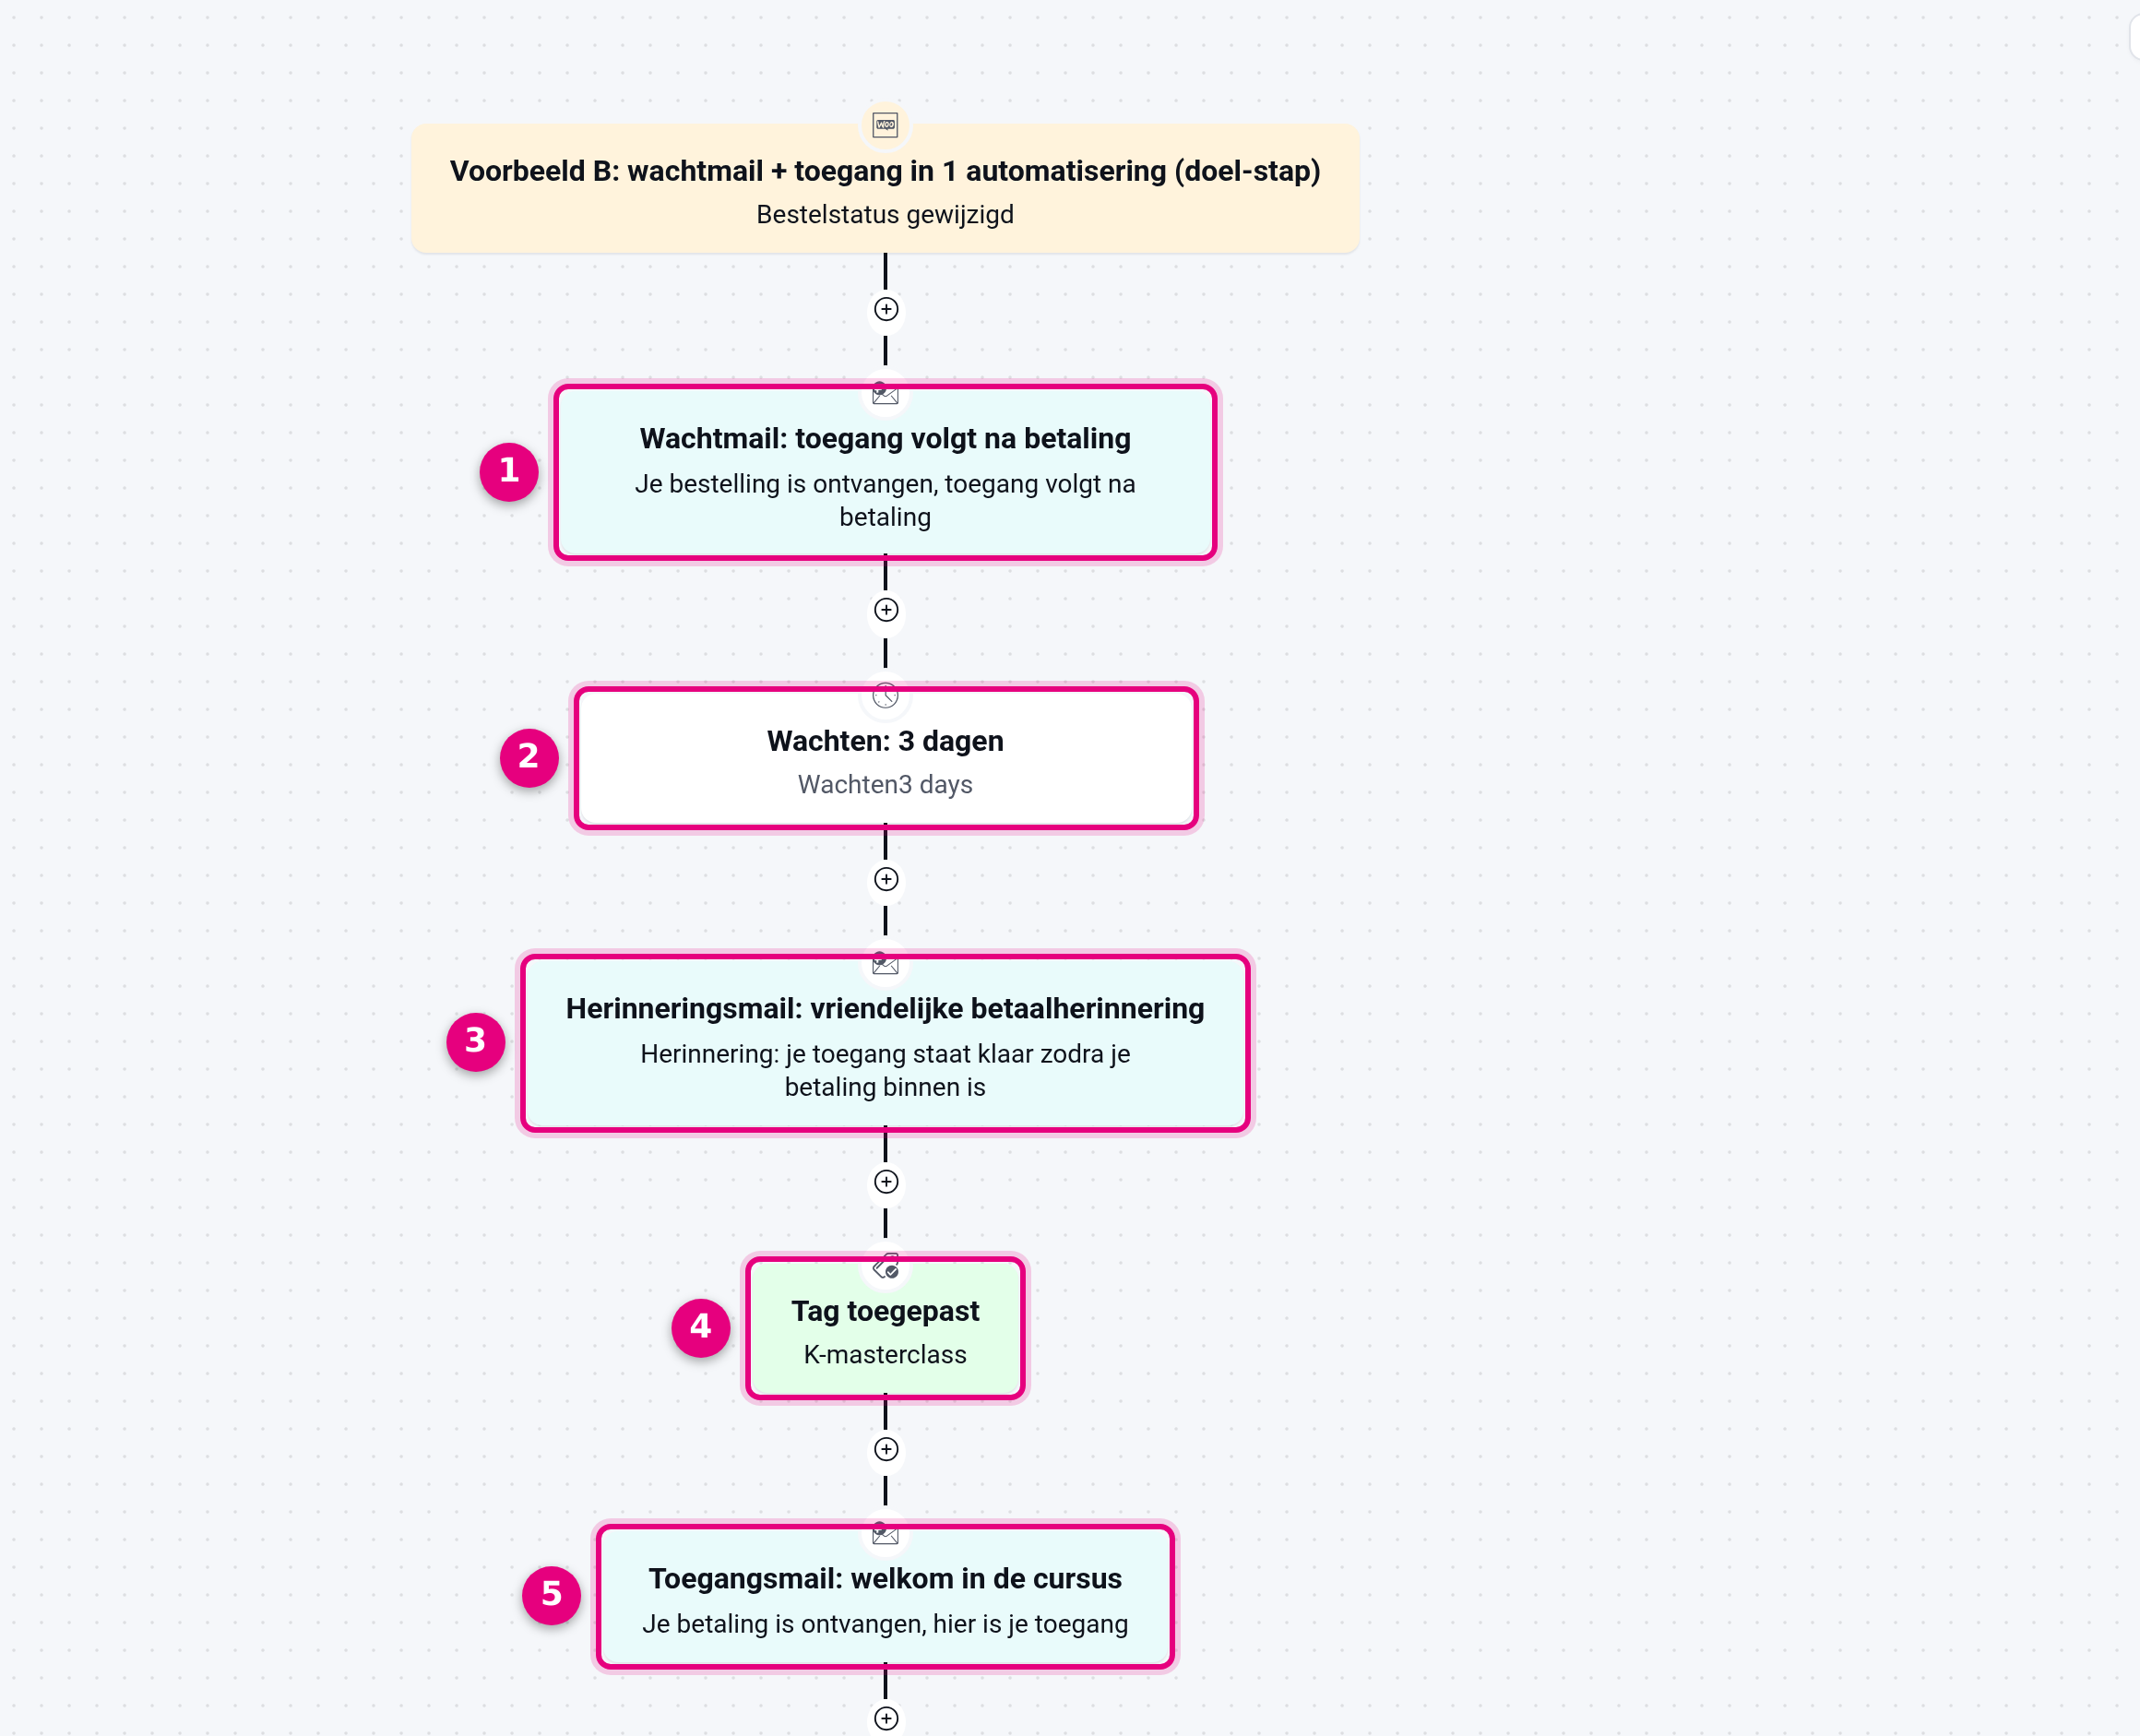
- The holding email, straight after the order. The trigger above it is Order status changed to On hold, as in step 1.
- A Wait step of three days.
- The reminder email: a friendly payment reminder. If you want to remind people more often, add another wait step and an extra reminder after this.
- The goal step Tag applied with the payment tag of the product. Contacts who pay immediately enter here directly and skip the holding email and the reminders automatically.
- The access email, after the payment.
For an order by bank transfer it runs like this: the contact receives the holding email and then waits in the wait step. The moment the order is set to Processing, the product applies the payment tag, the contact jumps straight to the goal step and the access email goes out immediately. The reminder email then lapses by itself.
The advantage of this variant: the whole customer journey sits in one overview and the payment reminders stop by themselves once payment has been made. The drawbacks: contacts who never pay keep waiting in the automation at the goal step, and the set-up is harder to follow and adjust than two small automations. For most situations we therefore recommend the two separate automations from steps 1 and 2.
Testing #
- Set both automations to Published in the top right.
- Place a test order for your course product yourself and choose Direct bank transfer as the payment method. The order gets the status On hold and you only receive the holding email.
- Go to Shop → Orders, open the test order and set the status to Processing. The standard workflow then moves the order straight to Completed and you receive the access email.
- Afterwards, delete the test order and, if needed, the test contact through CRM & Emails → Contacts.
Related articles #
- Payment options in the shop checkout and for manual orders
- Creating a paid product with an automatic list connection and follow-up email
- Completing paid orders automatically (standard workflow)
- The order statuses of your shop explained
- Setting up automation triggers
- Configuring automation actions
- Granting access to Huddle automatically after a purchase
- Setting up an outgoing webhook to Zapier


