Creating your first calendar and booking type in the Appointments module #
The Appointments module is an optional extension you can add to your Autorespond package. This module lets people book appointments online, comparable to Calendly. More information about this module
Before anyone can schedule an appointment with you, you need two things: a calendar (the calendar of a person or a room) and at least one booking type (the service that can be booked, for example a 15 minute introductory call). Everything you set up in the module afterwards, from availability to payments and notifications, hangs off those two components. In this article you create both of them, from the empty screen to a working booking type, and along the way you see what each field does.
1. Where the module sits and what you see #
You find the module via the menu Manage → Appointments. At the top of the screen you see the path Home » Admin » Manage » Appointments, so you can check that you are in the right place. Below that is a row of tabs. Those tabs are the fixed structure of the entire module.
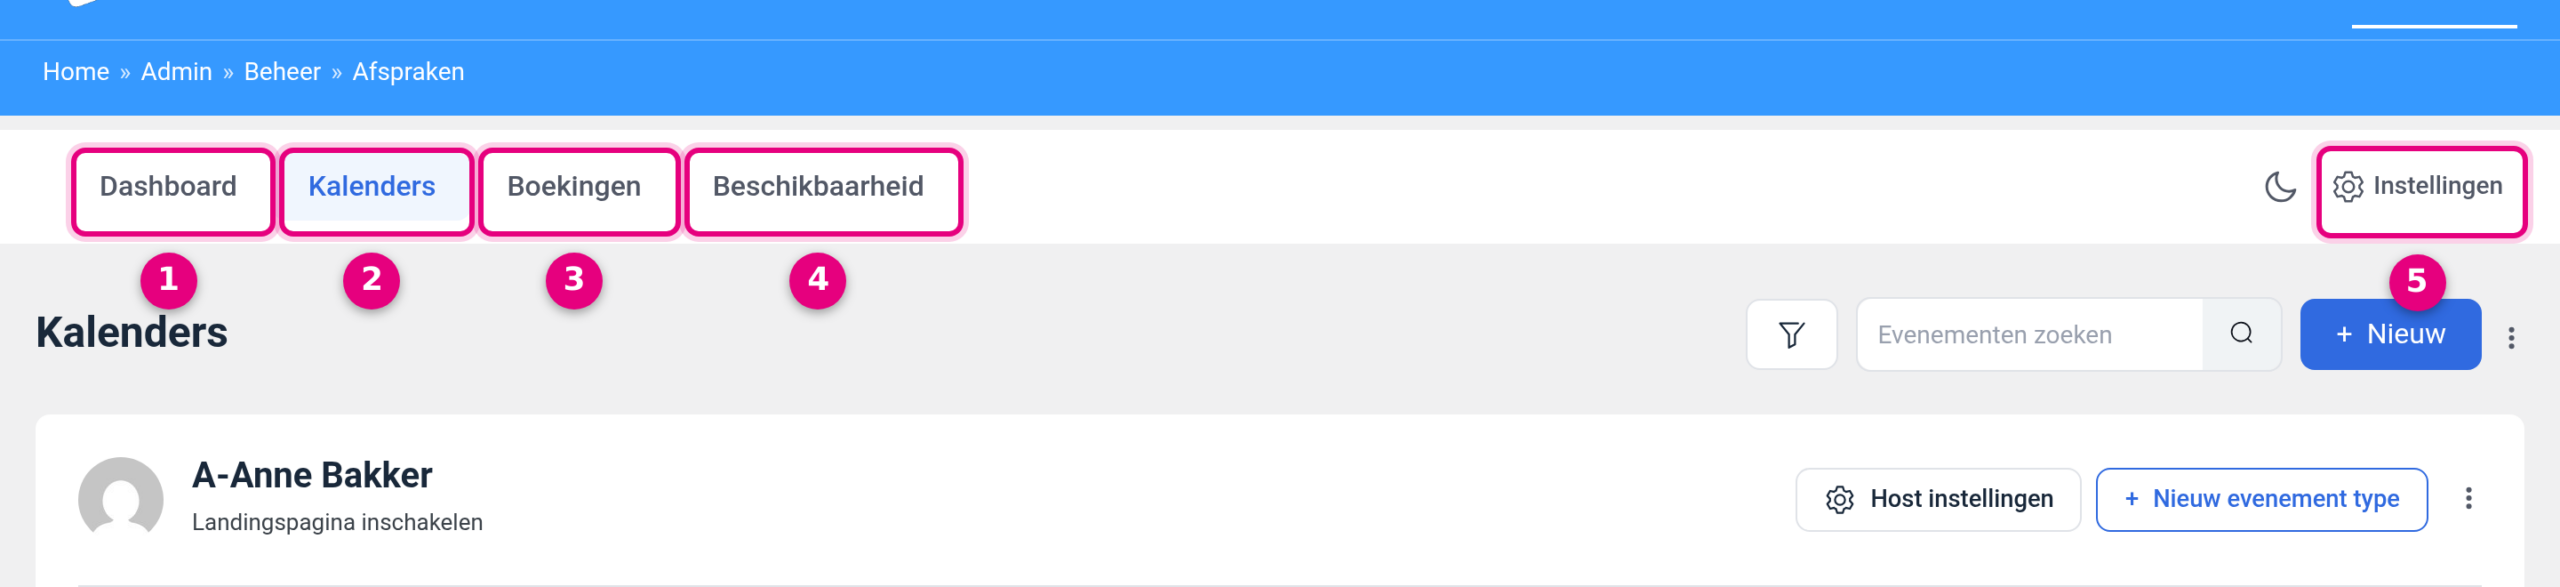
- Dashboard. The overview with figures: total number of bookings, completed bookings, cancelled bookings and total number of guests, with a chart of booking trends below it and lists of your next meetings and the most recently booked meetings.
- Calendars. The screen you work in while you are setting things up. All your calendars are listed here with their booking types underneath, and this is where you create new ones.
- Bookings. All appointments that have actually been booked. Here you can switch between list view and calendar view and filter on upcoming, completed and all bookings.
- Availability. The schedules with working hours that you can reuse. Useful as soon as you have several booking types that use the same hours.
- Settings. The settings that apply to the whole module, such as connections with external calendars. This one sits on the right of the bar, with a cog in front of it.
For this article you only need the Calendars tab. Click on it.
2. The difference between a calendar and a booking type #
The module works with two layers that you should not mix up. Once that difference is clear, the rest of the module becomes a good deal more logical.
- The calendar, also called the host. This is the calendar of one person or one room. The calendar holds who is being booked, which time zone applies, the connection with an external calendar and the shared page that can list all your services. Important to know: a calendar is linked to a user in your environment, and one user can only have one calendar.
- The booking type, called event type on screen. This is the service someone actually books: a 15 minute introduction, an hour-long advisory session, a workshop. You can hang as many booking types under one calendar as you like. Each type has its own name, its own duration, its own location, its own questions for the attendee, its own notifications and its own booking link.
The rule of thumb: who is being booked is arranged at calendar level, what is being booked is arranged per booking type. If you work with several colleagues or with several rooms, each of them gets their own calendar, with the services that apply to that person or that room underneath.
3. Creating a calendar #
You do not create a calendar on its own: you create it together with the first booking type. So you go through one short wizard, and at the end the calendar with the first service in it is ready. Start here:
- Go to Manage → Appointments and click the Calendars tab.
- Click the blue + New button at the top right.
- In the menu that opens, choose Add host.
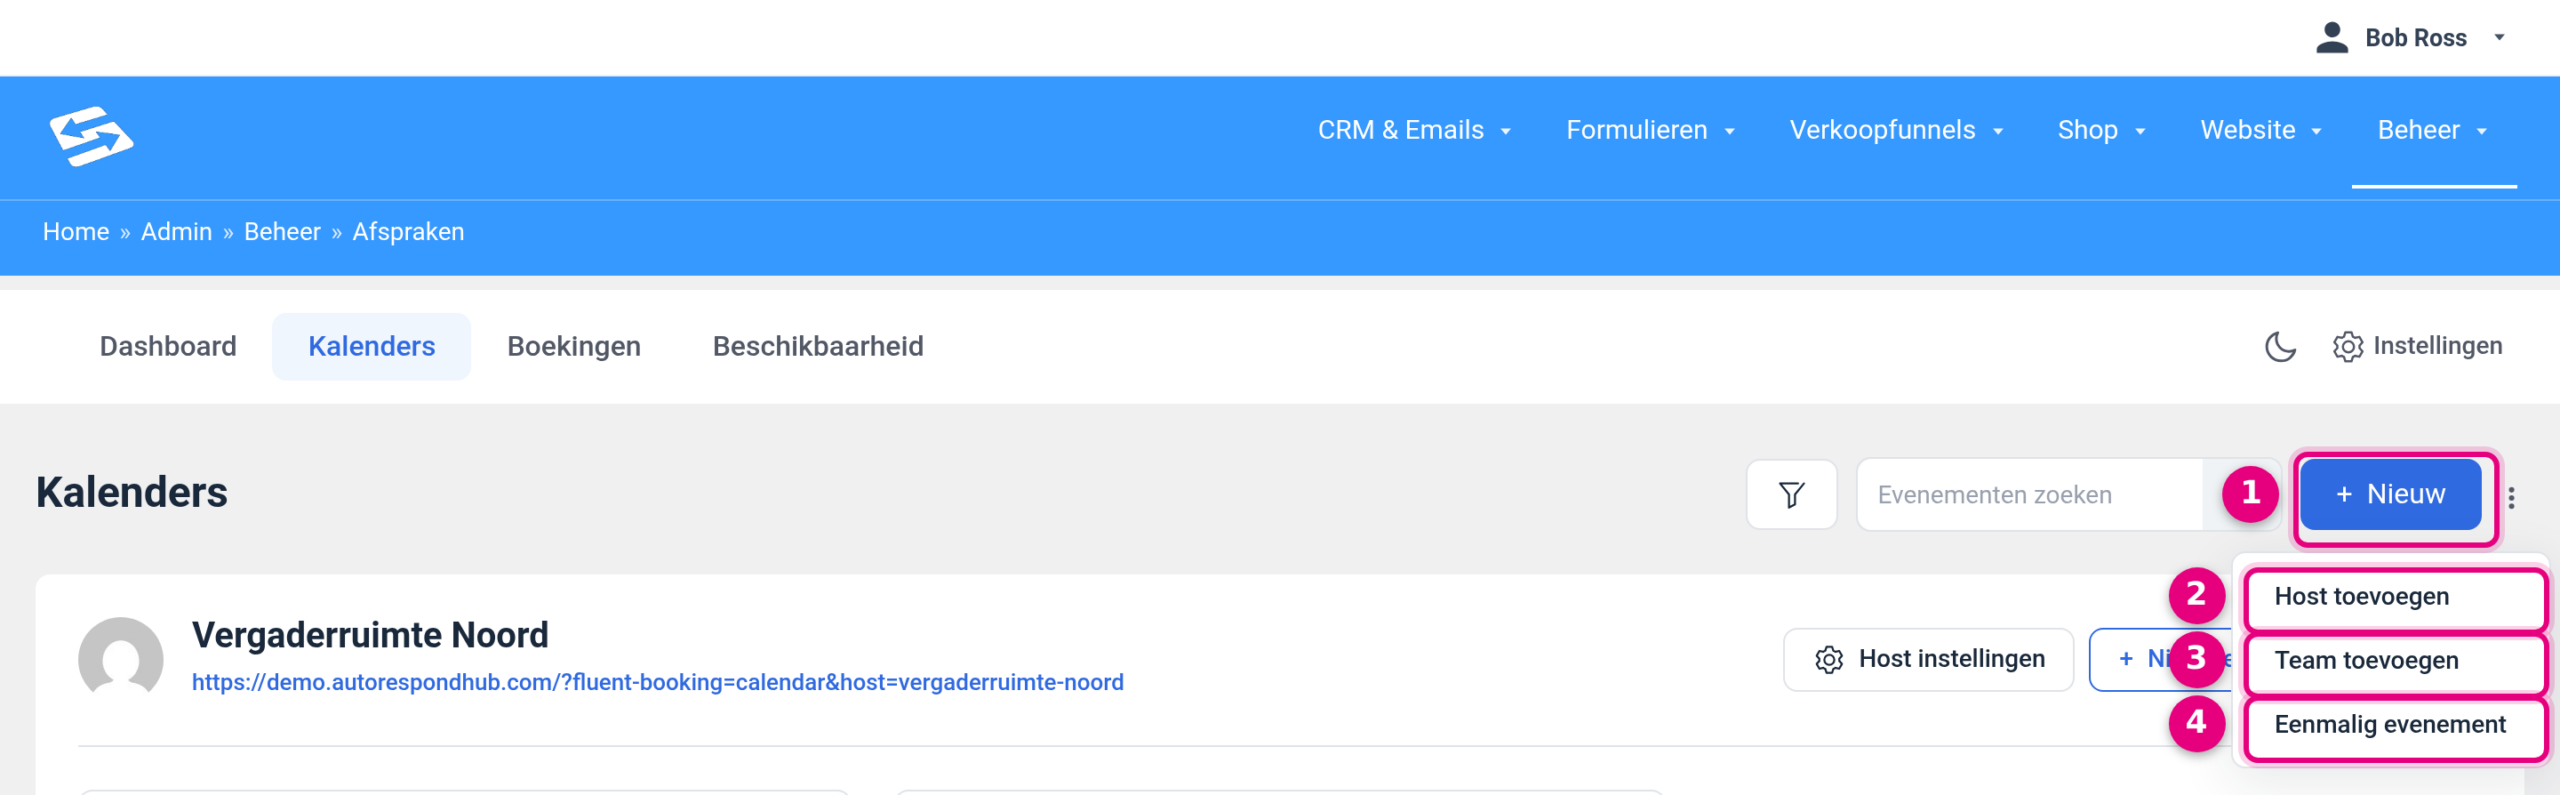
- + New. The button at the top right of the Calendars screen. To its left are a filter button and a search field Search events, which lets you quickly find the right booking type in a busy environment.
- Add host. This is the option you need: a new calendar for one person or one room.
- Add team. This creates a calendar in which several hosts offer one service together, for example to spread appointments across colleagues. Leave this one alone as long as you have not set up individual calendars yet.
- One-off event. For a single occasion on a fixed date, rather than a service that can be booked on an ongoing basis.
The panel Add new calendar host now slides open on the right. Here you decide whose calendar it becomes and what kind of service you create first.
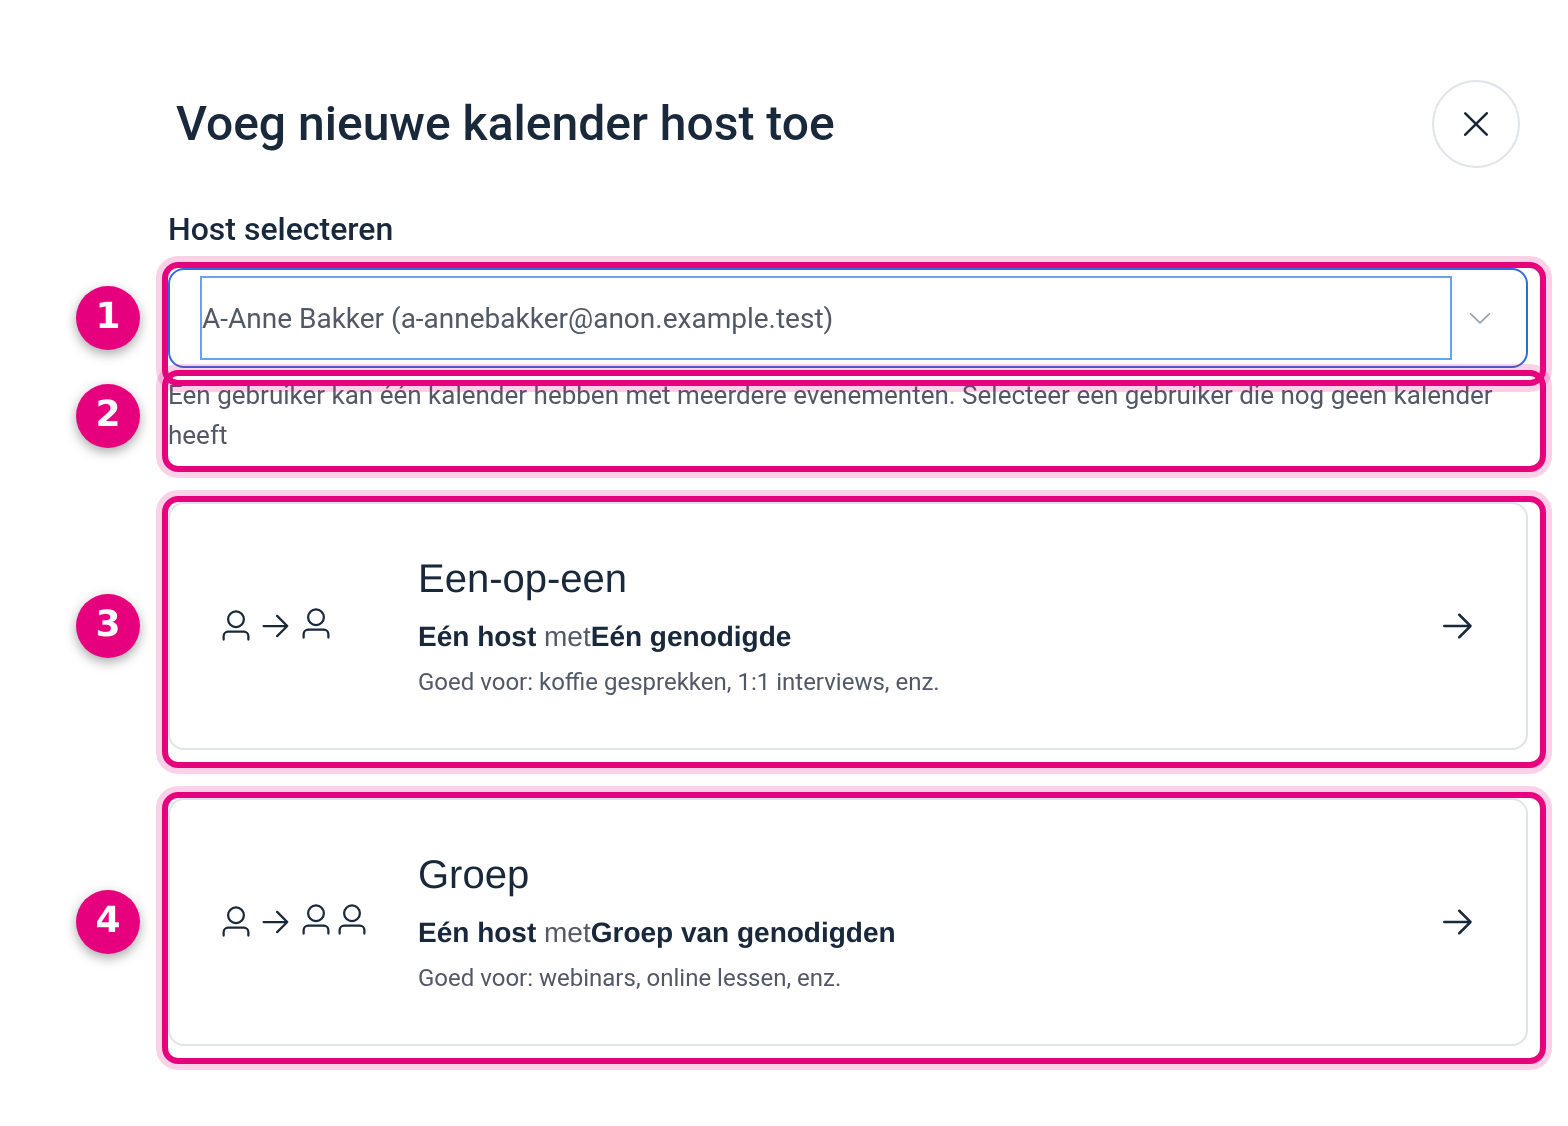
- Select host. Click in the field and choose the user who will receive the appointments. You can type to search. If the person does not exist as a user in your environment yet, create them first via Users → Add user and then come back here. If it concerns a room rather than a person, create a user with the name of that room.
- The note under the field. This states the most important rule: a user can have one calendar with several events, so you select a user who does not have a calendar yet. If you cannot find someone in the list, that person already has a calendar and you only need to add a booking type to it.
- One-to-one. One host with one invitee, suitable for introductory calls, intakes and advisory sessions. As long as you have not chosen a host, these two blocks are greyed out; they become clickable as soon as you have selected someone.
- Group. One host with a group of invitees, suitable for webinars, workshops and online lessons. Several attendees then book the same time slot. If you choose this, also read Setting up group events in the Appointments module.
Choose the host and then click One-to-one. You go straight on to the screen in which you fill in the first booking type. Note: nothing has been saved at this point. The calendar only exists once you finish the wizard in the next two steps.
4. Filling in the booking type on the Event details tab #
You now see the screen Add One-to-one Booking type with the block Event details. These are the details your visitor will see.
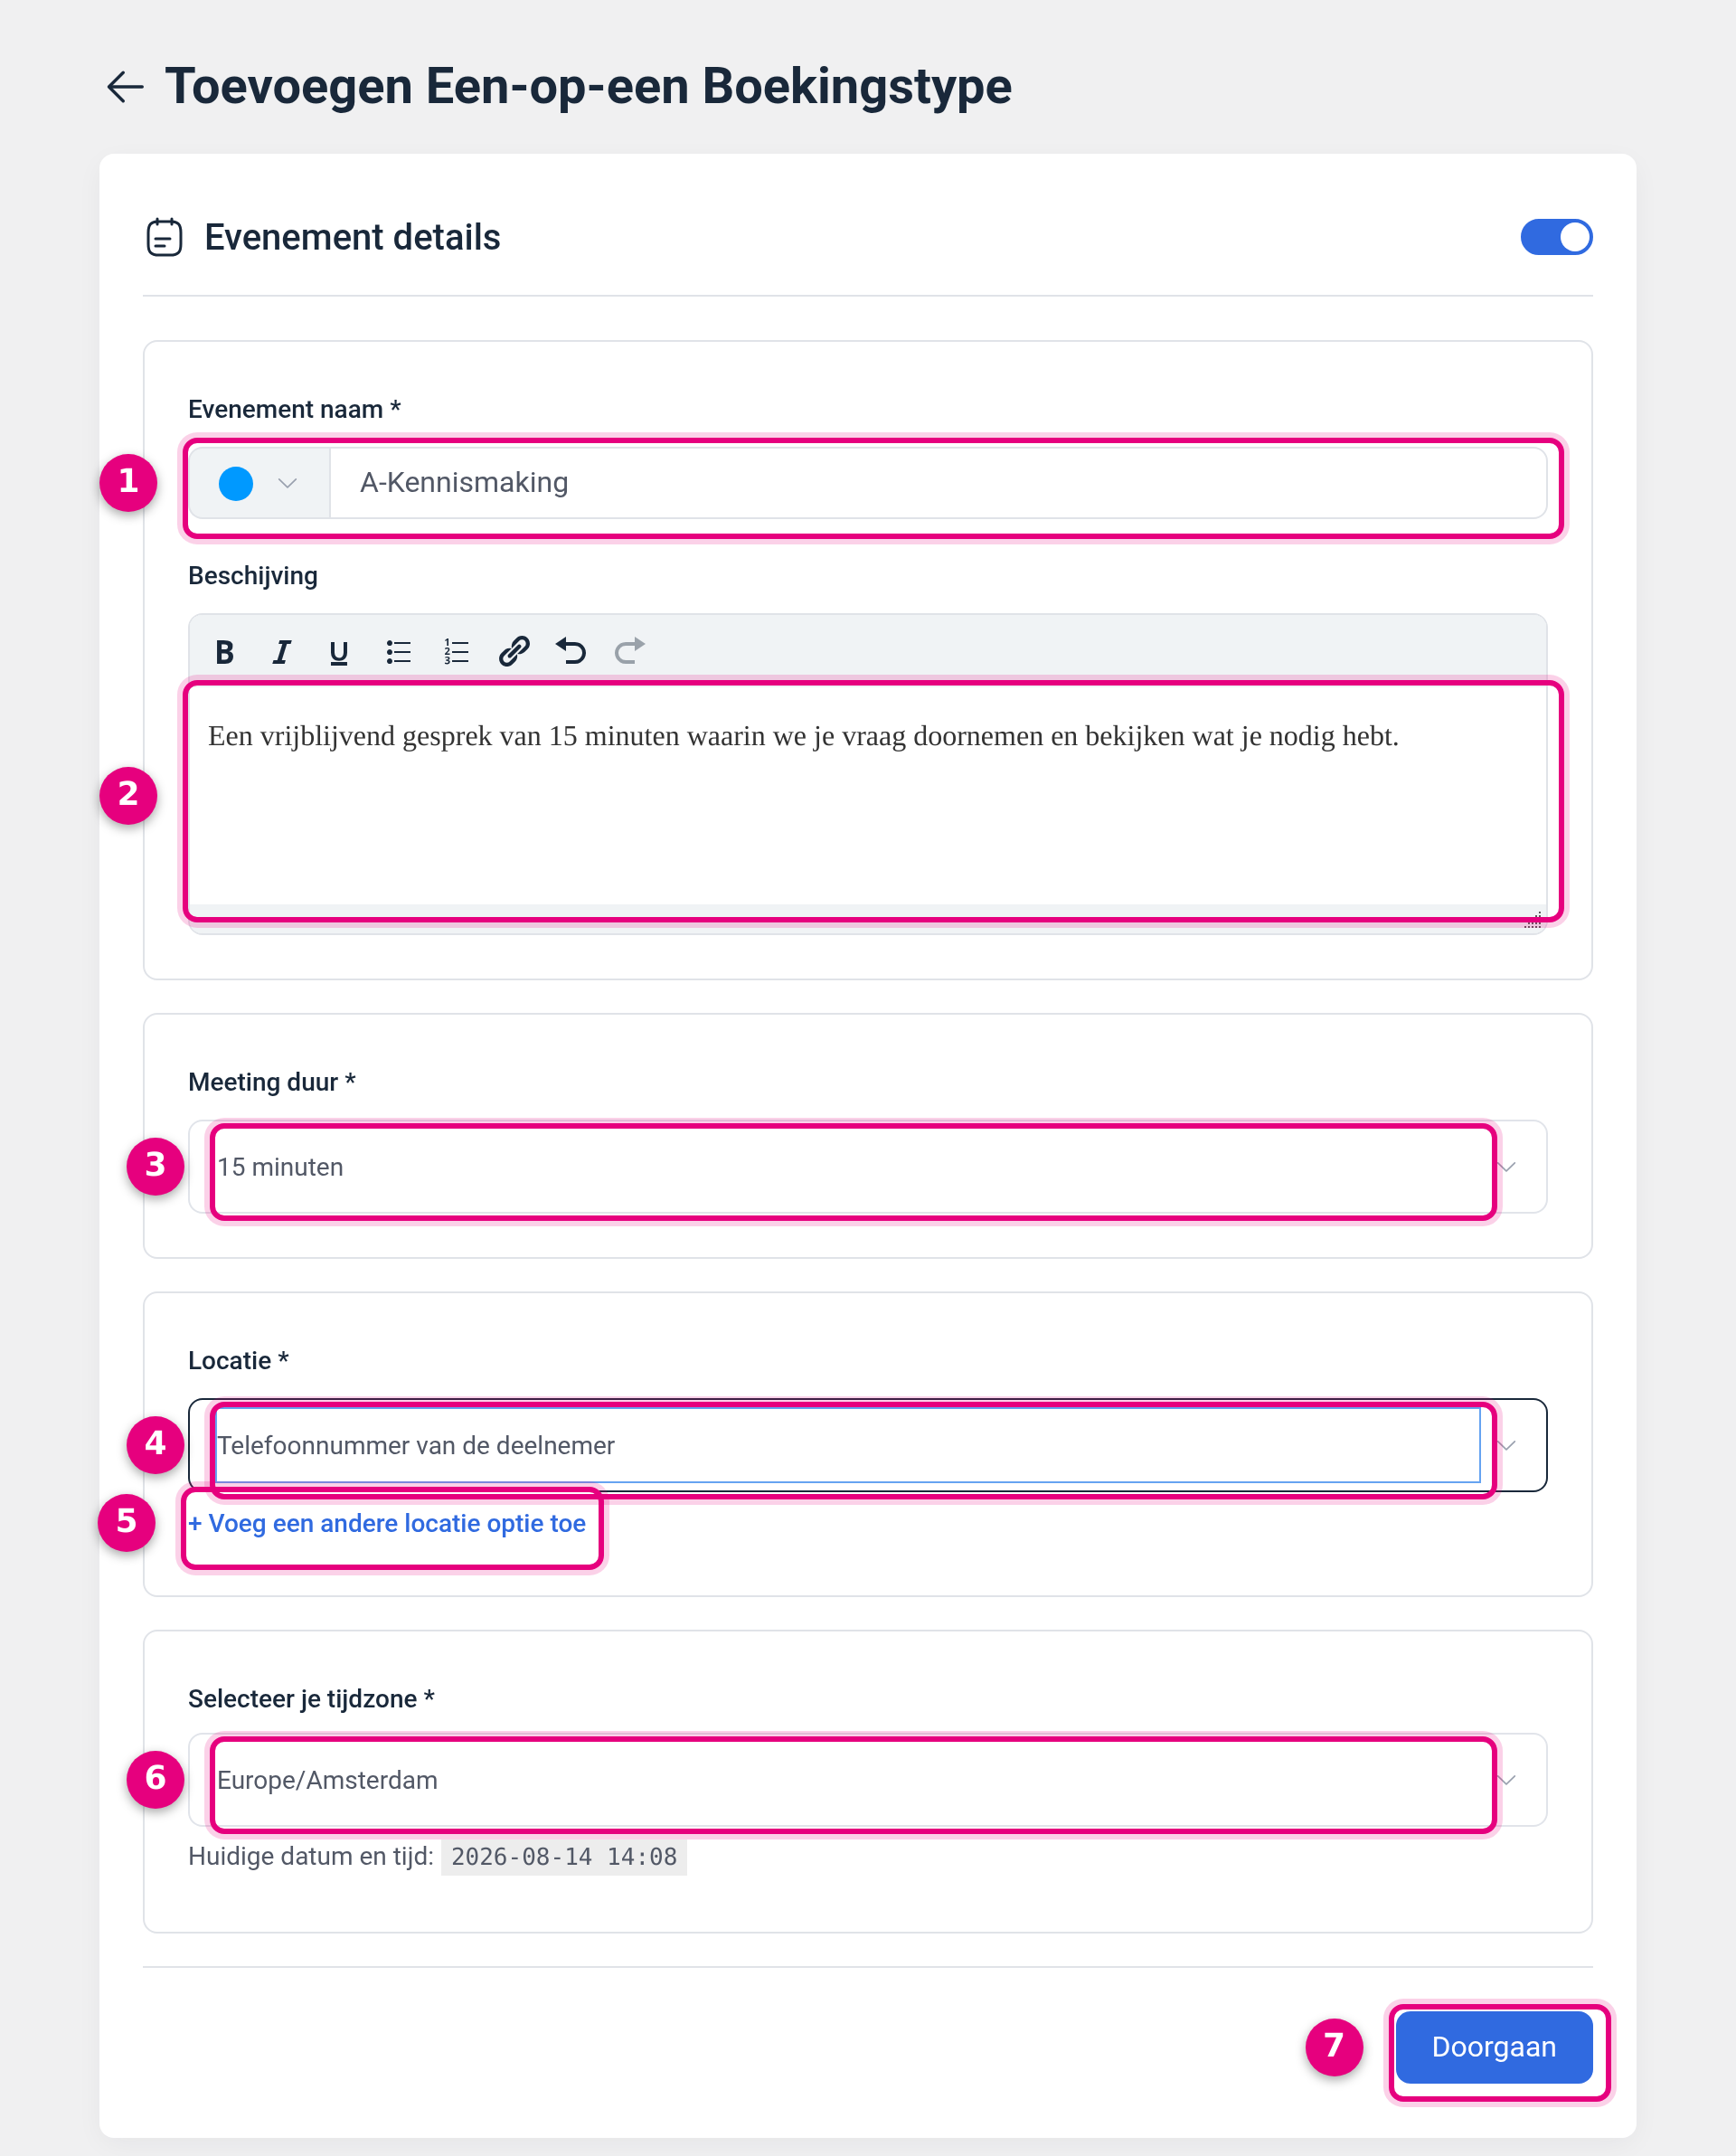
- Event name. Required field. This is the name your visitor sees at the top of the booking page, so write it from the customer’s point of view: Introductory call, Advisory session, Intake. On the left of the field is a coloured dot with an arrow; that is where you give this booking type a colour, so you recognise it more quickly in the overview and in your calendar.
- Description. A short explanation that appears under the name, with buttons for bold, italic, underline, lists and a link. Use it to say what you do in the session and what the visitor should prepare or bring. This field is not required, but it saves questions afterwards. If you later make a copy of this booking type, this text comes along, so adjust it in the copy straight away.
- Meeting duration. Required field. Choose from 15 minutes, 30 minutes, 45 minutes, 60 minutes or Custom for your own number of minutes. The duration determines how long a time slot is blocked in your calendar.
- Location. Required field. Here you choose where the appointment takes place. What the options mean is covered in the next chapter.
- + Add another location option. This lets you offer several locations for the same booking type, for example by phone or at the office. The visitor then chooses when booking. For your first booking type you can safely skip this.
- Select your time zone. Required field, Europe/Amsterdam by default. All times you set later apply in this time zone. Below it the current date and time are shown as a check, so you can see straight away whether it is correct. On the booking page itself there is a Time zone option under the calendar, so a visitor abroad can view the times in their own time zone.
- Continue. Does not save the details definitively yet, but takes you to the next step of the wizard.
5. What the location choice means #
The Location list is divided into groups: Conferencing, In person, By phone, Online and Other. The choice determines not only what the visitor reads, but also which details are requested during booking and what appears in the confirmation email.
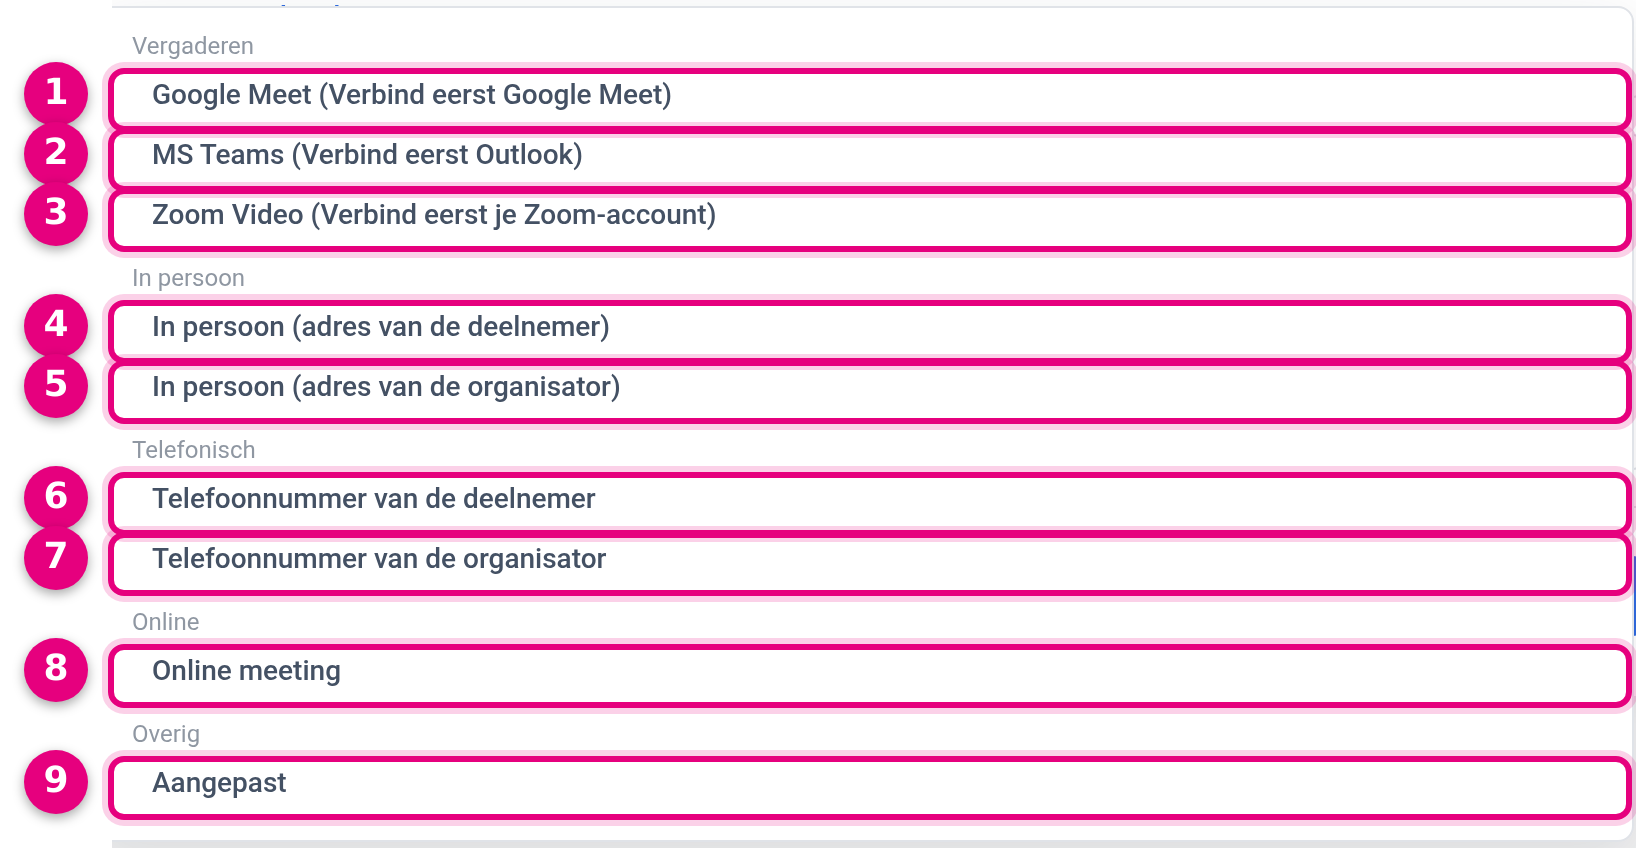
- Google Meet. Creates a Meet link automatically for each appointment. After the name it says Connect Google Meet first in brackets as long as that connection has not been made in your environment.
- MS Teams. The same principle for Microsoft Teams, with the note Connect Outlook first as long as your Outlook account is not connected yet.
- Zoom Video. Creates a Zoom meeting automatically for each booking. The addition Connect your Zoom account first indicates that the connection still has to be made. So you can select these three options without a connection, but then no meeting link can be created and the overview for the booking type reports that the selected location appears to be disabled. So make the connection first; for Zoom this is described step by step in Connecting Zoom to the Appointments module for automatic meetings.
- In person (attendee’s address). You travel to the customer. The visitor fills in their own address while booking.
- In person (organiser’s address). The customer comes to you. You fill in the address, and that address appears in the confirmation.
- Attendee’s phone number. You call the customer. The visitor fills in their phone number while booking. A sensible choice for a first introduction, because you need no connection whatsoever for it.
- Organiser’s phone number. The customer calls you. You fill in the number that appears in the confirmation.
Below these groups there are two more choices. With Online meeting you supply a fixed meeting link yourself, for example from a service that is not in the list; everyone who books then gets the same link. With Custom you fill in your own description, useful for something like a conversation via WhatsApp.
6. Setting your weekly hours and saving the calendar #
After Continue you arrive at the step Create your availability. This is the last step of the wizard: here you record on which days and between which times you can be booked. You only see this step when you create a new calendar. If you later add a second booking type to the same calendar, the existing availability is used and the booking type is ready after a single step.
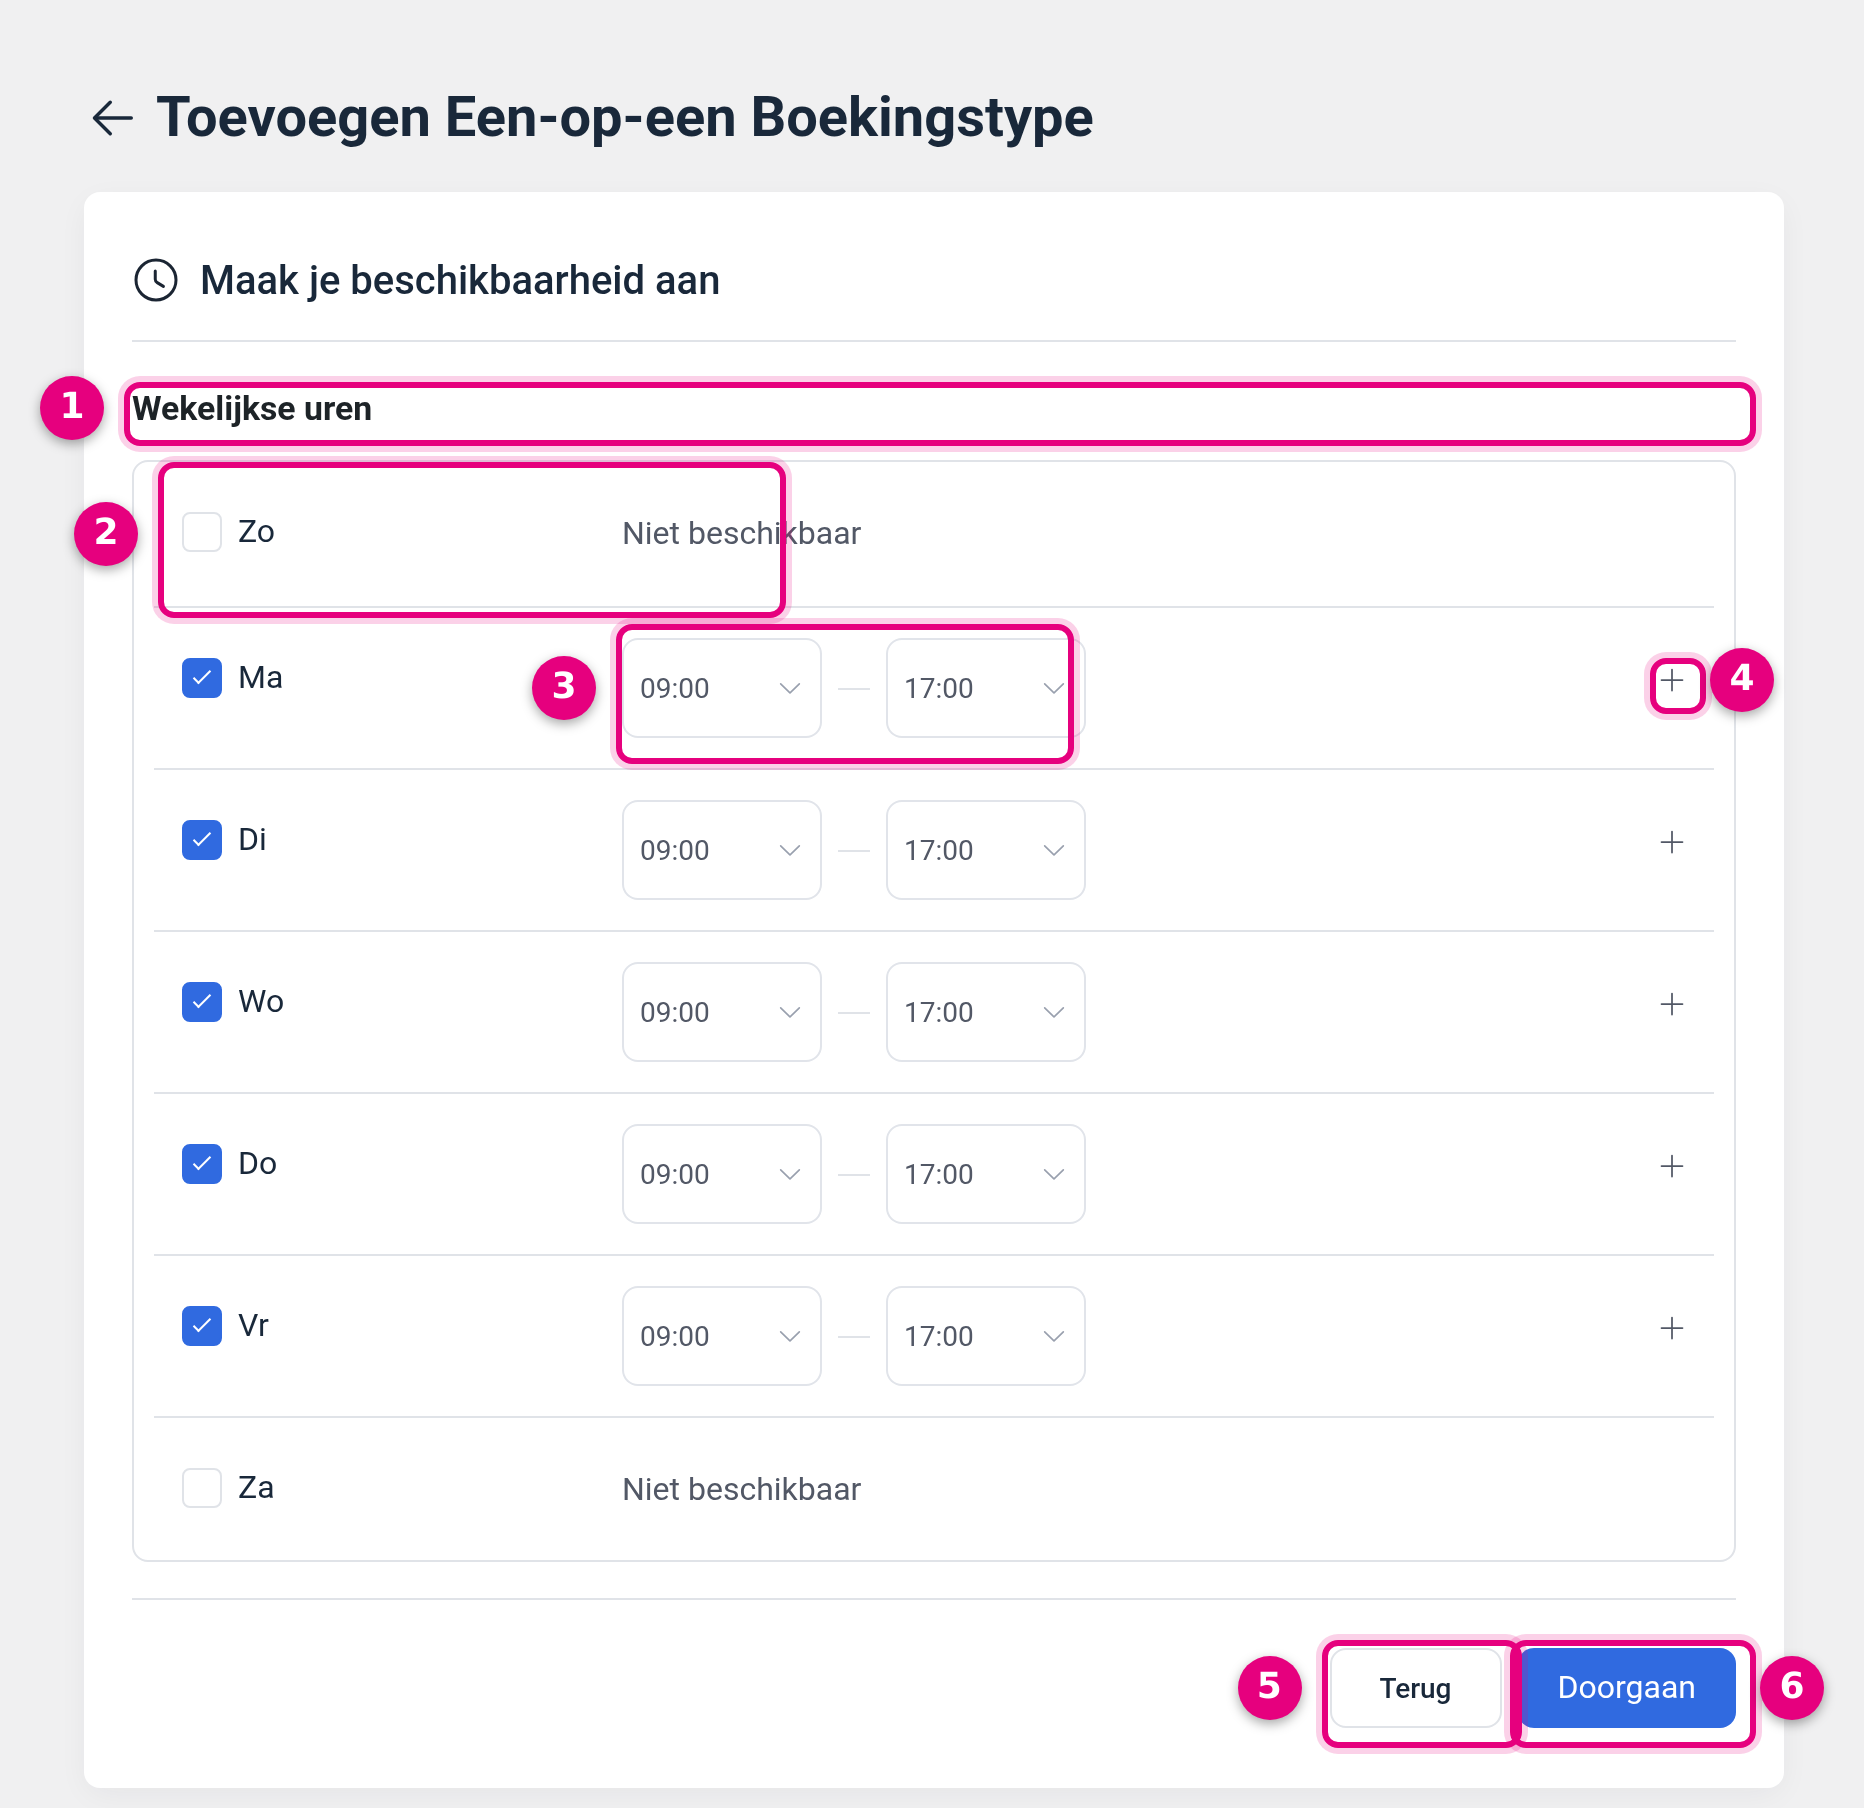
- Weekly hours. The schedule that applies again every week. By default Monday to Friday are switched on from 09:00 to 17:00.
- The tick box per day. If the tick box is off, it says Unavailable and nothing can be booked that day. If you switch the tick box on, times appear that you can adjust.
- The start and end time. Click a time and choose another one from the list. If you work mornings until half past twelve, set the end time to 12:30.
- The plus sign after the day. Adds a second time block on the same day. That is how you make 09:00 to 12:00 and 13:00 to 17:00, for example, with the lunch break in between kept free.
- Back. Takes you back to the previous screen if you still want to change something in the event details.
- Continue. Completes the wizard. Only now are the calendar and the booking type actually created, and you go straight on to the edit screen of your new booking type.
You do not have to get everything perfect here yet. You can always update the availability later via the Availability section in the edit screen of the booking type.
7. What you now see in the Calendars overview #
Click the Calendars tab. Your new calendar is now listed, with the booking type as a card underneath it.
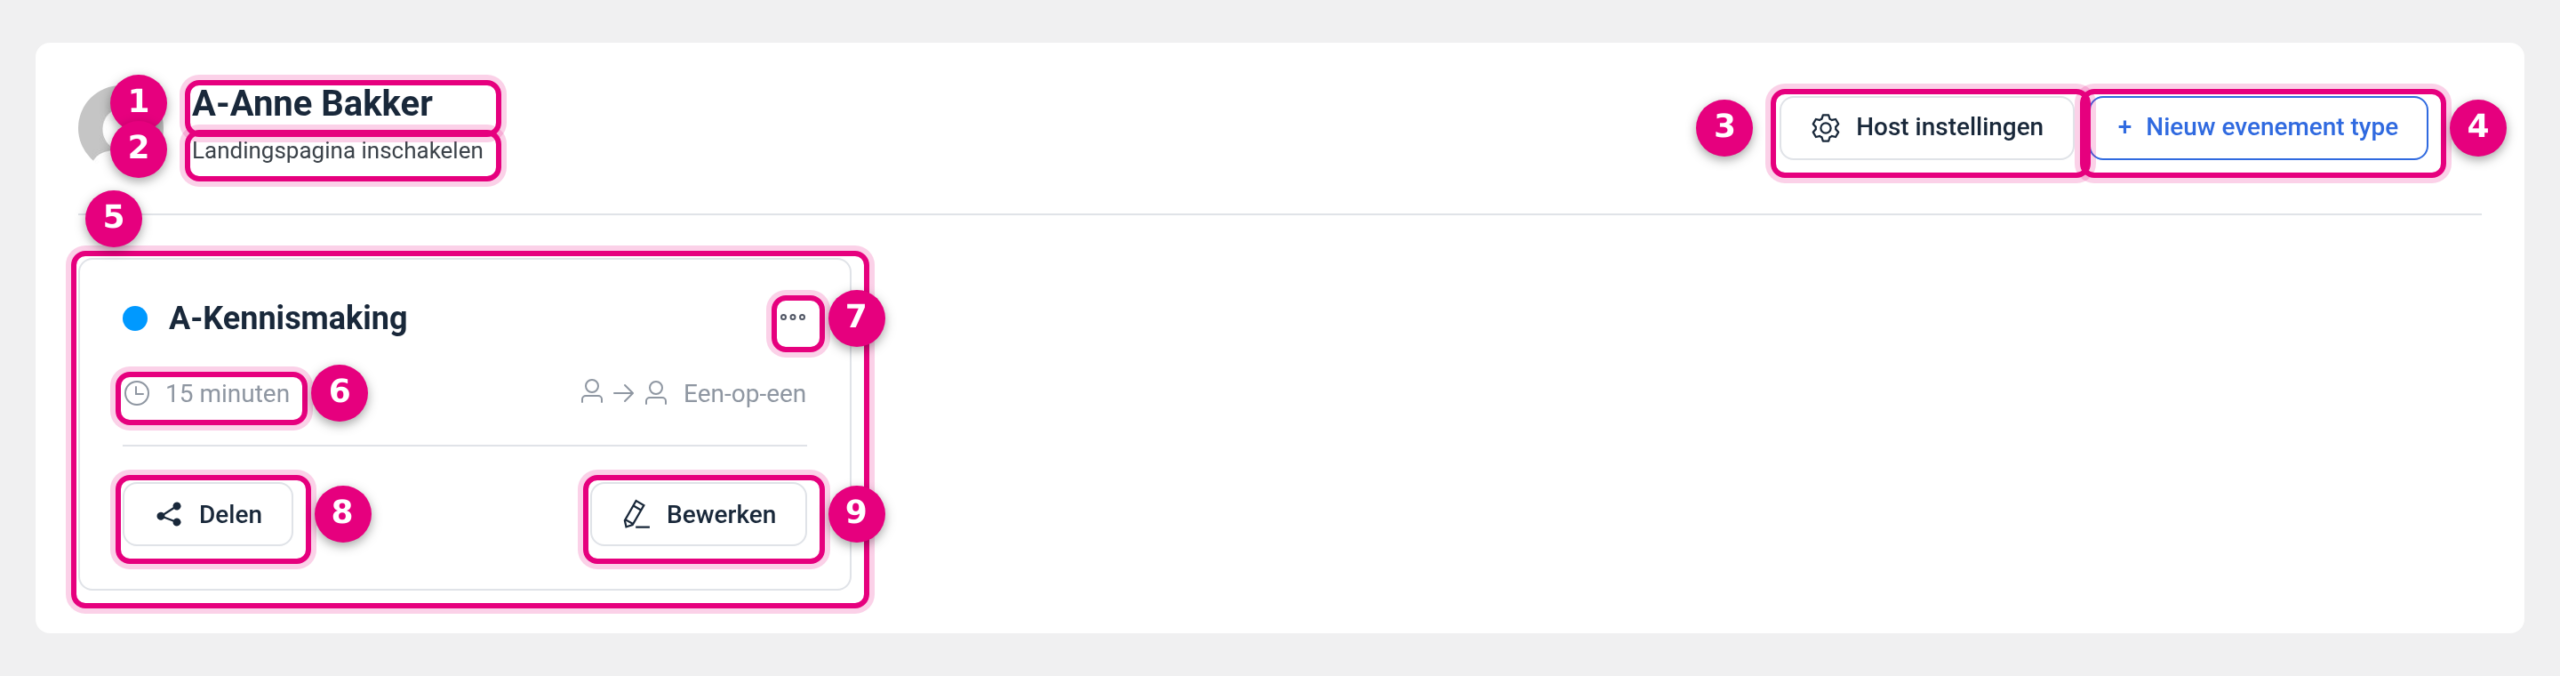
- The name of the calendar. By default the name of the user you chose as host. You can change that name under Host settings, for example to the name of a room or a team.
- Enable landing page. On a brand new calendar this link appears here instead of a web address. That is because the shared page listing all your services is not switched on yet. As soon as you enable it, the address of your calendar page appears in this spot, ready to copy. Switch this function on in any case, even if you only want to share one individual service: as long as the landing page function is off, no booking link of this calendar works at all, not even the direct link of that single booking type, and your visitor ends up on the home page of your site without an error message. You do not have to use the shared calendar page afterwards, but the function does have to be enabled. More about that in Sharing your booking link: one service or all your services on one page.
- Host settings. The settings of the calendar itself: the name, the avatar and the featured image, the phone number, the time zone, the introduction text, the external calendars and the settings of the shared landing page.
- + New event type. This is how you add a second, third and further service to this calendar. So use this button, and not the + New button at the top of the screen, because that one is meant for a new calendar.
- The card of the booking type. Everything you do on this card applies only to this one service.
- The duration and the kind. As a check, the configured duration and whether it is One-to-one or Group are shown here.
- The three dots. Behind these are Disable, Clone and Delete. Clone lets you quickly make a variant of an existing service; Disable takes a service offline temporarily without losing it.
- Share. This is where you get the booking link, the shortcode and the embed code of this one booking type.
- Edit. Opens the edit screen of the booking type, with all further settings.
8. The edit screen: where the rest of the settings sit #
Click Edit on your booking type. You arrive at the Event details section, with a list of all sections of this booking type on the left. This is the screen where you will do most of your work from now on.
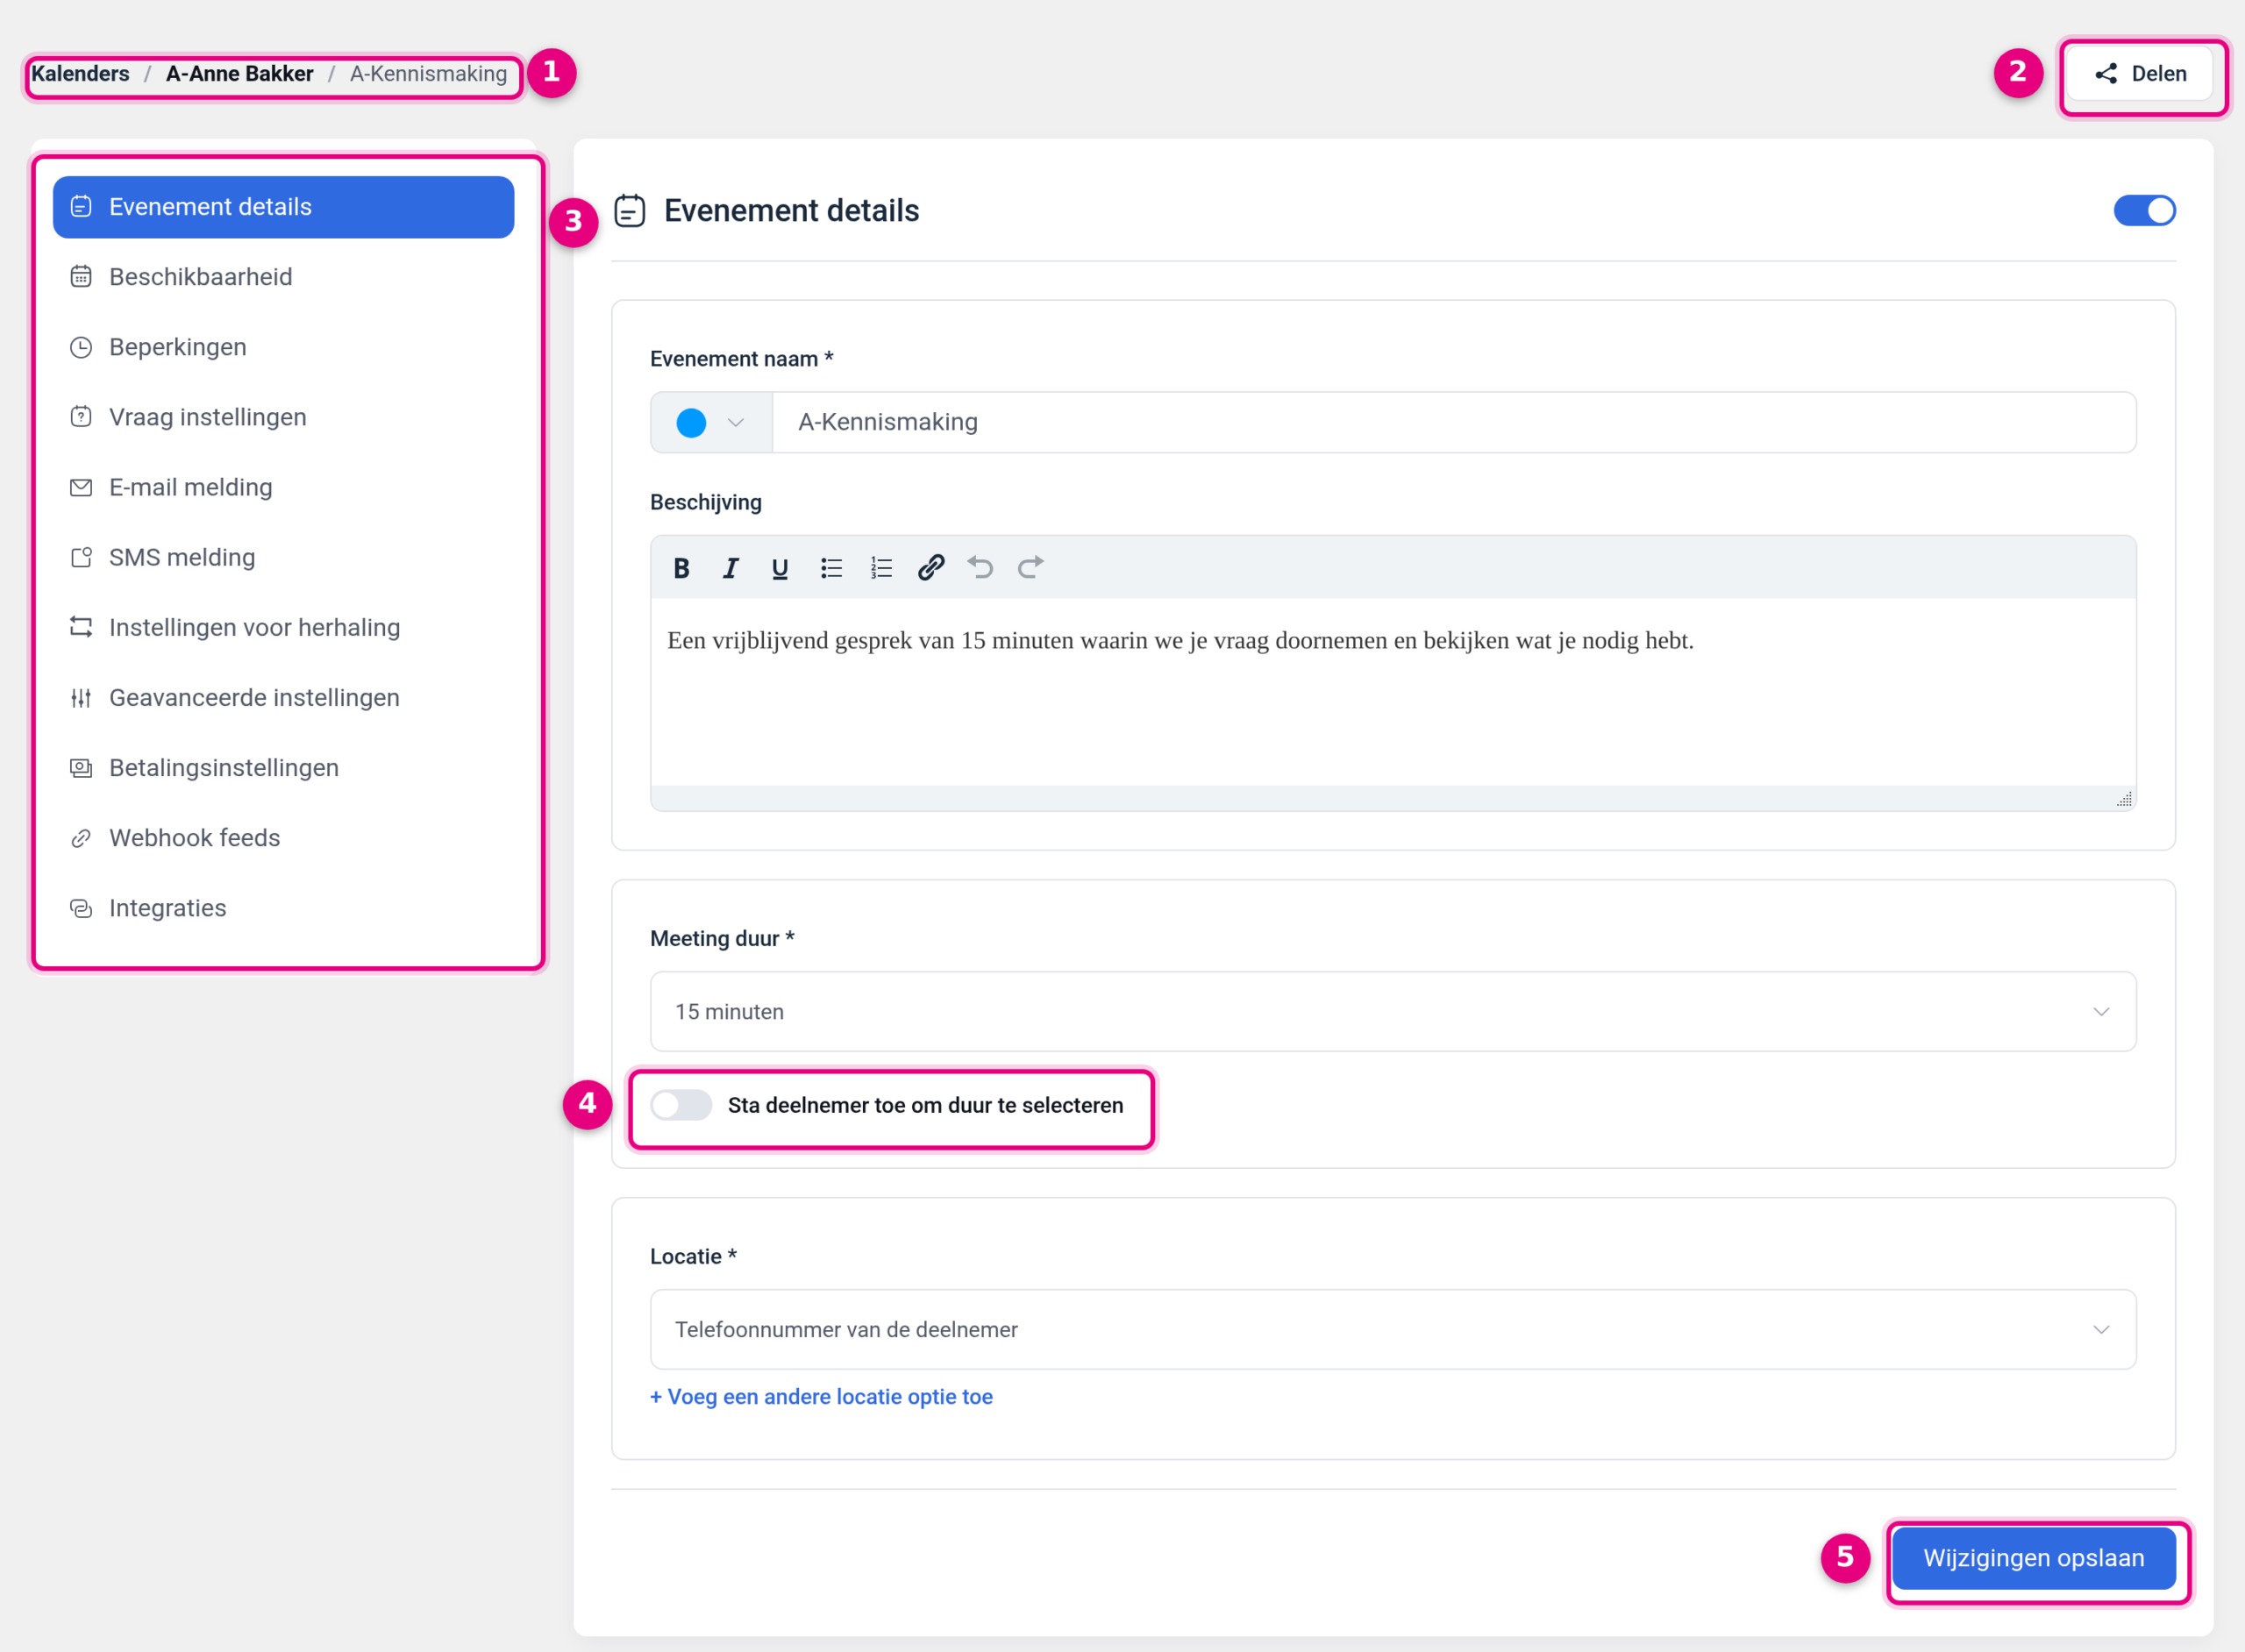
- The path at the top. This shows Calendars / name of the calendar / name of the booking type. This is your check that you are editing the right service under the right calendar.
- Share. The same share button as on the card, now inside the edit screen.
- The sections on the left. Event details for name, description, duration and location. Availability for the days and times. Limits for rules such as how much time there must be at minimum between the booking and the appointment. Question settings for the questions the visitor answers while booking. Email notification and SMS notification for confirmations and reminders. Recurring settings for repeating appointments. Advanced settings for, among other things, the slug of the booking link and the page shown after booking. Payment settings to turn it into a paid appointment. Webhook feeds and Integrations for connections with other components and with external services.
- Allow attendee to select duration. This switch appears under Meeting duration once the booking type has been created; you do not see it during the wizard. If you switch it on, you choose several durations and the visitor may decide how long the appointment lasts, for example 15, 30 or 60 minutes. How that works is described in Setting up multiple booking durations in the Appointments module.
- Save changes. Every adjustment in this screen only becomes final after you click this.
9. How to continue from here #
Your calendar and your first booking type are ready. These are the logical next steps, with the article that covers each subject in full.
- Share your link and try it yourself. Get the booking link via Share on the card, paste it into your browser and make one test booking. That way you see immediately what your visitor sees. Which link you use for what is covered in Sharing your booking link: one service or all your services on one page.
- Connect your own calendar. As long as your calendar is not connected, the module does not take into account appointments you make outside Autorespond. See Connecting your calendar to the appointment scheduler.
- Refine your availability. Adjust the weekly hours via the Availability section in the edit screen, or create a schedule via the Availability tab in the module that you reuse across several booking types.
- Have a video meeting created. Connect Zoom and choose that location for your booking type: Connecting Zoom to the Appointments module for automatic meetings.
- Offer several durations. See Setting up multiple booking durations in the Appointments module.
- Turn it into a paid appointment. See Setting up paid appointments with automatic checkout.
- Work with several attendees at once. See Setting up group events in the Appointments module, and for rooms with a maximum capacity Making several meeting rooms bookable with a maximum capacity.
- Schedule an appointment for someone yourself. See Adding appointments manually in the Appointments module.
- Get people who book into your CRM automatically. See Connecting appointments to the CRM: creating contacts automatically on a booking.
10. Good to know #
- One user, one calendar. If you want two very different calendars for the same person, work with two booking types under the same calendar, each with its own availability.
- Stopping a service temporarily is done with Disable via the three dots on the card, not with Delete. Delete is permanent.
- Booking links only work properly on your own (sub)domain. If your environment is still on the temporary onboarding URL, only share the link widely after you have gone live on your own domain.
- Appointments that have been made are under Manage → Appointments → Bookings, not under Calendars. The Calendars tab only shows what can be booked.
- If you switch the landing page on, pay attention to the option below it. In the host settings, under Which booking forms to display?, there is the option Only selected active booking types. If you choose that, the services you do not tick can no longer be opened via their own direct link either, without an error message: your visitor ends up on the home page of your site. If you share individual links per service, keep All active booking forms selected. The explanation is in Sharing your booking link: one service or all your services on one page.
Related articles #
- Sharing your booking link: one service or all your services on one page
- Connecting your calendar to the appointment scheduler
- Setting up multiple booking durations in the Appointments module
- Connecting Zoom to the Appointments module for automatic meetings
- Setting up group events in the Appointments module
- Making several meeting rooms bookable with a maximum capacity
- Setting up paid appointments with automatic checkout
- Adding appointments manually in the Appointments module
- Connecting appointments to the CRM: creating contacts automatically on a booking


