With an automated webinar every participant watches at a different moment. A promotional price that is “valid for another 2 days” cannot be arranged with a single fixed end date. The solution: an automation that creates a personal discount code for every viewer that is valid for exactly 2 days, and emails that code straight away. After 2 days the code expires by itself, without you having to do anything.
Automations and the shop in Autorespond are based on FluentCRM Pro and WooCommerce, included in your package.
How does it work? #
- After the webinar the viewer receives a tag, for example “Webinar watched” (your webinar platform can apply that tag automatically through a webhook).
- The tag starts an automation that creates a personal discount code valid for 2 days.
- The automation emails the code to the viewer straight away, together with the link to your offer.
- After 2 days the code expires automatically. Anyone who orders too late pays the normal price.
Worth knowing: the price on your sales page itself does not change per visitor. Everyone sees the same page and the same price. The promotion runs through the personal discount code: only those who use the code within 2 days get the discount at checkout.
Step 1: create the automation with the Tag applied trigger #
Go to CRM & Emails → Automations and click New automation. Choose Tag applied as the trigger: the automation then starts as soon as a contact receives the chosen tag.
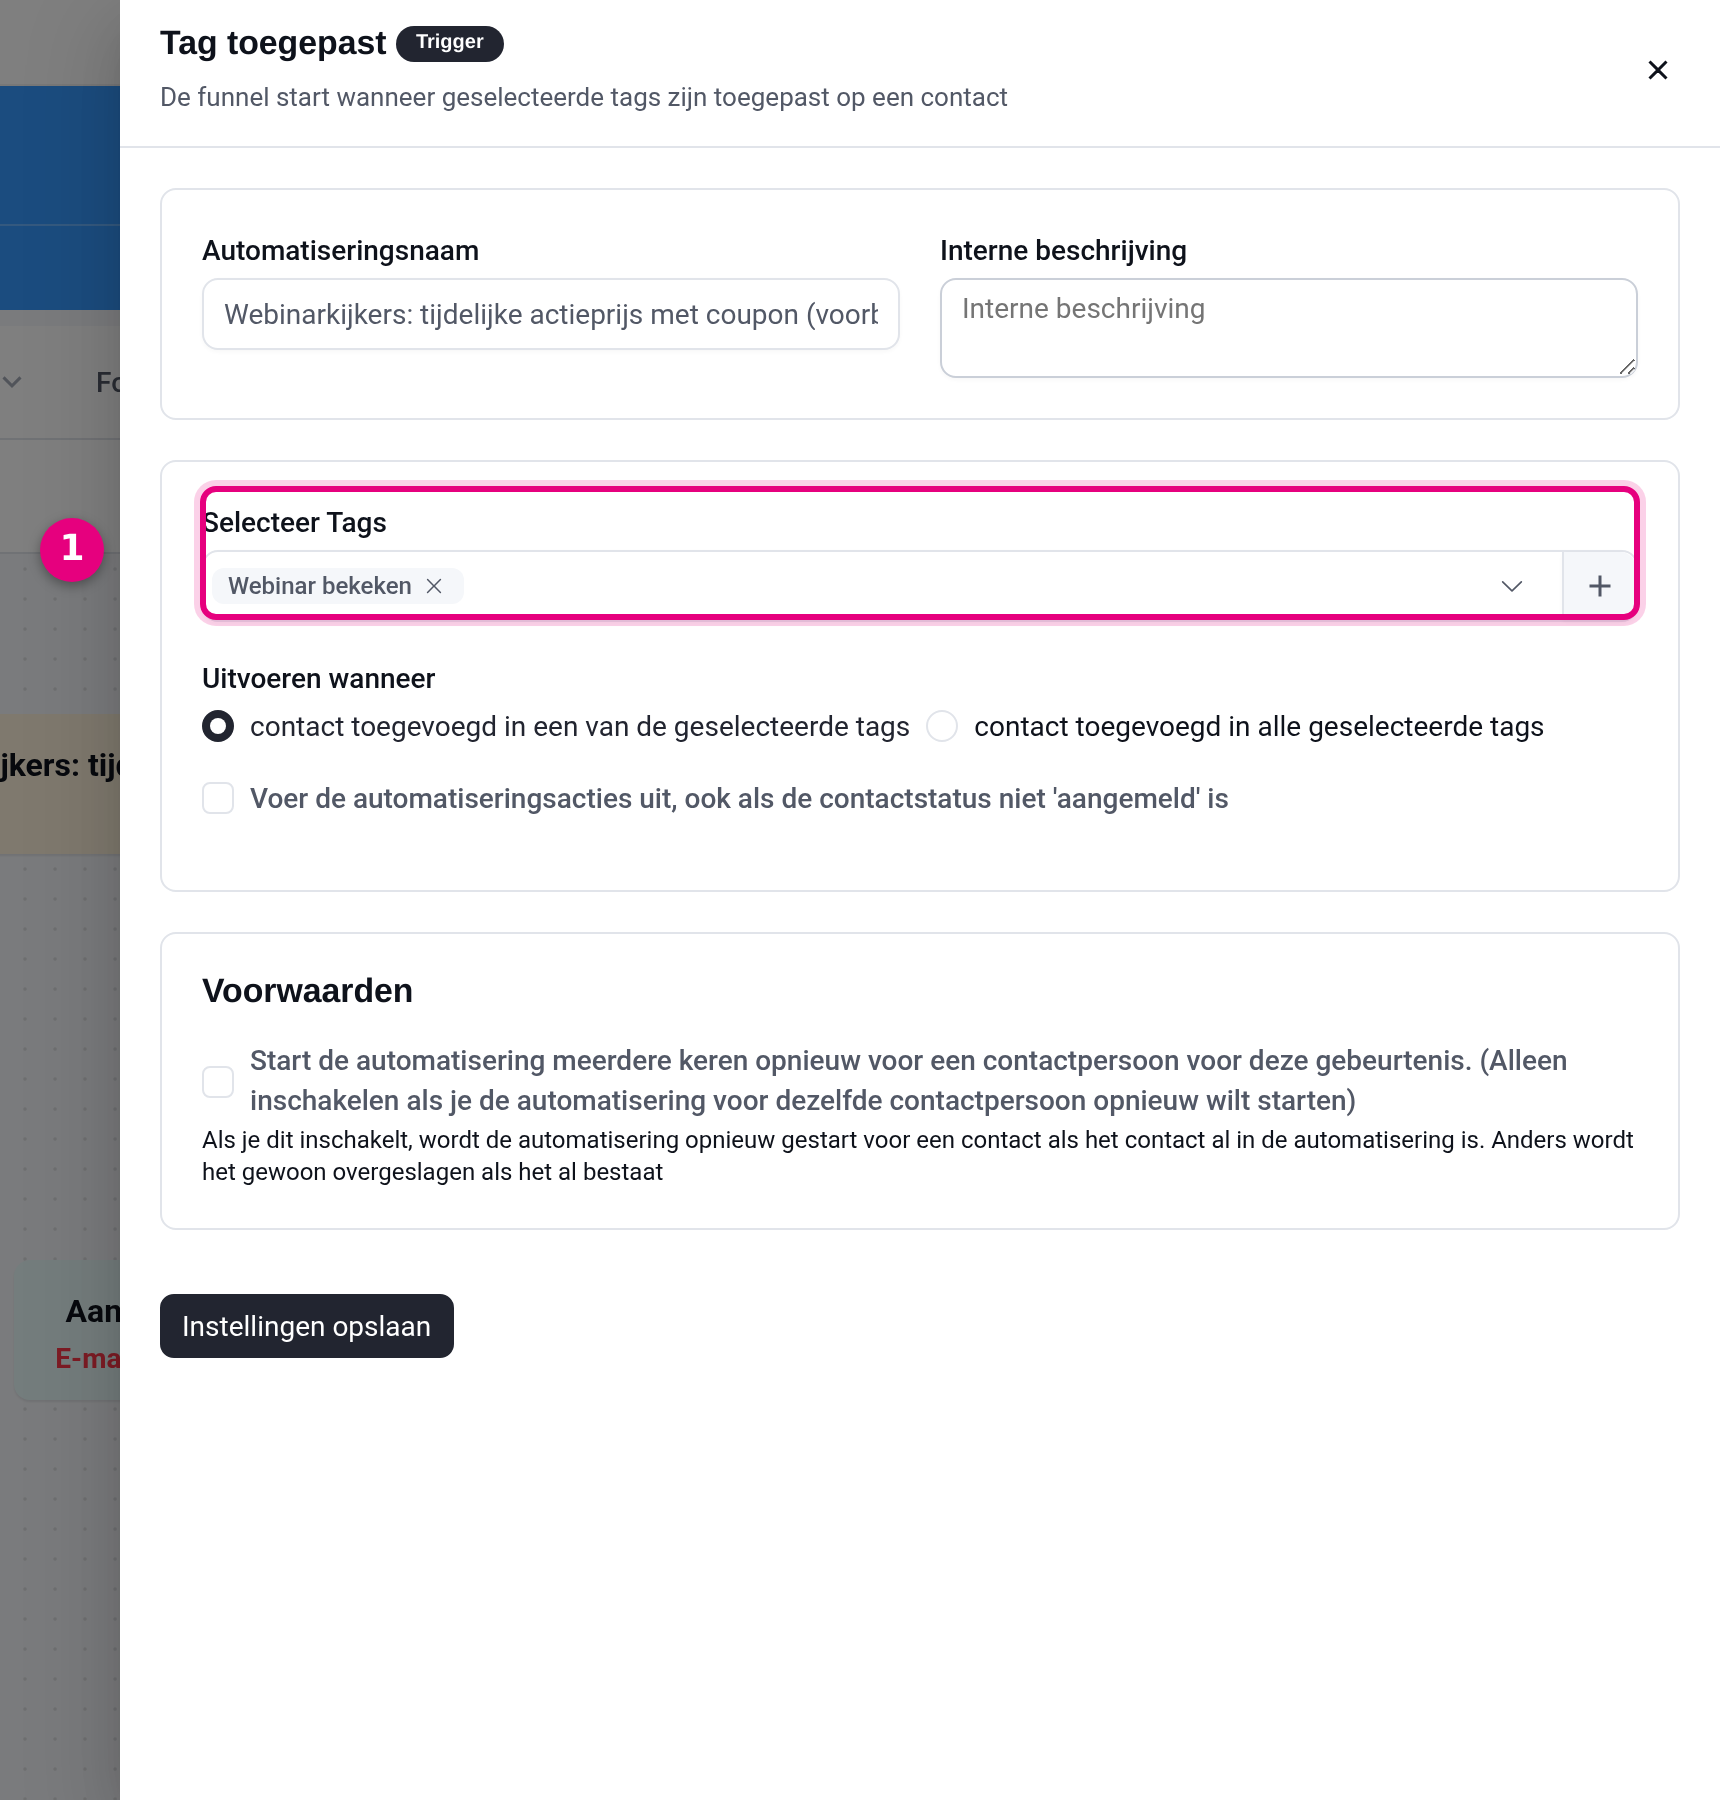
- Select Tags: choose the tag a viewer receives once the webinar (or the promotional moment in the webinar) has been watched, for example “Webinar watched”. You can choose several tags; under Run when you decide whether one of the tags is enough or whether the contact has to have all of them.
This screen also shows the Automation name (visible internally only), the option to run the automation even if the contact status is not “subscribed” (usually best left off), and, under Conditions, the choice of whether the automation may start again for the same contact. Leave that last one off: that way someone who receives the tag twice by accident does not get another discount code.
Step 2: add the Create coupon action #
Click the plus sign below the trigger in the canvas and choose the Create coupon action in the WooCommerce category. This action creates a unique discount code every time the automation starts.
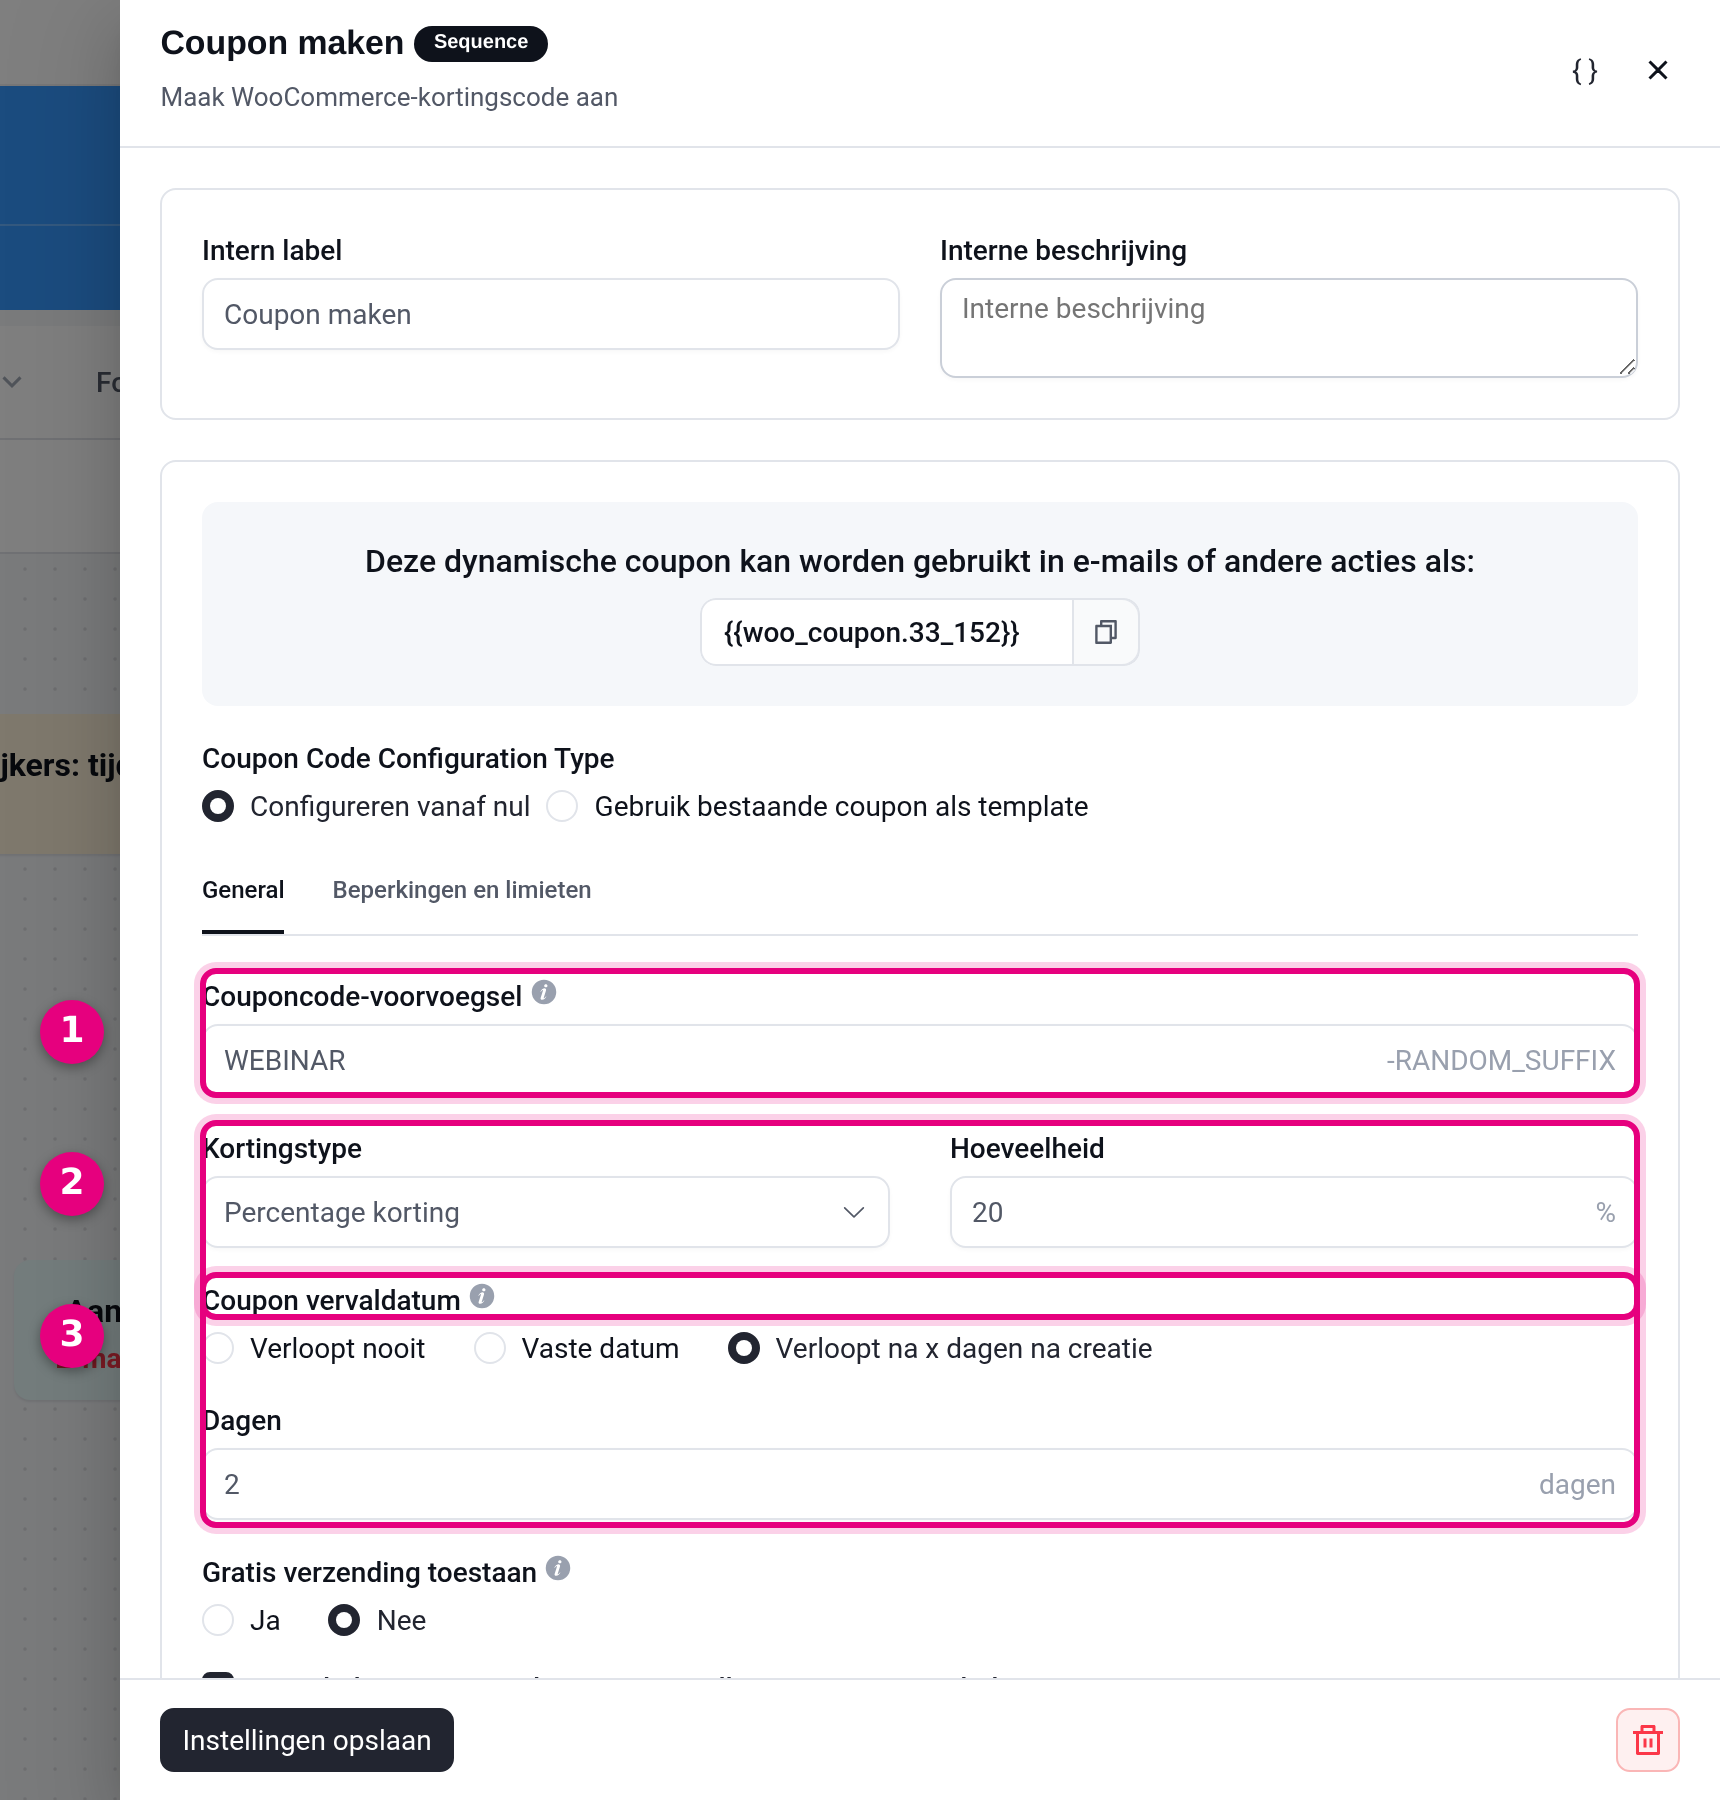
- Coupon code prefix: the fixed first part of the code, for example WEBINAR. Every viewer then gets a random, unique suffix after it (WEBINAR-A3F7X). That makes every code personal.
- Discount type and Amount: choose Percentage discount and 20%, for example, or a fixed amount. This is the promotional price the viewer receives.
- Coupon expiry date: choose Expires x days after creation and enter 2 at Days. The code then expires exactly 2 days after it was created, so 2 days after that particular viewer watched the webinar. This is the setting that makes the temporary offer work per person.
At the top of this screen you will see the smartcode of this coupon, for example {{woo_coupon.33_152}}. You need that code in the next step to put the discount code in your email. On the Restrictions and limits tab you can make the code even more personal: restrict use to the contact email address and set the maximum number of uses per customer to 1. You can also restrict the coupon to a specific product here.
Step 3: email the code with Send custom email #
Add the Send custom email action directly after the coupon step. In this email the viewer receives the personal code and the link to your offer.
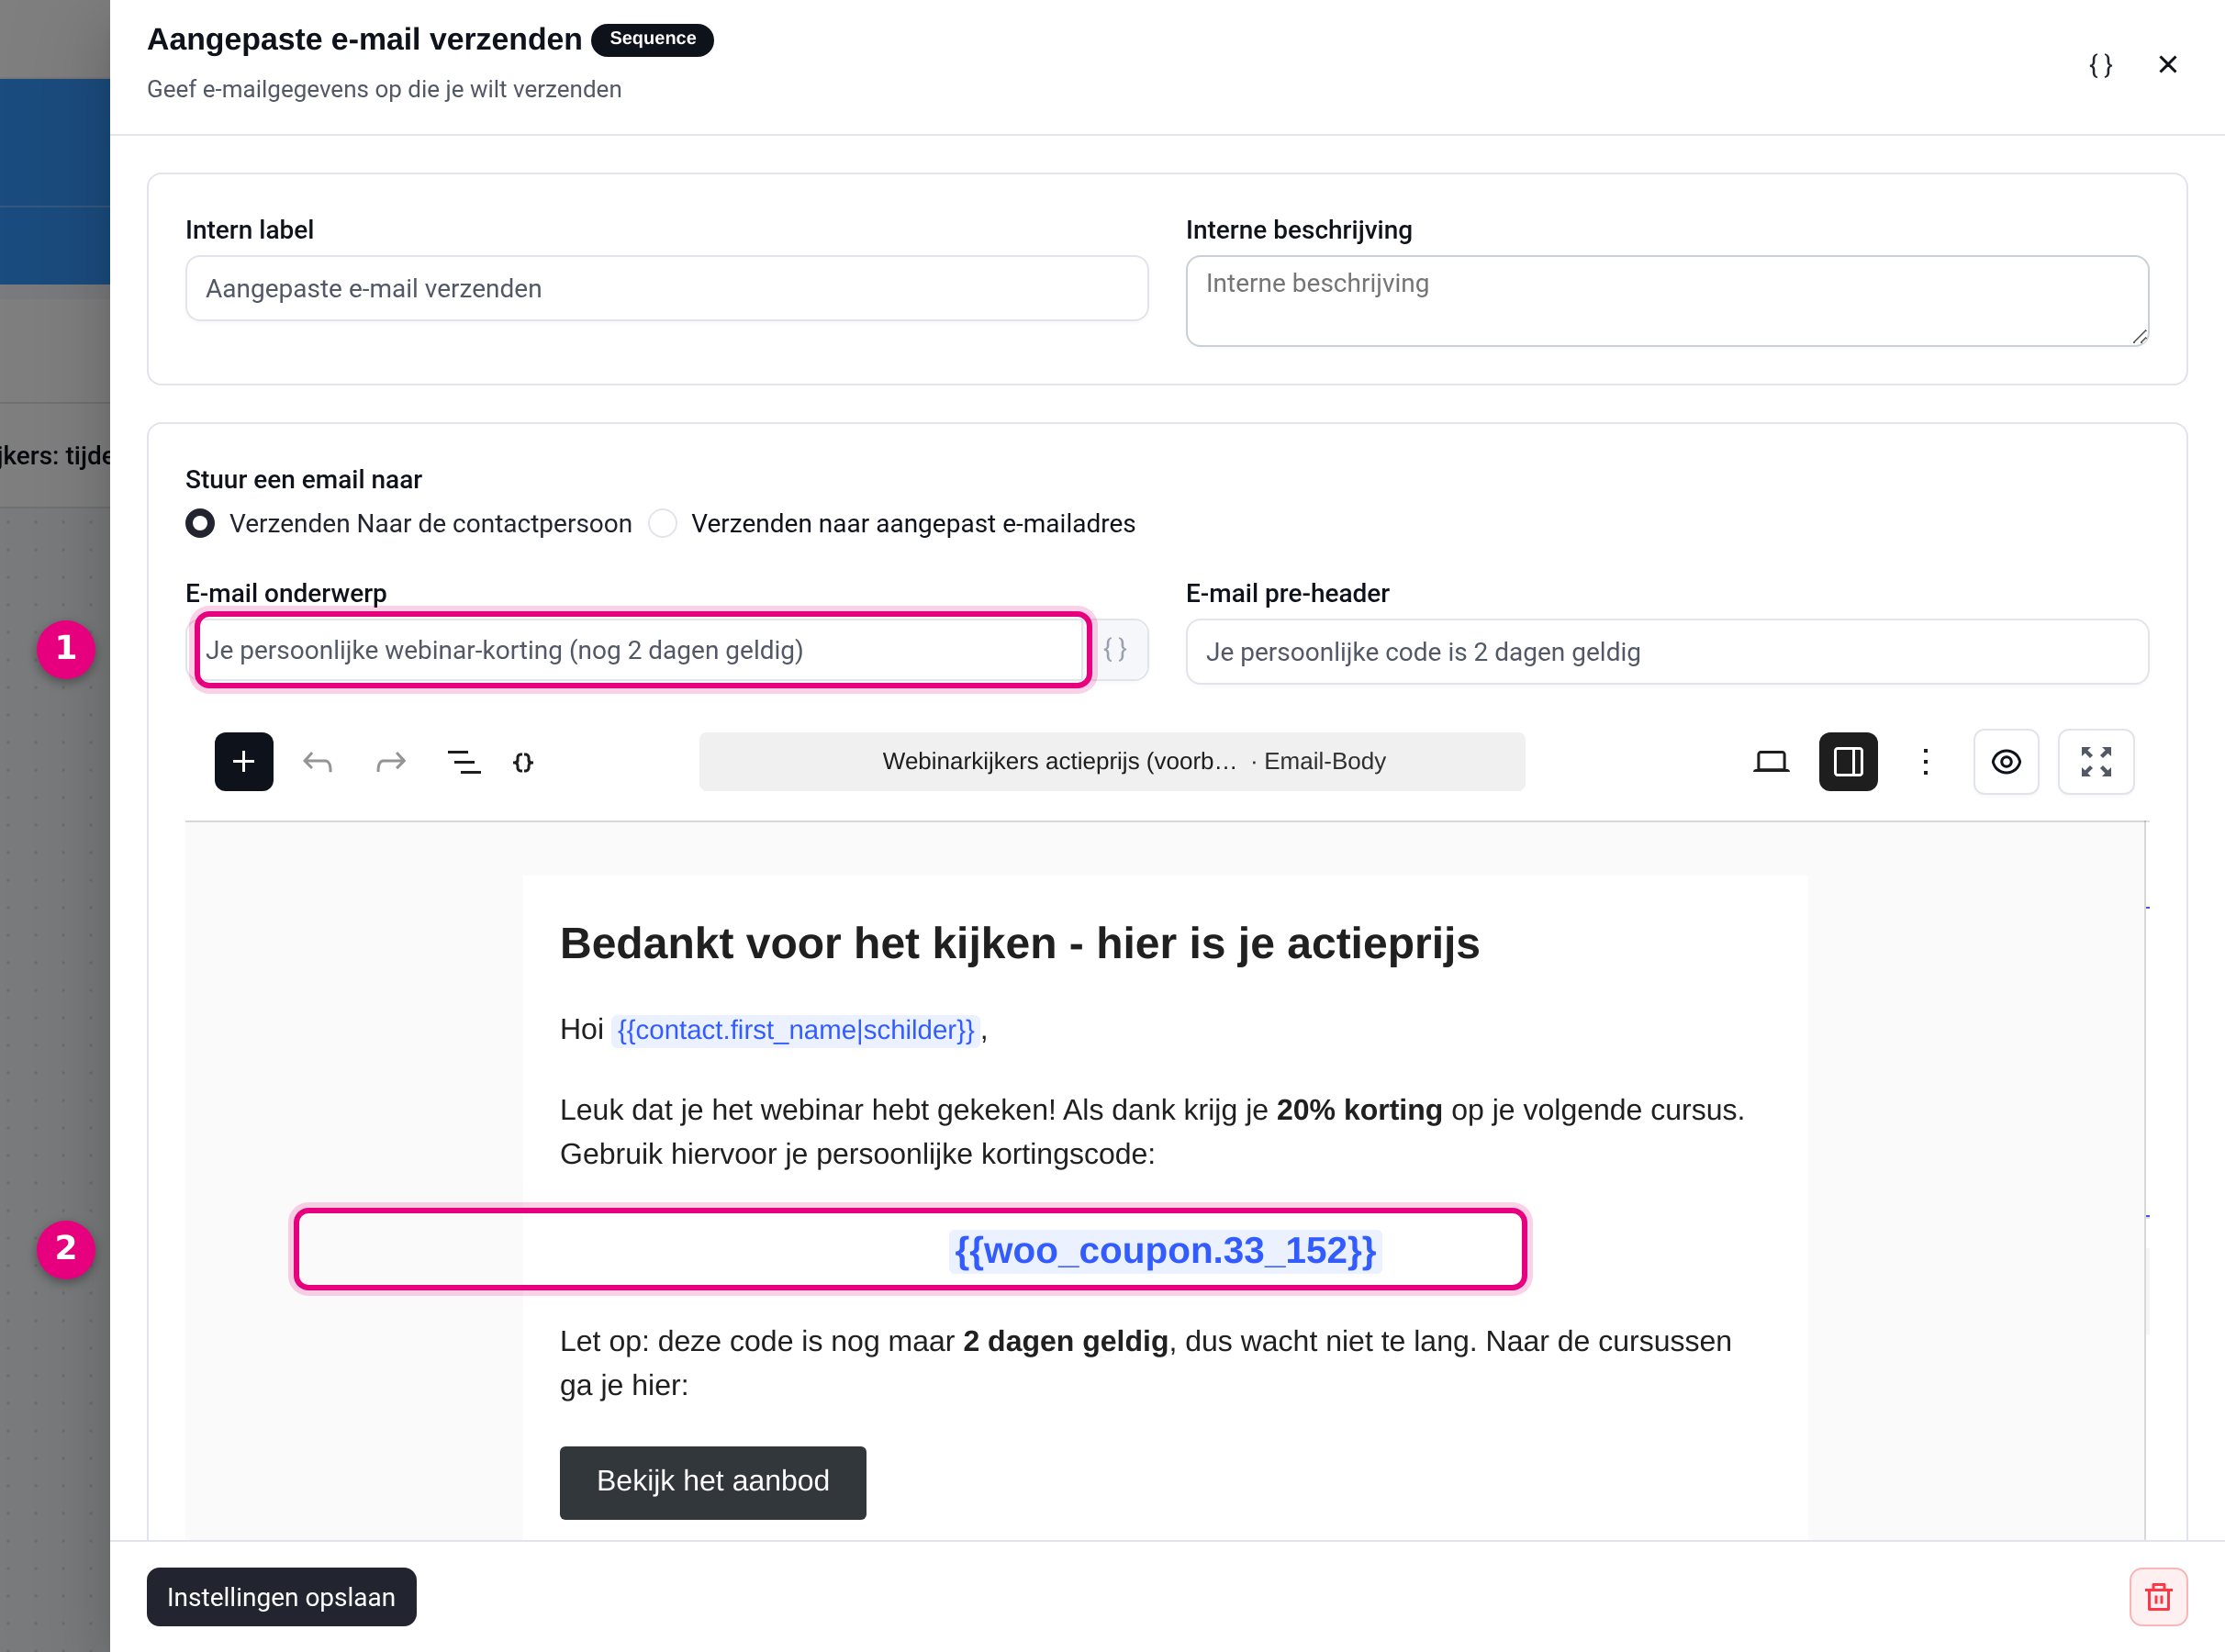
- Email subject: make the time pressure clear straight away, for example “Your personal webinar discount (valid for another 2 days)”.
- The coupon smartcode in the text: paste the smartcode from step 2 here (you can also pick it from the list using the button with the curly brackets {}). When the email is sent, Autorespond replaces this code automatically with that viewer’s unique discount code.
Also put a direct order link to your product in the email. That can be a button to your sales page, or a direct link in the form https://yourdomain.com/?add-to-cart=PRODUCTID that puts the product straight into the basket. The viewer then enters the discount code at checkout.
Step 4: check the steps and switch the automation on #
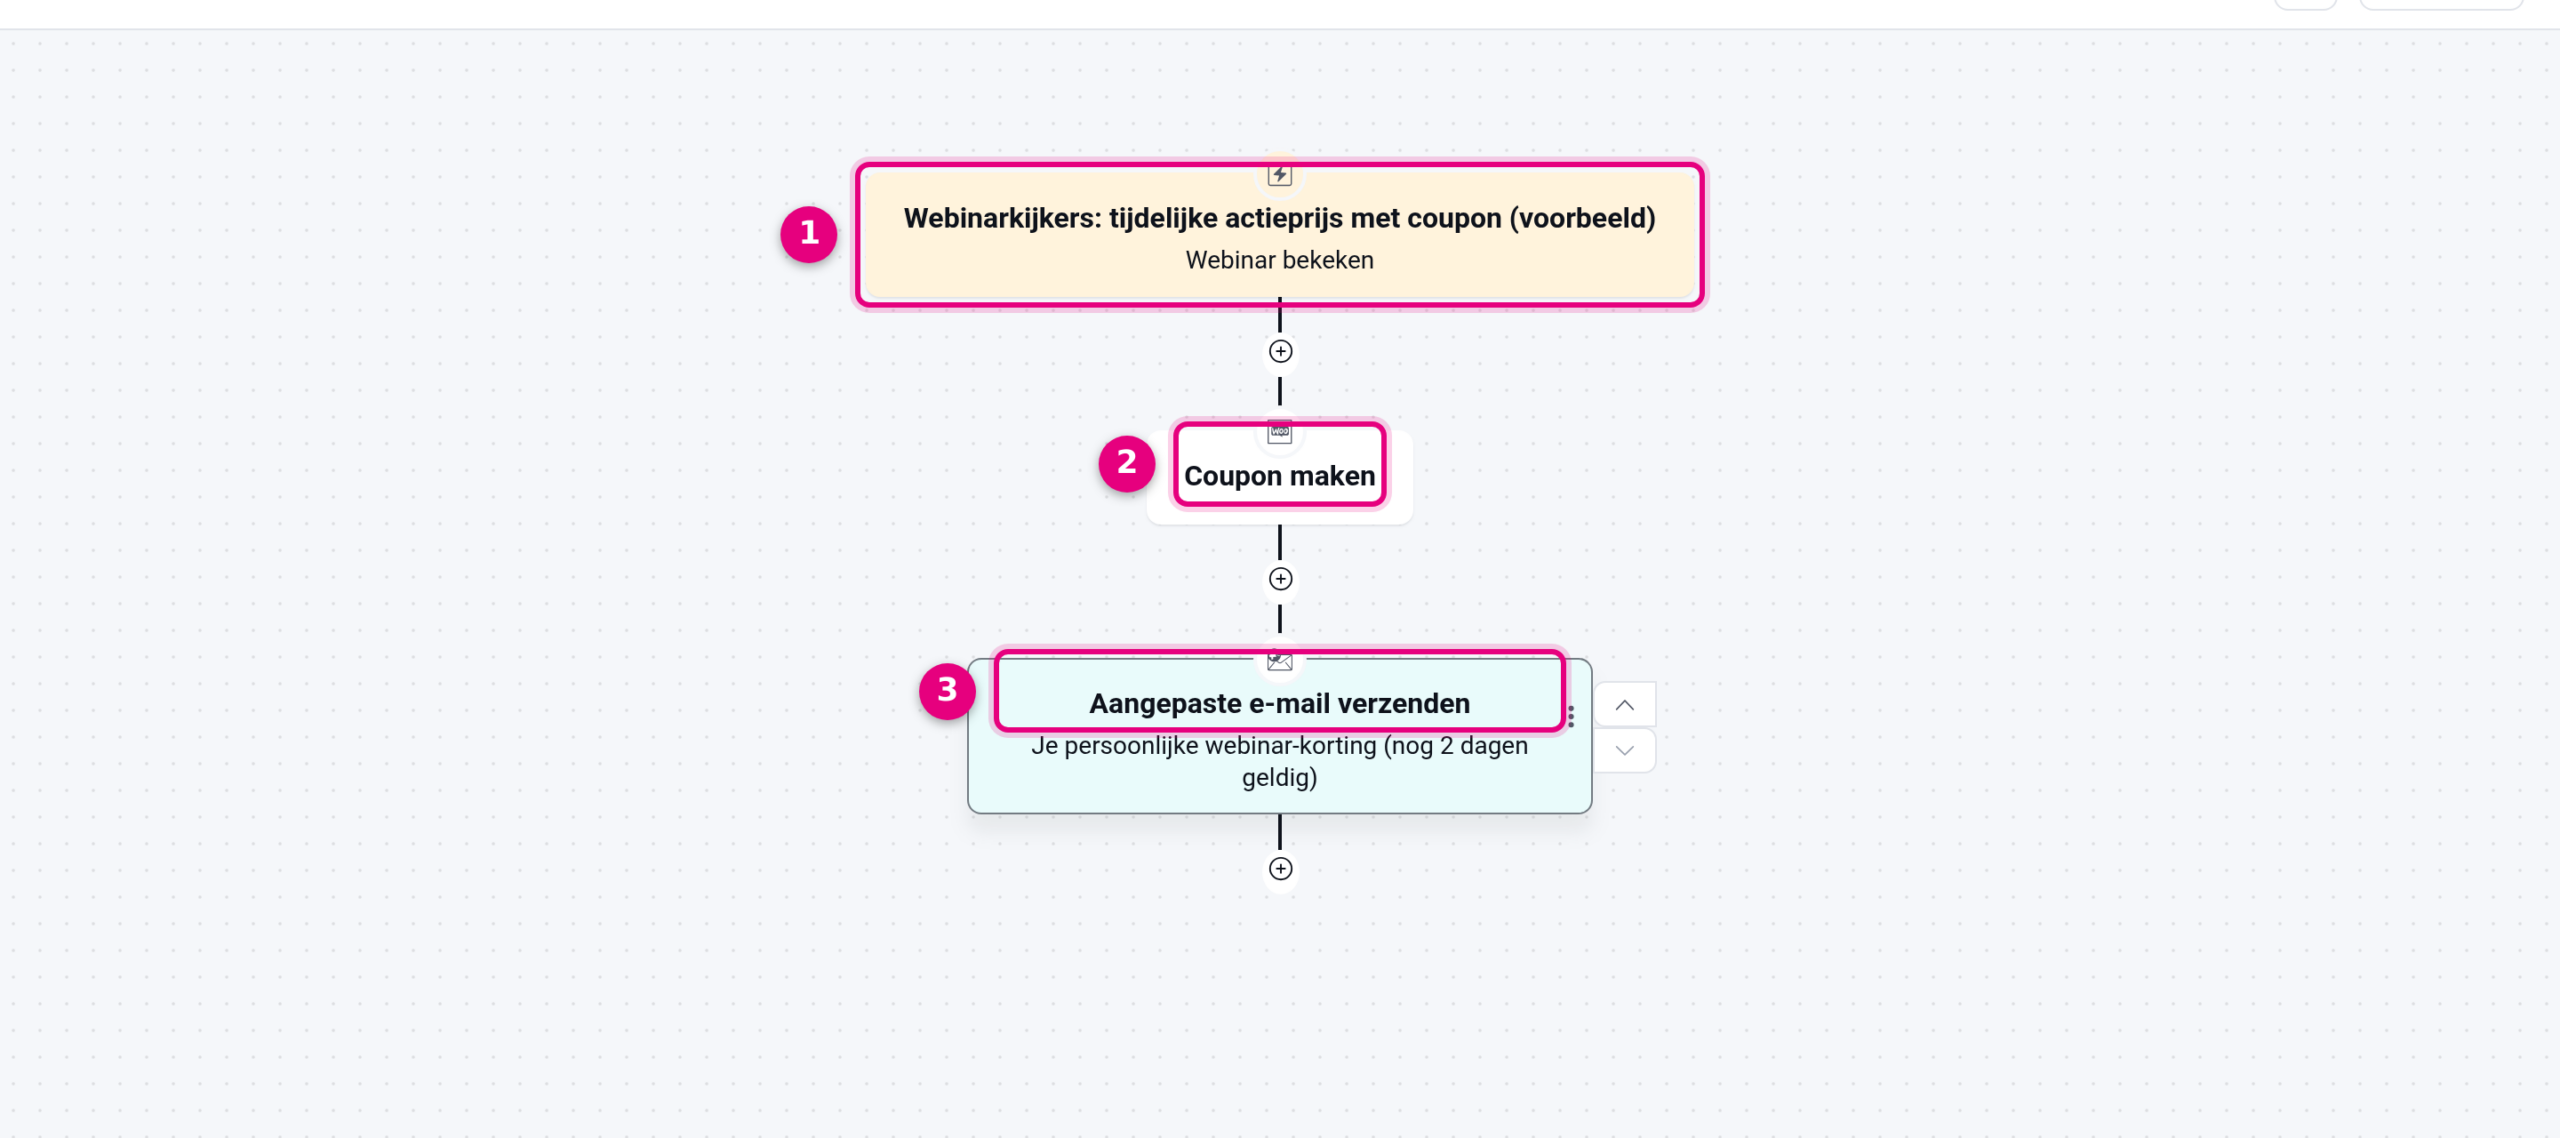
- The trigger: starts as soon as the tag “Webinar watched” is applied.
- Create coupon: creates the personal code that is valid for 2 days.
- Send custom email: emails the code and the order link to the viewer straight away.
Is everything correct? Then flip the switch at the top right from Draft so the automation becomes active. Optional: add a Wait step of 1 day after the email step, followed by a second email (“your discount expires tomorrow”). That reminds viewers in time that the offer is about to end.
Testing #
Testing is only possible with an active automation. Switch the automation on and apply the tag manually to your own test contact (open the contact and add the tag). Then check that you receive the email, that the code works at checkout, and that the coupon appears under Shop → Coupons with an expiry date 2 days from now. After testing, delete the test coupon and remove the tag from your test contact again.
Connecting your webinar platform as the trigger #
If you use an external webinar platform such as WebinarGeek, you can have the tag applied automatically through a webhook at the moment someone watches the webinar. How to set that up is described in Connecting WebinarGeek to Autorespond through a webhook. For other platforms, set up an incoming webhook through CRM & Emails → CRM settings → Incoming webhooks.
Alternative: one fixed promotion date for everyone #
Does your webinar take place live on a fixed date, with the promotion ending for all participants at the same time? Then an ordinary discount code with a fixed expiry date is simpler. You create it through Shop → Coupons. See Setting up a recurring discount with a coupon.


