More and more parts of your Autorespond environment can be operated directly from your own AI assistant: Claude, ChatGPT, Cursor or another program that supports the Model Context Protocol (MCP). You simply ask in your own words “how many contacts have tag X?”, “create a task for Peter” or “write a draft article for my knowledge base”, and your assistant does it through a secure connection with your site. This overview shows which connections exist, how to switch them on and what you can do with them.
The AI connections are built into FluentCRM, FluentBoards, BetterDocs and WooCommerce and use the WordPress MCP adapter (FluentHub). Everything is part of your package.
Important: the connections keep growing. The makers regularly extend the MCPs with new functions. So the best way to find out exactly what your assistant can do is to ask the assistant itself, straight after connecting (see the section “Ask your AI what it can do” below). That way your AI is up to date immediately, including functions that are newer than this article. There may also be more connections by now than described here, for example for the Community (which has been announced). We do our best to update this article as soon as that is the case. Last updated: September 2026.
First: secure and GDPR compliant #
An AI connection gives your assistant access to data on your site, often including customer data. So first go through the legal basis and the secure setup from Connecting your Autorespond to your AI assistant (FluentCRM MCP): only use a business AI account with a data processing agreement, create a separate user with minimal rights for the AI, and let the AI make proposals while you send and publish. Those principles apply to all the connections below.
Which connections are there? #
| Item | What can your assistant do with it? | Switch on through | Log in with |
|---|---|---|---|
| CRM & email (FluentCRM) | Look up and update contacts, manage tags and lists, prepare campaigns, view and steer automations, render emails and (with send rights) send them. | CRM & Emails → Settings → AI configuration → MCP for AI agents | Application password |
| Projects & tasks (FluentBoards) | Request boards and tasks, create, assign, move and label tasks, add subtasks and comments, search in tasks. | Administration → Project management → Settings → MCP for AI Agent | Application password |
| Forms (Fluent Forms) | View and edit forms and fields, request submissions and add notes or a status to them, manage statistics and notifications. Please note: submissions contain personal data. | Administration → Connections (FluentHub) → MCP → Fluent Forms | Application password |
| Appointments (FluentBooking) | Request and report on bookings, find free slots, schedule, reschedule or cancel appointments (always with a confirmation step), manage availability and appointment types, view payments. Names and email addresses of participants are masked by default. New since September 2026. | Administration → Appointments → Settings → MCP for AI Agents (off by default; choose per toolset what you allow) | Application password |
| Knowledge base / Docs (BetterDocs) | Search and read articles, create and update them as drafts, manage categories and tags, create FAQs, request statistics. | Website → Docs Settings → MCP | Logging in through your browser (OAuth) or a connection token |
| Shop (WooCommerce) | Coming soon. WooCommerce is working on a connection for products and orders; it is still in the testing phase at WooCommerce itself. | Not yet available | – |
Every connection works with the rights of the user you connect with. An AI that connects with a user who may only read can therefore only read. That is your most important protection; for each item you can read below which rights you need.
Step 1: a separate user and an application password #
The connections for CRM and projects log in with an application password: a separate key that you can revoke at any time. Create it on a dedicated user for the AI, never on your administrator account.
- Go to Users → Add new user, for example
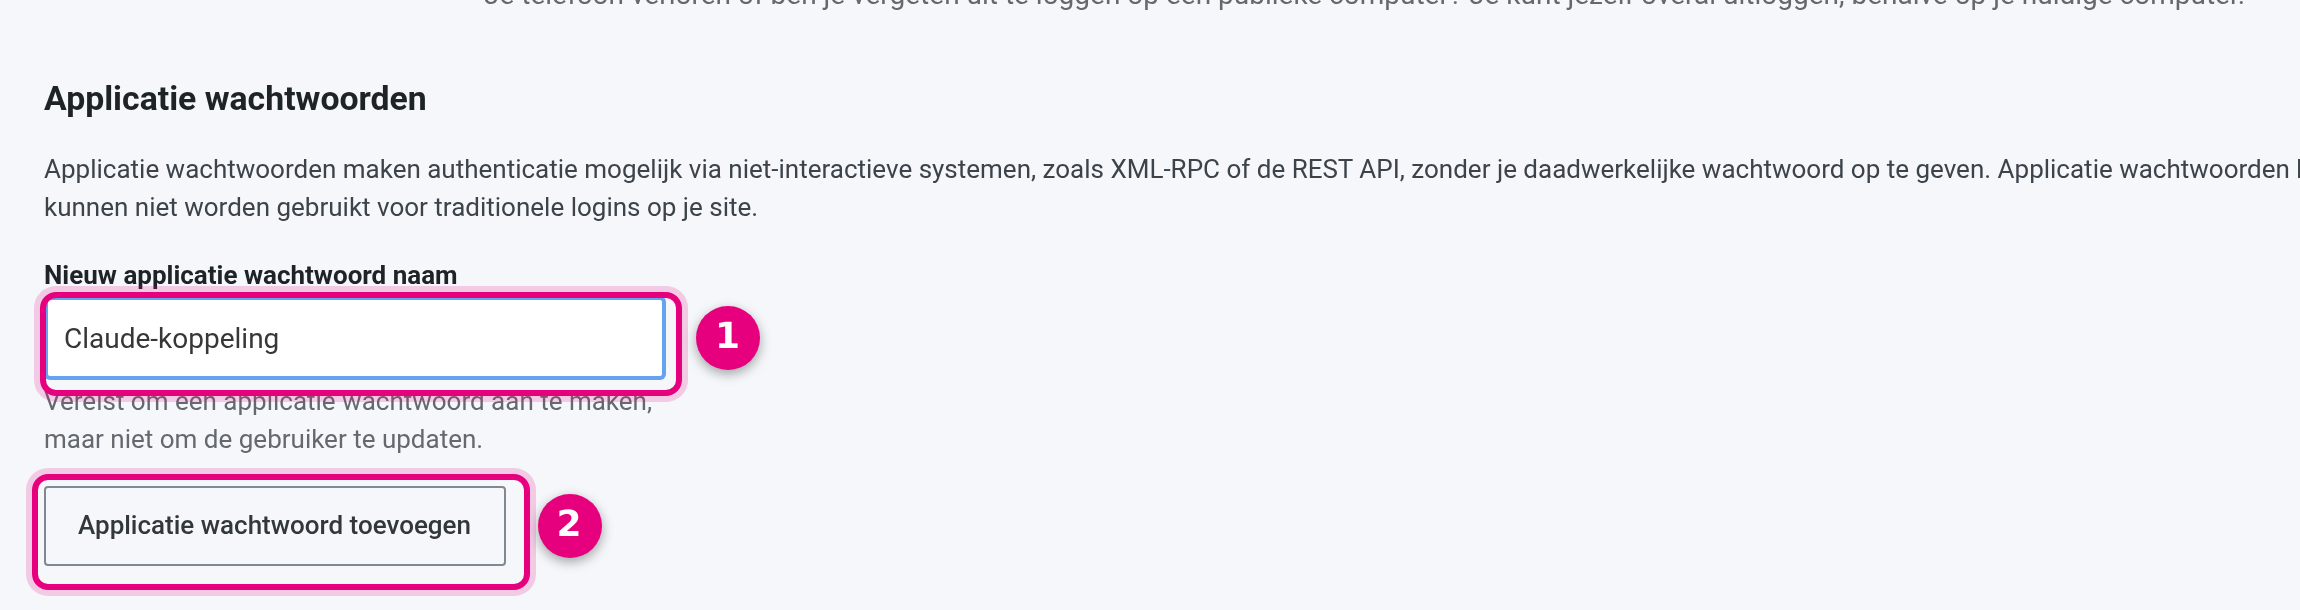
ai-assistent, role Subscriber. Then give it the rights the AI needs per item (CRM manager rights for FluentCRM and board membership for FluentBoards). - Open that user, scroll to Application passwords, give it a name (for example “Claude”) and click Add new application password. Copy the code straight away; it is only shown once.
- Create a separate application password per AI program. That way you can revoke one without affecting the rest.
Step 2: switching on the connection per item #
CRM & email (FluentCRM) #
- Go to CRM & Emails → Settings → AI configuration → MCP for AI agents.
- Switch on Enable MCP for AI agents.
- Copy the endpoint URL, or enter your username and application password under Connect a client: the page then creates a ready-made configuration for Claude Code, Claude Desktop, Cursor or Codex.
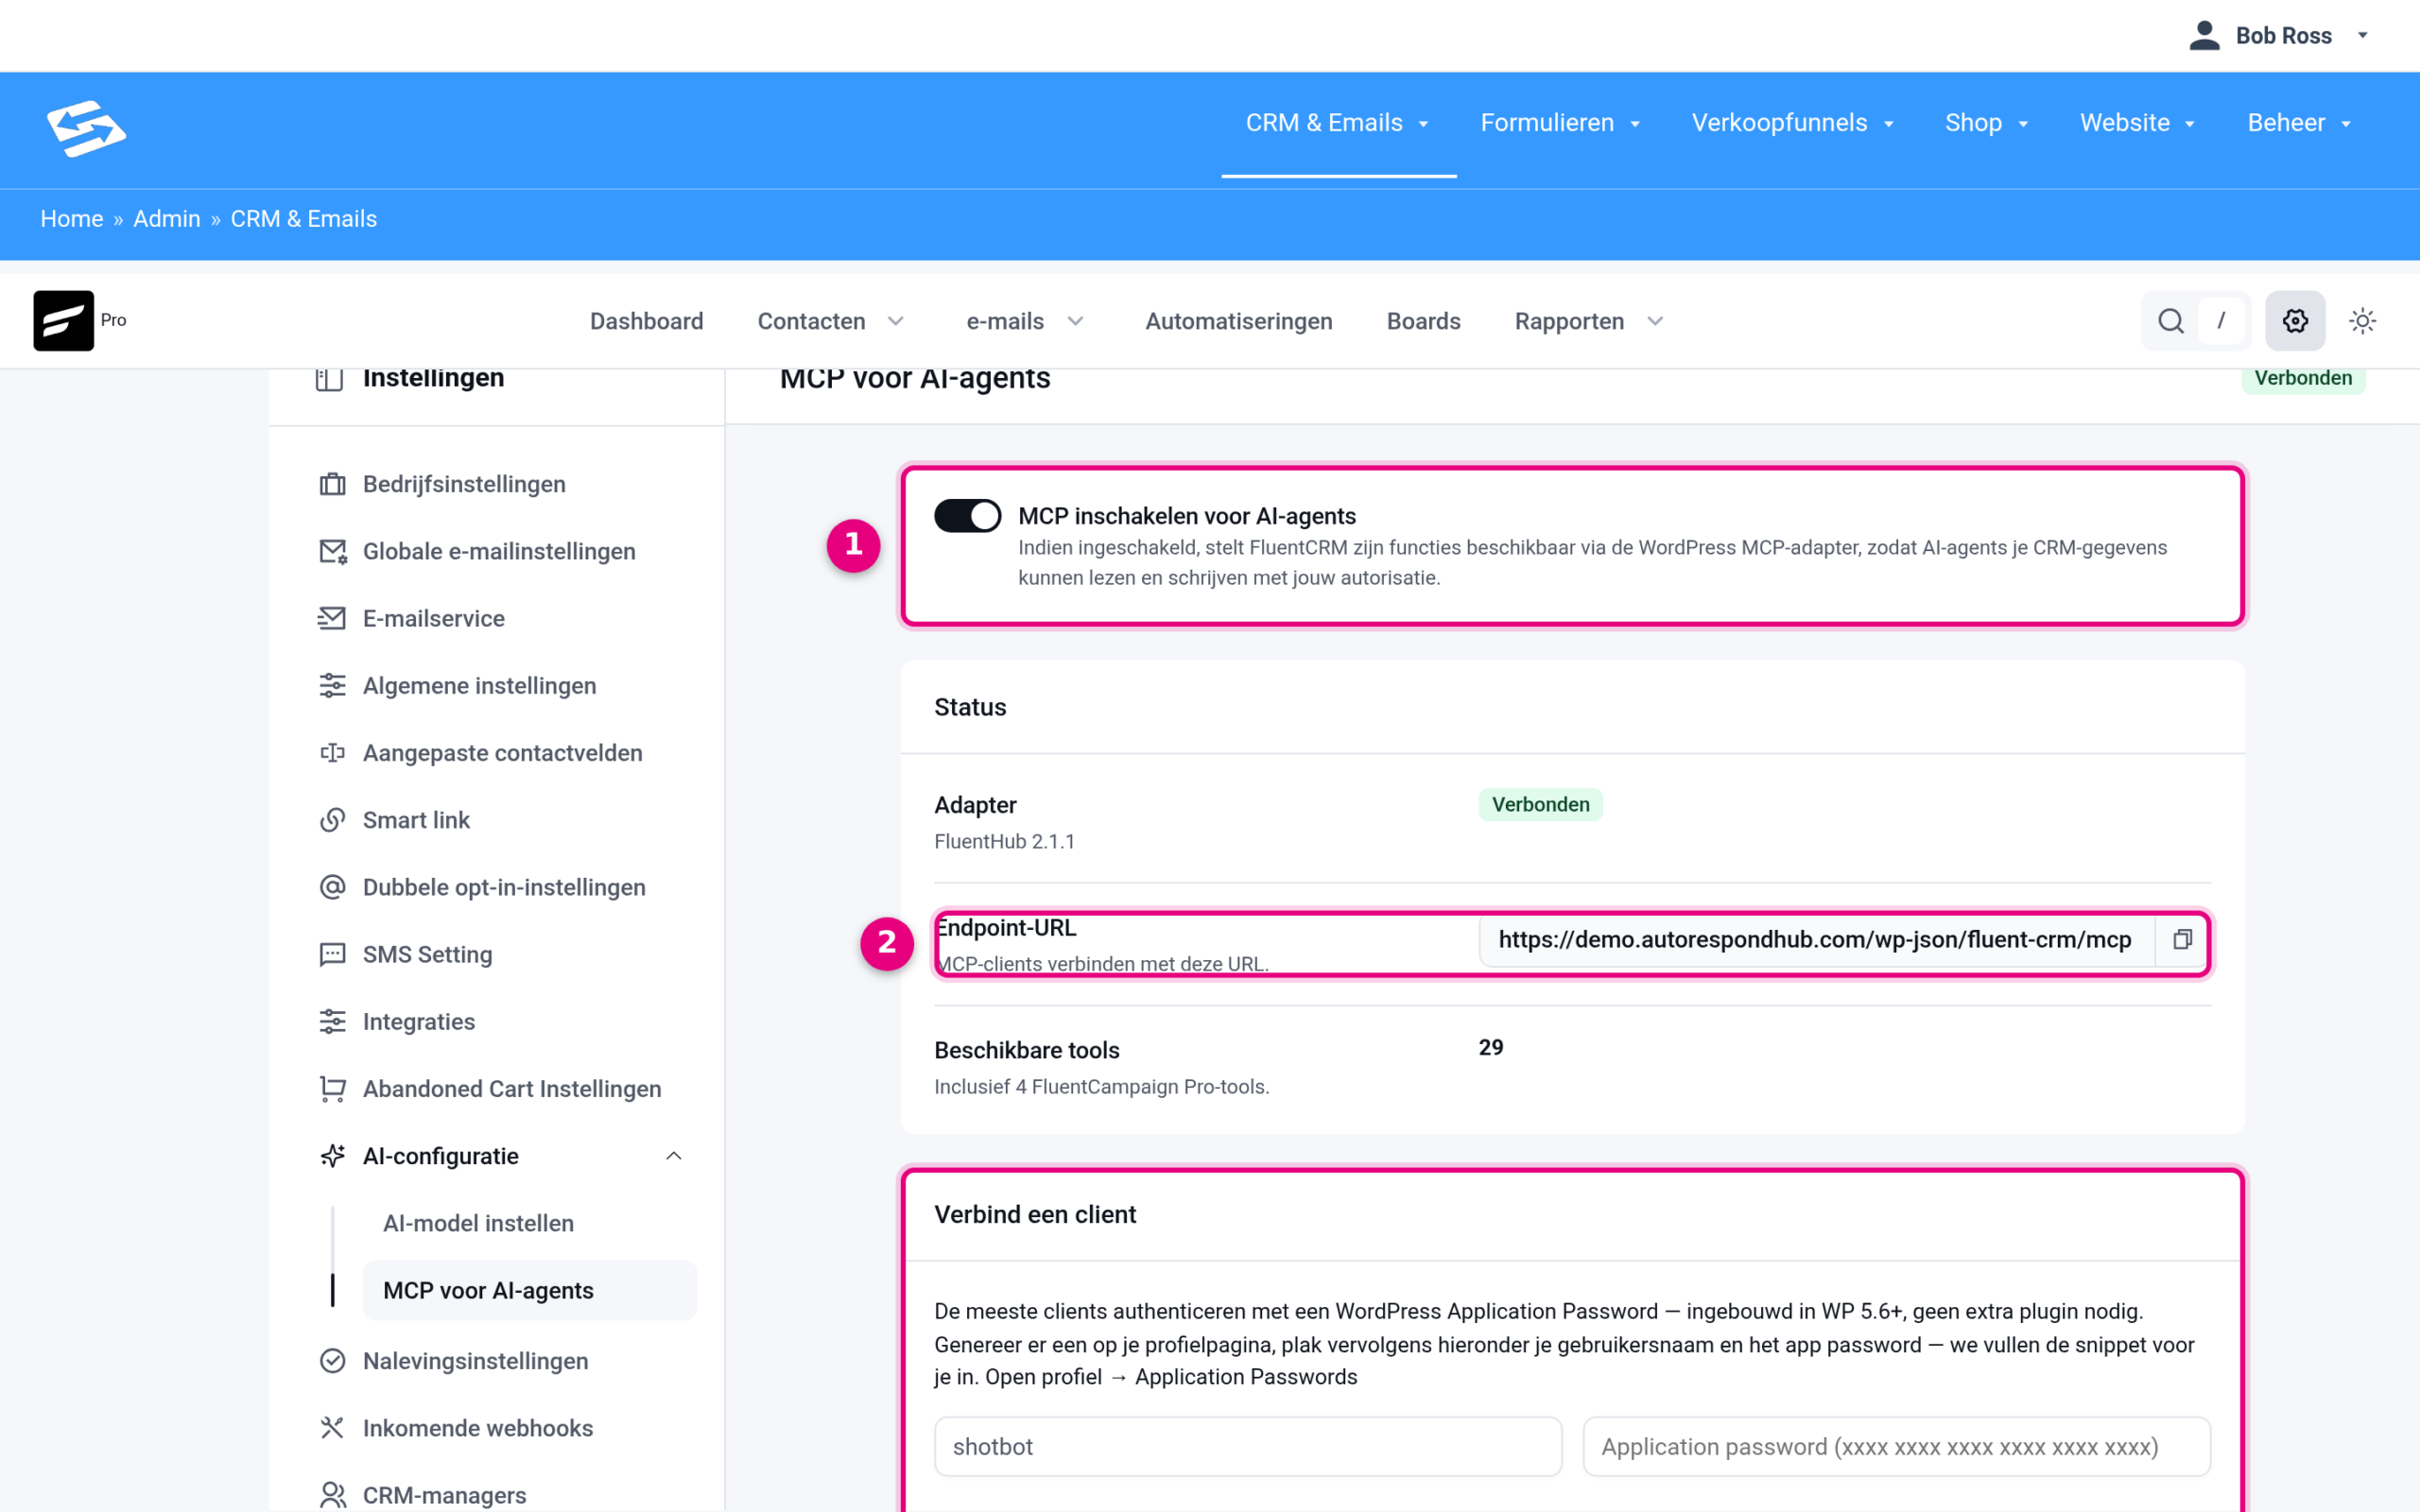
- Switch: turns the whole connection on or off. Off means no AI can reach it at all, handy if you are not using it for a while.
- Endpoint URL: the address of your connection (ends in
/wp-json/fluent-crm/mcp). - Connect a client: choose your AI program and enter the details; you get the exact configuration or the command you need to paste.
The rights the AI gets here are set under CRM managers. A full explanation, including three example profiles from “read only” to “full access”, is in the FluentCRM article.
Projects & tasks (FluentBoards) #
- Go to Administration → Project management, click the cog (Settings) and choose MCP for AI Agent on the left.
- Switch on the connection and copy the endpoint URL (ends in
/wp-json/fluent-boards/mcp). - Connect your AI program with that URL and the application password of the AI user.
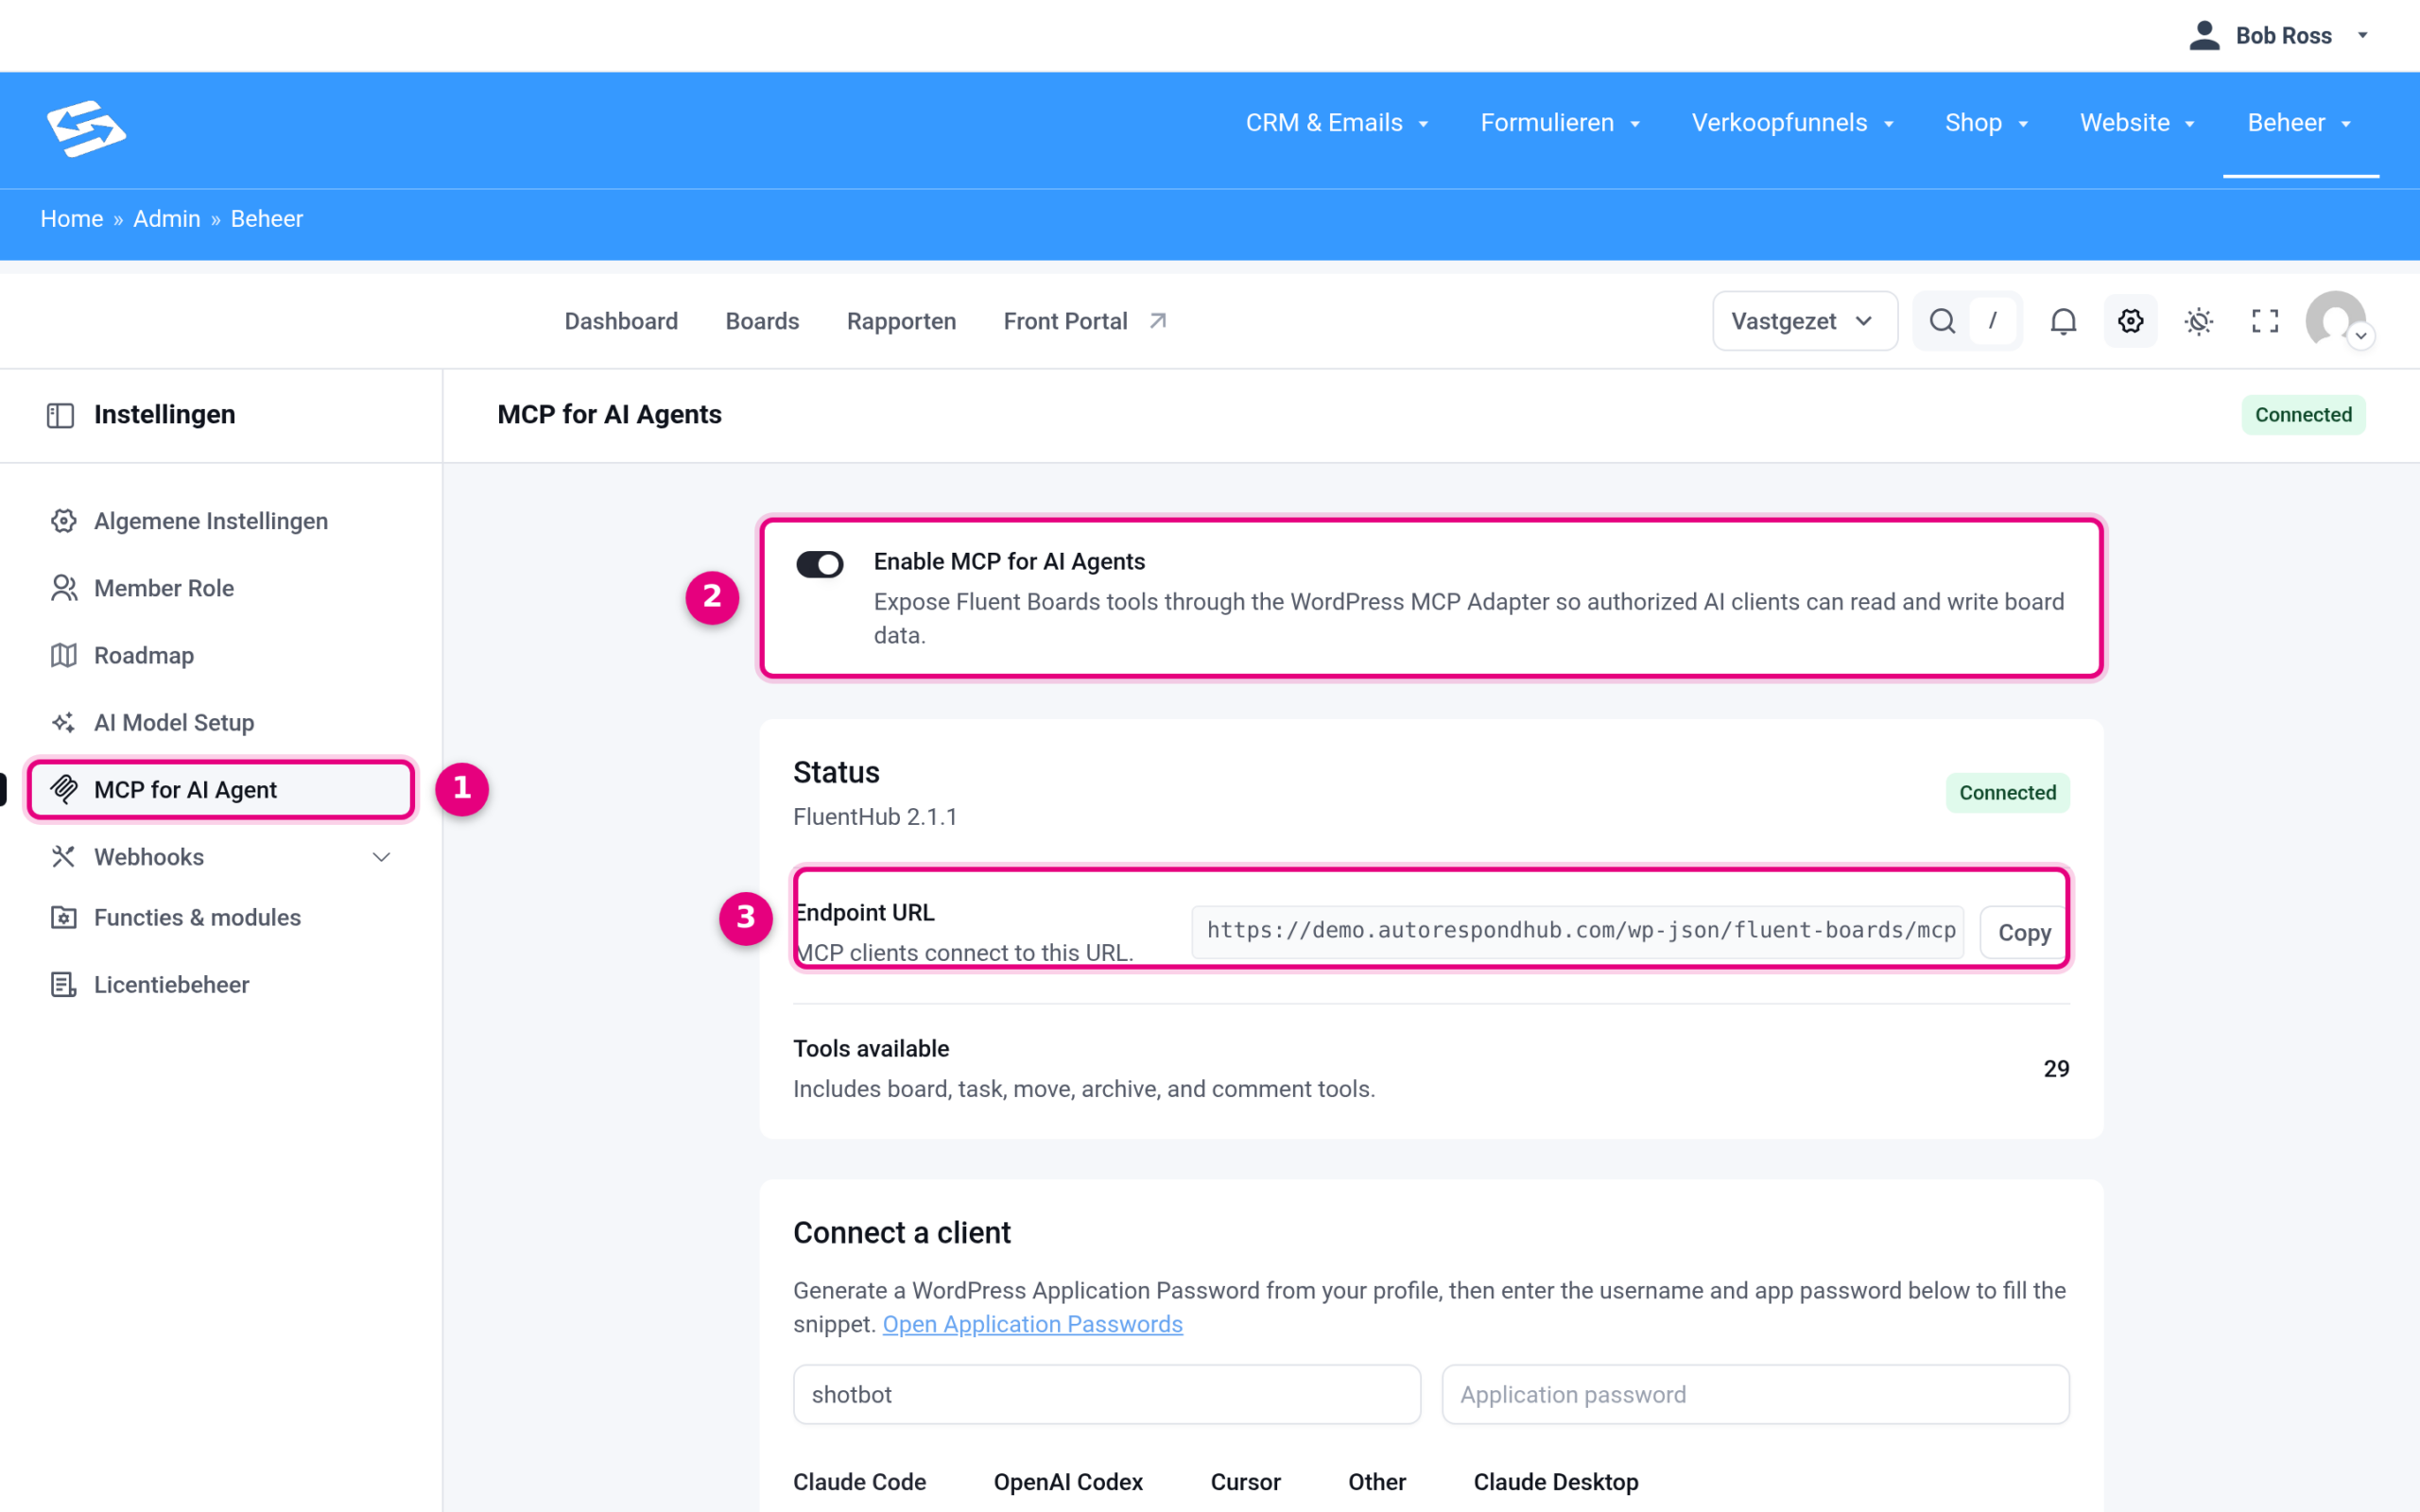
The AI sees exactly the boards the connected user is a member of, with the same rights. So make the AI user a member of the boards where it may help, and of nothing more. More in Connecting your projects and tasks to your AI assistant (FluentBoards MCP).
Knowledge base / Docs (BetterDocs) #
- Go to Website → Docs Settings and open the MCP section.
- Switch on Enable MCP access.
- This connection works differently from the others: in Claude or ChatGPT you only paste the Connector URL, after which you log in to your site once and give approval. So no password to paste. For programs such as Claude Code, Cursor or VS Code there is an Editors & CLI tab with a connection token.
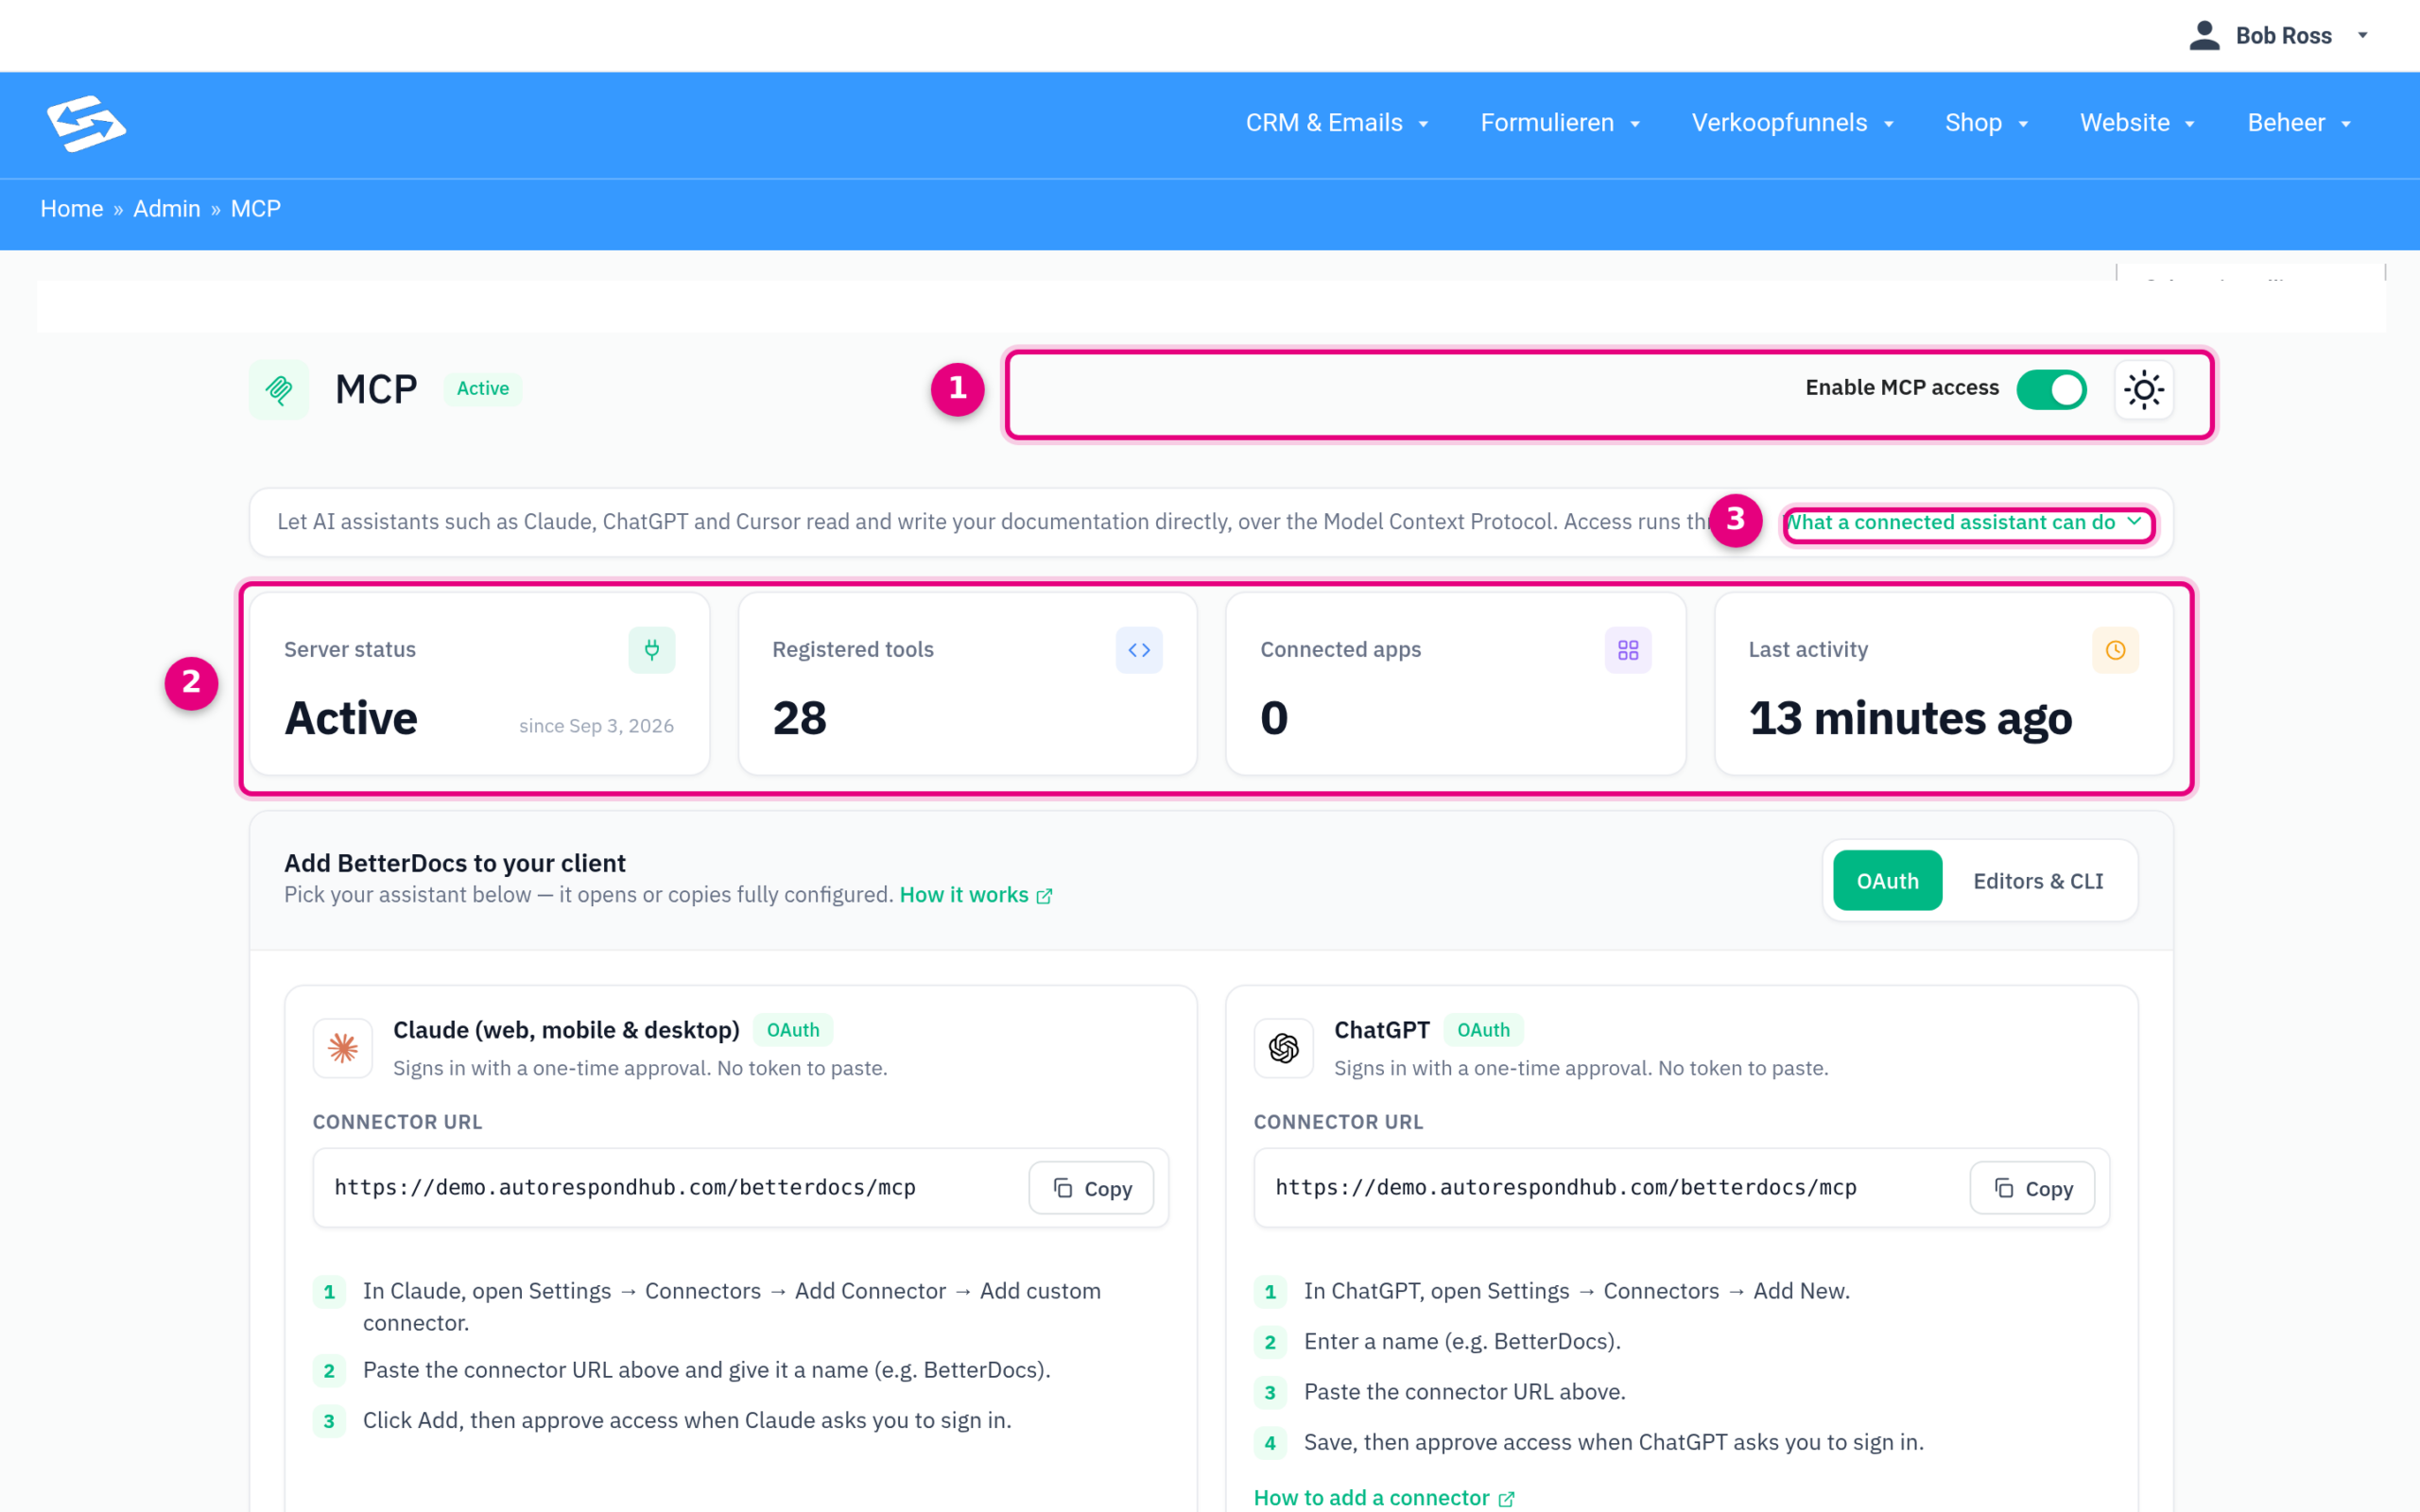
Here the AI gets the rights of the user who gives approval. New articles come in as a draft by default; publishing is only possible if that user has that right. All the details are in Connecting your knowledge base to your AI assistant (BetterDocs MCP).
Shop (WooCommerce) #
WooCommerce has its own AI connection for products and orders in development, but still calls it a test version itself and advises using it only on a test environment. Because orders contain customer data and a status change sends emails to your customers straight away, we will only offer this connection once WooCommerce declares it stable. We will update this article then; until that time you manage your shop through the Shop menu as usual.
Step 3: connecting from your AI program #
How you add a connection differs per program. These are the most commonly used:
- Claude (web, app and desktop): Settings → Connectors → Add custom connector, paste the URL. This works straight away for the knowledge base connection (logging in through your browser). For the FluentCRM, FluentBoards and shop connections, which work with an application password, use the ready-made configuration from “Connect a client” in Claude Desktop (it runs through a small helper program that sends the password along).
- Claude Code (terminal): one command per connection, for example
claude mcp add --transport http fluent-crm https://yourdomain.com/wp-json/fluent-crm/mcp --header "Authorization: Basic …". FluentCRM and FluentBoards generate this command for you. - Cursor, Codex, VS Code, Windsurf: add an MCP server with the URL and, where asked, the header
Authorization: Basic …(FluentCRM/FluentBoards/shop) orAuthorization: Bearer …(knowledge base). - ChatGPT: Settings → Connectors → Add new, paste the URL. ChatGPT can only connect directly to connections with browser login (OAuth), which is currently the knowledge base connection. The other connections only work in ChatGPT through an extra step for advanced users.
Step 4: ask your AI what it can do (and have it remember) #
Straight after connecting, this is the most important step. Every connection tells your assistant itself which functions there are, including functions added after this article. So start with a question like this:
“You have just been connected to my Autorespond site. Look at all the available tools of this connection, summarise for me what you can do with them and what you may not do without my permission. Remember this overview for our next conversations. For now, only make proposals; do not send, publish or delete anything without my explicit confirmation.”
If your AI program has a memory or project function (such as Claude Projects or ChatGPT memory), put this overview and your working agreements there. Repeat the question now and then, for example after an update of Autorespond: new functions appear in the connection automatically.
Tips #
- Start with read-only rights and only extend them once you have been working comfortably for a few weeks.
- Use a separate application password per AI program, so you can revoke one of them.
- Not sure whether something happens the way you want? First ask the AI for an example or preview (many connections have a separate function for that, such as rendering an email or a dry run).
- Is a connection not working? Check whether the switch is on, whether the application password still exists, and whether the user has the right permissions. For the knowledge base connection there is a Connection health check on the MCP page.


