Managing and adding contacts #
Your contacts are the heart of your Autorespond CRM. This is where you manage all contact details, add new contacts and keep an overview of your customers and prospects. Contact management is the basis for all your email marketing activities, from newsletters to automated follow-up campaigns.
In your Autorespond admin, go to CRM & Emails → Contacts to view and manage your contact list. Here you see every contact that entered your system through forms, imports or manual entry.
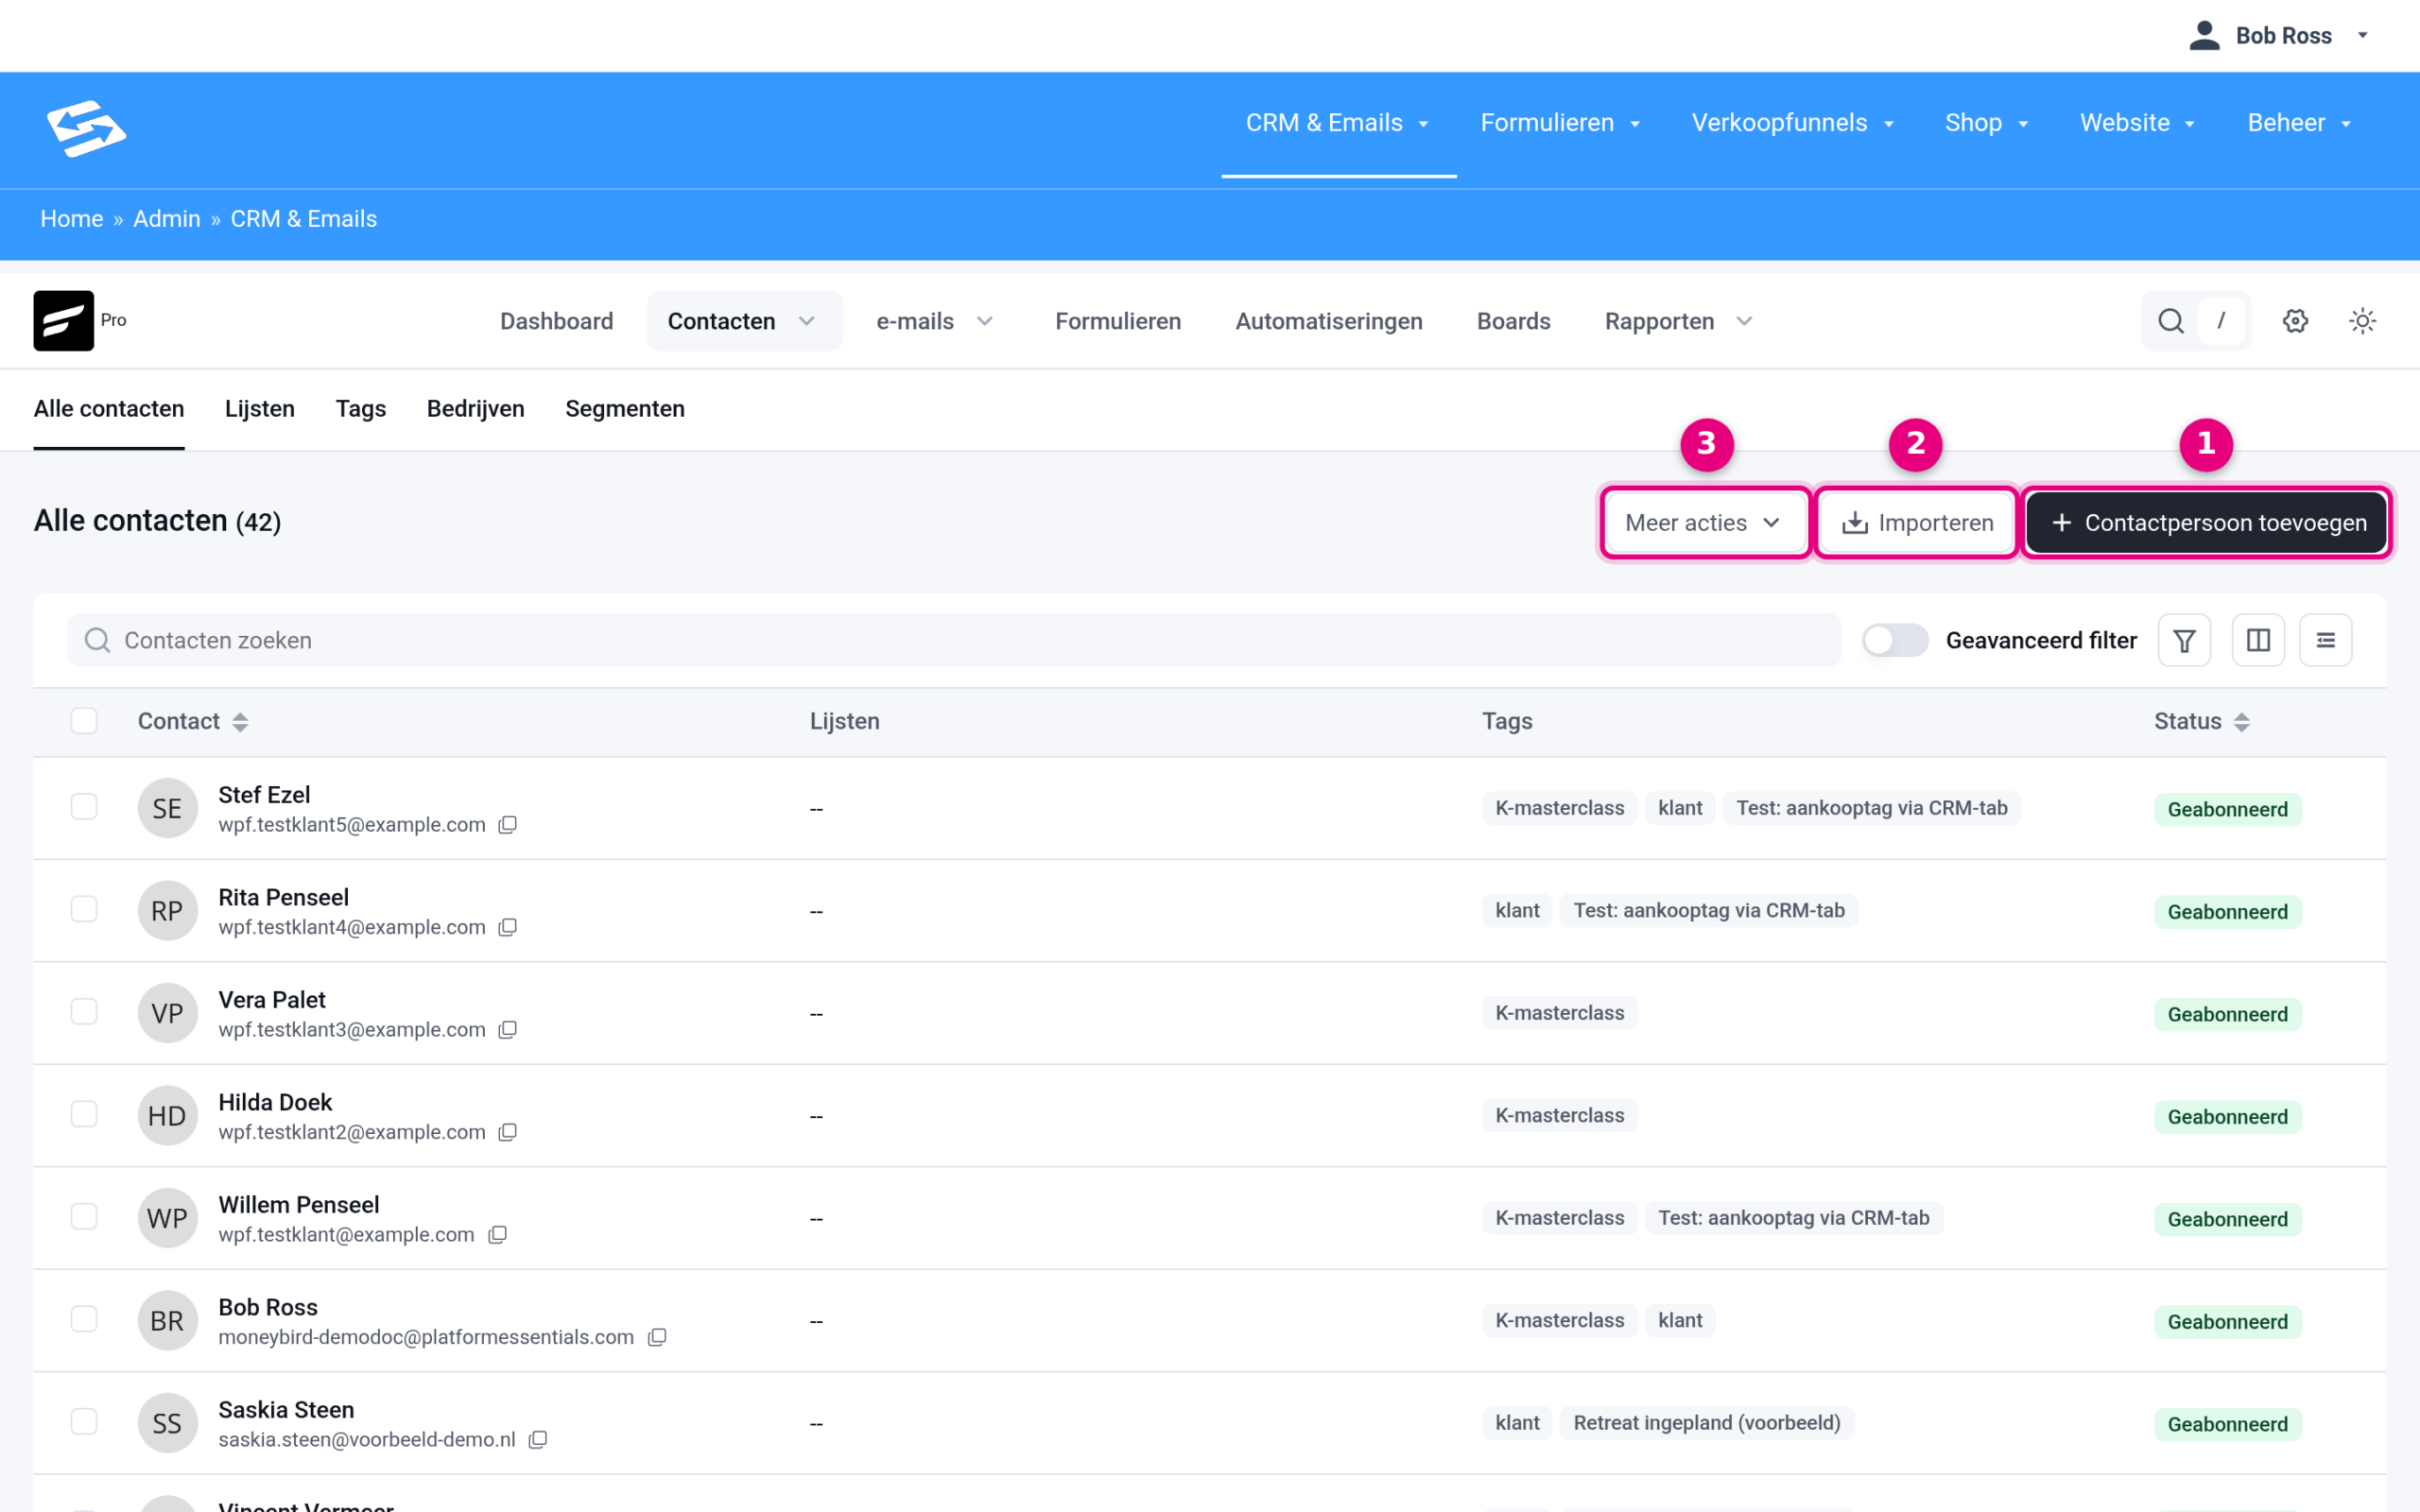
- Add contact: add a new contact manually.
- Import: import contacts from a CSV file or another system.
- More actions: exporting your contacts, among other things.
Adding new contacts manually #
Do you want to add a contact manually? Click the Add contact button in the top right. A form opens where you fill in the details:
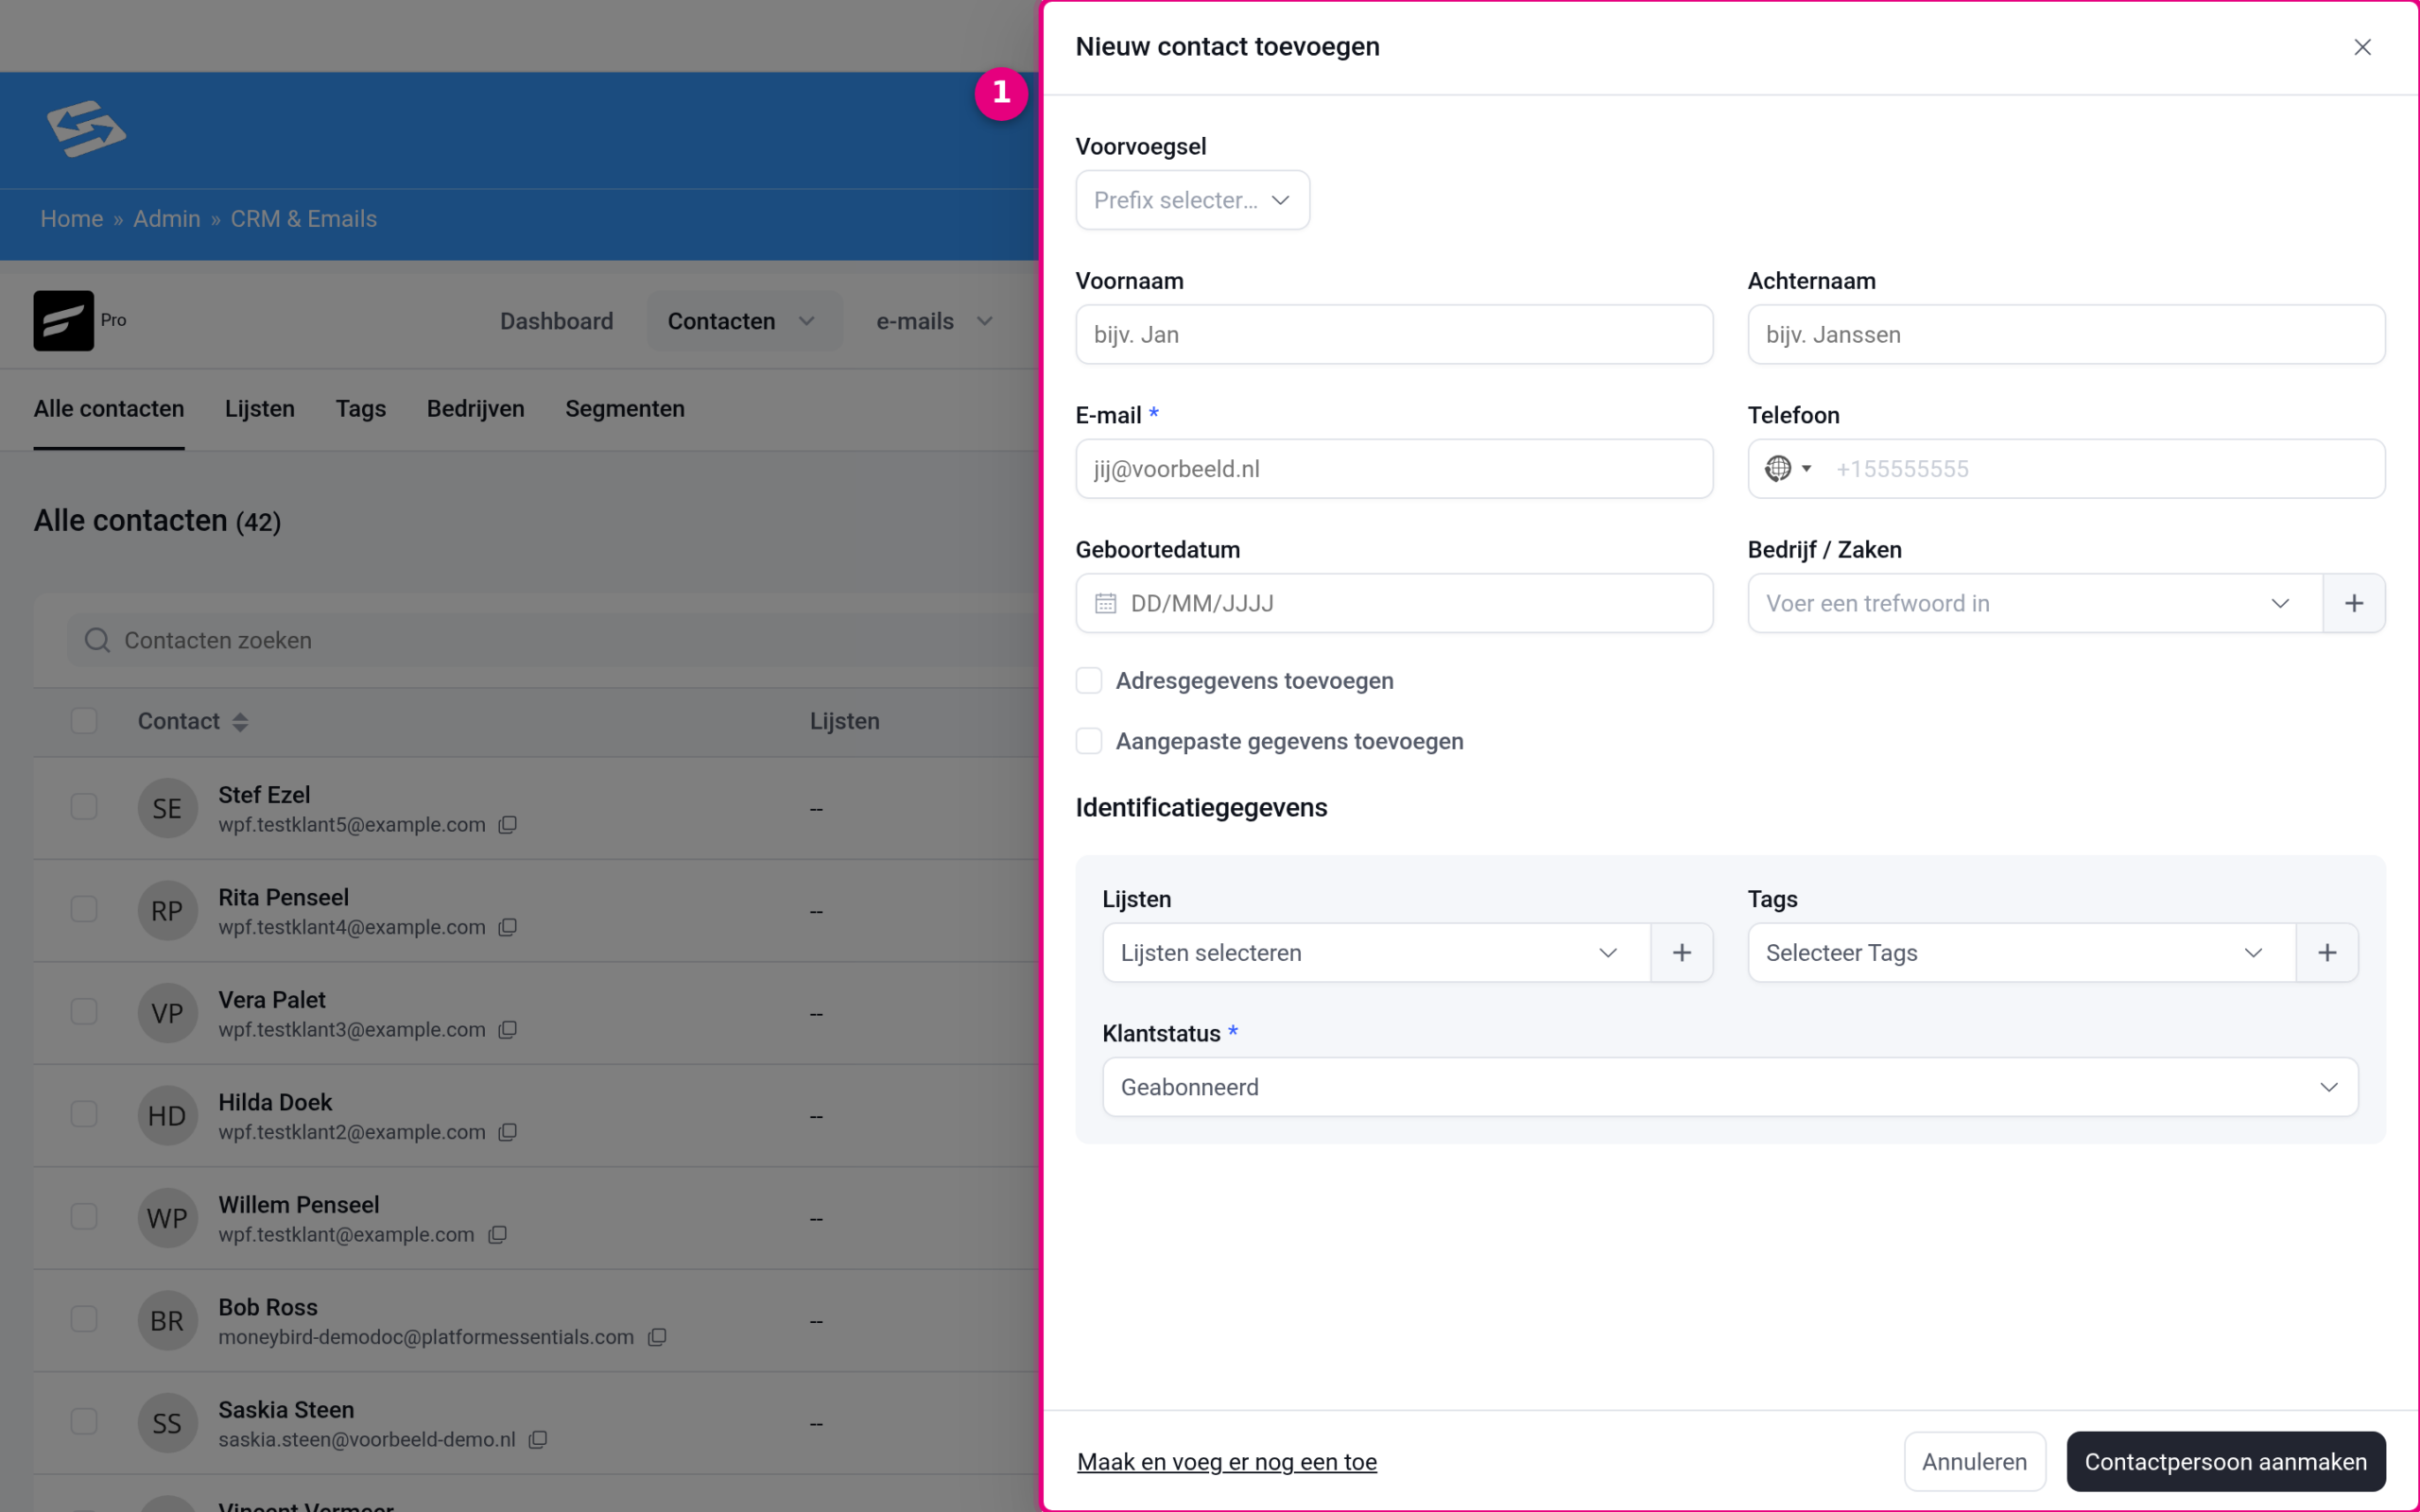
- Add new contact: fill in at least the email address (the unique identifier of every contact) and preferably the first and last name separately, for better personalisation. The Add address details and Add custom details checkboxes expand extra fields. Under Identification details you add the contact straight to lists and tags and choose the Customer status (default: Subscribed). Then click Create contact, or use Create and add another if you are entering several in a row.
Where possible, also fill in additional fields such as phone number or company name. You can use this information later for segmentation and personalisation of your emails.
Setting the contact status #
Every contact has a status that determines whether they receive emails from you:
- Subscribed: receives all your emails.
- Pending: waiting for confirmation through double opt-in.
- Unsubscribed: no longer receives marketing emails.
- Bounced: the email address cannot be reached.
- Complaints: has marked an email as spam.
- Transactional: receives only transactional emails (such as order confirmations), no marketing.
Set new contacts to Subscribed by default, unless they still have to confirm their sign-up through double opt-in.
Importing contacts from external sources #
Do you have contacts in another system? The Import button lets you upload CSV files, among other options. Make sure your CSV file has clear column headers (Email, First name, Last name, and so on) and that all imported contacts have given explicit permission for email marketing.
Please note: only import contacts who have been in touch with you recently. Old, inactive contacts can damage your mail reputation if they mark your emails as spam.
Managing and updating contact details #
Click a contact name to open the profile. At the top you see the basic information with lists and tags; below that you find tabs with everything that is known about this contact:
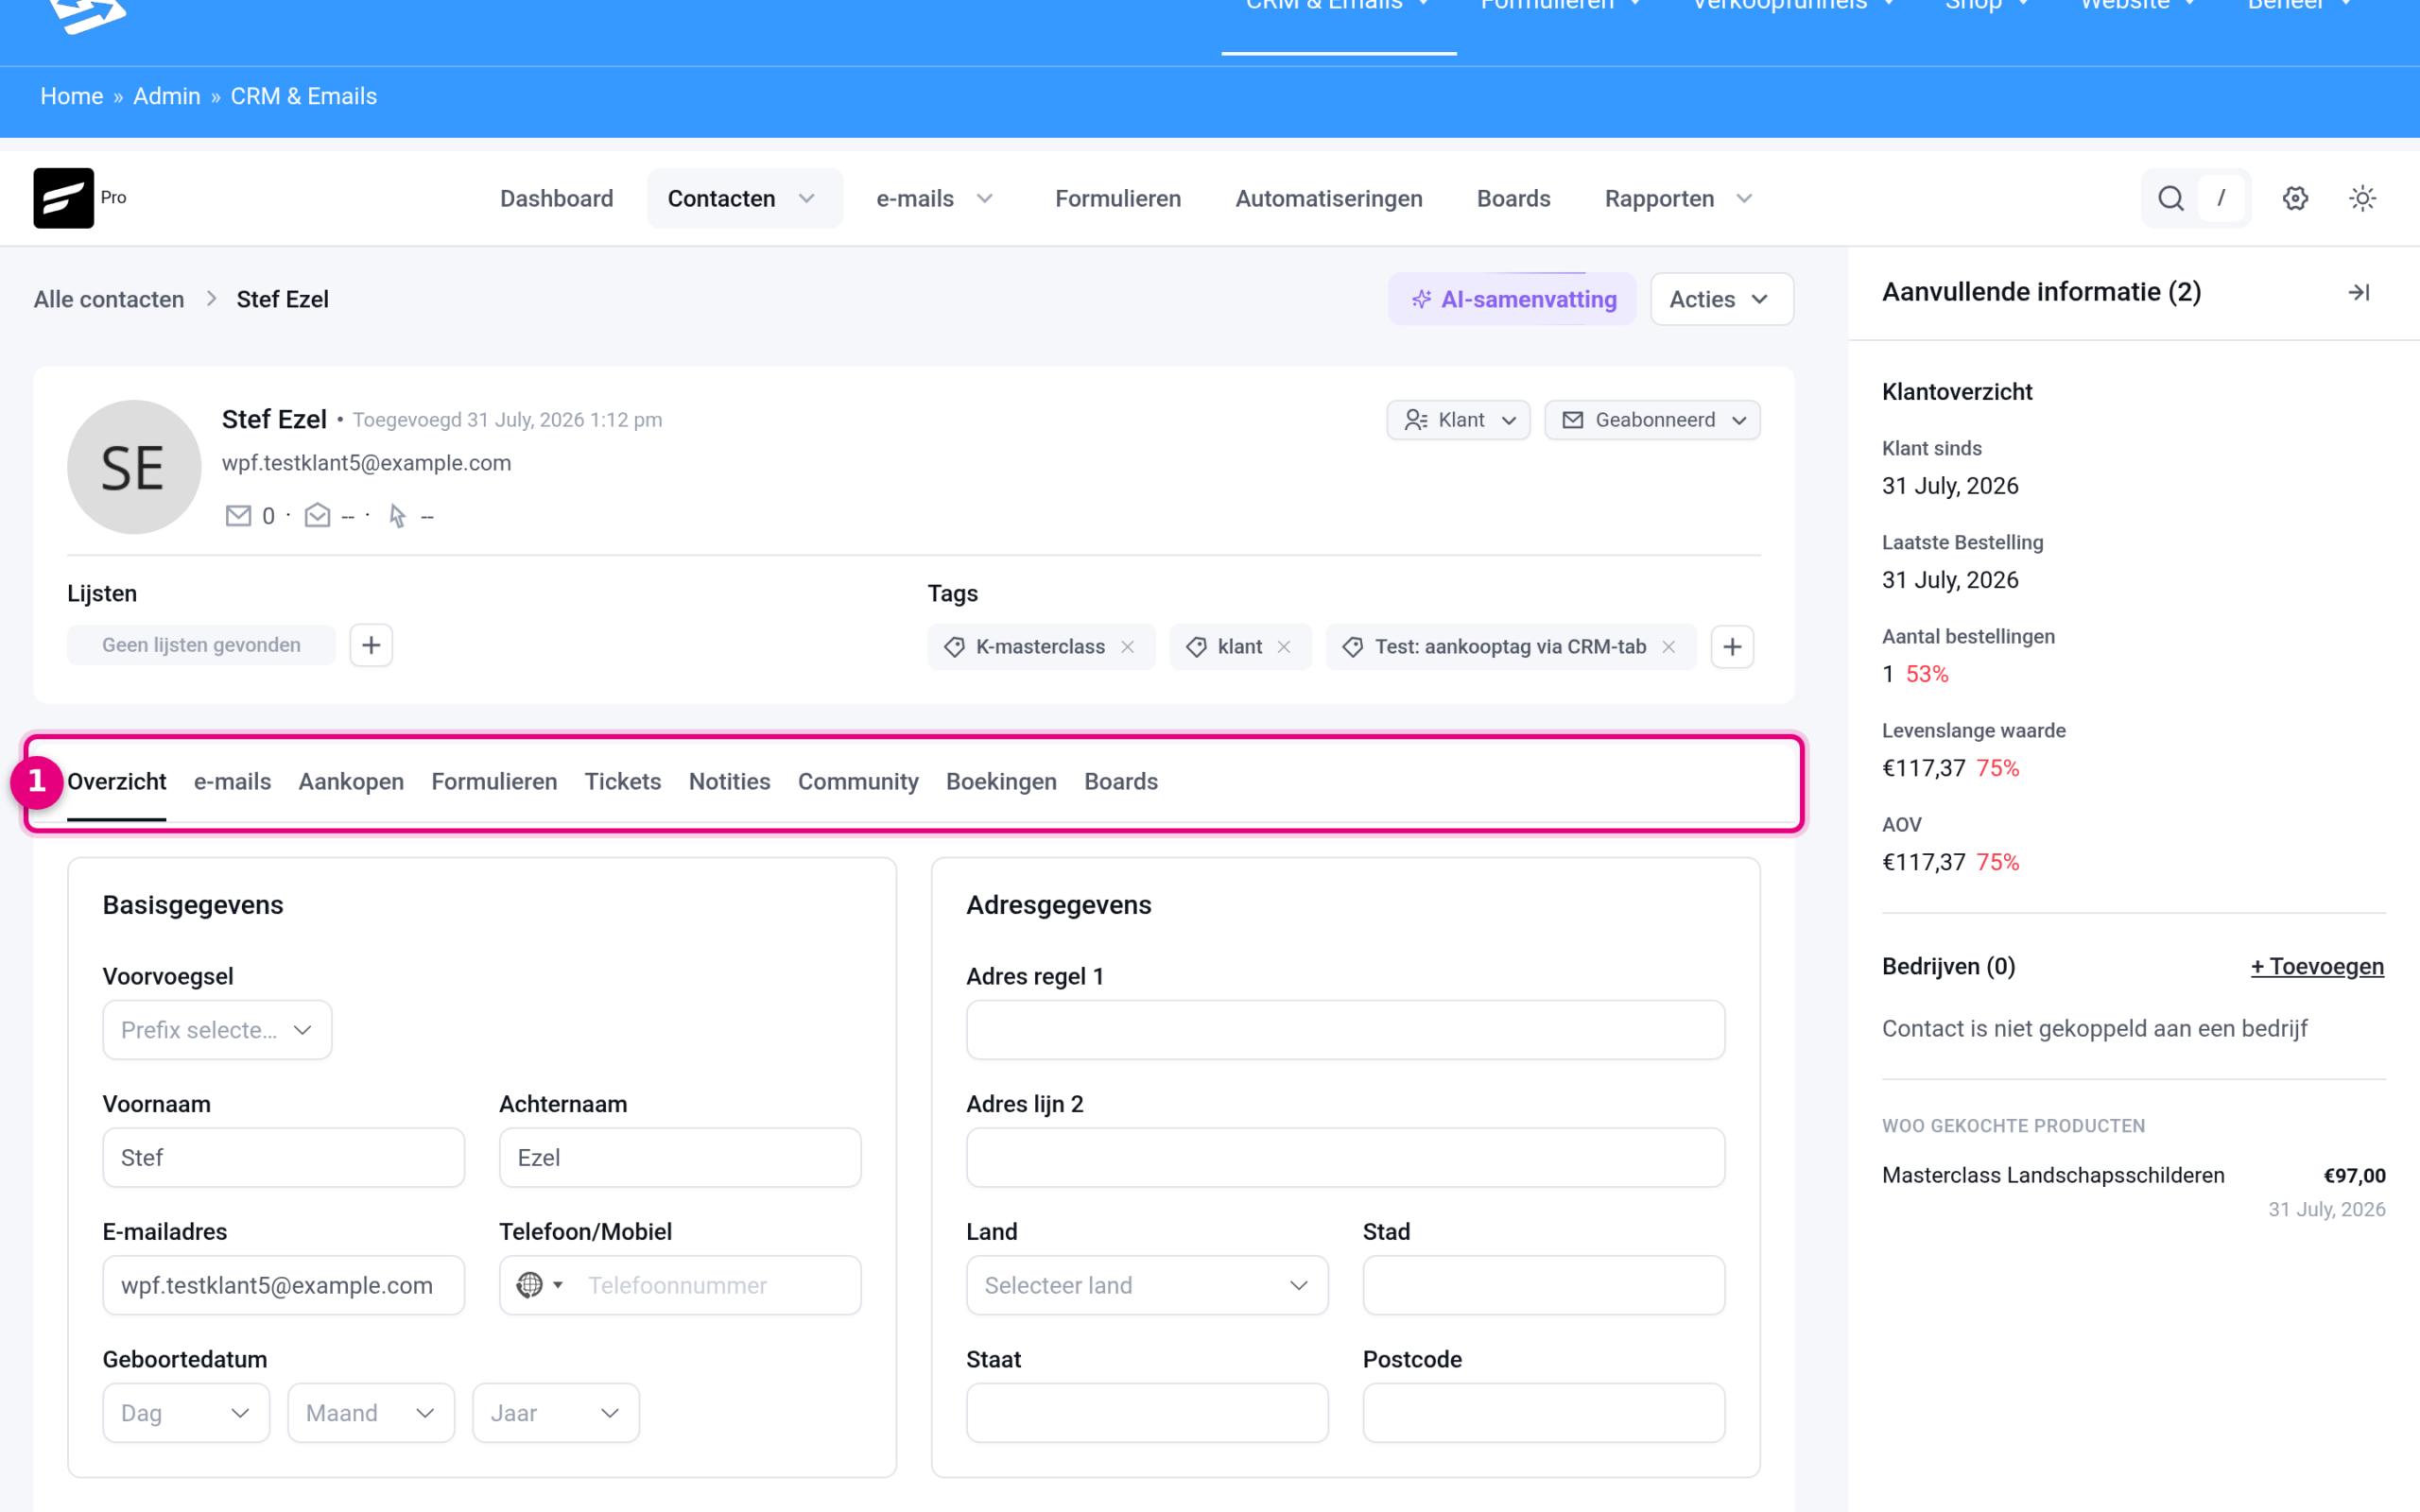
- Tabs in the contact profile: Overview (edit details), emails (which campaigns this contact received, with opens and clicks), Purchases, Forms (submissions), Tickets, Notes (for internal use) and, depending on your modules, Community, Bookings and Boards.
From the Overview tab you can update all details, add the contact to other lists, assign tags or make notes. The right-hand column shows the customer summary, including the number of orders and the amount spent.
Deleting contacts #
You delete a single contact from the contact profile:
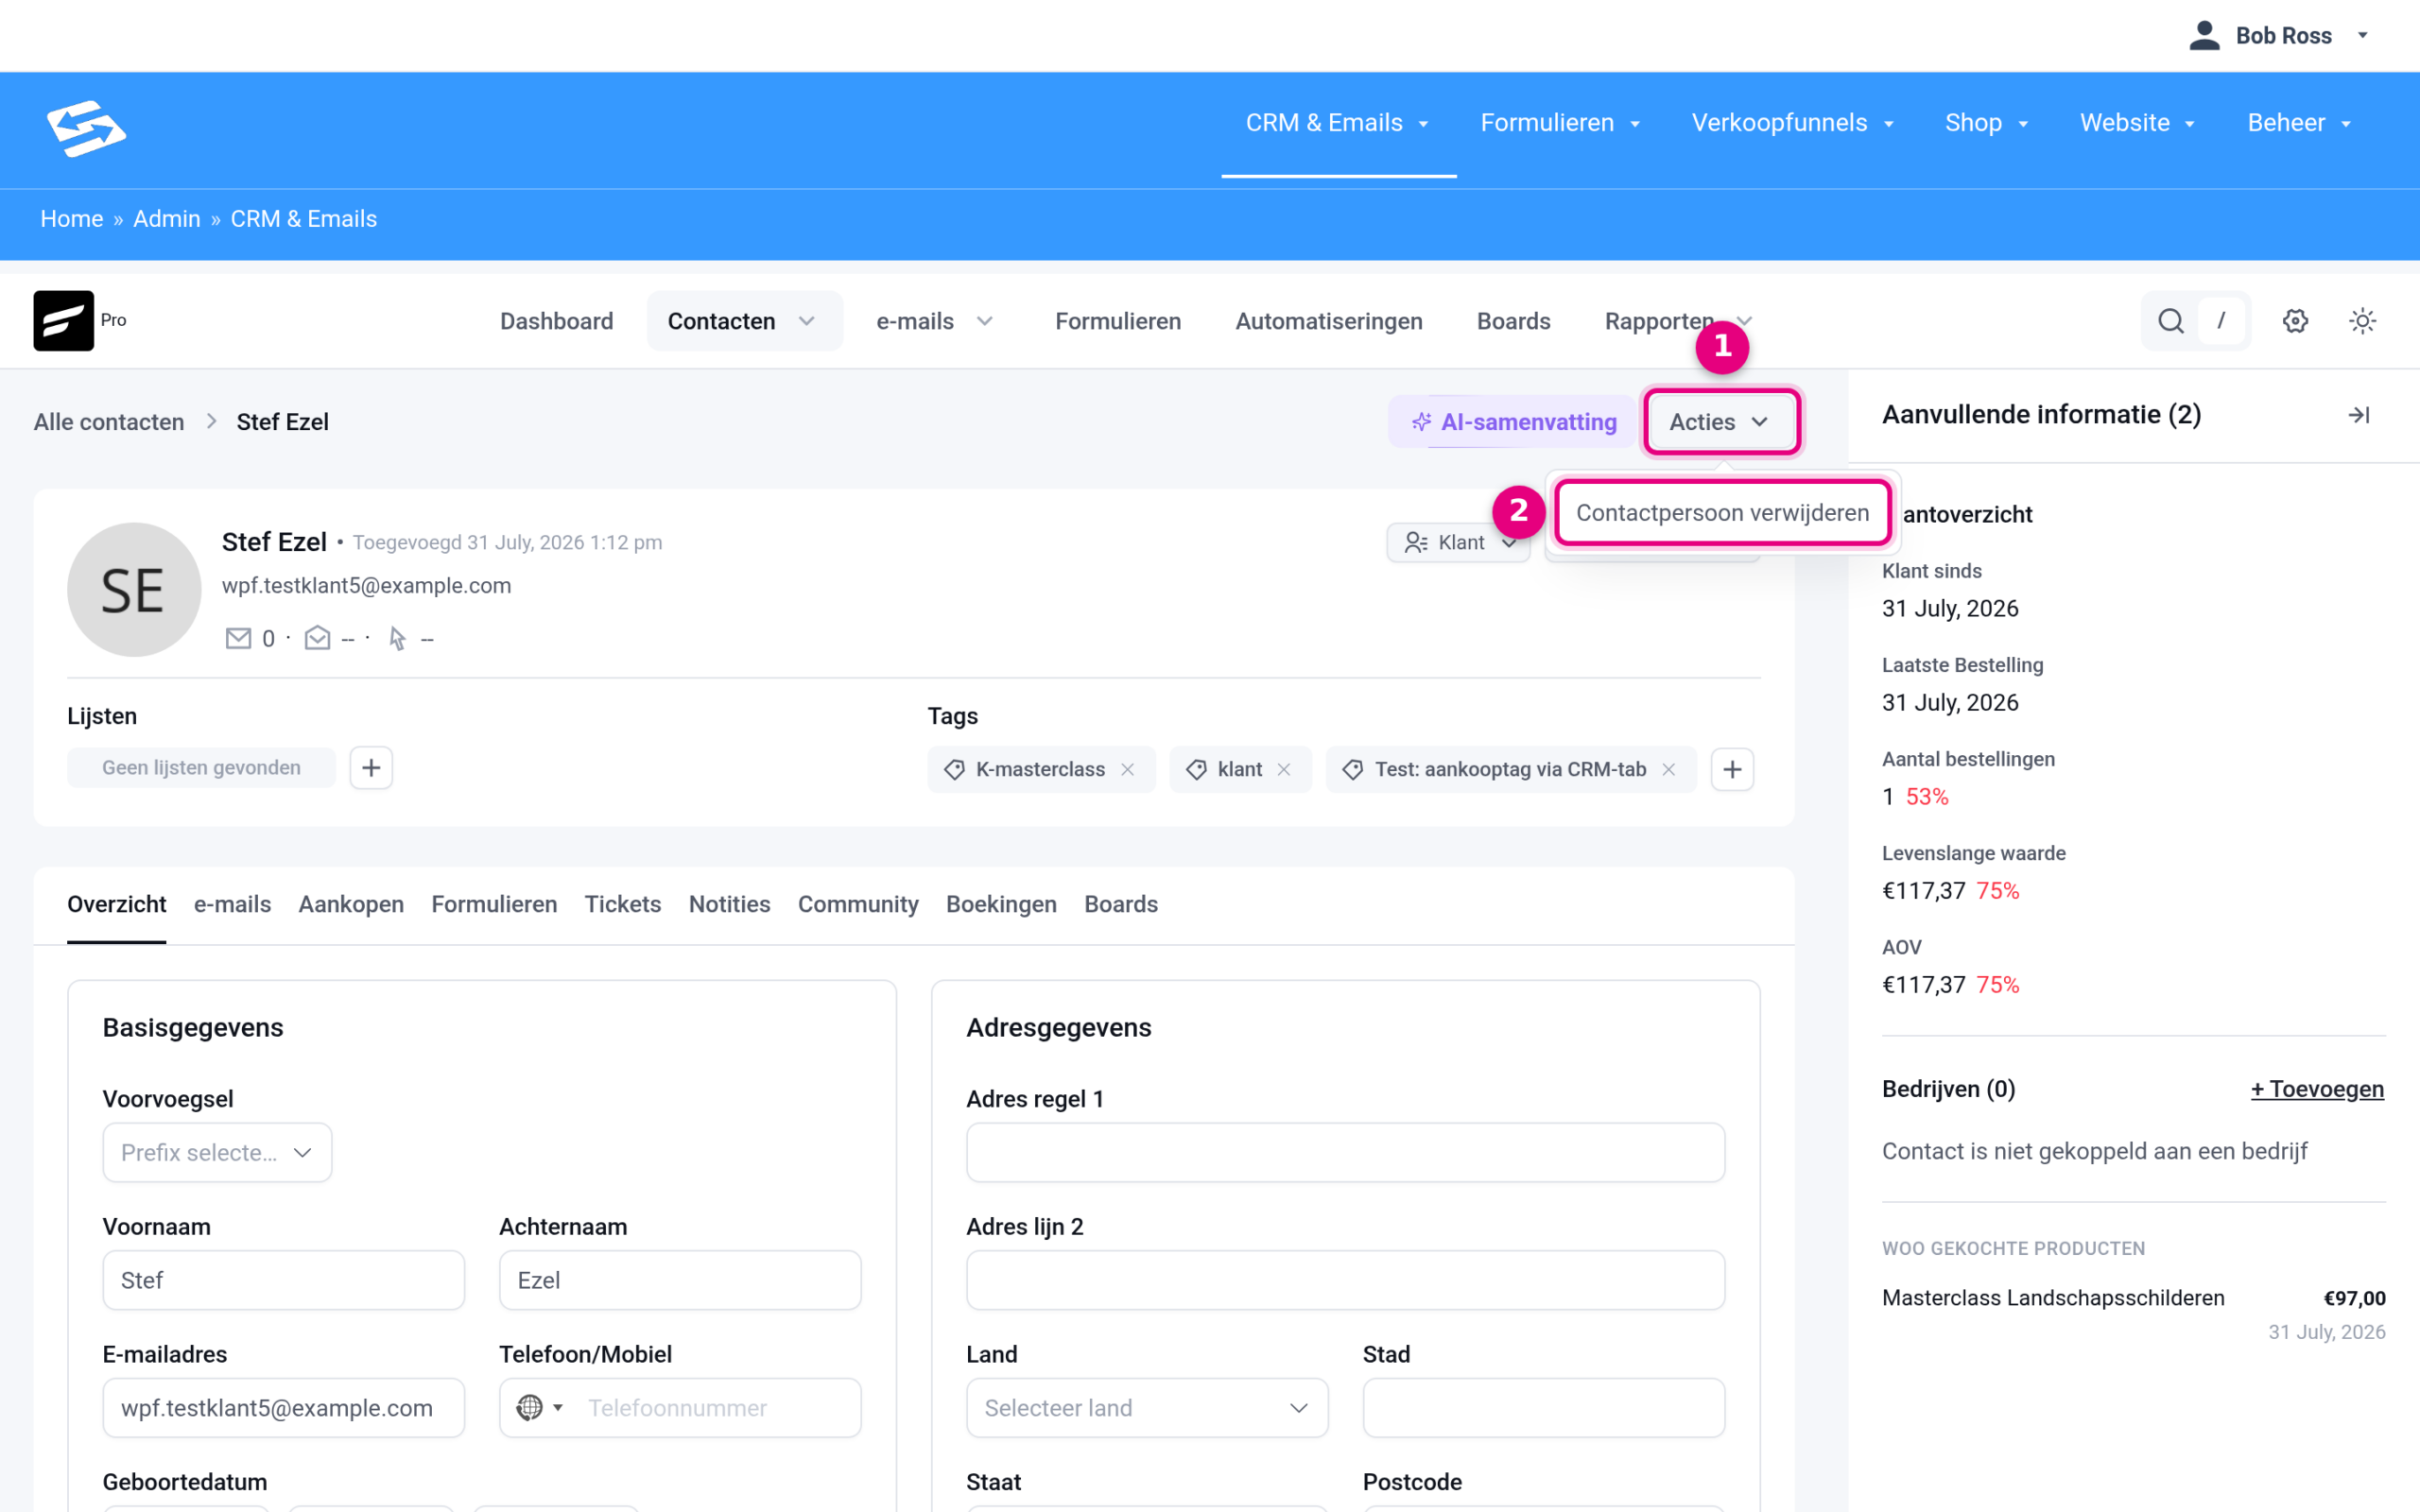
- Click the Actions button in the top right of the profile.
- Choose Delete contact and confirm.
You delete several contacts at once from the overview. As soon as you tick contacts, a black action bar appears at the bottom of the screen:
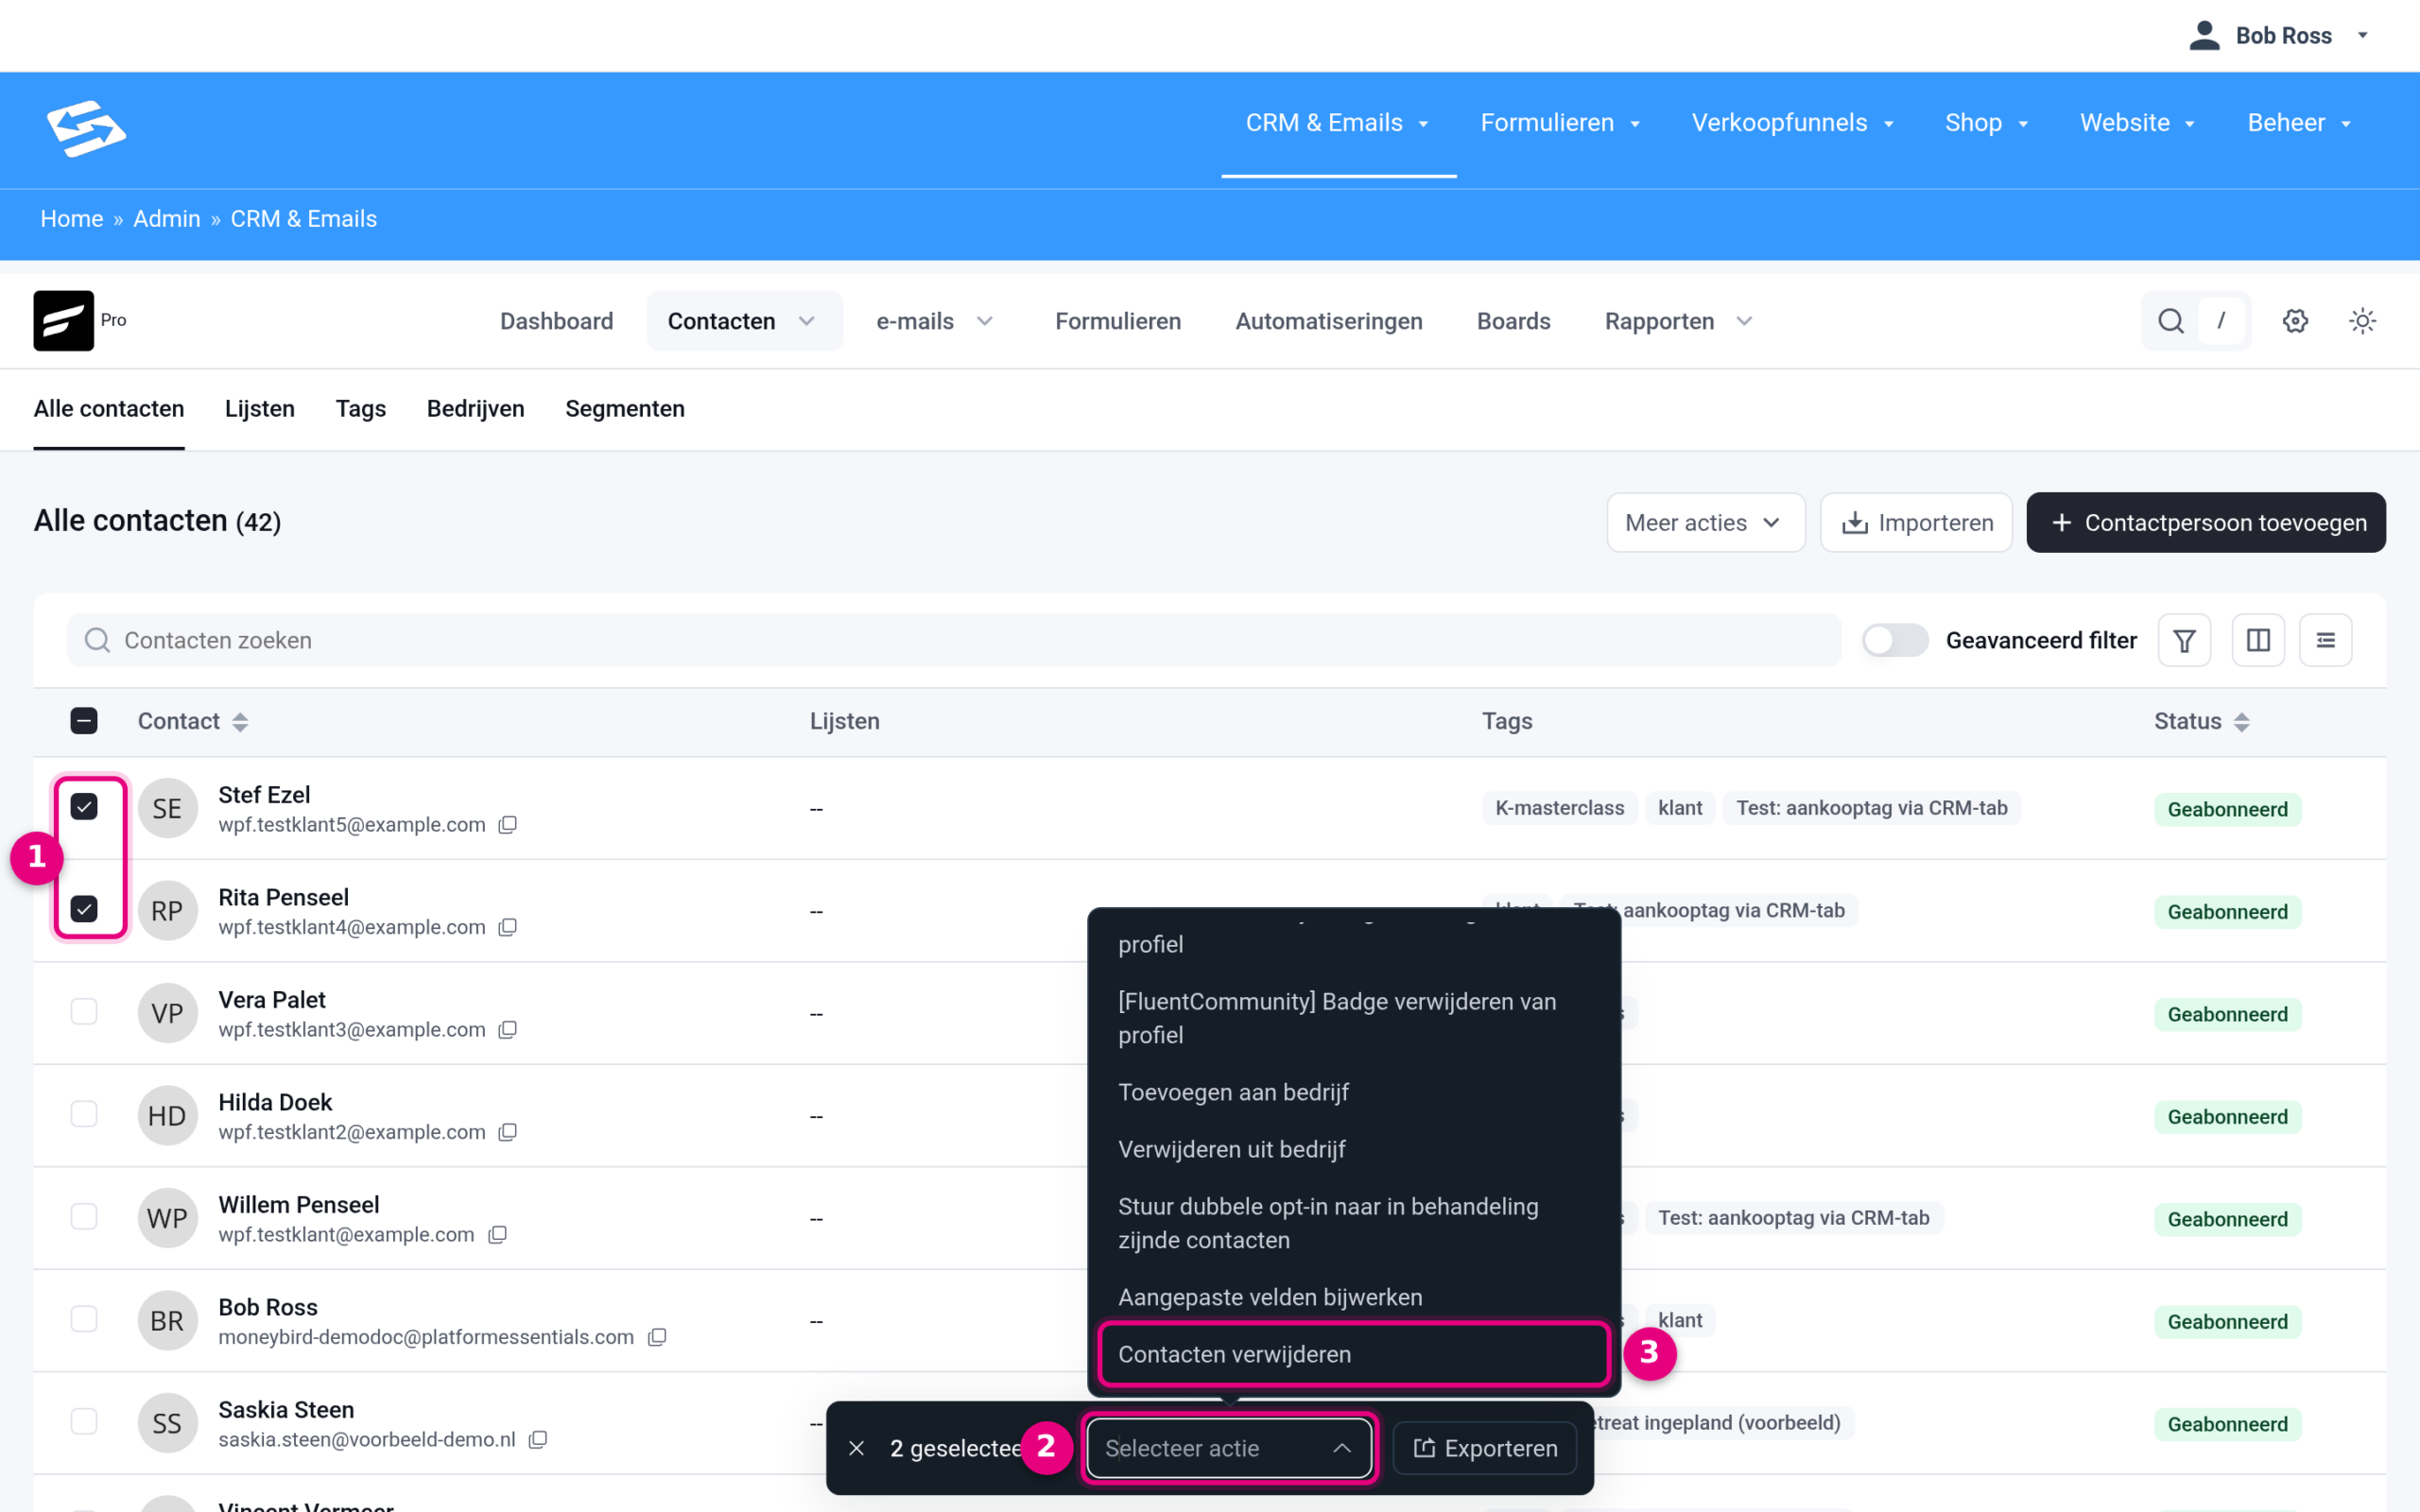
- In the overview, tick the contacts you want to delete (or use the top checkbox to select the whole page).
- Click Select action in the action bar at the bottom.
- Choose Delete contacts at the bottom of the list and confirm. The same list also holds other bulk actions, such as adding to lists or tags and changing the contact status.
Please note: deleting is permanent, the email history and activity of the contact are lost with it. If you only want to stop mailing someone, set the status to Unsubscribed instead of deleting the contact. Do you want to clear out large numbers at once? See also: deleting contacts in bulk.
Using custom fields #
Alongside the standard contact fields, you can create custom fields for information that is specifically relevant to your business. Think of “Company size”, “Interest” or other segmentation criteria.
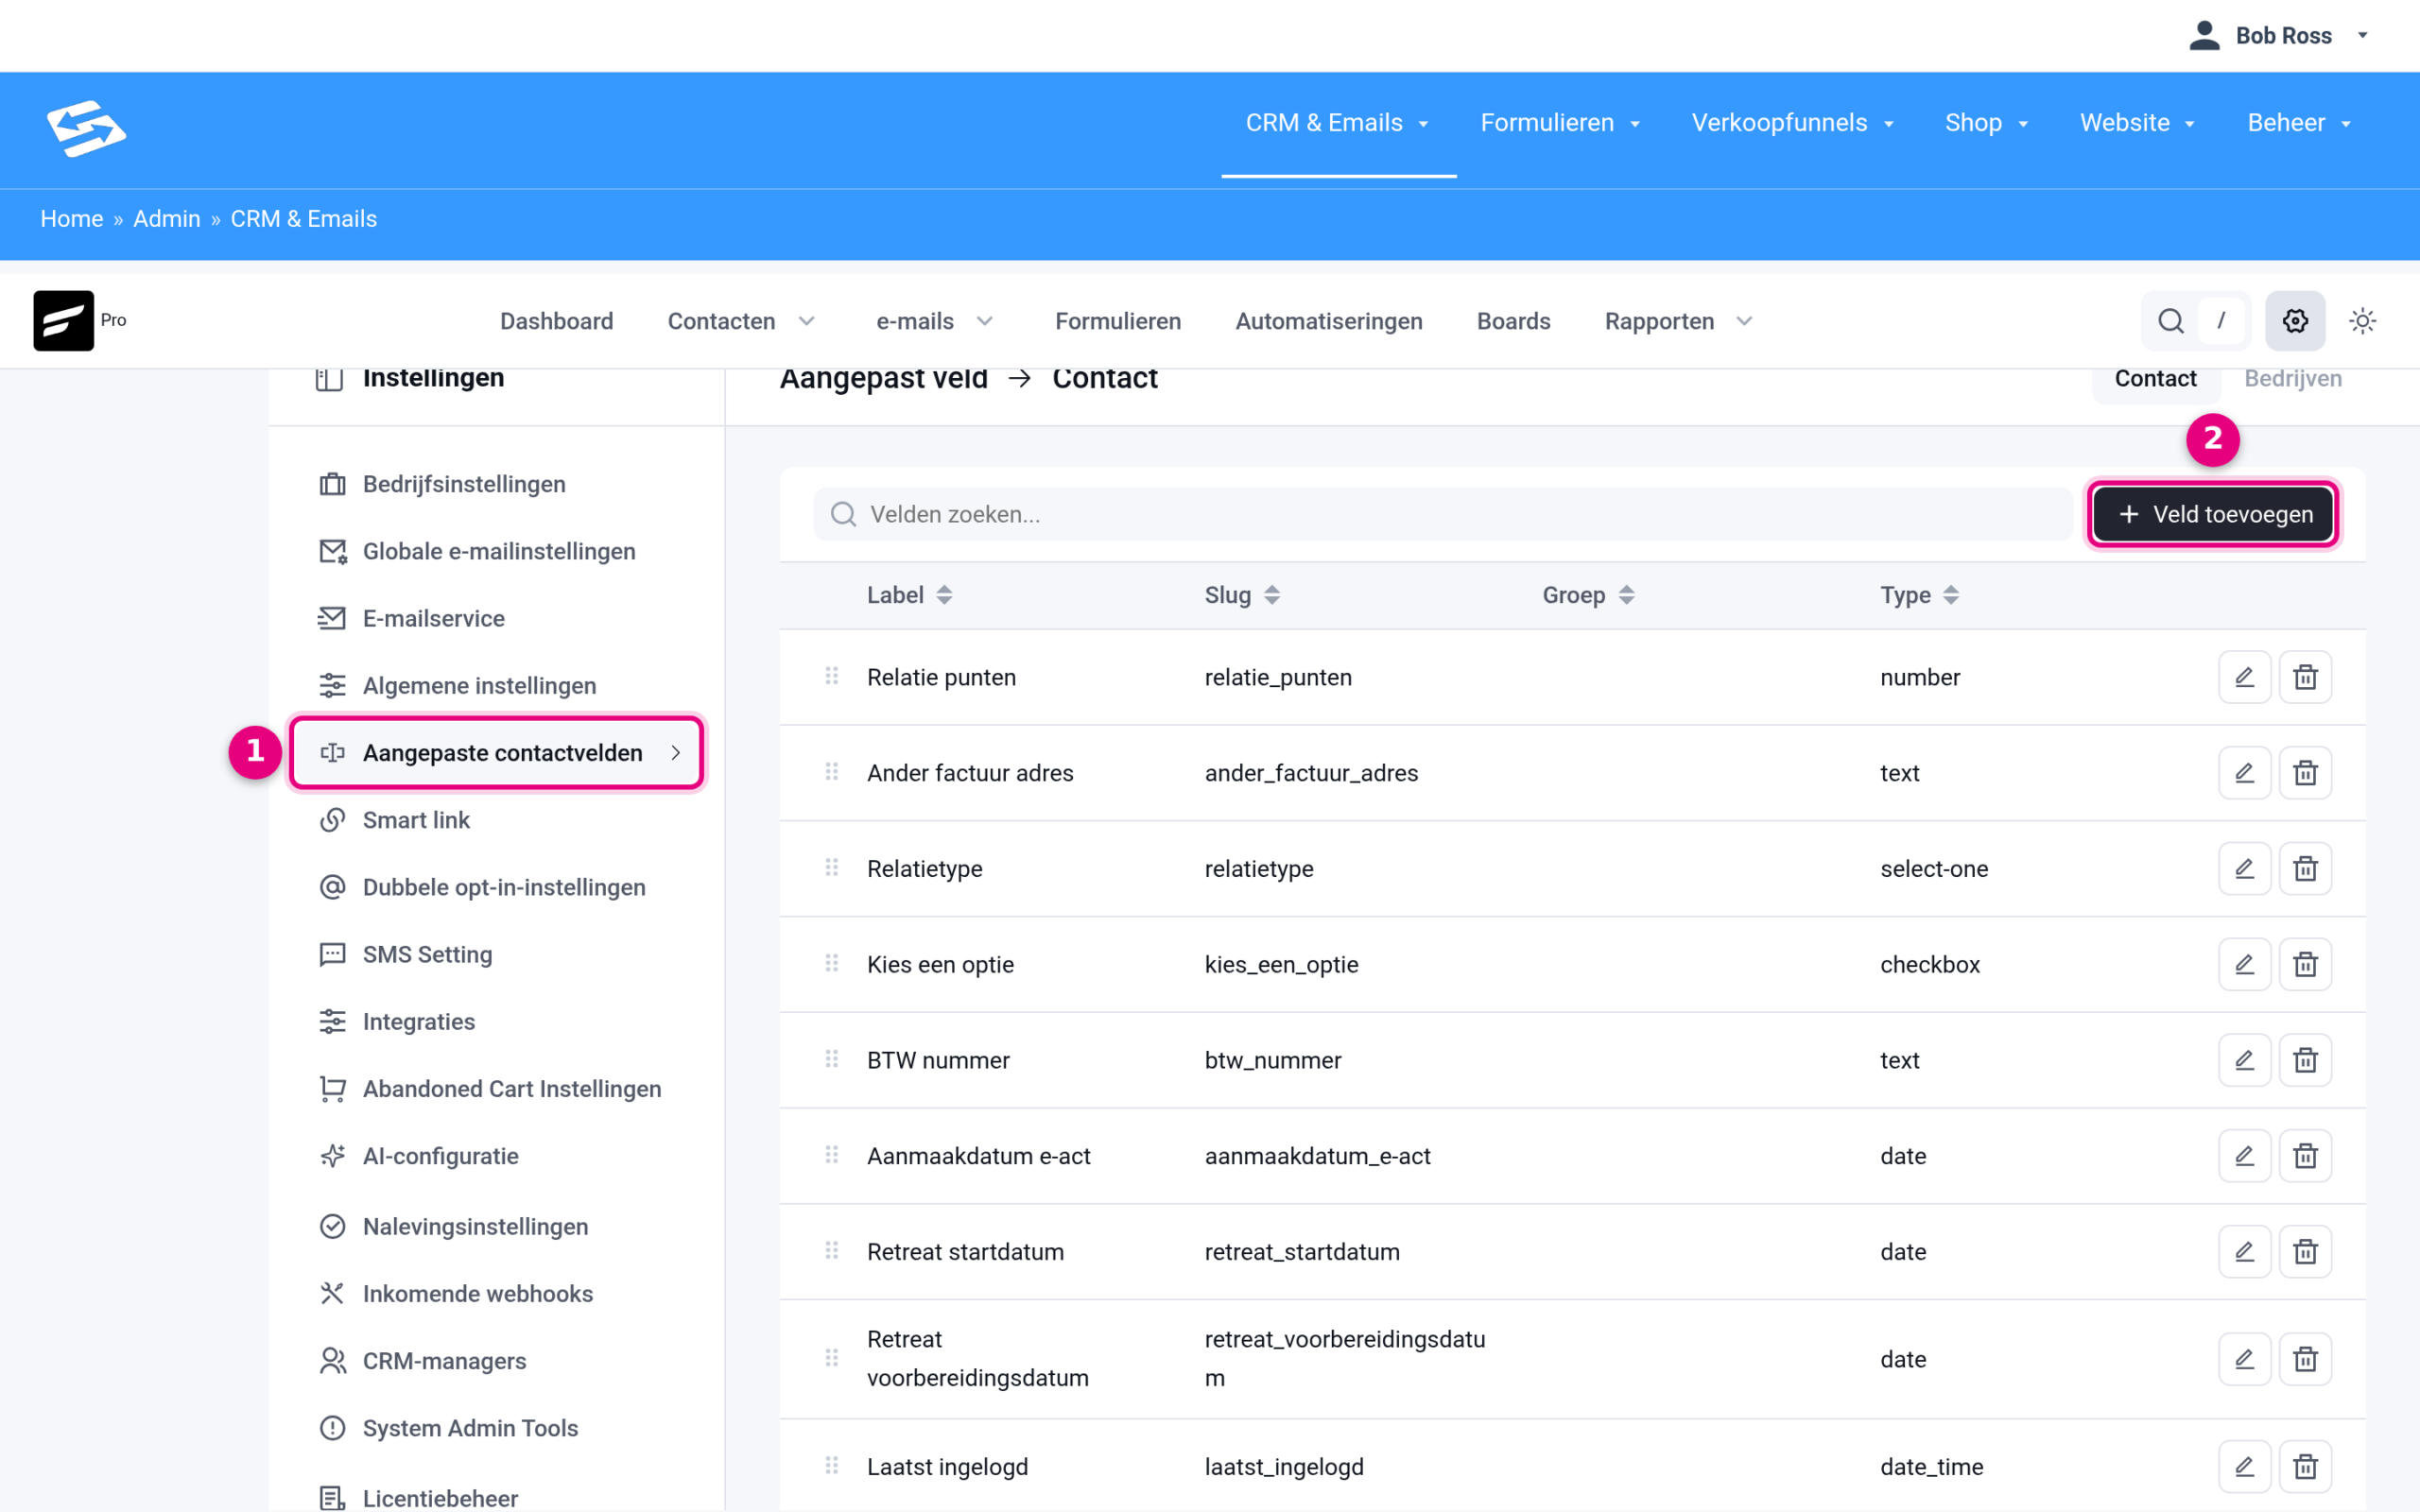
- In the CRM screen, click the cog icon (Settings) in the top right and choose Custom contact fields from the menu.
- Click Add field to create a new field. Once created, you can fill it in for every contact and use it for targeted email campaigns.
Filtering and segmenting contacts #
Use the search bar above your contact list to find a contact quickly. For targeted selections, switch on the advanced filter:
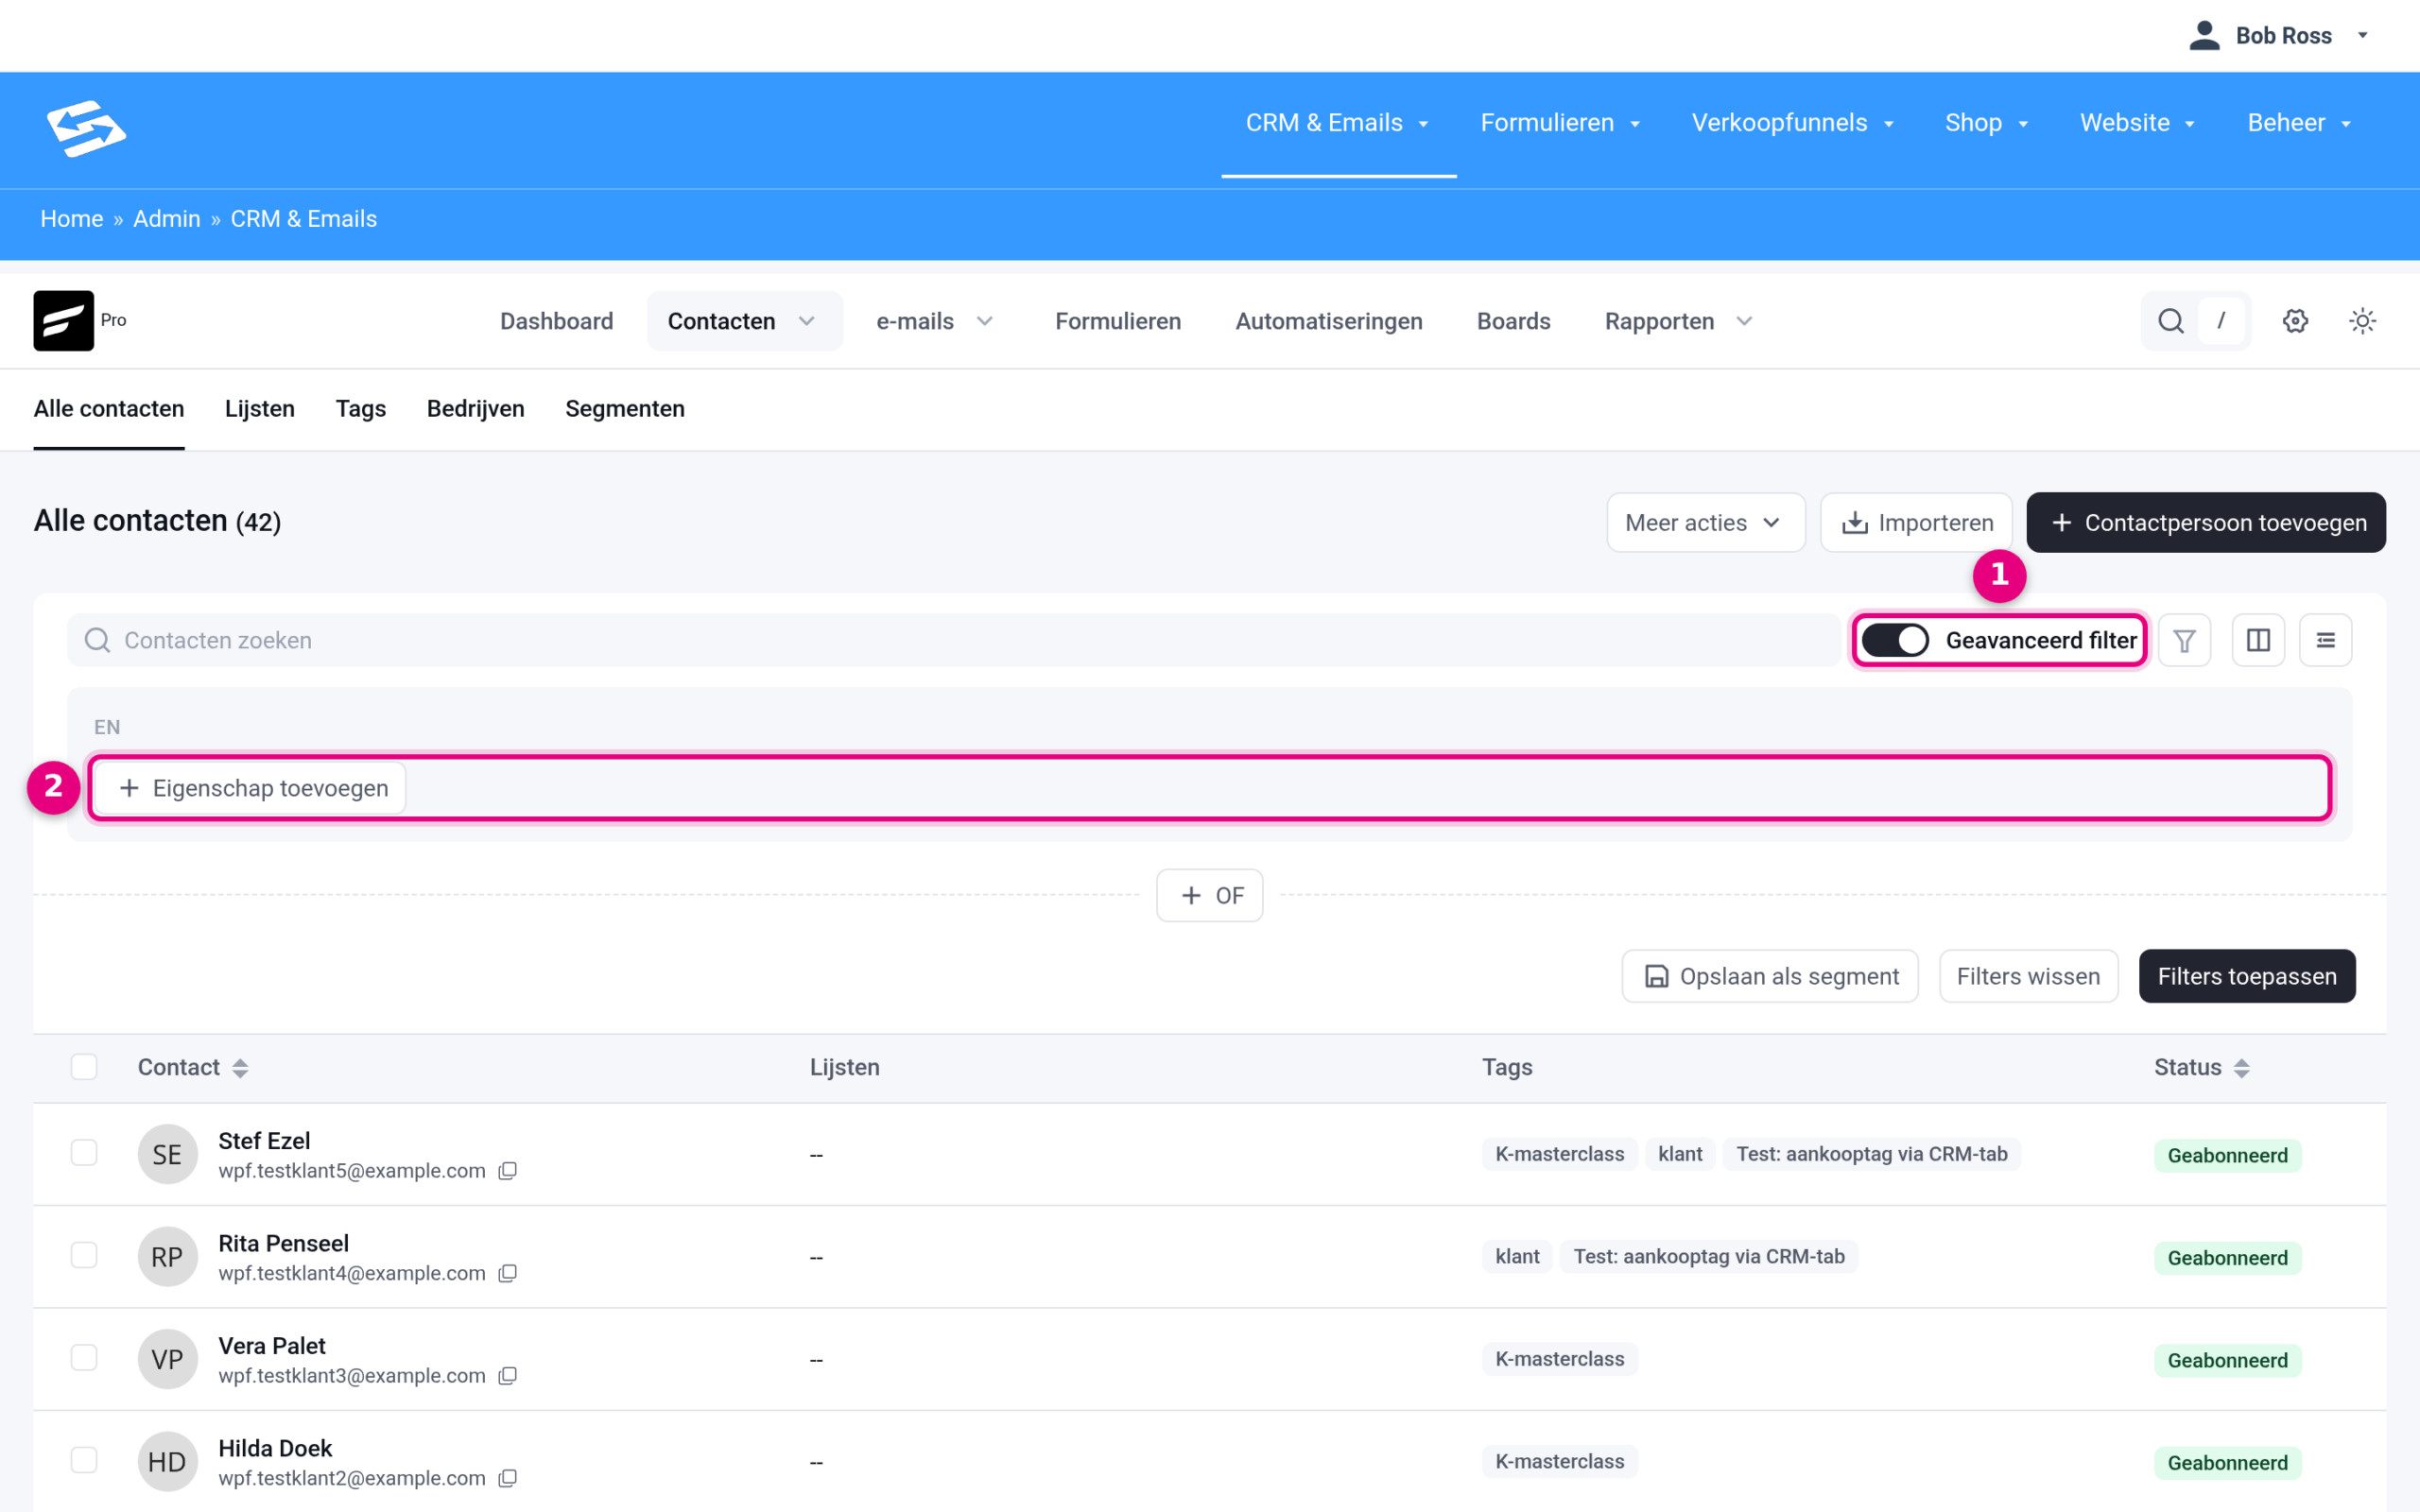
- Switch on the Advanced filter toggle, to the right of the search bar.
- Click Add property and choose what you want to filter on: lists, tags, status, activity, purchases, custom fields and more. You can combine conditions with AND/OR. Save useful selections with Save as segment; apply them with Apply filters.
This way you can mail only contacts who were active in the past 3 months, for example, or send an offer to customers with a specific tag. The columns icon to the right of the filter adds extra columns to the overview, such as Last activity or Created date.
Organising contacts with lists and tags #
Lists and tags are your most important tools for organising contacts. You find them through the tabs at the top of the contacts screen:
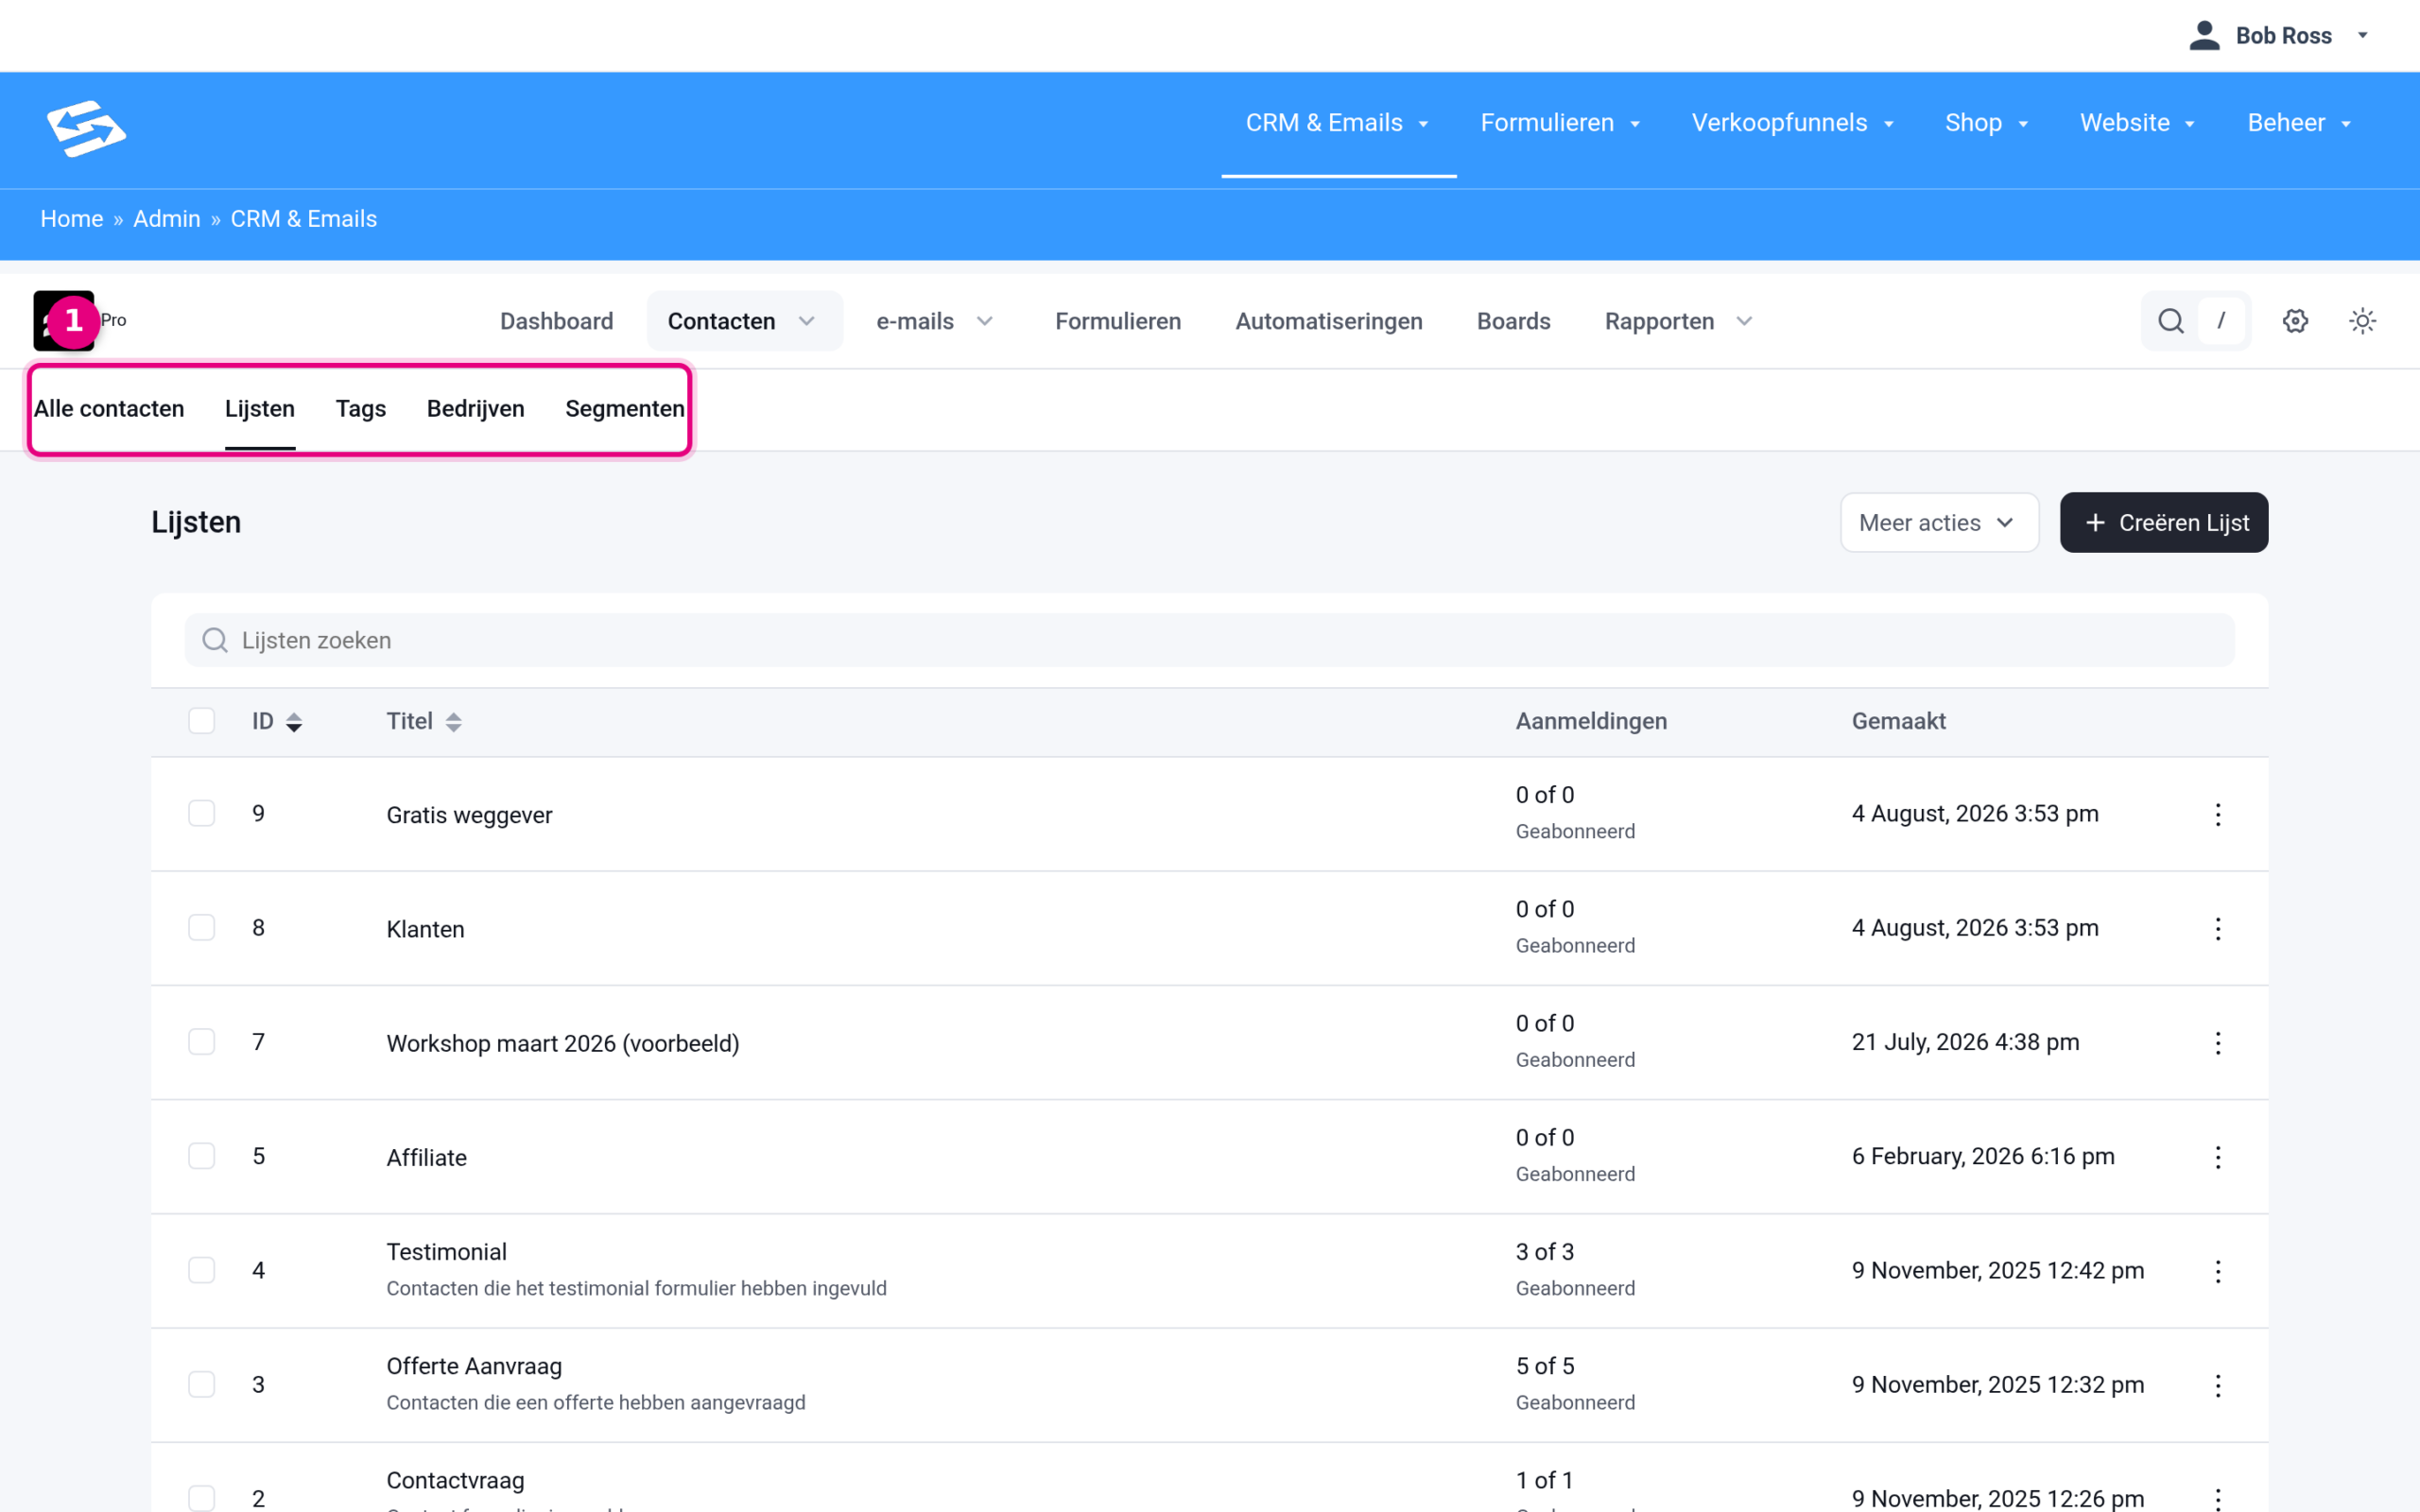
- The Lists, Tags, Companies and Segments tabs are where you manage your groupings. For each list you see the number of sign-ups straight away; with Create List you add a new one.
Lists are for broad categories such as “Newsletter subscribers”, “Customers” or “Prospects”. A contact can belong to several lists at the same time.
Tags are for specific characteristics such as “Interested in product X”, “VIP customer” or “Requested a demo”. Tags are more flexible than lists and ideal for detailed segmentation.
Add contacts to lists and tags from their profile, or use the bulk actions in the overview (tick contacts → action bar at the bottom) to edit several contacts at once.
Cleaning up inactive contacts #
Keep your contact list healthy by clearing out inactive contacts regularly. Contacts who do not open or click your emails for months can damage your mail reputation and increase your costs.
Use the advanced filter to find contacts that have shown no activity for more than 6 months. Consider deleting them or putting them on a separate “inactive” list. See also the documentation on deleting contacts in bulk.
Contact management in Autorespond is based on FluentCRM, included in your package. Read the FluentCRM documentation


