Sharing your booking link: one service or all your services on one page #
The Appointments module is an optional extension you can add to your Autorespond package. This module lets people book appointments online, comparable to Calendly. More information about this module
In the Appointments module two kinds of link exist side by side: a link to one specific booking type (for example only your introductory call) and a link to the page of your whole calendar, where visitors choose from all your services themselves. That is exactly where it often goes wrong, certainly when you have cloned and adjusted a booking type: you then copy the link of the original or of the whole calendar by mistake. This article shows you step by step where each link comes from, how to check that you have the right one, and how to put all your services neatly on one page.
1. The two levels: the booking type and the calendar of the host #
The module works with two layers. At the top sits the host (also called the calendar): the person or the room that is being booked. Underneath that host sit the booking types: the individual services someone can book with you, each with its own duration, its own questions and its own link.
- Link to one booking type: the visitor lands straight in the calendar of that one service and only picks a date and time. The link takes the form
https://yourdomain.com/?fluent-booking=calendar&host=hostname&event=booking-type-slug. You recognise it by the&event=part at the end. - Link to the host or calendar: the visitor first sees an overview of all your booking types and chooses from it. That link takes the form
https://yourdomain.com/?fluent-booking=calendar&host=hostname, so without&event=.
You find both links on the same screen, but through a different button. Go to Manage → Appointments and click the Calendars tab. You then see a block for each host with all its booking types below it as separate cards.
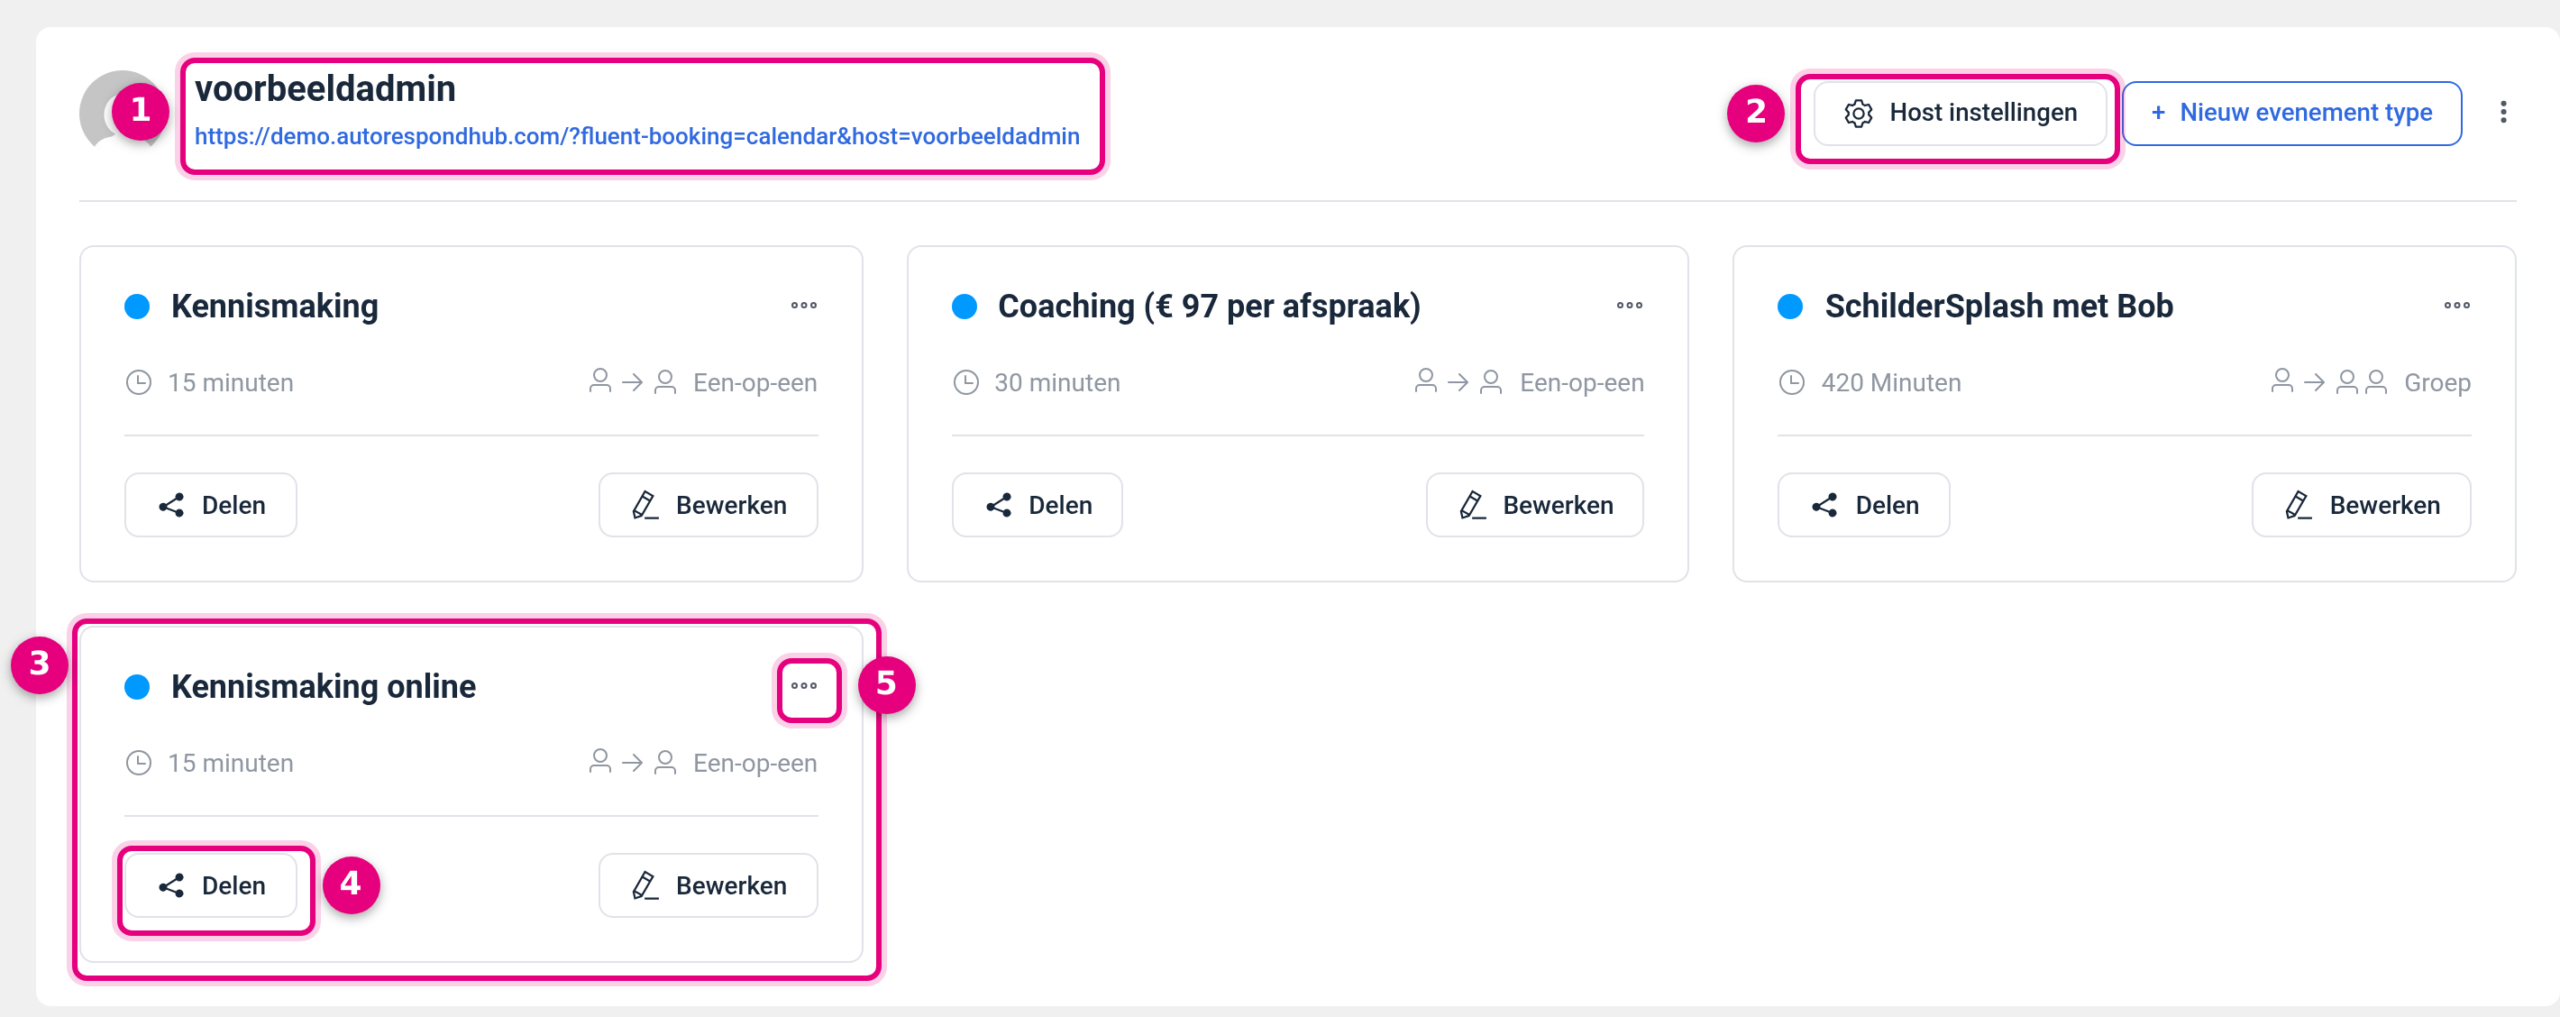
- Name of the host with the calendar link below it. This is the page that holds all your booking types together. You can select and copy this link straight from here.
- Host settings. This opens the settings of the calendar itself: among other things the name, the time zone and the settings of the shared landing page. To the right of it sits the New event type button, with which you add an extra service to this host.
- The card of a booking type. Each card is one service and shows the name, the duration and the type (One-to-one or Group). Everything you do on this card applies to this one service only.
- Share. The button you need for the link of this booking type. Next to Share sits Edit, with which you change the content and settings of this service.
- The three dots. Behind these sit Disable, Clone and Delete. With Clone you make a copy of an existing service, which is handy when you want to offer two almost identical variants.
2. Copying the link of one booking type #
To share one service, for example in an email or in your signature, get the link like this:
- Go to Manage → Appointments and click Calendars.
- Find the card of the booking type you want to share. Check the name on the card, not the name of the host above it.
- Click Share on that card.
- Check at the top of the panel that the name of the right booking type is shown, with the right duration below it.
- Click the Landing page tab.
- Click Copy. You now have the unique link of this one booking type on your clipboard.
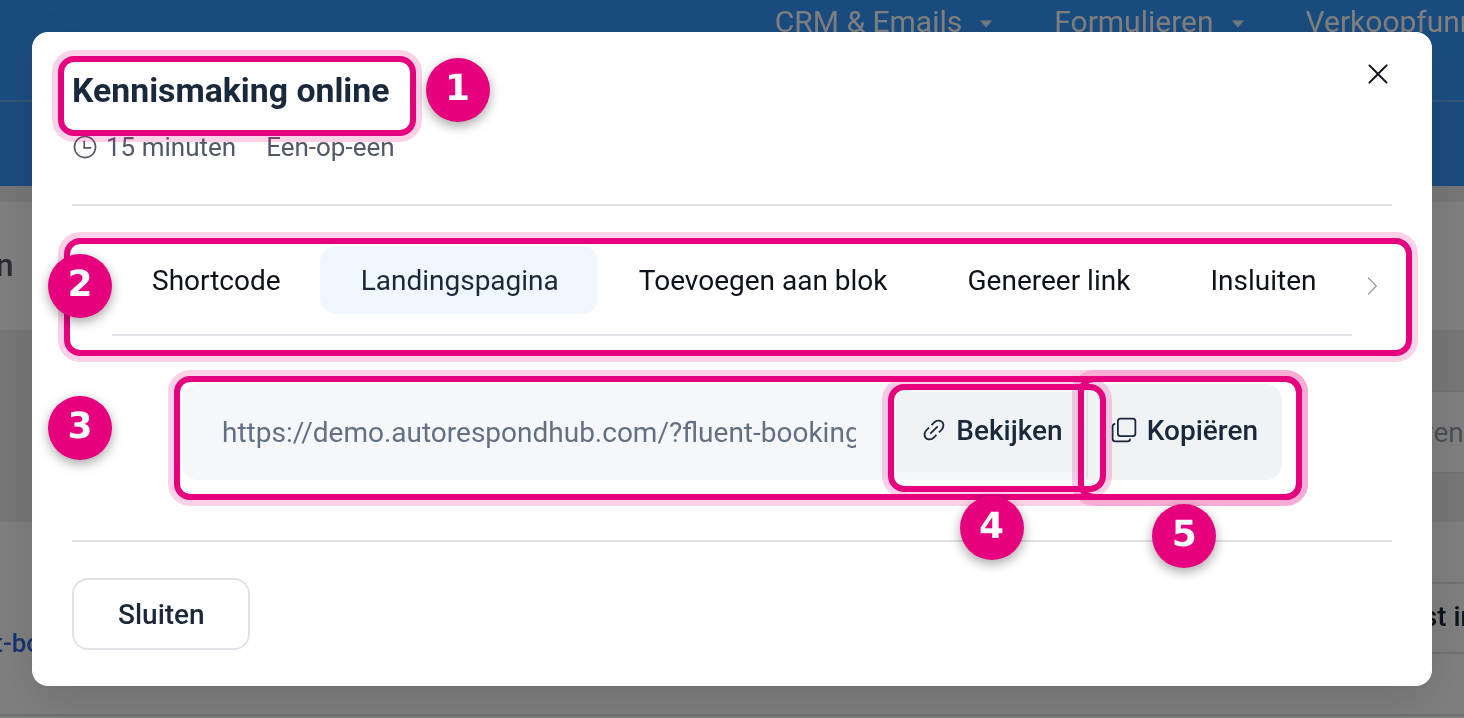
- The name of the booking type. This is your most important check: if the name of the service you wanted to share is shown here, you have the right one. If the name of the host is shown, you have the share panel of the whole calendar open.
- The tabs. A booking type has five: Shortcode, Landing page, Add to block, Generate link and Embed. The next chapter explains what each tab does.
- The address of the landing page. This is the ready-made page the module creates itself. You do not have to create anything for it in your website.
- View. Opens the page in a new tab, so you see straight away what your visitor will see.
- Copy. Puts the full link on your clipboard. Paste it into an empty document or into the address bar of your browser afterwards to check that it is the right one.
3. What the five tabs in the share panel do #
The share panel offers five ways to make the same booking calendar available. You choose one, depending on where the calendar needs to end up.
- Shortcode: a small piece of code that you paste into your own page or post inside your Autorespond environment. Use this when you want to show the calendar in your own website, for example on a Book an appointment page, with your own heading, text and styling around it.
- Landing page: the direct link to the ready-made booking page. Use this when you only want to share a link, for example in an email, in a message, in your email signature or as a button in a newsletter.
- Add to block: this places the calendar as a block in the block editor of a page. The result is the same as with the shortcode, you just place it visually instead of with code.
- Generate link: this builds a link with extra details in it. You first choose under Page type whether the link points to the Landing page or to Another page, and then fill in a Field and a Value per row under Add parameters. The Generated link appears at the bottom. Handy when you want a name and email address to be filled in beforehand from a mailing, for example.
- Embed: a piece of HTML with an iframe, meant for a website outside your Autorespond environment. Use this when you want to show the booking calendar on another site that you manage yourself.
The short rule of thumb: only a link needed, choose Landing page. The calendar on your own page inside your environment, choose Shortcode or Add to block. The calendar on an external website, choose Embed.
4. After cloning: how to be sure you are sharing the right link #
Cloning is the fastest way to create a second, almost identical service. You click the three dots on a card, choose Clone and then adjust the copy. One thing easily goes wrong here: the copy appears as a new card in the overview, often with a name that closely resembles the original. If you then click Share on the wrong card, you copy the link of the original and your visitors end up in the wrong calendar.
These three checks always keep you right:
- Check the card before you click. The Share button belongs to the card it sits on. So look first at the name and the duration at the top of that card, and only then click Share.
- Check the title at the top of the share panel. It shows the name of the booking type whose link you are getting. If the host name appears instead of the service name, you have the panel of the whole calendar open. Close it and click Share on the right card.
- Check the part after
&event=in the link. Paste the copied link into the address bar or into an empty document. Every booking type has its own unique value there: the slug. Two cloned services therefore have different slugs, even when the names are almost the same. If&event=is missing altogether, you have the link of the whole calendar instead of the link of one service.
The slug is created automatically and is not always recognisable, because it is based on the duration of the appointment. A copy of a 15-minute service can end up with the slug 15min. You can turn that into a clear name yourself: click Edit on the booking type, go to the Advanced settings tab, click Edit at the bottom under Landing page settings and enter your own text under Slug, for example intro-online. The slug has to be unique within your environment. Then click Save changes. Note: links you shared earlier with the old slug stop working after this, so preferably change the slug before you distribute the link.
5. Putting all your booking types on one page #
If you would rather let visitors choose from all your services, use the page of the host. That page comes in two forms: the ready-made landing page of the calendar, and your own page in your website on which you place the calendar with a shortcode. In both cases you decide in the host settings which booking types appear.
5a. Setting which booking types appear on the page #
- Go to Manage → Appointments and click Calendars.
- At the top right of the block of the right host, click Host settings. At the top of the screen you see the path Booking types / host name / Settings as a check.
- Scroll down and tick Enable landing page feature for this calendar.
- Under Which booking forms to display? choose between All active booking forms and Only selected active booking types.
- If you choose the second, tick the services you want to show under Select which booking forms you want to display on the page?.
- Click Save settings.
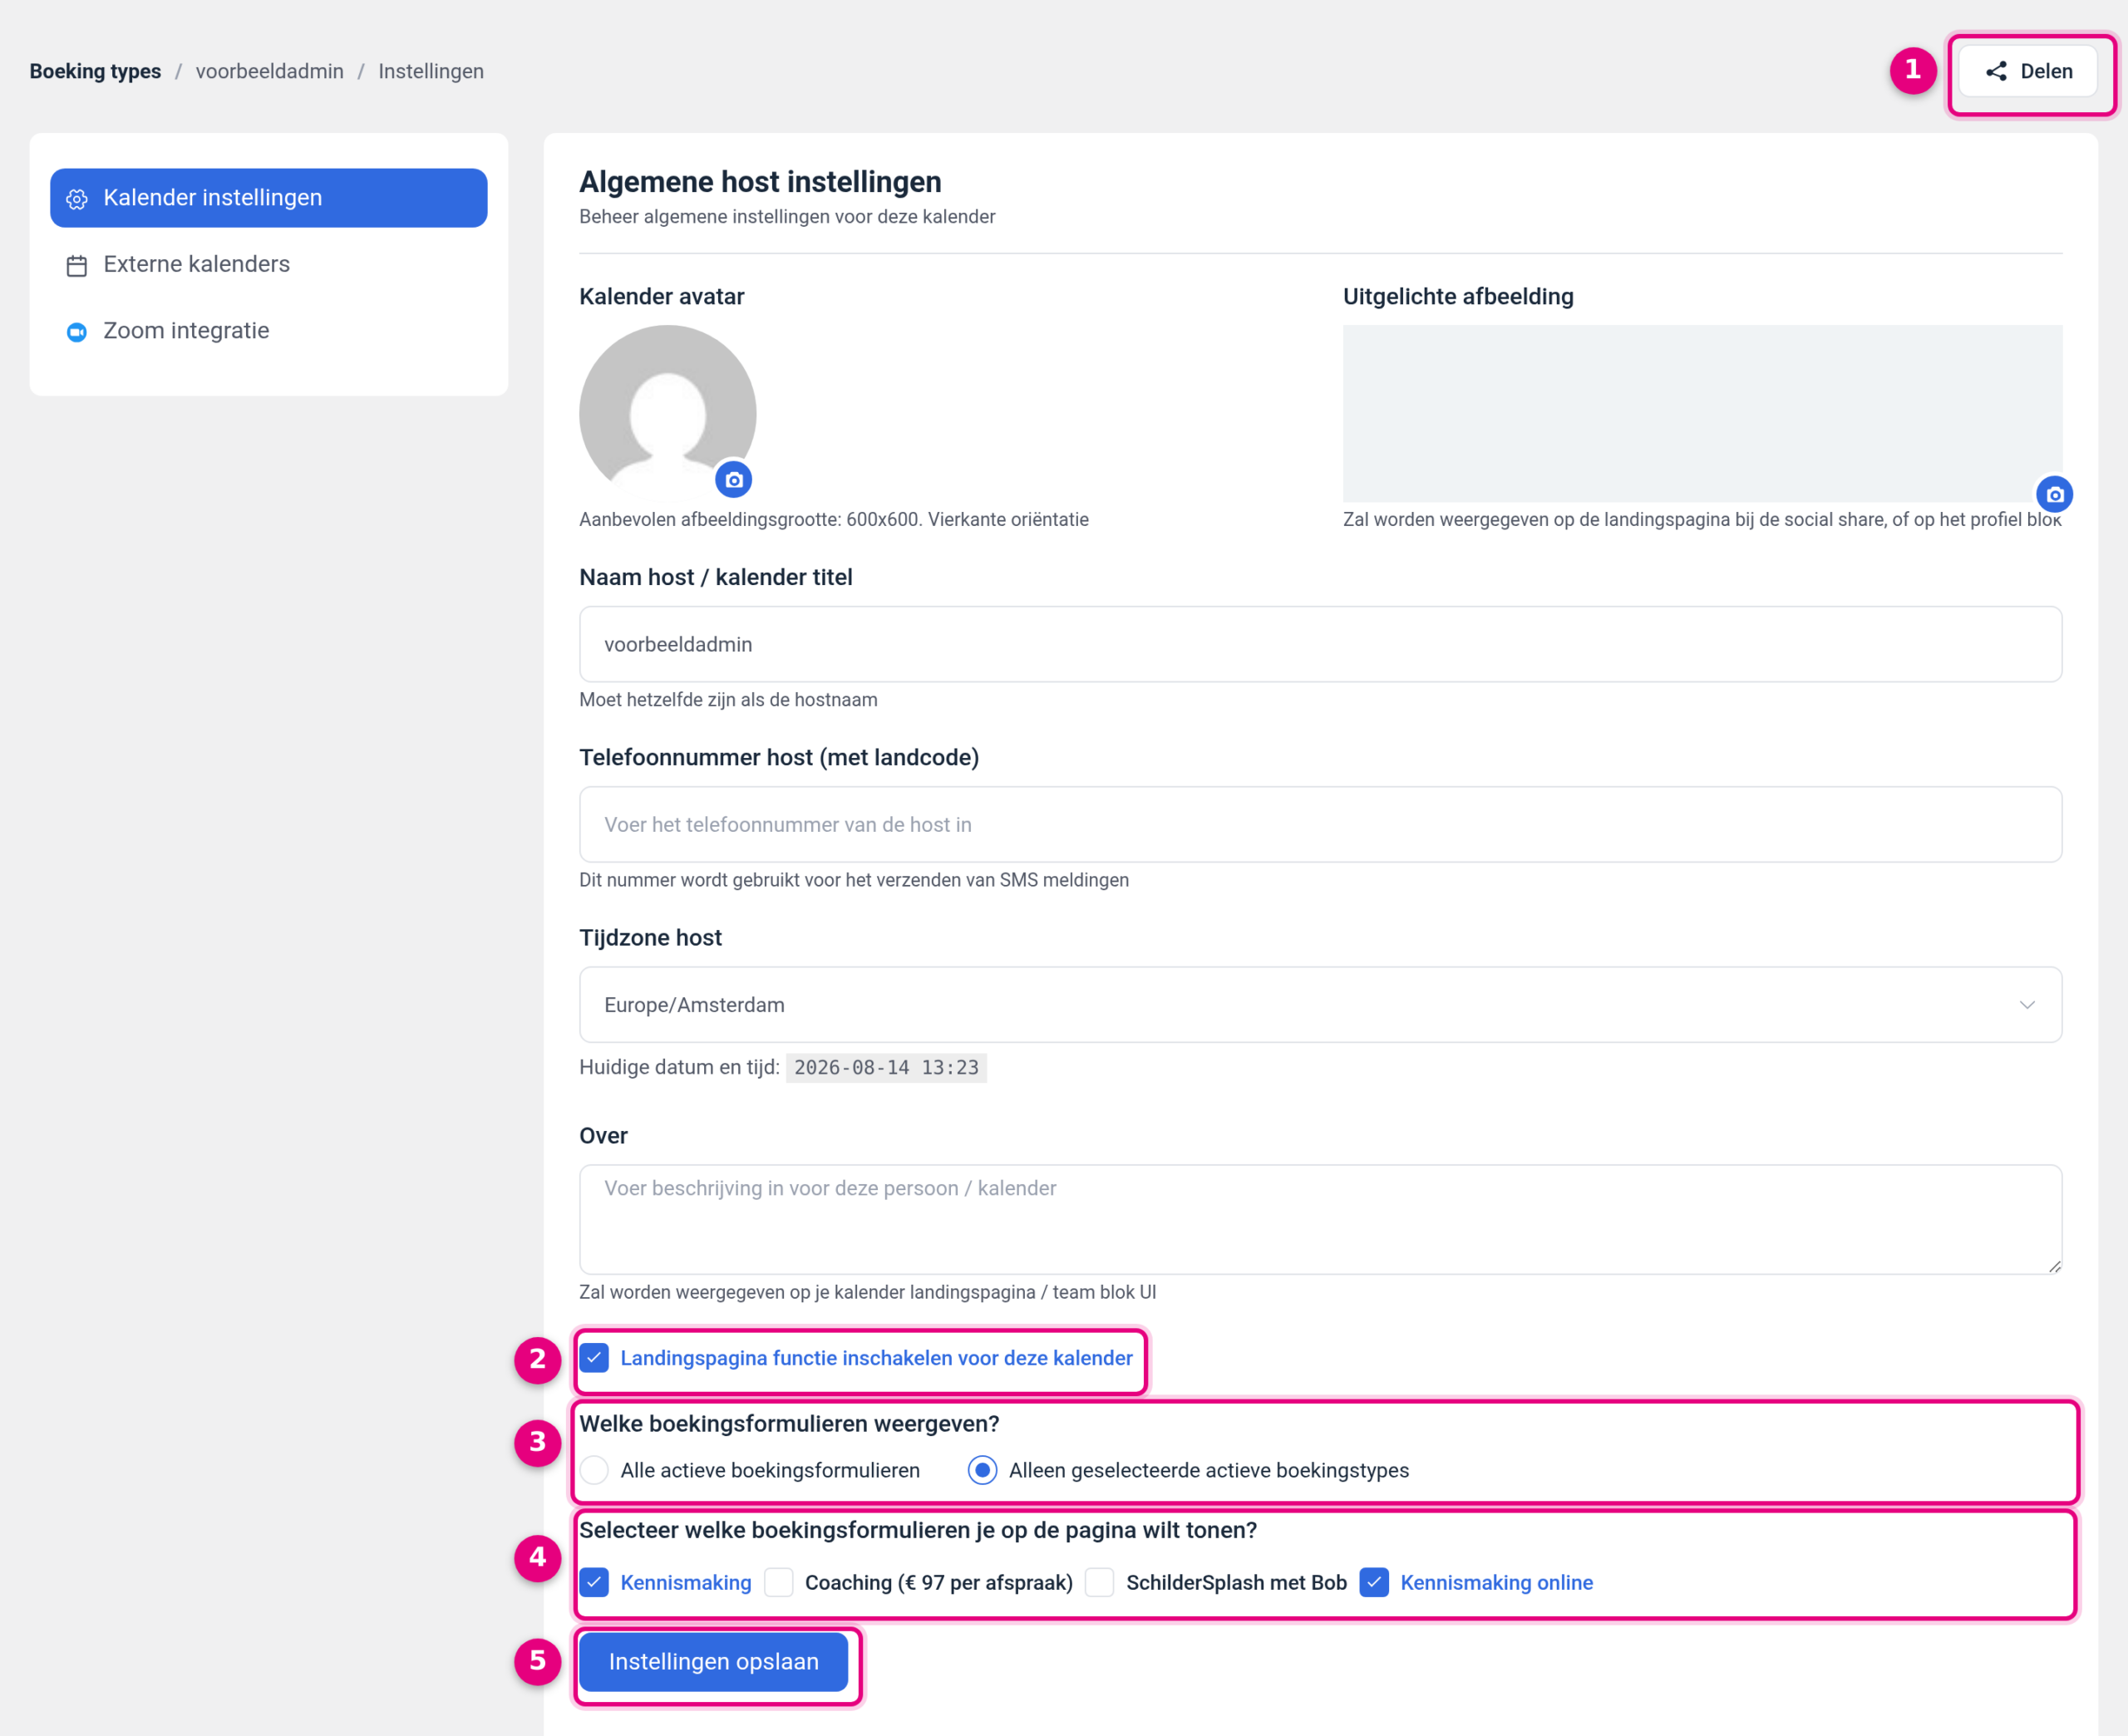
- Share. The share button at host level. Here you get the link and the shortcode of the whole calendar, so of all booking types together.
- Enable landing page feature for this calendar. If this box is unticked, the shared page does not exist and the calendar link does not work.
- Which booking forms to display? With All active booking forms every active service appears on the page automatically, including new ones you add later. With Only selected active booking types you decide yourself.
- Select which booking forms you want to display on the page? The list of all your booking types. Only the ticked services appear on the page, and only those stay reachable through their own direct link as well. So read the warning in 5b before you untick a service here.
- Save settings. Without this click nothing is saved.
The top of this screen also holds the general details of the host: the Calendar avatar and the Featured image used on the landing page, the Host name / calendar title, the Host phone number for SMS notifications, the Host time zone and the About field with the introduction text on your calendar page. On the left you find the sections Calendar settings, External calendars and Zoom integration.
5b. Note: unticked services are no longer reachable through their own link either #
The choice under Which booking forms to display? does more than determine what appears on the shared page. If you choose Only selected active booking types, the services you do not tick can no longer be opened through their own direct link either. Those booking pages are simply not published.
That is hard to spot, because no error message appears and there is no “not found” page either. You share your booking link, and your visitor ends up on the home page of your site. If a calendar happens to be on it, through a shortcode or a block, your visitor sees that calendar and it looks as though all your links point to the same calendar.
- Do you share separate links per service? Then choose All active booking forms. All your booking types stay reachable through their own link, and a service you add later works immediately.
- Use the selection only when you deliberately want it, namely when only part of your services may be publicly bookable. What you do not tick can no longer be booked by anyone.
- Existing appointments can still be changed. Anyone who has already booked an appointment can still reschedule or cancel it through the links in their confirmation email. The block applies only to new bookings.
So if a booking link ends up on your home page, look here first. If Which booking forms to display? is set to Only selected active booking types while that service is not among them, set the option to All active booking forms, click Save settings and try the link again.
5c. Placing the calendar on your own page #
To show the services on your own page, for example on your home page or on a Book an appointment page, use the shortcode of the calendar:
- In the host settings, click Share at the top right.
- Stay on the Shortcode tab and click the shortcode to copy it.
- Go to Manage → Pages, open the page where the calendar should appear and paste the shortcode in the right spot.
- Update the page and then view it in your browser.
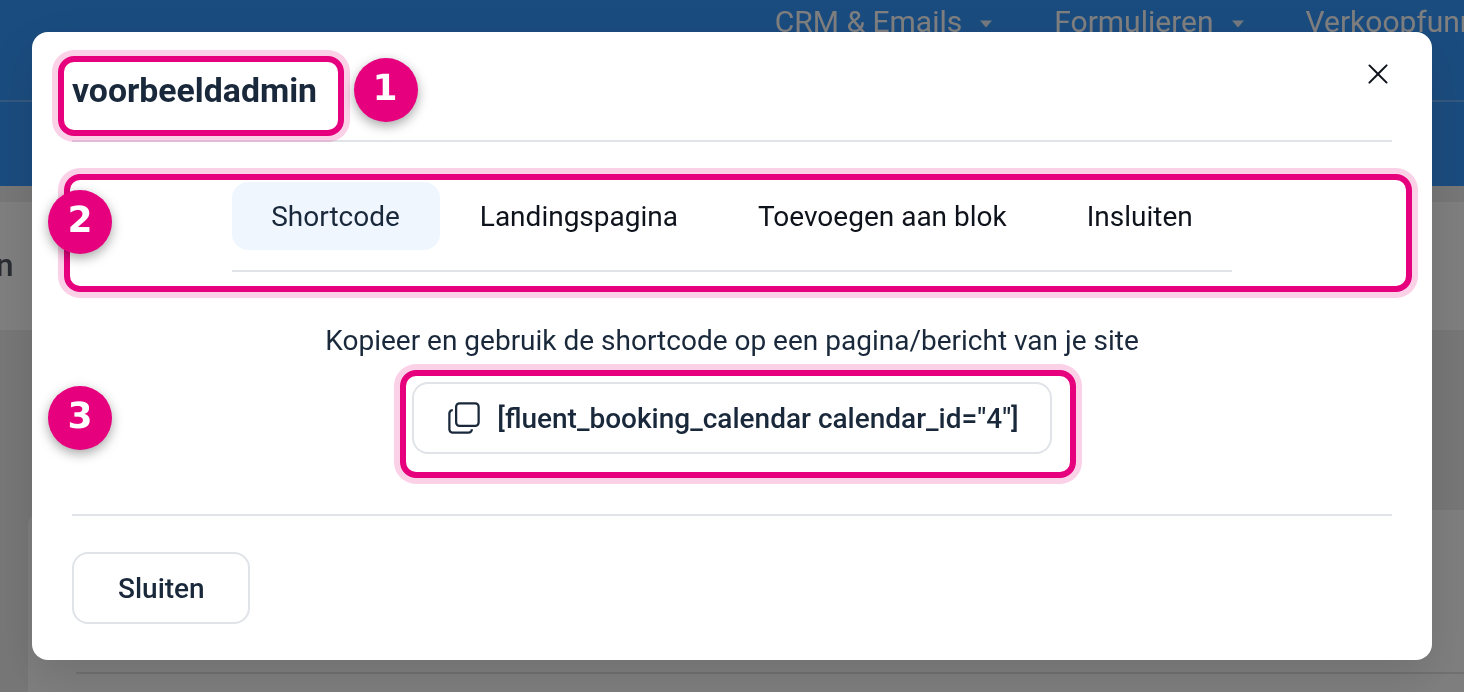
- The name of the host. If the host name is shown here and not the name of a service, you do indeed have the share panel of the whole calendar.
- The tabs. At host level there are four: Shortcode, Landing page, Add to block and Embed. The Generate link tab is not here, it exists only per booking type. Under Landing page you find the link to the ready-made calendar page, without
&event=in it. - The shortcode of the calendar. It takes the form
Loading... #
5d. The result for your visitor #
This is what the shared page looks like when a visitor opens it. All selected services are listed one below the other, each with its own button.
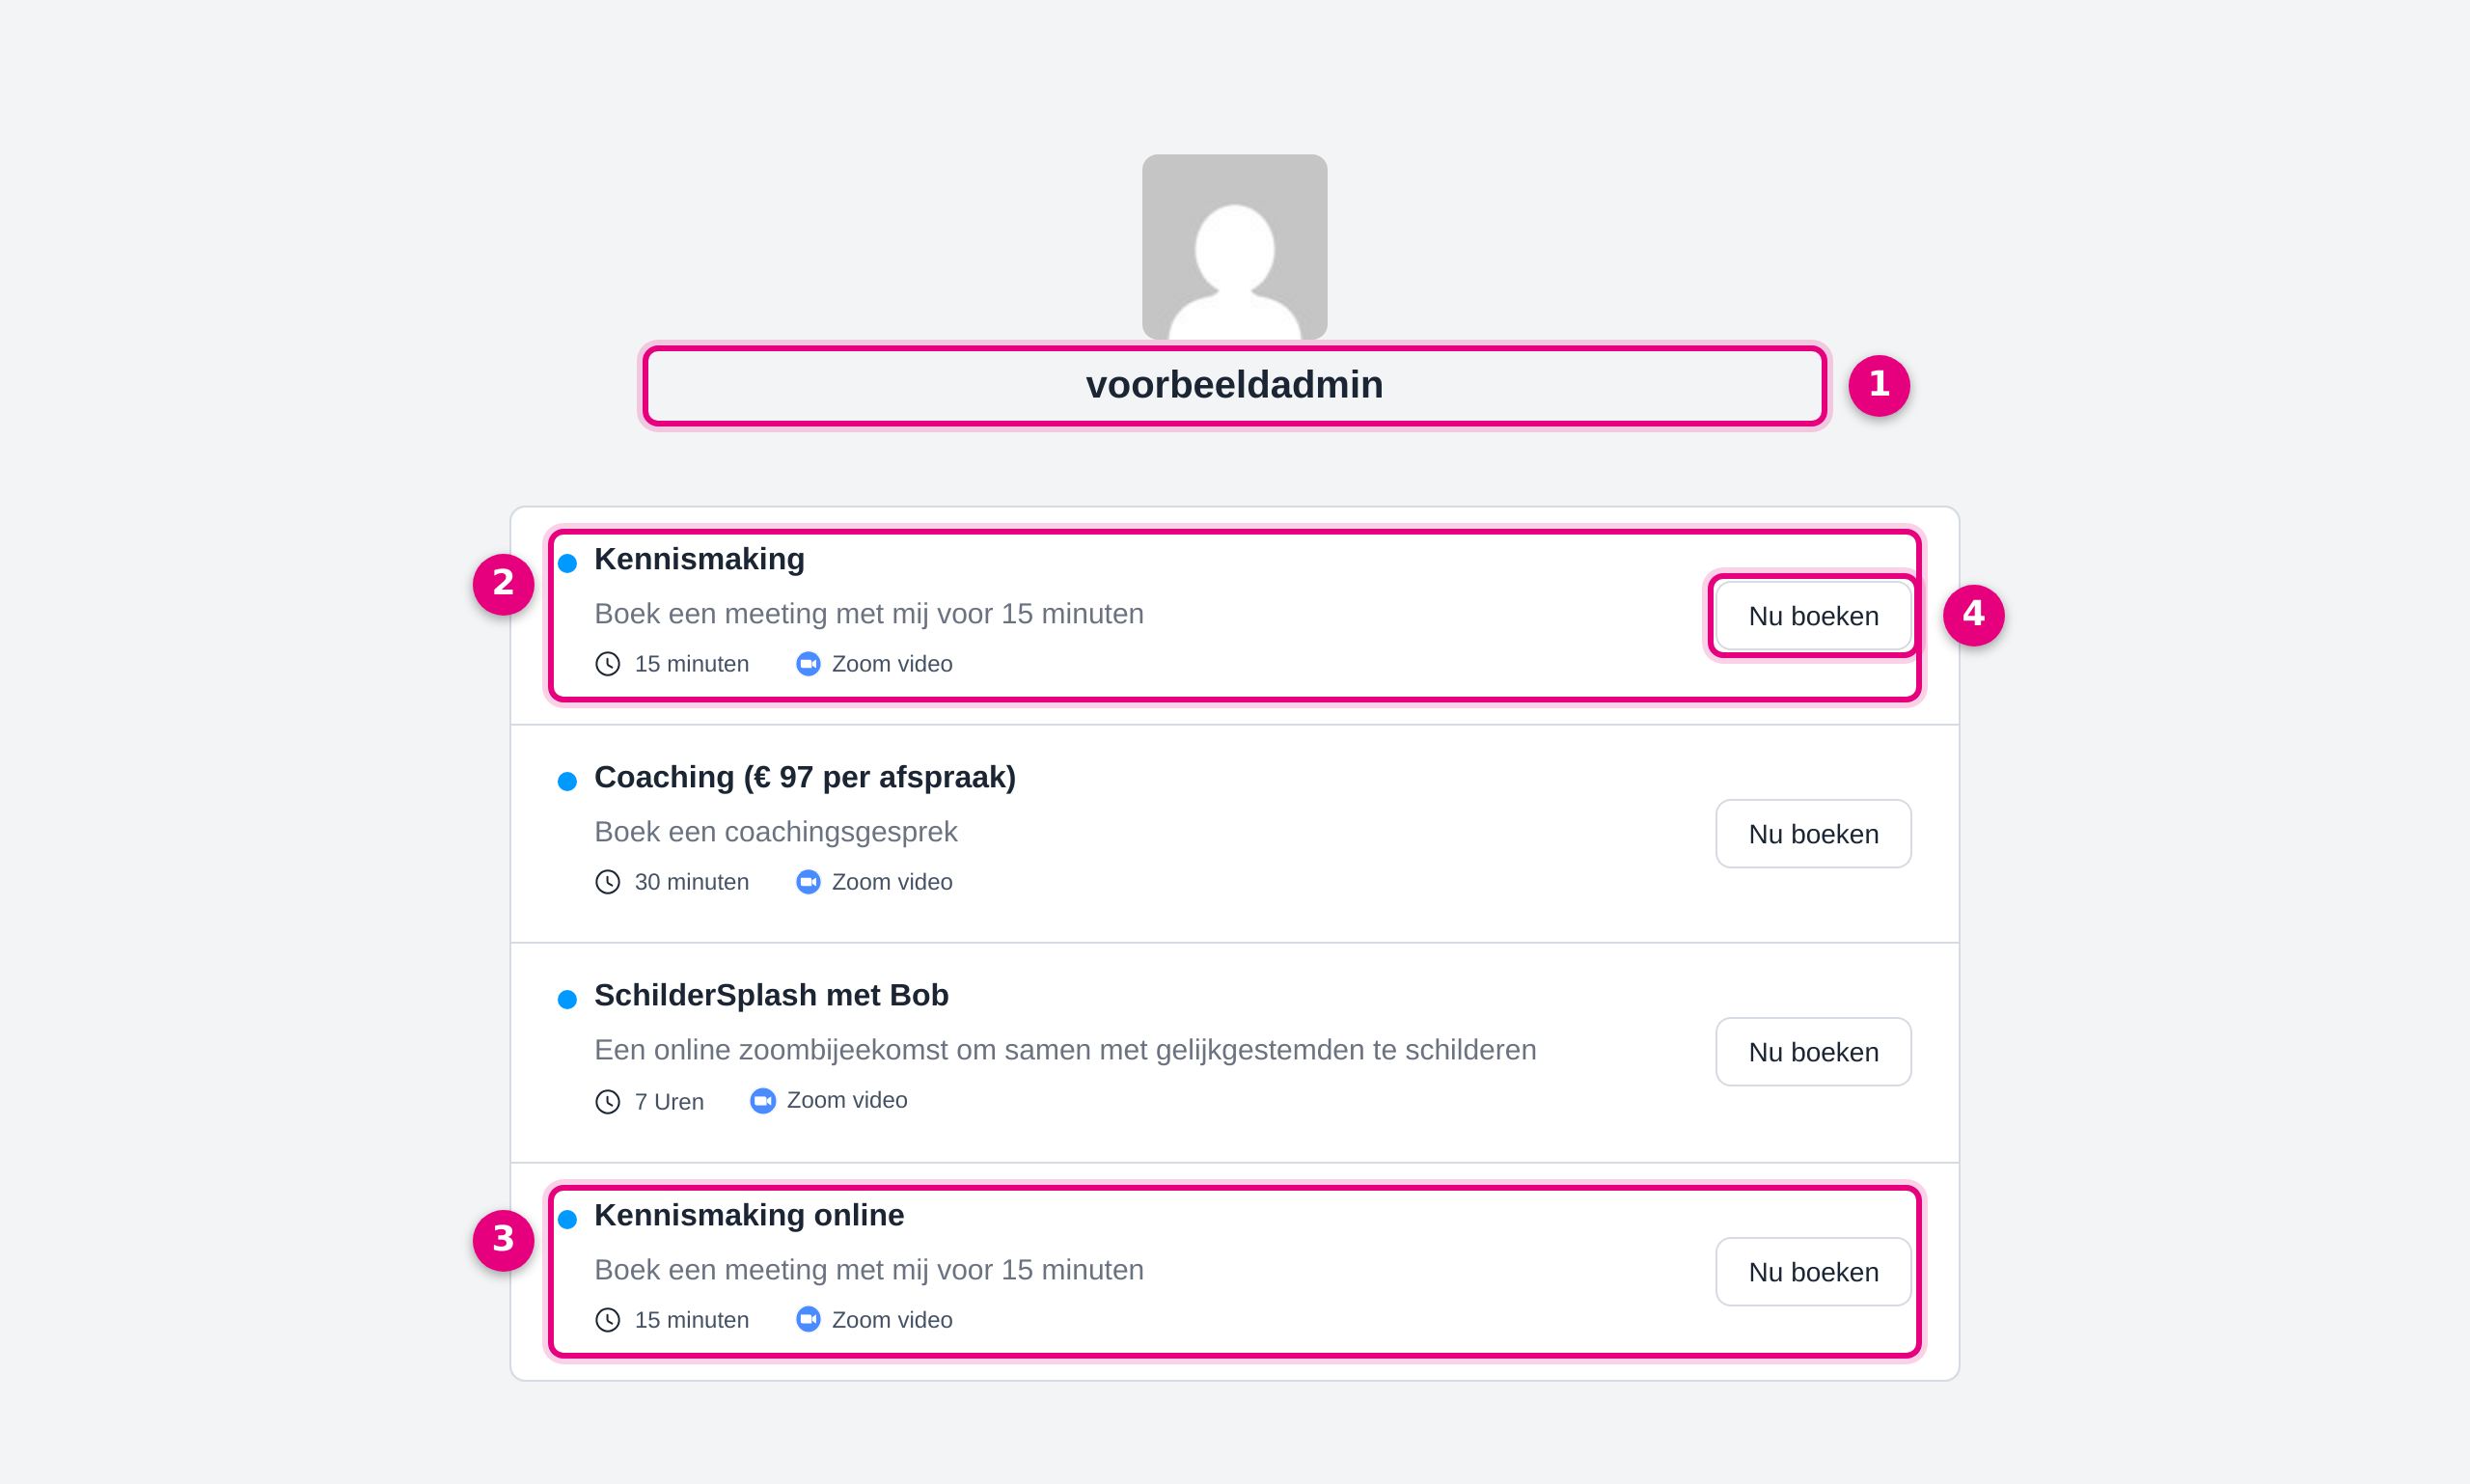
- The name of the host with the avatar above it, exactly as you entered it in the host settings.
- A booking type. For each service the visitor sees the name, the short description, the duration and the location.
- A second booking type. A cloned service simply appears here as a separate row, with its own button and its own link behind it.
- Book now. This takes the visitor to the calendar of that one service. That is exactly the same page as the link you copy in step 2.
Make sure the descriptions of your services differ from each other. With a copy the module also takes over the description of the original, which can make two rows on this page look identical. You change the description through Edit on the card, tab Event details.
6. Good to know #
- Booking links only work on your own (sub)domain. As long as your environment is still on the temporary onboarding URL, the links and the embed code point to that temporary address. So only share them widely after you have gone live on your own domain, and replace links you distributed earlier. The same applies to the embed code on an external website and to connections with your calendar.
- Always try a link once yourself before you share it. Paste the copied link into your browser and, if need be, book a test appointment yourself. That way you see straight away whether the right service, the right duration and the right questions appear.
- You find booked appointments under Manage → Appointments → Bookings. There you can switch between List view and Calendar view and filter on Upcoming, Completed, Latest bookings and All.
- Take a service offline temporarily with Disable through the three dots on the card. The service then disappears from the shared page, while you switch it back on later with one click. That is tidier than deleting, because deleting loses the booking type for good.
Related articles #
- Connecting your calendar to the appointment scheduler
- Setting up multiple booking durations in the Appointments module
- Setting up group events in the Appointments module
- Setting up paid appointments with automatic checkout
- Adding appointments manually in the Appointments module
- Connecting appointments to the CRM: creating contacts automatically on a booking


