Do you sell a course, training or other product through your shop where your customer gets something extra after the purchase, such as access to a protected area or a welcome email series? Then you want those follow-up steps to happen only once the payment has really come in. The simplest way to arrange that is a product tag: a tag that is assigned to the contact automatically as soon as the order is paid. In this article you set up the product tag, start an automation with it and see how the tag is withdrawn again by itself on a refund.
Access control in Autorespond is based on WP Fusion, included in your package. Read the WP Fusion documentation
How it works: the tag follows the payment status #
The product tag looks at the status of the order in your shop. This distinction matters:
- On hold: the order is waiting for confirmation of the payment. Orders with the Direct bank transfer payment method end up here. So payment has not been made yet and the contact does not get the tag.
- Processing: the payment has been received. At this moment the product tag is assigned. With an online payment (such as iDEAL) that happens straight after checkout; with a bank transfer at the moment you set the order to Processing.
- Completed: the order has been handled in full. The tag is assigned with this status too, if that has not happened yet.
With the On hold status the contact does not have the tag yet. As soon as the order is set to Processing, the tag has been assigned. You can read more about the order statuses and about processing bank transfers manually in the article Only grant access after payment (including bank transfers).
Step 1: set the product tag on the product #
Go to Shop → Products and open the product you want to link. Scroll to the Product data block and click WP Fusion in the list of tabs on the left.
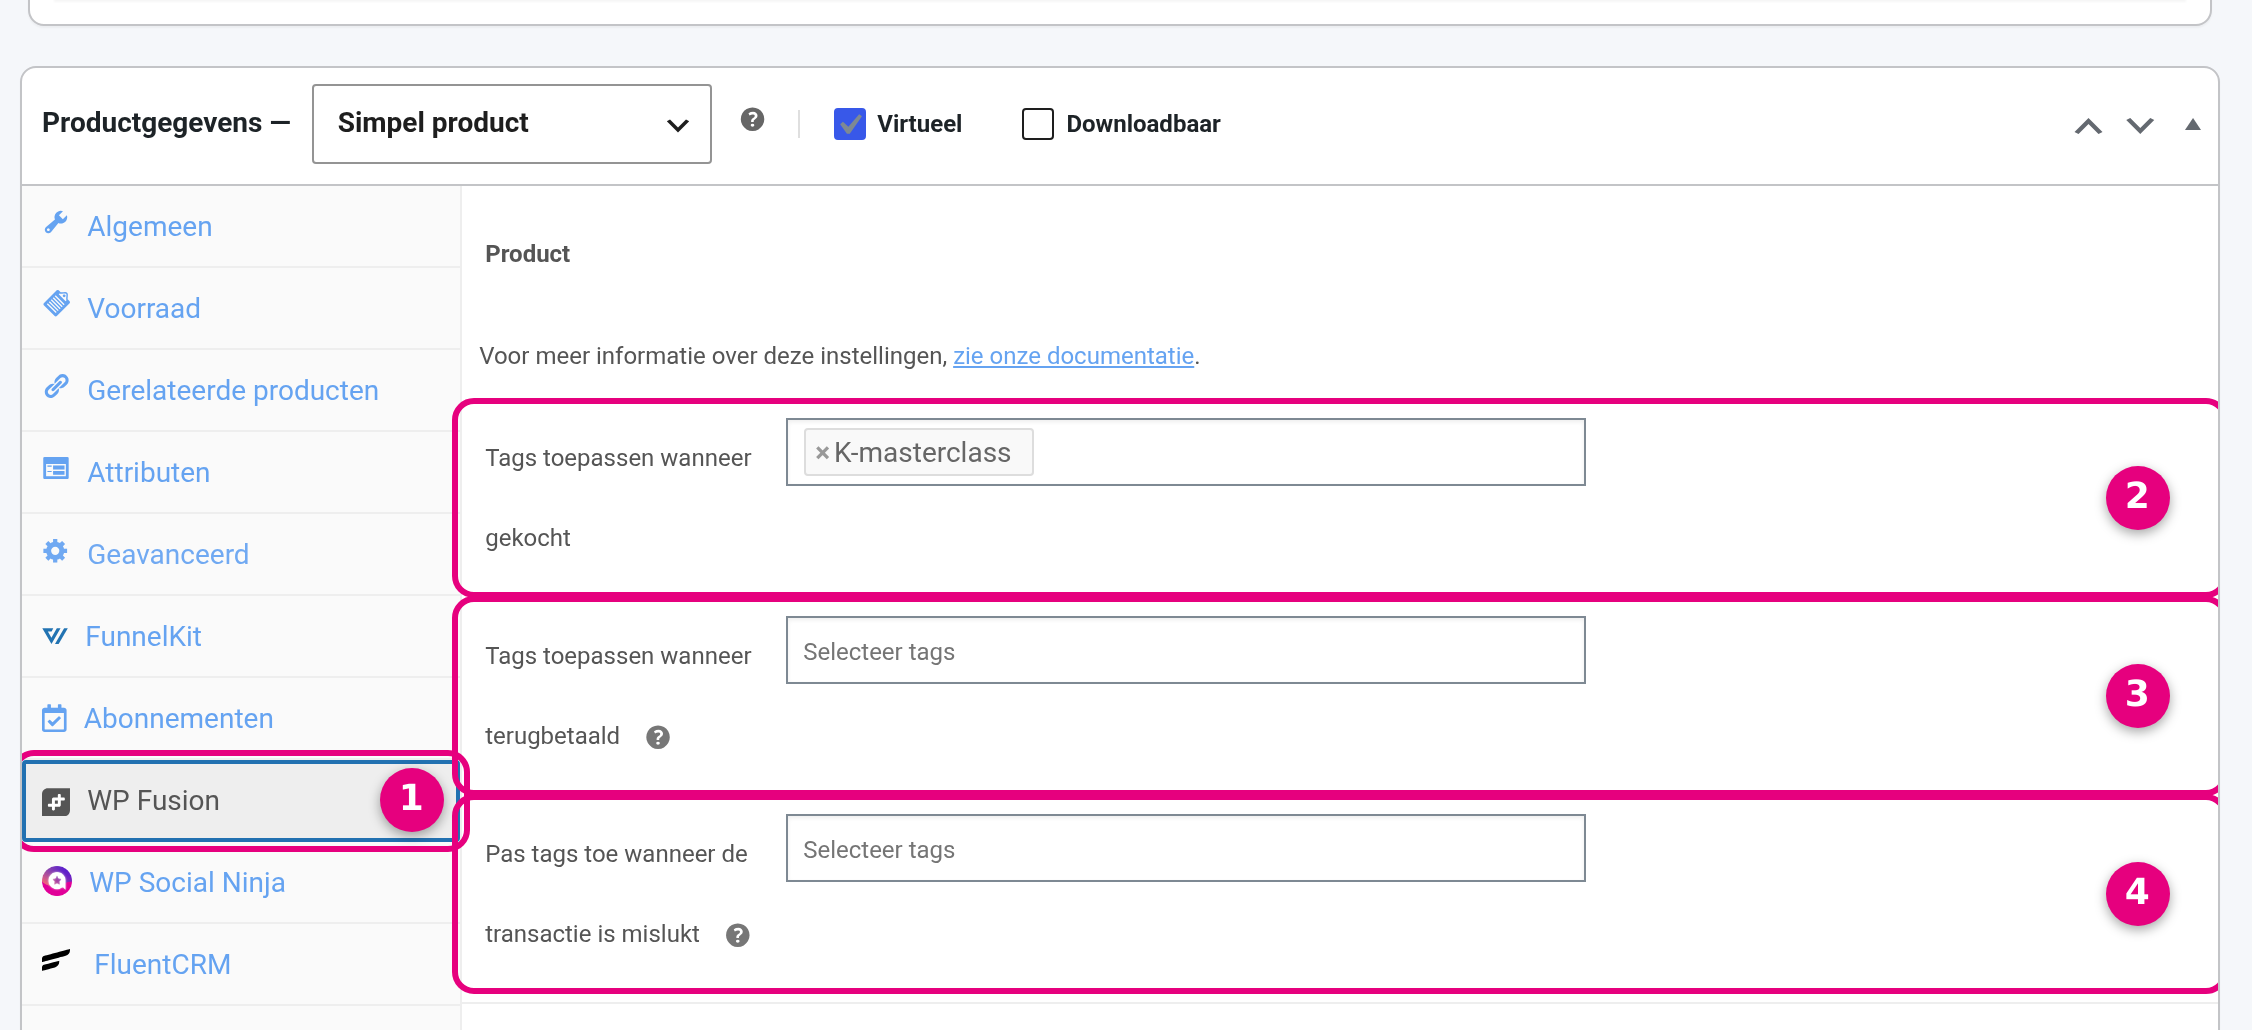
- The WP Fusion tab: you find this tab in the list of product settings, below the familiar tabs such as General and Inventory. All tag settings for this product are together here.
- Apply tags when purchased: this is the field it all revolves around. Choose the tag the buyer should receive, for example a tag with the name of your course. You can pick an existing tag or type a new name straight away. This tag is only assigned once the order is paid, so not while a bank transfer is still outstanding.
- Apply tags when refunded: optional. Here you can have an extra tag assigned at the moment you refund an order, for example so you can approach those customers separately later. Note: you do not need this field to withdraw the purchase tag, because that happens automatically. More about that below.
- Apply tags when the transaction has failed: also optional. With this you can assign a tag to customers whose payment failed, useful if you want to send them an email with a new payment link, for instance.
Click Update at the top right to save the product. You do not need to do anything else on the product.
What you see in the CRM afterwards #
As soon as an order is paid, you find the tag on the buyer’s contact card via CRM & Emails → Contacts.
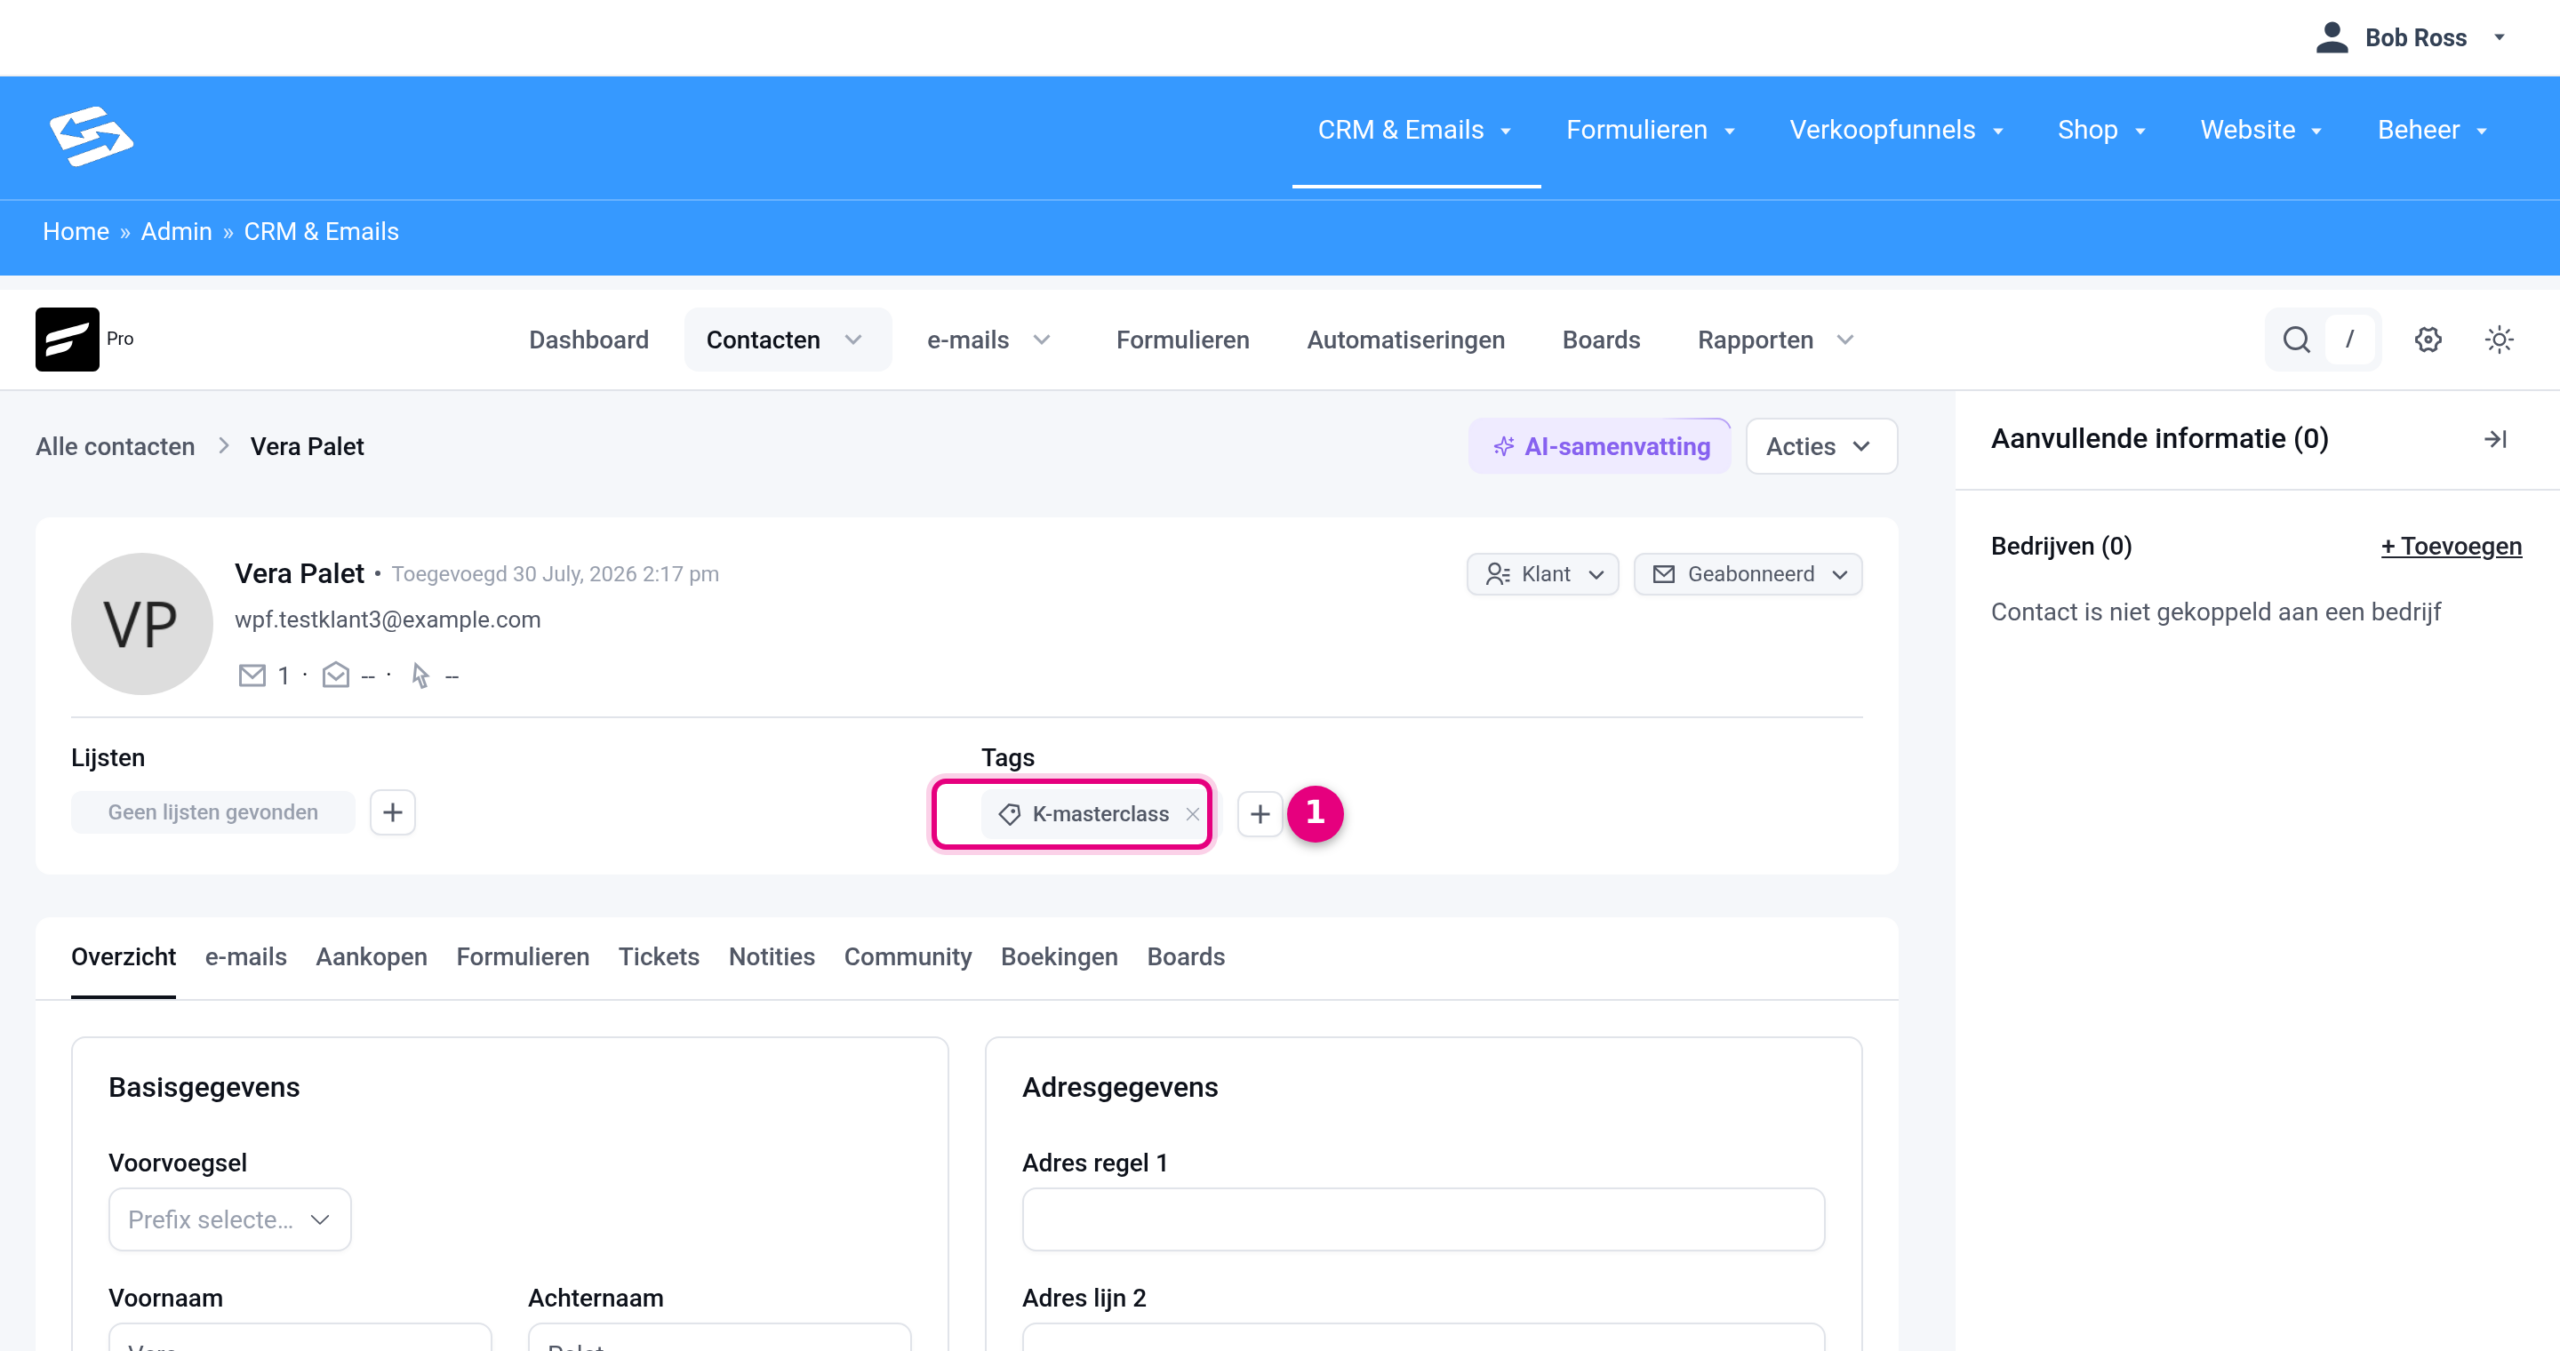
- Tags: the product tag appears here as soon as the payment has come in. Via the plus sign next to it you can also add tags by hand, for example if you want to give someone access outside the shop. To the left of that, at the same height, you see the Lists of this contact, and at the top of the contact card are the contact details, the contact type (such as Customer) and the sign-up status for your emails.
Withdrawn automatically on a refund or cancellation #
If you give a full refund on the order, the product tag is removed from the contact automatically. You do not have to set anything up for that. Right after the refund the order is set to Refunded and the tag has disappeared from the contact card. The same happens when you set an order that was already paid to Cancelled.
If you use the tag to give access to protected pages, community spaces or courses, that access therefore stops by itself on a refund. You do not have to keep track yourself of who should still have access.
If you sell subscriptions, the WP Fusion tab on a subscription product has extra options. There you can have tags assigned per subscription status, for example via the field “Apply these tags when a subscription is cancelled”, and with the “Remove tags” option you can have the purchase tags removed automatically when the subscription is cancelled or expires. That way access also stops by itself at the end of a subscription.
Start an automation with the Tag applied trigger #
The product tag is also a reliable starting point for an automation: it then starts only at the moment of payment, whatever the payment method. Go to CRM & Emails → Automations, click New automation and choose the Tag applied trigger. Then set the trigger up like this:
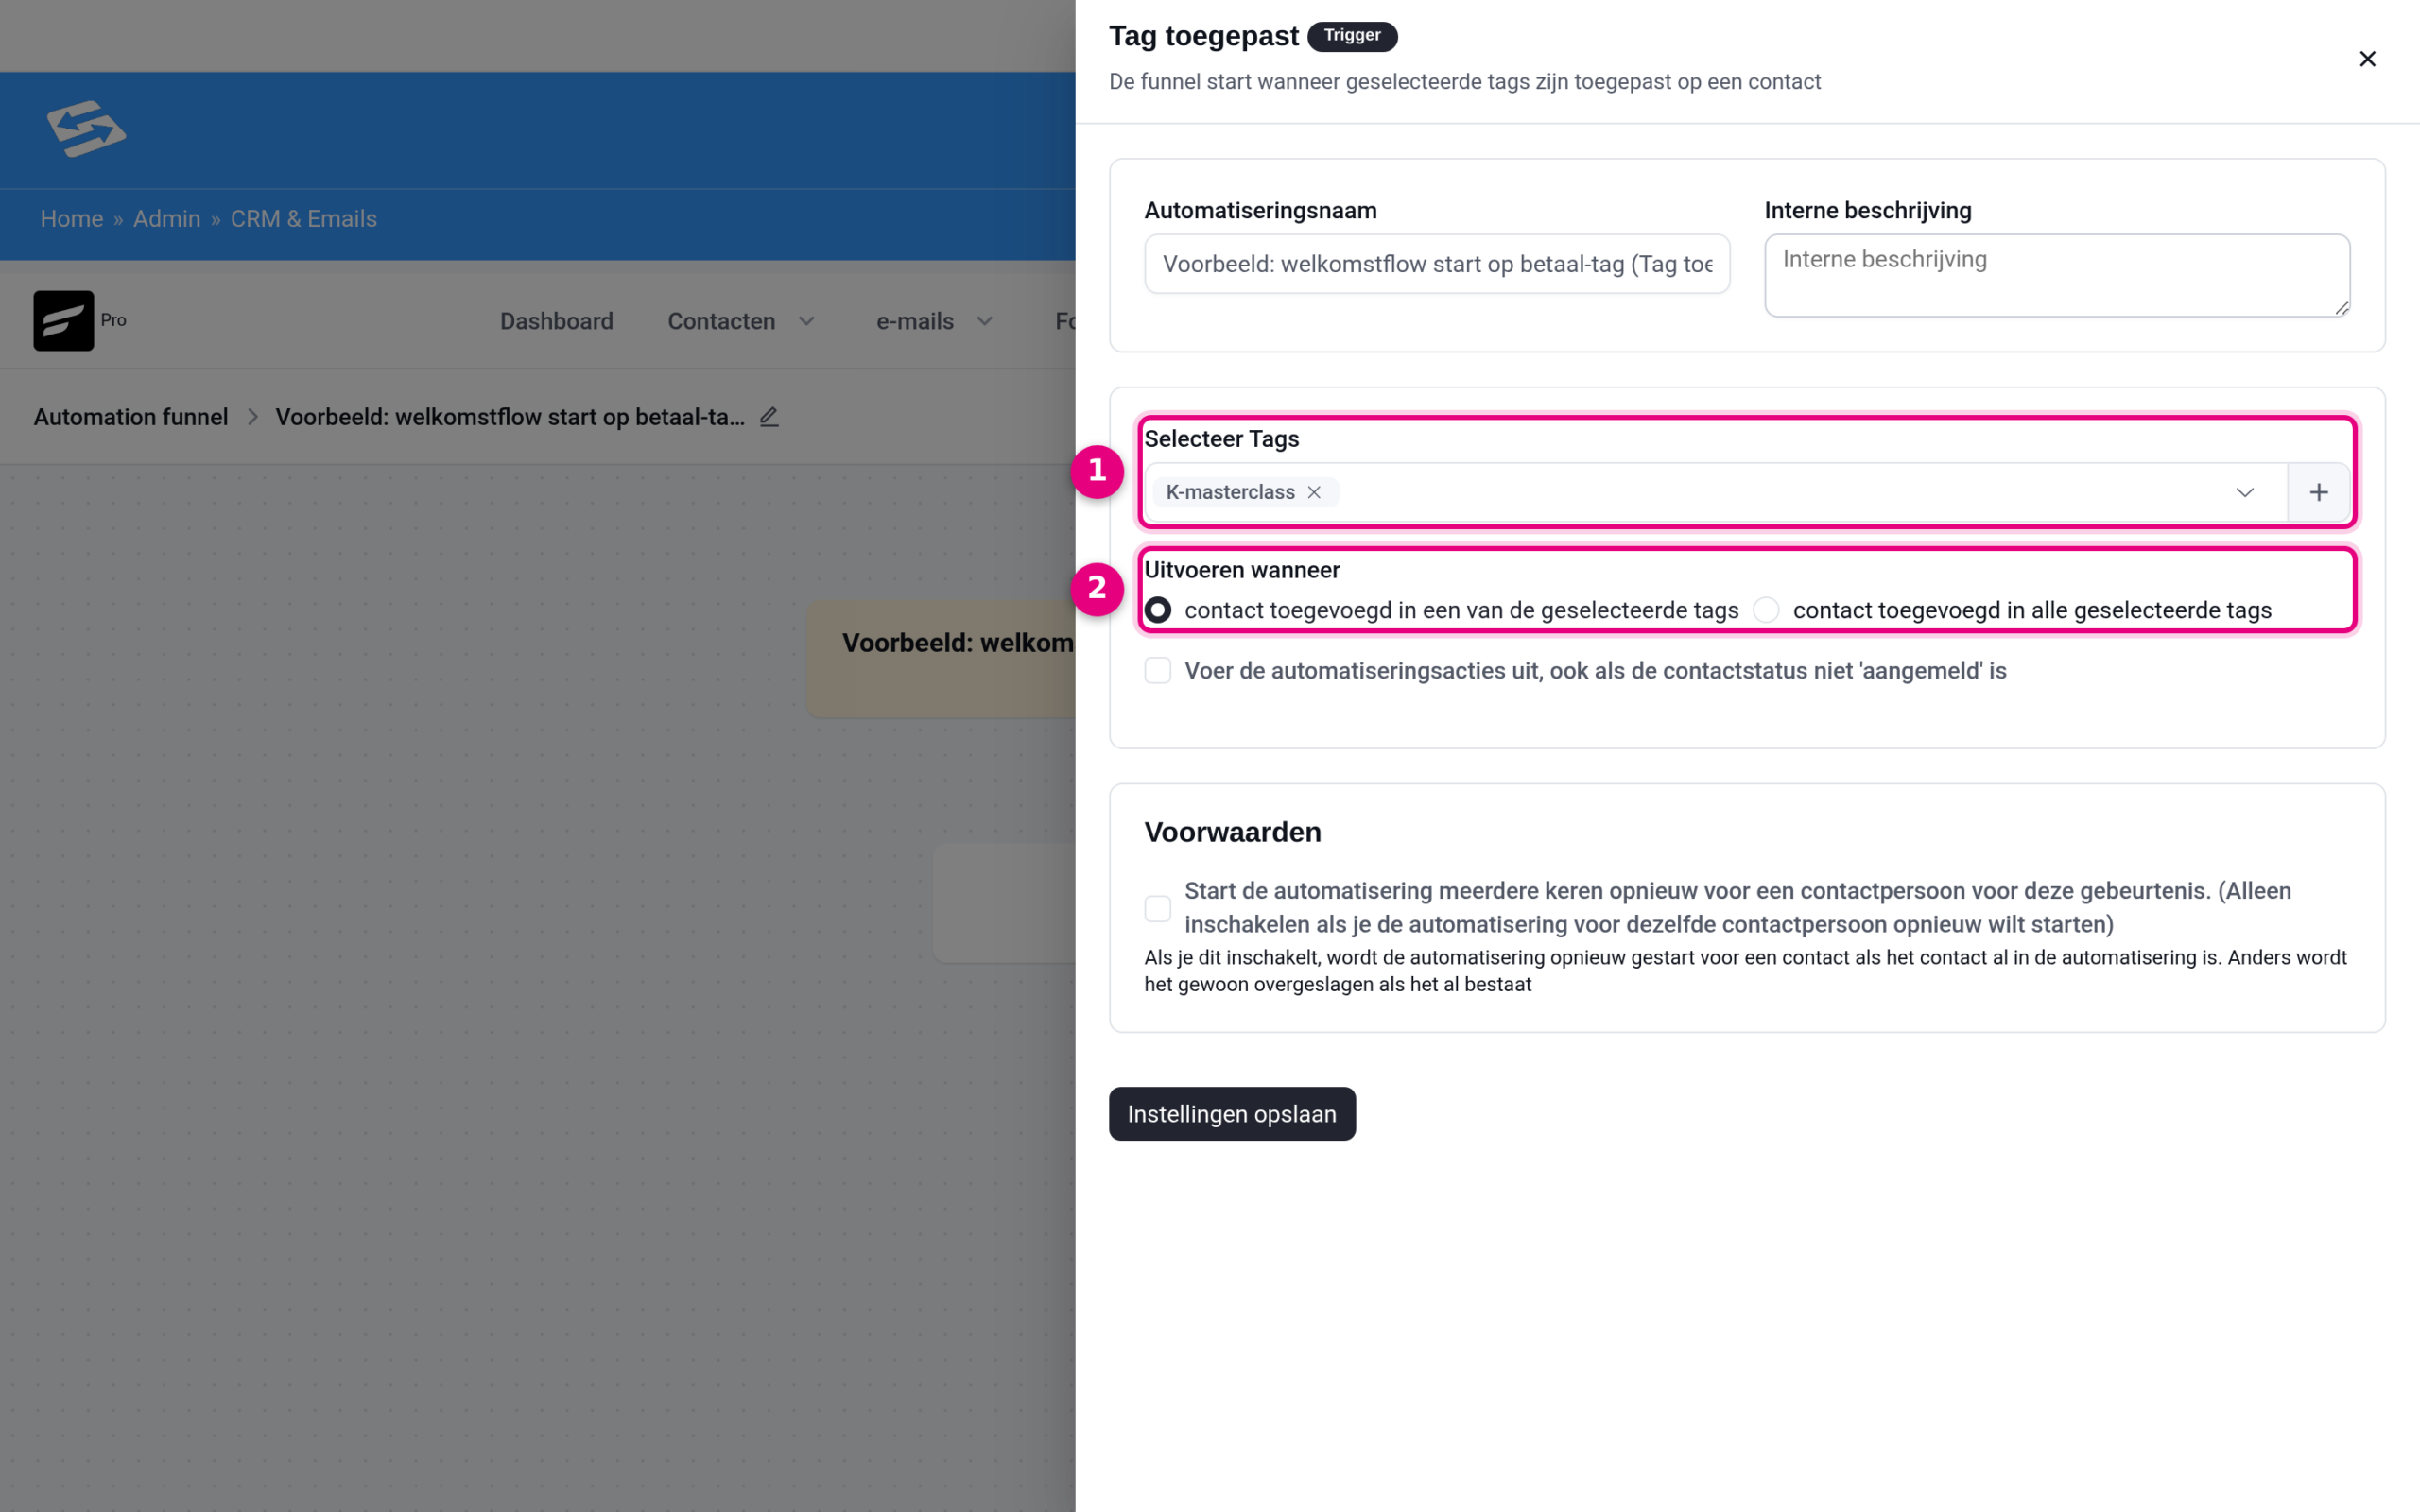
- Select Tags: choose your product tag here. The automation starts as soon as a contact gets this tag, so only after payment. At the top you first give the automation a recognisable name; the Internal description field is optional and visible only to you.
- Run when: leave this on contact added to any of the selected tags. The second option (all selected tags) is only relevant if you select several tags and want the contact to have all of them. Below that you see another tick box to let the automation start for contacts who are not registered as subscribed as well, and under Conditions an option to let the automation start again if the same contact gets the tag once more.
Click Save settings and then build your follow-up steps, for example a welcome email with the access link. How to add steps is explained in the article Configuring automation actions.
The same tag gives access to your content #
Do you want buyers with this tag to get access to a protected page, community space or course automatically? Then set the tag as an access condition on that content. How to do that is explained step by step in Controlling access to pages and content with tags. The combination is exactly what makes this route so strong: one tag arranges the access, starts your emails and is withdrawn automatically on a refund.
Product tag or the CRM tab on the product? #
Besides the WP Fusion tab, every product also has a FluentCRM tab with Successful purchase actions, as described in Creating a paid product with automatic list linking and a follow-up email. The tags on that tab are also assigned only on payment. There is one important difference: on a refund the tags from the CRM tab simply stay in place, unless you set up separate refund actions there yourself. The product tag via the WP Fusion tab is withdrawn automatically.
So choose the product tag from this article when the tag controls access or when follow-up actions really have to stop on a refund. The CRM tab is a good choice for tags that are meant to stay in place, such as a general customer tag for your administration or marketing.
Testing #
- Place a test order for the product yourself and choose Direct bank transfer as the payment method. The order gets the On hold status.
- Check the contact card via CRM & Emails → Contacts: the tag is not there yet.
- Go to Shop → Orders, open the test order and set the status to Processing. Check the contact card again: the tag has now been assigned and any automation on the Tag applied trigger has started.
- Click Refund in the order and refund the full amount. Check the contact card once more: the tag has been removed automatically.
- Then delete the test order and, if you created one, the test contact.
Good to know: variable products #
Do you sell a variable product, for example an event with several dates as variations? Then the product tag works on two levels:
- A tag on the parent product (the tab from this article) is assigned with every variation somebody buys.
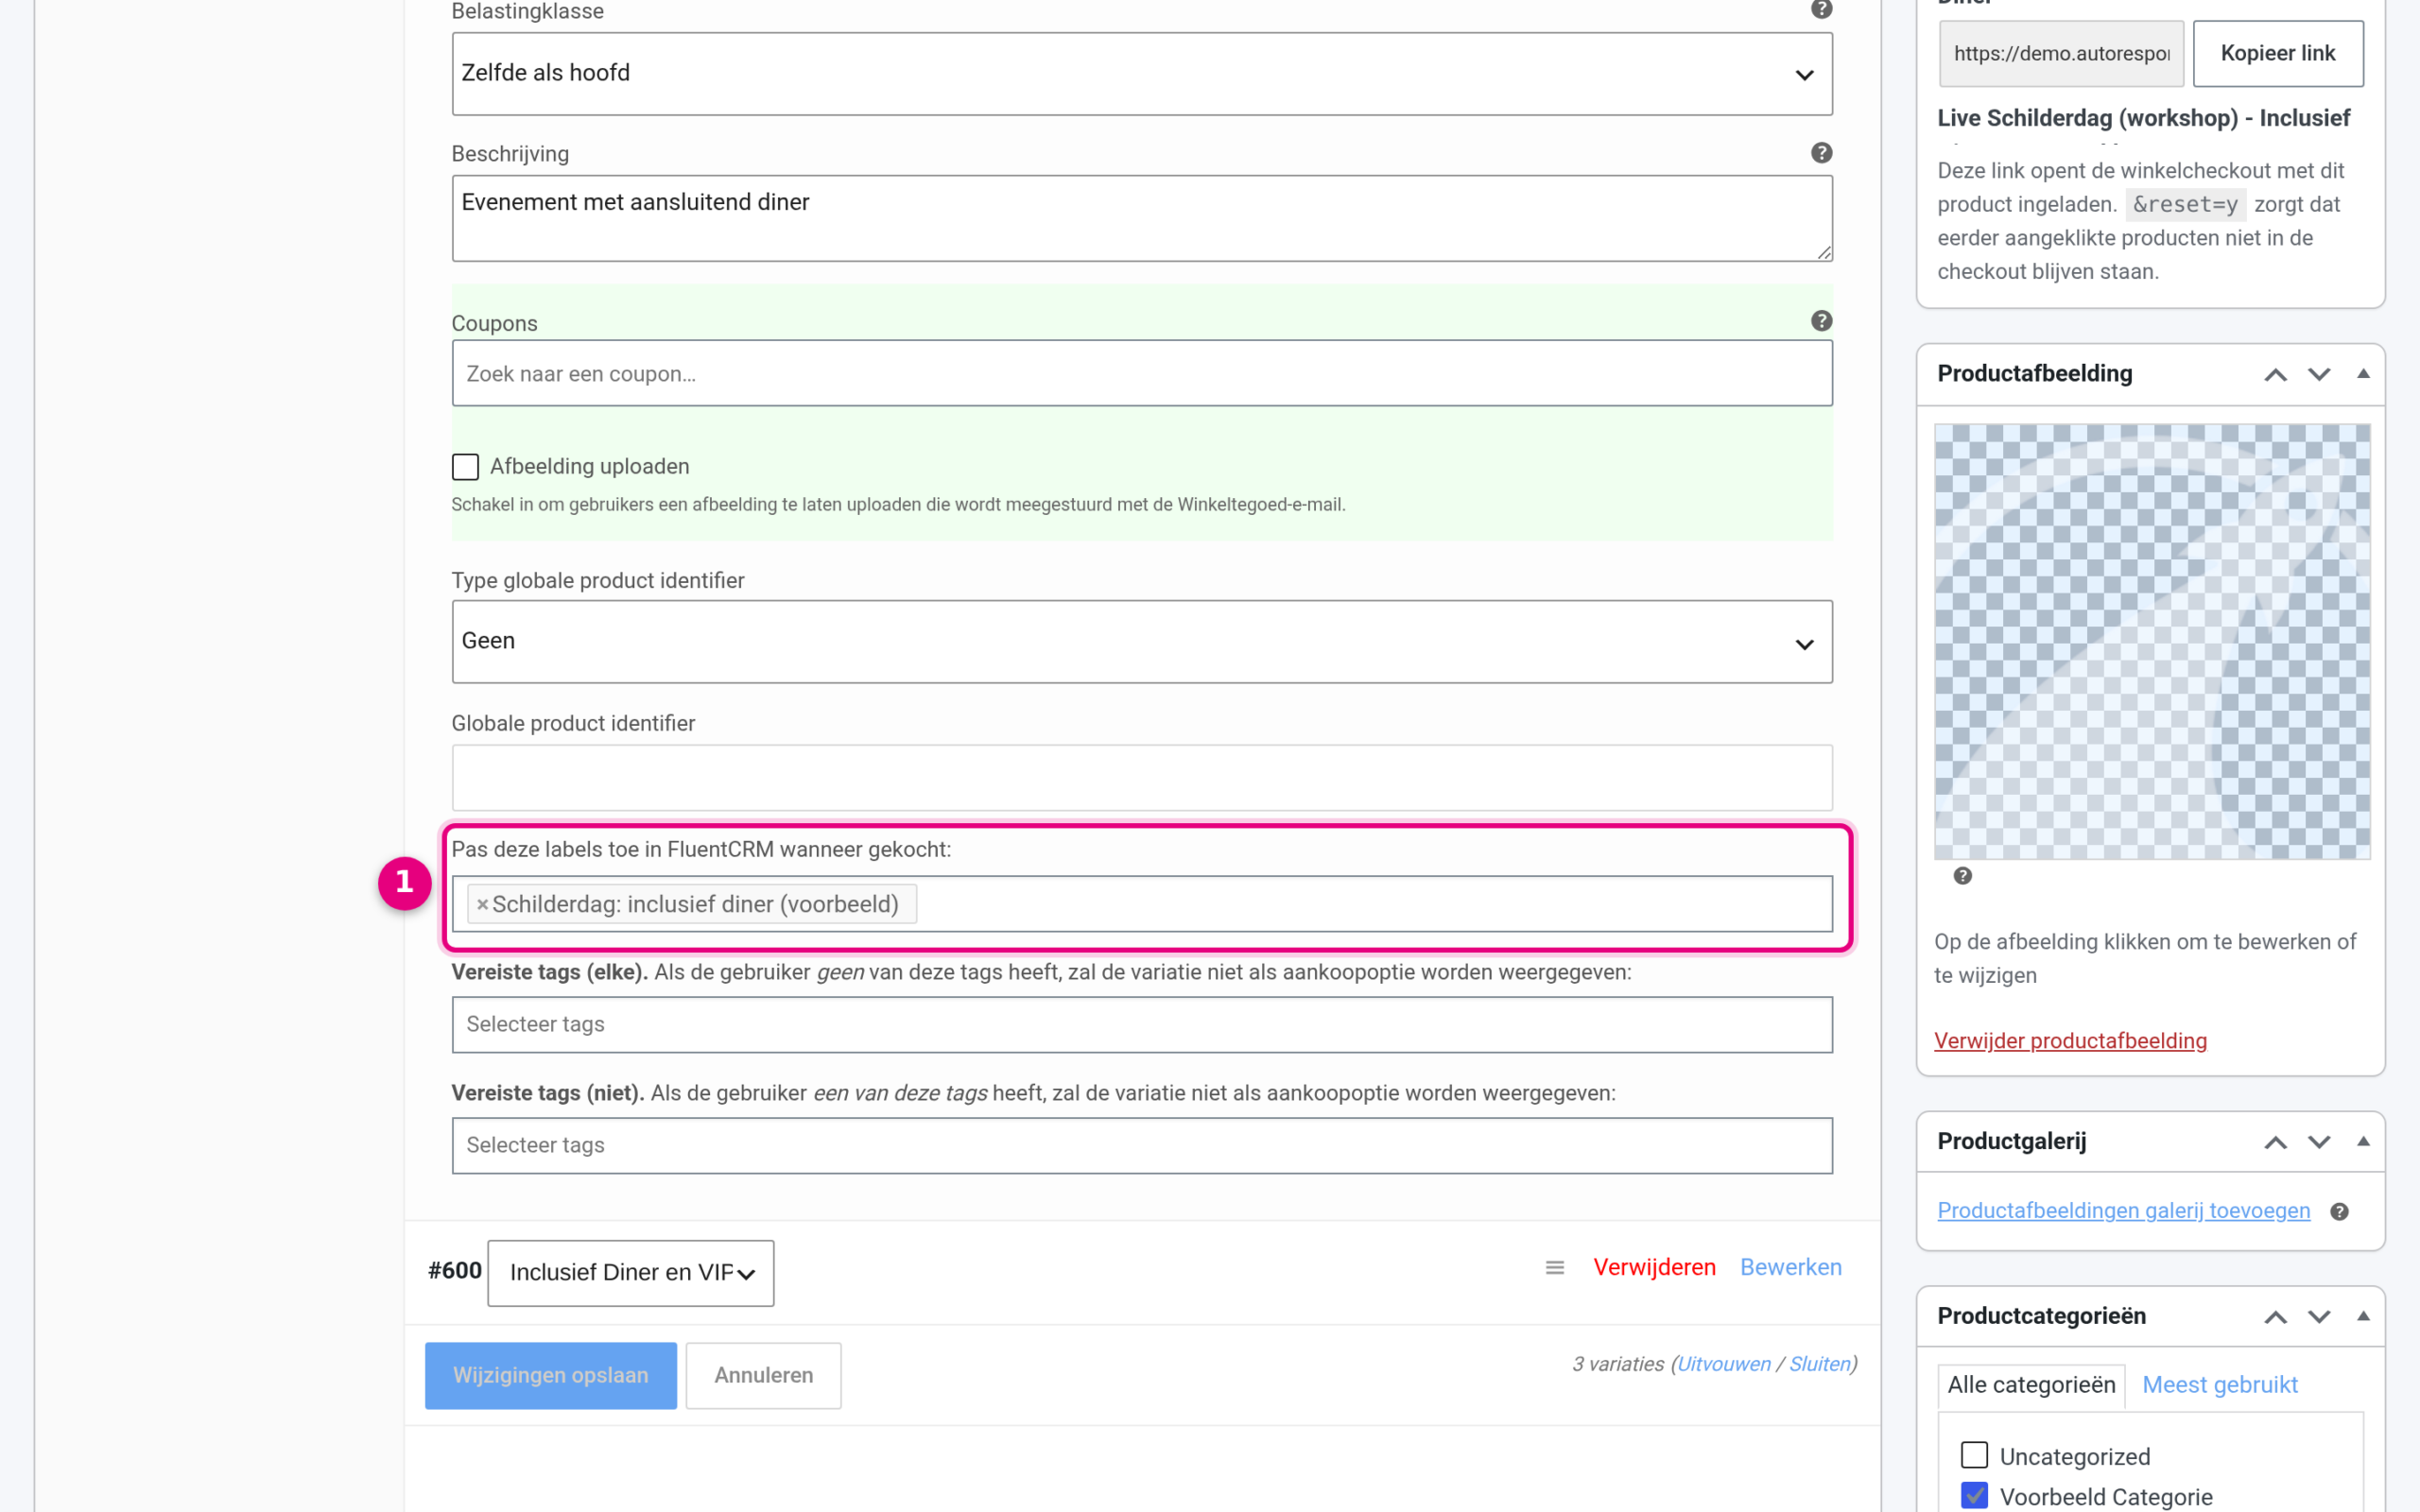
- A tag per variation is set via the Variations tab: expand the variation and fill in the field “Apply these labels in FluentCRM when purchased” at the bottom. That way every date gets its own tag, for example as a starting point for a separate automation per date.
Have you created a new tag in the CRM and do not see it in the field yet? Then first click “Refresh Available Tags & Fields” via Admin → Access control and reload the page.


