If you use a form with double opt-in, everyone who fills it in first receives a confirmation email. The sign-up is only complete after they click the button in that email. Want to know who filled in the form but has not confirmed yet, for example to contact those people personally? Then look them up in the form’s entries, not among your contacts. Below you can read why, where to find them and how long they are kept.
Forms in Autorespond are based on Fluent Forms Pro, included in your package. Read the Fluent Forms documentation
How double opt-in works in Autorespond #
Double opt-in is handled by the form itself. When someone fills in the form, the entry is saved with the status Unconfirmed and the confirmation email is sent. Nothing else happens yet: the person is not added to your CRM as a contact, gets no tags or lists and no automation starts.
When the person clicks the confirmation button, the entry gets the status Confirmed. At that moment the form passes the details on to your CRM: the contact is created, gets the tags and lists you set up, and the related automations start.
The CRM’s own double opt-in is switched off by default, so nobody receives two confirmation emails. This is also why you won’t find unconfirmed sign-ups among your contacts, and why a contact filter on the status Pending returns nothing for these forms. The only place they are listed is in the form’s entries.
1. Finding unconfirmed sign-ups #
Go to Forms → Forms and click the name of the form. This takes you to the editor of that form.
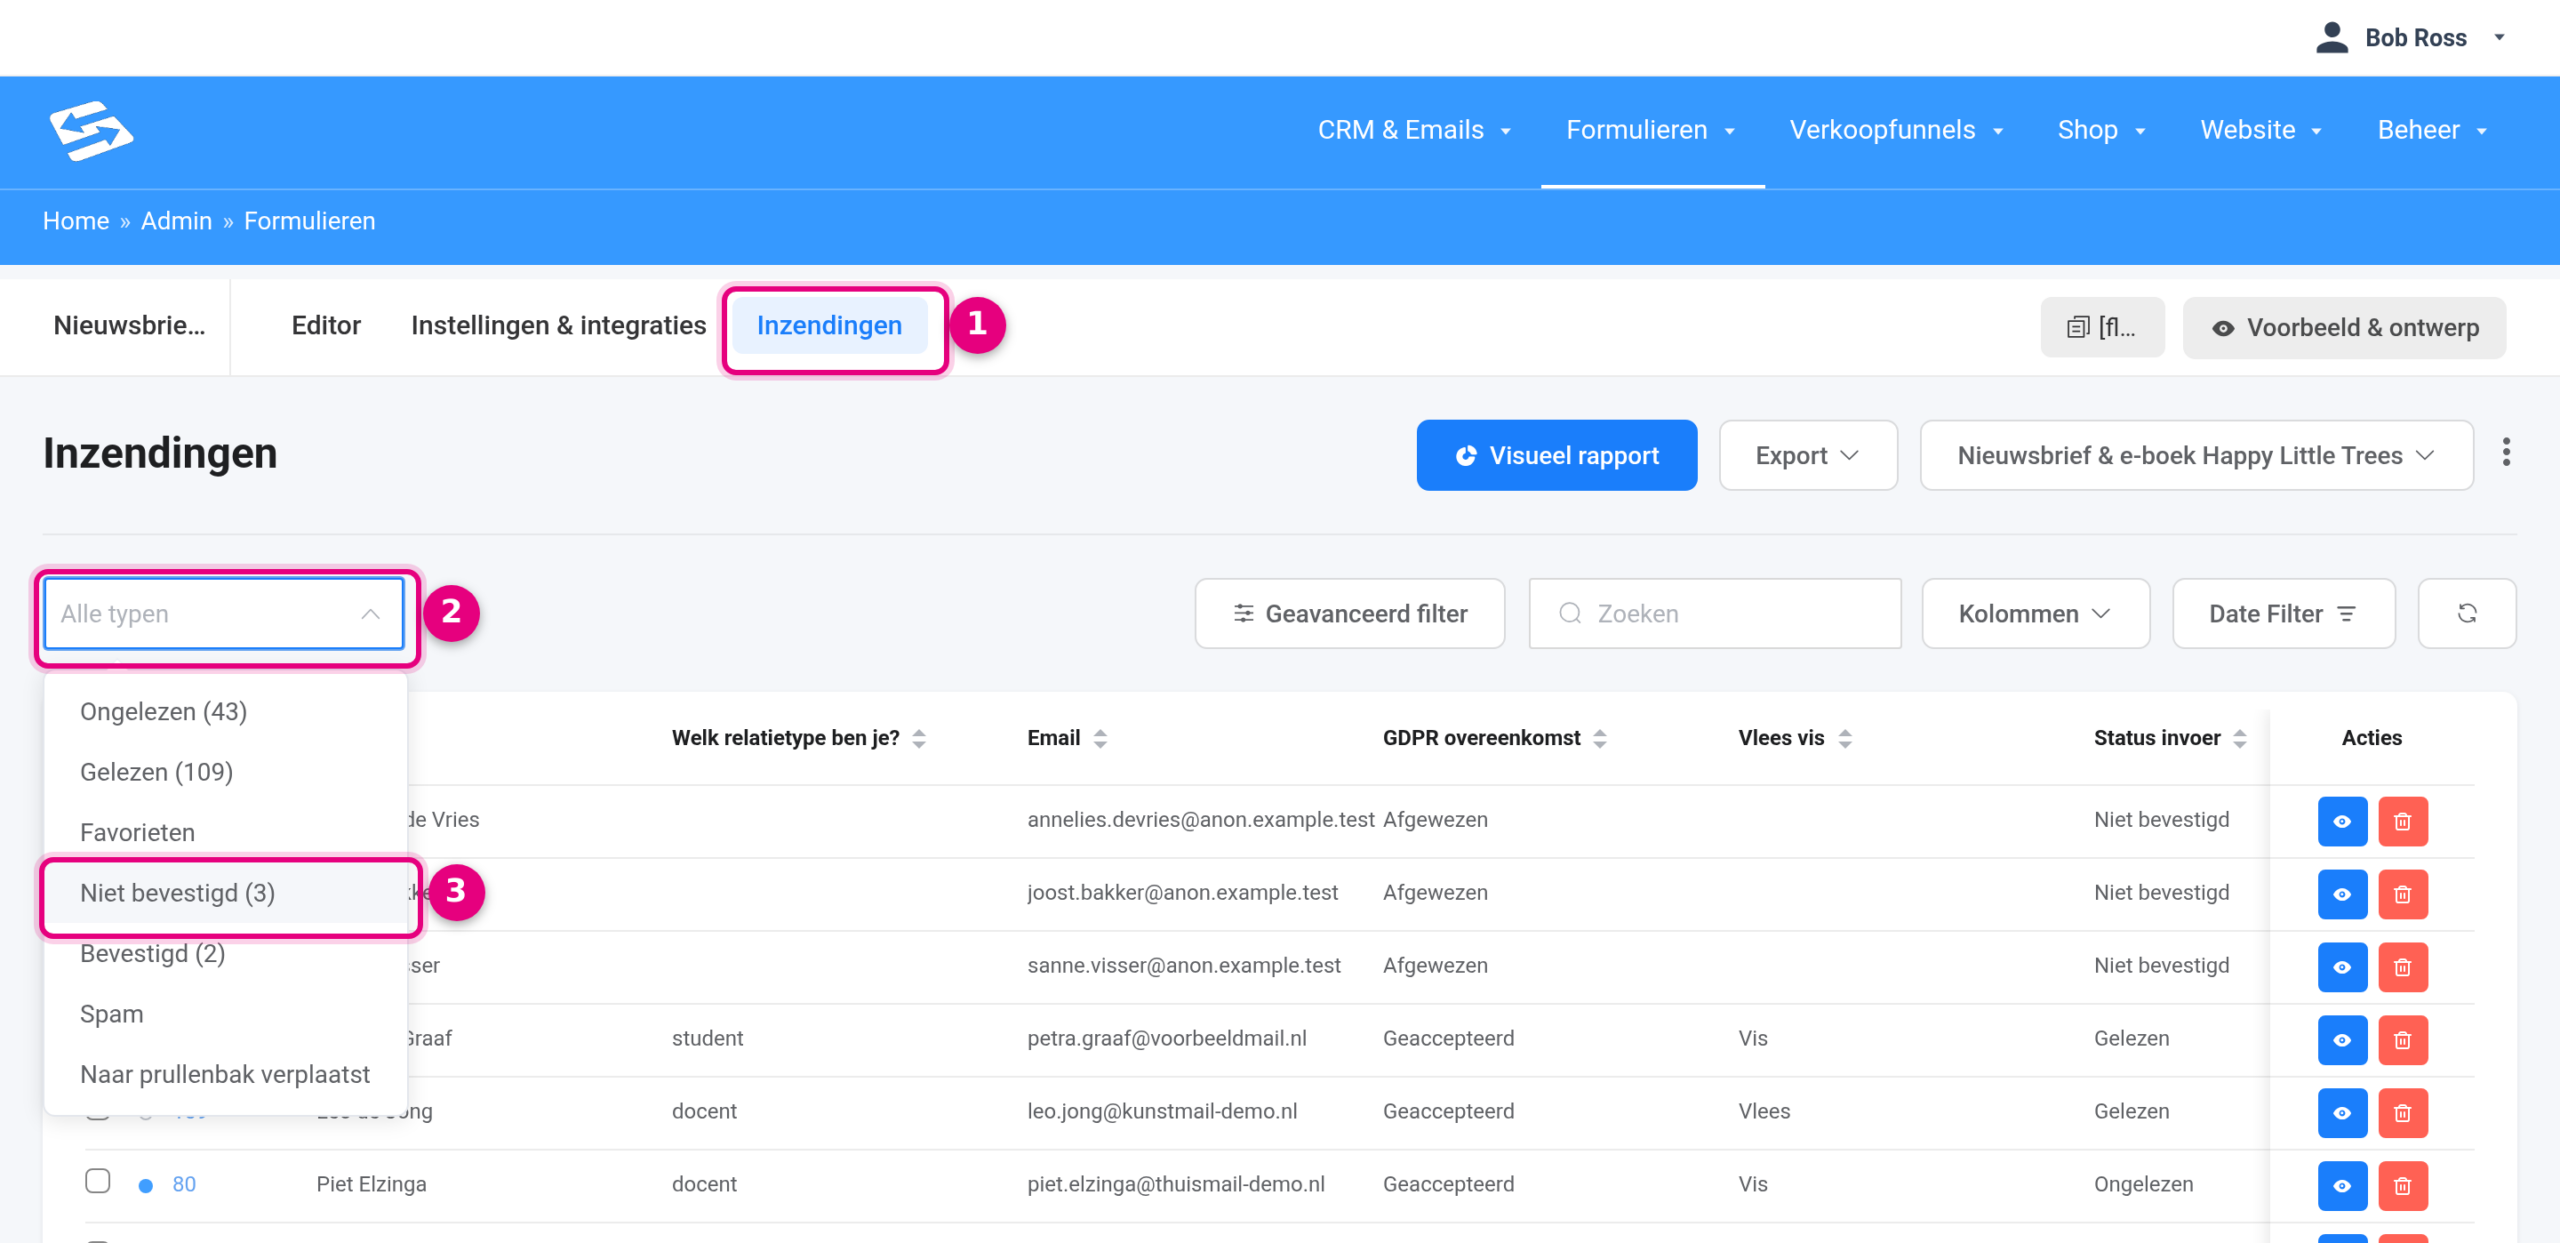
- Entries: open this tab at the top of the form. You see all the entries of this form, from newest to oldest.
- All Types: click this filter at the top left of the list. Here you choose which entries you want to see, with the number in brackets.
- Unconfirmed: choose this option. The list then only shows the people who have not clicked the confirmation email yet. Confirmed shows you who has confirmed.
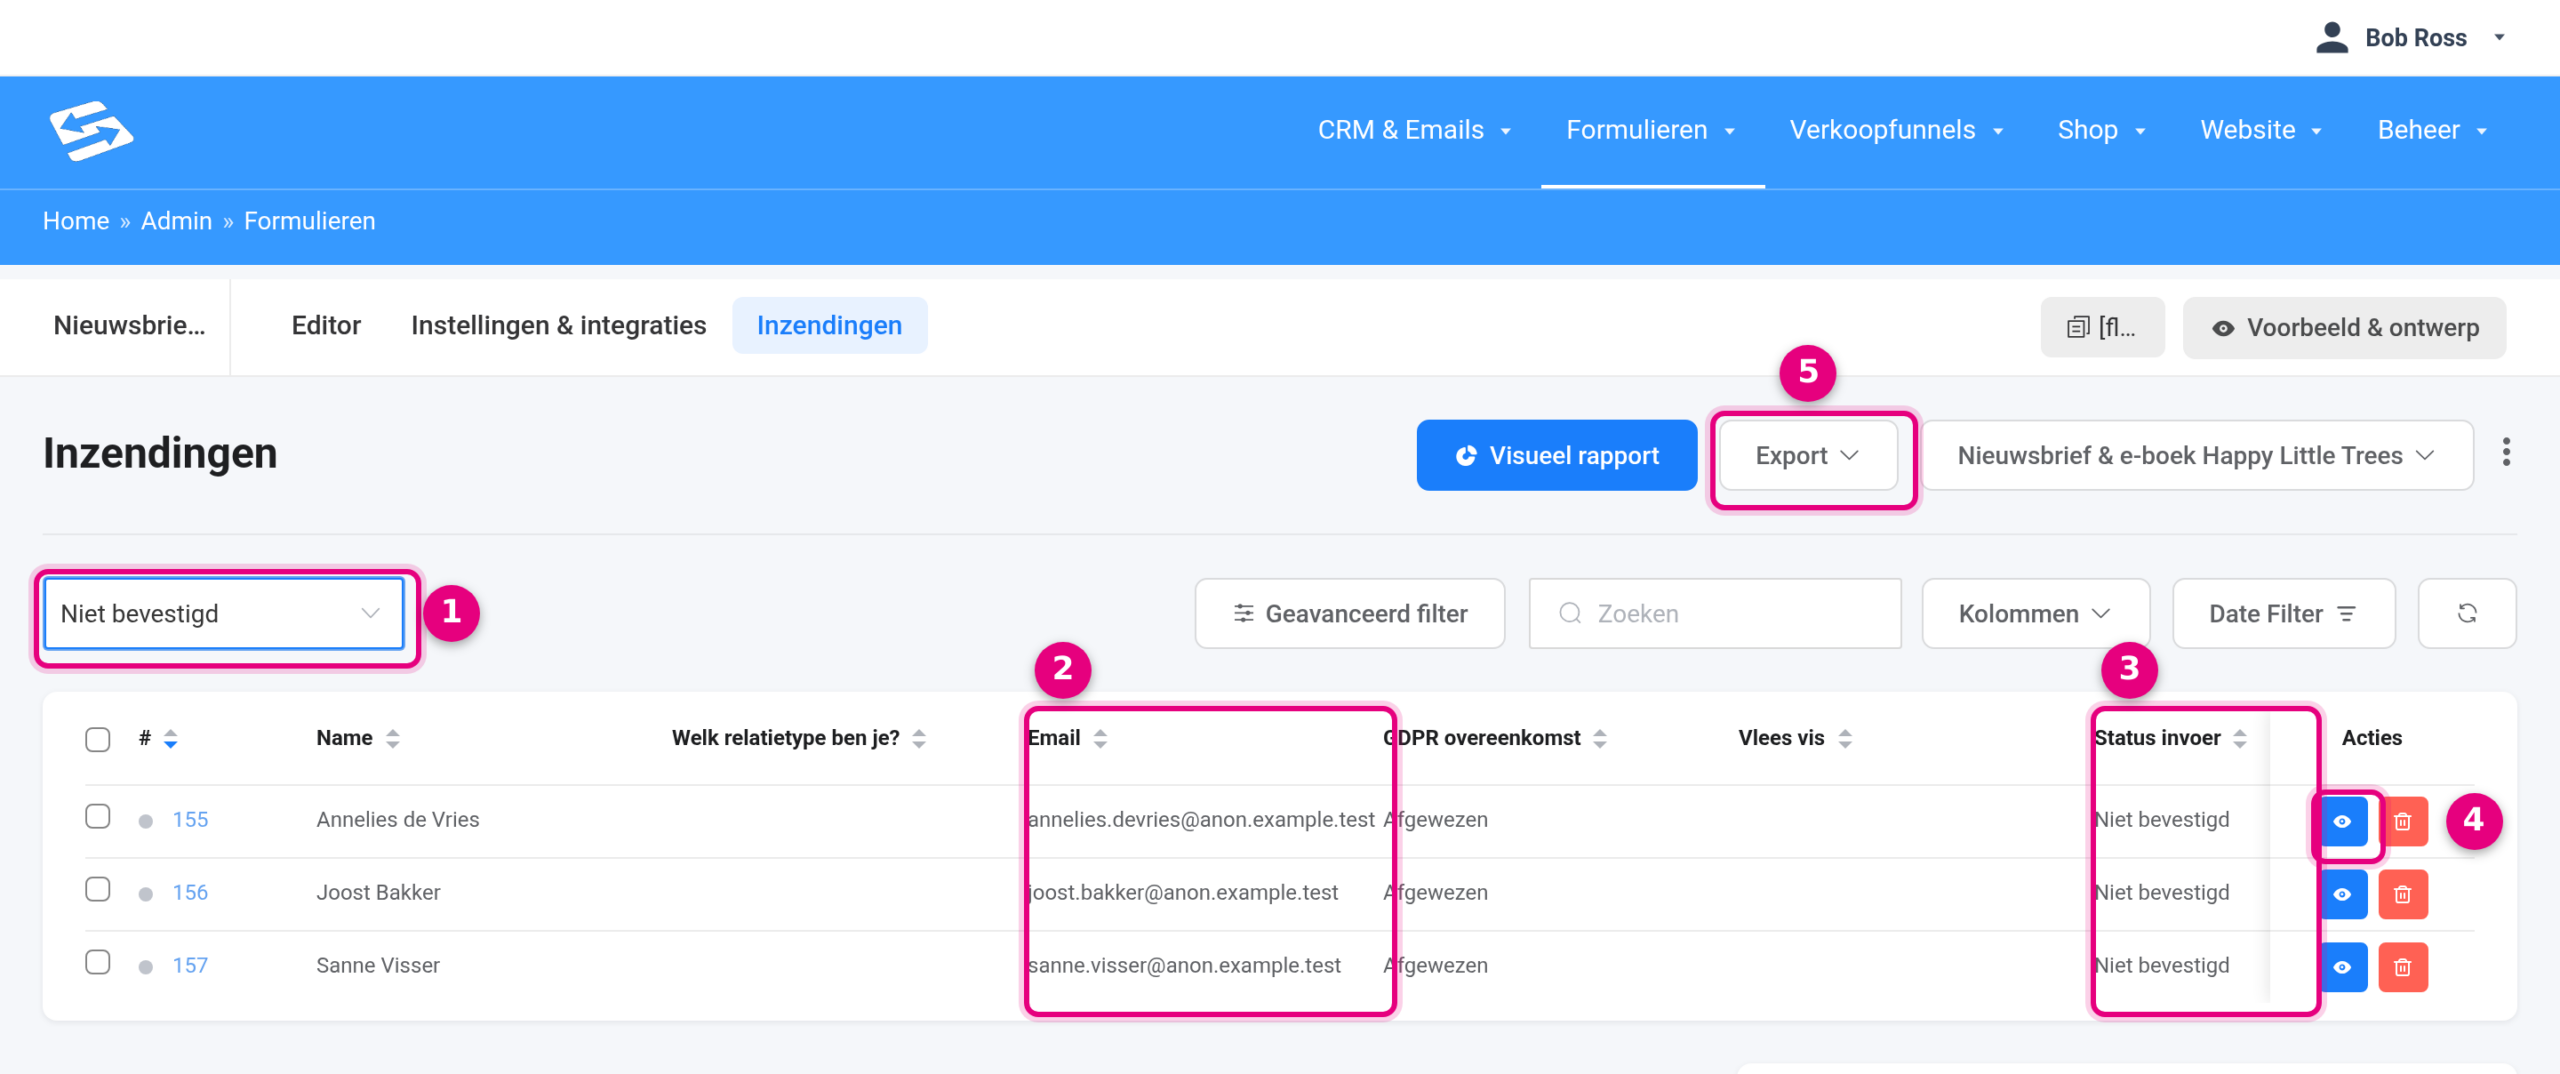
- Unconfirmed: the filter is now on. To see everything again, choose another option in the same filter or clear it.
- Email: the email address the person signed up with. That is also where the confirmation email went.
- Entry Status: shows Unconfirmed or Confirmed for each entry.
- View (the eye icon): opens the full entry with all the fields filled in and the date it was submitted.
- Export: puts the entries shown into a file (for example CSV or Excel). Handy if you want the unconfirmed sign-ups of a whole week in one list.
The filter works per form. If you use several forms with double opt-in, repeat these steps for each form.
2. Please note: unconfirmed entries are deleted after 5 days #
By default, entries that have not been confirmed within 5 days are deleted automatically. That is deliberate: you don’t keep the details of people who don’t complete their sign-up for longer than necessary. It does mean you can no longer find an unconfirmed sign-up from two weeks ago. If you check once a week, for example, set the number of days a little higher.
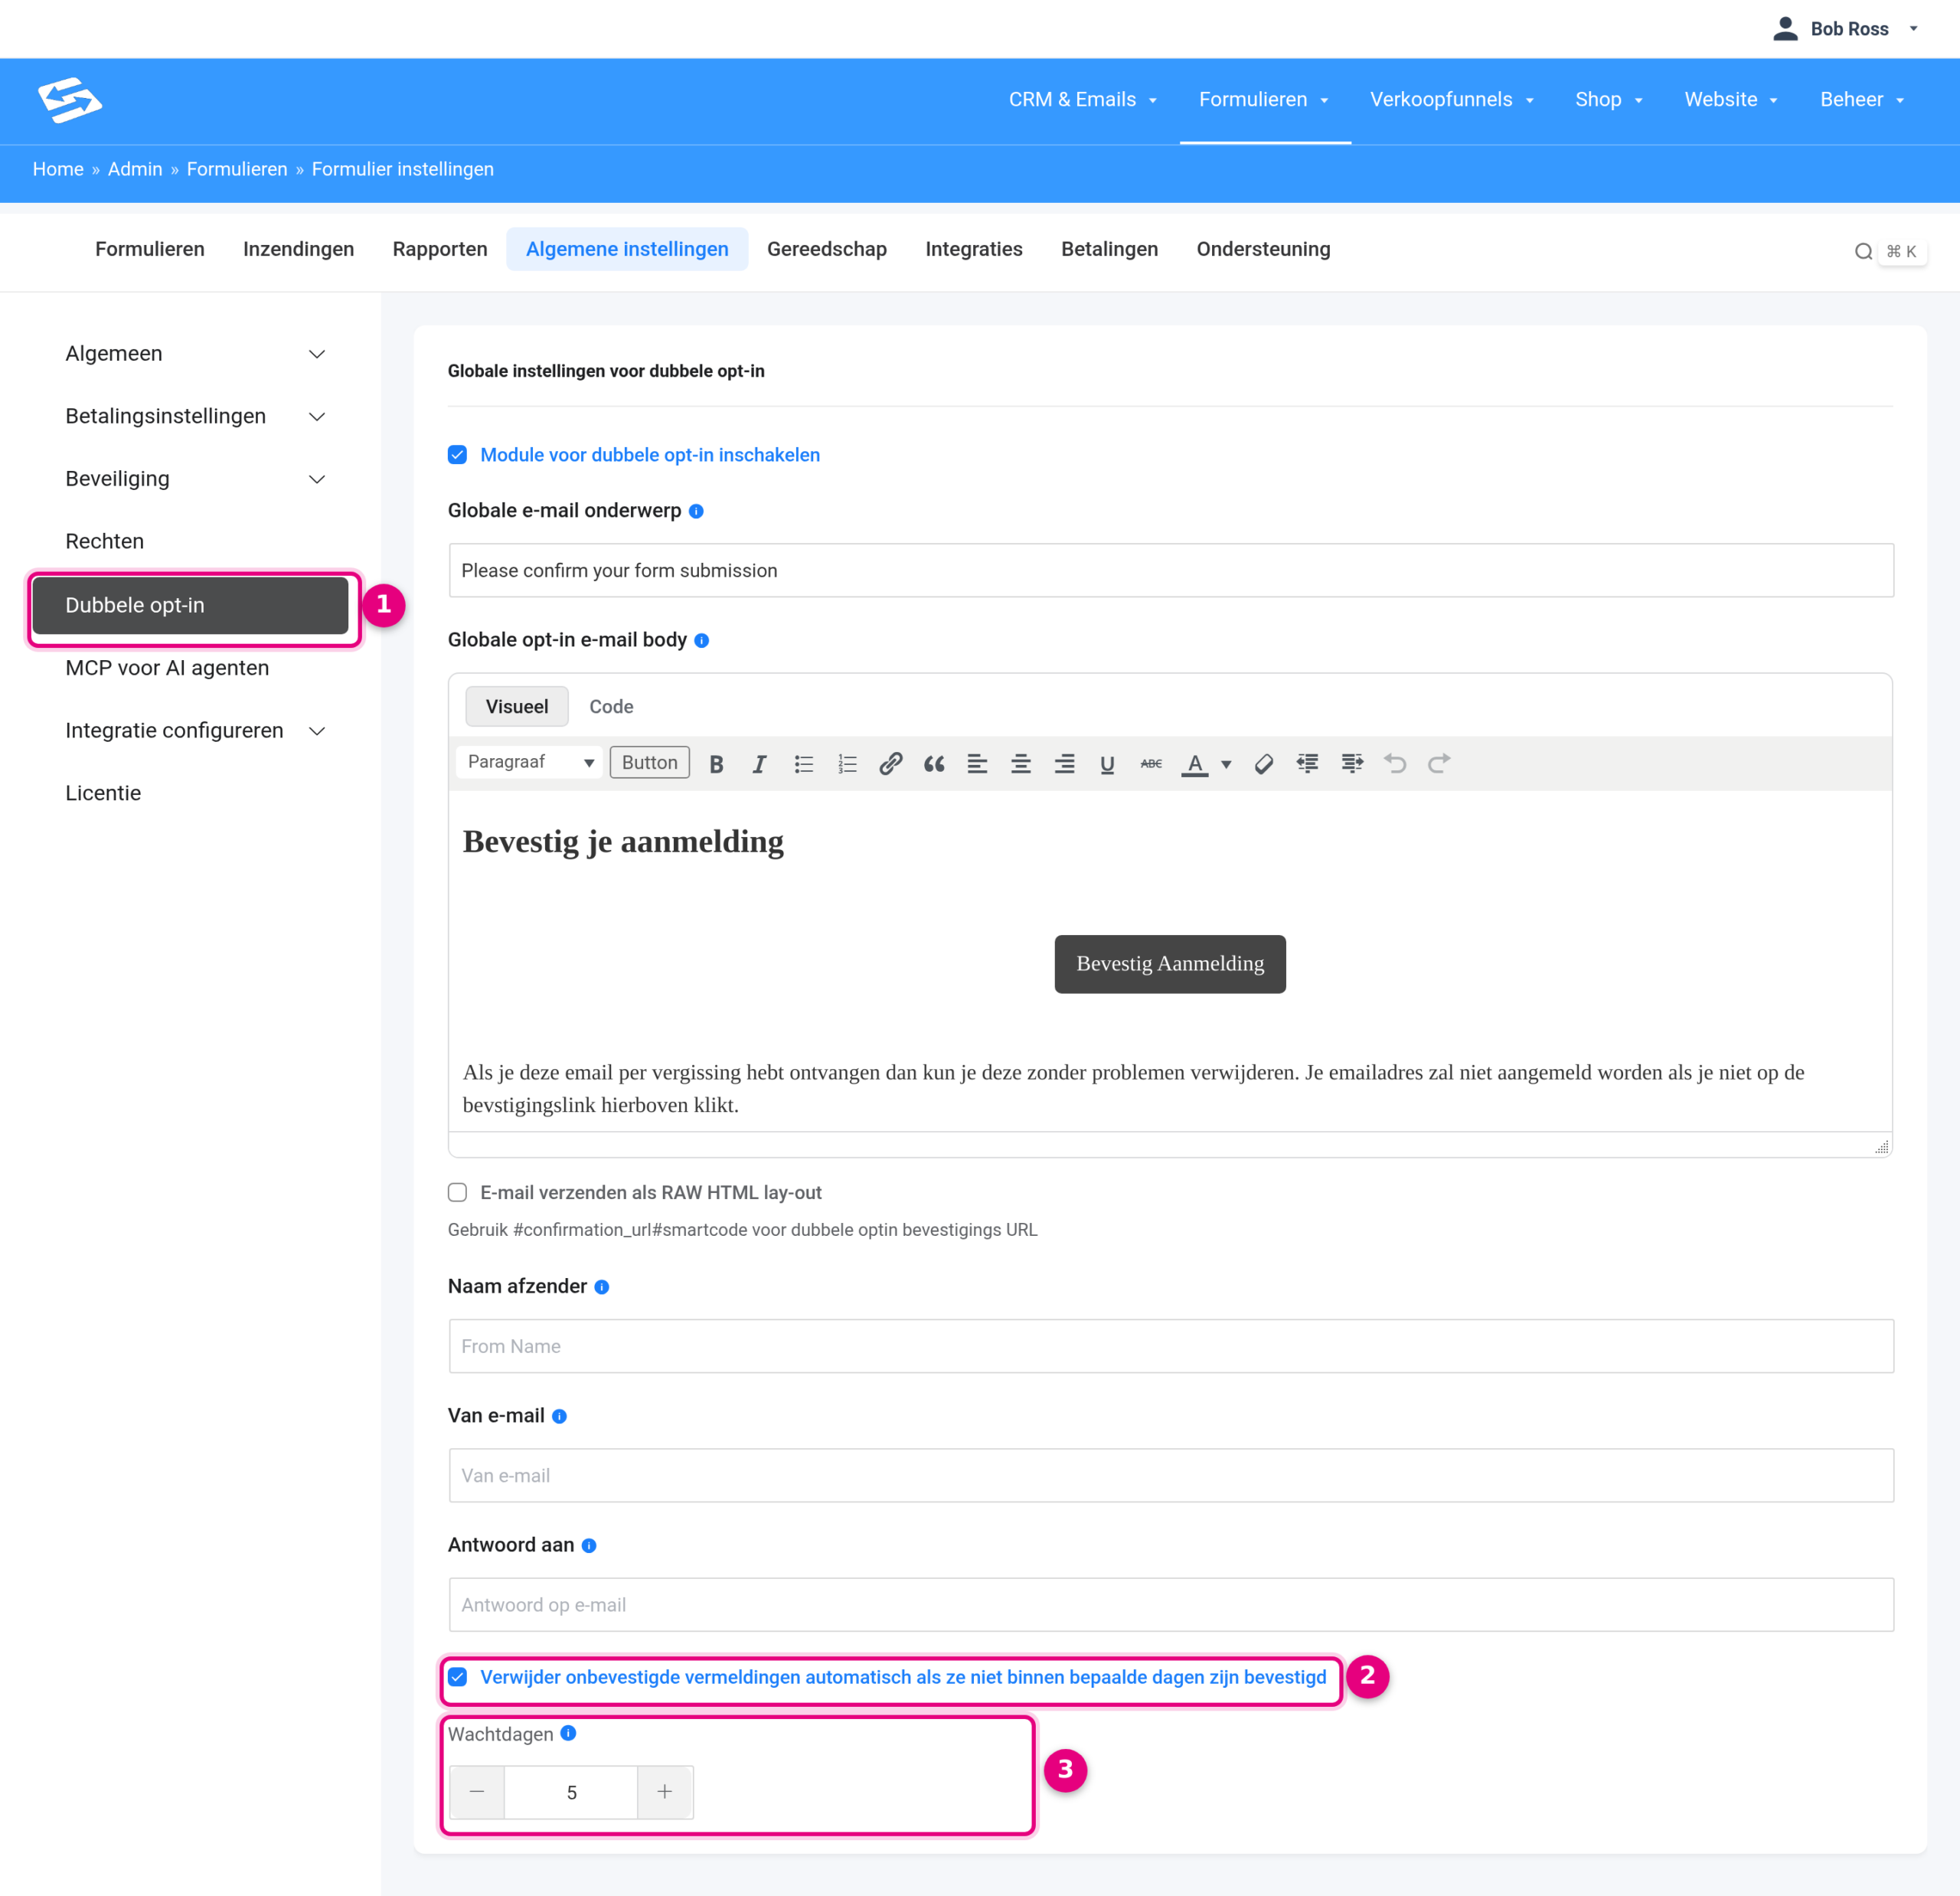
- Double Opt-in: go to Forms → Form settings and click Double Opt-in on the left. These settings apply to all your forms.
- Delete Unconfirmed Entries automatically if not confirmed in certain days: on by default. Leave this on; only switch it off if you have a good reason to keep unconfirmed details indefinitely.
- Wait Days: the number of days before an unconfirmed entry is deleted. If you check weekly, 10 days is a good value, for example. Then save the settings at the bottom of the page.
3. What you can do with unconfirmed sign-ups #
A personal email to ask whether someone is still interested is fine. Don’t add unconfirmed sign-ups to a list or to your CRM as a contact yourself: without confirmation they have not given permission to receive your newsletter or other mailings. Often the confirmation email has simply ended up in the spam folder; feel free to mention that in your message. If someone does click the confirmation button after all, the sign-up is processed automatically and the automation starts.
4. Checking whether a form uses double opt-in #
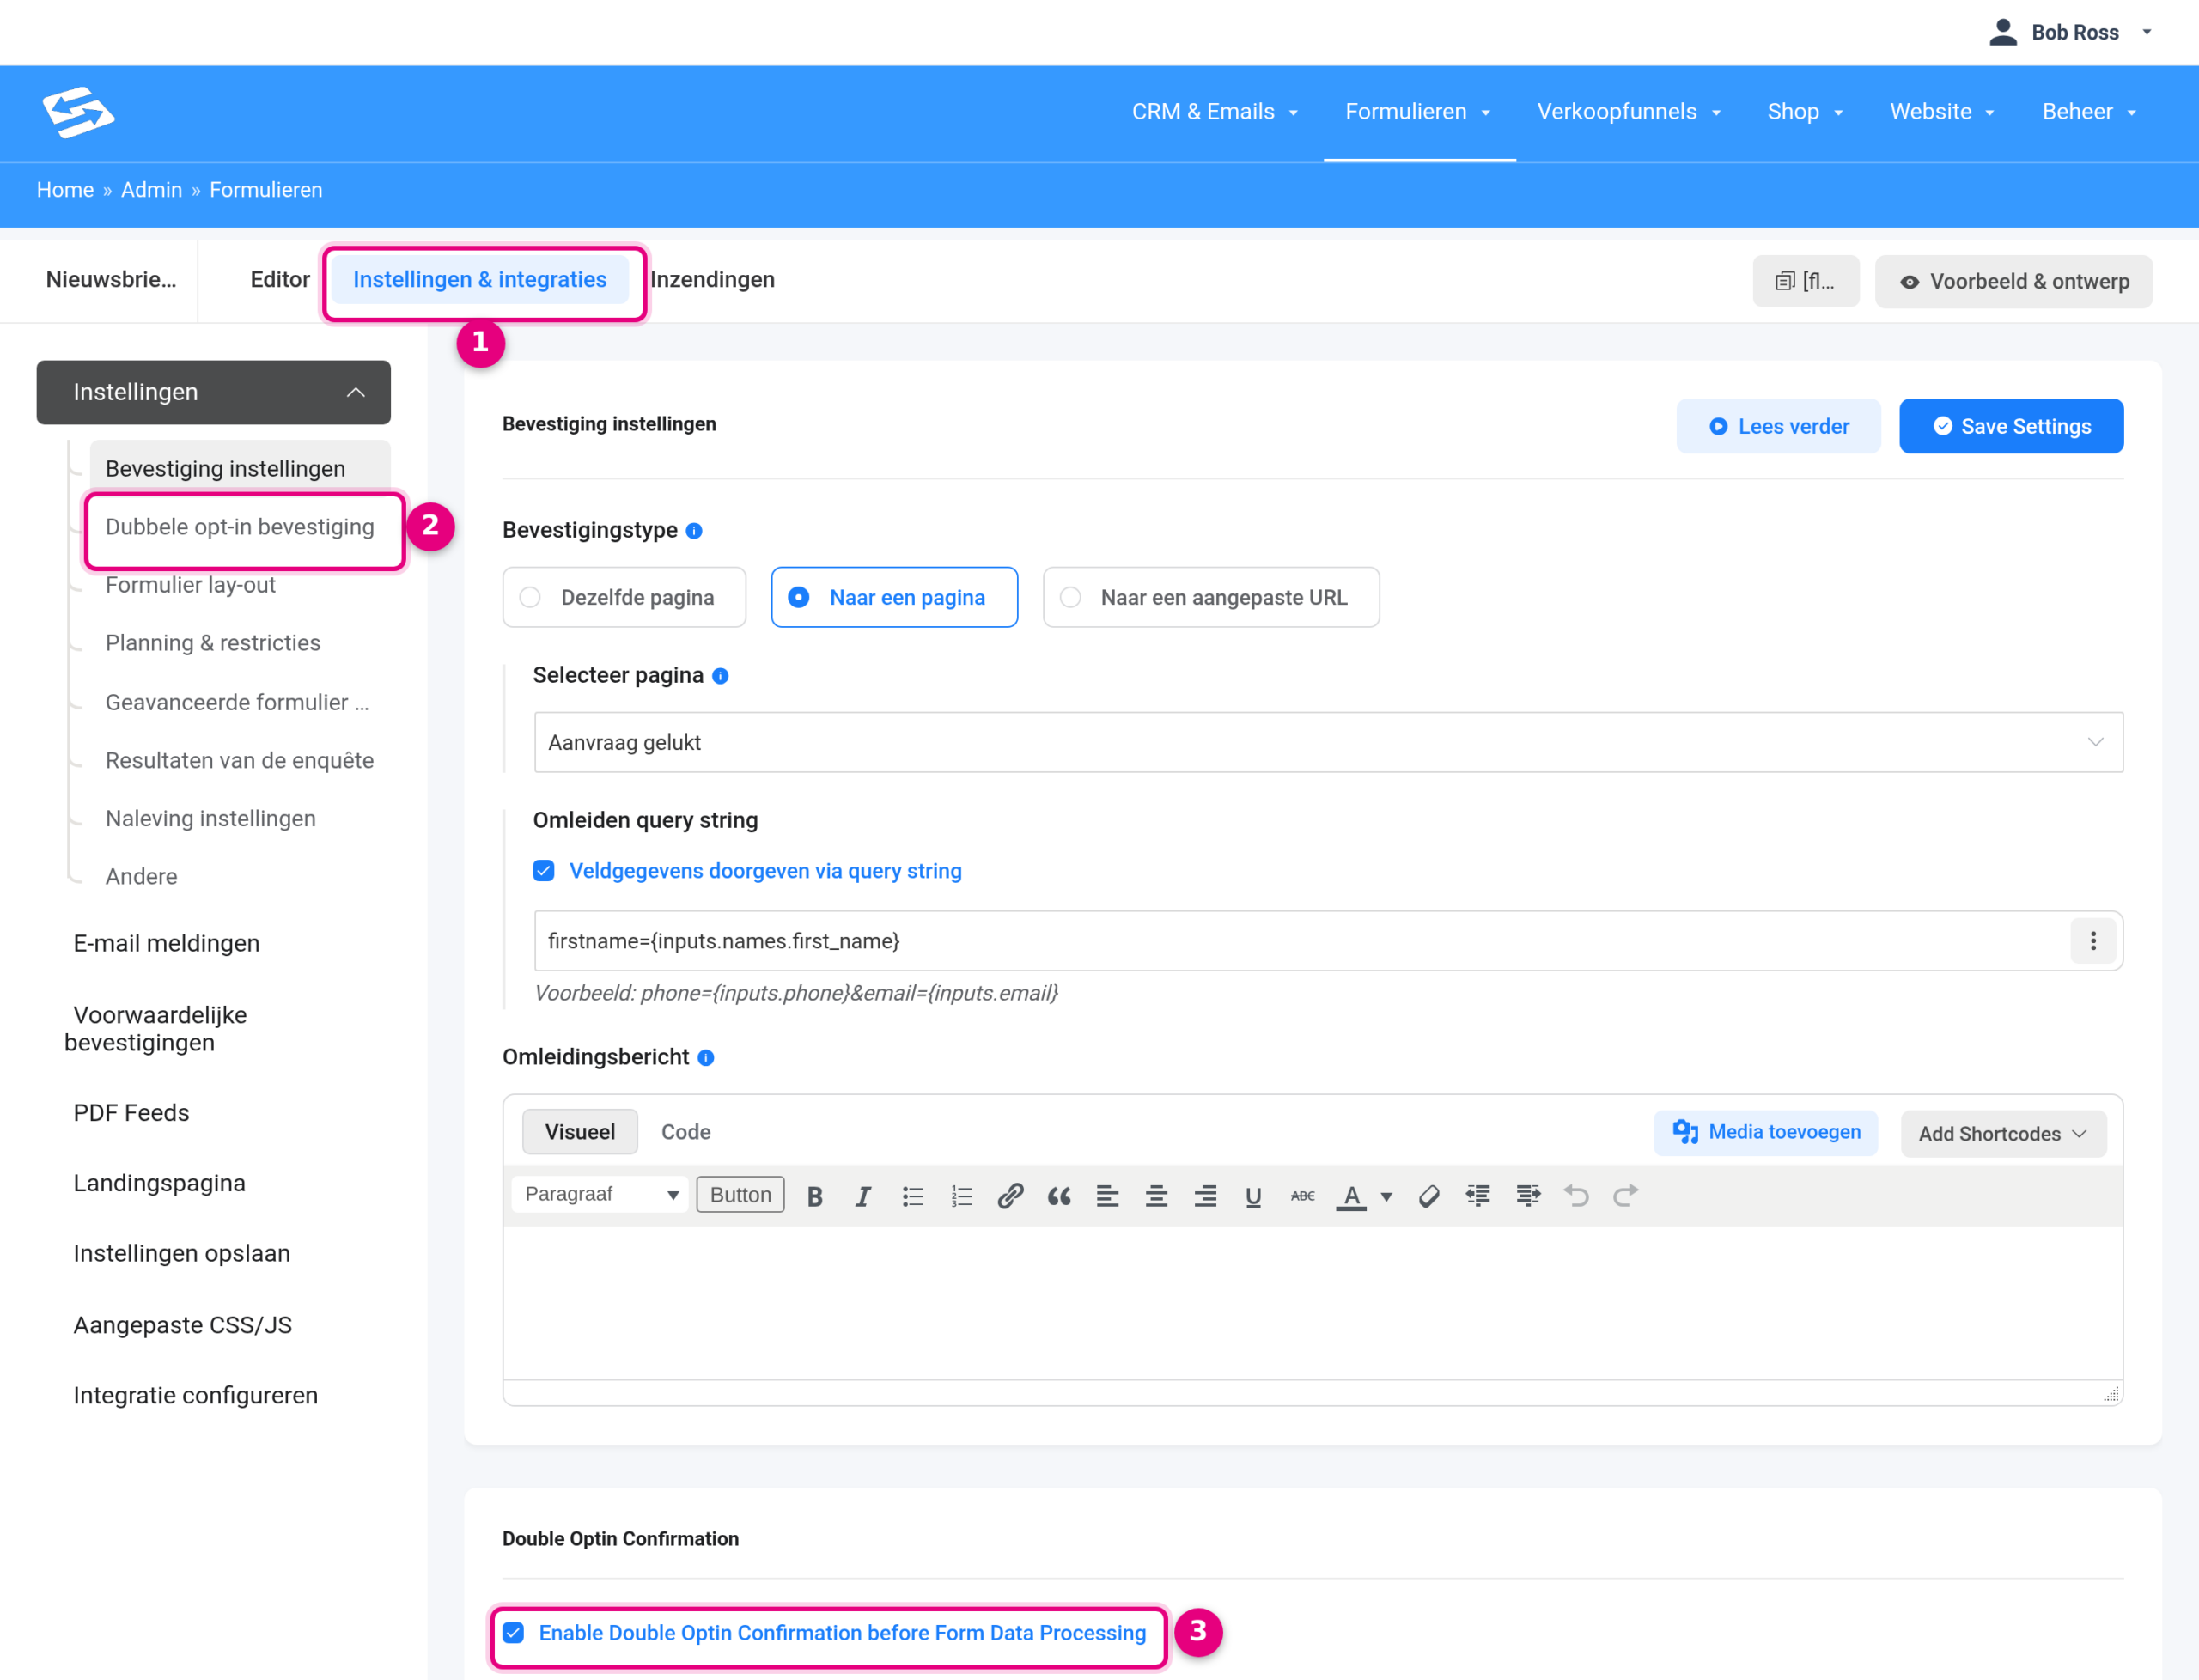
- Settings & Integrations: open this tab at the top of the form.
- Double Optin Confirmation: click this item in the menu on the left, under Settings.
- Enable Double Optin Confirmation before Form Data Processing: if this box is ticked, the form uses double opt-in and unconfirmed sign-ups appear in the entries. Below this box you also set the text of the confirmation email and the message shown after the form is submitted.


