Has the URL of a page changed, or have you deleted a page? Then you do not want visitors to end up on an error message (404 page). With a redirect you automatically send visitors, and search engines such as Google, on to the correct new page. This is crucial for a good user experience and for keeping your SEO value.
In this article we explain step by step how to create redirects within the Autorespond platform.
Step 1: Go to the redirect overview #
To start, go to the SEO settings of your website.
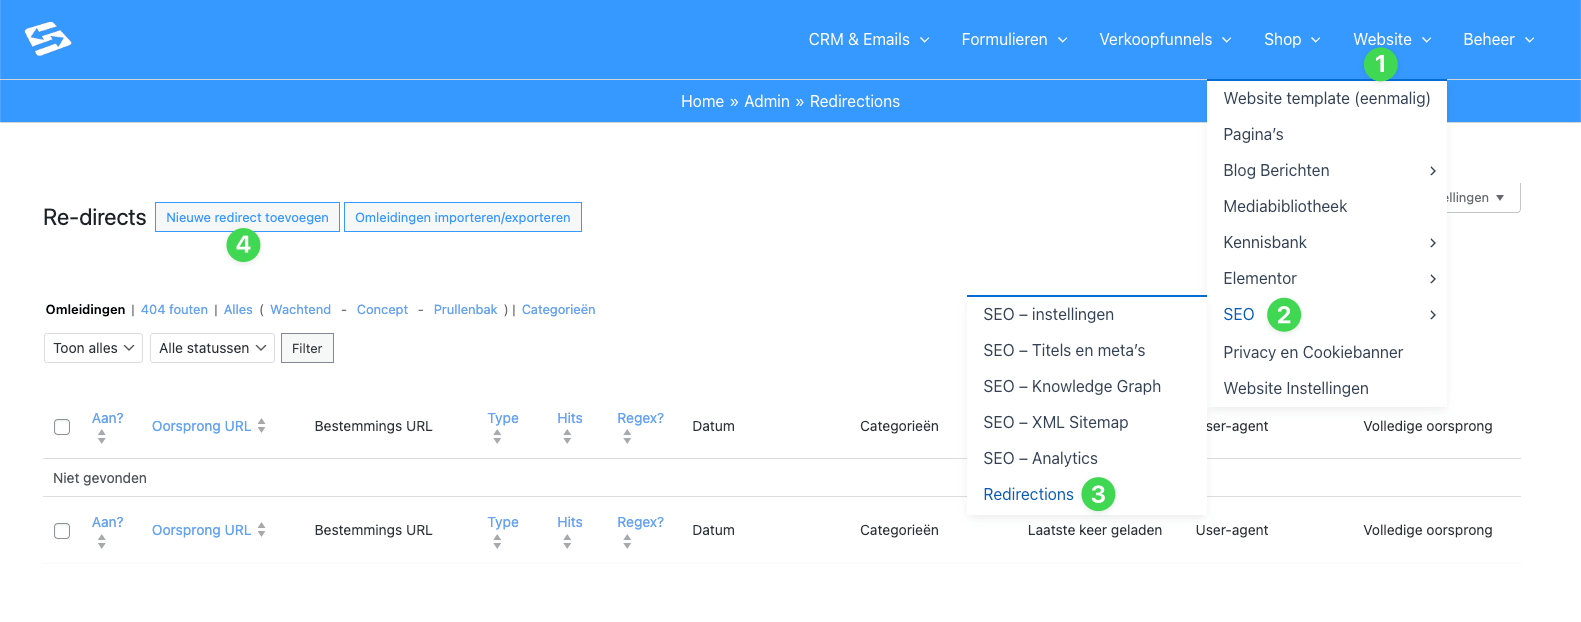
- In the blue menu bar at the top, go to (1) Website.
- In the drop-down menu, choose (2) SEO.
- Then click the option (3) Redirections.
- You now see an overview of existing redirects. Click the button (4) Add new redirect to create a new one.
Step 2: Setting up the redirect #
You now reach the screen where you can enter the details of the redirect. Below we walk through the numbered steps you see in the image.
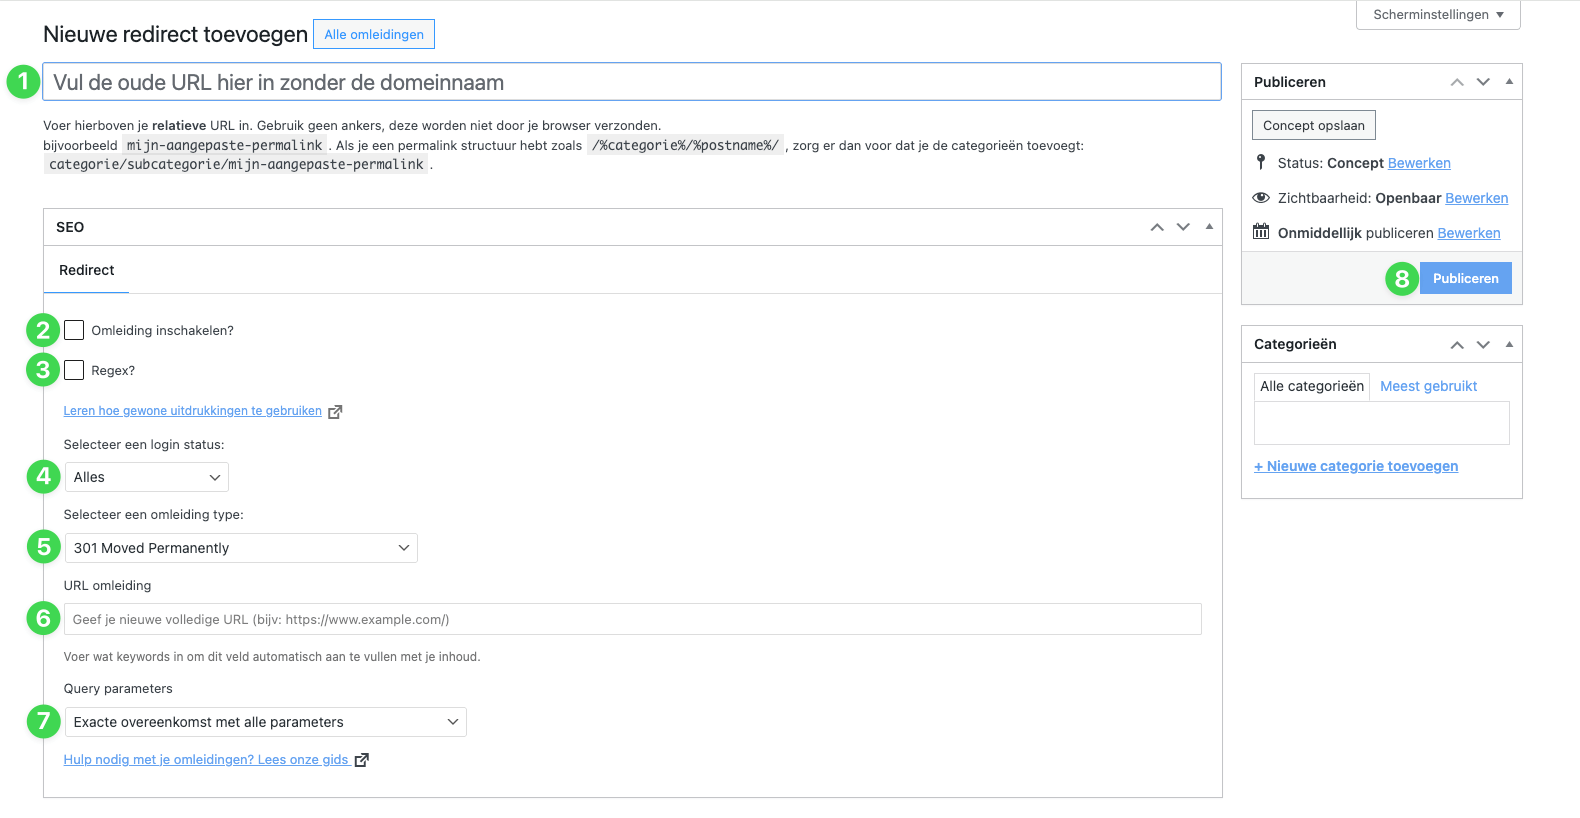
1. The old URL Here you enter the URL you want to redirect (the page that no longer exists or has moved).
- Please note: Use a relative URL here. This means you leave out the domain name.
- Example: If the old page was `www.yourwebsite.com/old-page`, you only enter `/old-page` here.
2. Enable redirect Tick this box to make the redirect active straight away. If you leave it unticked, the rule is saved but the redirect does not work yet.
3. Regex (advanced) Do you want to redirect a whole group of pages at once based on a pattern? Then you can tick ‘Regex’ (regular expressions).
- Tip: This is an advanced function. Not sure what it does? Then leave this box empty.
4. Login status Here you can determine who the redirect applies to.
- All: The redirect works for everyone (default setting).
- You can also choose to redirect only logged-in users or only logged-out visitors.
5. Redirect type Choose here how search engines should interpret the redirect.
- 301 Moved Permanently: Use this almost always. It tells Google: “This page has moved for good”. This passes the SEO value (ranking) of the old page on to the new one.
- 302 Found: Use this only if the move is temporary.
6. The new URL (target) Here you enter the destination: the page the visitor should go to.
- Please note: Enter the full URL here, including `https://`.
- Example: `https://www.yourwebsite.com/new-page`.
7. Query parameters Sometimes a URL contains extra parameters (for example `?source=newsletter`).
- Exact match with all parameters: The redirect only works if the URL matches exactly, including those extra pieces of code. In most cases the default setting is enough here.
8. Publish Happy with the settings? Then click the blue Publish button in the ‘Publish’ block on the right. Your redirect is now active straight away.
Frequently asked questions (FAQ) #
I have created the redirect, but I still see the old page or an error message
This is often caused by the ‘cache’ (the memory) of your browser. Try opening the page in an incognito window or clear your browser cache. Does it work then? In that case the redirect is set up correctly.
Can I also redirect to a completely different website?
Yes, you can. Because you enter a full link at step 6 (the new URL), you can also send visitors to an external website, for example a partner page or a social media profile.
What is the difference between a 301 and a 307 redirect?
A 301 is permanent; you are effectively saying that the old URL will never return. A 302 or 307 is temporary; you are sending people on for now, but the old URL may come back later. For SEO a 301 is almost always the best choice.


