Do you use Moneybird for your bookkeeping? Then you can connect your webshop to it directly. Every paid order is placed in your Moneybird administration as a sales invoice automatically, including the creation of contacts and credit notes for refunds. That way your bookkeeping is always up to date, without retyping and without external links in between such as Zapier.
The Moneybird integration is a built-in function of your Autorespond environment, included in your package. You can read more about Moneybird itself in the Moneybird help centre.
Worth knowing beforehand #
- The information only flows one way: from your webshop to Moneybird. Nothing in your webshop is ever changed from Moneybird, your orders are and remain leading.
- Moneybird never sends emails to your customers itself. All order and invoice emails come from your own environment, as you are used to.
- The integration is switched off by default. It only starts doing anything once you deliberately activate it with an API key.
Step 1: Create an API key in Moneybird #
The integration needs a key so it is allowed to place invoices in your administration on your behalf. You create it in Moneybird itself in a few clicks.
- Log in to moneybird.com and open the administration you want to connect.
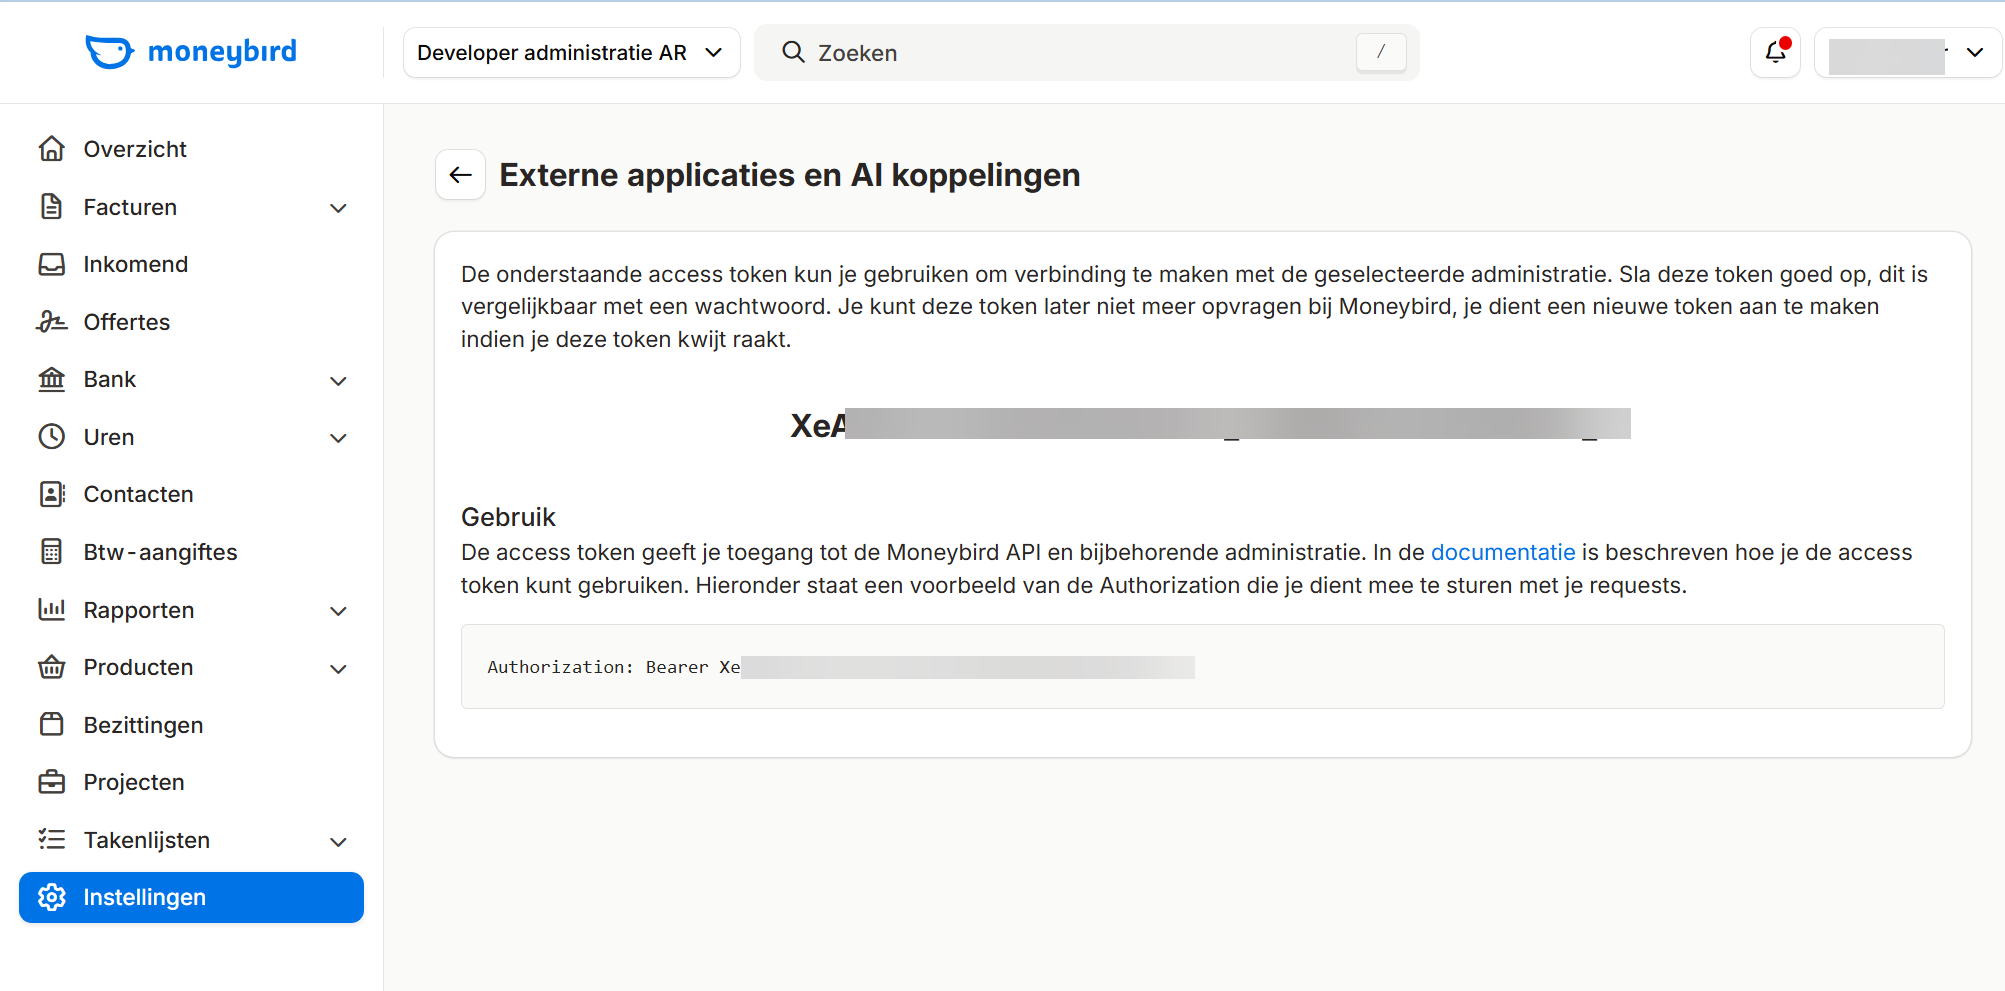
- Go to Settings (the cog at the bottom left) → External and AI integrations and choose to create an API token there. Cannot find it (Moneybird renames this menu from time to time)? Then use the direct link moneybird.com/user/applications/new: that opens the right screen straight away.
- Give the key a recognisable name, for example Webshop integration.
- Under Permissions choose Read and write and in any case tick Sales invoices.
- Click Save. Moneybird now shows your key once: copy it straight away. Closed the screen too soon? Not to worry, just delete the key and create a new one.
Step 2: Activate the integration in your environment #
In the menu, go to Administration → Integrations. Here you see all the external services that are connected to your environment (or that can be connected).
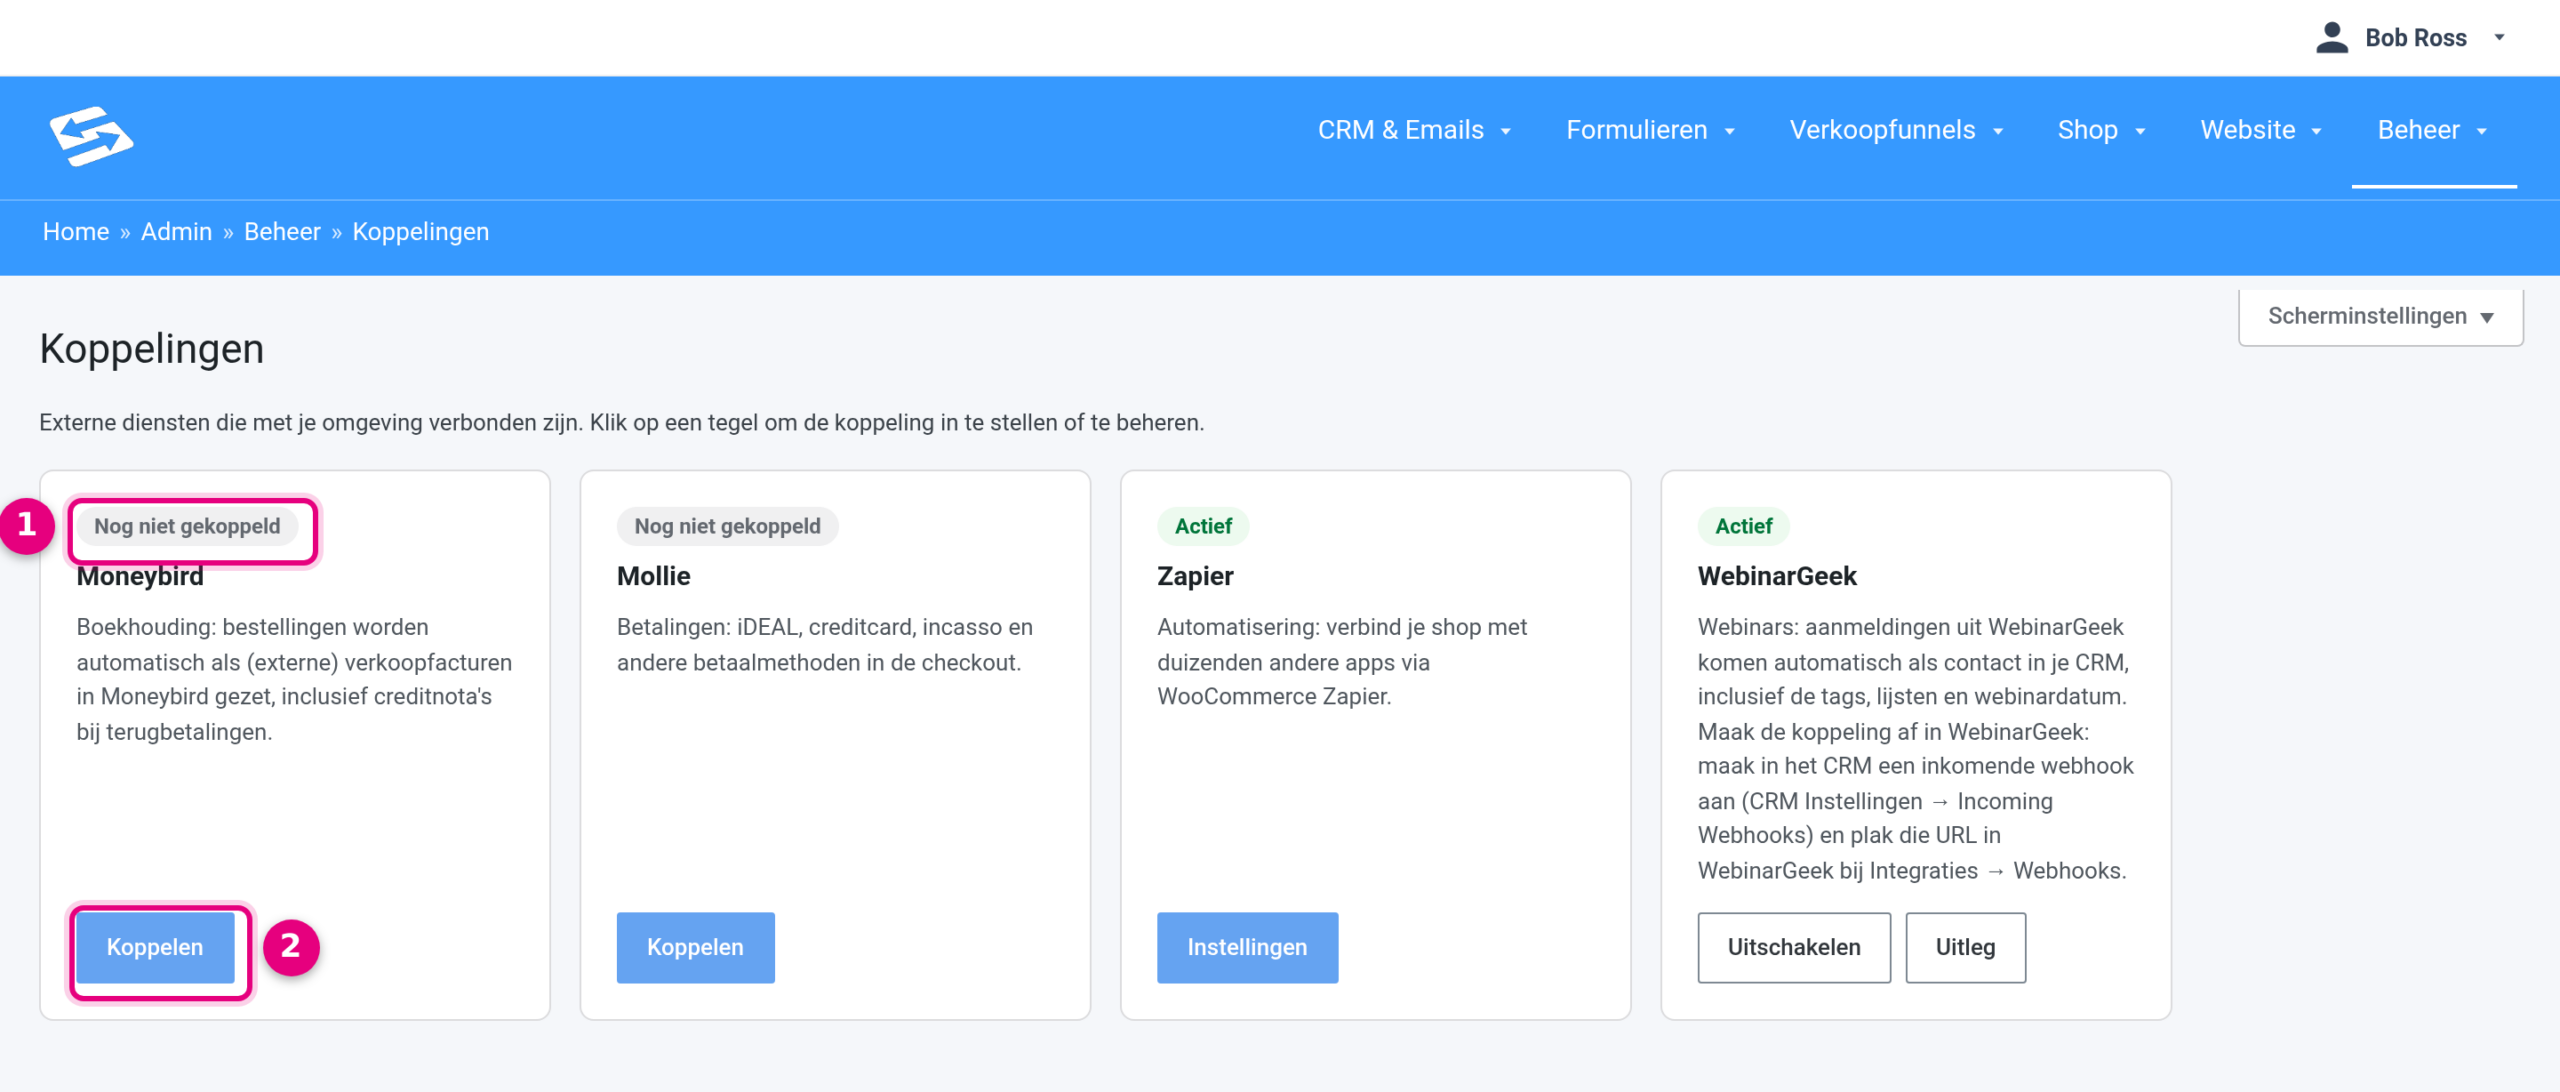
- The status badge shows for each service whether it is connected. As long as Moneybird is not connected, it says “Not connected yet” here.
- Click the button on the Moneybird tile to open the settings.
Then paste the API key from step 1 and choose your administration:
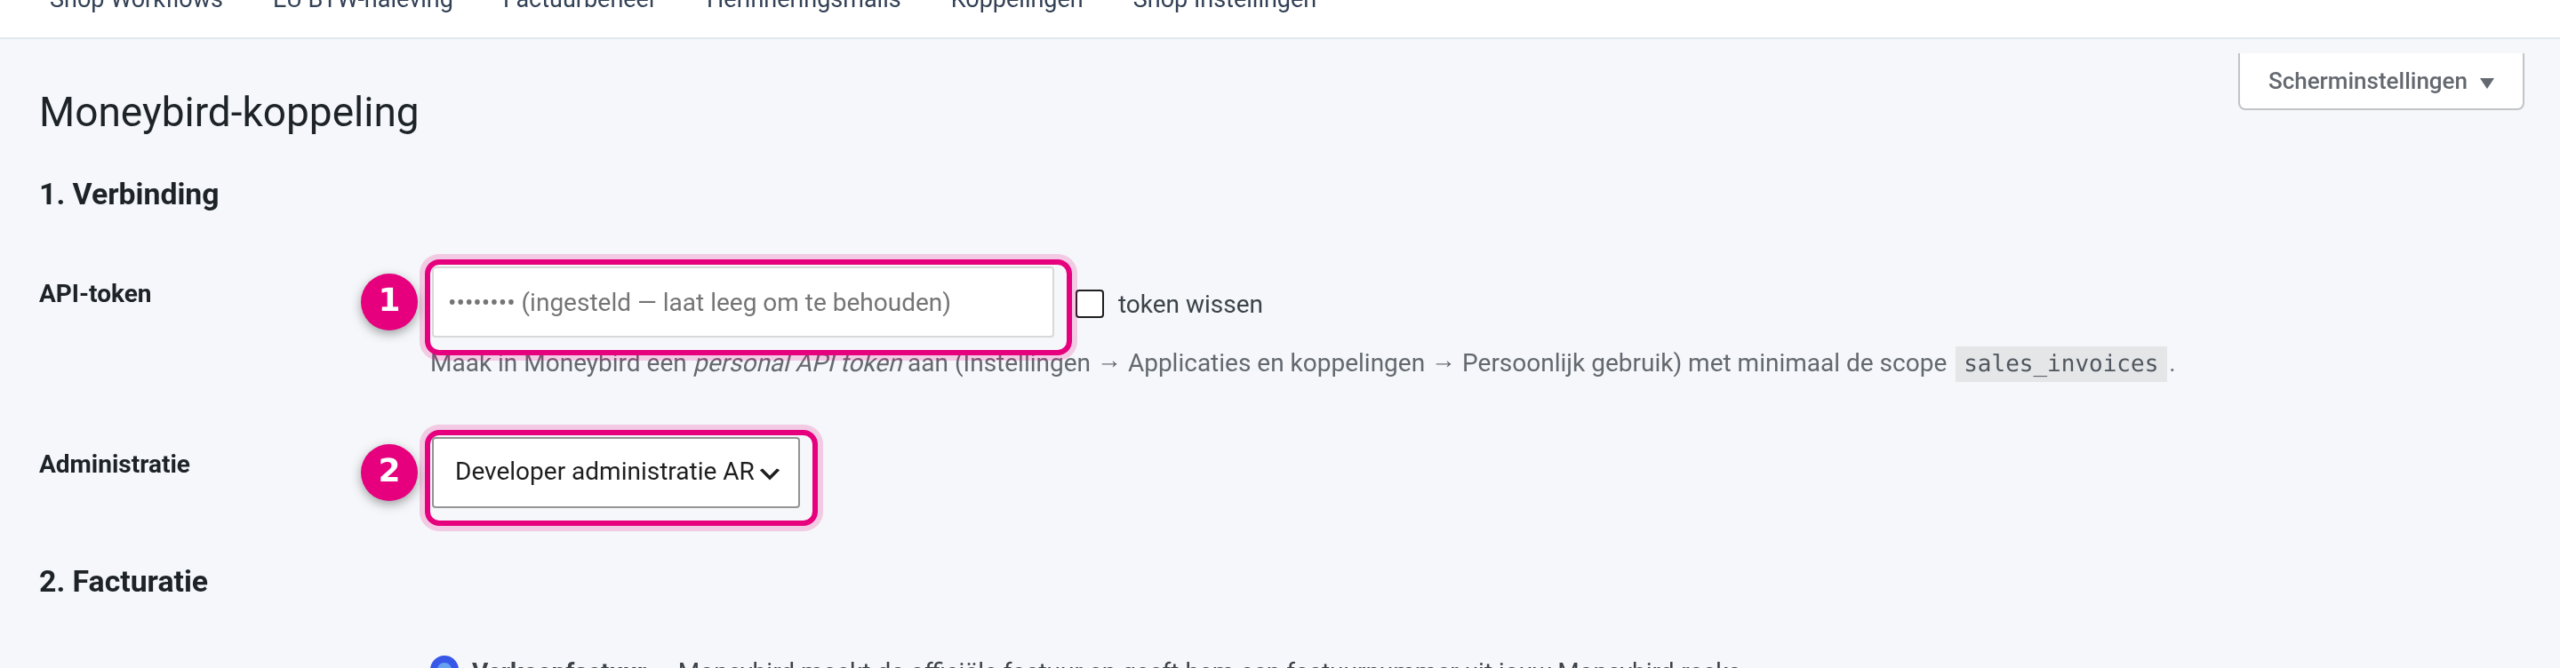
- API token: paste the key here and click Save. The key is checked with Moneybird as soon as you save; if it is not valid you will see a message about it and an earlier working key simply stays in place. The key is then shown hidden; leave the field empty to keep the saved key. Does your browser fill in a saved password here uninvited? Then clear the field before you save.
- Administration: choose your Moneybird administration and click Save again. Do you see the green message “Integration active” at the top? Then the connection is in place.
Step 3: Choose how invoicing works #
Under the heading Invoicing there are a few choices. The default settings are exactly right for most shops, but do go through them calmly:
- Invoice type: on Autorespond sites this is set correctly by default, to External sales invoice. After all, your webshop already creates the official PDF invoice for your customer with Invoice management; Moneybird only books the revenue, with the invoice number of that invoice as the reference. That way there is exactly one invoice per order. Only choose Sales invoice if your site does not create its own invoices and Moneybird has to be your invoice book.
- Invoice at status: leave this on Processing to invoice directly after the payment.
- Make the invoice final?: leave this on Yes, make final straight away. If you want to check every invoice in Moneybird yourself first, choose prepare as a draft (no payment is registered in that case either).
- Register payment: with this box ticked, the invoice in Moneybird is marked as “paid” as soon as the order has been paid.
Step 4: Map your VAT rates #
Moneybird needs to know which VAT rate belongs to which product group. You set that once under the heading VAT mapping.
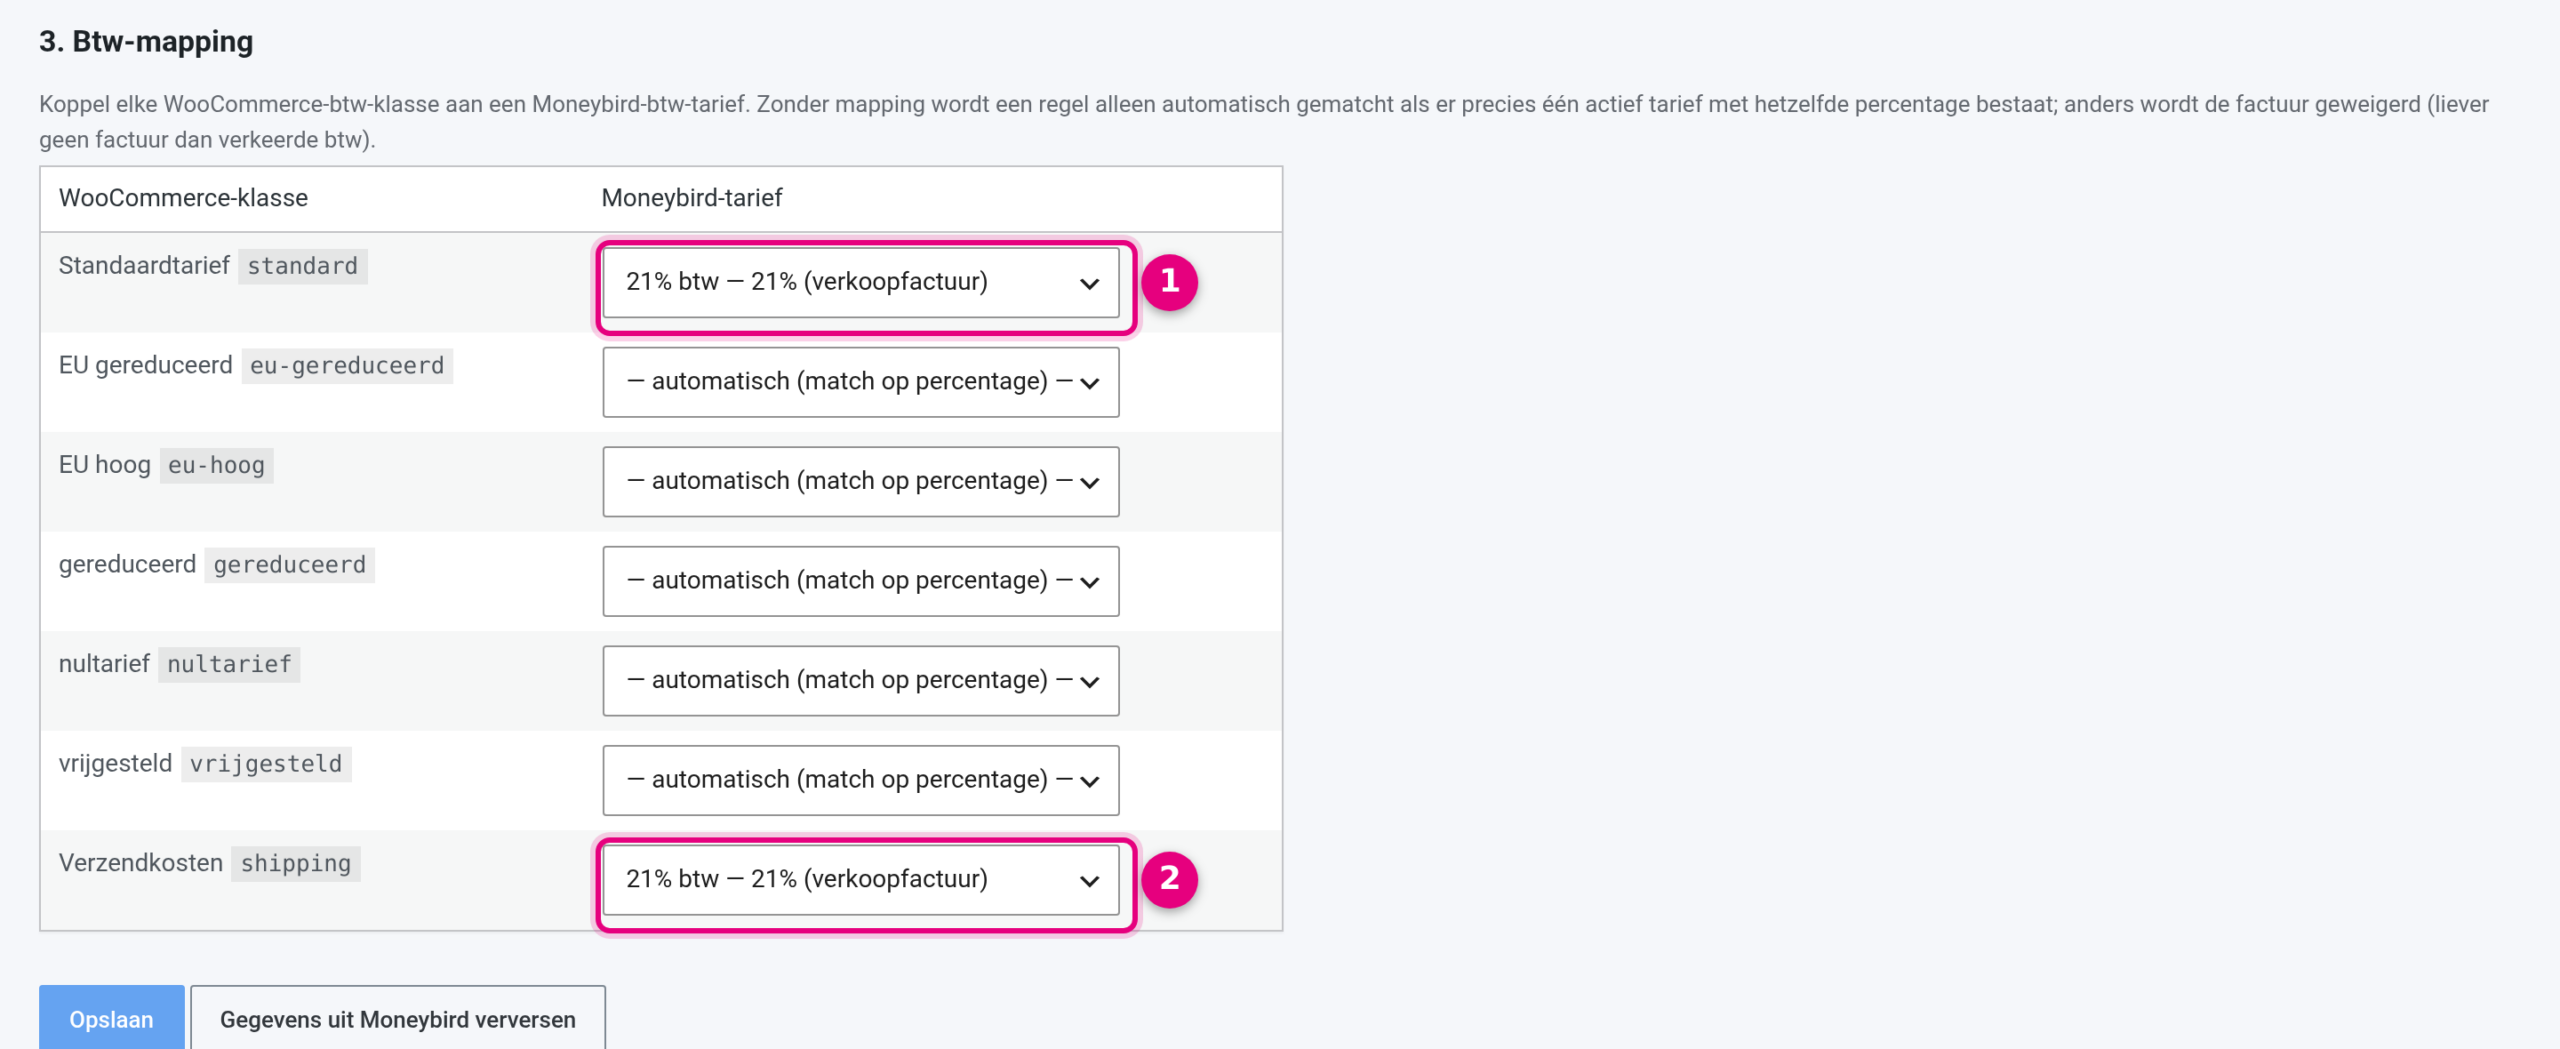
- For each WooCommerce VAT class, choose the matching Moneybird rate. For most shops it is enough to link the Standard rate to “21% VAT”.
- Do not forget the Shipping costs line, usually that is 21% as well. Then click Save.
Worth knowing: the integration never guesses at VAT. If an order comes in with a VAT class you have not mapped (and there is no unambiguous match on percentage), that order is not invoiced and you see a clear error message on the order. Better no invoice for the moment than an invoice with the wrong VAT; you then complete the mapping and try again (see step 6).
Step 5: How to follow what happens #
From now on everything runs by itself. In the order overview (Shop → Orders) you see for each order what is in Moneybird:
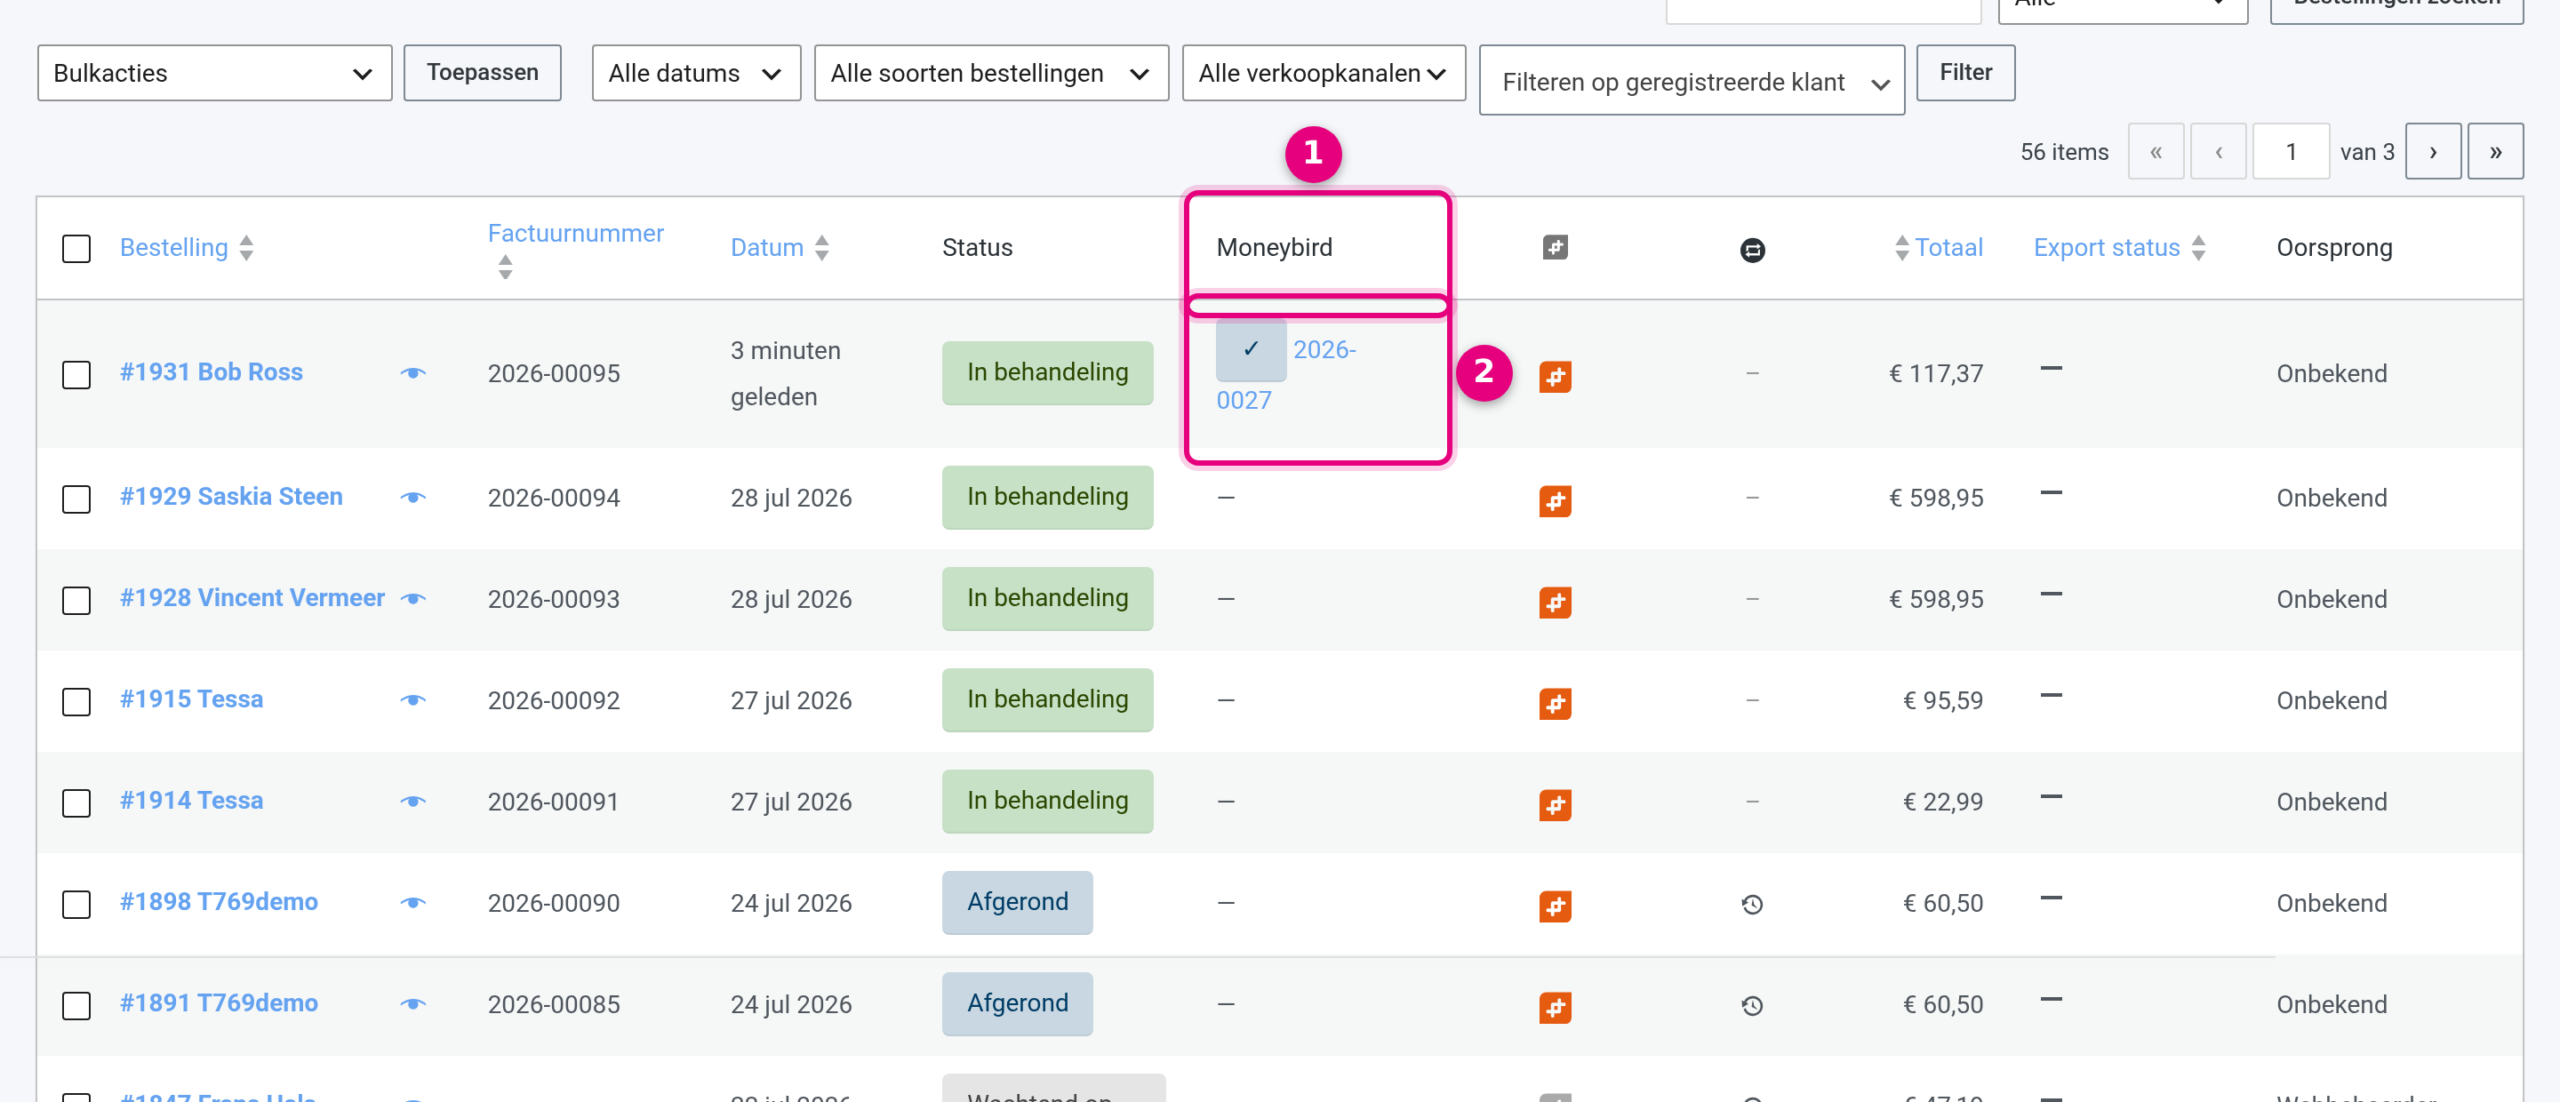
- The new Moneybird column. You can hide this column if you wish through Screen options at the top right.
- A green tick with the invoice number means: invoiced. Click the number to open the invoice in Moneybird straight away. A red cross means something went wrong (hover over it for the message), a dash means there is nothing to invoice.
On the order itself you see the Moneybird panel in the sidebar with the status and a link to the invoice. The order notes also record exactly what happened and when:
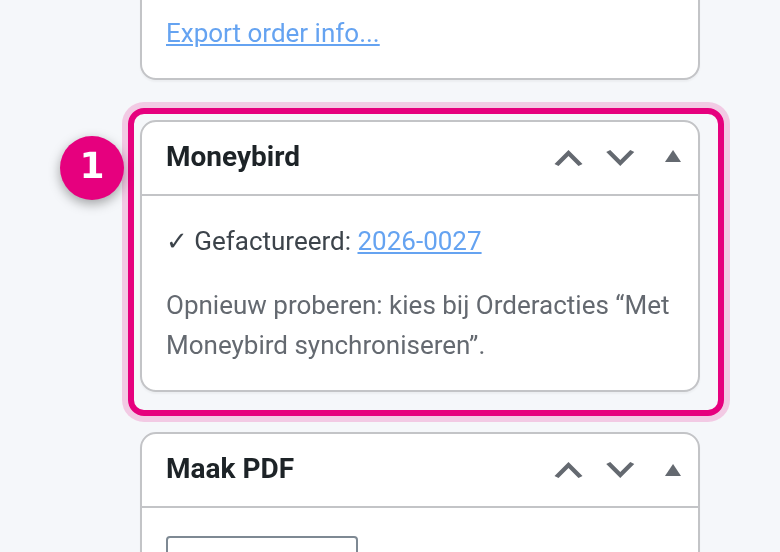
- The Moneybird panel on the order: status, invoice number (clickable) and the way to try again after an error.
Refunds: a credit note automatically #
If you create a refund on an order (full or partial), the integration automatically creates a credit note in Moneybird for exactly the refunded amount, at the correct VAT rates. You do not have to do anything for this. If you cancel an order without a refund, the invoice in Moneybird simply stays in place; only an actual refund leads to a credit note.
Step 6: If something goes wrong #
No need to panic, the integration always tells you clearly and nothing is lost.
- Do you see a red cross in the Moneybird column? Open the order and read the error message in the Moneybird panel or the order notes. Usually it is a VAT class that has not been mapped yet.
- Solve the cause, for example by mapping the missing VAT rate through Administration → Integrations → Moneybird.
- Open the order and at the top right, under Order actions, choose Synchronise with Moneybird and click the button next to it. The integration then tries again, including any credit notes that were still missing. Double invoicing is not possible: every order is placed in Moneybird at most once.

- The order action “Synchronise with Moneybird”: the button to submit an order again after a resolved error.


