Finding contacts with advanced filters #
The advanced filter lets you search for contacts very precisely, on the basis of several criteria at once. It is useful for finding all customers who bought something in the past month and live in a particular region, for example, or for identifying contacts who opened your newsletter but have never bought anything.
Advanced contact filters in Autorespond are based on FluentCRM Pro, which is included in your package. Read the English documentation
When do you use advanced filters? #
Advanced filters are most useful when a simple search is not enough. You can use them to:
- Identify specific audiences for targeted campaigns
- Track down inactive contacts you want to re-engage
- Find customers with particular buying patterns
- Segment contacts on the basis of their behaviour
- Clean up lists by identifying problem contacts
Filtering contacts with the advanced filter #
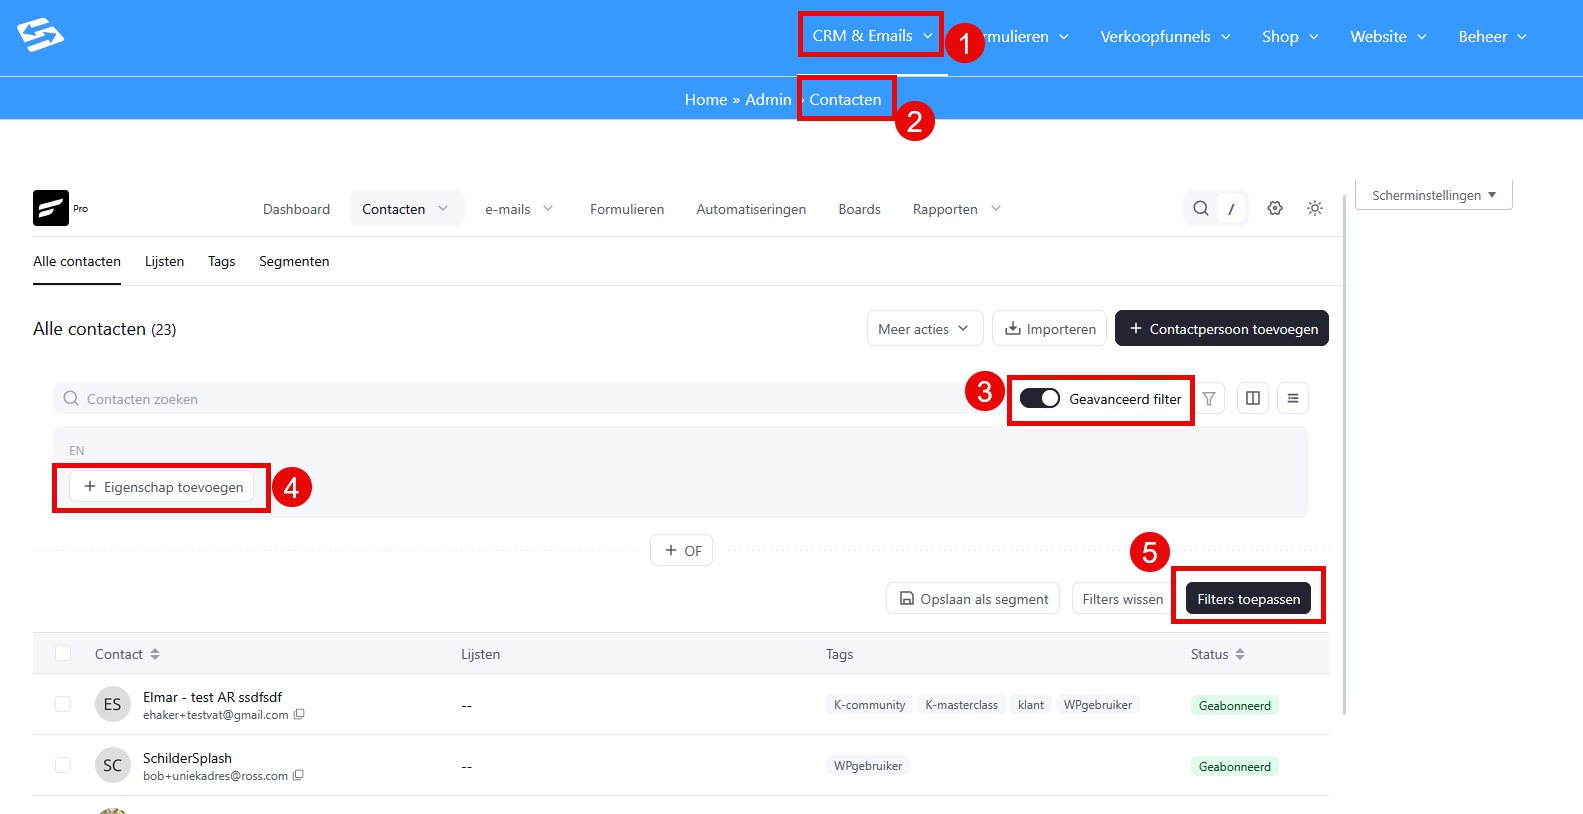
Go to CRM & Emails → Contacts (1 and 2). Select the ‘Advanced filter’ button at the top right of the bar (3). On the row below, click ‘Add property’ to add a search criterion (4). Then click ‘Apply filters’ (5) to show only the contacts that match the advanced filter.
Setting filter criteria #
You can add several filter conditions by clicking ‘+ Add property’. Between each condition you can choose:
- AND: every condition has to be true
- OR: at least one condition has to be true
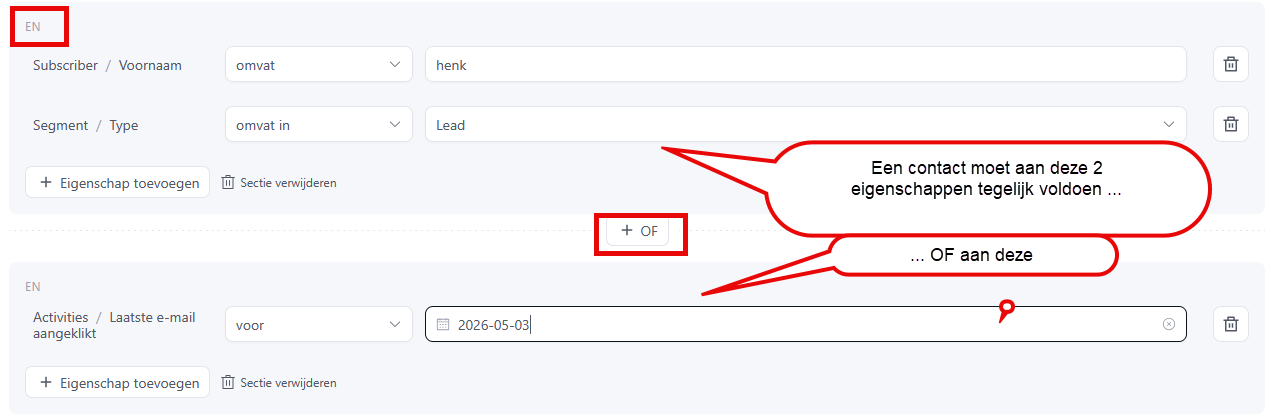
1 Filtering contacts that have to match several criteria #

If you want to filter contacts that match several criteria, for example contacts with the first name ‘Henk’ and the contact type ‘Lead’, search as follows: (in this example there is a list for ‘Newsletter’ and a list ‘Customer’)
Click ‘Add property’. A menu appears. Choose ‘Contact’ -> ‘First name’ -> ‘contains’ and enter ‘Henk’ as the ‘Condition value’.
Then we add the second criterion. Click ‘Add property’ again and choose ‘Contact segment’ -> ‘Type’ -> ‘Included in’ and then ‘Lead’.
Finally, click ‘Apply filter’ at the bottom right. The search result appears below.
2 Filtering contacts that only have to match one criterion #
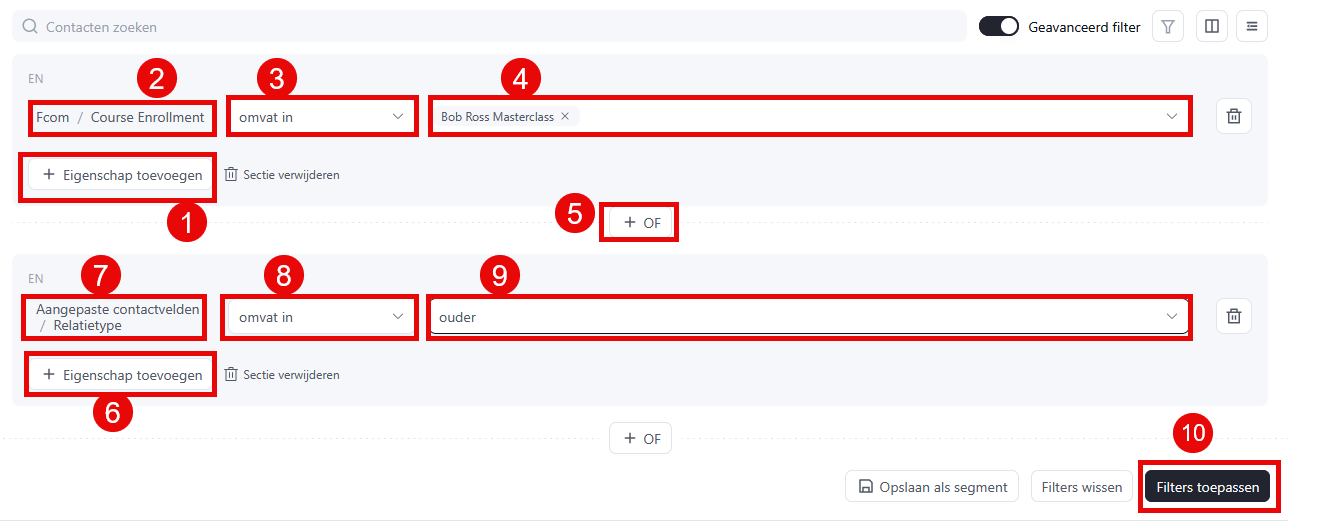
Use this when you are looking for contacts who are a member of Group A or of Group B. You might want to send a mailing to everyone enrolled in the Bob Ross Masterclass or who has the contact type ‘parent’. For this you use the ‘OR’ rule between the different criteria.
Start by adding the first criterion. Click ‘Add property’ (1). In this example you first select enrolment in the Bob Ross Masterclass. Choose ‘FluentCommunity’, then click ‘Course enrollment’ (2) -> ‘Included in’ (3) -> ‘Bob Ross Masterclass’ (4). Then click ‘OR’ (5). Now add the second criterion through ‘Add property’ (6) -> ‘Custom contact fields’ -> ‘Contact type’ (7) -> ‘Included in’ (8) -> ‘parent’. Click ‘Apply filter’ (10) to see the result.
Practical examples #
Active customers in a specific region #
Condition 1: Status equals ‘Subscribed’
AND condition 2: City contains ‘Amsterdam’
AND condition 3: Last order within the past 90 days
Inactive newsletter recipients #
Condition 1: Status equals ‘Subscribed’
AND condition 2: Last email opened not within the past 180 days
AND condition 3: Created more than 30 days ago
Viewing and using the filter results #
You can then carry out all kinds of actions on the filtered list:
- Create a new list from these contacts
- Add tags to every contact found
- Send an email campaign to this specific group
- Export contacts to a CSV file
- Run bulk actions such as changing the status
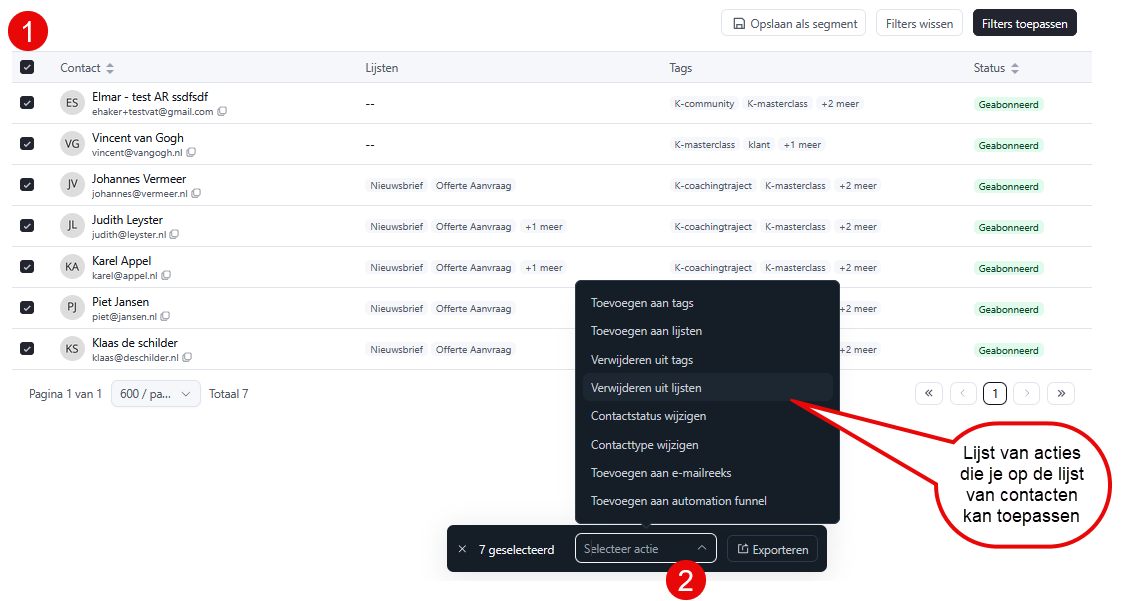
First select the contacts by ticking the box in the left column (1). Note: if you want to select all contacts from the filter, click the tick box at the top. You can now carry out a follow-up action. Click ‘Select action’ at the bottom (2), choose the action you want and then click ‘Confirm’
Saving a filter for reuse #
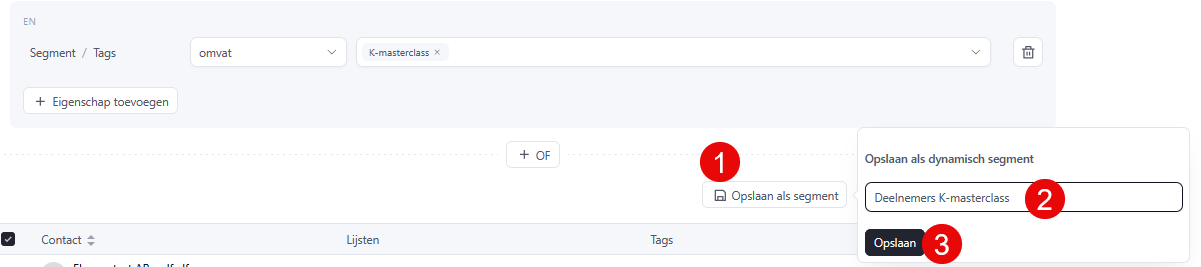
If you use a filter regularly, you can save it. Click ‘Save as segment’ (1), give it a sensible name (2) and choose ‘Save’ (3). Saved segments appear in the dropdown menu at the top of the filter screen.
Common filter combinations #
Bounce cleanup #
Find contacts with a high bounce rate to keep your list clean:
Status is ‘Bounced’
Re-engagement campaign #
Identify contacts you want to re-engage:
Status is ‘Subscribed’ AND Last email opened not within the past 120 days
The advanced filter becomes more powerful still when you combine it with automations: you can assign a tag automatically to contacts that match certain criteria, for example.


