This guide belongs to the Website module. It is part of Everything, and you can also add it to your plan on its own. See what the module does
You can now build and edit your website in Autorespond from your own AI assistant as well. “Create a landing page for my new training course in our house style”, “change the button text on the sign-up page” or “which pages are on my site and which colours do we use?”: your assistant does it through a secure connection (MCP) with the page builder. New pages come in as drafts, with a preview link, so you decide what goes online. In this article you switch the connection on, connect your AI program and read what you can do with it and where the limits are.
The page builder in Autorespond is based on Elementor Pro (version 4.3 and later, part of the Website module) with the Ultimate Addons for Elementor extension. Read the Elementor documentation
Good to know: the connection is new (September 2026) and is extended regularly. Ask your assistant what it can do straight after connecting (step 4). The overview of all AI connections in Autorespond, including the legal basis and a secure setup, is in Connecting your AI assistant to Autorespond: all connections at a glance.
What can your assistant do with your website? #
- Build pages: create a new page or post as a draft and build it from headings, text, buttons, images and sections, in your site’s house style.
- Edit pages: request the structure of an existing page and change specific elements, for example a text, a button or an image.
- Keep your house style consistent: request your site’s colours, fonts and spacing, and manage global colours, classes and default styles.
- Check before it goes live: create a temporary preview link, so you can look at the result before anything is published.
- Templates and pop-ups: request and edit the header, footer, 404 page and pop-ups from the Theme Builder.
- Keep an overview (Ultimate Addons): which pages there are, which widgets you use where, and which widgets are switched on or off.
There are two connections that work on your website together. The Elementor connection builds and changes pages. The Ultimate Addons AI tools give your assistant an extra overview (pages, widgets, design tokens) and work with the same AI user. You can start with just the Elementor connection.
Step 1: an AI user that is allowed to edit pages #
The connection works with the rights of the user you connect with. To build pages, that user needs the Editor role; with the Subscriber role (which we recommend for the CRM connection) the AI can look but not build anything.
- Go to Administration → Users. If you already have an AI user (for example
ai-assistent), open it; otherwise create one with Add user. - Set the Role to Editor and save. An editor may create and publish pages and posts, but cannot change settings, manage users or install anything.
- Don’t want the AI to be able to publish anything? Then leave the role on Author: an author may create their own pages as drafts, but cannot publish them or change existing pages by others.
Step 2: switch on and connect the Elementor connection #
- Go to Website → Elementor. You are now in the admin area of the page builder.
- Choose Elementor MCP in the left-hand menu.
- At the top, choose the tab for your AI program: Claude Code, Claude Desktop, Codex, Cursor or Other.
- For this step, log in as the AI user from step 1, or use Prefer manual configuration (see below). The Generate Prompt button creates an application password for the user who is logged in at that moment. If you do this as an administrator, the AI gets administrator rights, and you don’t want that.
- Tick the box to confirm you understand that an application password will be created, and click Generate Prompt. Copy the text and paste it into your AI program; your assistant then sets up the connection itself.
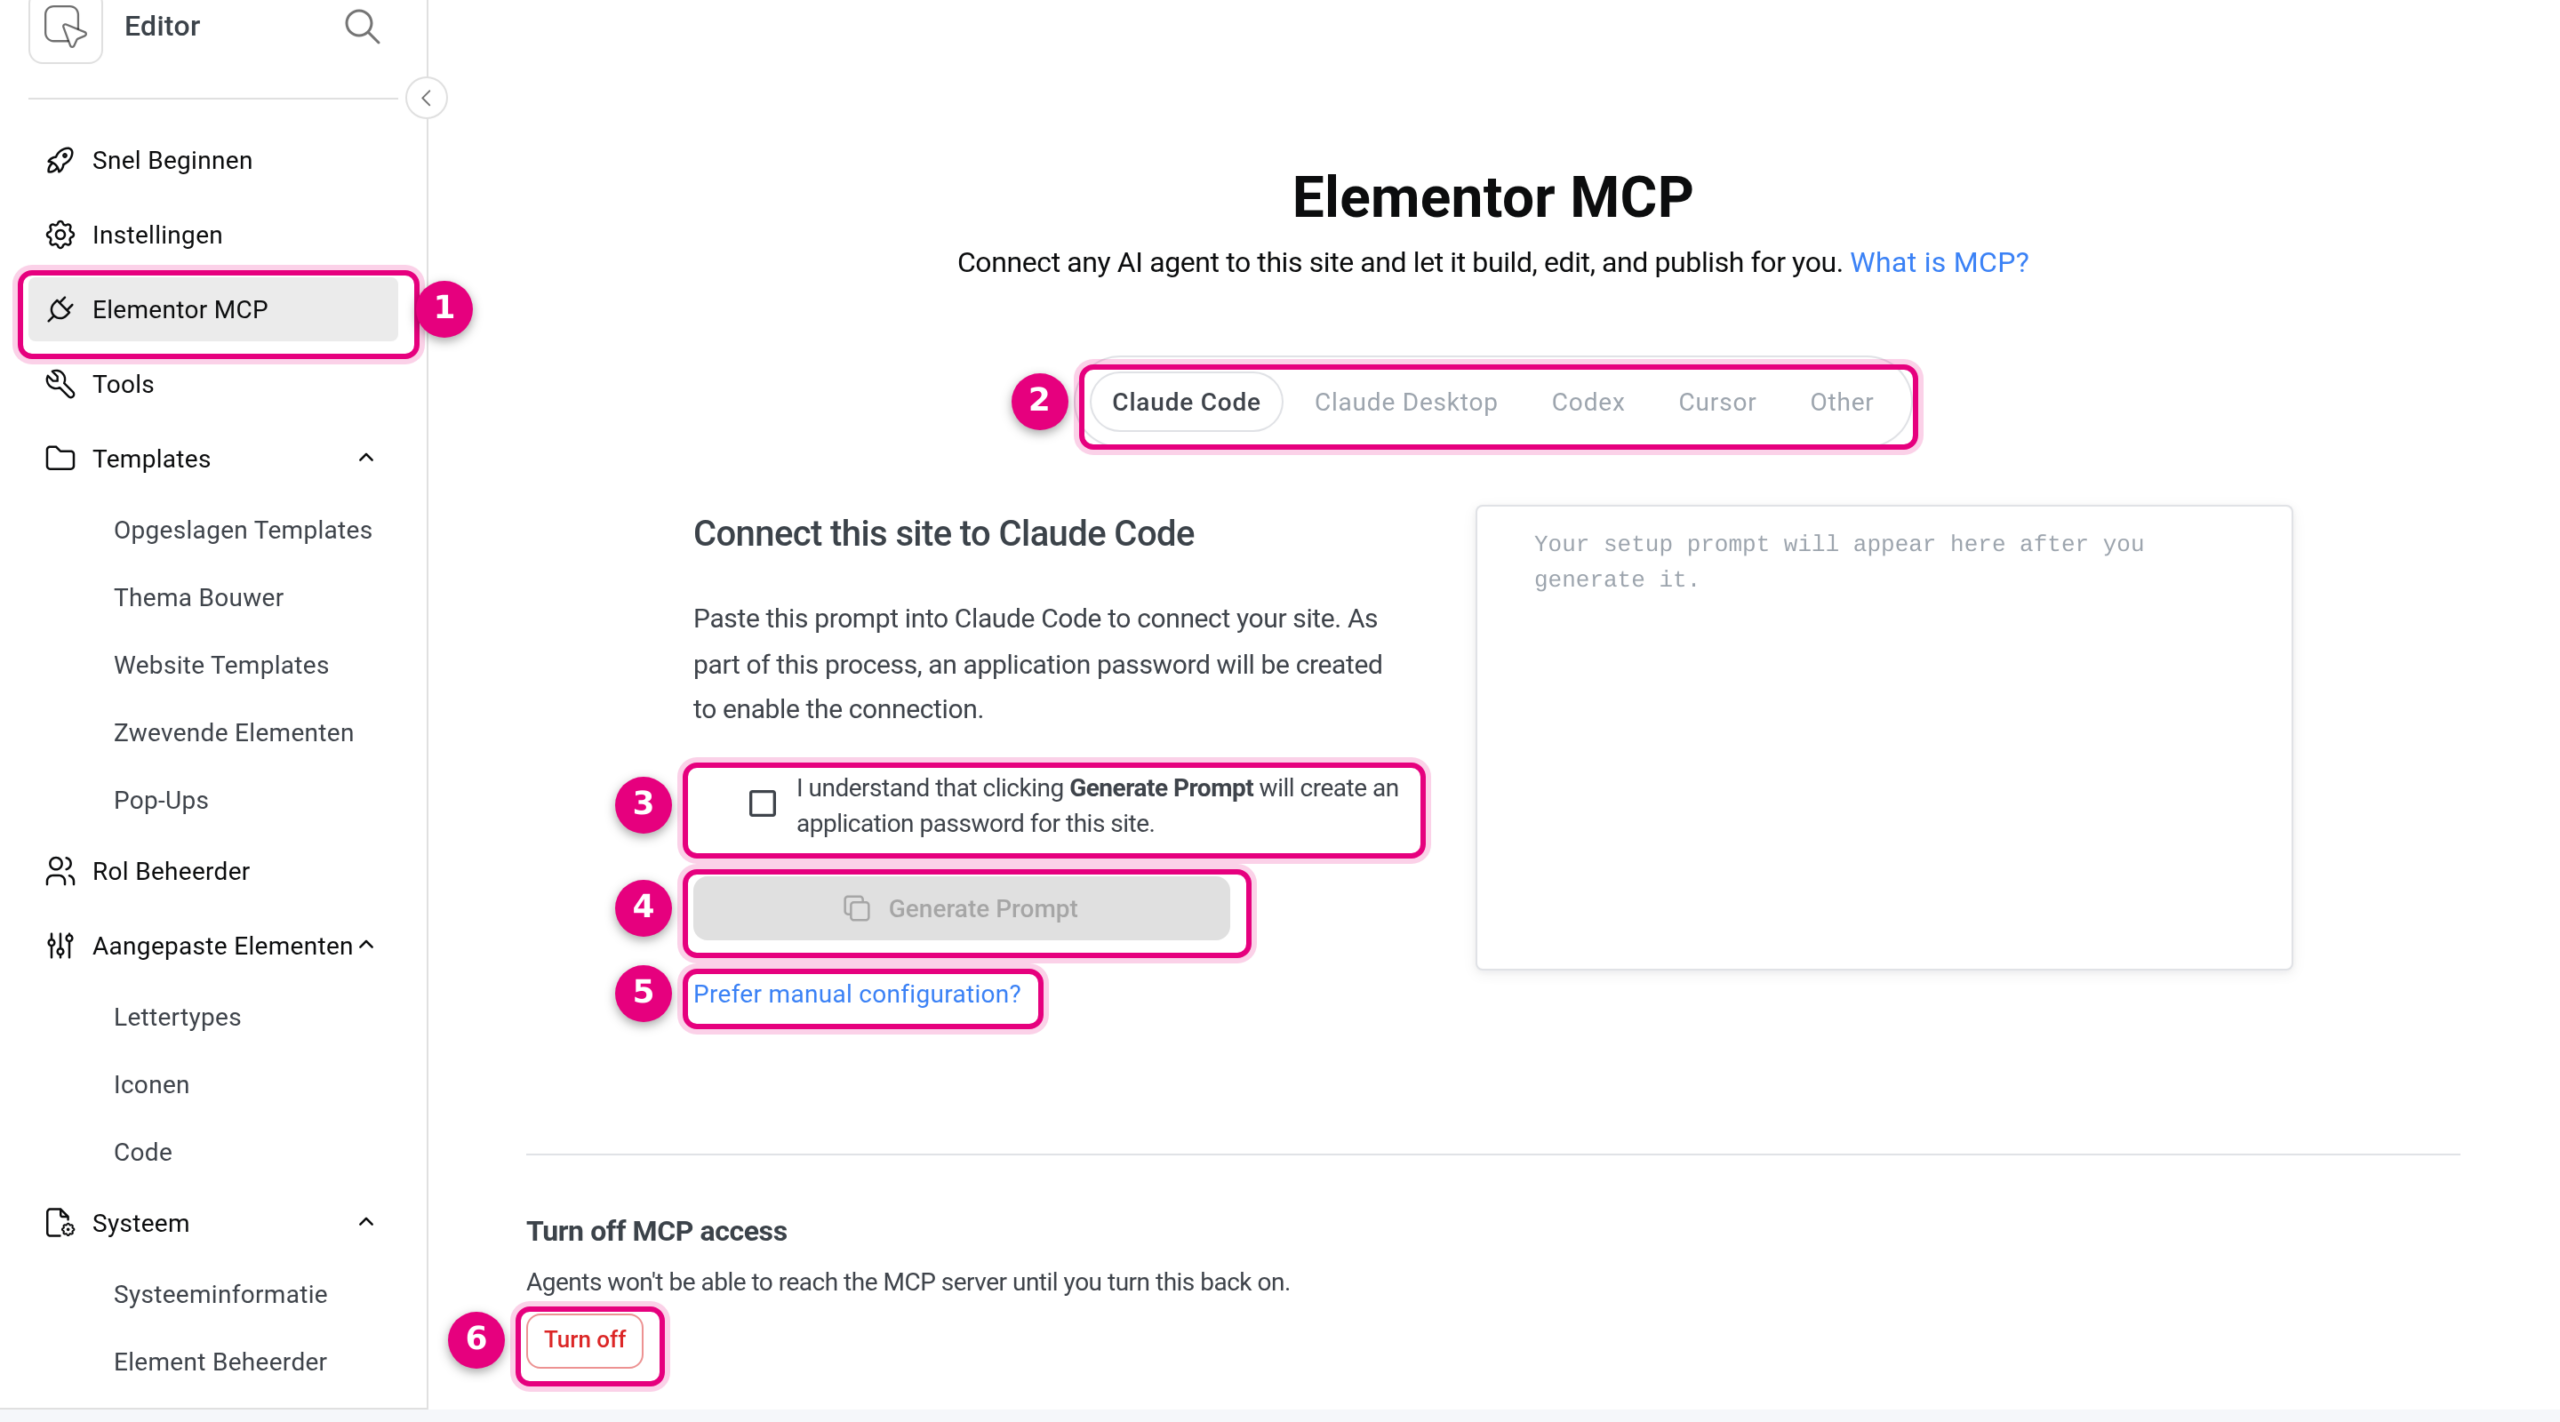
- Elementor MCP: the menu item in the admin area of the page builder.
- Tabs: choose your AI program; the instructions below adjust to it.
- Checkbox: confirms that an application password will be created for the logged-in user.
- Generate Prompt: creates the configuration for your AI program; paste it into your assistant.
- Prefer manual configuration: shows the configuration file instead, with a Generate & Copy configuration button, in case you prefer to paste the configuration into your program yourself. Here too, the application password is created for the logged-in user.
- Turn off: switches the whole connection off. No AI can reach it until you switch it on again.
The address of the connection ends in /wp-json/elementor/mcp. If you use the Autorespond extension for Claude Desktop, switch on the Website module in the extension; you then don’t need to paste a separate prompt or configuration.
Step 3 (optional): the Ultimate Addons AI tools #
- Go to the Ultimate Addons settings: in your browser, open your site’s address followed by
/wp-admin/admin.php?page=uaepro, click Settings at the top and choose AI Tools under AI on the left. - Switch on Enable Abilities. This lets your assistant request your site’s pages, widgets and design tokens.
- Leave Enable Edit Abilities off if the AI may only read here; you already do the building through the Elementor connection.
- Switch on Enable MCP Server. The address of this connection ends in
/wp-json/uae/mcp; you connect with the same AI user and the same application password as in step 2.
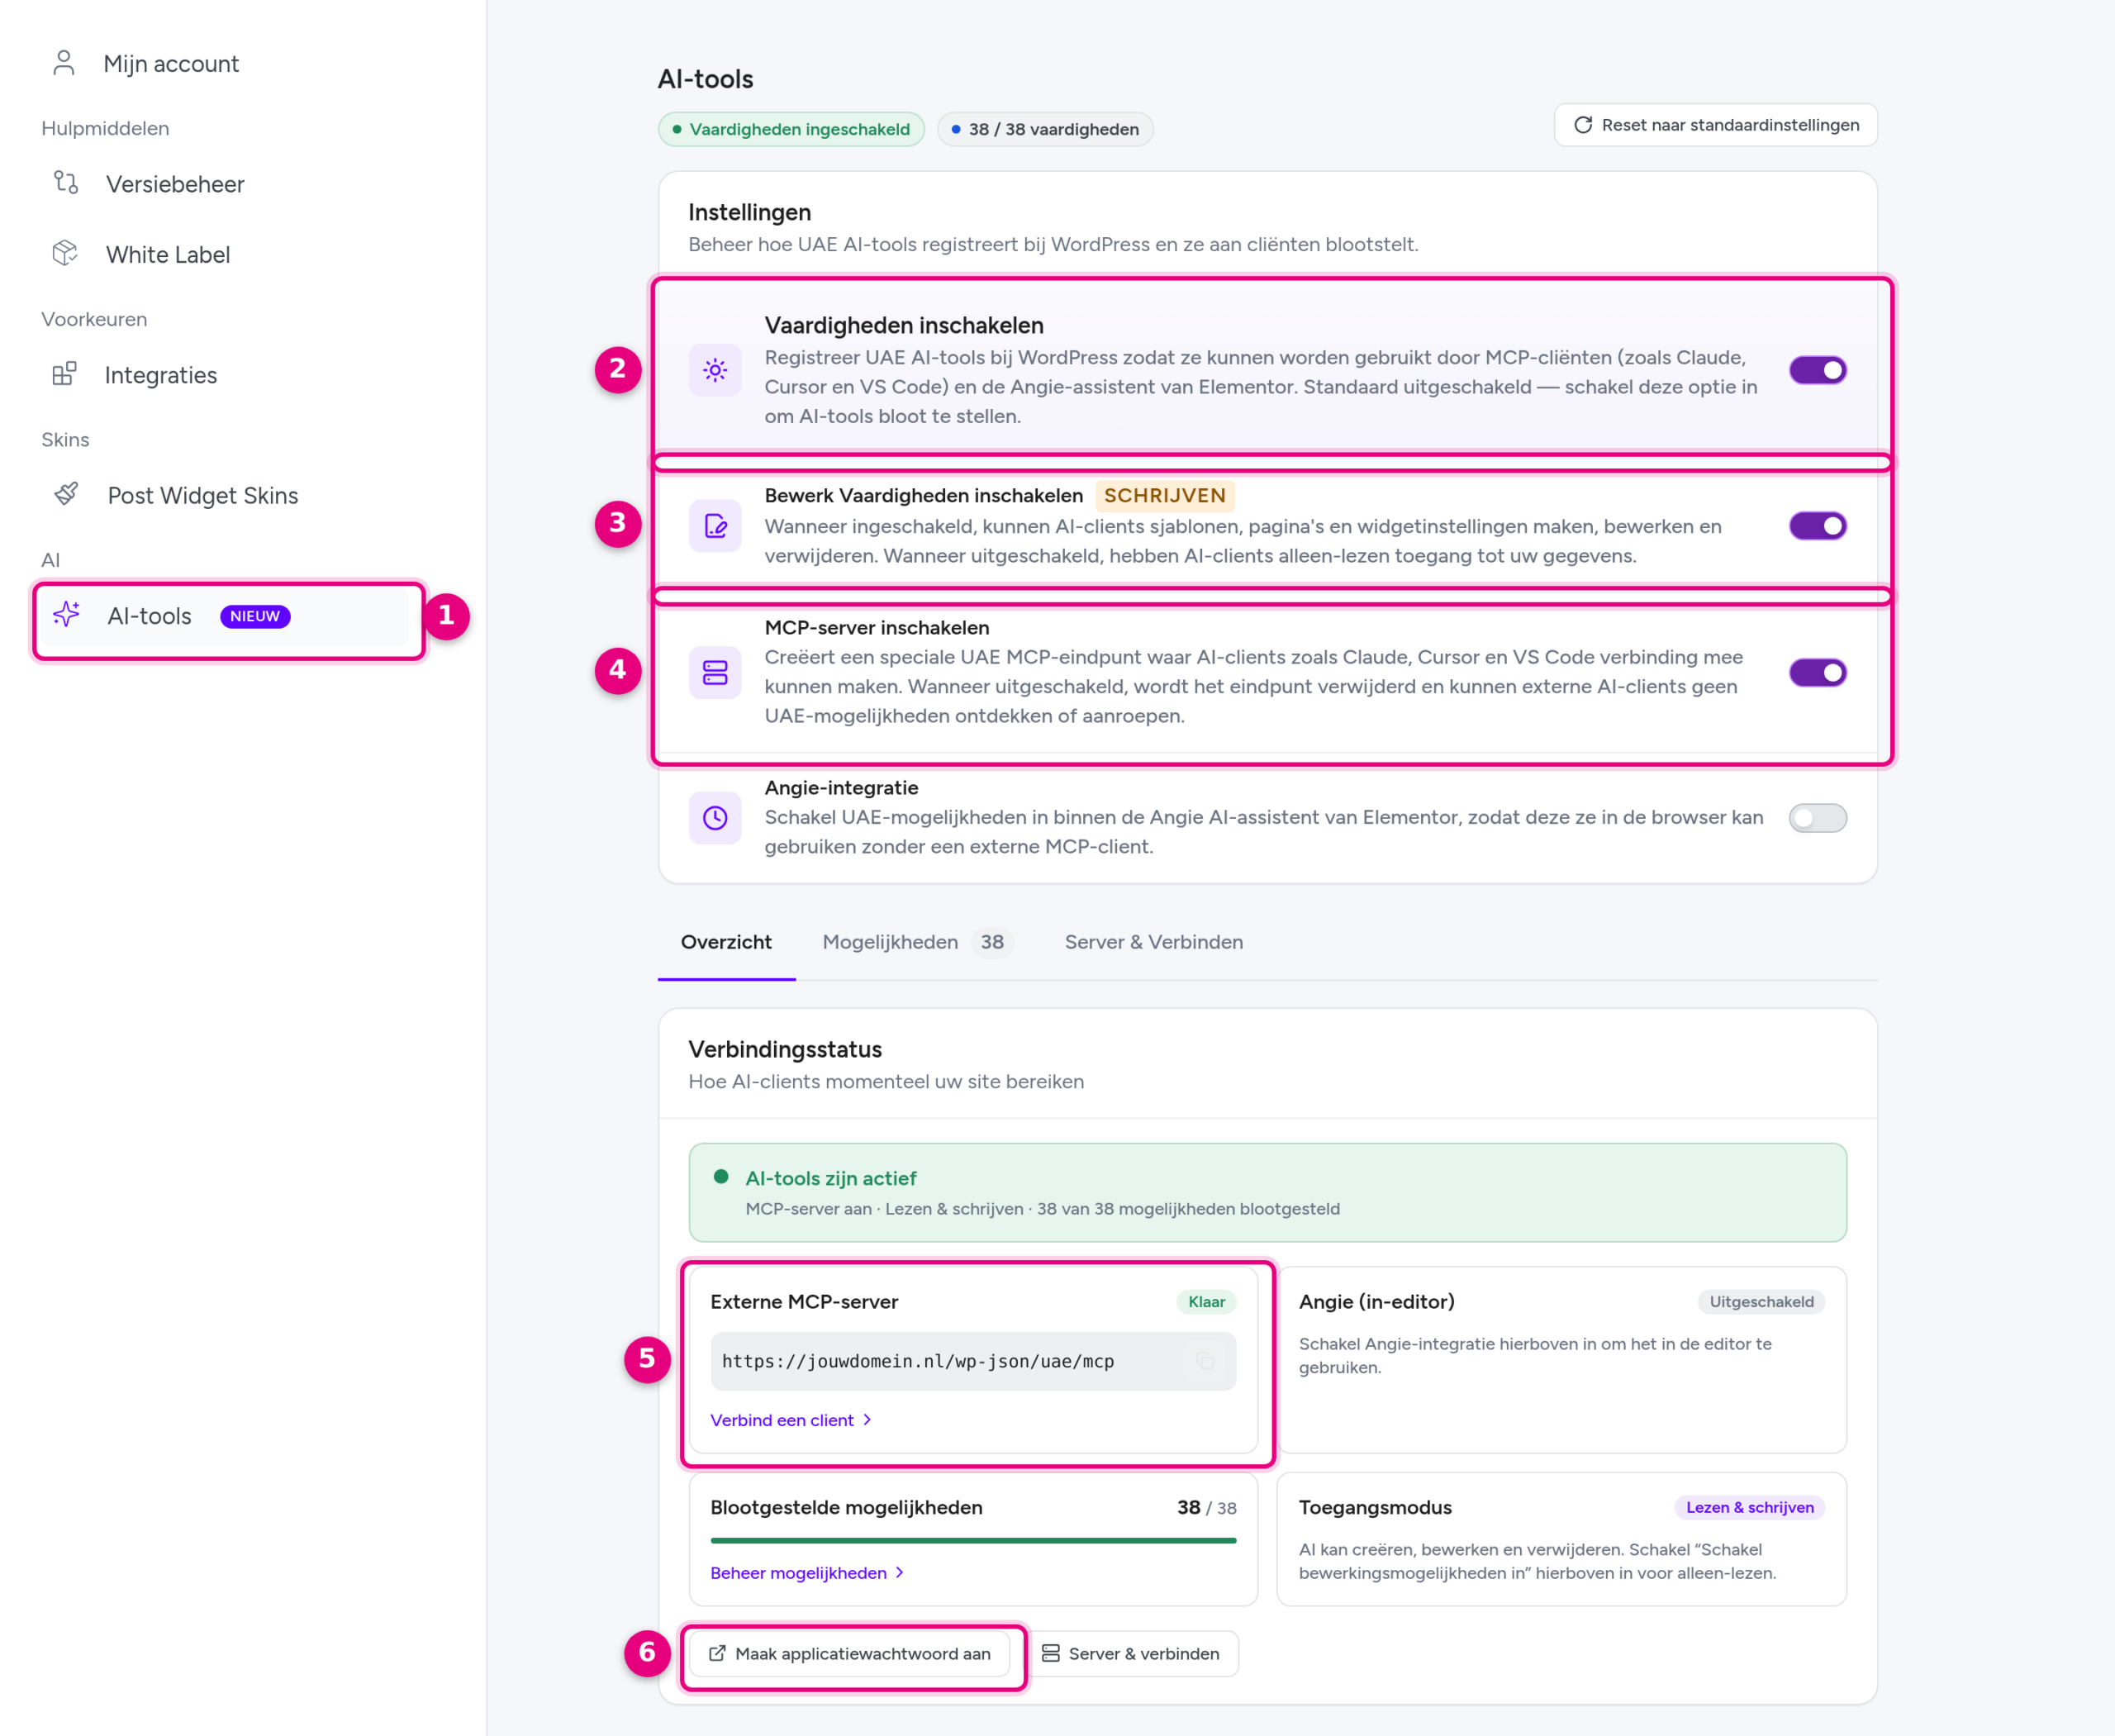
- AI Tools: the section in the Ultimate Addons settings.
- Enable Abilities: the main switch; off by default.
- Enable Edit Abilities: also gives the AI write access in Ultimate Addons (switching widgets on or off, creating pages). Off means read-only.
- Enable MCP Server: makes the address available that your AI program connects to.
- External MCP Server: the address of the connection, with Connect a client below it for the ready-made configuration per AI program.
- Create Application Password: a shortcut to the profile of the logged-in user; it is better to use the existing application password of your AI user.
Leave the Angie integration switch off; it is for Elementor’s own built-in AI assistant and has nothing to do with your own AI program.
Step 4: ask your AI what it can do, and have it make a draft first #
Ask this question straight after connecting, so your assistant fetches and remembers the current functions and your house style itself:
“You are connected to the website of my Autorespond site. First fetch the available resources and the design system (colours, fonts, default styles) and show which pages there are. Summarise what you can do for me. Remember this. Always create new pages as drafts with a preview link; only change existing pages after my approval and never publish without my confirmation.”
Examples of what you can ask after that: “Create a draft page ‘Autumn workshop’ in our house style with a heading, a short intro, three benefits and a button to the shop page, and give me a preview link”, “Which pages use the Countdown widget?”, “On the page ‘Join for free’, replace the button text with ‘Yes, count me in’ and show me the result” or “Which colours and fonts belong to our house style?”
Good to know #
- New editor elements. The connection builds with Elementor’s new elements (Editor V4, such as Flexbox, Heading, Paragraph, Button and Image). Your assistant can read existing pages built with the classic elements and change parts of them, but cannot rebuild them element by element. If building doesn’t work, the Editor V4 feature is still switched off under Website → Elementor → Settings → Features.
- Publishing is one step. An editor may publish, so your assistant can do that too. Agree that it only does so after your confirmation, and always check the preview link first.
- Images. Your assistant uses images that are already in your media library; you upload new images yourself through Website → Media.
- Switching the connection off. Finished with the connection? Click Turn off on the Elementor MCP page, or revoke the application password on the AI user; both take effect immediately.


