Do you organise an event that comes round a few times a year, such as a retreat, a training course or a series of workshops? Then you want to send emails automatically around the event date for each edition: a preparation email three days before the start, for example, and a follow-up email two days afterwards. In this article you build that once, after which every new edition takes only a few minutes of work. You never have to duplicate the emails themselves: only the dates differ per edition.
Automations in Autorespond are based on FluentCRM, which is included in your package. Read the English documentation
How the recipe fits together #
The recipe consists of four parts that together form one system:
- One variable product with a variation per edition (only the dates differ). This counts as one product for your package, variations are free.
- Two date fields on the contact: the start date of the event and the date on which the preparation email should fall.
- Automation 1 (recognising the edition): starts on purchase, checks which variation was bought, fills in the two date fields and applies a tag.
- Automation 2 (emails around the event date): starts on that tag and waits, per customer, for the dates in the date fields. This automation is the same for every edition.
Step 1: create the variable product with a variation per edition #
In Shop → Products, create one product (for example “Painting retreat”) of the type Variable product, with an attribute “Edition” and a variation per edition, such as “May 2027” and “September 2027”. How to create and connect a product is explained in Creating a paid product with an automatic list connection and follow-up email. If you want a maximum number of places per edition, set up stock management per variation, see Setting up stock management for products.
Step 2: create two date fields #
Create two custom contact fields of the type Date, for example “Retreat start date” and “Retreat preparation date”. How to create custom fields is explained in Setting up custom contact fields. The second field may look redundant, but it is needed: the wait step can wait until a date from a field, but has no option for “X days before that field”. Storing the preparation date as a separate field (start date minus three days) solves that neatly.
Step 3: automation 1, recognising the edition on purchase #
Through CRM & Emails → Automations, create a new automation with the trigger New order (processing) and choose your variable product under Target products. Note that Target products matches on the main product, and you determine which edition was bought afterwards with a condition block. Build the automation like this:
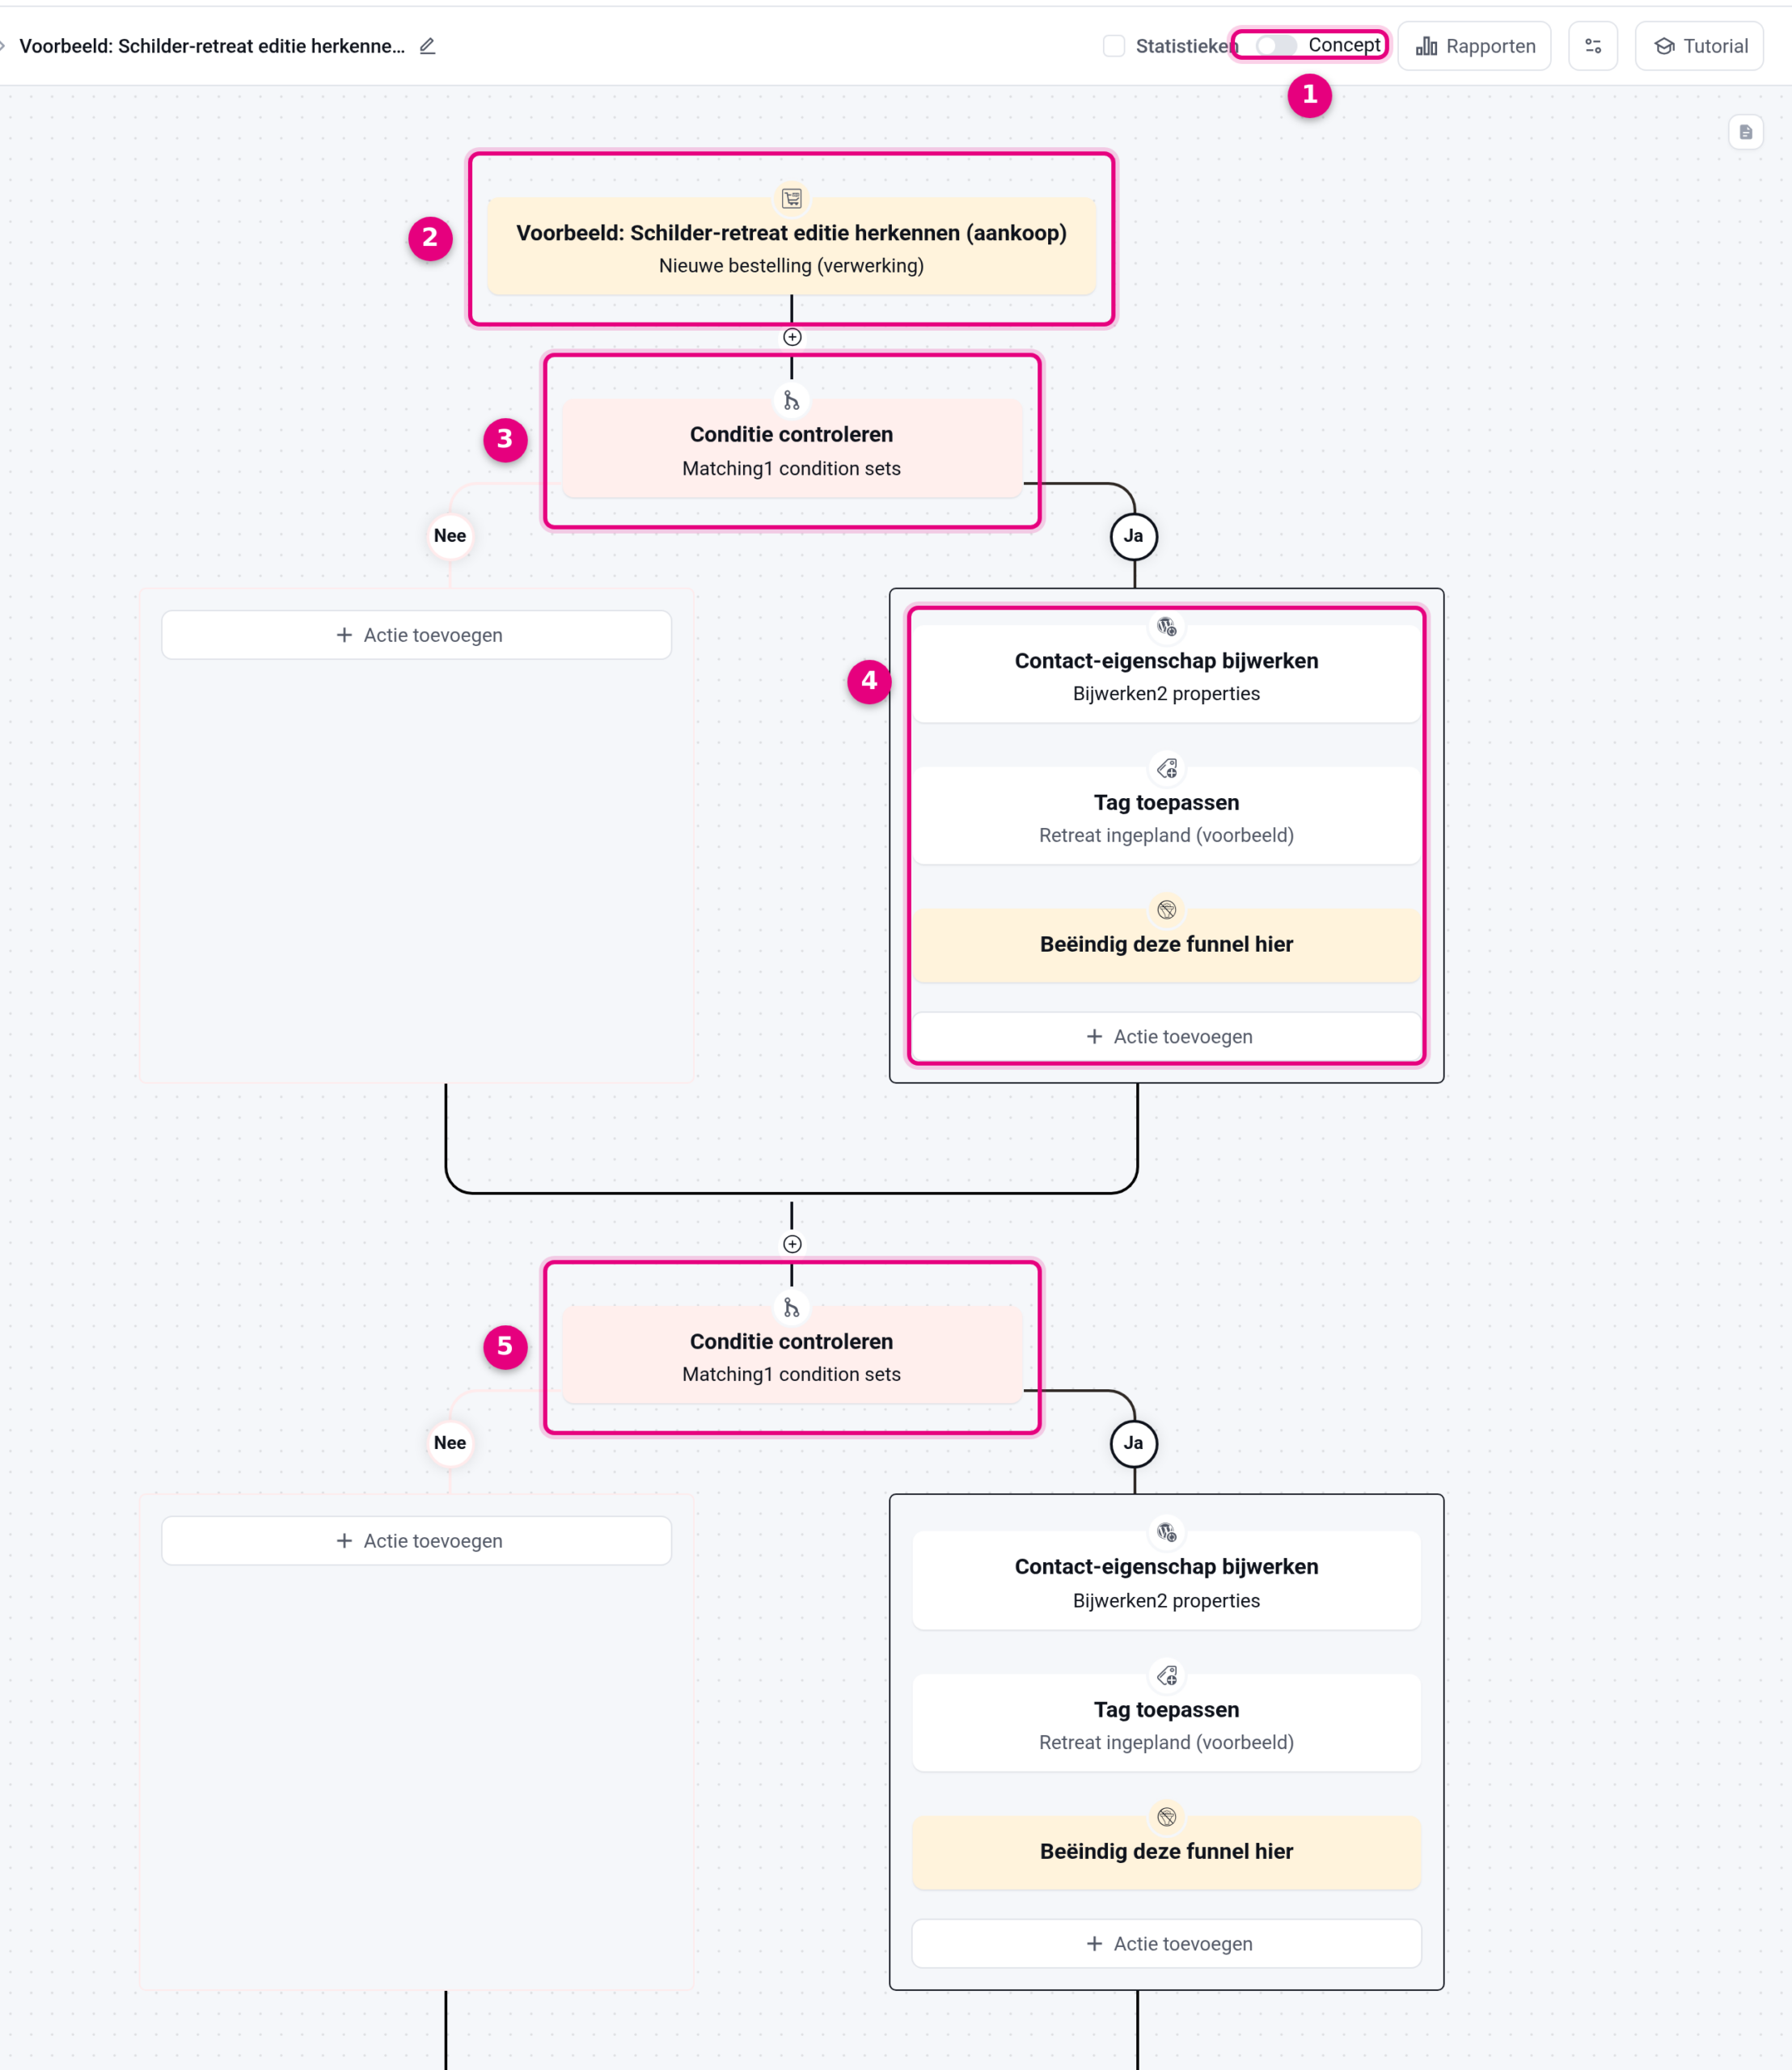
- The automation is still set to Draft here, and you activate it later with this switch. To the right of it you will find Reports (who is where in the flow) and the Tutorial.
- The trigger: New order (processing) with the variable product as the target product. It starts as soon as the payment has arrived.
- The first condition block checks whether the customer bought the variation “May 2027”.
- The Yes branch of that block: Update contact property (fills both date fields with the dates of this edition), Apply tag (starts automation 2) and End this funnel here.
- Through the No branch the customer falls through to the next condition block, here for the edition “September 2027”. You add a block like this for every new edition.
Click the condition block to set the condition:
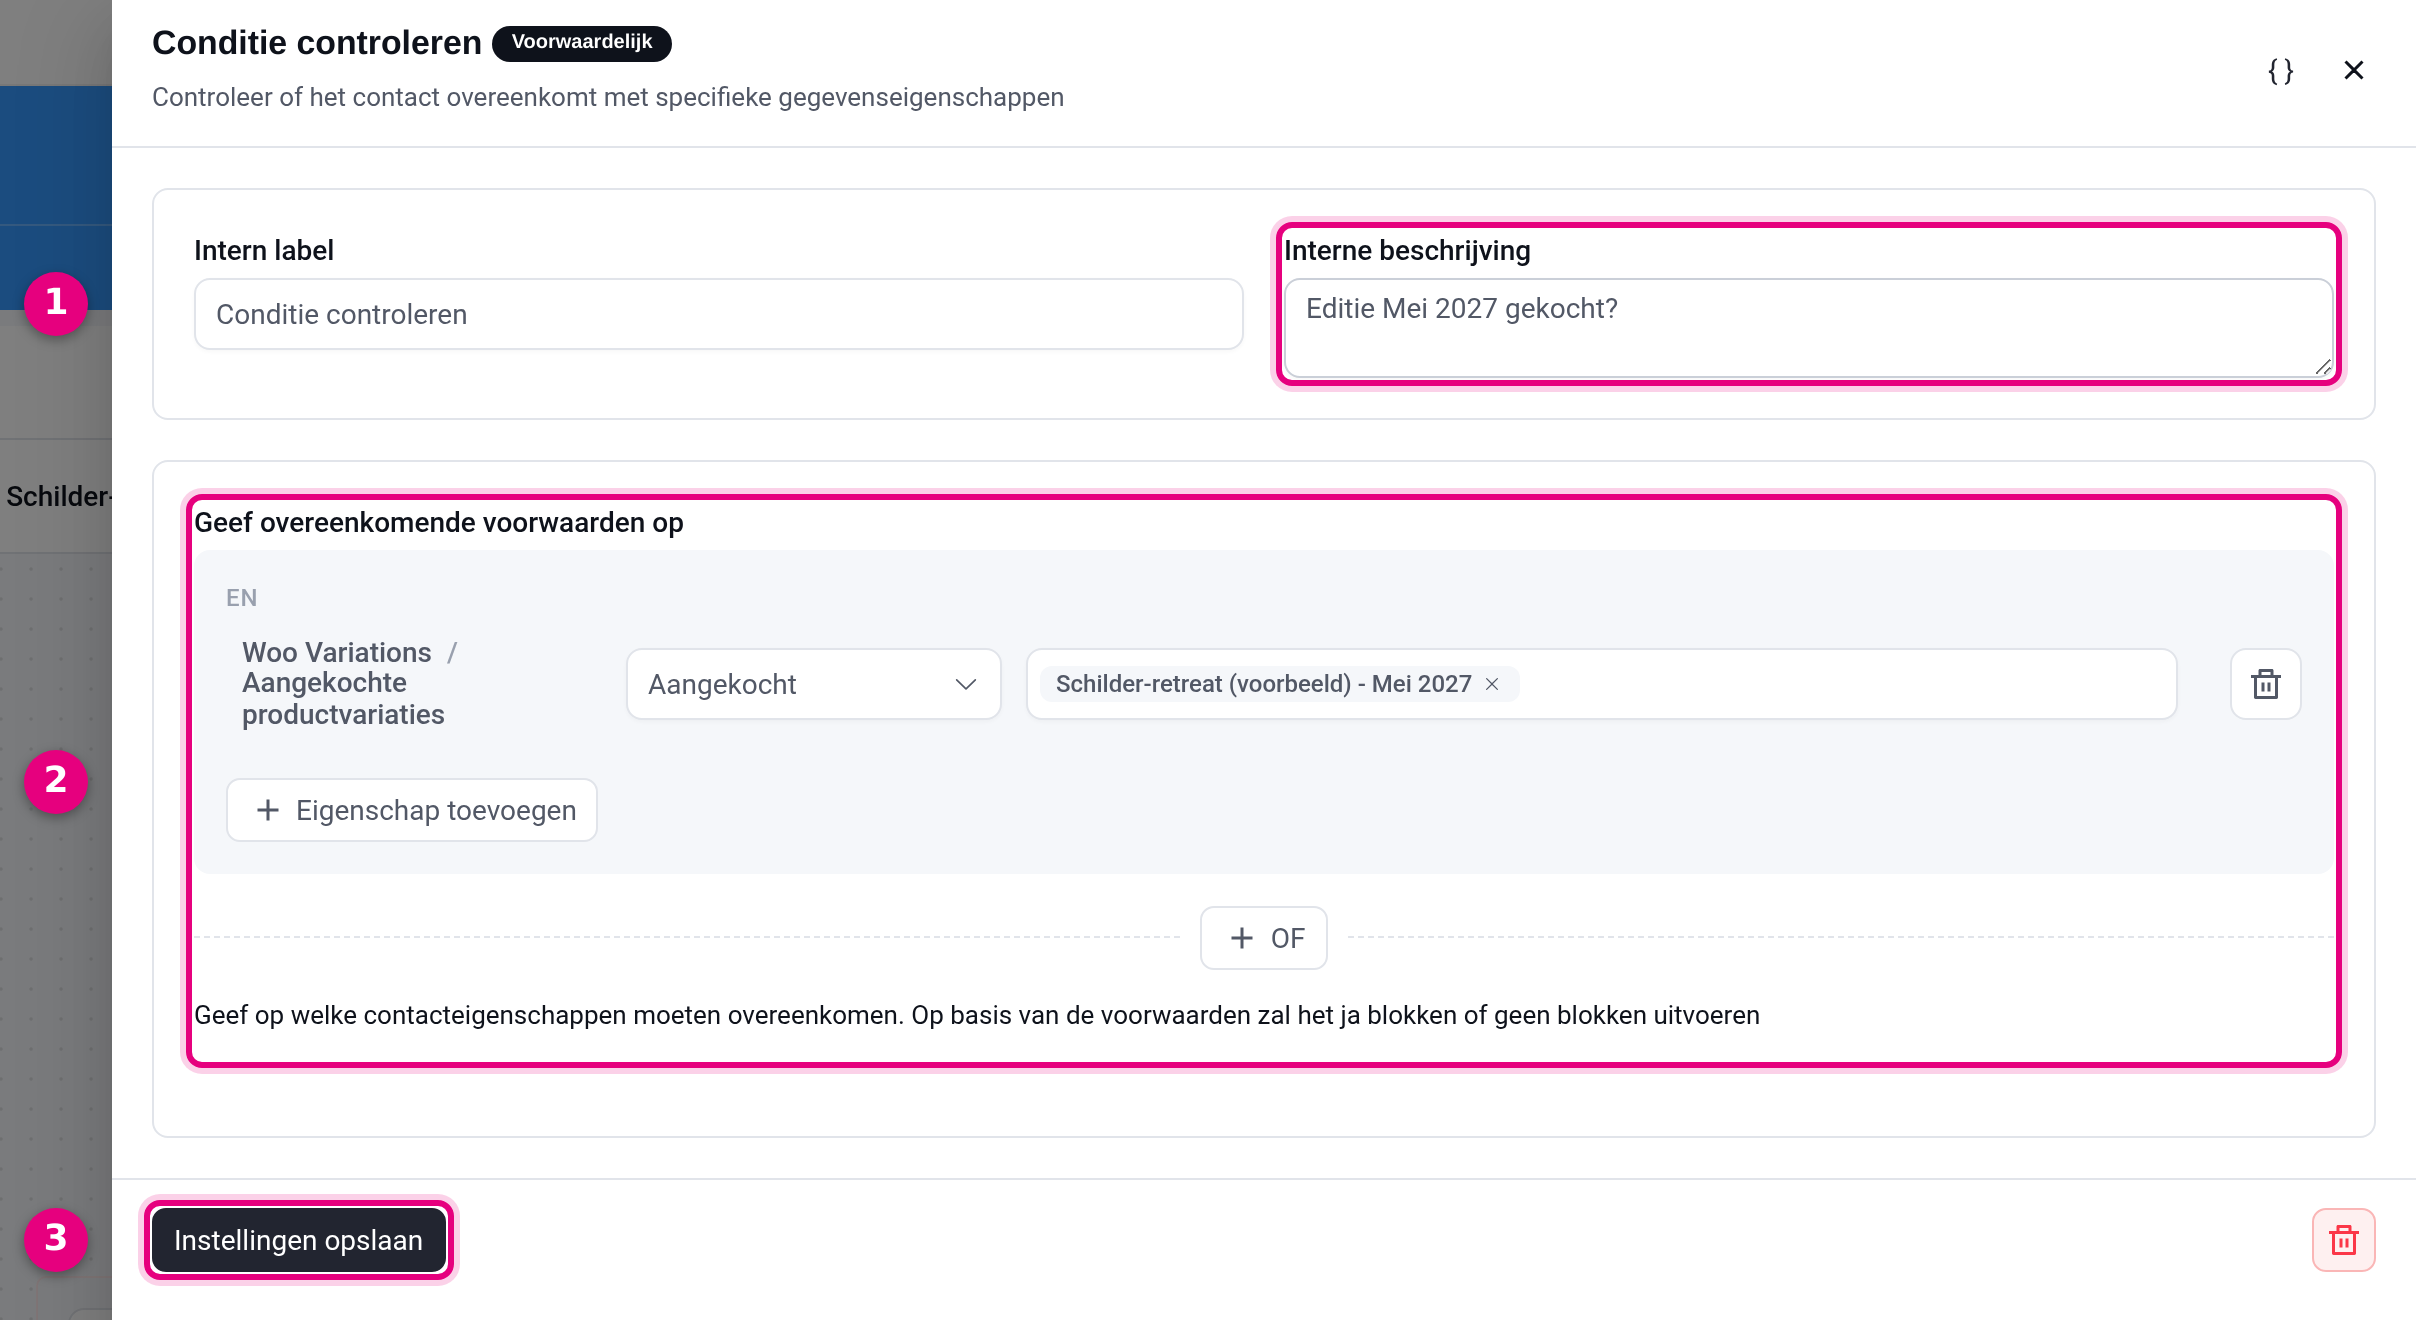
- Give the block a recognisable internal description, for example “Edition May 2027 bought?”. That text appears in the canvas.
- The condition itself: under Contact Data choose the group Woo Variations → Purchased product variations, set the condition to Purchased and choose the variation of this edition as the value, here “Painting retreat – May 2027”. With “Add property” and “+ OR” you can combine more conditions, for this recipe this single one is enough.
- Click Save settings. At the bottom right you can delete the block (bin icon).
Then set up the Update contact property action in the Yes branch:
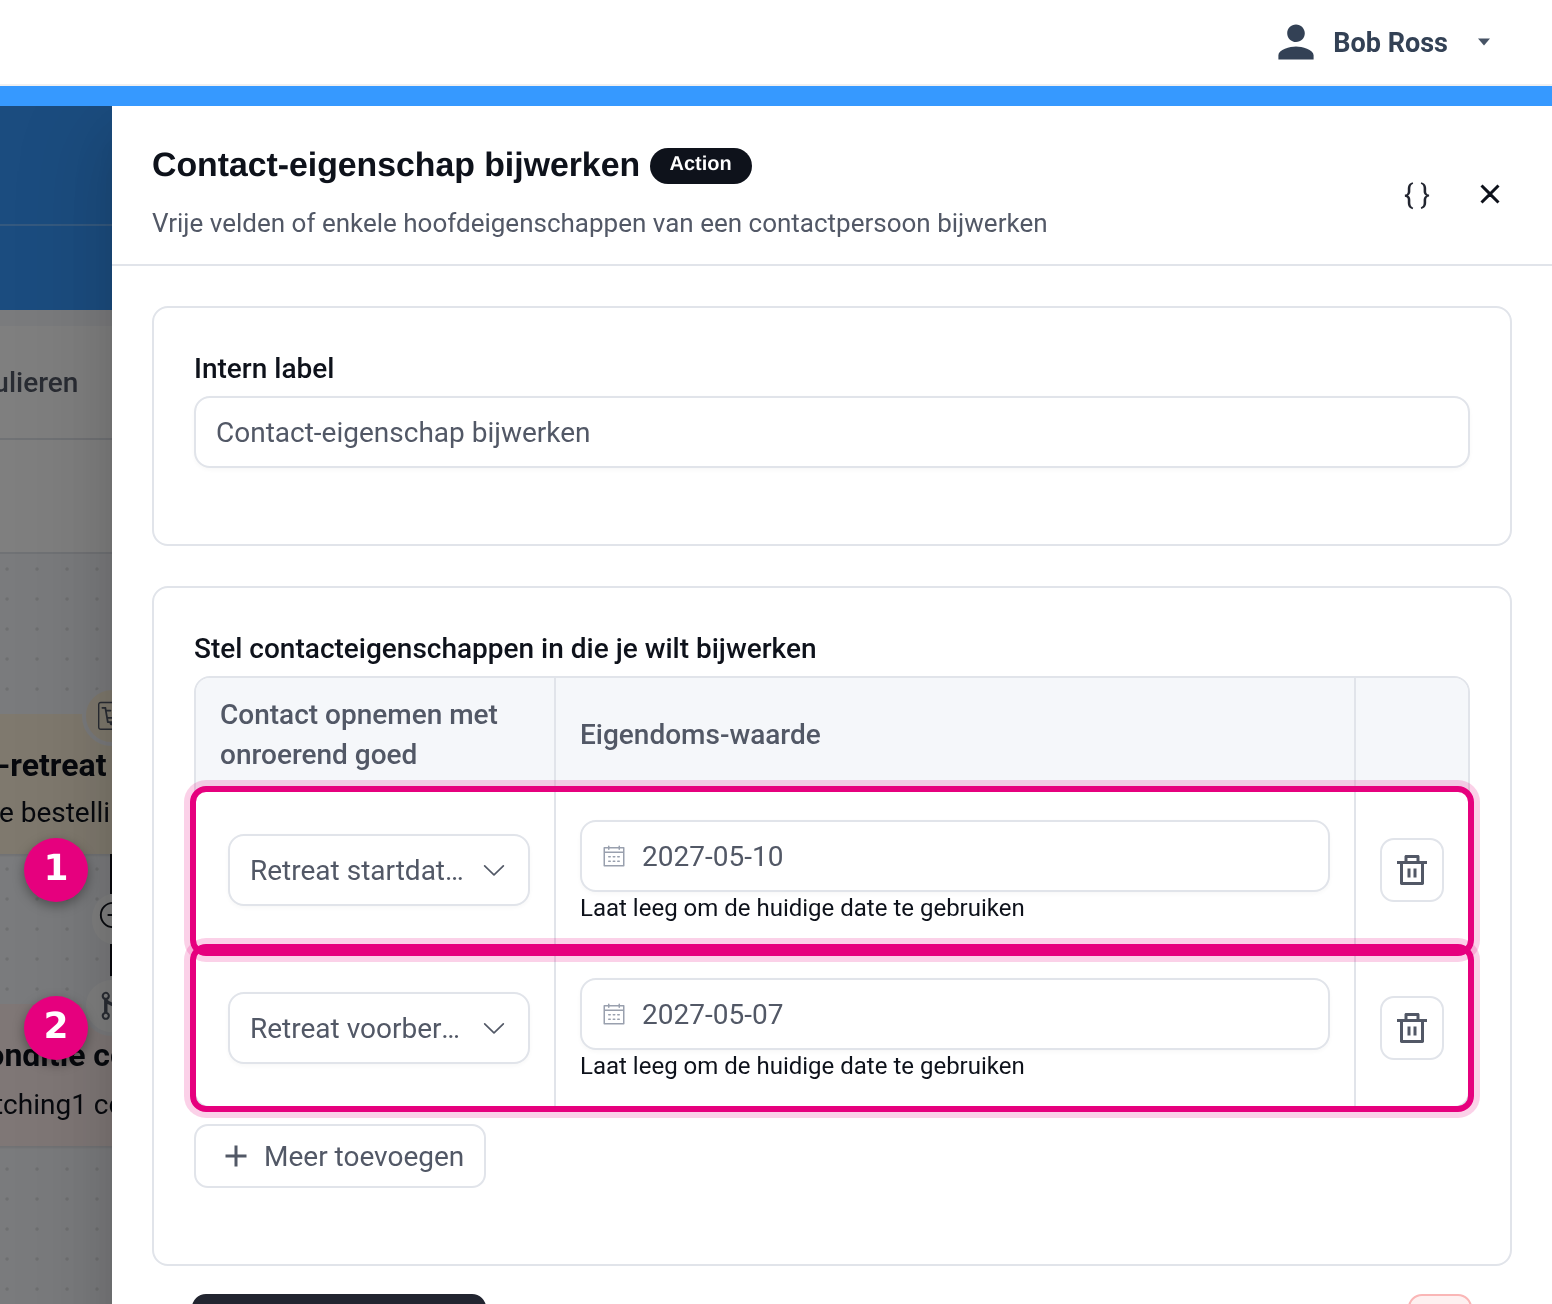
- First row: choose the field Retreat start date and enter the start date of this edition, here 2027-05-10.
- Second row (through “Add more”): choose Retreat preparation date and enter the start date minus three days, here 2027-05-07. Do not leave the values empty: empty means “today’s date”.
Add two more actions in the same Yes branch: Apply tag with a fixed tag such as “Retreat scheduled” (create it once) and End this funnel here. Then repeat the whole condition block for every other edition, each time with its own variation and dates.
Step 4: automation 2, the emails around the event date #
Create a second automation with the trigger Tag applied and choose the tag from step 3. You build this automation once and it works for every edition, because the wait steps take the dates for each customer from the date fields:
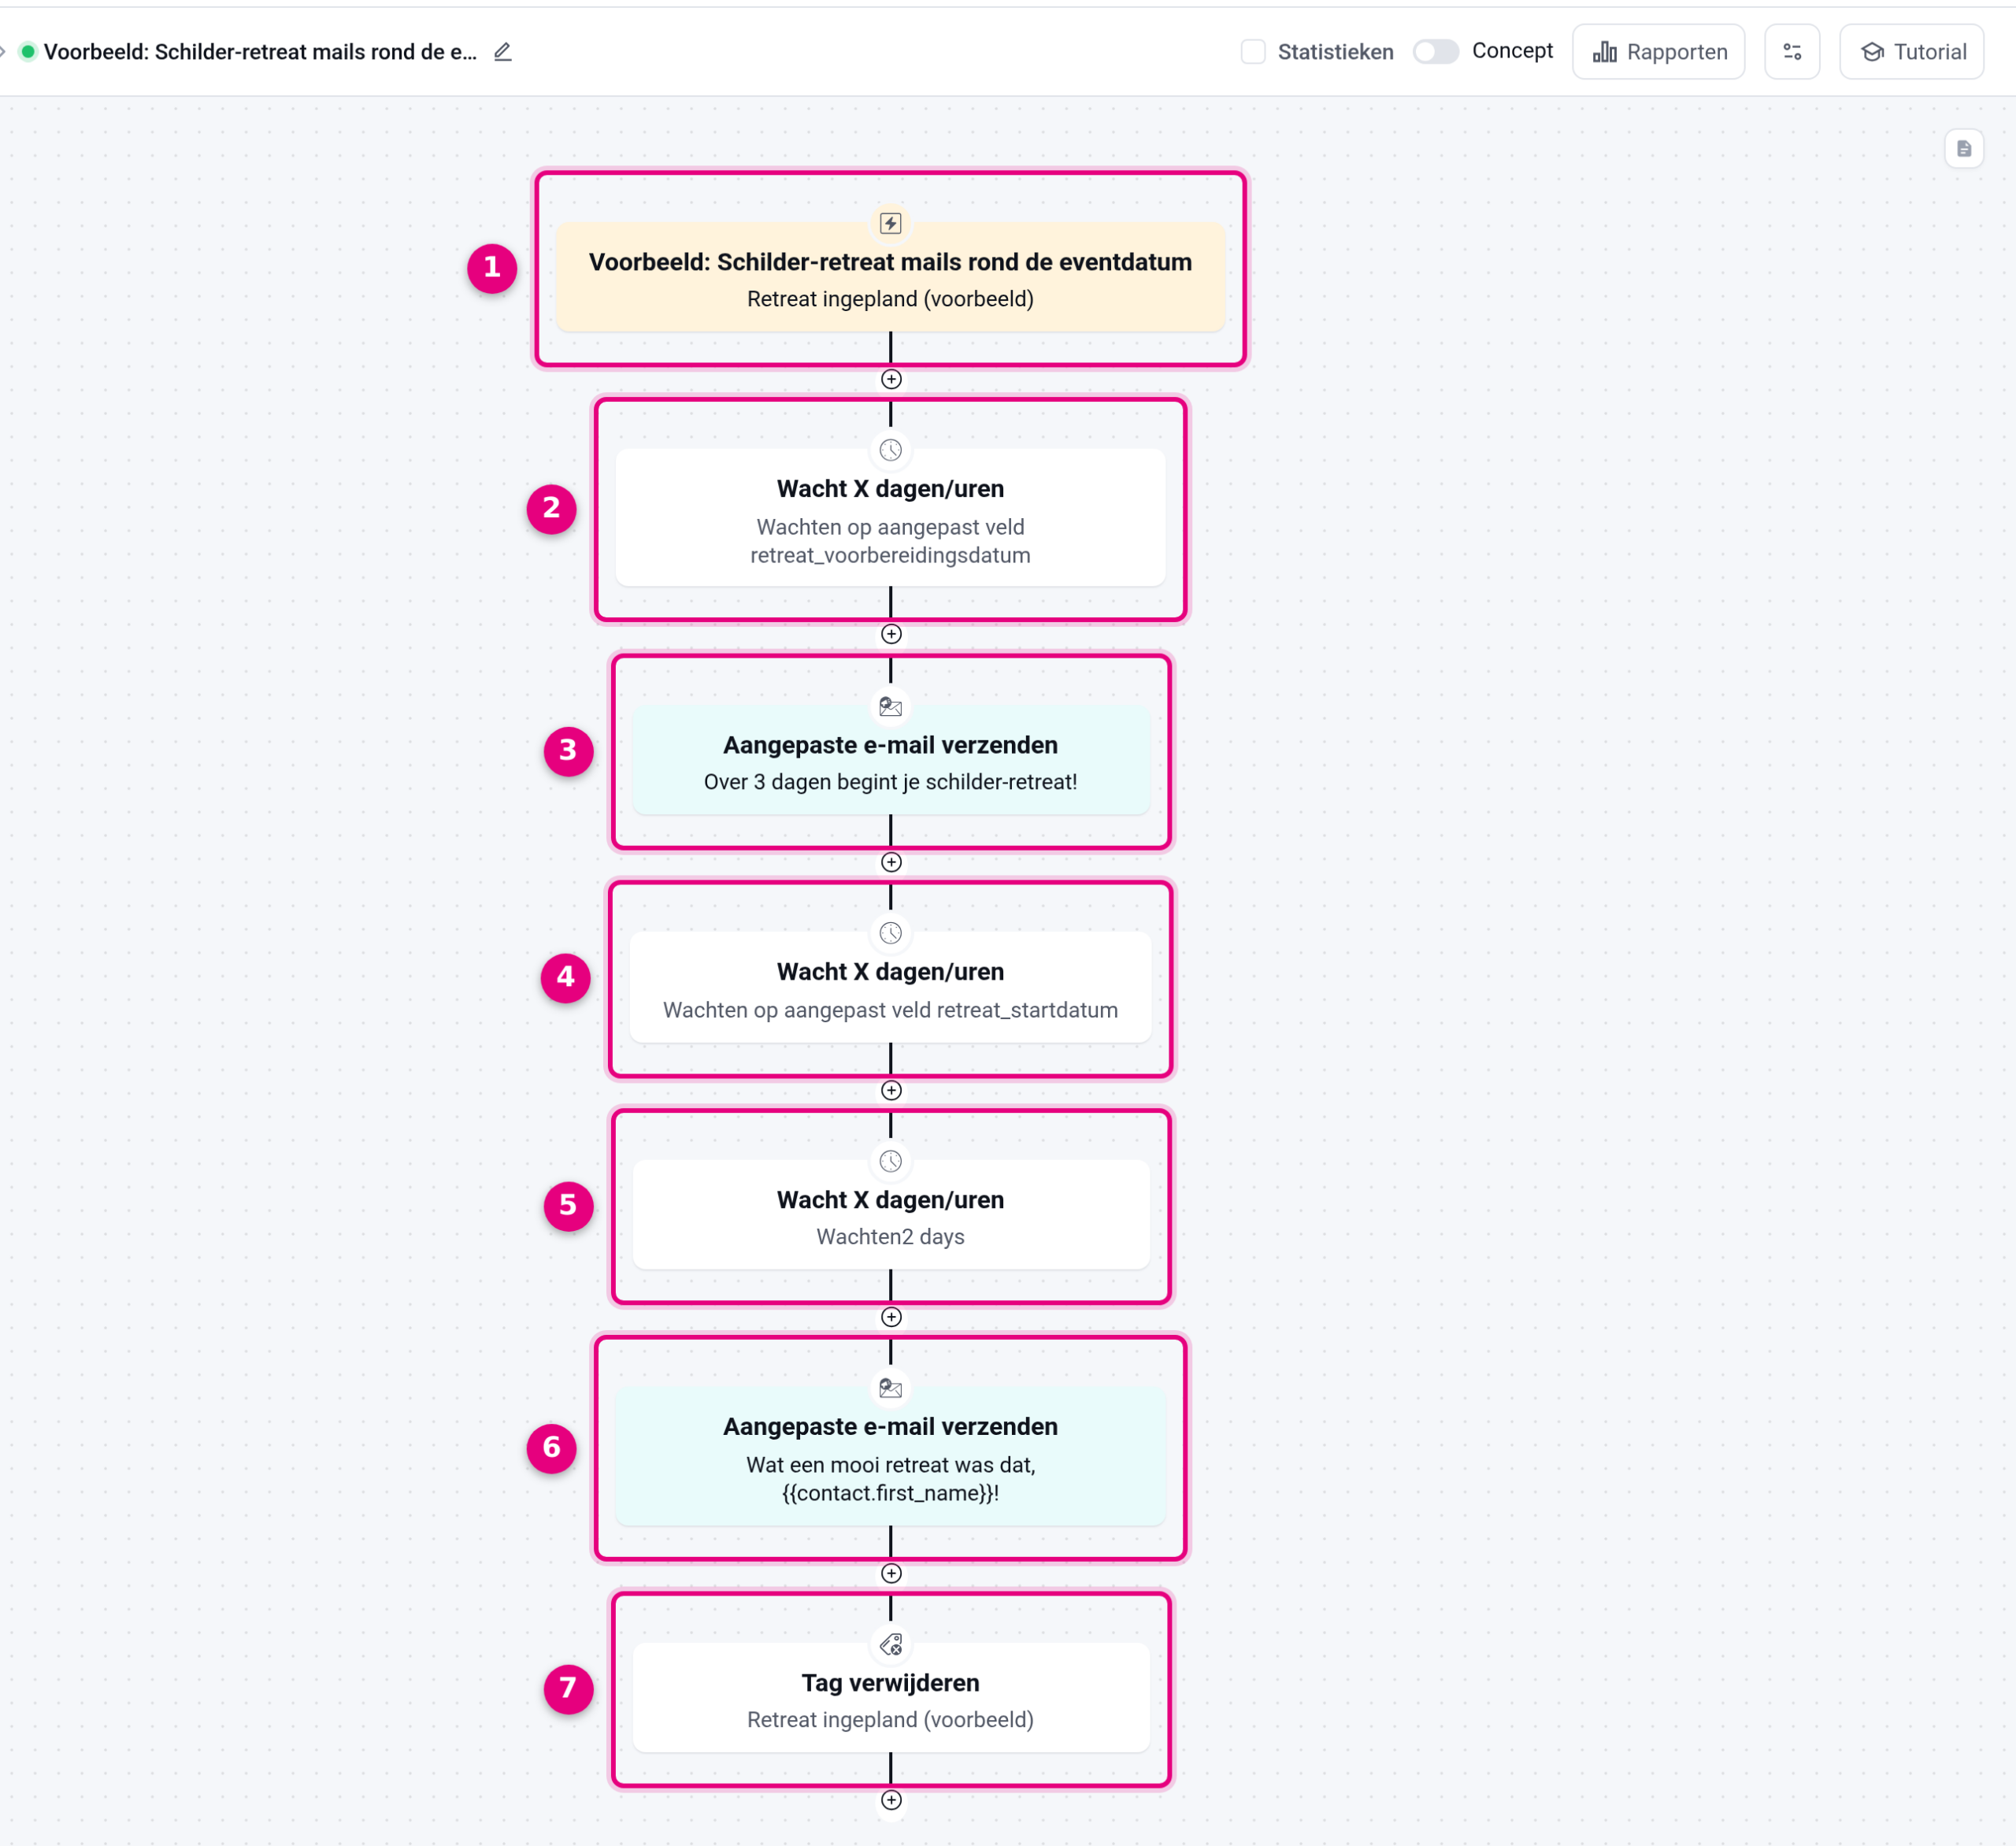
- The trigger: Tag applied with the tag “Retreat scheduled”.
- Wait step 1: Wait on custom field with the field Retreat preparation date. The customer waits here until three days before the start of their own edition.
- The preparation email, with the start date as a merge code in the text.
- Wait step 2: Wait on custom field with the field Retreat start date.
- Wait step 3: Wait for a period, two days. Together with step 4 this means: two days after the start date.
- The follow-up email.
- Remove tag takes the tag “Retreat scheduled” off again. That way the automation can start again if the same customer books a later edition.
The wait step has four wait types, and for this recipe you use “Wait on custom field”:
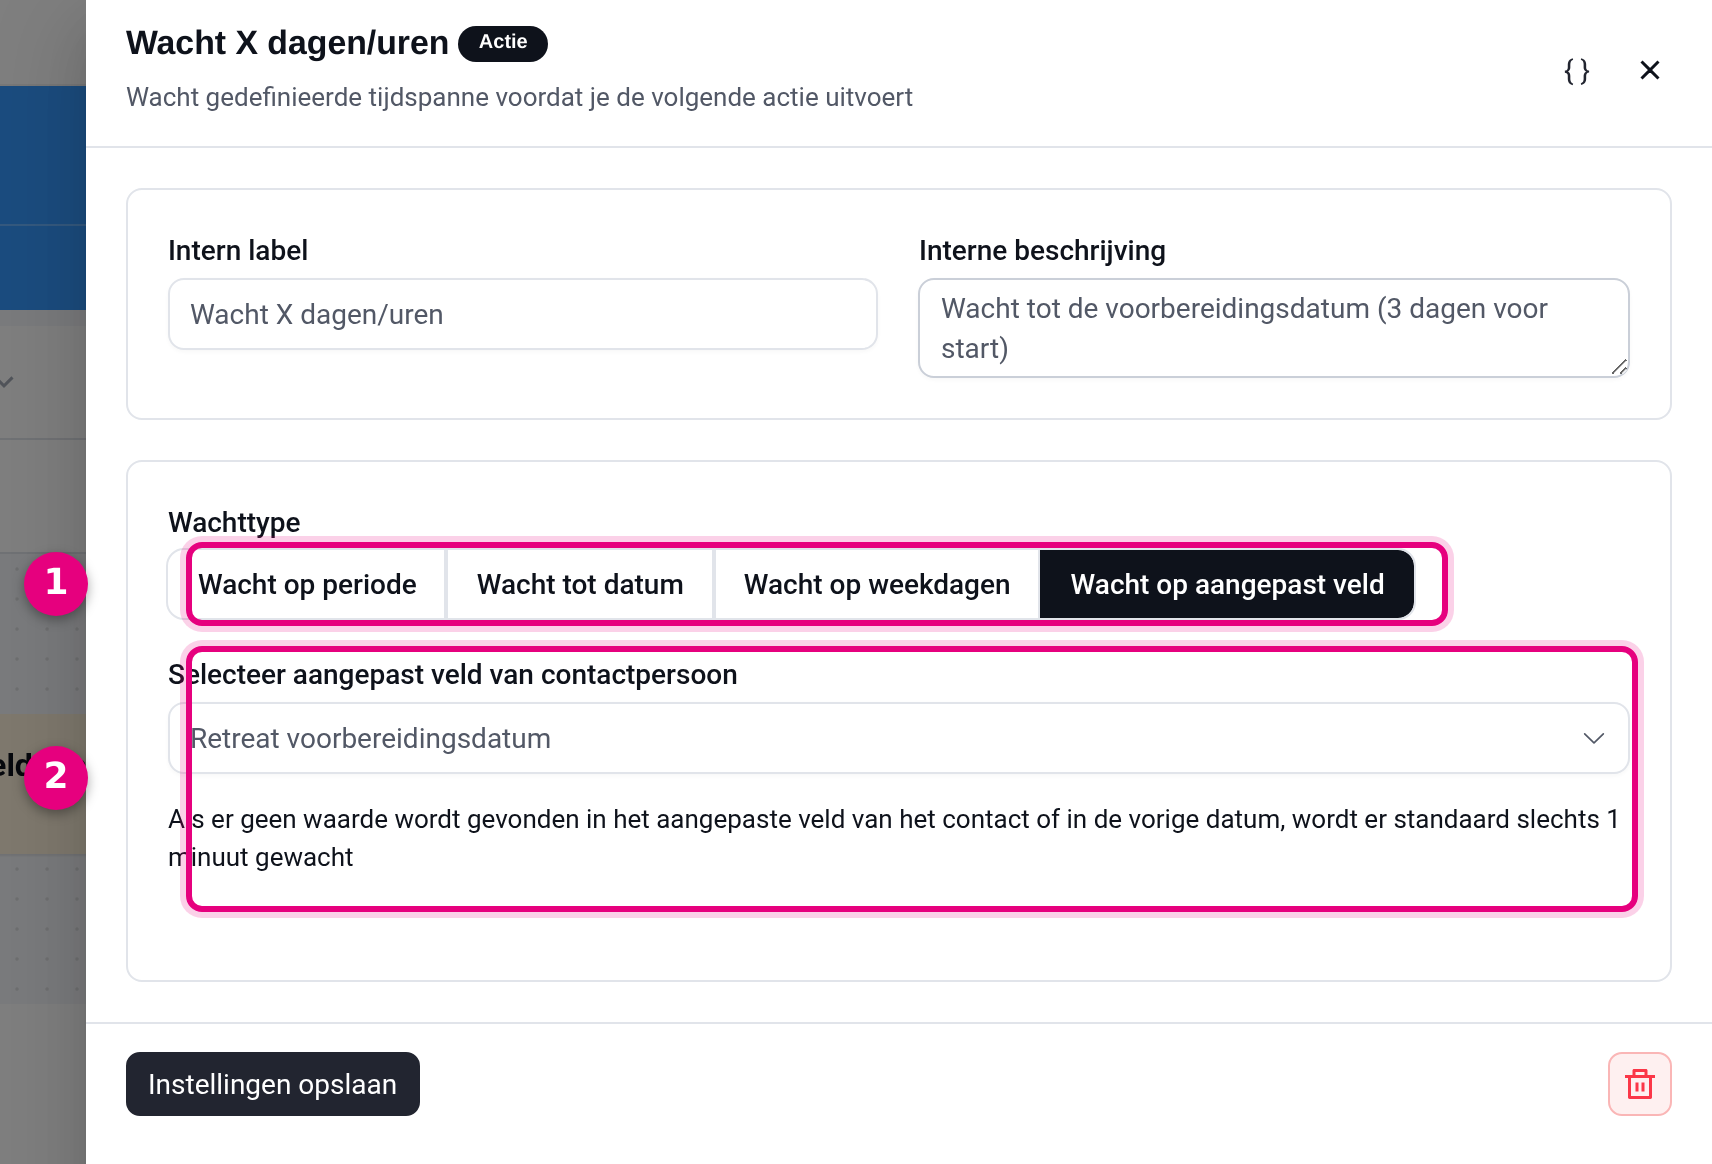
- The wait type. You can choose Wait for a period (a fixed number of minutes, hours, days or months), Wait until a date (one fixed moment, the same for every customer), Wait for weekdays (until the next chosen weekday, optionally with a time) and Wait on custom field (until the date held in a date field on the contact). Choose the last one here.
- Choose the date field, here “Retreat preparation date”. Note the message below it: if the field has no value, or the date lies in the past, the step waits only one minute and the flow continues straight away.
In the emails you use the date fields as merge codes, so every customer sees the dates of their own edition:
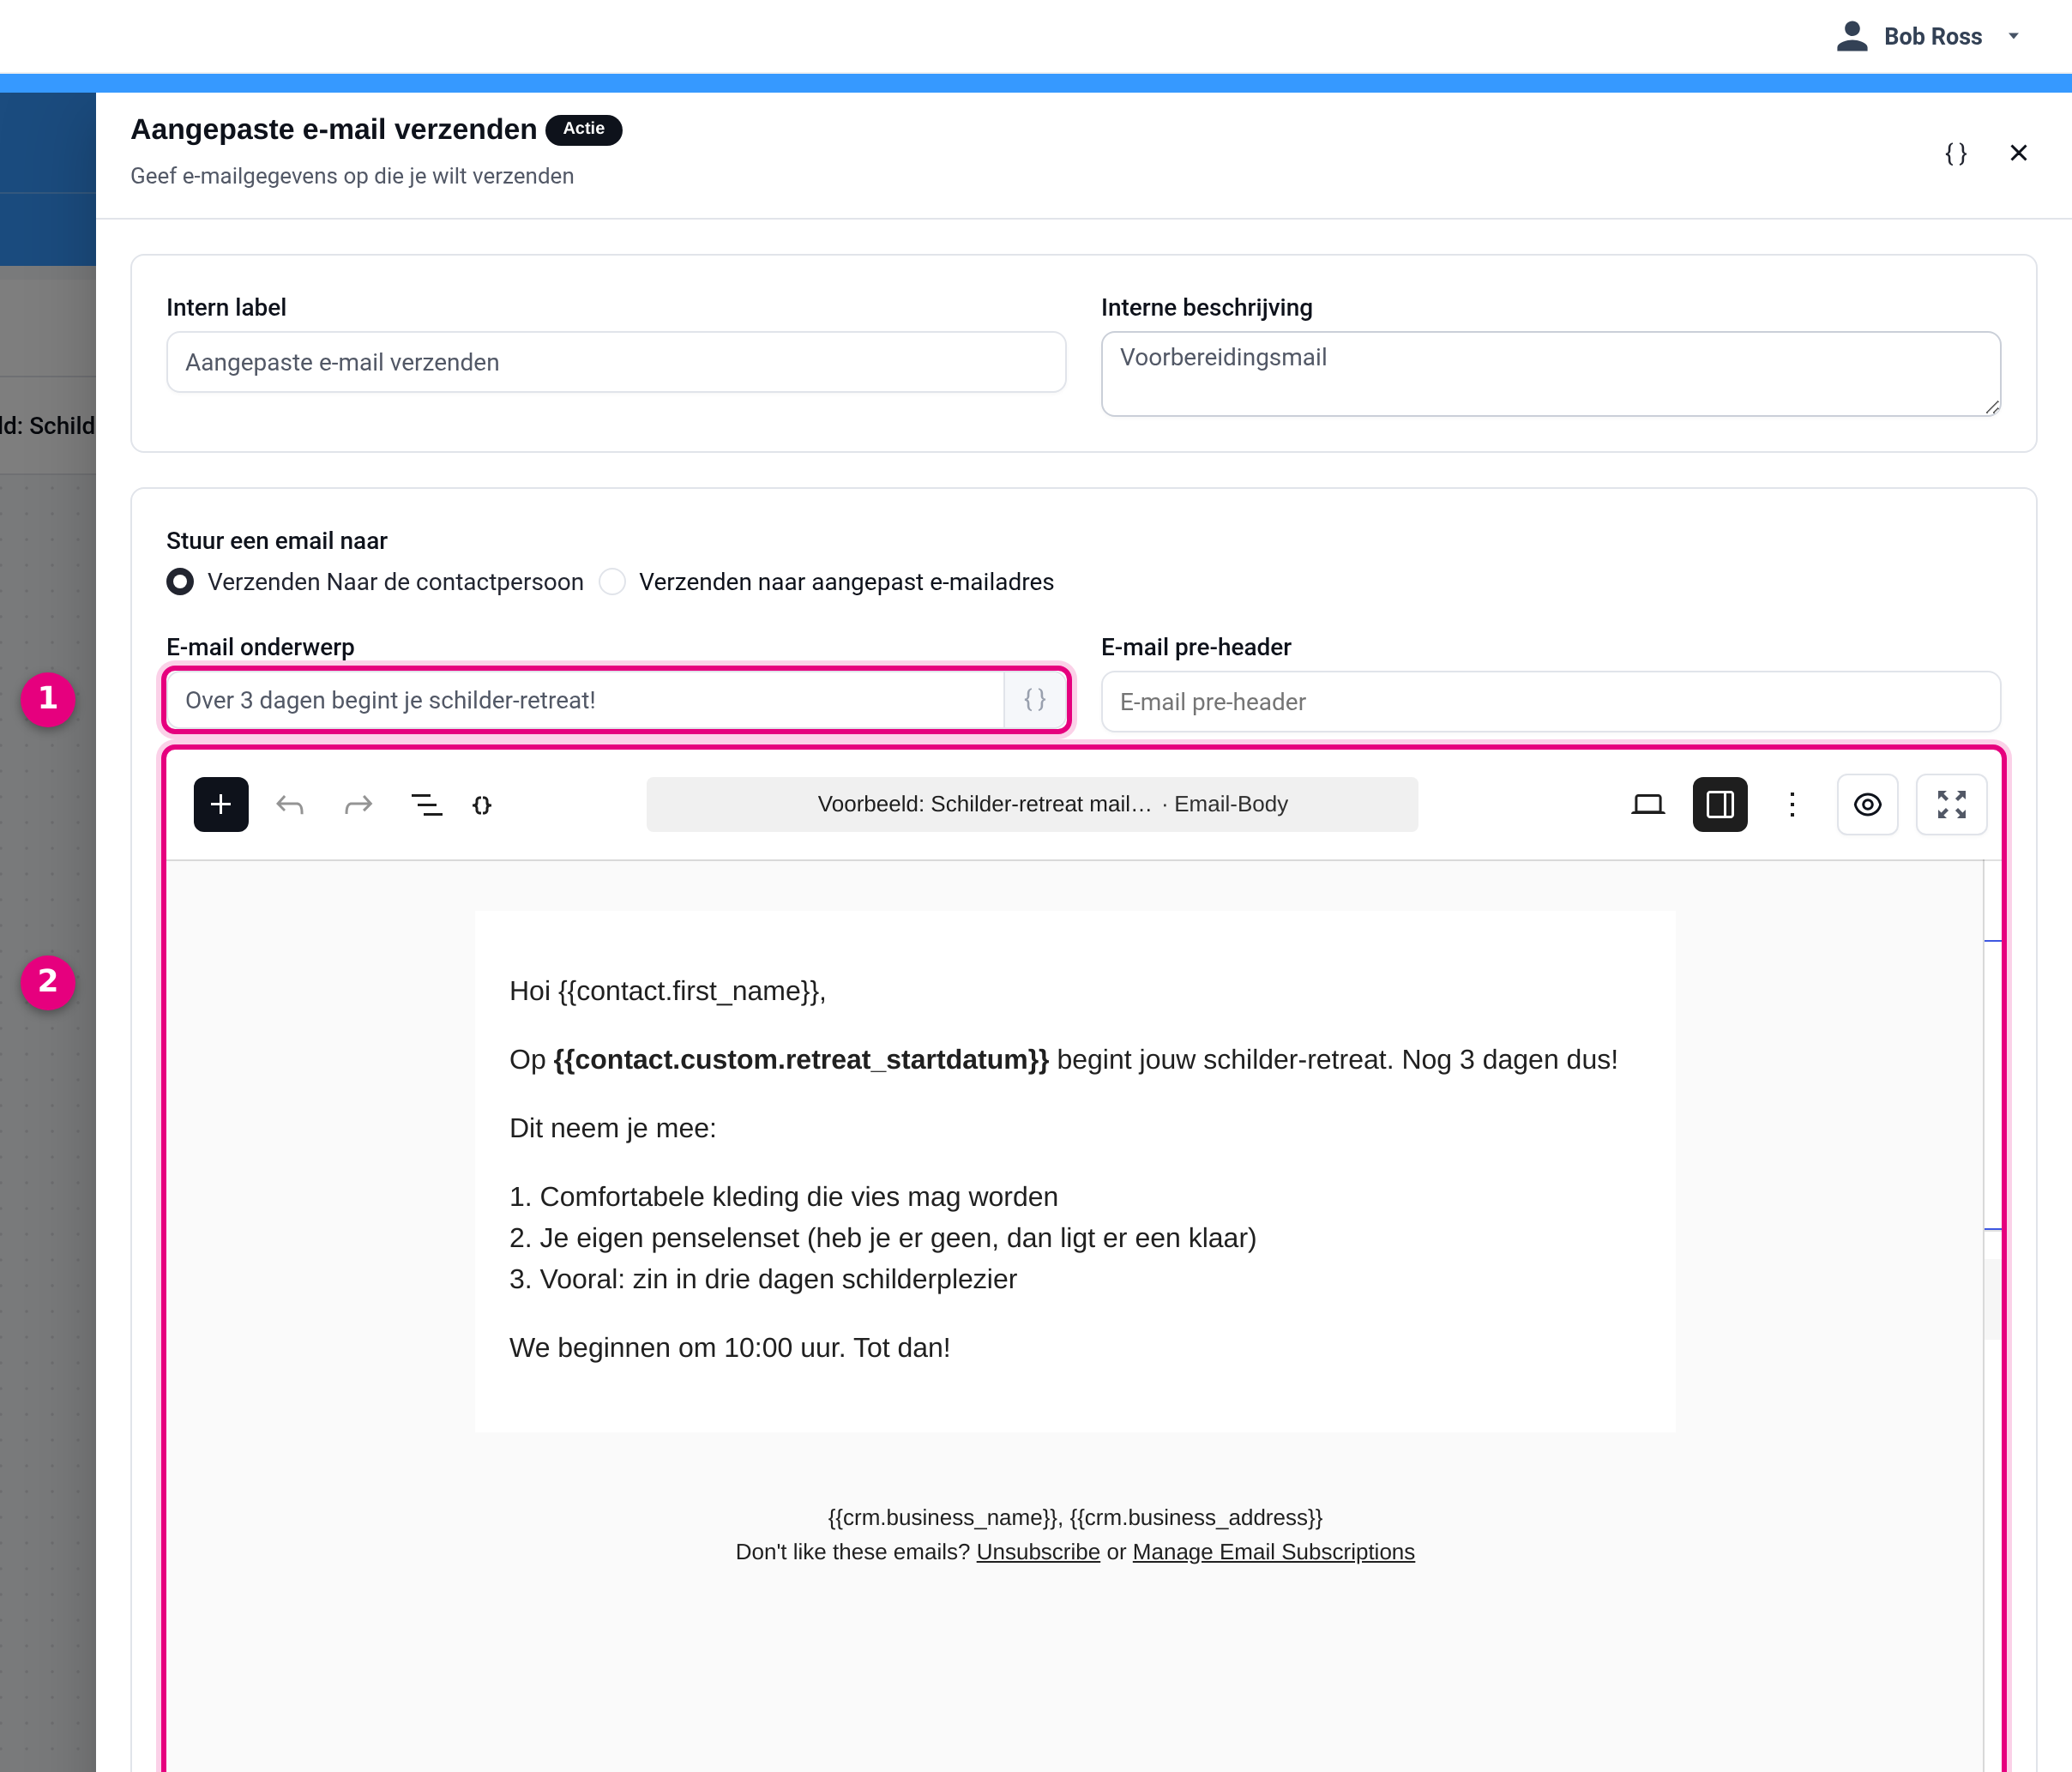
- The email subject. With the {} icon you can insert merge codes here too.
- The email text with the merge code
{{contact.custom.retreat_start_date}}: you will find it in the editor through the {} icon, under Custom fields. On sending, the code is replaced by the customer’s date, in the form 2027-05-10. If you prefer “Monday 10 May”, create an extra text field (for example “Retreat date in words”) and fill that in per edition in step 3 as well.
Adding a new edition #
Once the system is in place, a new edition is arranged quickly:
- Add a new variation to the product, for example “November 2027”.
- In automation 1, add a condition block for that variation, with the two matching dates in the Update contact property action.
- Delete the condition block of editions that have passed.
Automation 2 and the emails stay unchanged. Your product remains one product, so nothing changes for your package either.
Activating and testing #
Set both automations to active with the switch in the top right (from Draft to active). The easiest way to test is without a real order:
- Open a test contact and fill the two date fields by hand with dates close to today, for example tomorrow as the preparation date and the day after tomorrow as the start date.
- Apply the tag “Retreat scheduled” to the test contact by hand. Automation 2 now starts and in Reports you can see that the contact is at the first wait step, scheduled for your test date.
- If you also want to test the purchase route, place a test order for one variation and then check on the contact whether the date fields are filled and the tag has been applied.
- After testing, remove the tag and the test dates from your test contact.
Good to know #
- Time of day: “Wait on custom field” waits until the start of that day (midnight). If you want the email to go out at 9:00, for example, add an extra “Wait for a period” step of nine hours straight after the wait step.
- No offset option: a setting such as “three days before the field” does not exist in the wait step. That is why you work with the separate field for the preparation date.
- Late bookers: if someone books after the preparation date, that date has already passed and the flow sends the preparation email almost immediately (the wait step then waits only one minute). Usually that is exactly what you want.
- Purchase history: the condition block “Purchased product variations” looks at every purchase by the contact, not only at the new order. So clear out condition blocks for editions that have passed. If a customer buys two future editions at once, the dates from the topmost condition block win, and you then correct the date fields on the contact by hand.
- One event at a time: the date fields exist once per contact. So a customer can have one future event “scheduled” per course type. If you offer several types alongside each other, read the section below.
Several courses or event series alongside each other #
If you offer several types of courses or events, a customer can sign up for more than one at a time. Because a date field holds only one value per contact, the second registration would otherwise overwrite the dates of the first. The solution: give every course type its own set of fields and automations.
- Create separate date fields per course type, with a short code for the type in the name. For the BKP course, for example: “startdate_bkp” and “preparation_bkp”, and for the BIK course: “startdate_bik” and “preparation_bik”.
- Also create a separate tag per course type and a separate set of the two automations from this article (recognising the edition and the emails around the event date), running on the fields of that type.
- Registrations for different types then run completely separately: someone can be in the BKP email sequence and the BIK one at the same time without the dates overwriting each other.
This may look like a lot of fields, but in practice it is manageable: two date fields per course type, and most organisations have a limited number of fixed types. Extra fields cost nothing and do not count towards anything.
Please note: within the same course type the latest registration still wins. If someone signs up for two future editions of the same course, the second registration overwrites the dates, and you then correct the fields on the contact by hand.


