Do you have your own WordPress website alongside your Autorespond environment, a learning environment, membership platform or community on a different URL, for example? Then you want the two to understand each other: a new contact or a purchase in your Autorespond environment should have the right result on your platform automatically, such as an account or access to content. That is exactly what the WP Fusion integration is for. In this article you can read how it works, how to set it up and what you can do with it afterwards.
The integration uses the plugin WP Fusion on your external WordPress website, which talks directly to the CRM of your Autorespond environment (FluentCRM).
1. How the integration works #
WP Fusion runs on your external website and connects it to your Autorespond environment. From that moment on, the users on your website are linked to the contacts in your CRM, and your CRM tags can be used on the website as “keys”: a tag decides who may see which page, course or member content. If your Autorespond environment applies a tag (after a purchase or a form sign-up, for example), the matching door opens on your platform automatically.
The integration works on the basis of the URL of your Autorespond environment. So set it up (or check it) at the moment you go live on your own subdomain. An integration that still points to a temporary onboarding environment has to be updated once when you go live.
2. What you need: WP Fusion Lite or the premium version #
There are two flavours of the plugin:
- WP Fusion Lite (free): synchronises your website users with your CRM contacts and can protect individual pages and posts based on tags. Fine for getting a taste of the integration.
- WP Fusion (premium): this is where the integration really becomes valuable. The premium version integrates with more than a hundred plugins (including learning environments, community and membership plugins and page builders), so that you can link course access or the visibility of parts of a page directly to tags, for example. You also get the webhook function with it, which lets your Autorespond environment create accounts on your website itself (see step 5), plus extensions such as automatic login links and event tracking.
Are you a Platform Essentials customer as well? Then the premium version of WP Fusion is already included in your package and is ready and waiting on your platform. With the explanation below you can set the integration up yourself easily, and you can always get in touch with support: we are happy to help you make the connection.
3. Step 1: create a connection account in your Autorespond environment #
WP Fusion logs in to your Autorespond environment with a username and an application password. Do not use your own administrator account for this: the application password will be visible to everyone who can open the settings of your external website. A separate account with only CRM rights is safer, and a leaked password can then be revoked with one click without your own account being affected.
- In your Autorespond environment, create a separate user account for the integration (“platform-connection”, for example), with the Subscriber role. A heavyweight role is not needed: the rights come from the next step.
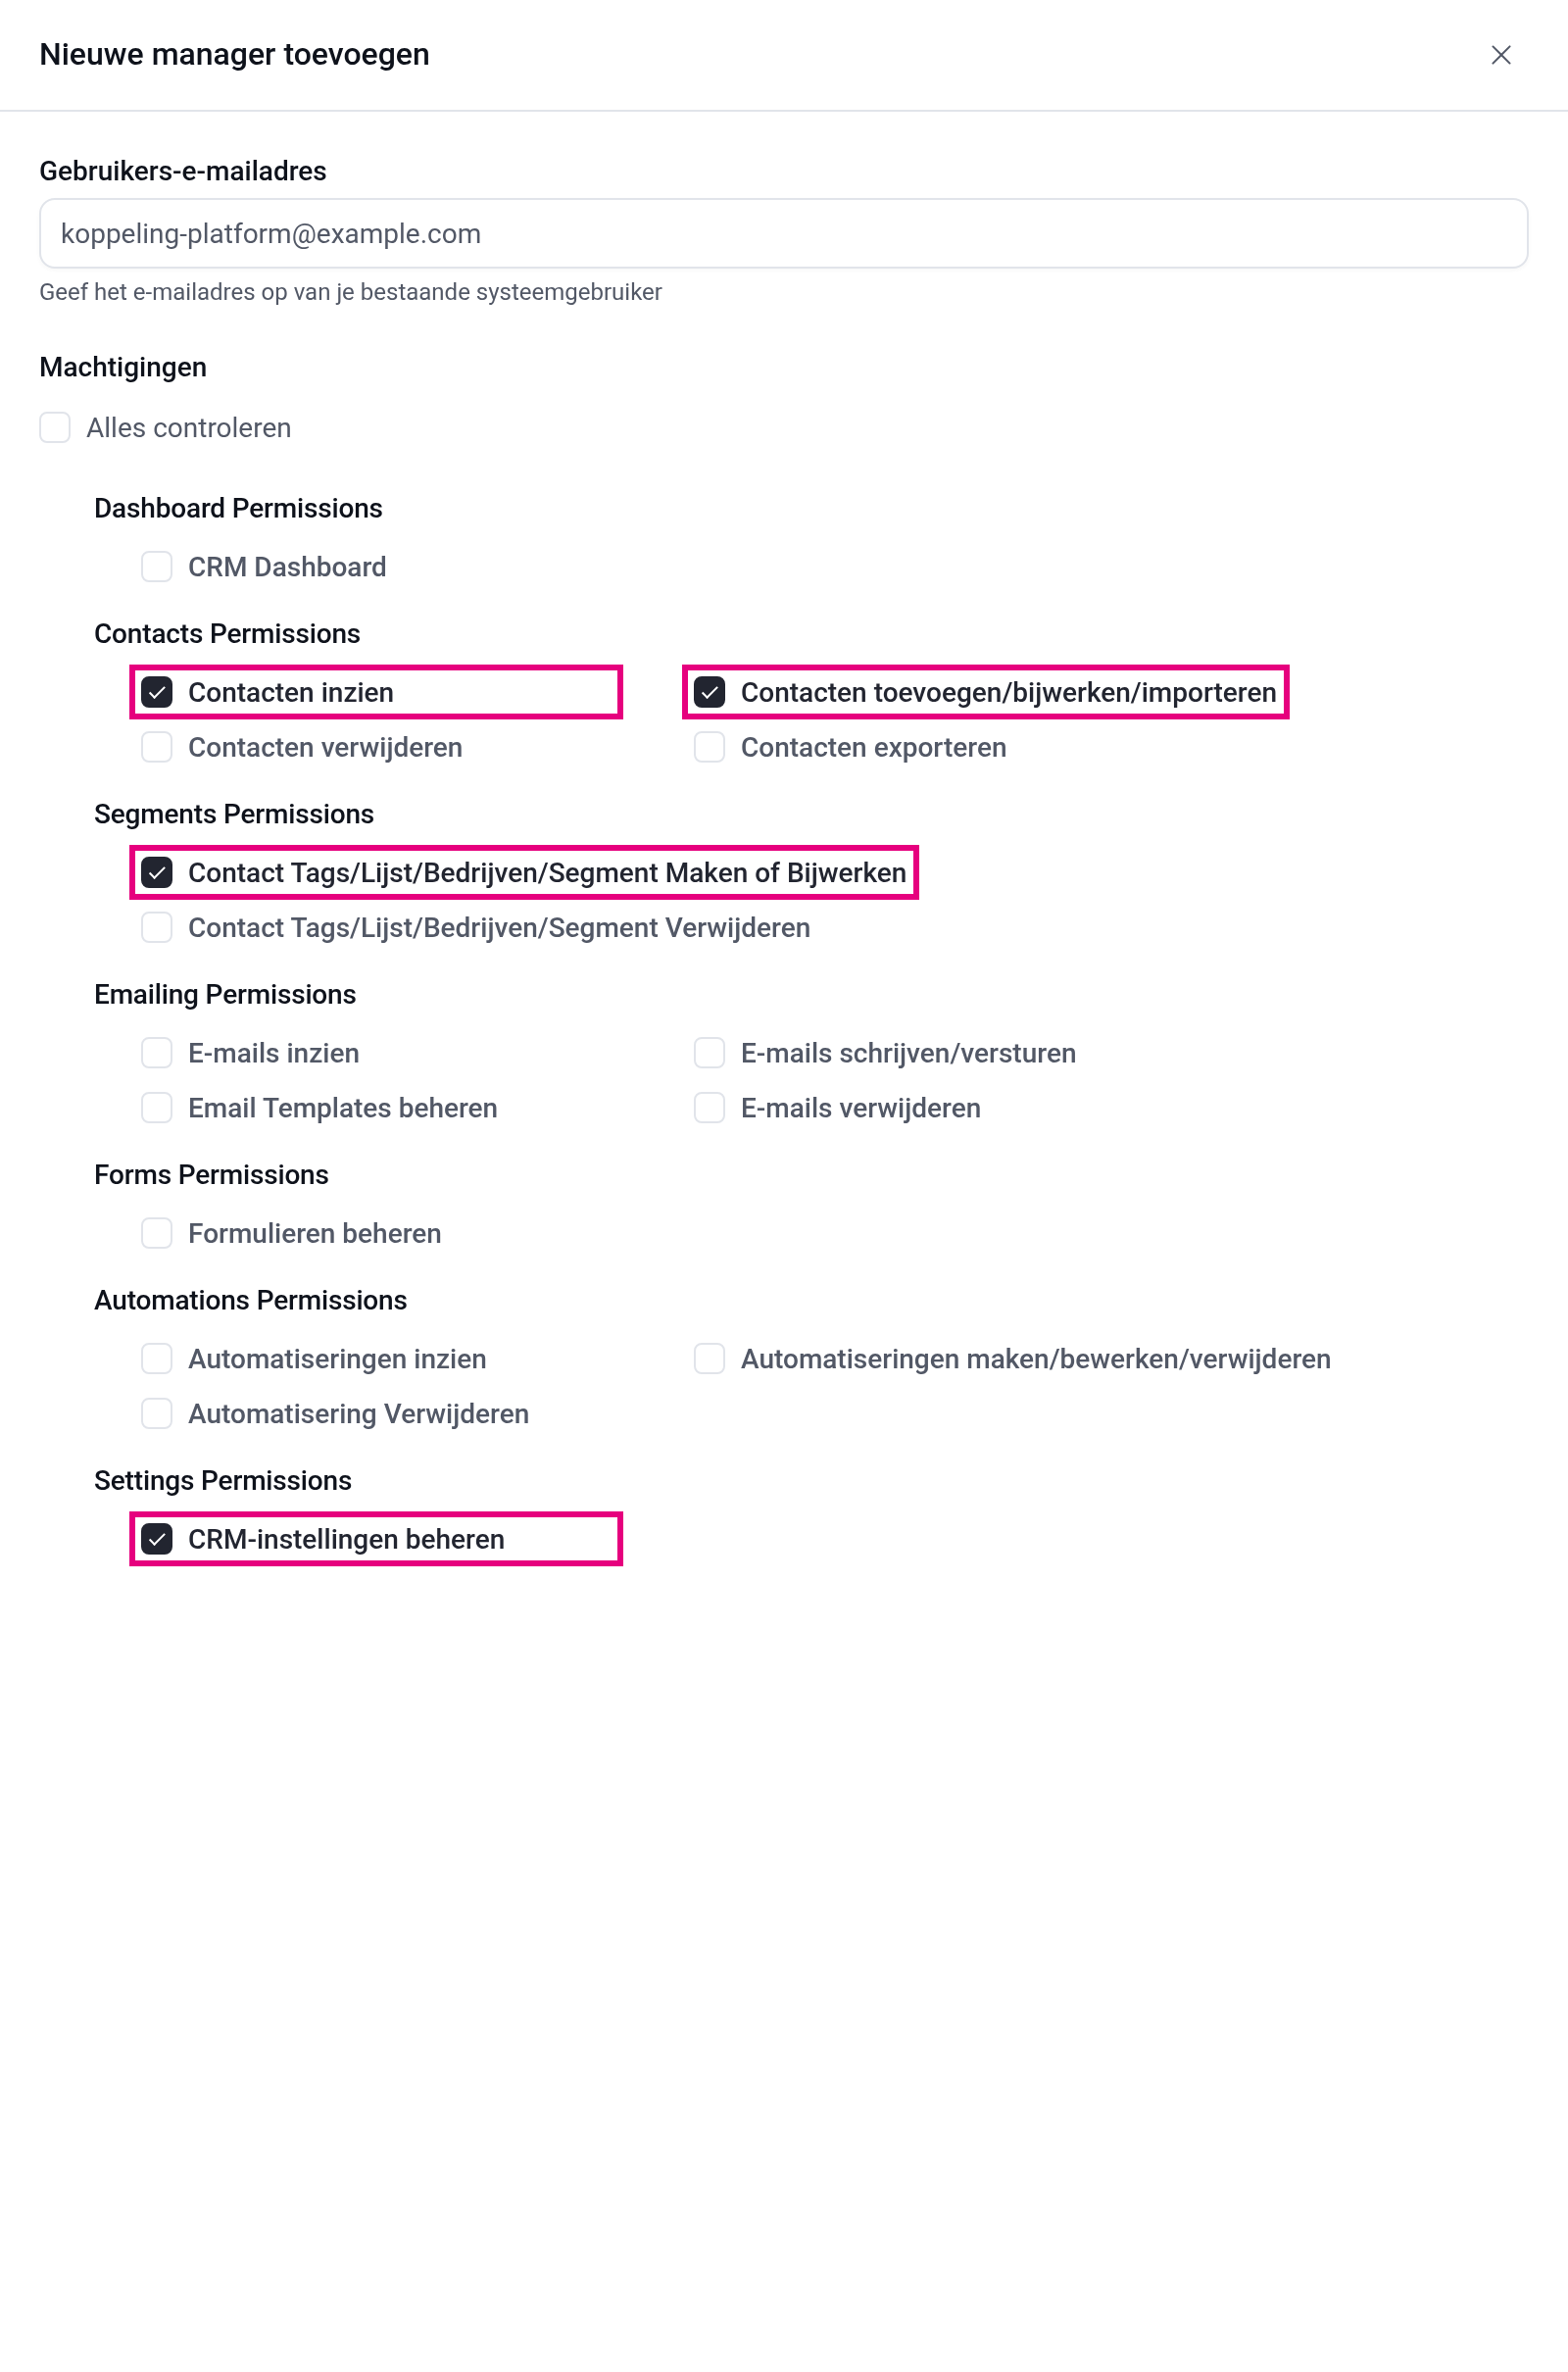
- Give that account CRM rights: go to CRM & Emails → CRM Settings → Managers, click Add manager, choose the connection account and tick exactly these four permissions: View contacts, Add/update/import contacts, Create or update contact tags/lists/companies/segments and Manage CRM settings (that last one is needed so the integration can also fetch your contact fields). Leave the other boxes unticked. If you get stuck, just ask us; we are happy to set an account like this up properly for you.
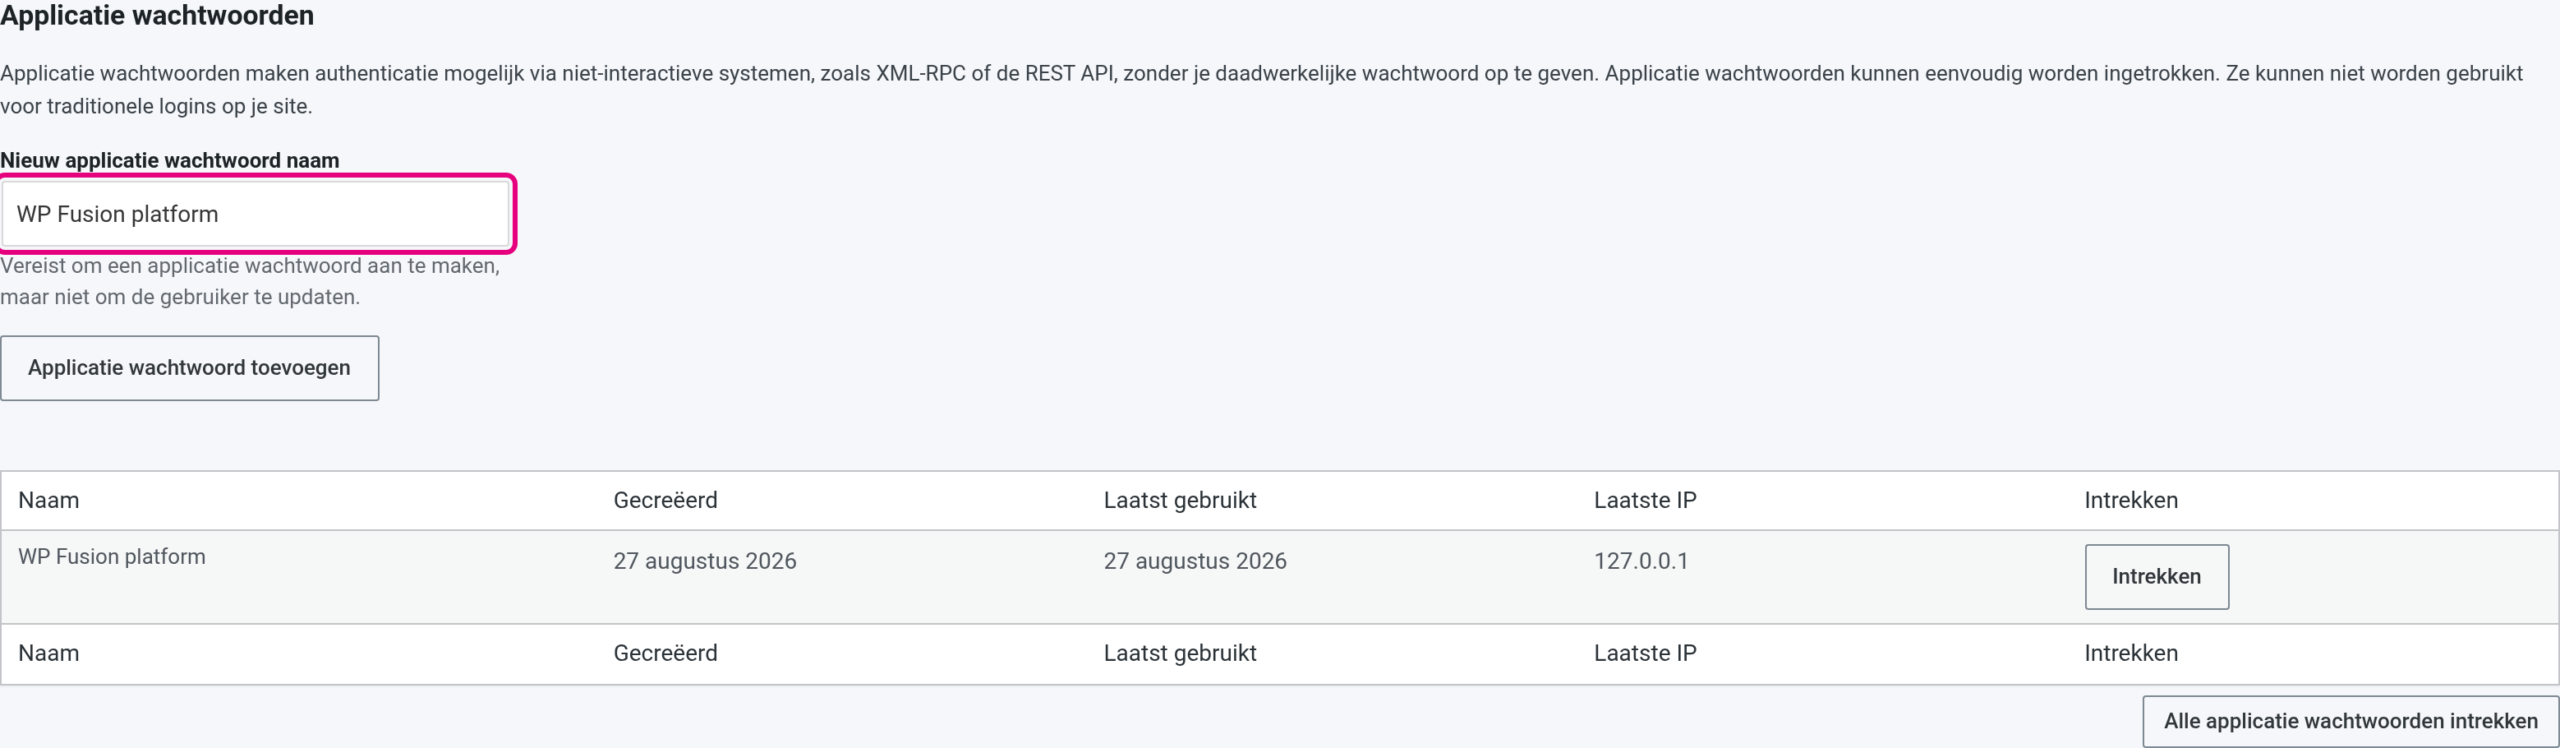
- Open the profile of that account and, at the bottom under Application passwords, create a new application password with a recognisable name (“WP Fusion platform”, for example).
- Copy the generated password straight away; it is only shown once.
4. Step 2: set WP Fusion up on your external website #
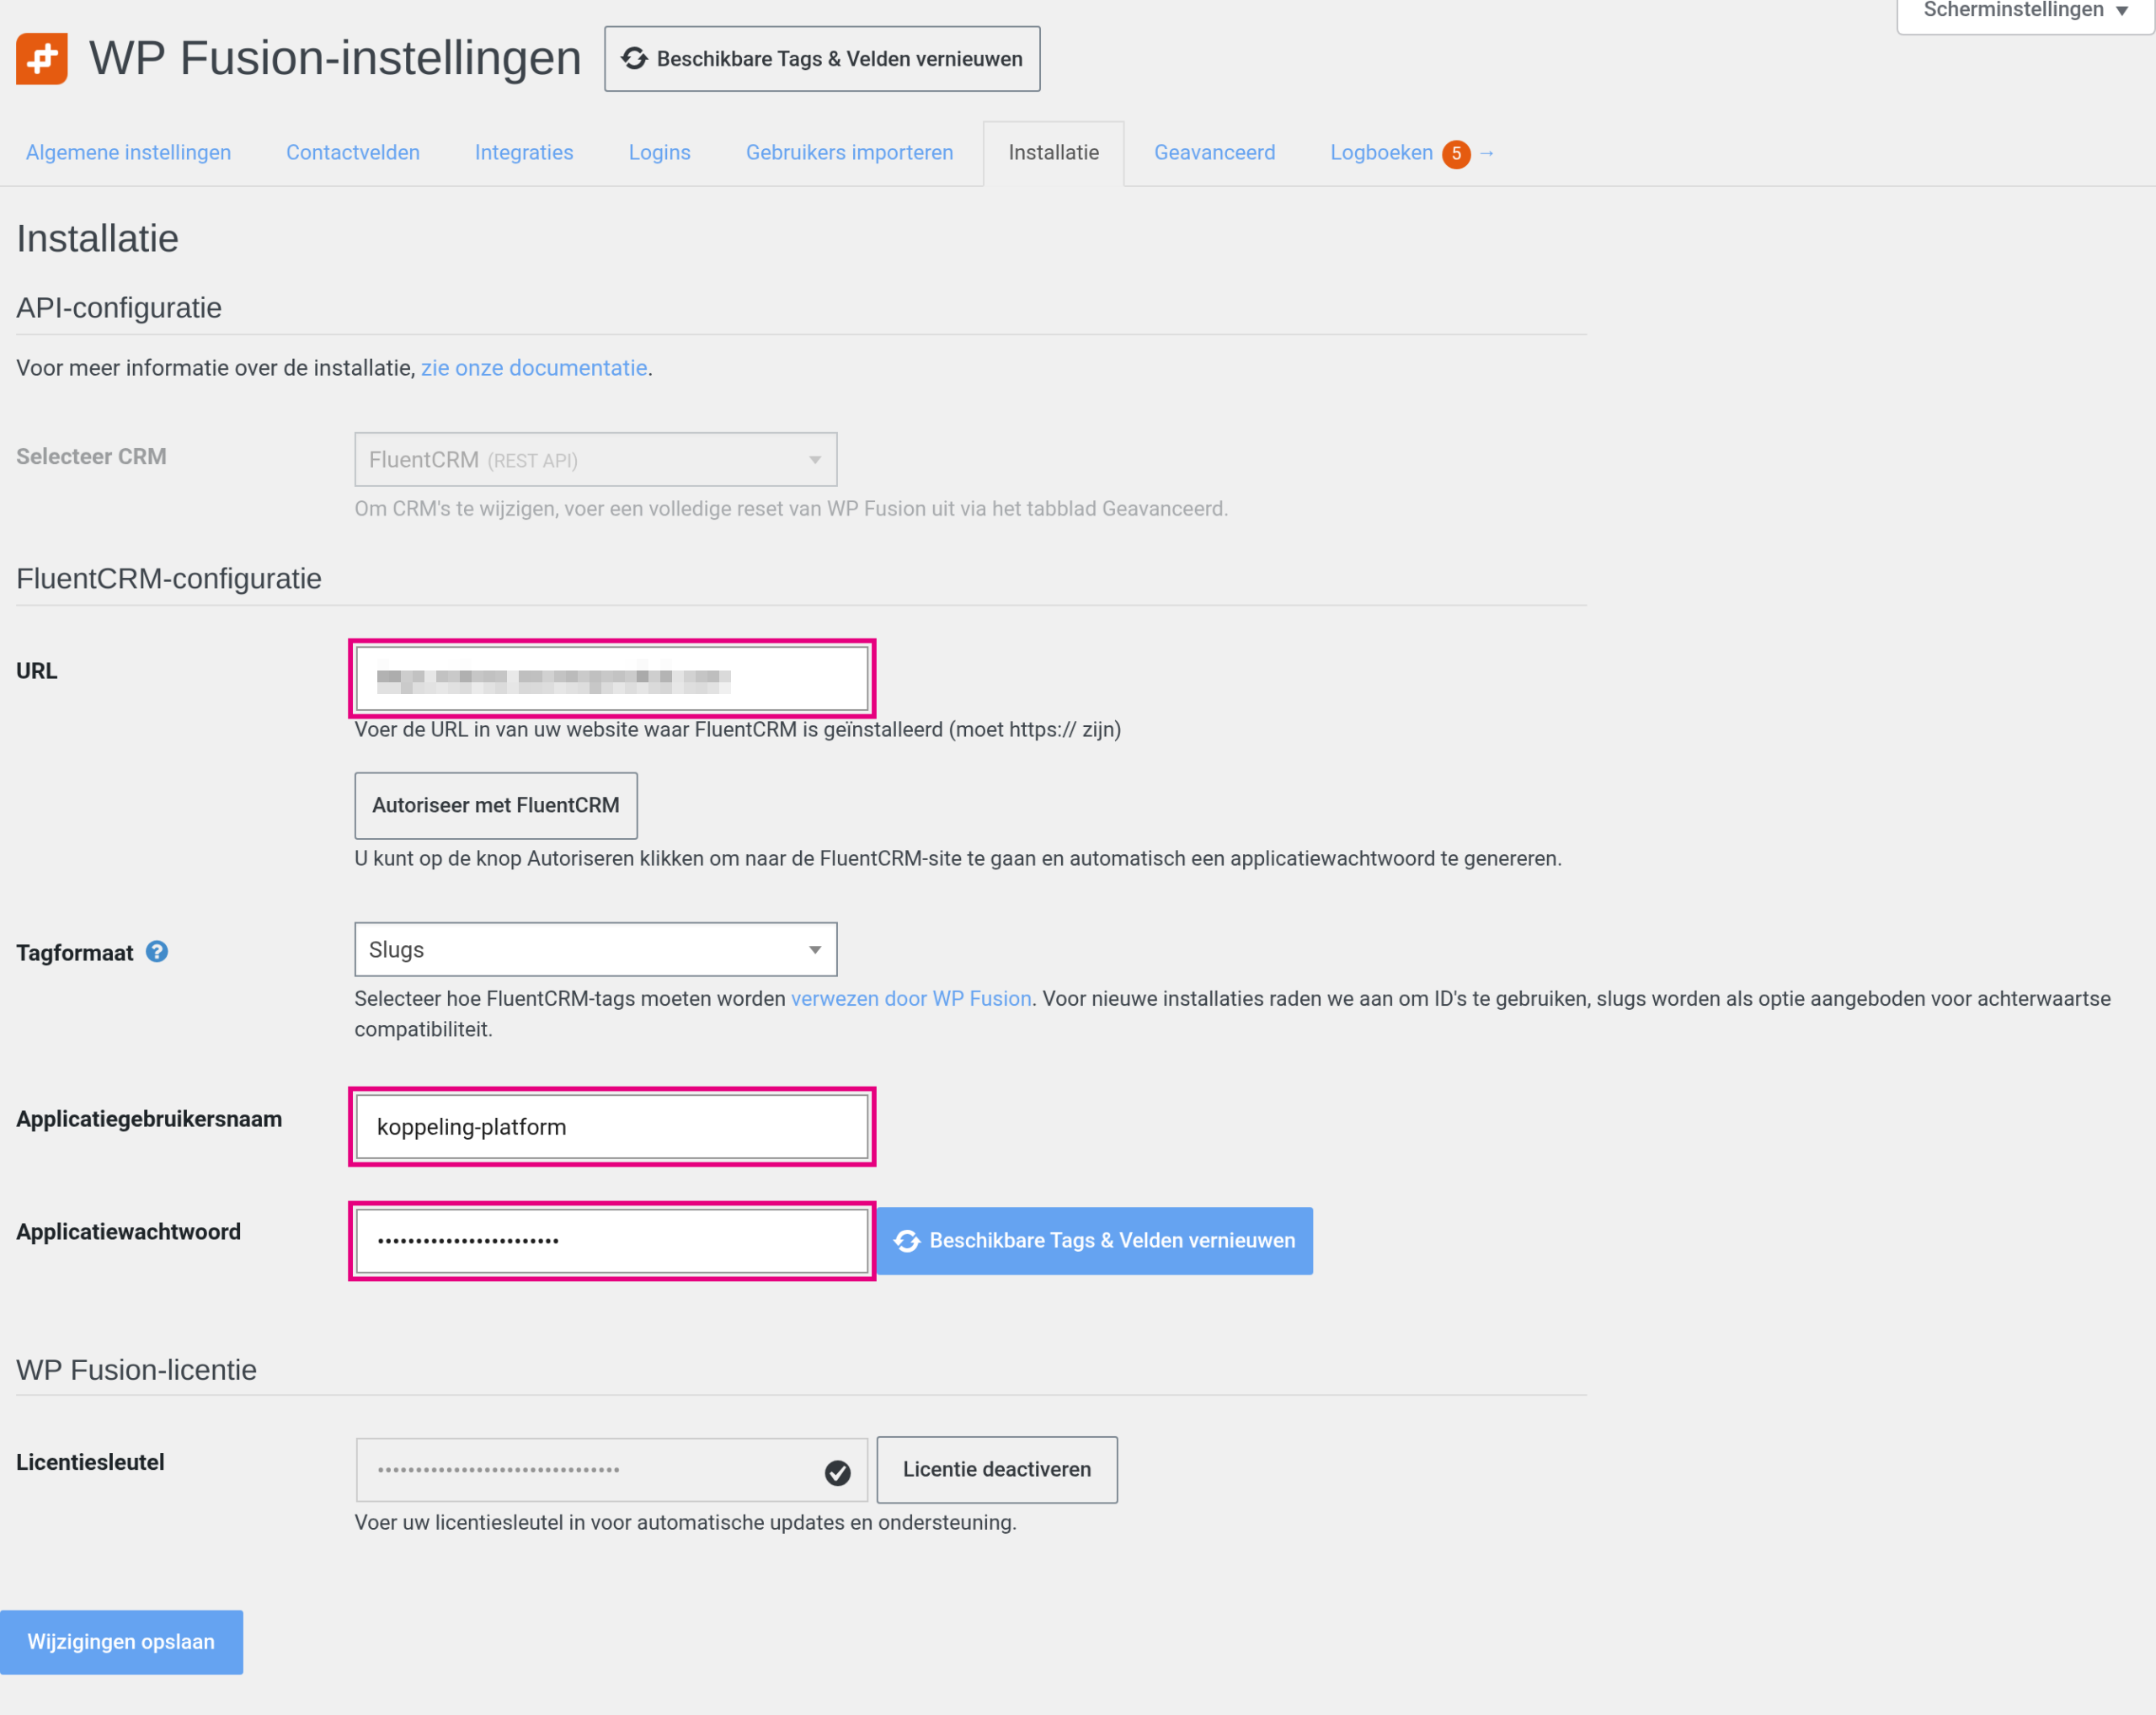
- On your external WordPress website, go to the WP Fusion settings and open the Setup tab.
- Under Select CRM, choose FluentCRM (REST API).
- Under URL, enter the address of your Autorespond environment, for example https://my.yourdomain.com (with https://).
- Fill in the Application username (the connection account from step 1) and the Application password. You can also use the Authorise with FluentCRM button; in that case log in to your Autorespond environment with the connection account, not with your administrator account.
- Set Tag format to IDs (recommended; you can then safely change tag names later without breaking the integration).
- Click Save changes and then Refresh available tags & fields. Your tags and contact fields from Autorespond can now be used on your website.
Do you add new tags or fields in your Autorespond environment later? Then click Refresh available tags & fields again, otherwise you will not see them in the dropdown lists on the website yet.
5. Creating an account automatically for a new contact #
A common question: can a new contact in my Autorespond environment get an account on my platform automatically? Yes, that is possible. This webhook function is part of the premium version of WP Fusion (not Lite). WP Fusion has its own webhook address with a secret access key. You will find it on your external website in the WP Fusion settings on the General settings tab, under the heading Webhooks (the Access key and Webhook base URL fields). If your Autorespond environment calls that address, WP Fusion creates an account for the contact on the website automatically.
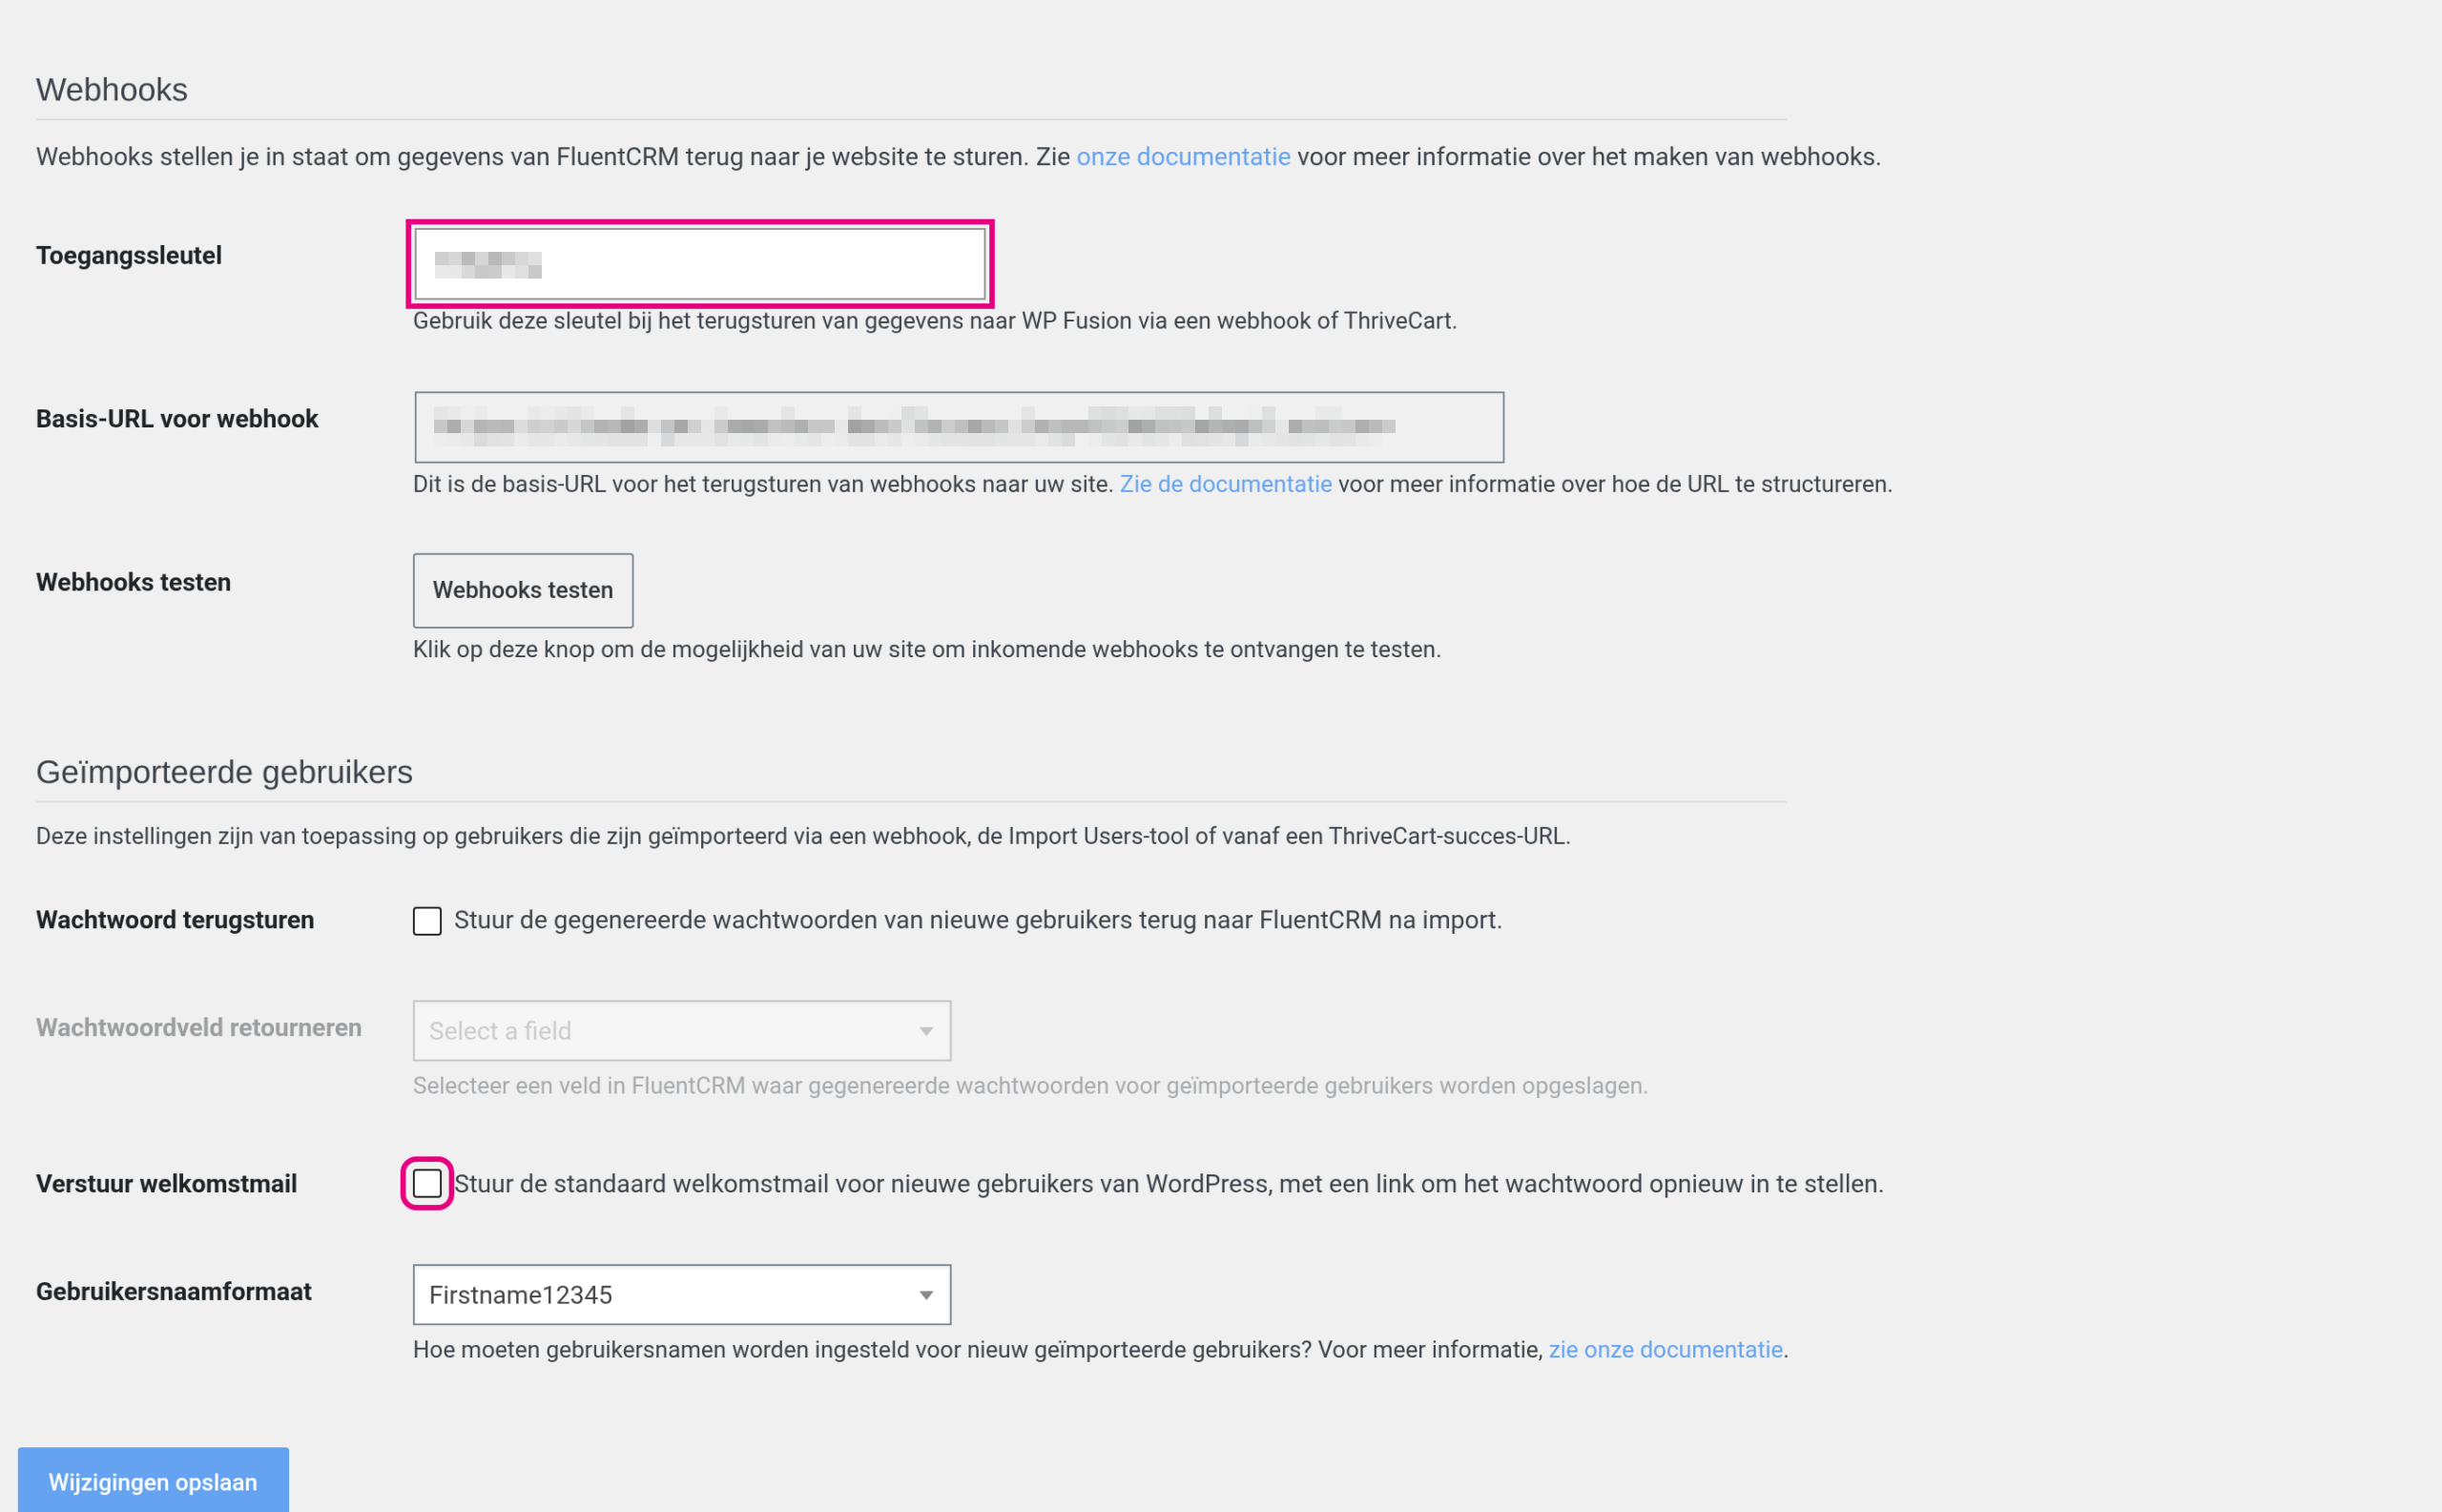
A little further down on that same tab, under Imported users, is the tick box Send welcome email: with it, every automatically created user immediately receives the standard WordPress welcome email with a link to set a password. This can also be arranged per webhook by adding send_notification=true to the address, as in the example below.
This is how you set it up:
- On your external website, find the Access key in the WP Fusion settings, General settings tab, Webhooks section, and copy it.
- Use it to build the webhook address, in this fixed format (replace yourwebsite.com and KEY):
https://yourwebsite.com/?wpf_action=add&access_key=KEY&contact_id={{contact.id}}&send_notification=true&role=subscriber- In your Autorespond environment, create an automation with Tag applied as the trigger, using the tag of your product or programme (“platform-access”, for example).
- Add the action Outgoing Webhook (send data to external server), choose the GET method and paste the address from step 2 into the URL field. Your environment fills the code {{contact.id}} in automatically with the number of the contact when it sends.
- Set the automation to Published. From now on your platform creates an account automatically for everyone who gets the tag; with send_notification=true that person immediately receives the standard welcome email from the website with a link to set a password. If you leave that part out, the account is created silently.
Worth knowing: if an account with the same email address already exists on the website, no duplicate account is created, but the existing account is linked and updated. And for security reasons an account with administrator rights can never be created through this webhook address; the role is always an ordinary visitor role. If you want to give existing contacts an account in one go, WP Fusion has the Import users tab for that (importing based on a tag; premium as well). If you get stuck, do get in touch with support and we will set this up together with you.
Are you using WP Fusion Lite? Then this webhook function is not available. The alternative is an integration service such as Zapier or Make: you send the same outgoing webhook from your Autorespond environment to that service, and have it create a user on your website with the WordPress action. That requires an account with such a service; the premium webhook route above is simpler and is what we prefer.
6. Worth knowing #
- The integration is tied to the URL. If you move from your onboarding environment to your own subdomain later, update the URL in the WP Fusion settings and authorise again.
- Tags are the language of the integration. Think about your tag structure beforehand (one tag per product or programme, for example); that keeps access on your platform clear. See also the article about managing access with tags below.
- Watch out when you remove tags. Depending on the settings on your platform, removing a tag can also revoke access. Handy with refunds, but good to know before you clean up tags.
- Security. Always use a separate connection account (step 1). If you want to convert an existing integration that still runs on an administrator account, create the new application password first, enter it on the website, and only then revoke the old password via the administrator’s profile.


