The Autorespond shop is built on a WooCommerce foundation, which is always the best option for running a shop that is integrated with the Autorespond system. But in some cases you are already selling through your own external website using WooCommerce (so outside the Autorespond system). In that case you usually want everyone who orders something there to end up as a contact in the CRM of this environment automatically, with the right tags and lists. You arrange that with a webhook: your external webshop reports every new order to your CRM, and your CRM turns it into a contact. In this article you set that integration up yourself in four steps.
Incoming webhooks in Autorespond are based on FluentCRM Pro, included in your package.
1. When you need this integration (and when you do not) #
This integration is intended for one specific situation: a WooCommerce webshop that sits on your own external website and has to pass buyers on to the CRM in this Autorespond environment.
You need the integration if:
- you have your own website with WooCommerce on it, separate from this environment;
- you want everyone who orders there to appear as a contact in this CRM;
- you want to give those buyers the right tags and lists straight away, so that automations can respond to them.
You do not need the integration if:
- you only sell through the shop that is part of this Autorespond environment. That shop and your CRM are already connected, so orders from it end up in your CRM in any case. The tile can simply stay switched off.
- you only want to connect forms on an external website. There is a separate route for that, see Connecting an external website with Fluent Forms Pro to the Autorespond CRM.
Why is a separate integration needed? WooCommerce sends an order through as one big parcel of order data, in which the email address is hidden inside the billing address. Your CRM, on the other hand, expects the email address at the top of the message. Without this integration your CRM therefore does not recognise the email address and the message is refused, while your webshop gets a successful response back. The integration takes the contact details (email address, first name, last name, phone number and address) out of the billing address and puts them where your CRM expects them. Which tags, lists and status the contact receives is still determined by the webhook settings in your CRM.
2. Step 1: switch the integration on in your environment #
The integration is switched off by default. Switch it on first:
- Go to Administration → Integrations.
- Find the tile “External webshop” on that page.
- Click the Enable button.
- The status of the tile jumps from Disabled to Active.
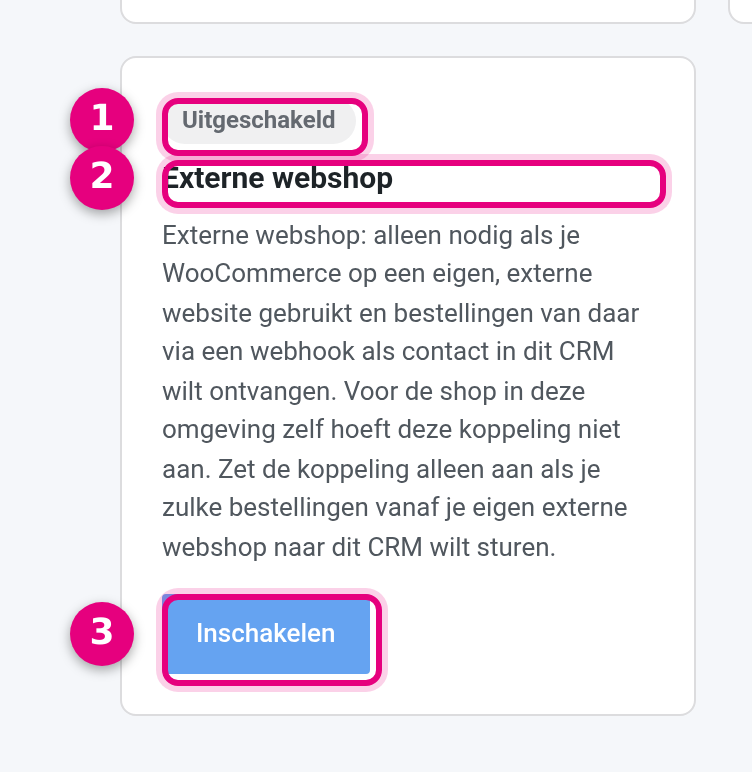
- The status of the tile. As long as it says Disabled, the integration does nothing and orders from your external webshop are not processed.
- The “External webshop” tile. The text below it briefly summarises when you need it and when you do not.
- The Enable button. One click and the integration is on. You do not have to fill anything else in on this page.
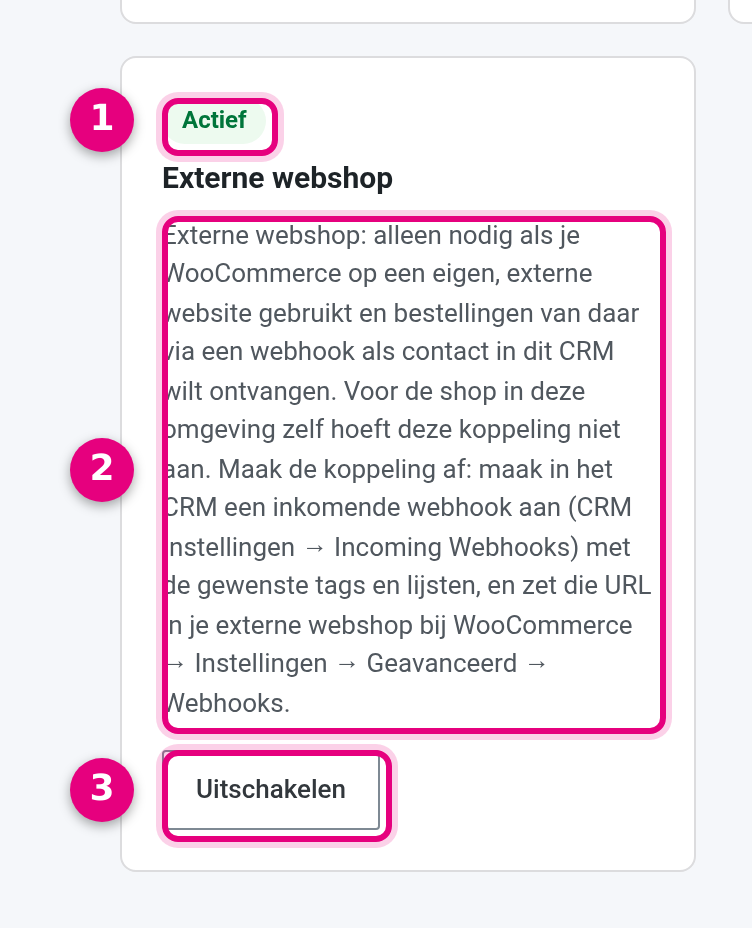
- The status is now Active. From this moment on, your CRM can process orders from an external WooCommerce webshop.
- The tile text names the two next steps: first create an incoming webhook in your CRM, then put that URL in your external webshop. You do those two steps below.
- The button is now called Disable. Use it to switch the integration off again later, if you stop using your external webshop, for example.
3. Step 2: create the incoming webhook in your CRM #
An incoming webhook is an address of its own (a URL) that your CRM listens to. Everything your webshop sends to that address becomes a contact there. While creating it you also decide which list, which tags and which status those contacts get. You will find more background about this type of webhook in Incoming webhooks.
- Go to CRM & Emails → CRM Settings → Incoming webhooks.
- Click Create webhook in the top right.
- Fill in the form that slides open on the right (see the image below).
- Click Create webhook at the bottom to save.
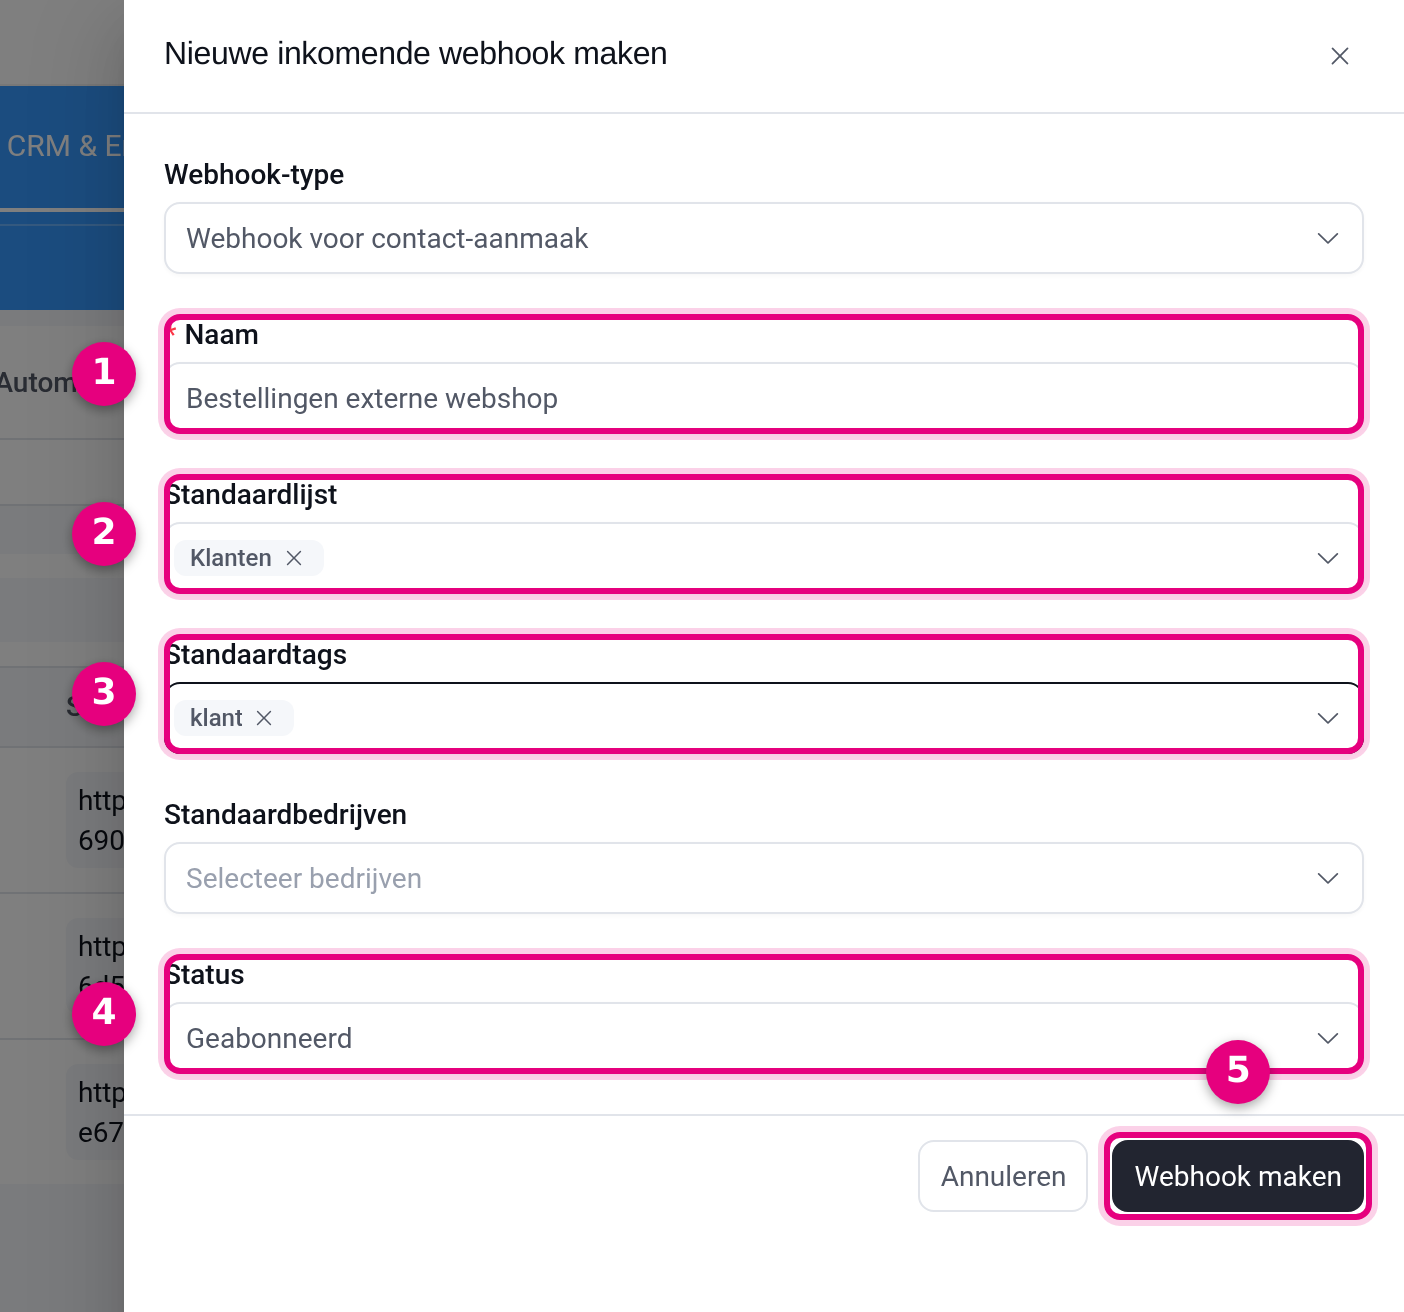
- Name. For your own reference only, so that you can see later what this webhook is for. Something like “Orders external webshop” works fine. This field is required.
- Default list. The list every incoming buyer is put on. Handy if you want to approach your webshop customers separately later. You can choose more than one.
- Default tags. The tags every contact from this webhook receives. This is usually the most important field, because you can start an automation on such a tag (a welcome email or access to something, for example).
- Status. The contact status the contact is created with. Subscribed means the contact can simply receive your emails. If you choose something else, these buyers will not be included in your ordinary mailings.
- Create webhook. This saves the webhook and your CRM generates the URL you need in the next step.
You leave two fields exactly as they are. Under Webhook type, “Webhook for contact creation” stays selected, which is precisely what you want here. You leave Default companies empty, unless you work with company profiles and every contact from this webshop belongs to the same company.
After saving, your webhook appears in the overview with the URL alongside:
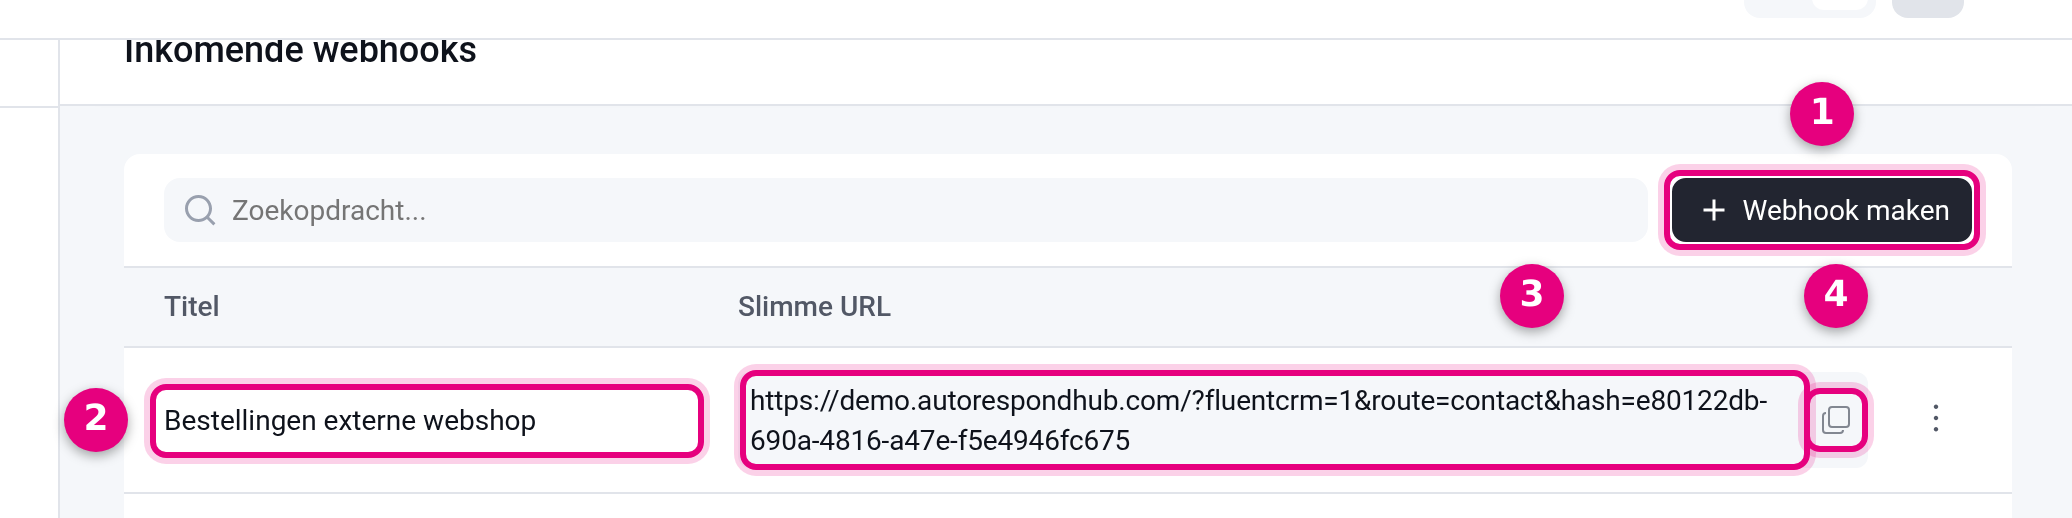
- Create webhook. With this button you create another webhook, a second one with different tags for a different webshop, for example.
- Title. The name you entered when you created it.
- Smart URL. This is the address your webshop has to send to. Every webhook has its own unique address.
- The copy button. Click it to copy the whole URL to your clipboard. Do that now, because you are about to paste it into your webshop.
Treat this URL as a key: anyone who has it can create contacts in your CRM. So do not share it publicly. Through the three-dot menu at the end of the row you can edit or delete a webhook later.
4. Step 3: set the webhook up in your external webshop #
You do this step in the admin area of your own external website. You need the administrator role there.
- Log in to your external website and go to WooCommerce → Settings.
- Open the Advanced tab and click Webhooks within it.
- Click Add webhook in the top right. You arrive at the “Webhook data” screen.
- Fill in the fields as described below and click Save webhook.
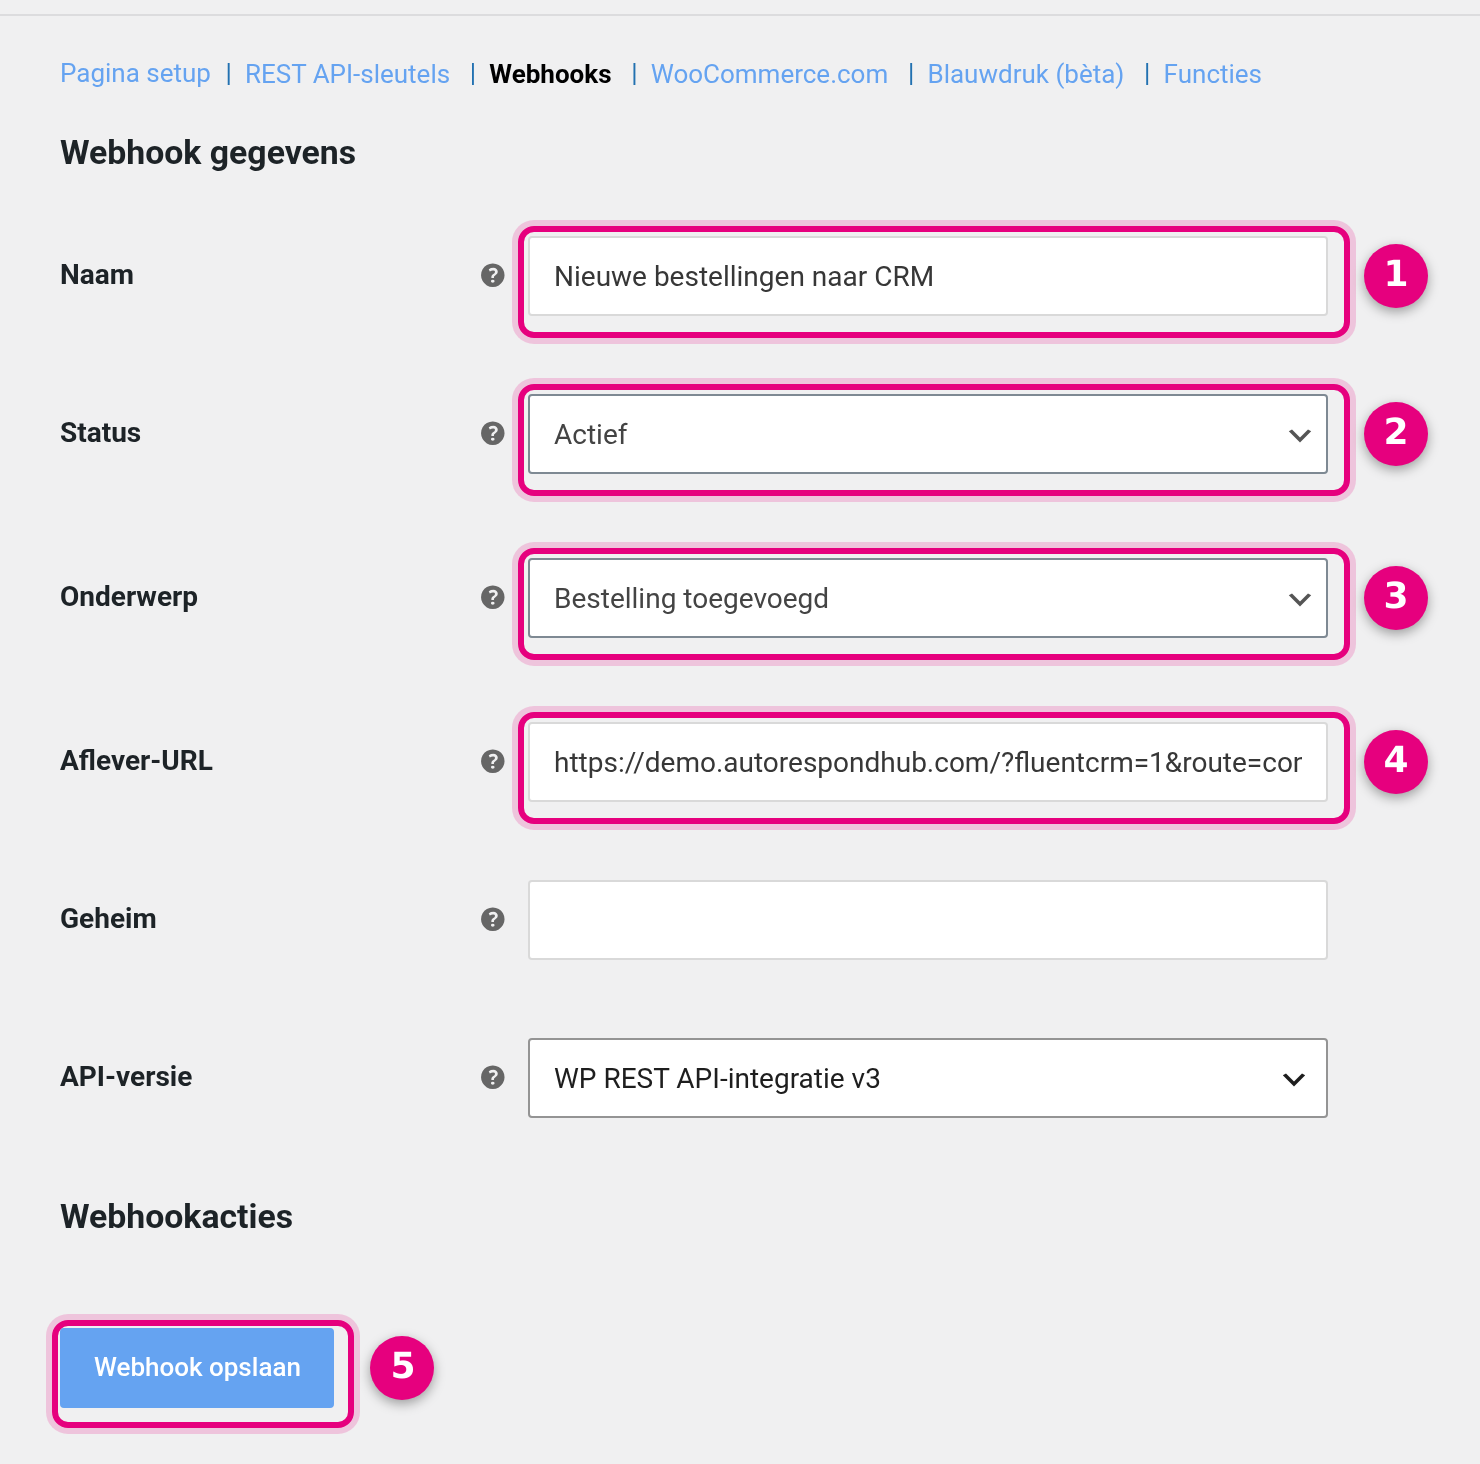
- Name. Free to choose, “New orders to CRM”, for example. Handy if you have more webhooks later.
- Status. Set this to Active. On Paused or Disabled nothing is sent.
- Topic. Choose “Order created”. This is the creation topic for orders: WooCommerce then sends a message as soon as a new order comes into existence. Note what is said about that in the Worth knowing section below.
- Delivery URL. Paste the URL you copied in step 2 here. Check that the whole URL is in there, from https:// right through to the long code at the end.
- Save webhook. From now on your webshop reports every new order to your CRM.
Leave the other fields alone. You leave Secret empty, your CRM does not expect a signature here. Leave API version at its default value; that is the version this integration works with. The Action event field only appears if you choose “Action” under Topic, and you do not do that here.
5. Step 4: check that it works #
Place one test order in your external webshop yourself and see whether it lands neatly in your CRM:
- Place an order in your external webshop with an email address that is not yet a contact in your CRM. Use an address you can access yourself.
- In this environment, go to CRM & Emails → Contacts and search for that email address.
- Open the contact and check whether the name and phone number from the billing address have been taken over.
- Check that the tags and the list you set on the webhook are there, and that the status is right.
- Clean up your test order and the test contact afterwards, so that your statistics stay accurate.
No contact appearing? Then check three things: is the “External webshop” tile set to Active, is the webhook in WooCommerce set to Active with the topic “Order created”, and has the Delivery URL been copied over in full and without spaces.
6. More products, each with its own email sequence #
Do you want buyers of different products each to receive their own email sequence? Then you repeat the set-up per product: each product gets its own tag, its own webhook and its own automation. That keeps things clear and every buyer starts exactly the right sequence.
On the side of your Autorespond environment you do this for each new product:
- Create a new tag for the product, “Bought [product name]”, for example.
- Go to CRM & Emails → CRM Settings → Incoming webhooks, click Create webhook and select that new tag (and a list, if you want one).
- Copy the webhook URL with the copy button in the Smart URL column and pass it on to whoever manages your webshop, with the name of the product alongside.
- Via CRM & Emails → Automations, create a new automation with Tag applied as the trigger, using the tag from step 1, and have it start the email sequence for the product.
- Set the automation to Published; on Draft it does nothing.
Watch out on the webshop side. A standard WooCommerce webhook fires on every order, regardless of which product was bought, and has no setting to filter per product. So the split (order with product A → webhook URL of product A) has to be made in the webshop itself, which is work for whoever manages your webshop. If that does not happen, every buyer ends up in every sequence. Support has an example script for the webshop that calls the right webhook per product and only sends after the payment; ask for it through a ticket and your web developer can take it from there.
7. Only buyers who tick a box themselves #
The webhook from step 3 reports every order to your CRM. If you only want to put buyers on your newsletter list when they tick a box for it themselves at the checkout, something extra is needed on your external website. That part falls outside your Autorespond environment: it is set up by the administrator of your own website, and we do not provide support on the code or settings of external websites. There are two routes:
- Without custom work, using WP Fusion. The paid version of the WP Fusion plugin on your external website has a built-in opt-in for WooCommerce: under Settings → WP Fusion → Integrations you switch “Email Optin” on, enter the text next to the tick box and choose a tag under “Email Optin Tags” that is only applied if the buyer ticks the box. That tag starts your automation in your Autorespond environment (adding a list and a welcome email, for example). You can read how to connect WP Fusion to your environment in Connect Autorespond to your external WordPress website with WP Fusion. On this route you do not need the webhook from step 3.
- With custom work from your website administrator. Your website administrator adds a tick box to the checkout page and makes sure the order data is only sent to the webhook URL from step 2 if that box is ticked. The side of your Autorespond environment (steps 1 and 2) stays exactly as described above.
You decide which route it will be together with your website administrator. In both cases you test the result as in step 4: a test order with the box ticked appears as a contact in your CRM, a test order without the box ticked does not.
8. Worth knowing #
Unpaid orders come in as well #
The topic “Order created” does exactly what it says: the message leaves at the moment the order is created, so before the payment. Everyone who starts the order therefore ends up as a contact in your CRM, even if the payment fails or is never completed. For a newsletter list that is often not a problem, but if you use the tag to grant access to something paid, you do not want this. If you only want paid orders in your CRM, request that through support. There is an extension for it that only sends the message at the moment of payment.
The tile has to stay switched on #
If you switch the “External webshop” tile off again later, the messages from your webshop are refused without you seeing an error on the webshop side. Simply no new contacts come in any more. So keep the tile on Active as long as you use this integration.
For anyone following along technically with logging #
If you are watching the logging of your webshop or of an integration partner, the HTTP code tells you nothing here: even a refused message gets code 200 back. Look at the response itself instead. If it contains "success": true, the contact has been created or updated. If it says "success": false, the message was not processed and something is wrong with the settings.


