Do you want to ask your customer for extra information during checkout? Think of a question such as “How did you find us?” or, for a training course, what prior education and work experience someone has. You can easily add your own fields to the checkout page of an individual sales funnel. In this guide you create such an extra question field, place it on the checkout page and link the answer to a custom contact field in the CRM. That way you see every buyer’s answer on the contact card automatically.
The checkout fields in Autorespond are based on FunnelKit and the CRM connection on WP Fusion, included in your package. Read the FunnelKit documentation
Step 1: create a custom contact field in the CRM #
First create the contact field in which the answer will be stored. Then the link can be set up straight away in steps 5 and 6.
- Go to CRM & Emails → CRM Settings → Custom fields
- Click Add field
- Choose a field type that suits your question. For an open question choose Text; for a multiple-choice question choose Select choice and enter exactly the same options as you will use in the checkout (mind the capitals and spelling)
- Give the field a clear name, for example: How did you find us?
- Save the field
You can read more about custom fields in Setting up custom contact fields.
Step 2: open the checkout page of your sales funnel #
- Go to Sales funnels → Individual Funnels and open the funnel to which you want to add the question
- In the step overview (Steps) click the checkout step, usually called Checkout page
- You land on the Design tab. Scroll to the Checkout Form Fields block
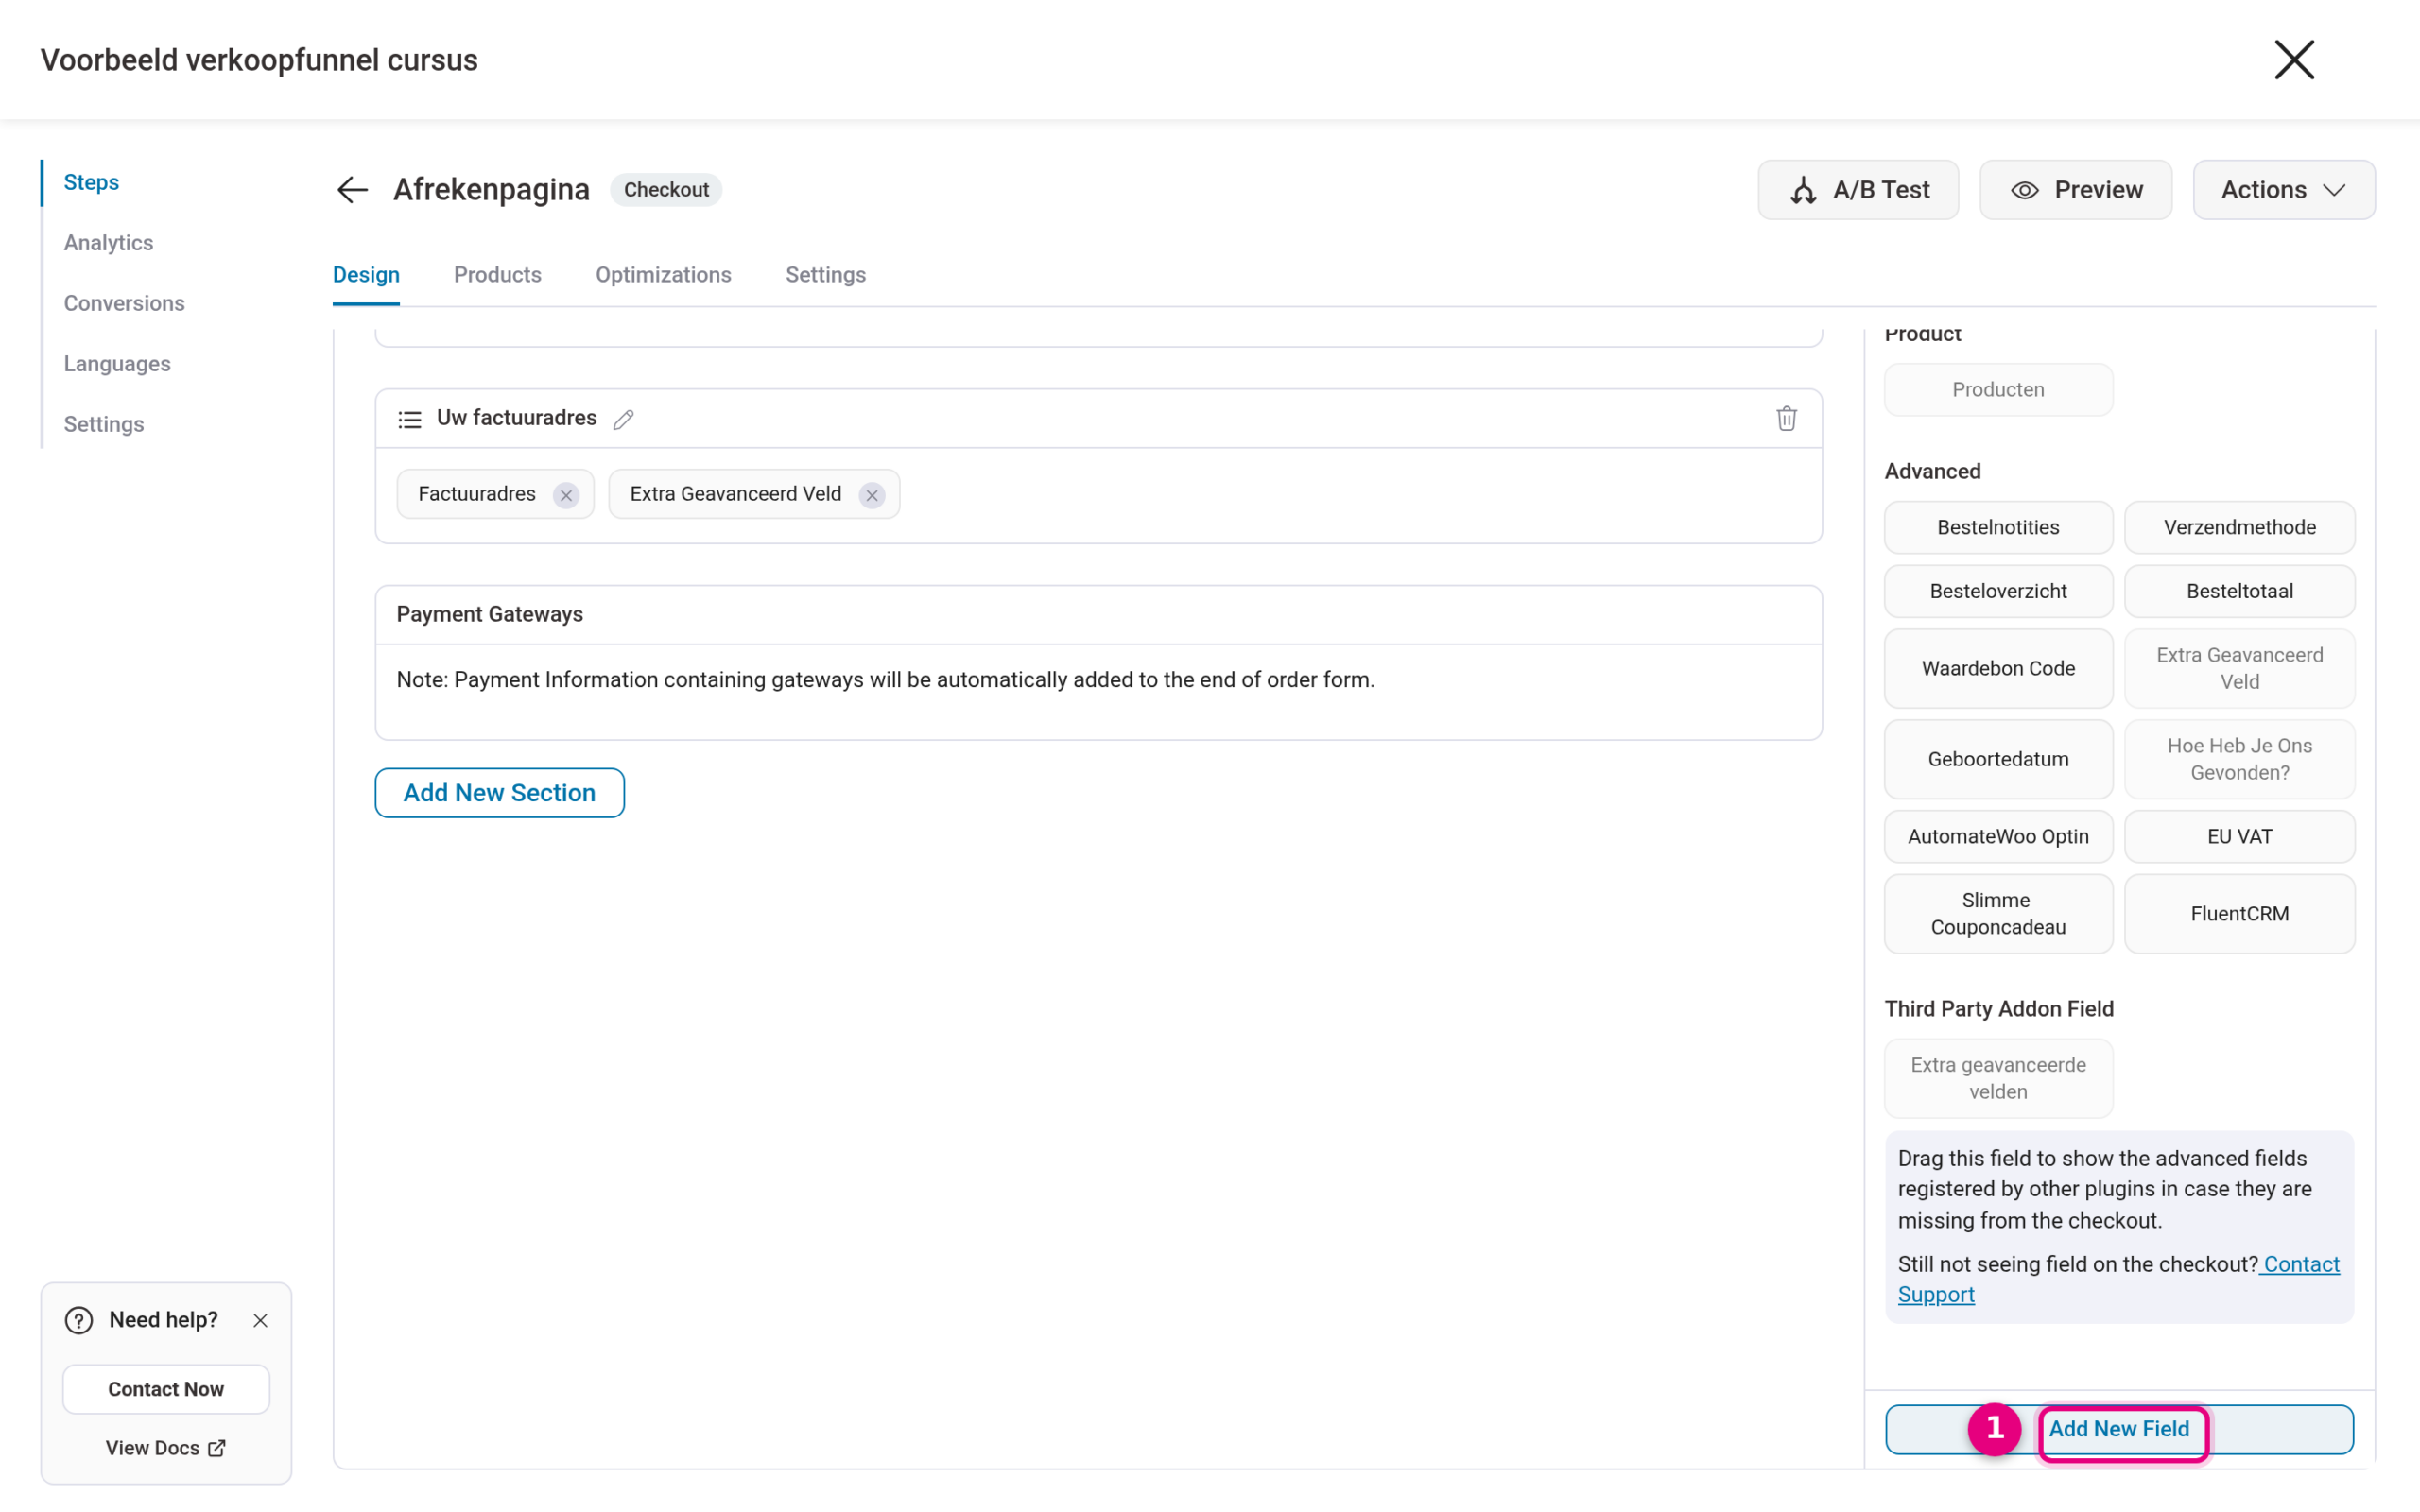
What you see on this screen:
- On the left under Form Sections are the sections of the checkout form, for example Your information, Your plans (the product choice), Your billing address and Payment Gateways. This is the layout the customer sees on the checkout page
- On the right under Fields are all available fields, divided into Basic (name, email, address), Product and Advanced (including Order notes, Date of birth and Coupon Code)
- (1) With the Add New Field button at the bottom of the right-hand column you create your own field
Step 3: create the extra field with Add New Field #
Click Add New Field. A window opens in which you configure the field.
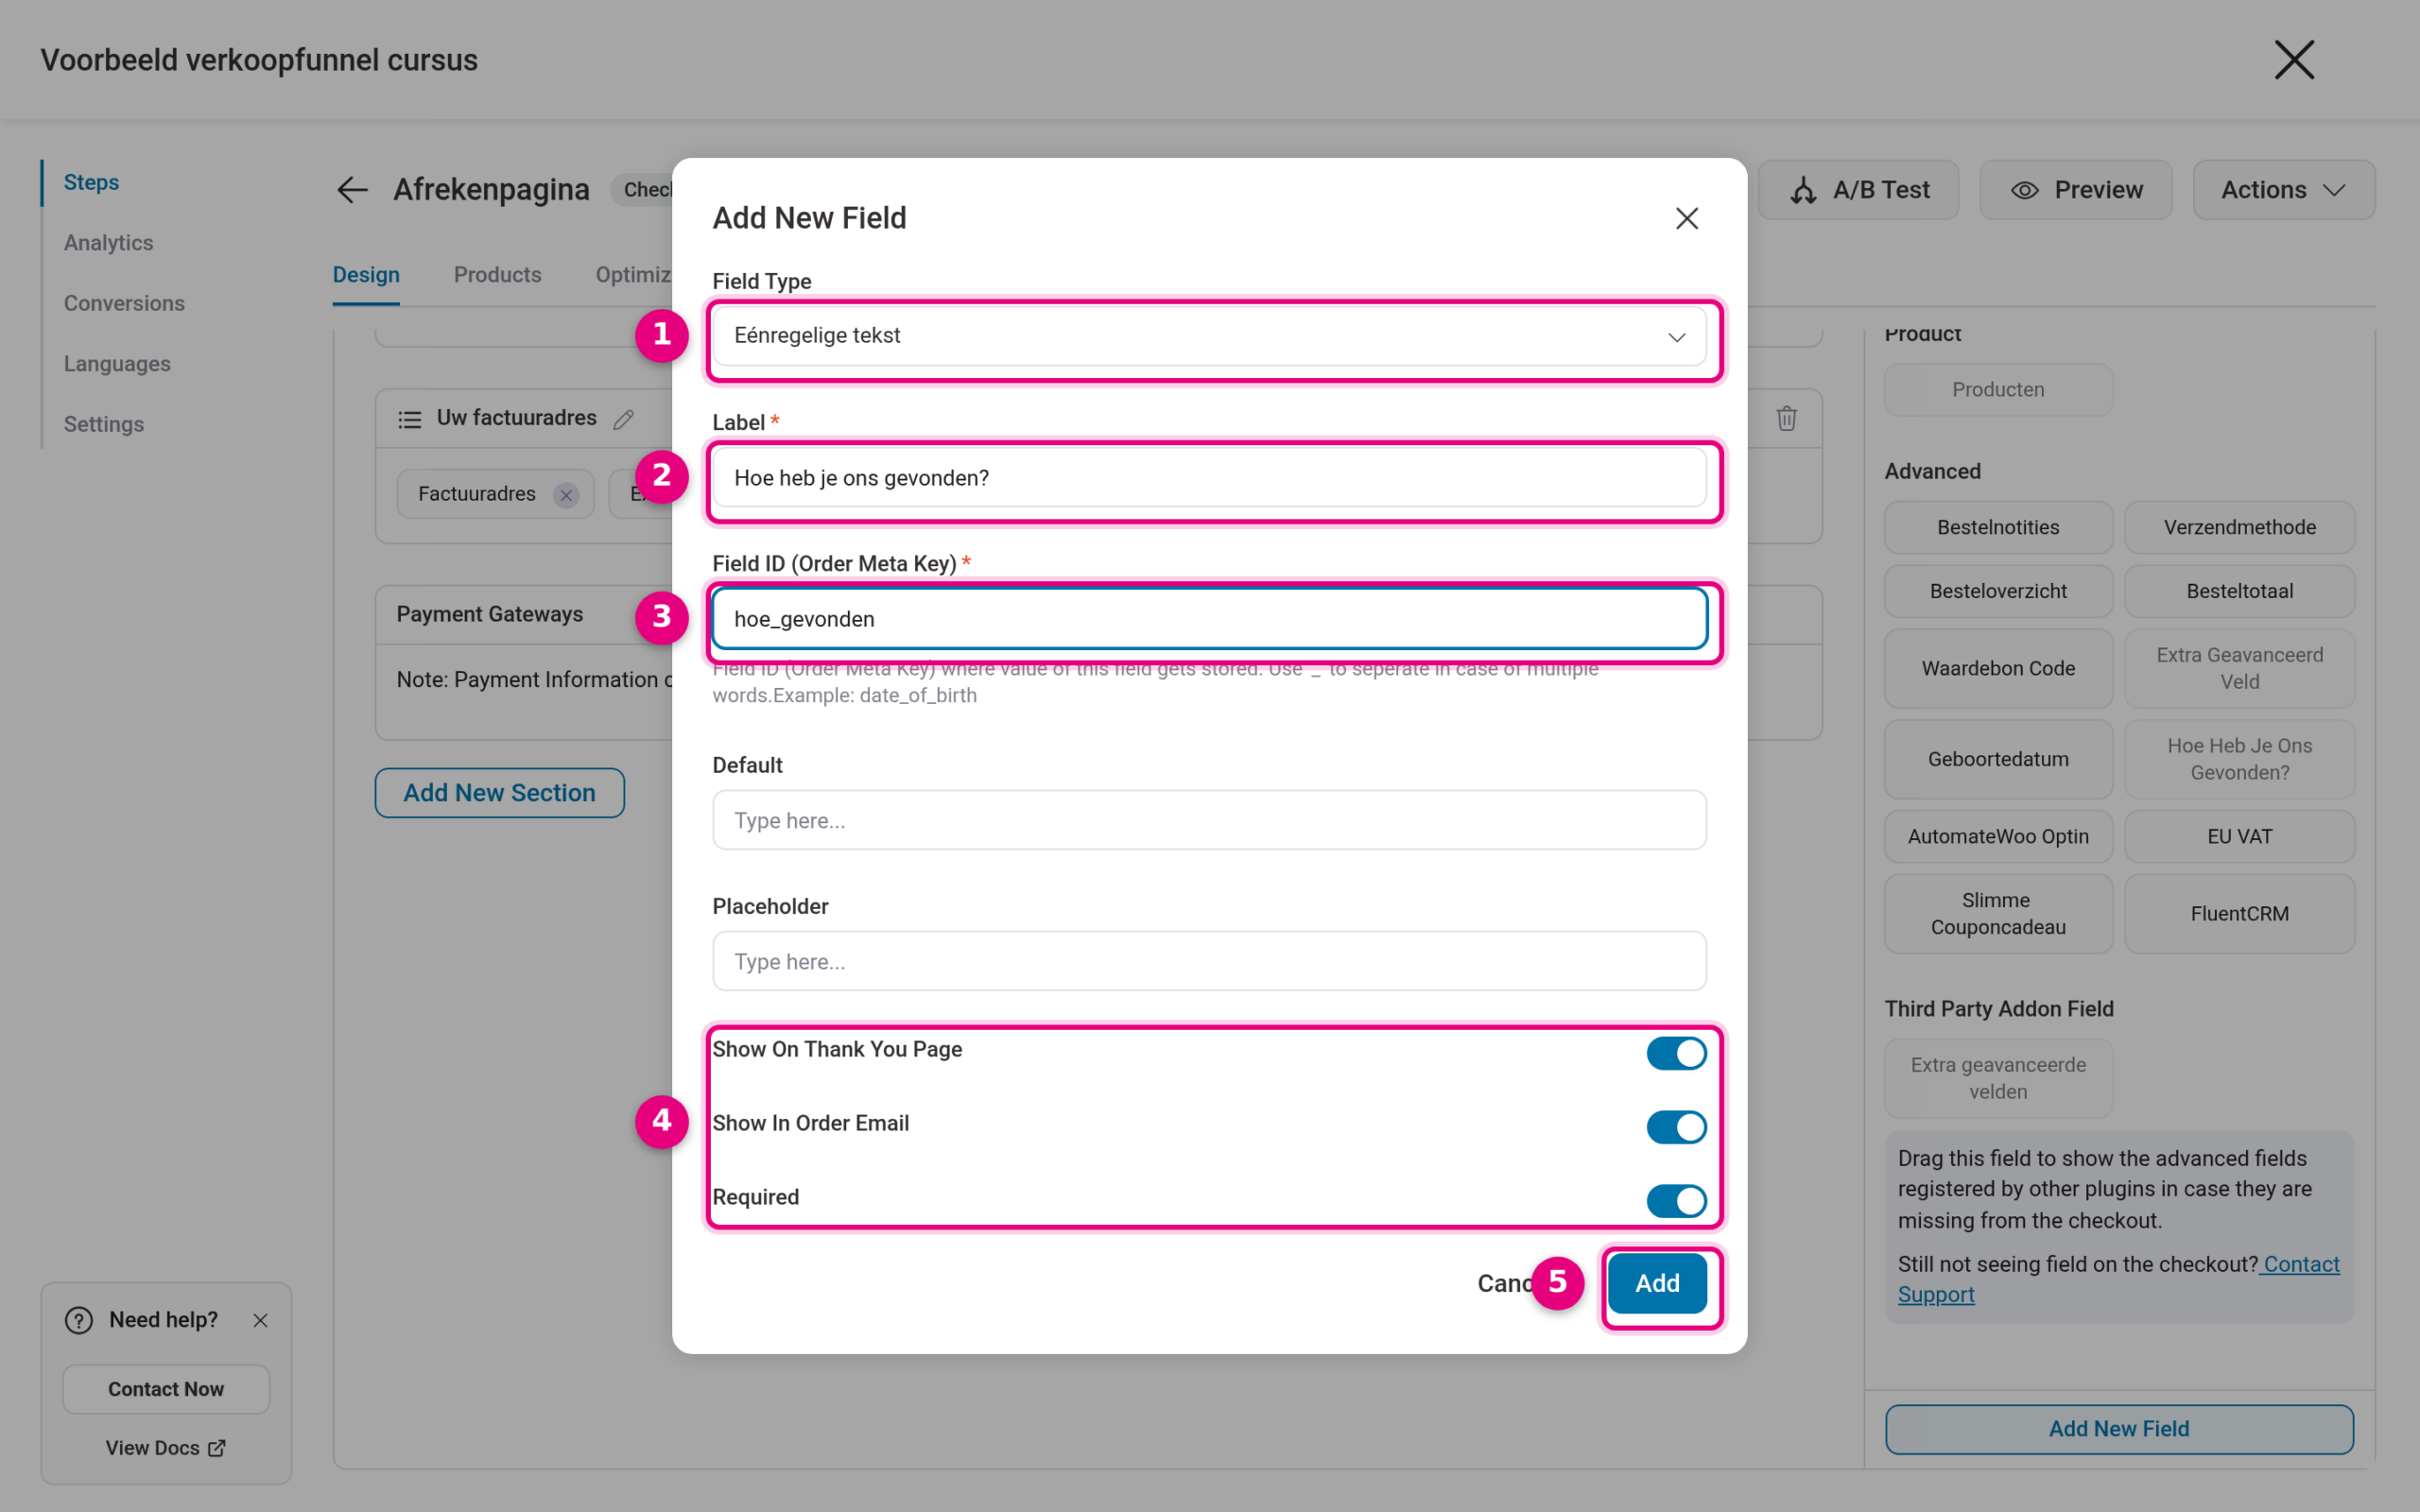
- Field Type: the kind of field. For an open question choose Single line text. Other options are: Checkbox, Radio, HTML, Select list, Select2 (select list with a search function), Multiple select, Paragraph Text (large text box), Number, Tel., Hidden, Password, Email and File upload
- Label: the question as the customer sees it, for example How did you find us?
- Field ID (Order Meta Key): the technical name under which the answer is stored with the order. Use lower-case letters and an underscore between words, for example how_found. You will need this name again in step 6
- Below that there are a few more options: Default (a pre-filled value) and Placeholder (example text in the empty field) can usually be left empty. The toggles determine whether the answer appears on the thank you page (Show On Thank You Page), is included in the order confirmation (Show In Order Email) and whether the field is required (Required)
- Click Add. The field now appears on the right in the list under Advanced
Step 4: drag the field into the form and save #
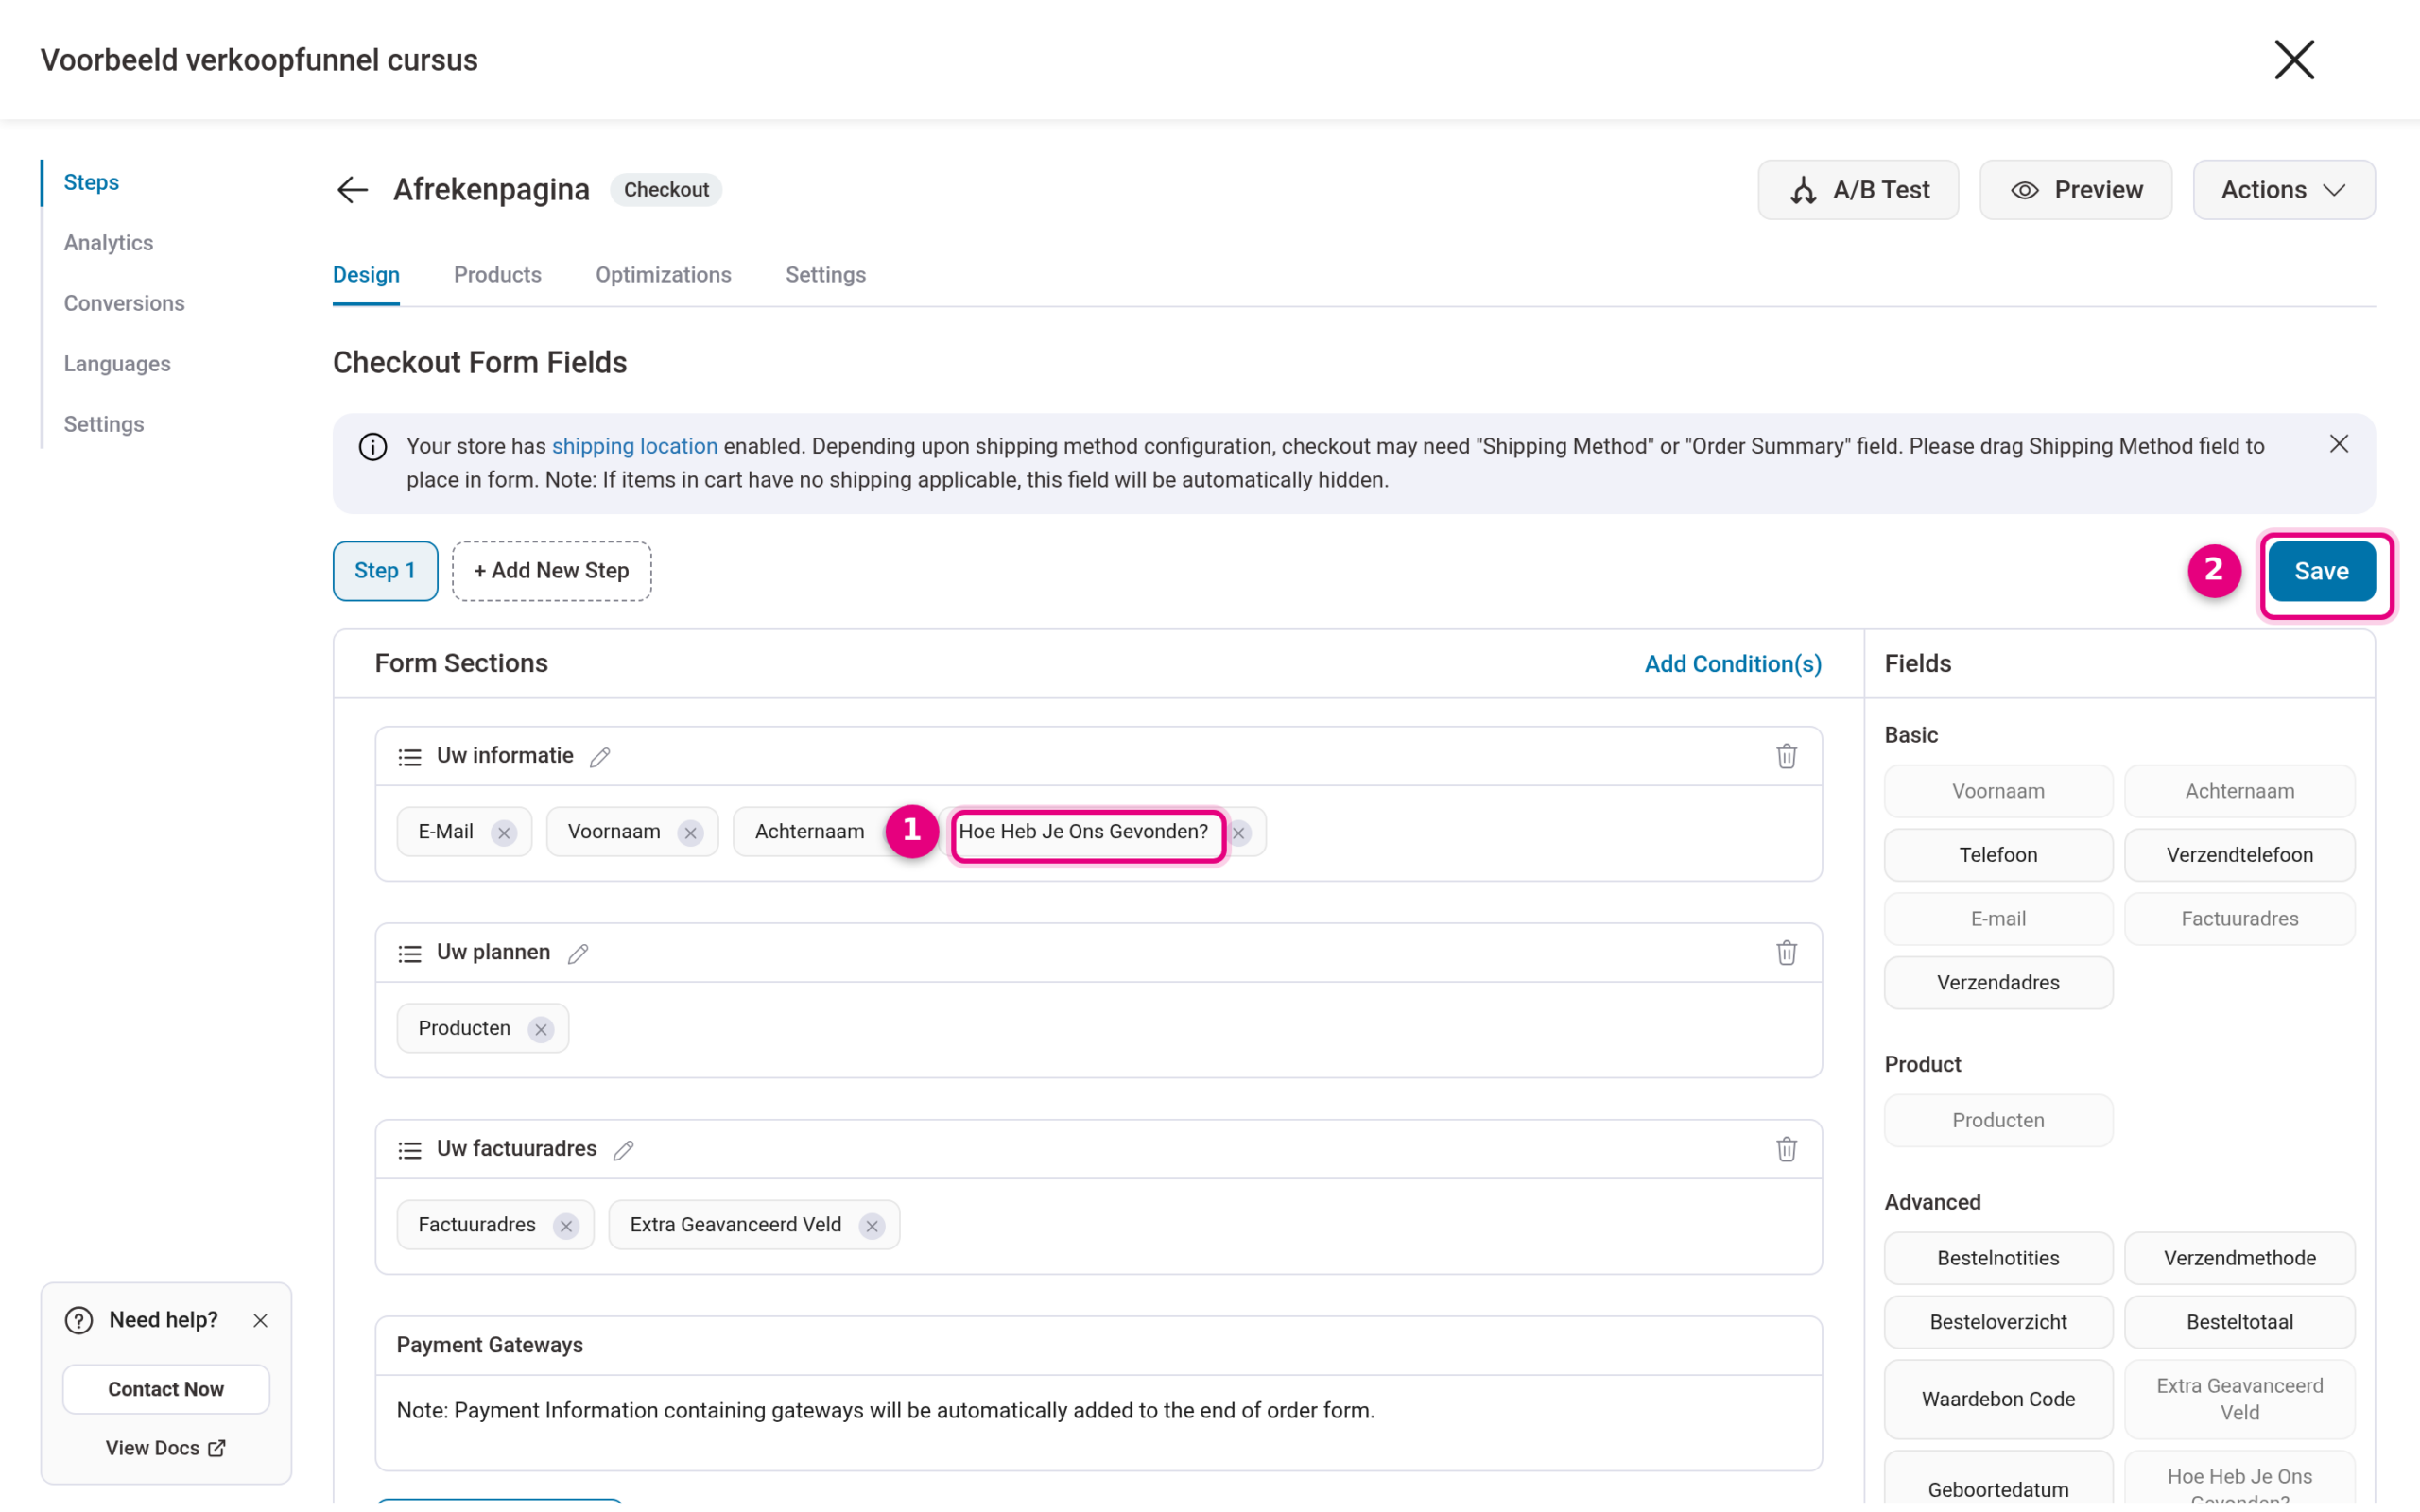
After you create it, a new field is only in the list of available fields. It is not on the checkout page until you place it in a section:
- (1) Drag the field from the right-hand column to the position you want in a section, for example below Last name in the Your information section
- (2) Click Save at the top right
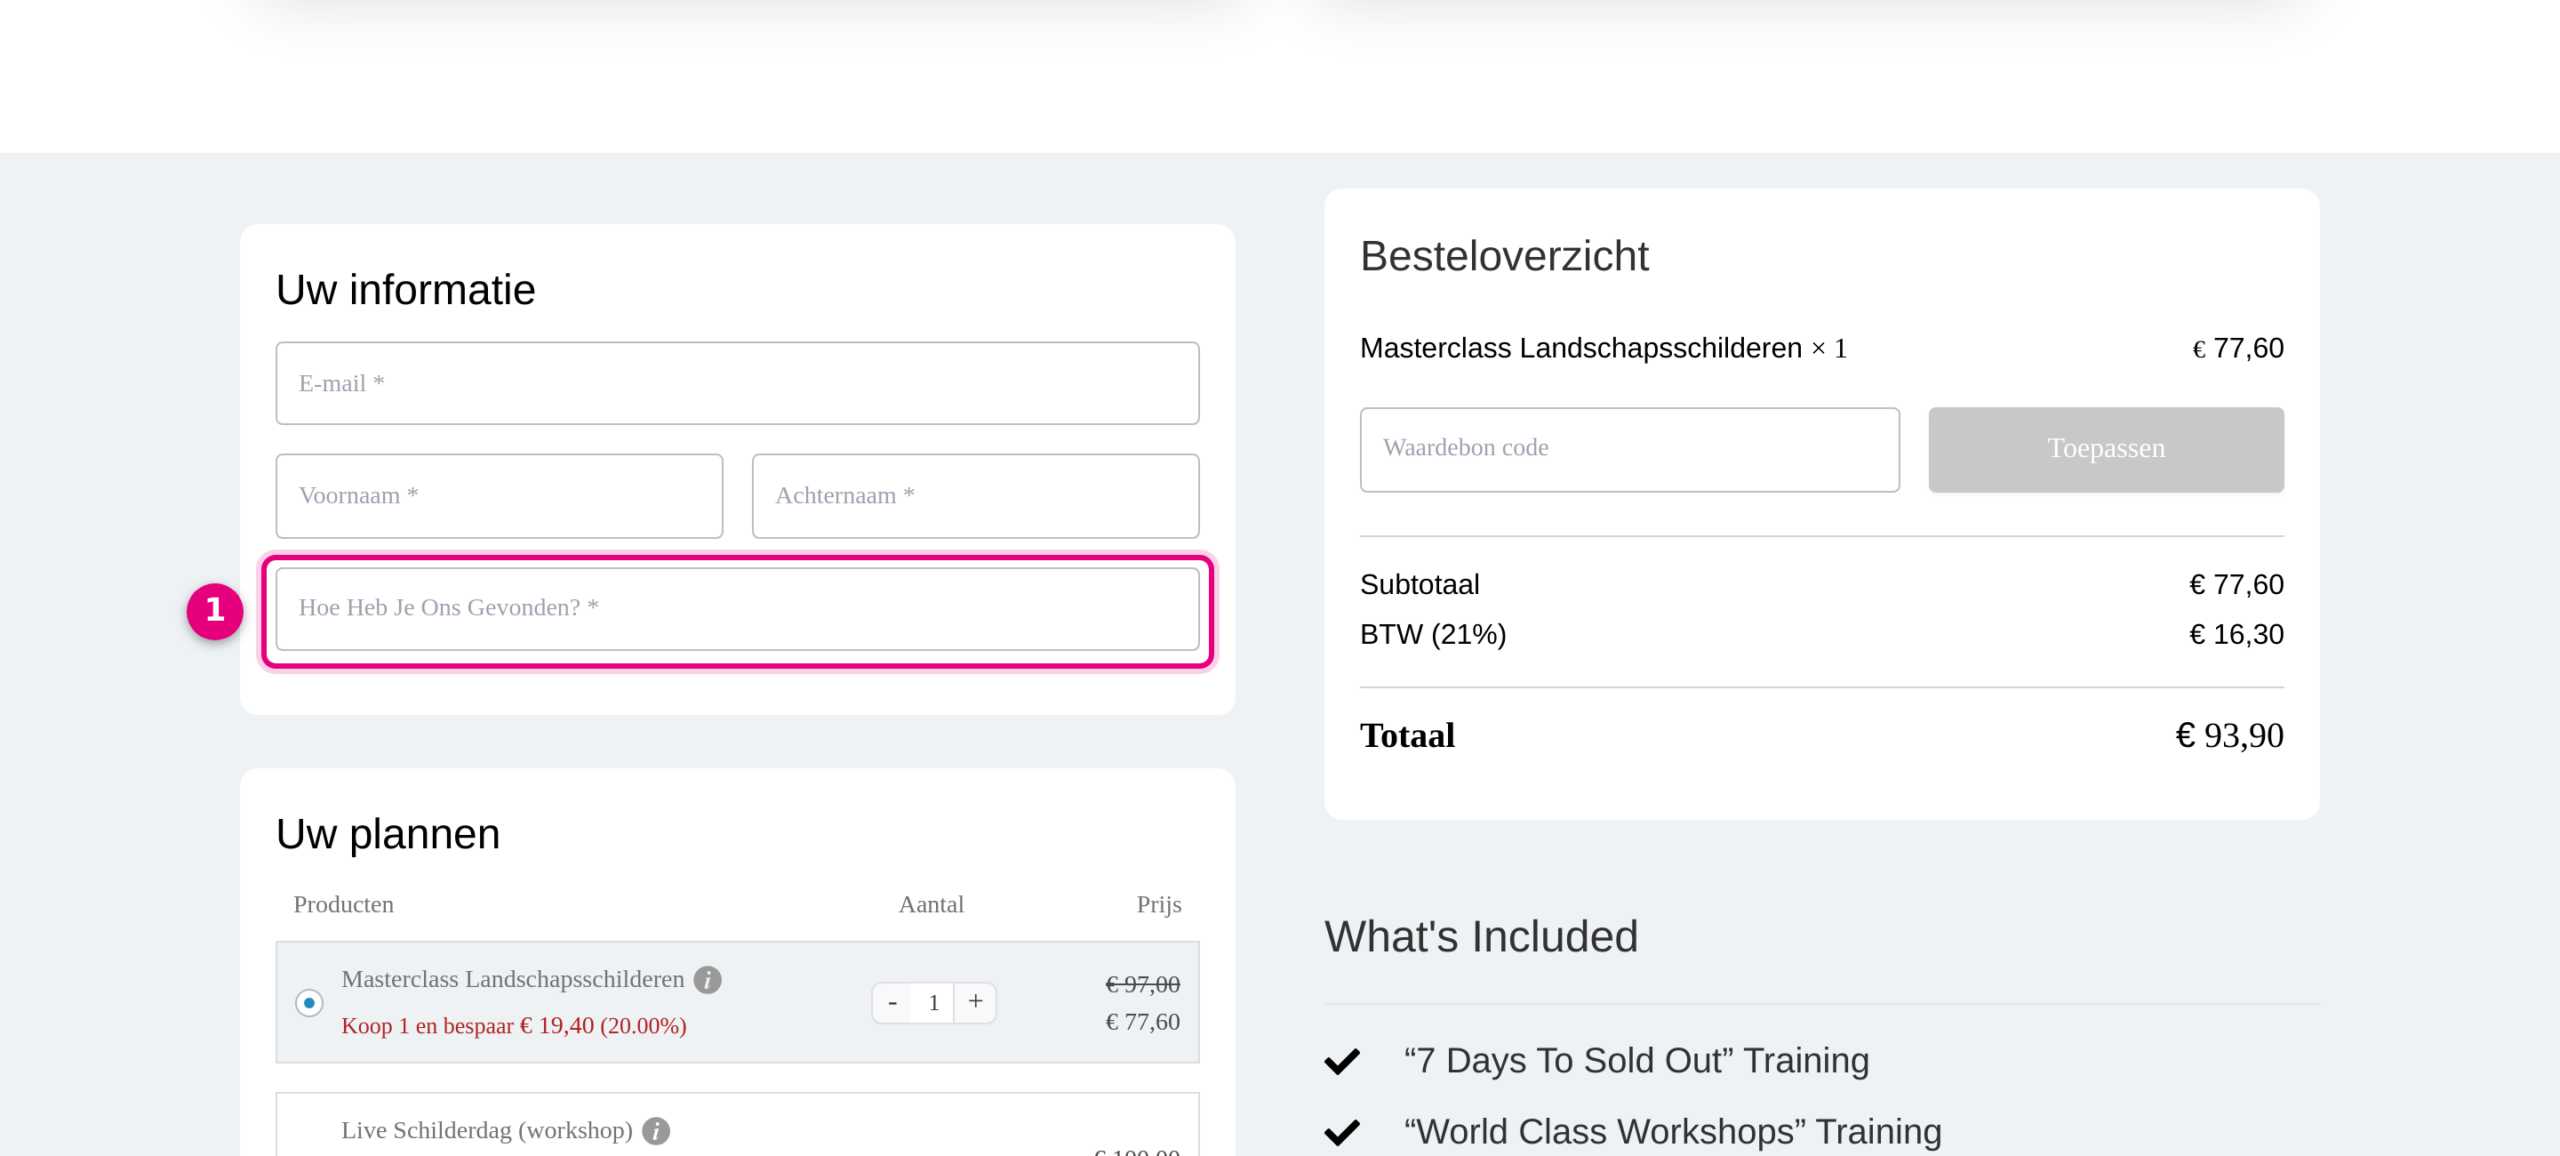
Then view the checkout page through the Preview button or the Page URL at the top of the Design tab. The customer now sees the field in the checkout form:
Step 5: open the contact fields of the CRM connection #
The answer is now stored with the order. To get it onto the contact card in the CRM as well, you link the checkout field to the contact field from step 1.
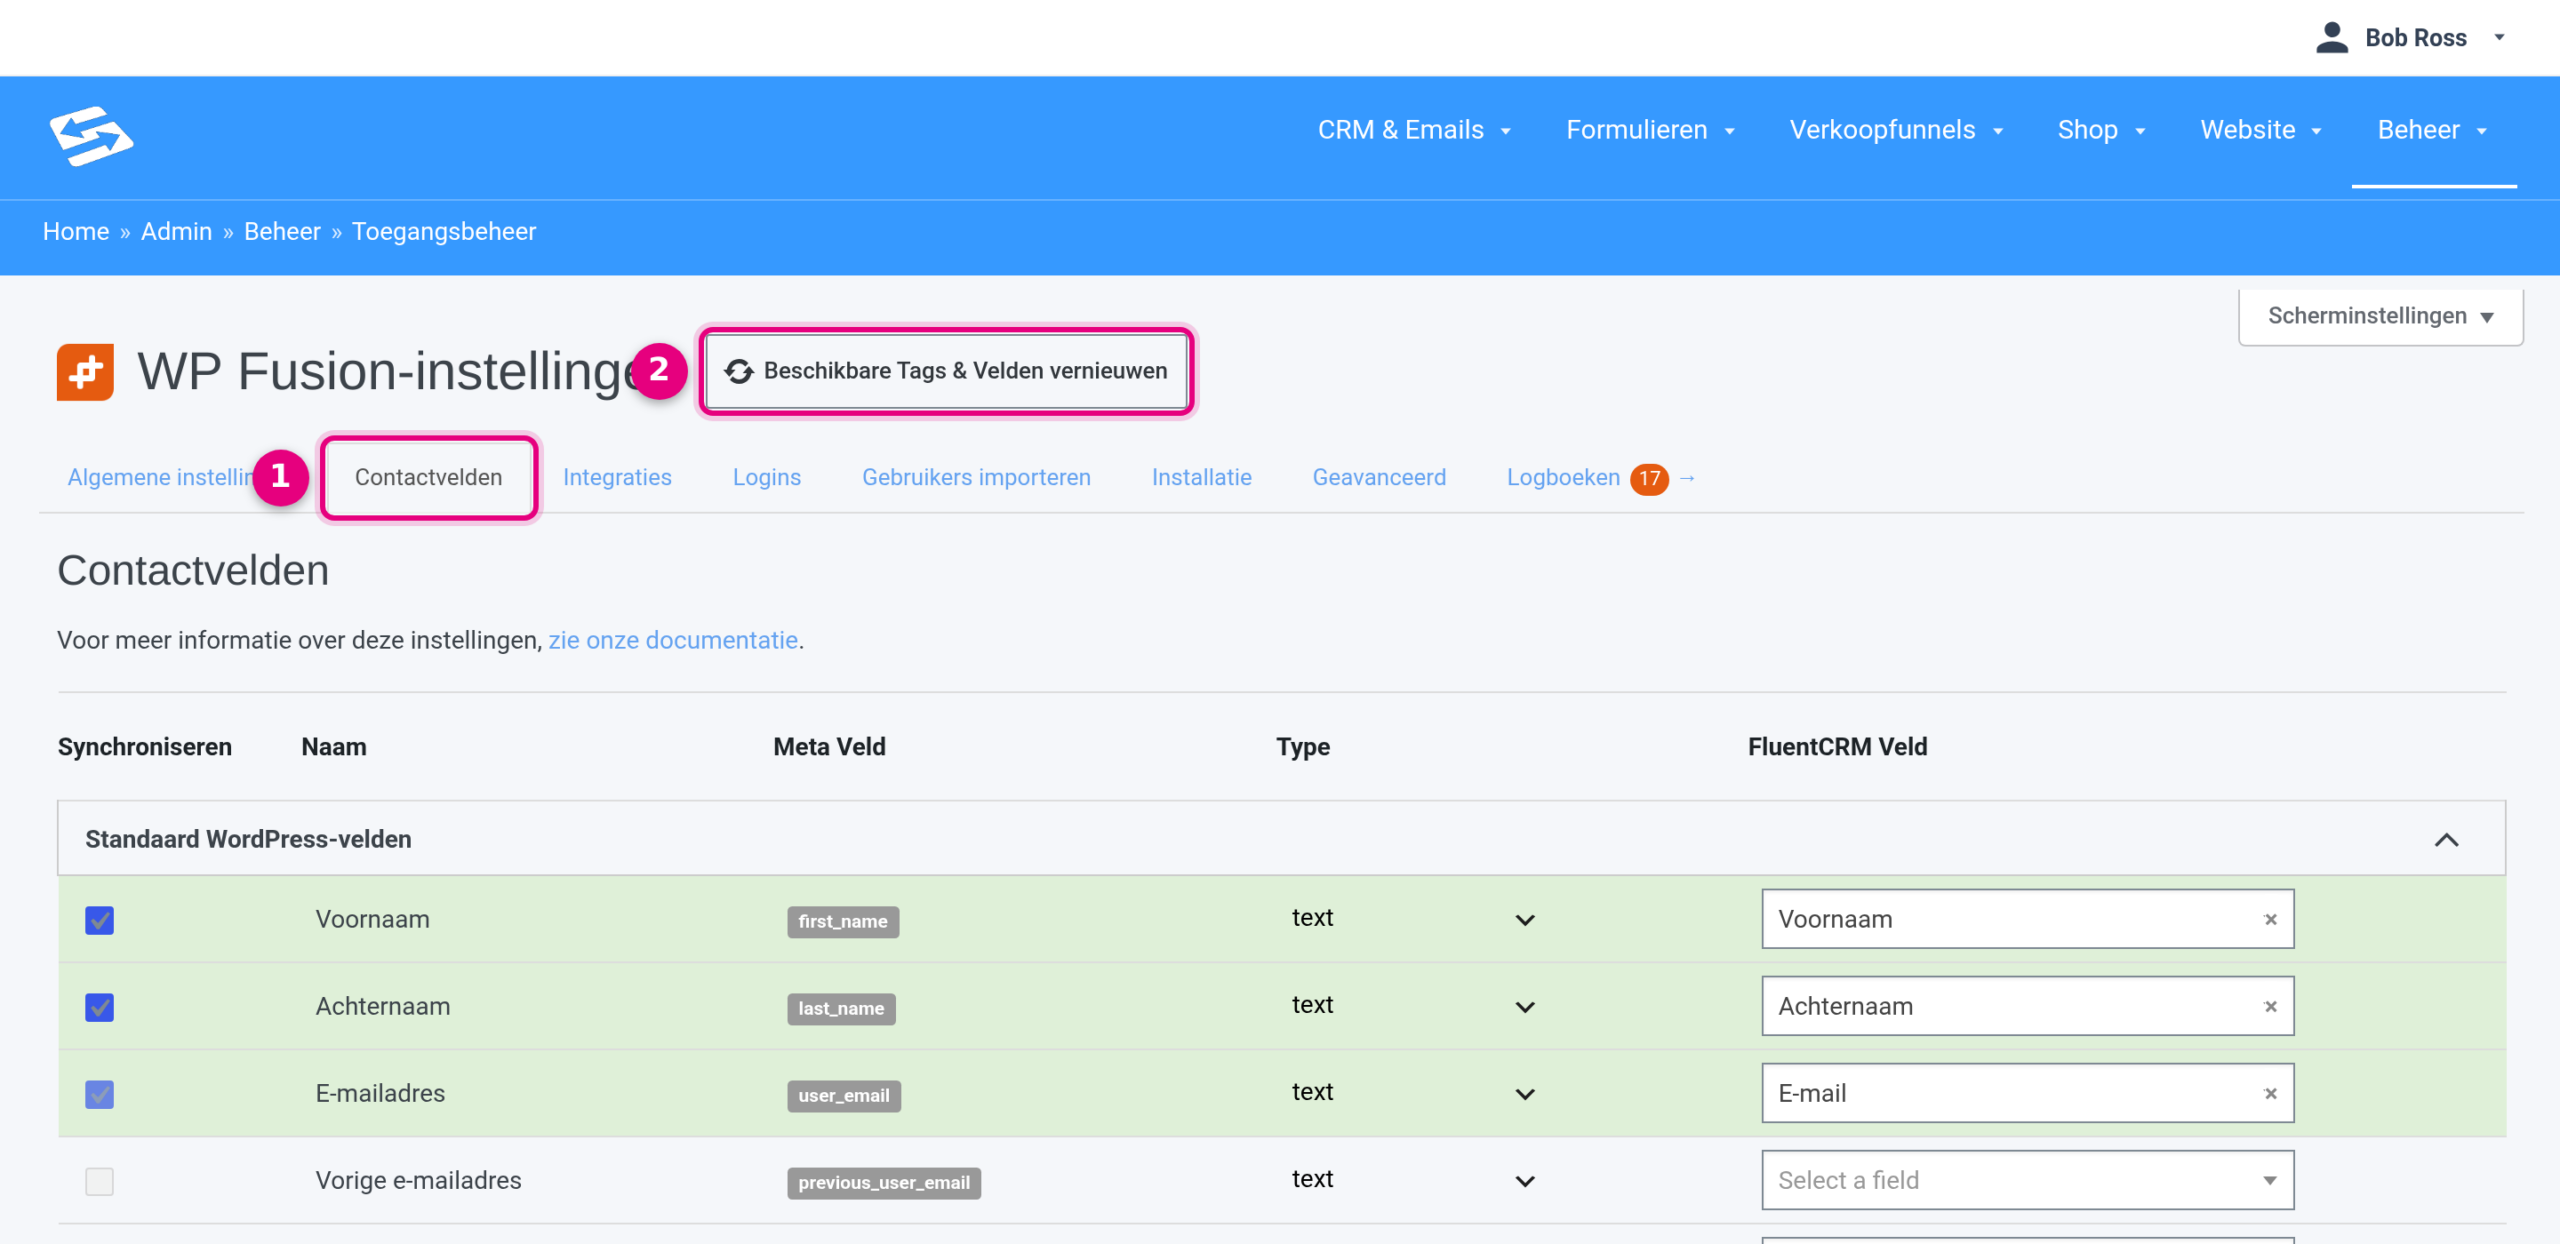
- Go to Administration → Access management (the WP Fusion settings)
- (2) Click Refresh Available Tags & Fields at the top and then reload the page, so your new field appears in the lists
- (1) Open the Contact fields tab
Step 6: link the checkout field to the CRM field #
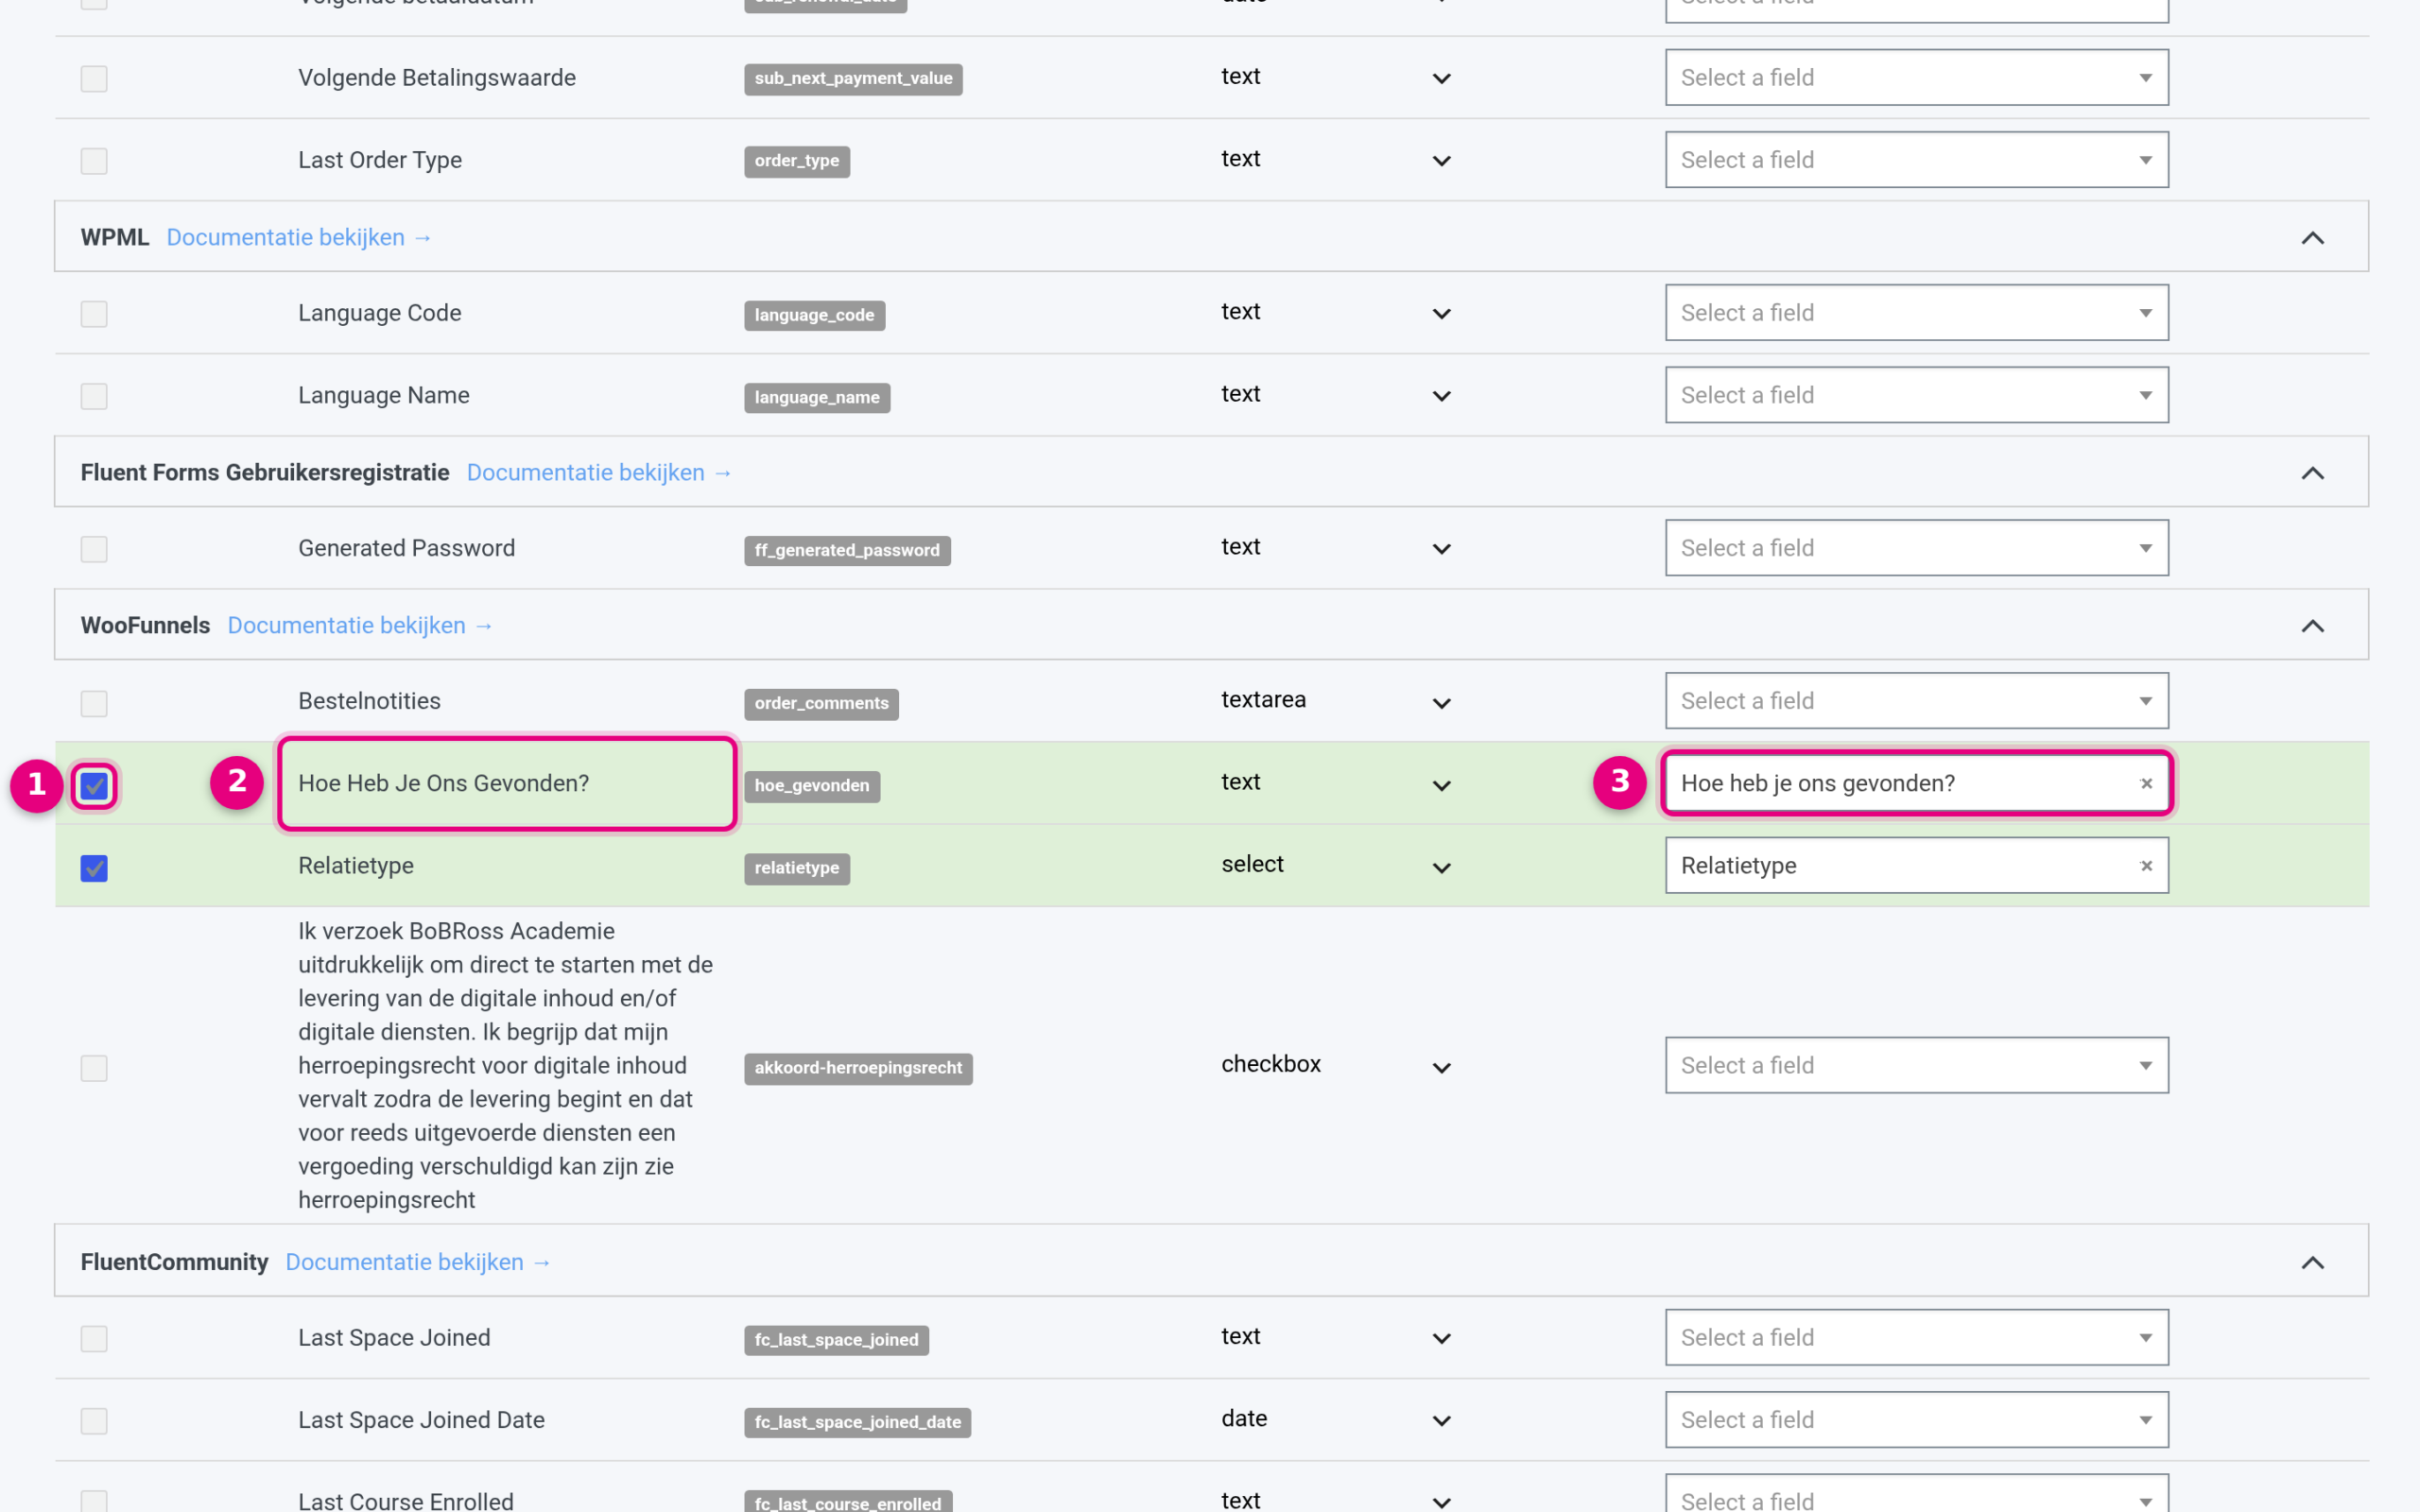
On the Contact fields tab you see all fields that can be synchronised, grouped per component. You will find your checkout field in the WooFunnels group, recognisable by the Field ID from step 3 in the Meta Field column.
- (1) Tick the box in front of the row in the Sync column
- (2) Check that this is the right row: the label and the Field ID of your checkout field are shown here
- (3) In the FluentCRM Field column choose the custom contact field from step 1 (you will find it in the Custom Fields group)
- Click Save changes at the bottom of the page
Step 7: test the connection and view the contact card #
- Place a test order through the checkout page of the funnel and fill in the extra field. Test in an incognito window with an email address that does not yet exist as a contact, otherwise you will not see the result properly
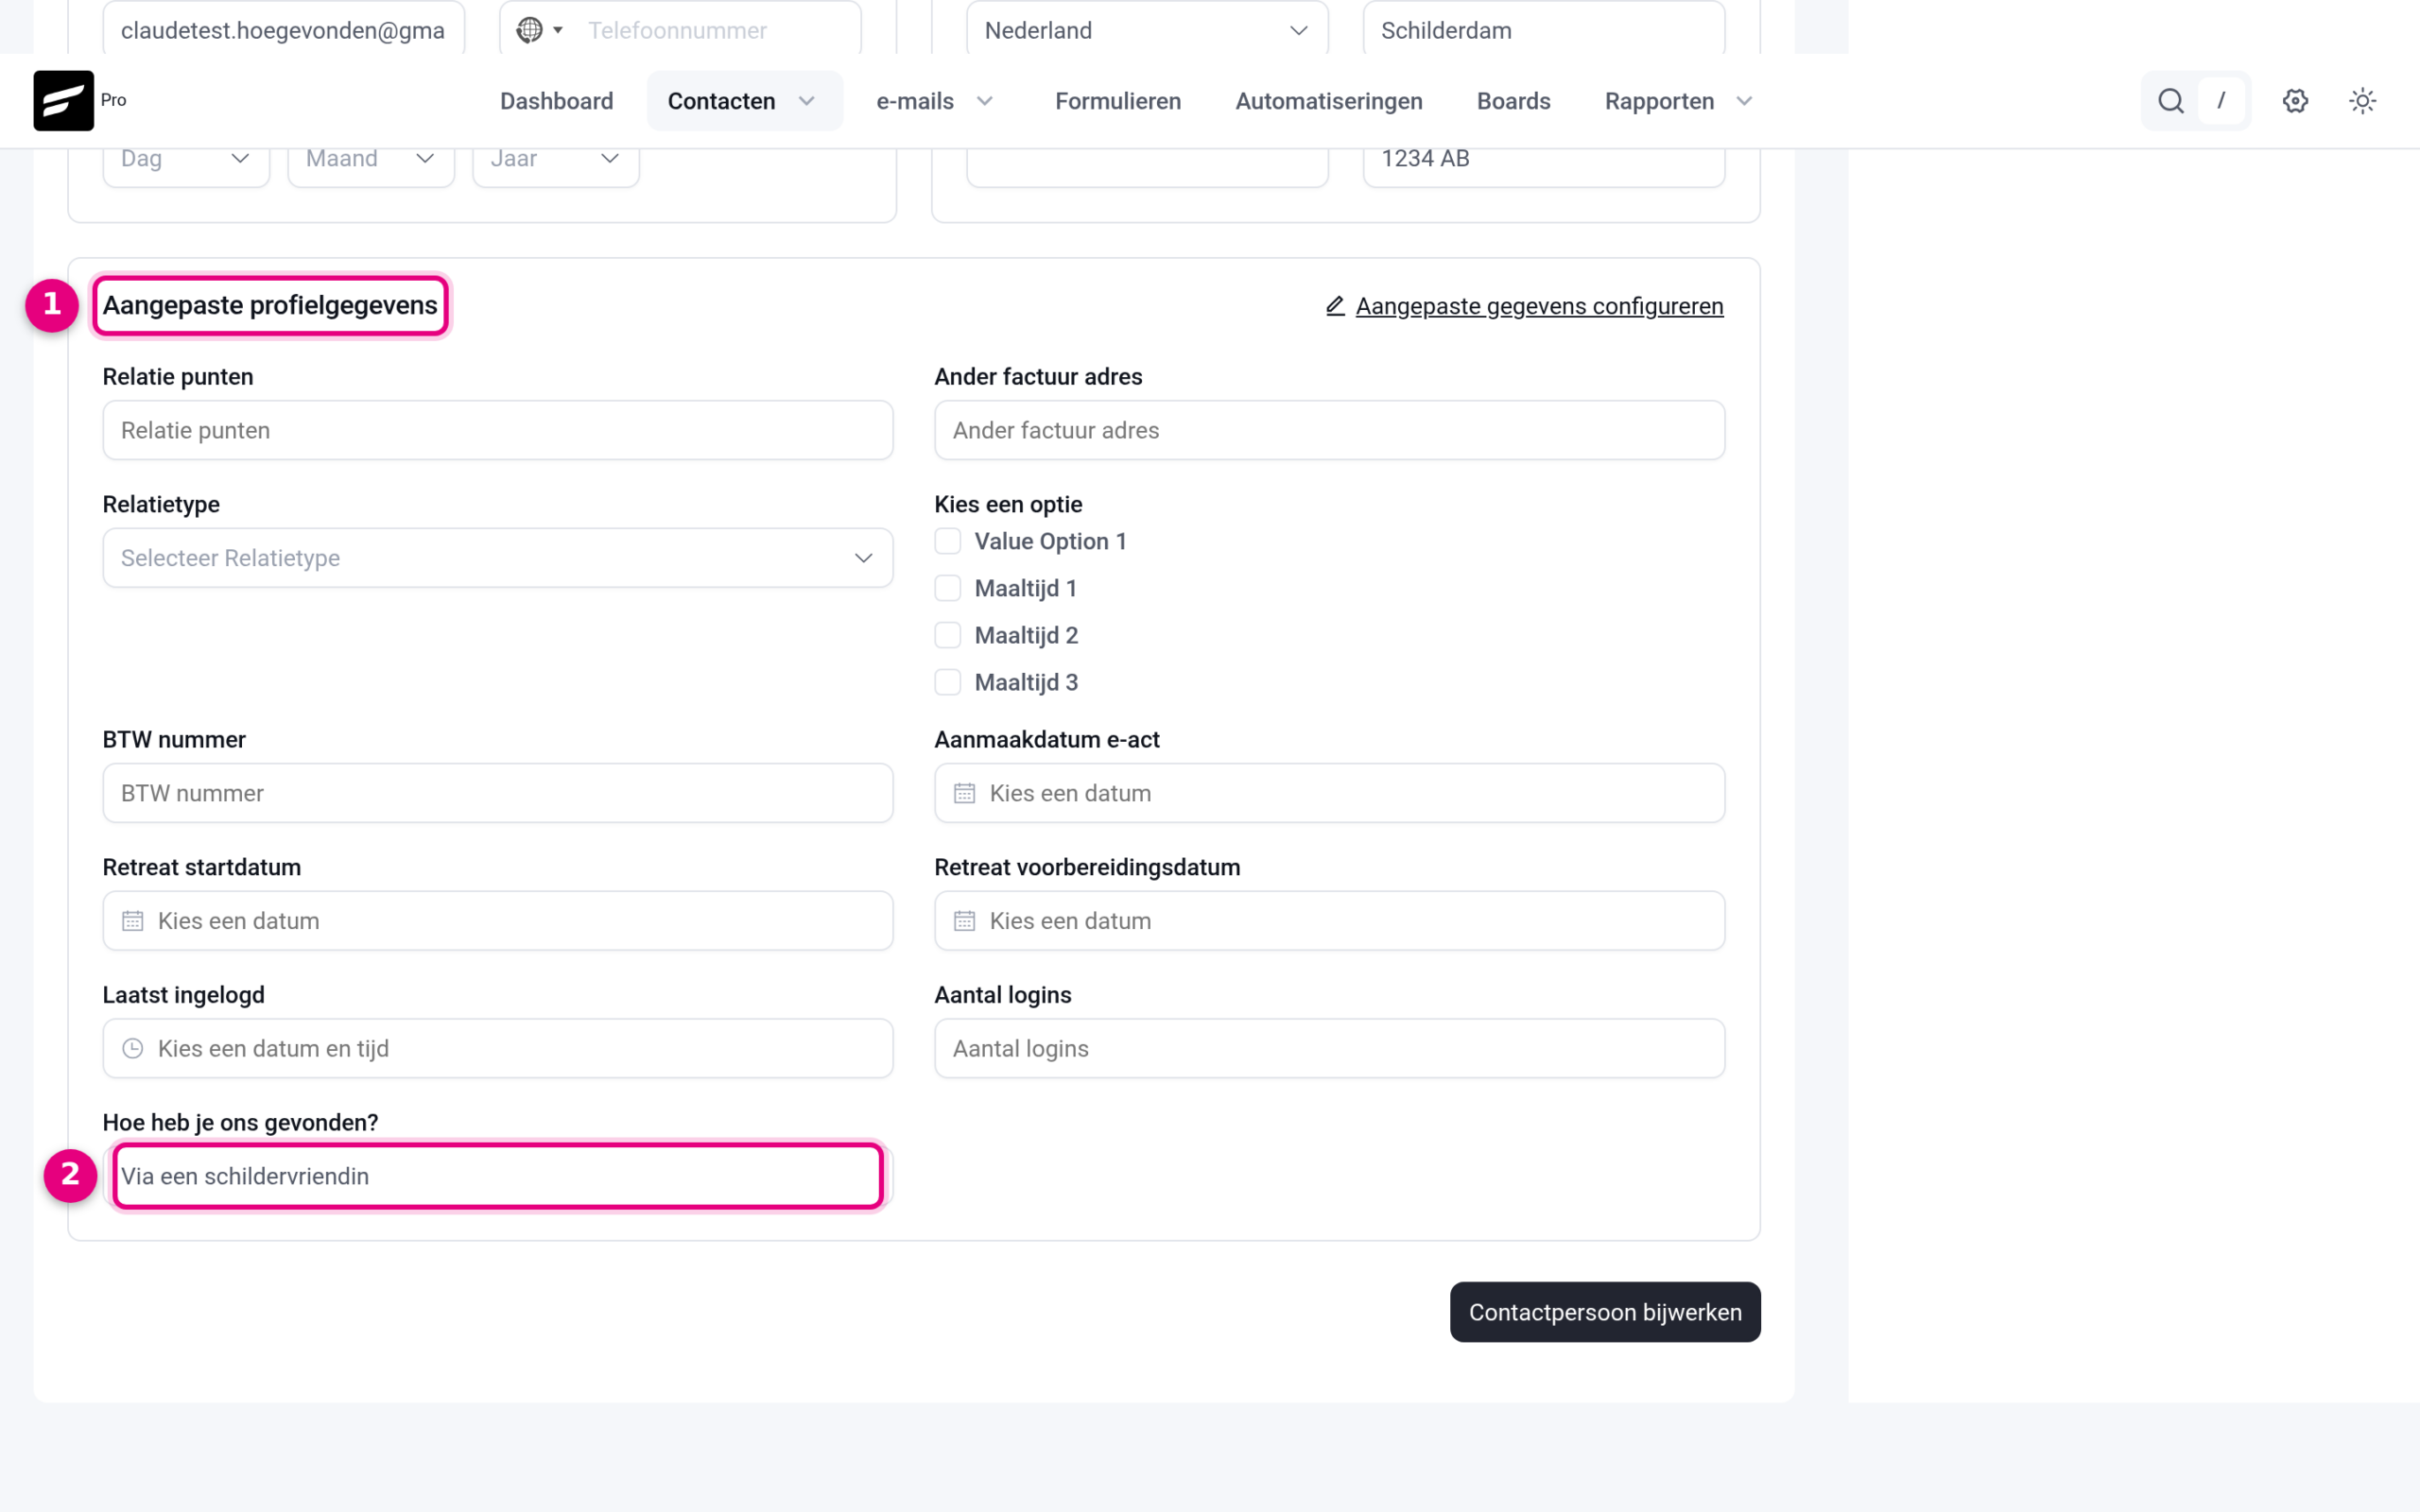
- After the order, go to CRM & Emails → Contacts and open the contact from the test order
- (1) On the Overview tab, scroll to the Custom profile data section
- (2) That is where the answer appears in your custom field
The answer is also always kept with the order itself. You will find it through Shop → Orders in the order in question, and (depending on the toggles from step 3) on the thank you page and in the order confirmation.
Not seeing the field on your checkout page? #
Then check these points:
- Every funnel has its own checkout page. Extra fields apply only to the funnel in which you added them, not automatically to other funnels or to the general store checkout
- Test through the Page URL or the Preview button of the checkout step itself. If you check out through the normal product page or the cart, you end up on the general store checkout and will not see the funnel fields
- Check that the field really is in a section under Form Sections (step 4) and not only in the list of available fields on the right, and that you clicked Save
- Do you want to ask the same question on the general store checkout? That works in exactly the same way through Sales funnels → Store Checkout


