PDF Customizer guide #
Adjusting invoices and credit notes in Autorespond
You can design the invoices and credit notes that Autorespond creates yourself. You make most adjustments without technical knowledge. For more complicated changes you use CSS, but we explain that step by step as well.
Contents #
- Making columns wider or narrower (most requested)
- How to add CSS
- Keeping dates and amounts on one line
- Adjusting the totals table
- Changing texts and labels
- Complete examples
- Overview of all codes (CSS selectors)
1. Making columns wider or narrower #
This is the most requested adjustment. Sometimes a column is too narrow and the text runs over two lines. Or it is too wide, which squeezes the other columns.
Step 1: Open the customizer #
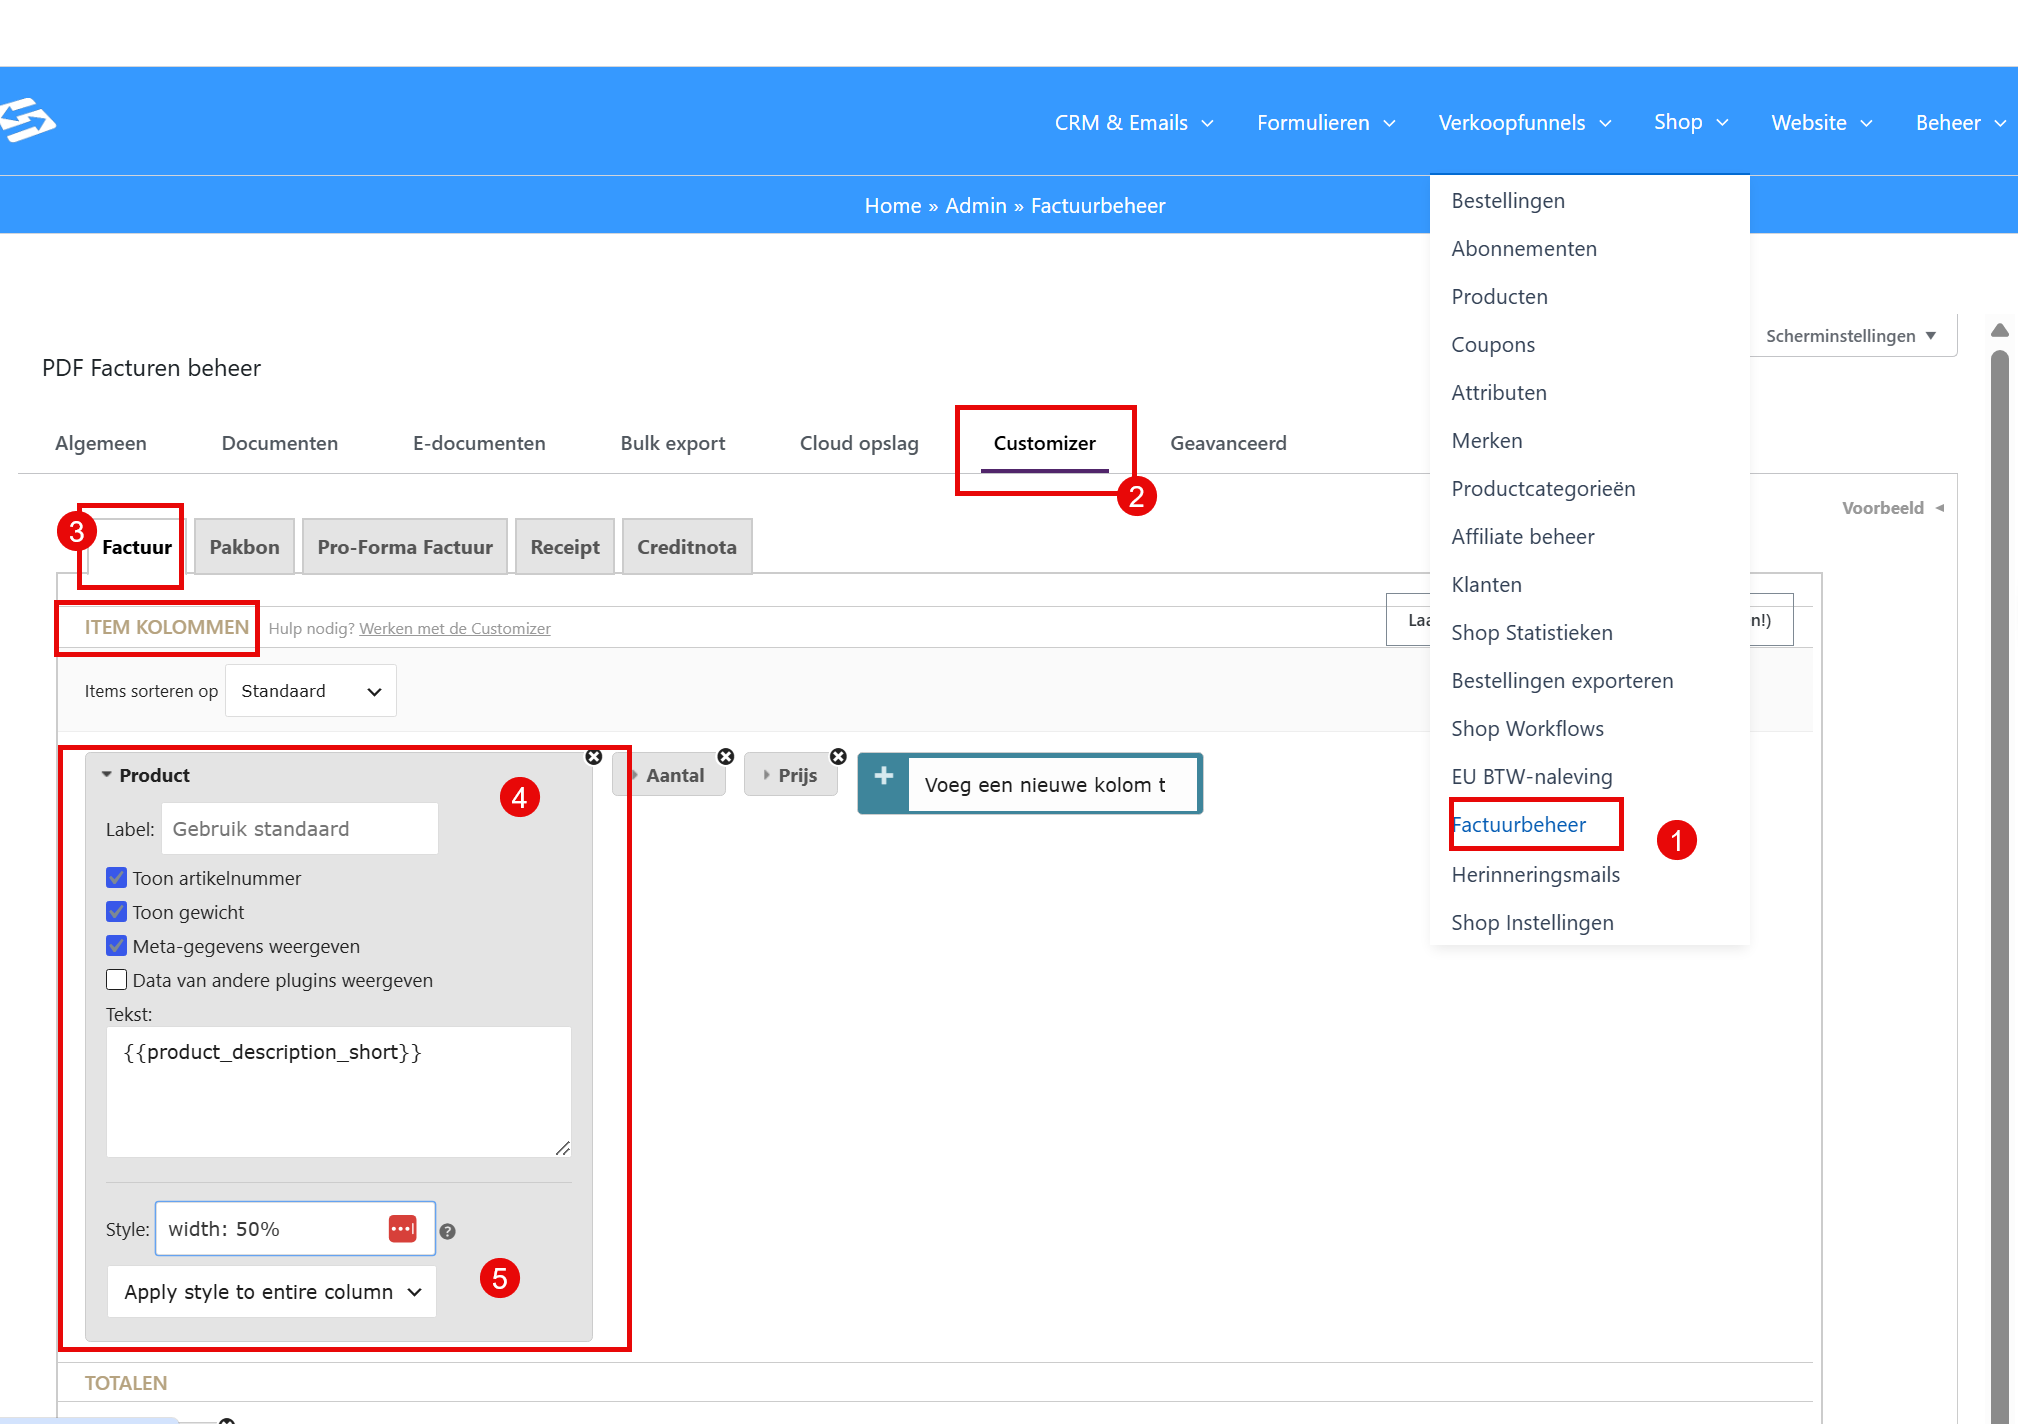
Go to Shoppingcart > PDF Invoices and click the Customizer tab. At the top, choose whether you want to adjust the invoice or the credit note.
Step 2: Click a column #
In the preview, click the column you want to adjust. A panel with options appears.
Step 3: Enter the width #
Look for the Style field. Type the width here, for example:
width: 50%;Set the dropdown below it to:
- Apply style to entire column – for the whole column
- Apply to column header – only for the title at the top
Step 4: Check it in the preview #
You see the change in the screen immediately. Does it fit? Then save.
Important: the total must be 100% #
If you have several columns next to each other, the widths together must be 100%. With four columns, for example:
| Column | Width |
|---|---|
| Product name | 60% |
| Quantity | 10% |
| Price per item | 15% |
| Total | 15% |
| Sum | 100% |
Is the sum more than 100%? Then the table runs over the edge. Is the sum less? Then empty space is left over.
2. How to add CSS #
For some adjustments you need CSS. This is a small piece of code that you paste into the customizer.
Step 1: Scroll down #
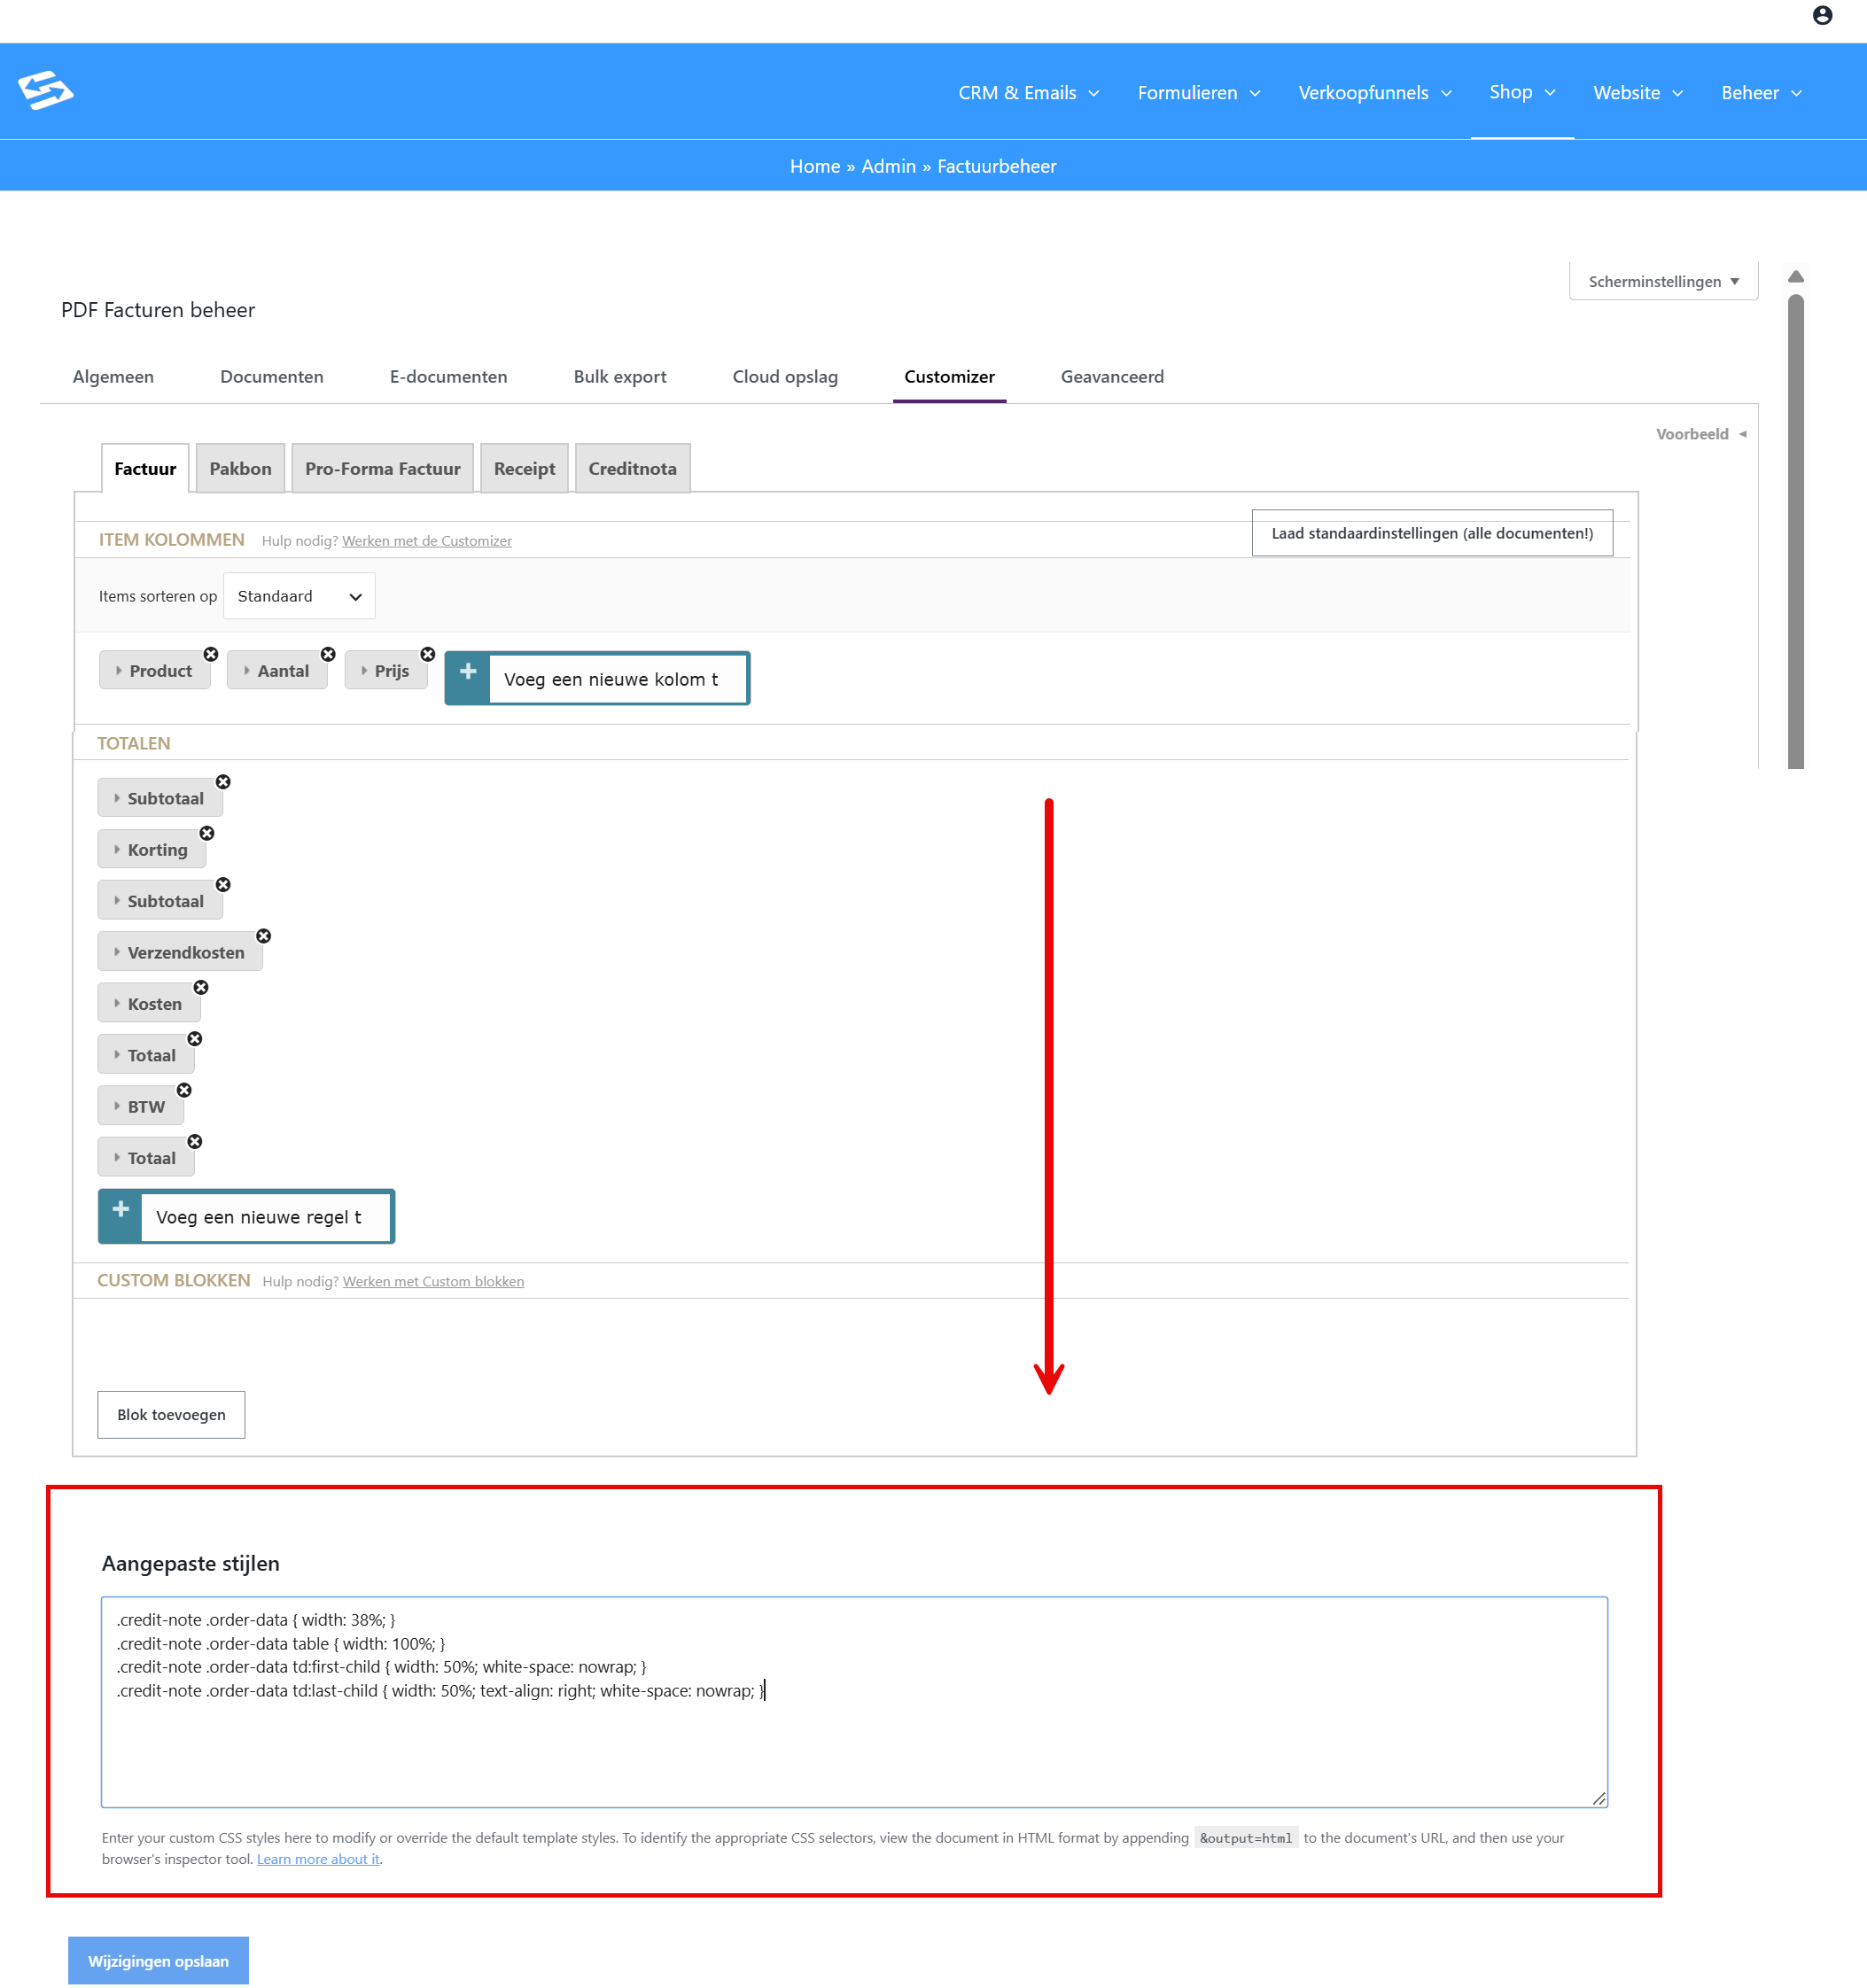
In the customizer, scroll all the way down. There you find the Custom CSS field.
Step 2: Paste the code #
Copy one of the examples from this guide and paste it into the field.
Step 3: Save #
Click Save. Always check the preview first to see whether everything looks right.
3. Keeping dates and amounts on one line #
Sometimes a date or price breaks over two lines because the column is too narrow. You solve this with a piece of CSS.
Copy this and paste it at Custom CSS in the customizer:
.credit-note .order-data { width: 38%; }
.credit-note .order-data table { width: 100%; }
.credit-note .order-data td:first-child { width: 50%; white-space: nowrap; }
.credit-note .order-data td:last-child { width: 50%; text-align: right; white-space: nowrap; }
This makes the right-hand column more compact and keeps all dates and prices on one line.
Amounts in the product table #
Prices can wrap in the product table too. You prevent that like this:
.price, .wc-price, .amount { white-space: nowrap; }4. Adjusting the totals table #
You can make the table with the subtotal, VAT and final total narrower and more compact:
.totals-table { width: 45%; margin-left: auto; }
.totals-table td:last-child { text-align: right; white-space: nowrap; }
This moves the totals table to the right and aligns the amounts neatly.
5. Changing texts and labels #
Does a label say ‘Total’ where you want different wording? Or do you want to adjust another text?
- In the customizer, look for the field with the text you want to change.
- Adjust the text.
- Check it in the live preview.
- Click Save.
6. Complete examples #
Below are two complete examples. Copy whatever you need and paste it at Custom CSS in the customizer.
Credit note (all-in-one) #
.credit-note .order-data { width: 38%; }
.credit-note .order-data table { width: 100%; }
.credit-note .order-data td:first-child { width: 50%; white-space: nowrap; }
.credit-note .order-data td:last-child { width: 50%; text-align: right; white-space: nowrap; }
.wc-order-item-name { width: 60%; }
.wc-order-item-quantity { width: 10%; text-align: center; }
.wc-order-item-price { width: 15%; text-align: right; }
.wc-order-item-total { width: 15%; text-align: right; }
.price, .wc-price, .amount { white-space: nowrap; }
.totals-table { width: 45%; margin-left: auto; }
.totals-table td:last-child { text-align: right; white-space: nowrap; }
Invoice (all-in-one) #
.invoice .order-data { width: 38%; }
.invoice .order-data table { width: 100%; }
.invoice .order-data td:first-child { width: 50%; white-space: nowrap; }
.invoice .order-data td:last-child { width: 50%; text-align: right; white-space: nowrap; }
.wc-order-item-name { width: 60%; }
.wc-order-item-quantity { width: 10%; text-align: center; }
.wc-order-item-price { width: 15%; text-align: right; }
.wc-order-item-total { width: 15%; text-align: right; }
.price, .wc-price, .amount { white-space: nowrap; }
.totals-table { width: 45%; margin-left: auto; }
.totals-table td:last-child { text-align: right; white-space: nowrap; }
7. Overview of all codes (CSS selectors) #
Want to get started yourself? The table below tells you which code belongs to which part. The selector map (image) shows this visually.
| Code (selector) | What you adjust with it |
|---|---|
| .invoice | Everything on the invoice |
| .credit-note | Everything on the credit note |
| .order-data | Right-hand column (dates, numbers) |
| .order-data td:first-child | Labels in the right-hand column |
| .order-data td:last-child | Values in the right-hand column |
| .billing-address | Billing address |
| .shipping-address | Delivery address |
| table.order-details | Product table |
| th.description | Column title ‘Product’ |
| th.quantity | Column title ‘Quantity’ |
| th.price | Column title ‘Price’ |
| .wc-order-item-name | Product name |
| .wc-order-item-quantity | Quantity |
| .wc-order-item-price | Price per item |
| .wc-order-item-total | Total price |
| .price, .amount | All prices |
| .totals-table | Totals table (subtotal, VAT, total) |
| tr.subtotal | Subtotal row |
| tr.tax-line | VAT row |
| .total, .grand-total | Final total row |
| .order-notes | Notes with the order |
| .customer-note | Customer notes |
| .order-extra-info | Extra information block |
| .shop-name | Company name (top right) |
| .shop-address | Company address (top right) |
| #footer | Footer at the bottom |
| @page | Page margins |
More information: Official documentation


