Managing email templates #
Email templates are reusable email designs that you can create and save for use in campaigns, automations and email sequences. Templates save you time and keep the look of your emails consistent.
Viewing and managing templates #
Go to CRM & Emails → Email Templates for an overview of all your templates. The overview shows the ID, the title and the date of the last change per template. The Show preview button lets you see straight away what a template looks like.
You can sort the list by ID, title or modification date by clicking the column heading. Use the search bar at the top of the list (type and press Enter) to find a specific template quickly.
Two kinds of template: block editor (Gutenberg) and Visual builder #
There are two kinds of email template, each with its own editor:
Block editor (Gutenberg): the default editor for new templates. You work with blocks, just as in the page editor of your website: you type your text into the canvas and add blocks such as headings, images and buttons with the + button. Every template you create through Add template uses this editor.
Visual builder: the drag and drop email builder. Here you drag ready-made blocks (columns, buttons, images, menus) into your email design and set the layout per block. If you have moved over from e-Act, the templates that came with you are almost always visual templates.
We recommend working with the Visual builder to begin with: it is a little easier if you are used to the old template editor in e-Act Autorespond for email layout, and you can carry on editing your existing visual templates in it directly. In the templates overview, the icon in front of the title tells you which type each template is:
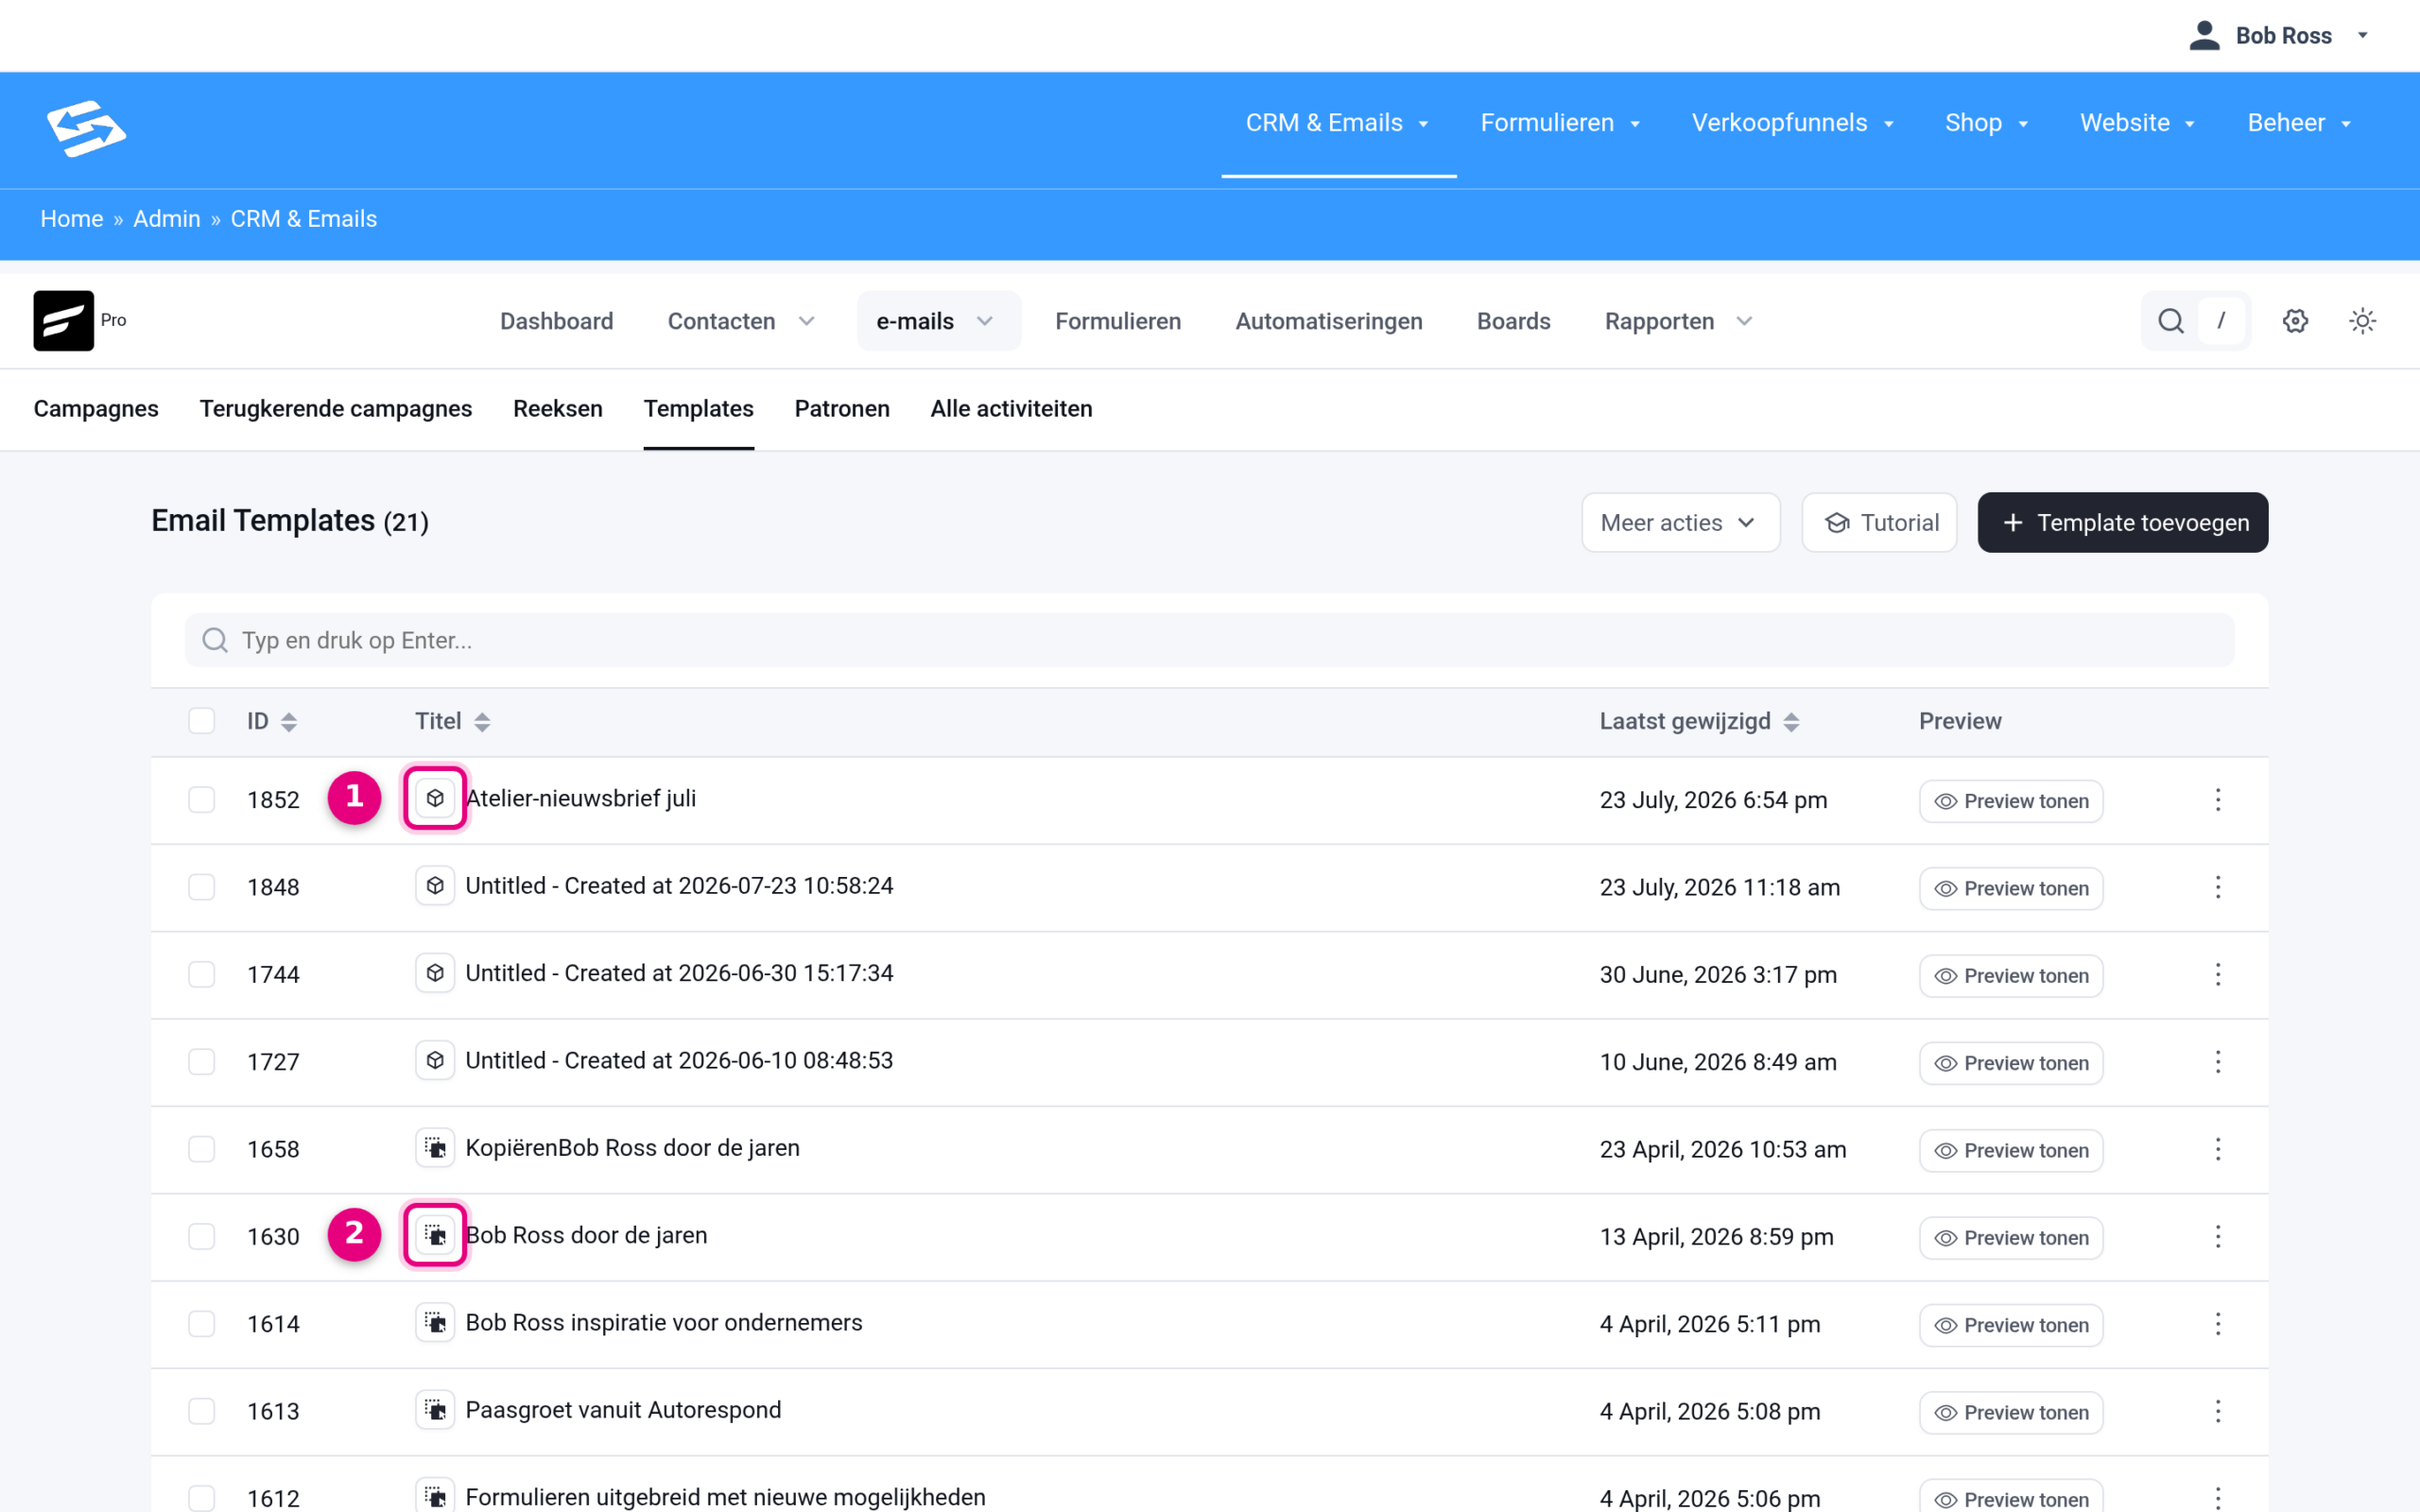
- Cube icon: this template was made with the block editor (Gutenberg) and opens there again.
- Block drag icon: this is a visual template, and it opens in the Visual builder.
Creating a new visual template: copy an existing visual template #
A new template created through Add template always opens in the block editor, and you cannot choose the Visual builder there. If you want a new visual template, copy an existing visual one. Here is how:
- Find a template with the block drag icon in the overview, for example one of your migrated visual templates.
- Click the three dots behind the template and choose Duplicate. The copy is created straight away.
- The copy appears at the top of the overview with [Copy] in front of the title. Click the title to open it: the copy opens in the Visual builder, with the full design of the original in it.
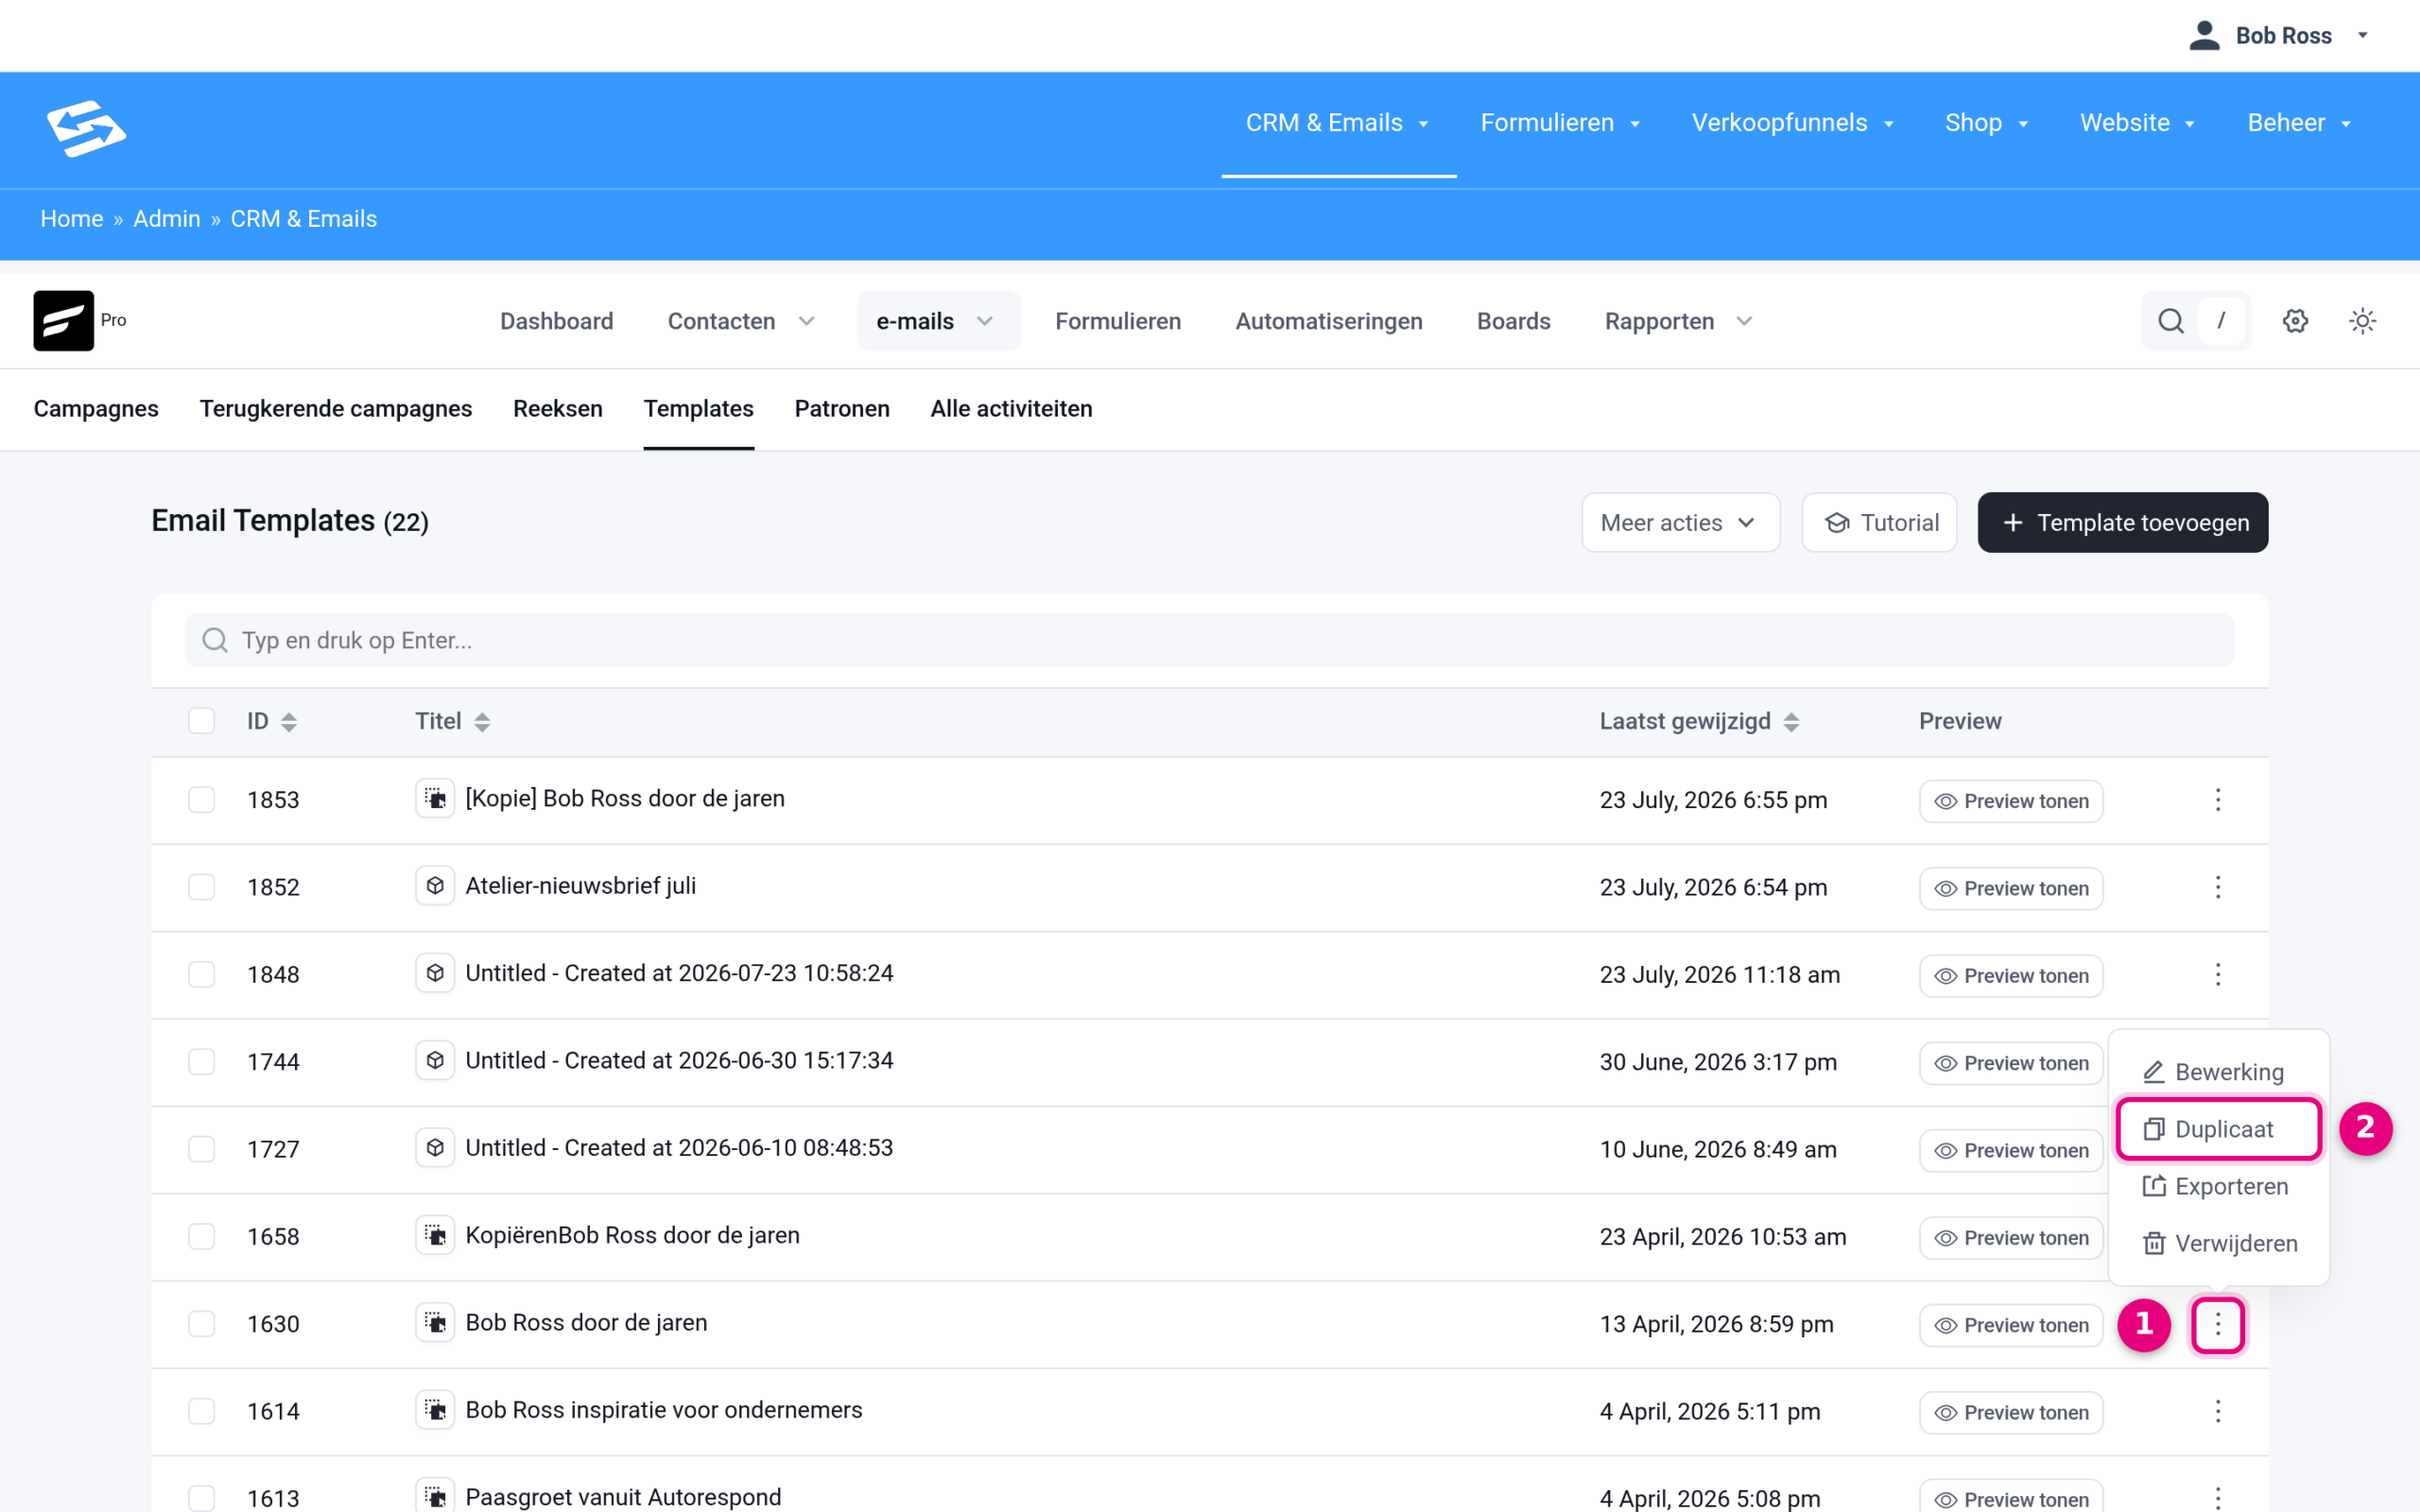
- Three dots menu: opens the actions for this template: Edit (open), Duplicate, Export and Delete.
- Duplicate: creates a copy of the template straight away, keeping the type and the full design.
![The copy of a visual template open in the Visual builder, with [Copy] in front of the title and the Select editor panel on the right with Visual builder selected](https://autorespondinwerker.inwerker.dev/wp-content/uploads/2026/04/e-mail-template-kopie-opent-visuele-bouwer-scaled-1.png)
- Template Title: the copy automatically gets [Copy] in front of the name. Adjust the title and click Save template at the top right.
- Select editor: on a visual template, the Visual builder is selected here. Leave that choice as it is: the layout cannot be exchanged between the editors, so switching means rebuilding your email.
Are you creating a campaign rather than a template? When you create a campaign you do choose an editor yourself, and you can also copy an existing visual campaign through Duplicate as the basis for a new mailing. See Composing an email in the editor.
Creating a new template in the Gutenberg editor #
Click Add template at the top right of the overview.
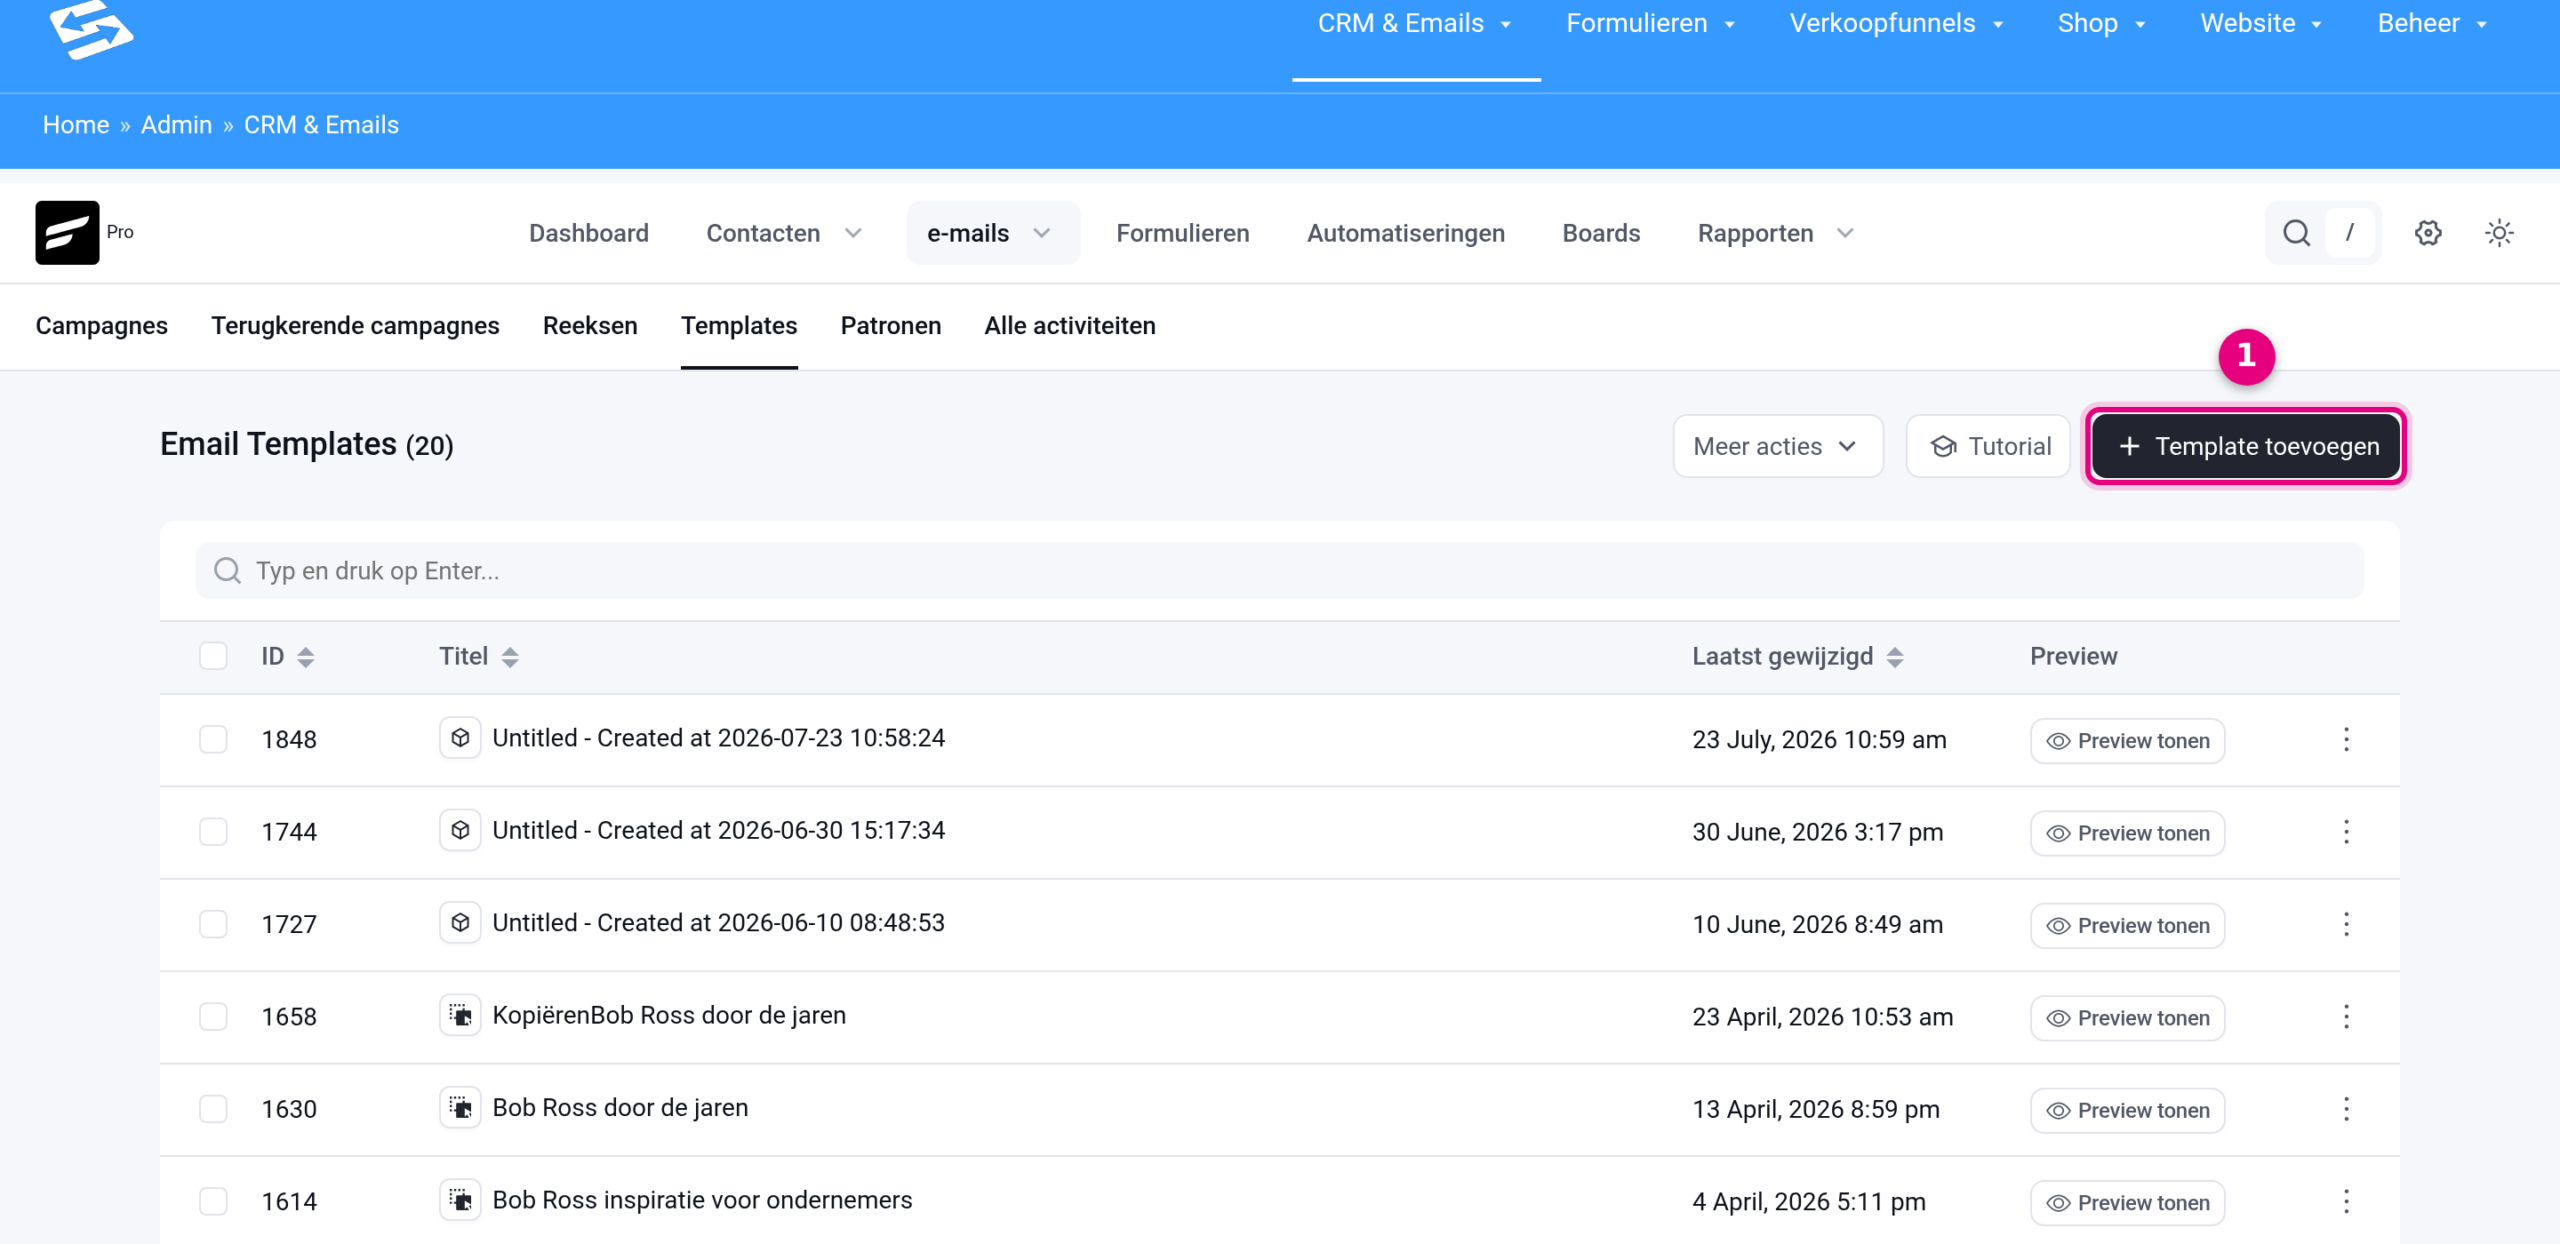
- Add template: opens the selection screen for a new email template.
A panel called Create new email template now opens on the right. You have two options here:
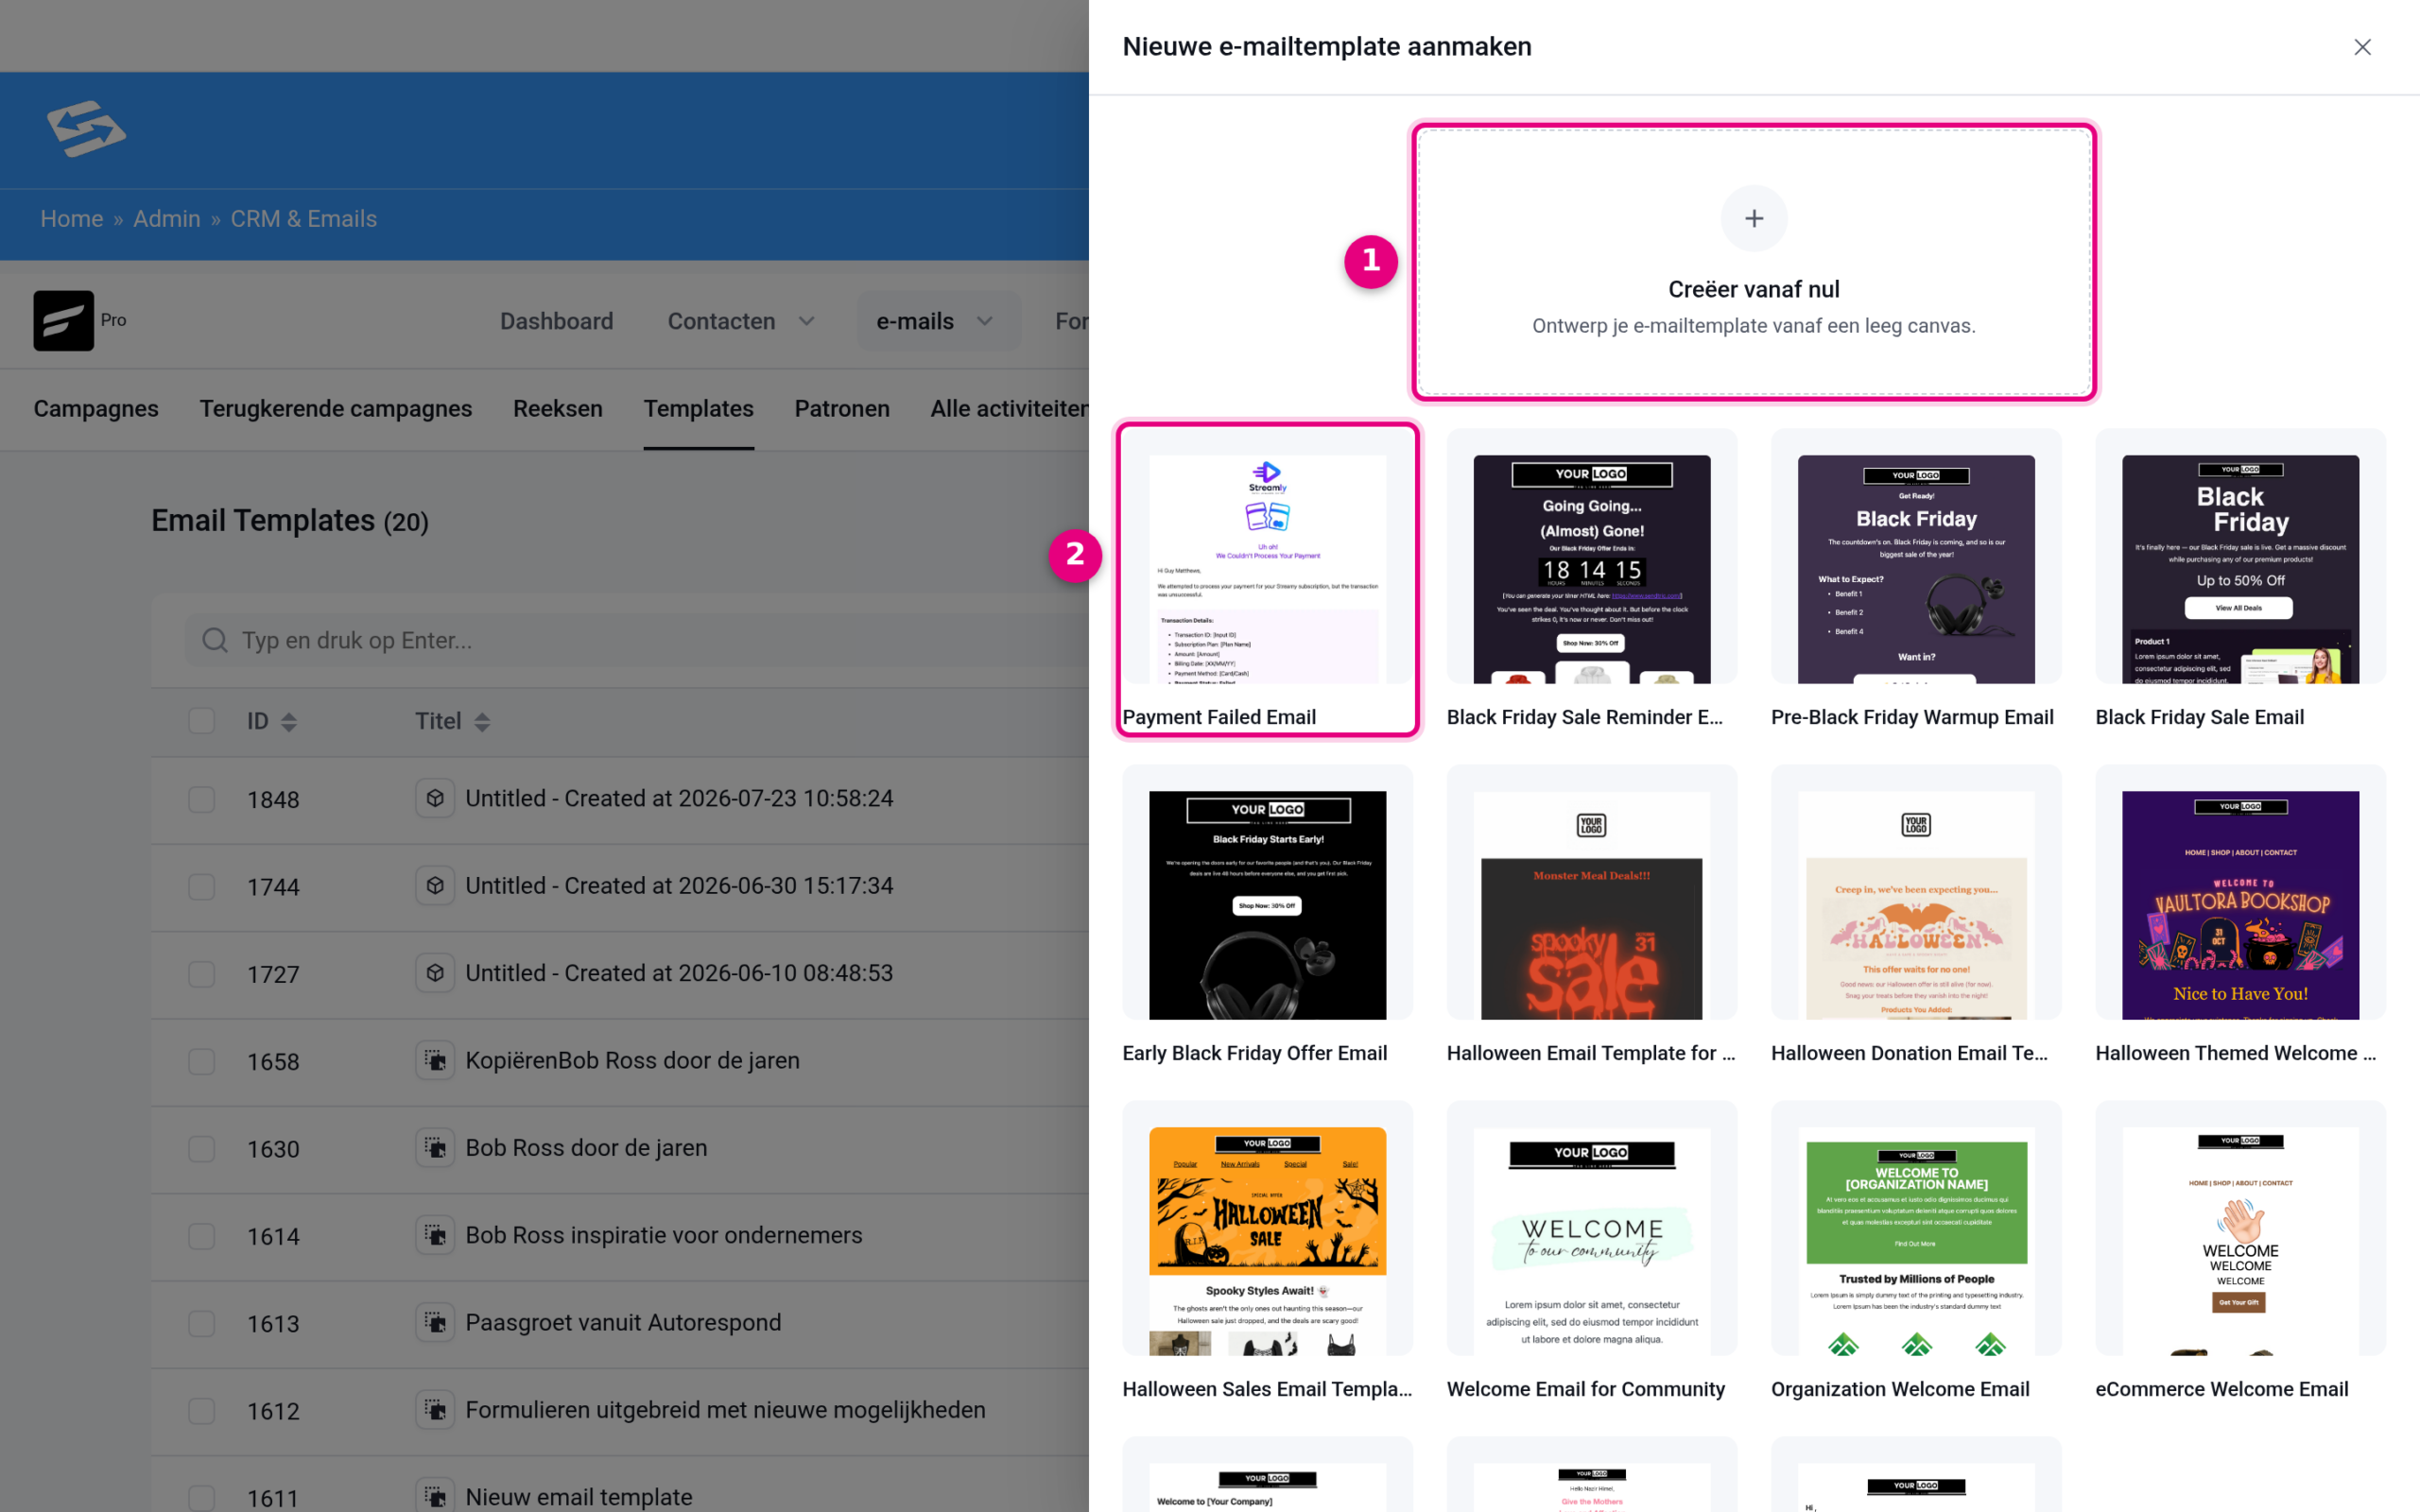
- Start from scratch: you design your email template on an empty canvas. The template is created straight away and the editor opens immediately.
- Ready-made templates: below the Start from scratch option is a gallery of example templates (welcome emails and promotional emails, for instance). Hover over an example: the eye icon shows a preview and Import brings the template in, after which you can change it completely.
Note: the old selection screen where you first chose an editor no longer exists for templates. A new template always opens directly in the block based email editor explained below. So you do not create a visual template with this button, but by copying an existing visual template (see the section above).
Using the template editor #
Once you have created a template, you arrive in the email editor. It works with blocks, comparable to the page editor of your website:
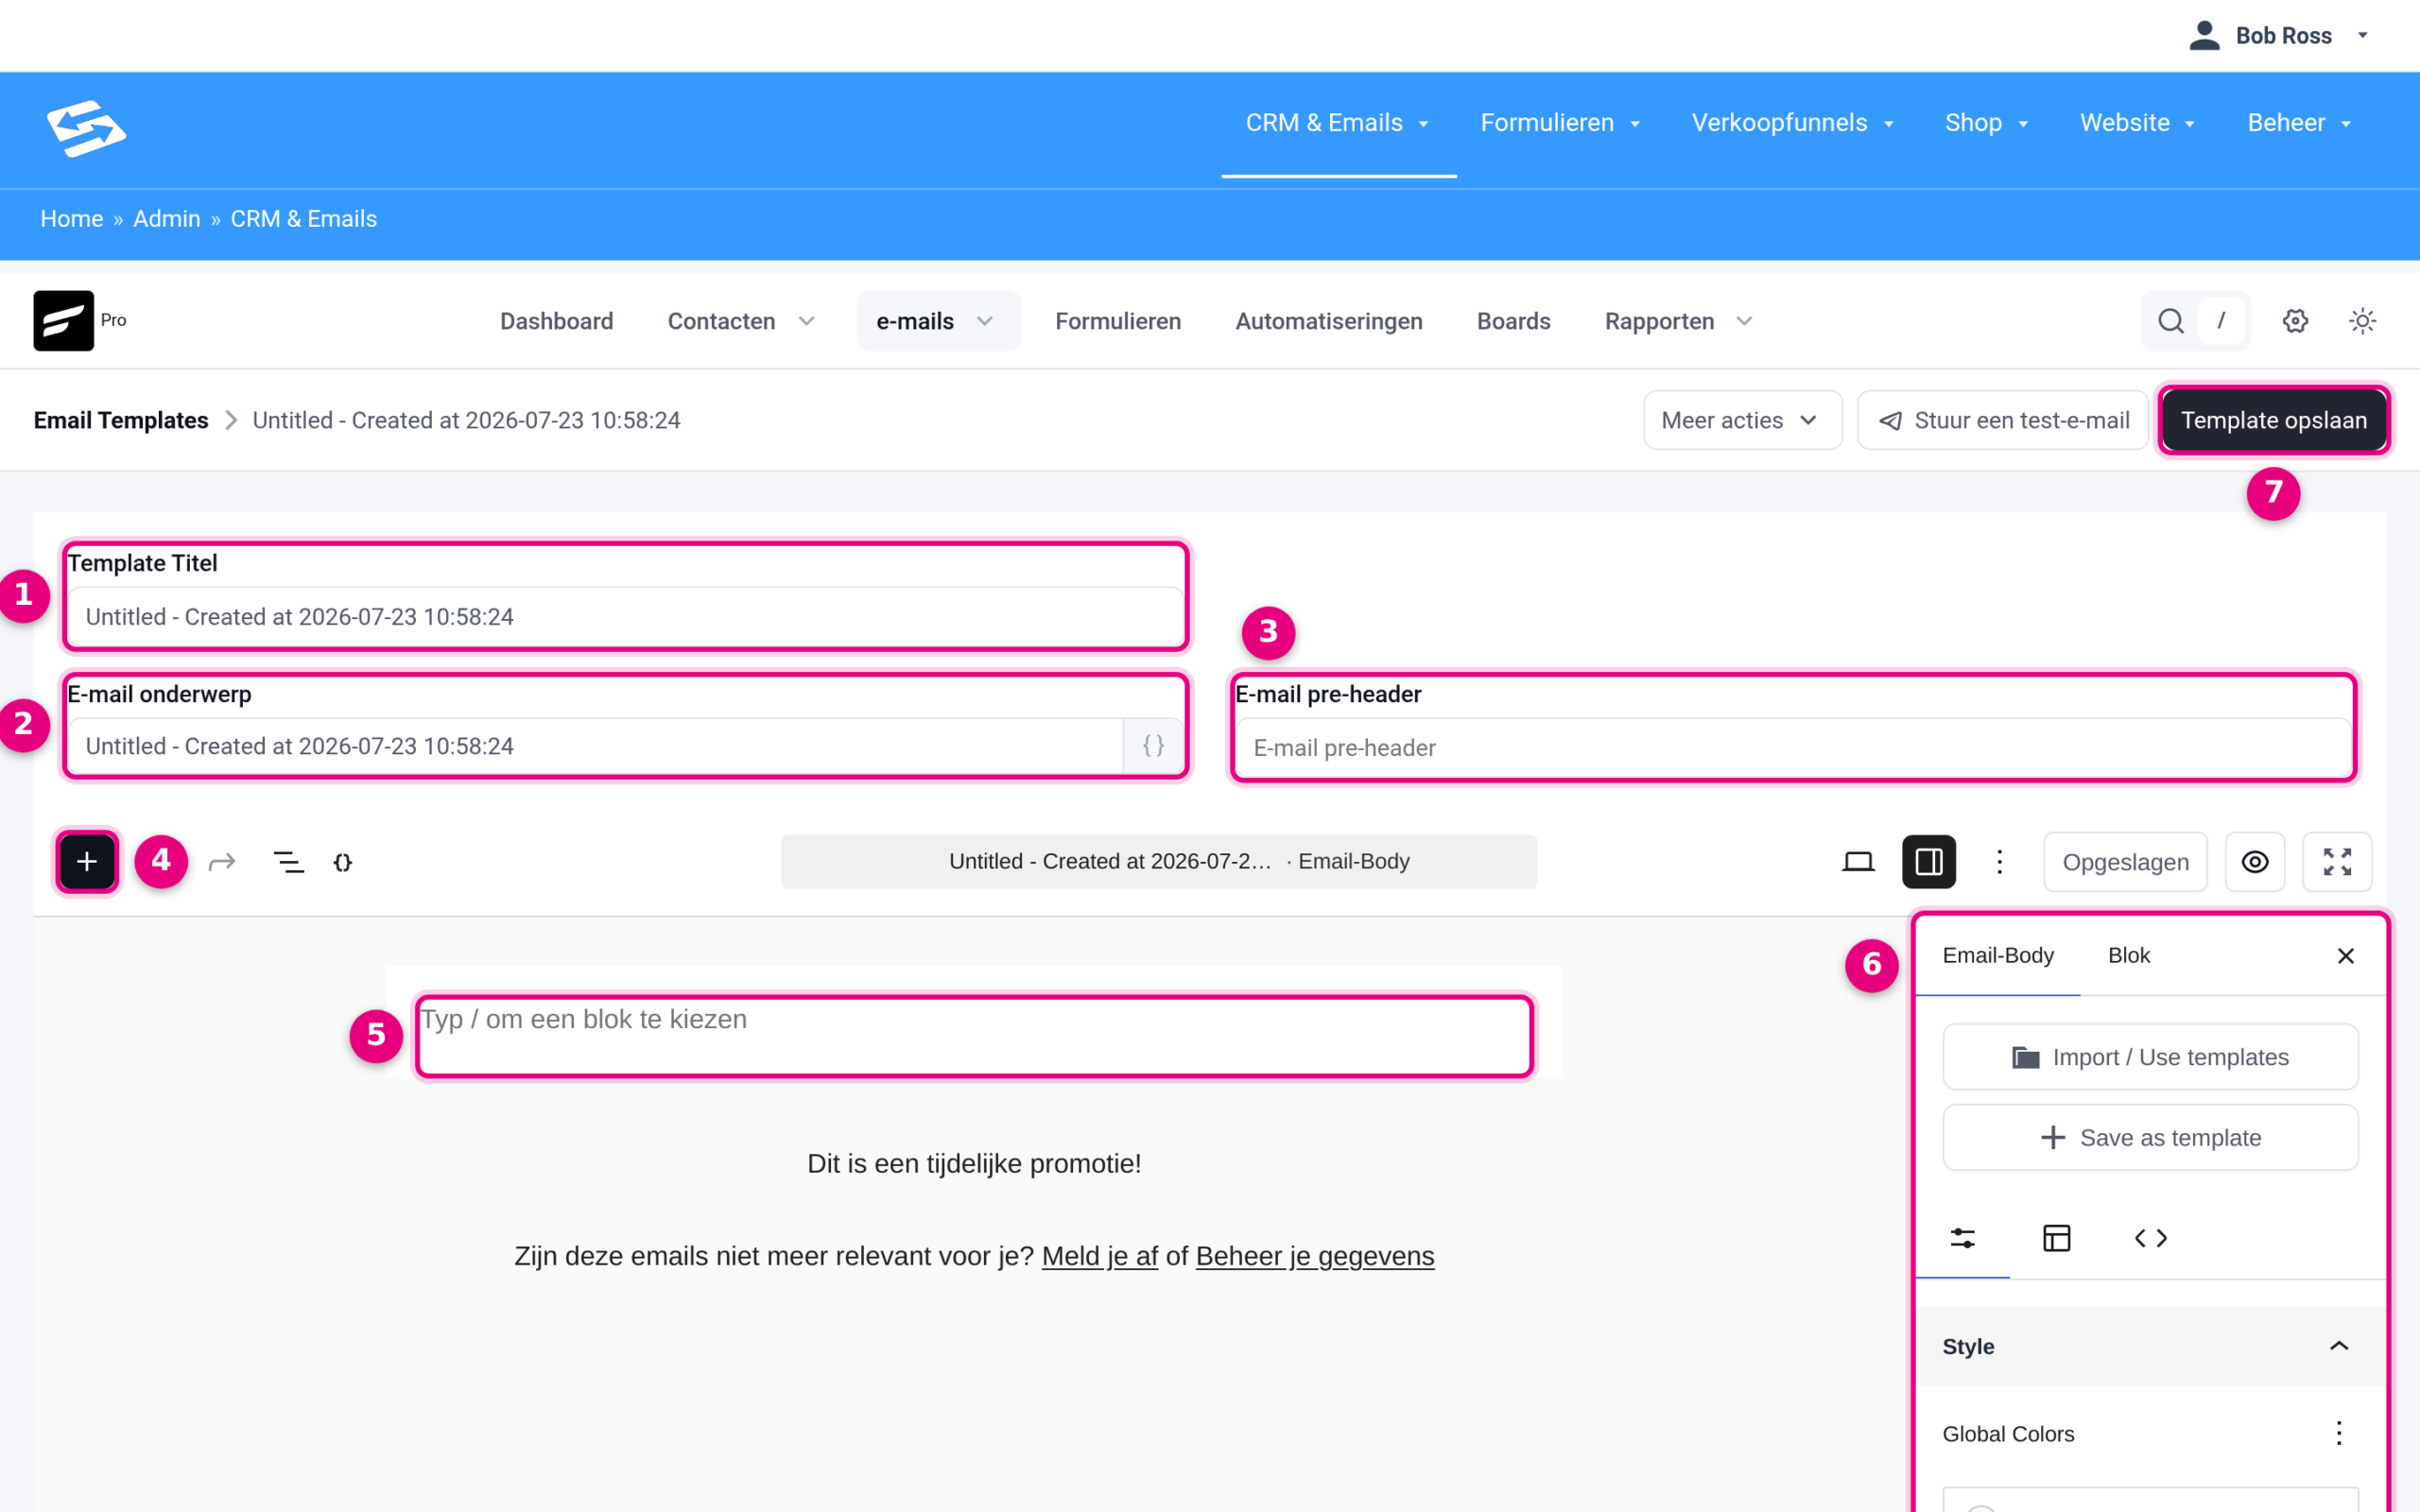
- Template Title: the internal name you use to find the template later (not visible to recipients).
- Email subject: the default subject line. The { } icon on the right of this field adds smart codes, such as the recipient’s first name.
- Email pre-header: the short text that email programs show next to or below the subject in the inbox.
- Block inserter (+): opens the blocks panel for adding new blocks. The same toolbar also holds undo and redo, the document overview and a { } button for smart codes.
- Canvas: this is where you build your email. Type your text directly, or type a forward slash (/) to pick a block straight away.
- Right hand panel: on the Email-Body tab you set the general style (Global Colors, background colours, headings, text, links and typography), and on the Block tab you see the settings of the selected block. At the top of this panel are the buttons Import / Use templates (load an existing template as a basis) and Save as template.
- Save template: saves your template. Next to it is Send a test email to check the result in your own inbox, and More actions lets you export the template.
If you click the block inserter (+), the blocks panel opens:
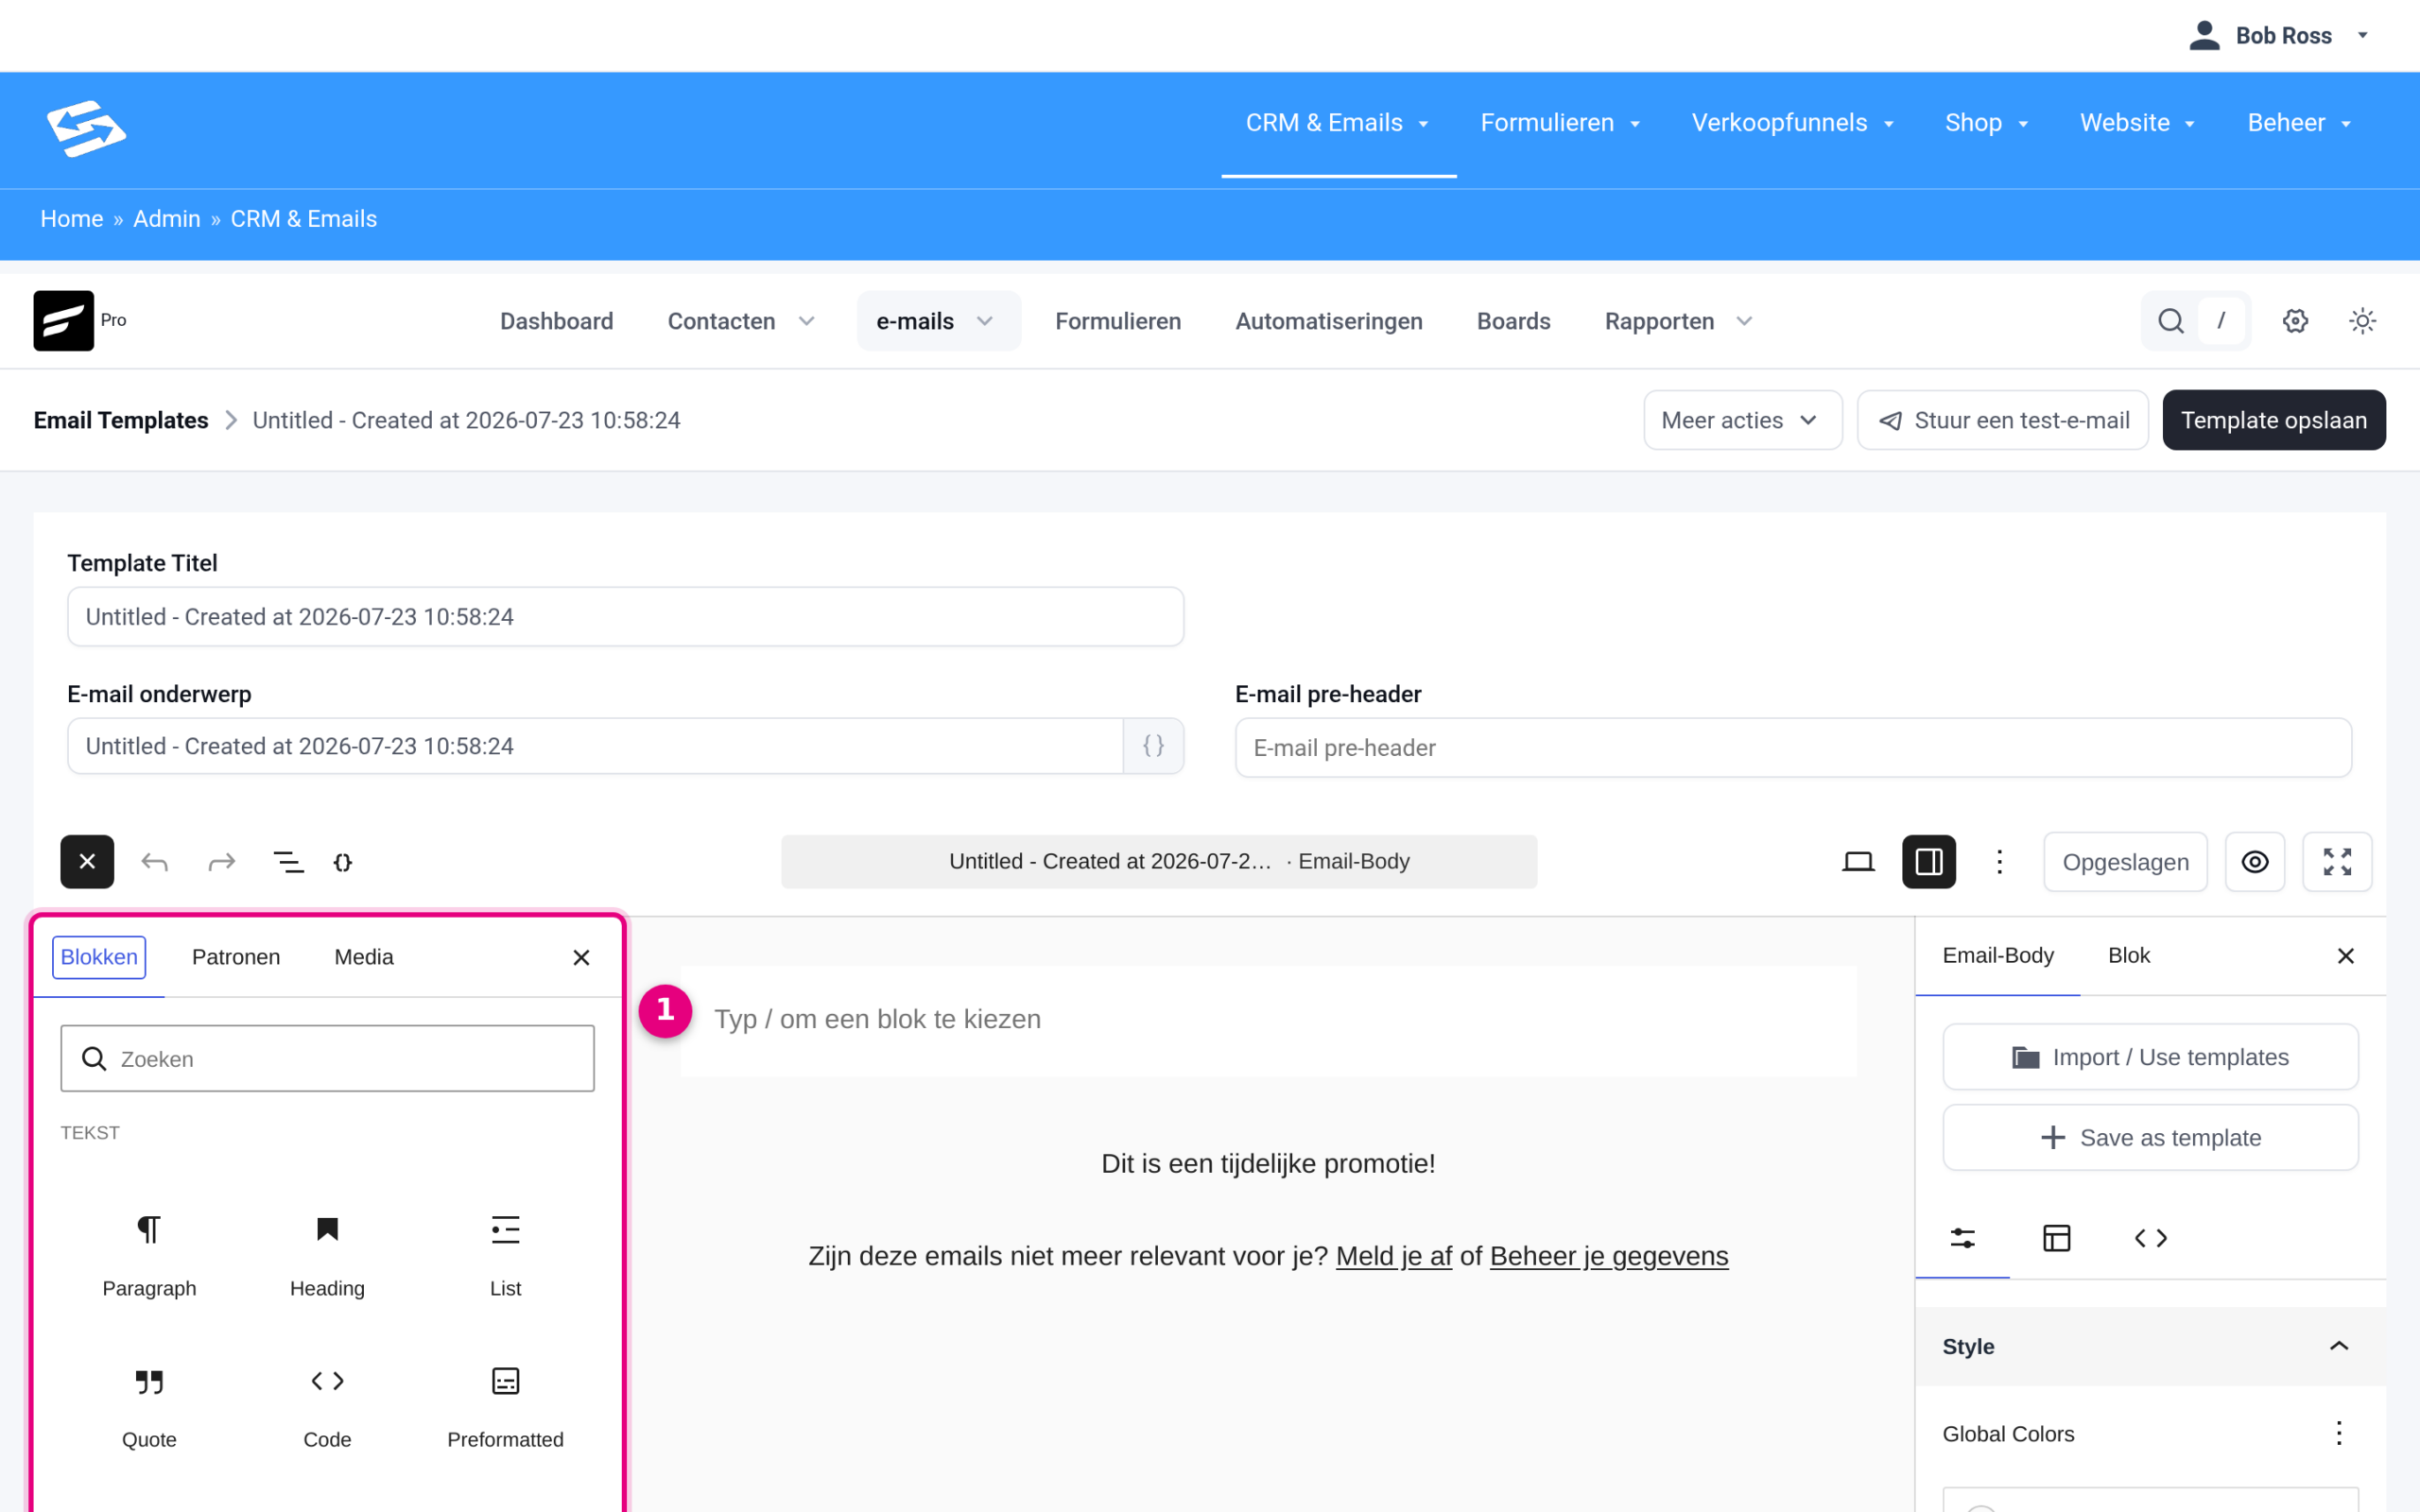
- Blocks panel: the Blocks tab holds Paragraph (text), Heading, List, Image, Buttons, Columns, Separator, Spacer, Conditional Section (content you show only to certain contacts) and Custom HTML, among others. The Patterns tab holds ready-made combinations of blocks, and the Media tab lets you choose images from your media library.
Every new template has a footer at the bottom by default with the unsubscribe links (Unsubscribe and Manage your details). Leave it in place: an option to unsubscribe is required in every marketing email.
Smart codes in templates #
Use smart codes to personalise your emails. Commonly used smart codes are:
- {{contact.first_name}}: the recipient’s first name
- {{contact.full_name}}: the recipient’s full name
- {{contact.email}}: the recipient’s email address
- {{business.name}}: your company name
- {{unsubscribe_url}}: the unsubscribe link (required in every email)
Type the smart code straight into your text, or use the { } button (Smartcodes) in the editor toolbar or next to the subject field. Smart codes are replaced automatically with the right data when the email is sent.
Conditional sections #
The Conditional Section block lets you show parts of your email only to specific contacts. This is useful for showing different content based on tags, lists or custom fields. Add the block through the block inserter and set the conditions in the right hand panel.
For example: show a special offer only to contacts with the tag ‘VIP customer’, or show different text based on the recipient’s region.
Duplicating and editing templates #
Click the three dots menu behind a template in the overview to see the actions. You can duplicate templates (the Duplicate menu item), edit, export or delete them. The copy always keeps the type of the original: a copy of a visual template opens in the Visual builder again, and a copy of a block editor template in the block editor. Duplicating is therefore also the way to create a new visual template (see the section Two kinds of template earlier in this article).
Edit a template by clicking the title. Note that changes to a template have no effect on emails already sent, but they do apply to future campaigns that use this template.
Using templates in campaigns #
When you create a new campaign, automation or email sequence you can choose from your saved templates. In the email editor you do that with the Import / Use templates button in the right hand panel. Select a template and adjust the subject and the content for that particular mailing if you want. The original template stays unchanged.
This lets you send consistent emails quickly while still having the flexibility to adjust details per campaign.
A template is a blueprint: changes do not carry into existing emails #
If you use a template in a campaign, automation or email sequence, that email gets its own copy of the template. From that moment on they stand apart: if you change the template later, nothing changes in the email already sitting in your automation, and the other way round. To change the text of an email in an automation (a date, for example), open the automation, click the email step and change the text there. You do not have to import the template again.
That is deliberate. A template is a blueprint for setting up a new email quickly, and the email itself belongs to one campaign or automation. You notice the benefit as soon as you use the same template for several products or editions: every automation keeps its own date, location or price, without you having to store a separate template per product. And an automation that is already running never changes unexpectedly when you adjust a template for a next edition.
Good to know: an email that has already been sent never changes. If a contact received an email with outdated information, send that contact a short separate email with the correct information, see Sending an email to an individual contact.
Tracking template performance #
For statistics on how an email with this template performs (such as open and click rates), look at the statistics of the individual campaigns the template was used in, under CRM & Emails → CRM Statistics. Templates that perform well can serve as the basis for new designs.
Email Templates in Autorespond are based on FluentCRM, which is included in your package. Read the English documentation


