Sending a newsletter with a fixed template design #
In Autorespond you send a newsletter with a campaign: one email that goes to a group of contacts at one moment. That is different from an automation or an email sequence, which send an email automatically after someone does something, such as completing a form. If you want to send a newsletter or an offer periodically, a campaign is the right place.
This article explains the best practice for anyone starting out with newsletters: create a good base template under CRM > Templates, import that template into your campaign and send it from there, and then prepare, adjust and send future newsletters quickly with the same campaign settings.
Campaigns in Autorespond are based on FluentCRM, which is included in your package. Read the English documentation
Preparation: create a base design once #
You only have to build the layout of your newsletter (logo, colours, standard sign-off, unsubscribe link) once. You save it as a template and reuse it every month after that. Go to CRM & Emails → emails → Templates.
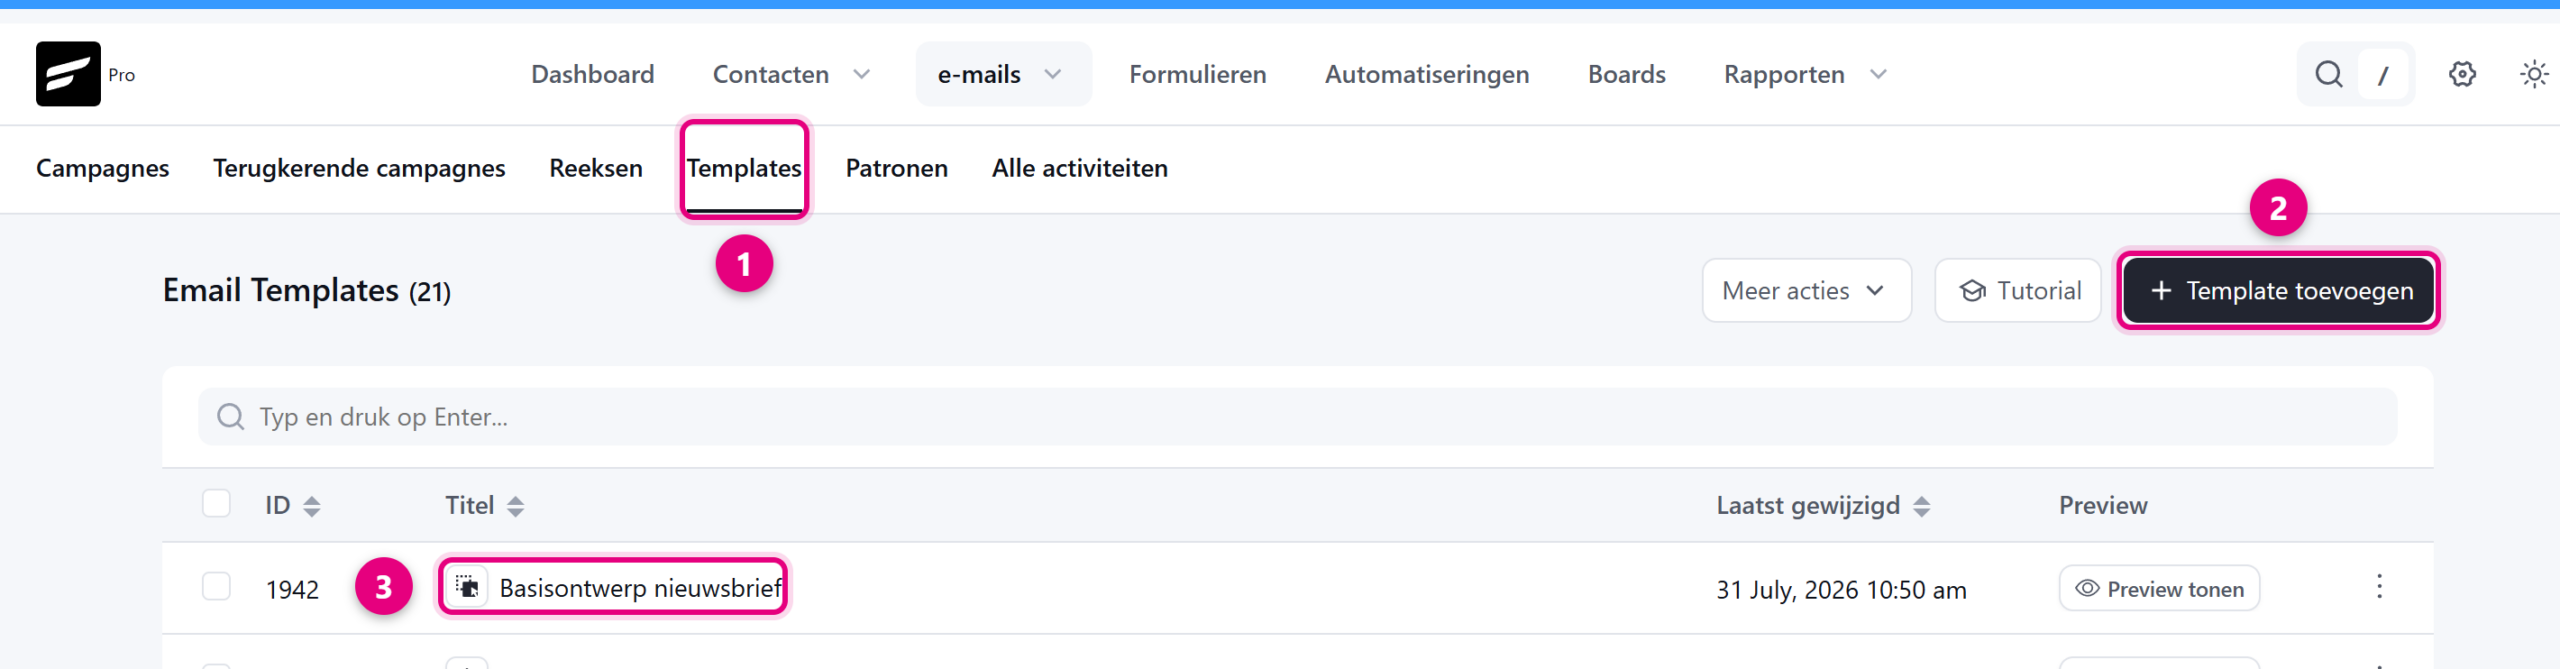
- The Templates tab under the emails menu. This is where all the email designs you keep are stored.
- Add template creates a new design. Put the things that are the same every month into it: your logo, your brand colours, your sign-off and the unsubscribe link.
- Give the template a recognisable name, for example Newsletter base design. Only you see this name, your recipients do not.
You can also skip this step and click Save as template later, from an email you are happy with. There is more about this in Managing email templates.
Step 1: go to your campaigns #
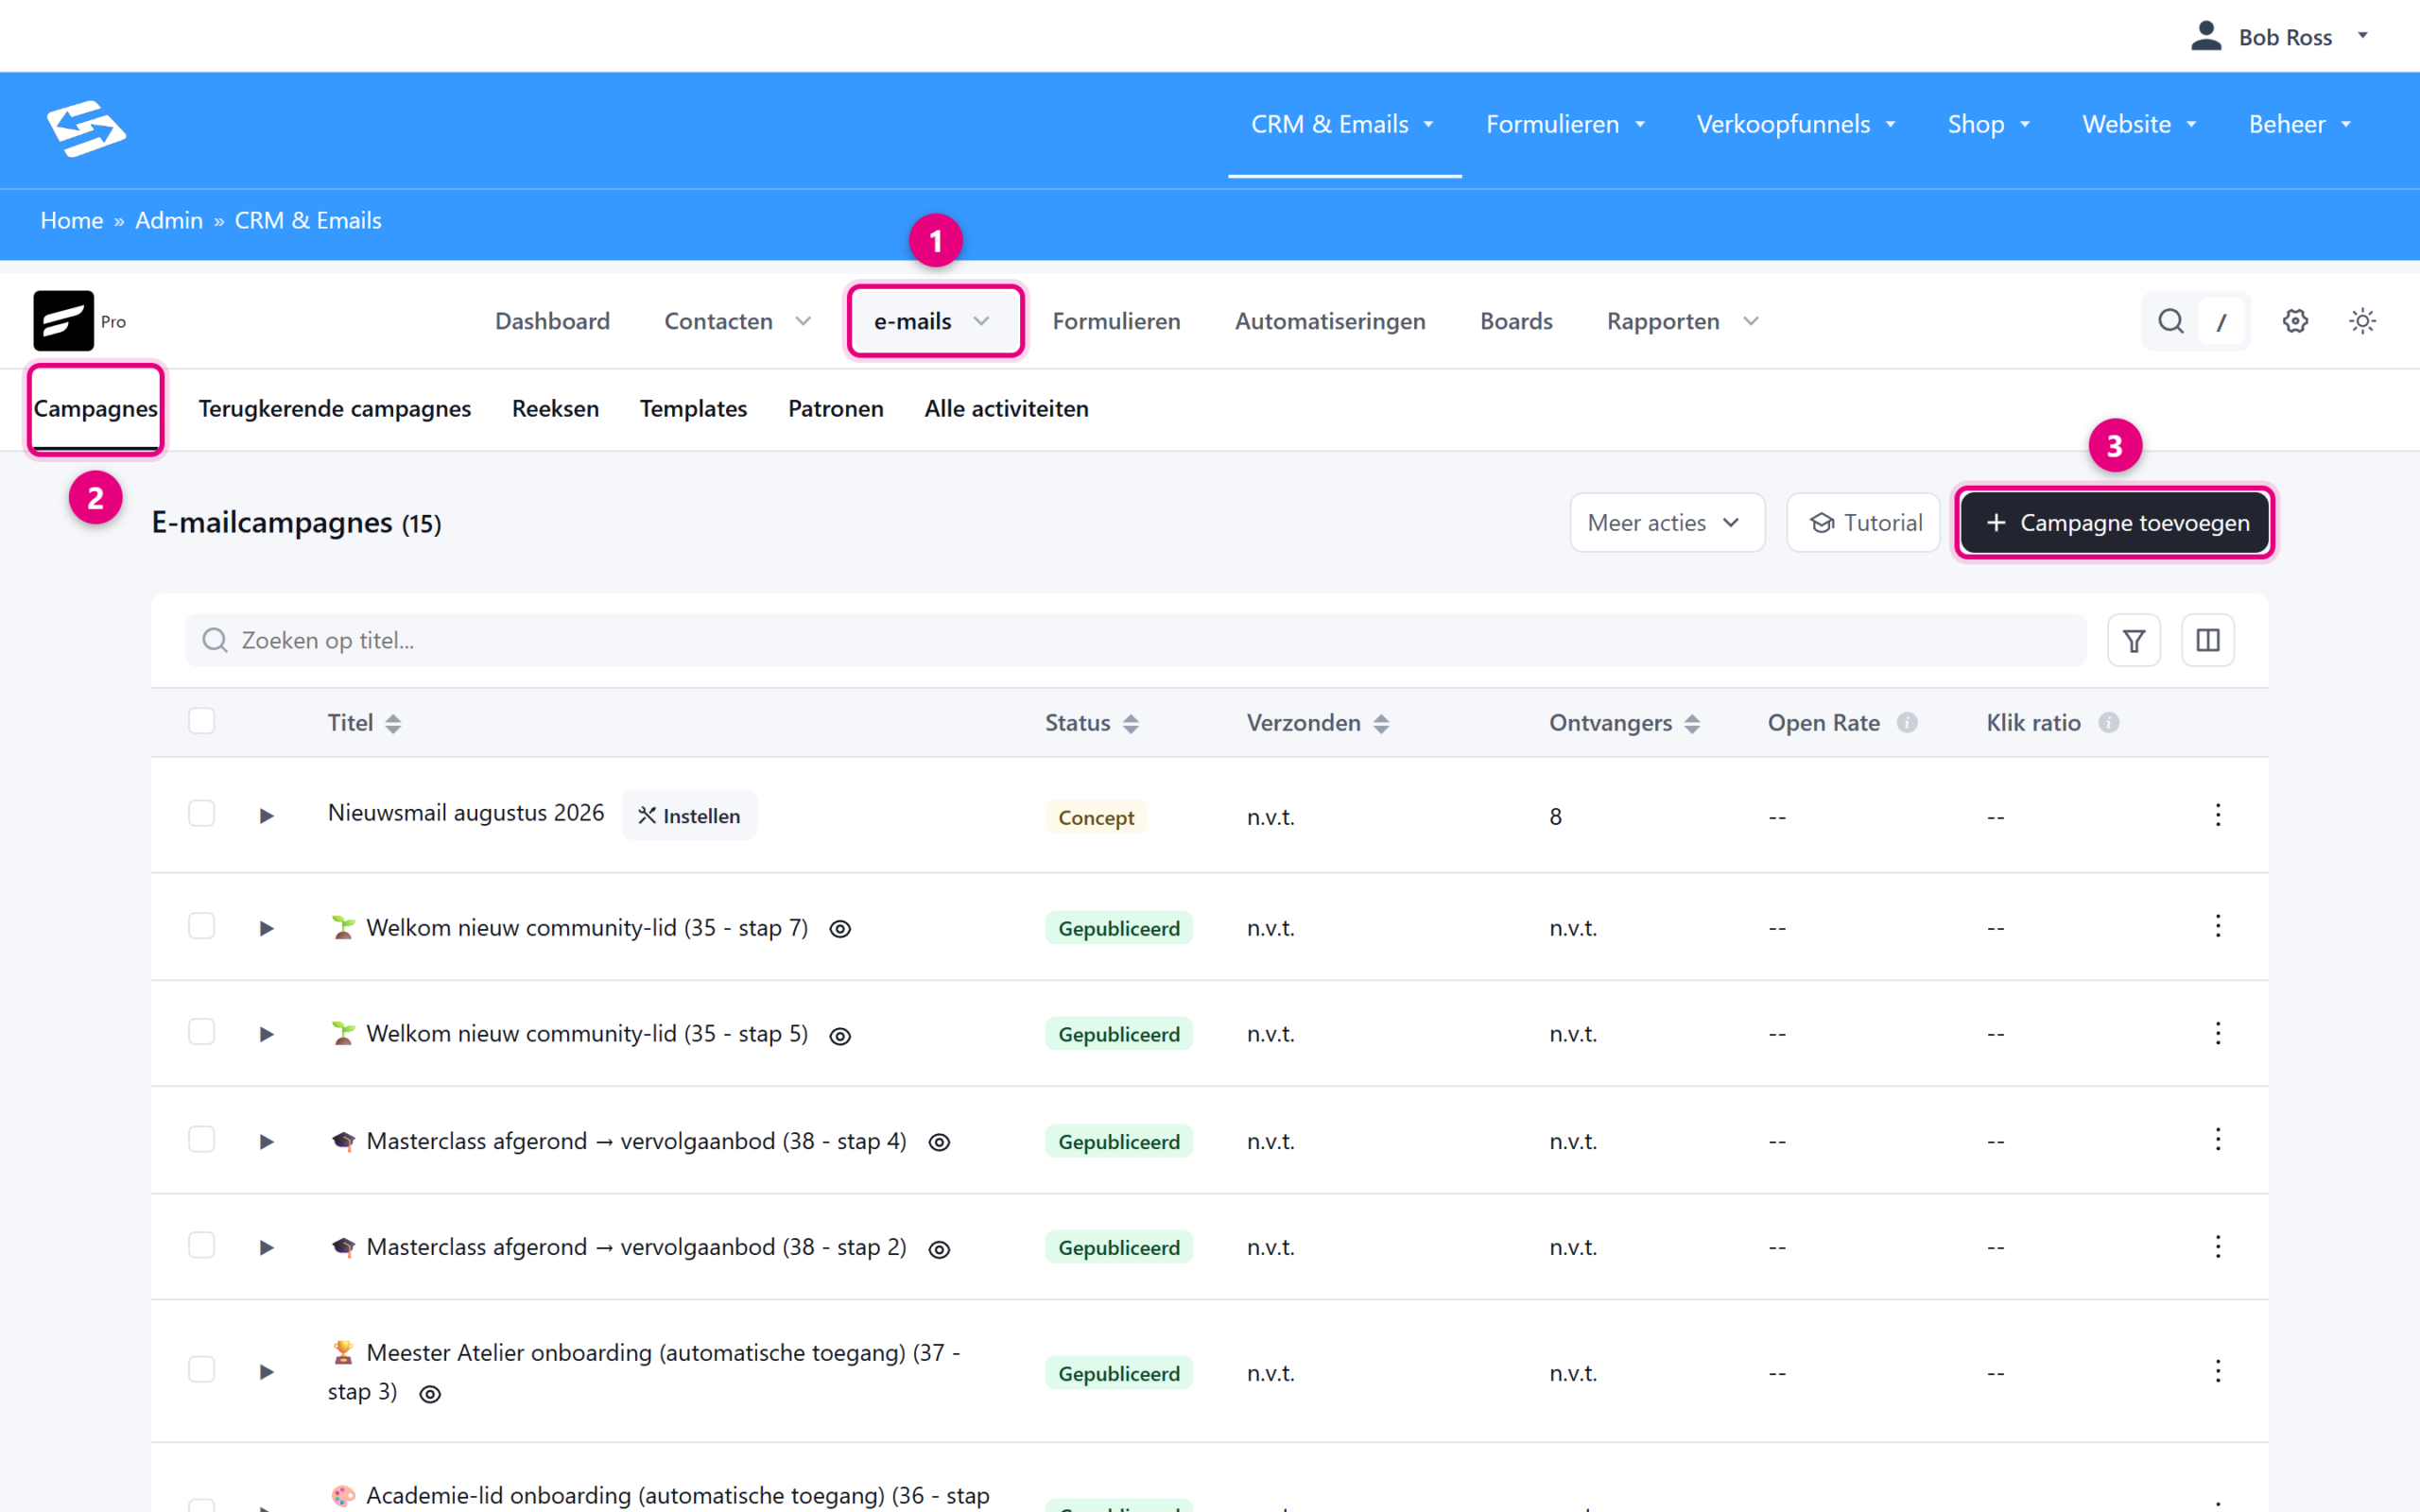
- Click emails in the menu.
- Choose the Campaigns tab. You now see all your sent and scheduled campaigns, with the status, the number of recipients, the open rate and the click rate per campaign.
- Click Add campaign at the top right.
Step 2: choose a title and an editor #
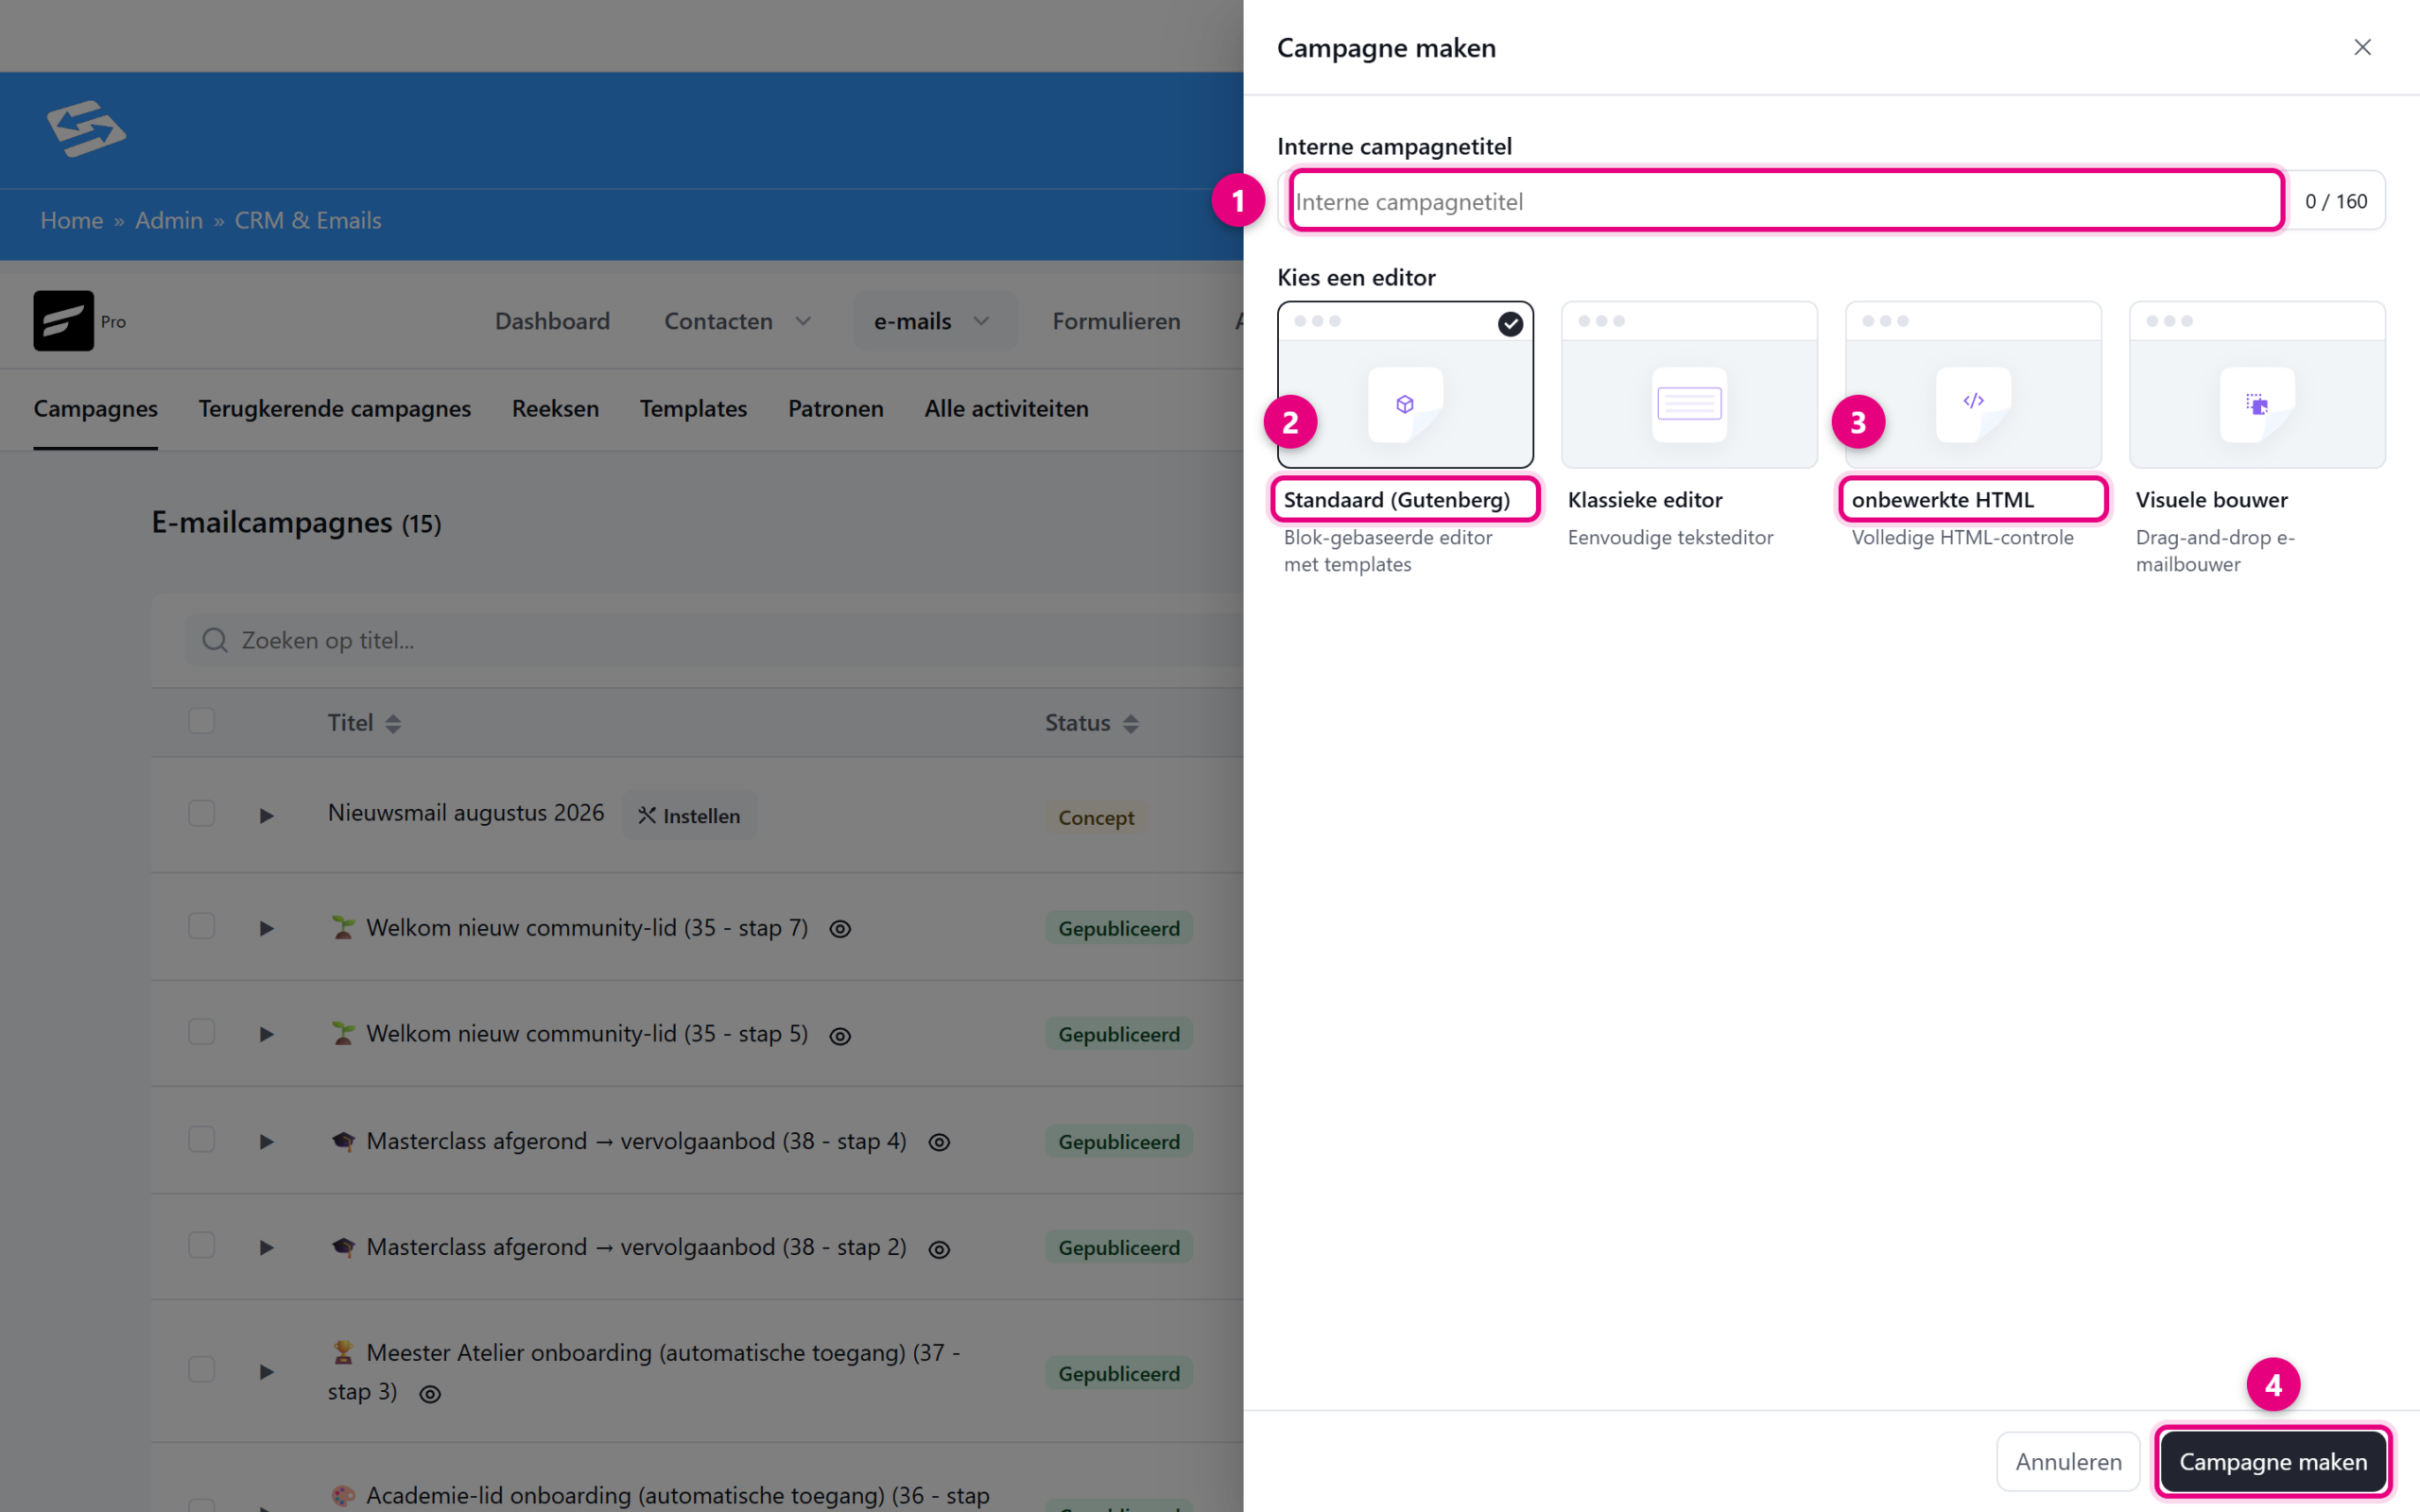
- Internal campaign title: the name you use to find this mailing again, for example News email August 2026. This title does not appear in the email itself and your recipients do not see it. You fill in the subject line in step 4.
- Default (Gutenberg) is the recommended choice: a block editor where you add text, images and buttons, and where you can import a template. The Classic editor is a simple text editor and the Visual builder is a drag and drop builder for more elaborate designs.
- Raw HTML is meant for ready-made HTML code. Emails migrated from the old Autorespond (e-Act) are often in this form. Only choose this editor if you deliberately want to work with HTML code.
- Click Create campaign. You arrive at the first of four steps. At the top right of the screen you can always see how far along you are (1/4, 2/4, and so on) and you can always go back.
Step 3: compose your email #
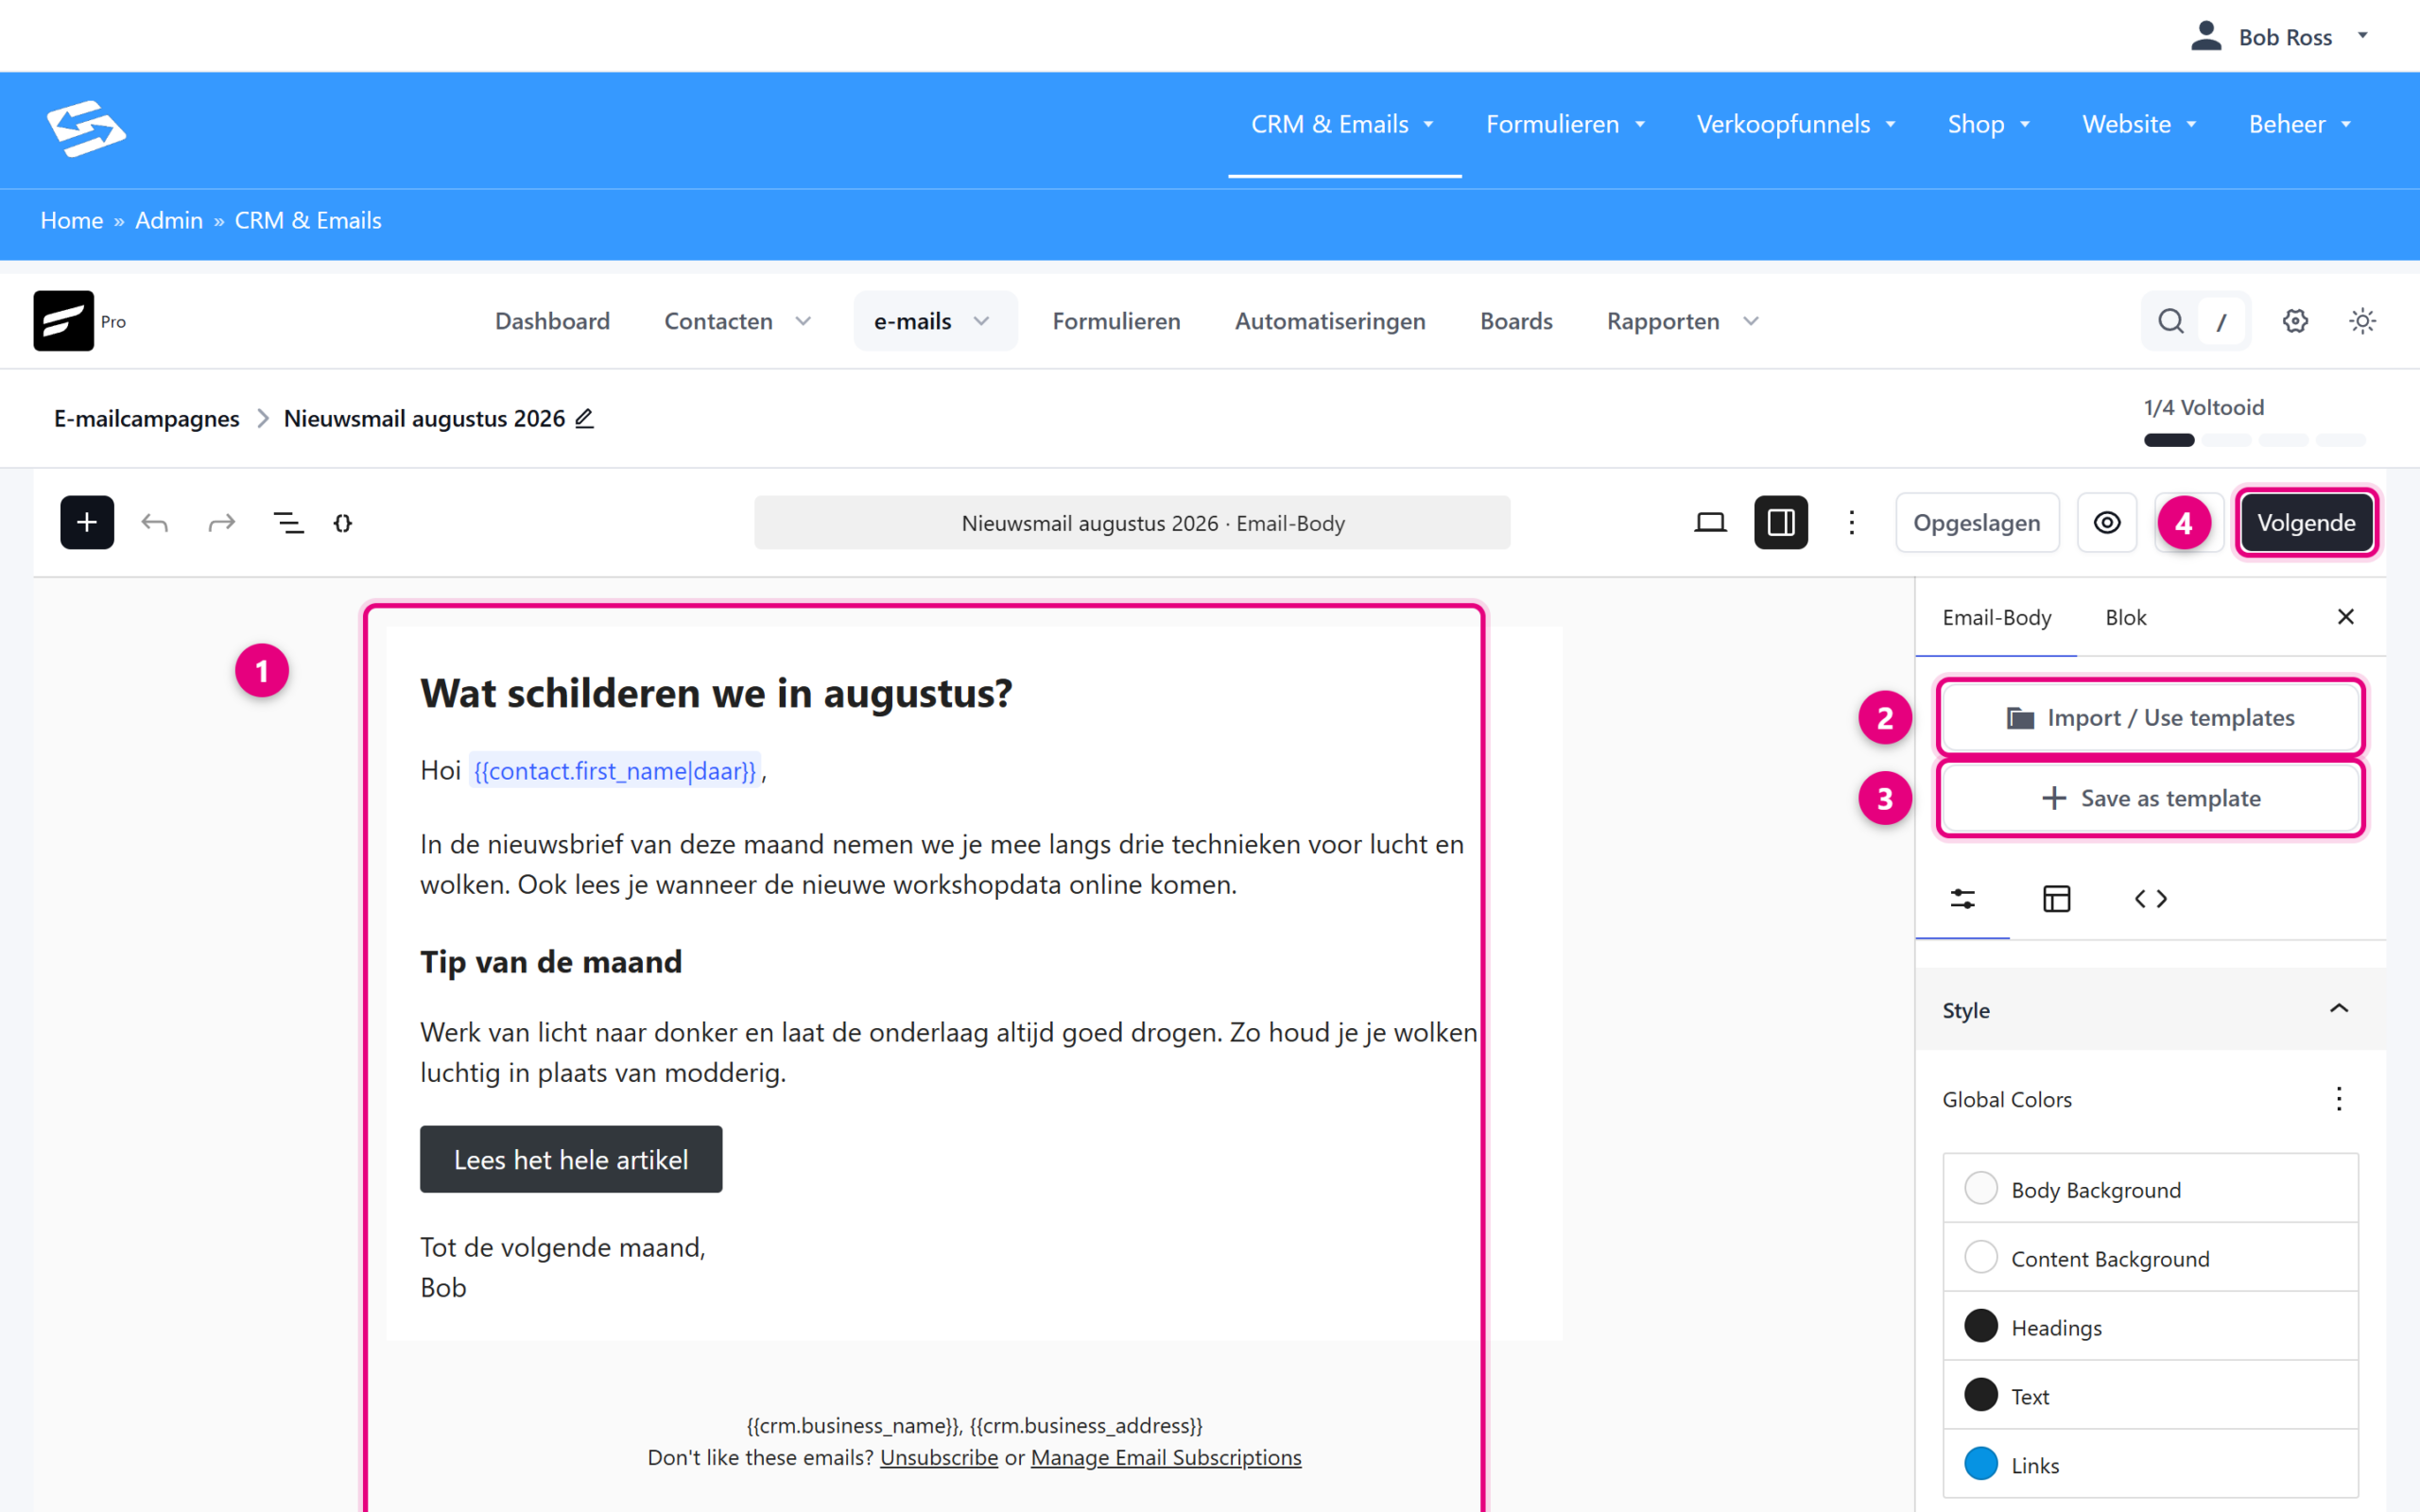
- Your email is in the middle. Click into the text to type. The plus button at the top left adds blocks: a heading, an image, a button or a divider. You add personal fields such as the first name with a smart code, for example {{contact.first_name|there}}. If a contact has no first name filled in, the word after the vertical bar is used.
- Import / Use templates pulls in the base design you created earlier. Do this before you start typing, because it replaces the content of the email.
- Save as template saves the layout you are looking at as a new template, so you can reuse it next time.
- Finished? Click Next. Your work is saved automatically, which you can see from the Saved message.
Some of the buttons in the right hand panel are still in English. That is the supplier’s own editor. It does not change what the buttons do.
Step 4: subject and settings #
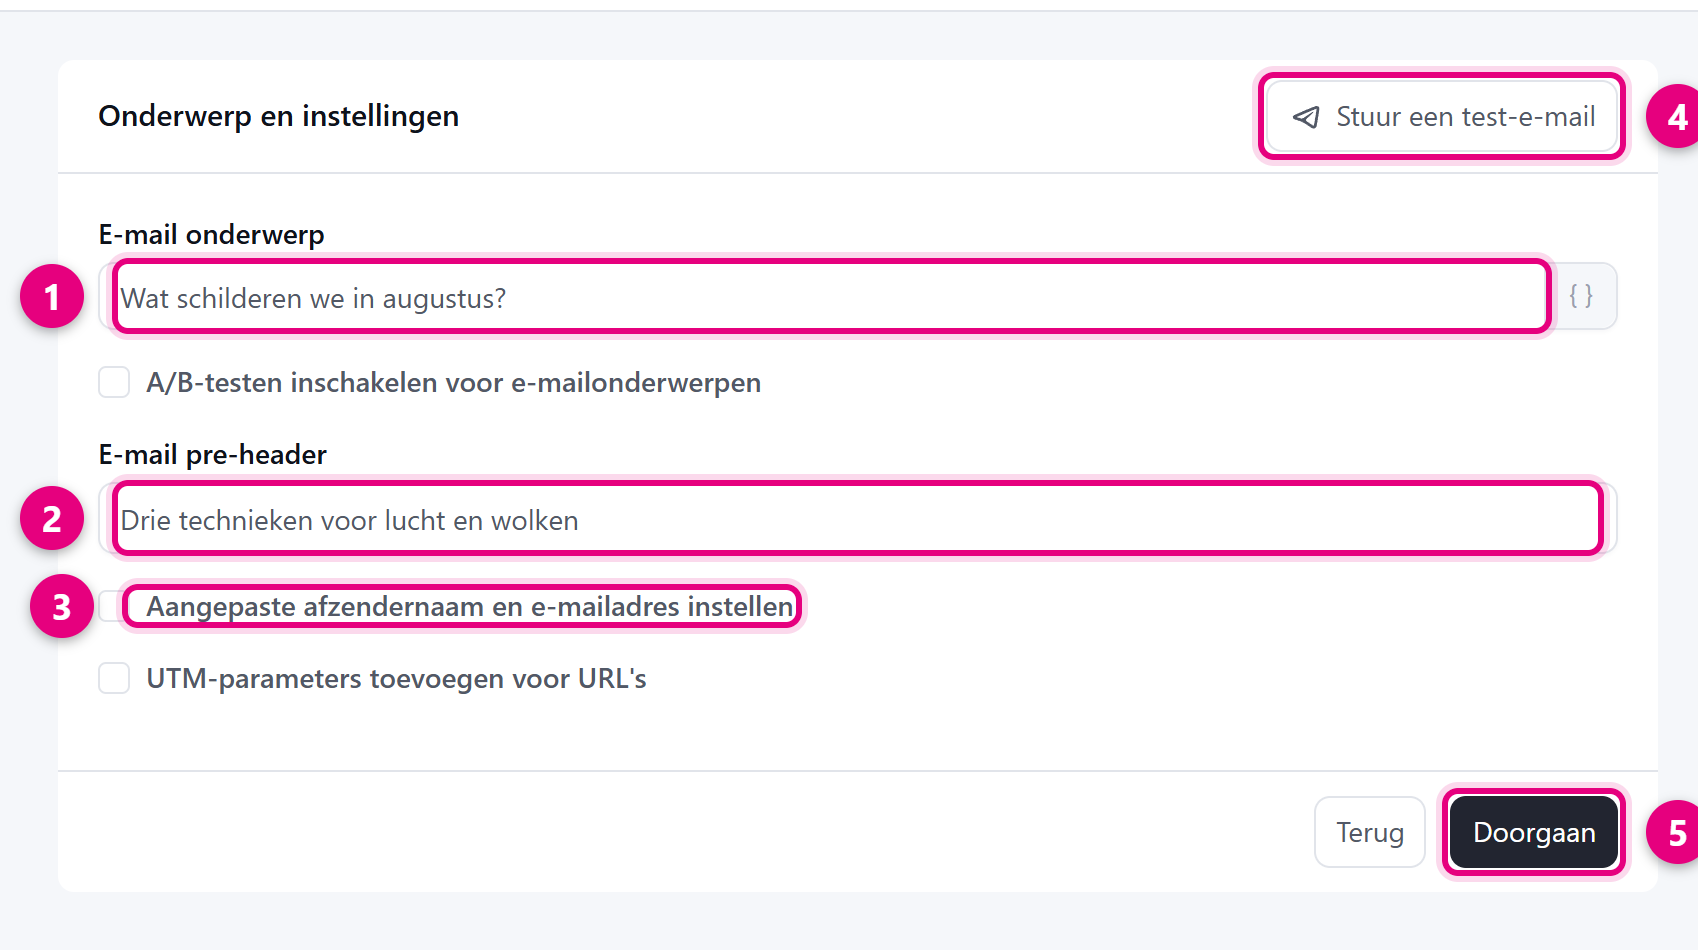
- Email subject: the line your recipient sees in their inbox. This is the most important line of your newsletter, because it decides whether someone opens it.
- Email pre-header: the short sentence that appears next to or below the subject in many email programs. If you leave it empty, the email program takes the first line of your email.
- Set a custom sender name and email address lets you use a different sender than your default for this one mailing. Leave it off if you want to use your usual sender.
- Send a test email sends the email to an address you specify, so you can look at it yourself first. Check it on your computer and on your phone.
- Click Continue.
The option Enable A/B testing for email subjects sends two different subject lines to part of your list and then uses the better performing one. Useful for larger lists, not necessary for an ordinary monthly email. Add UTM parameters to URLs is only for when you want to see in Google Analytics that visitors came from this mailing.
Step 5: choose your recipients #
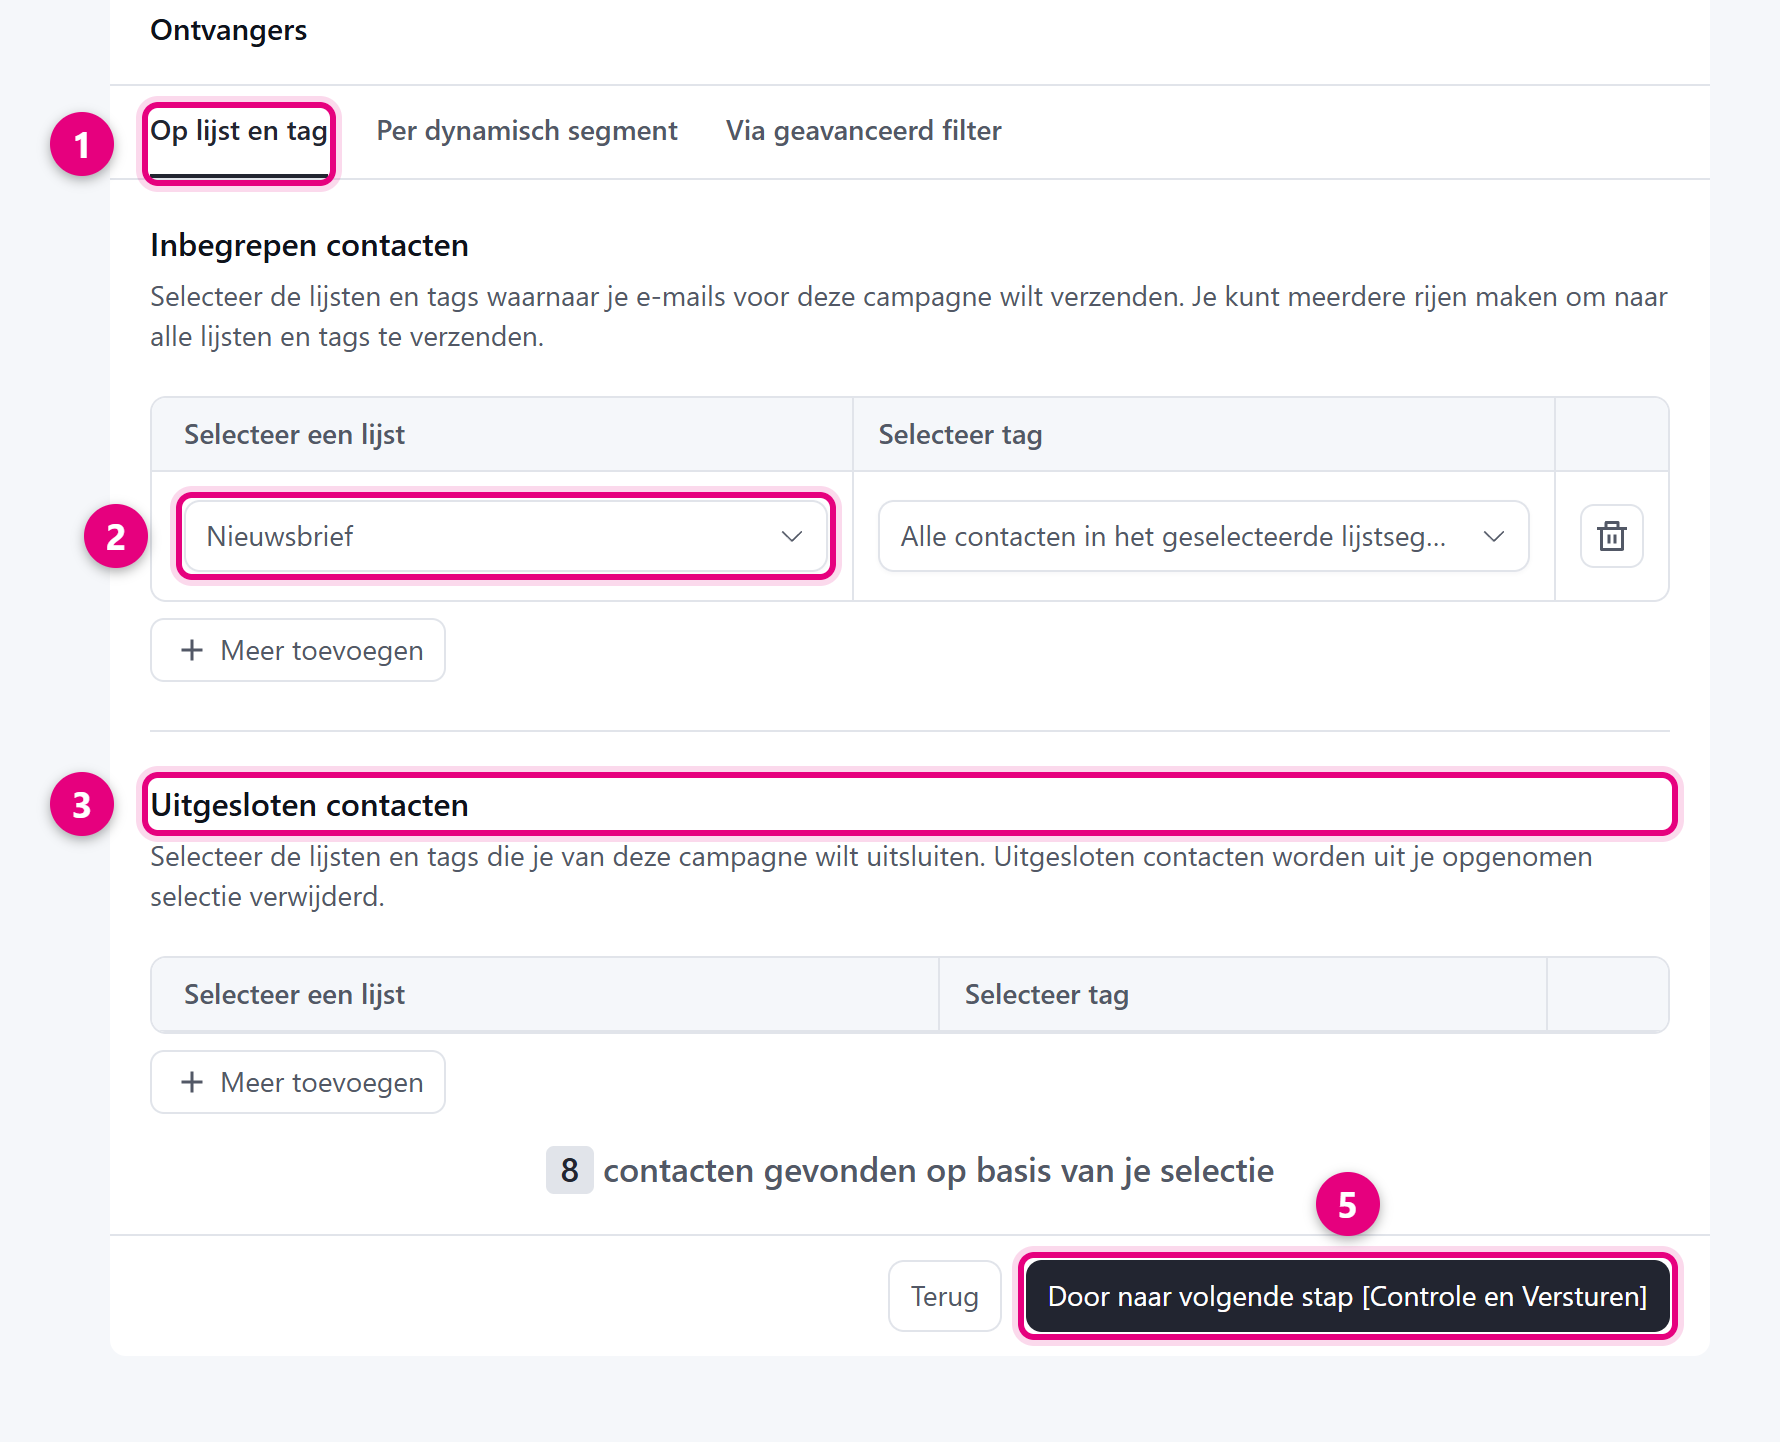
- By list and tag is the ordinary way of selecting. By dynamic segment and With advanced filter are for finer selections, for example everyone who has bought something.
- Under Select a list, choose your newsletter list. Leave the tag at its default value if you want to reach everyone on that list. Add more lets you combine several lists.
- Excluded contacts takes people back out again, for example everyone who has already bought the offer.
- At the bottom you see how many contacts are currently in your selection. If that number does not match what you expect, adjust your selection before you continue.
- Click Continue to the next step [Review and Send].
Step 6: review and send #
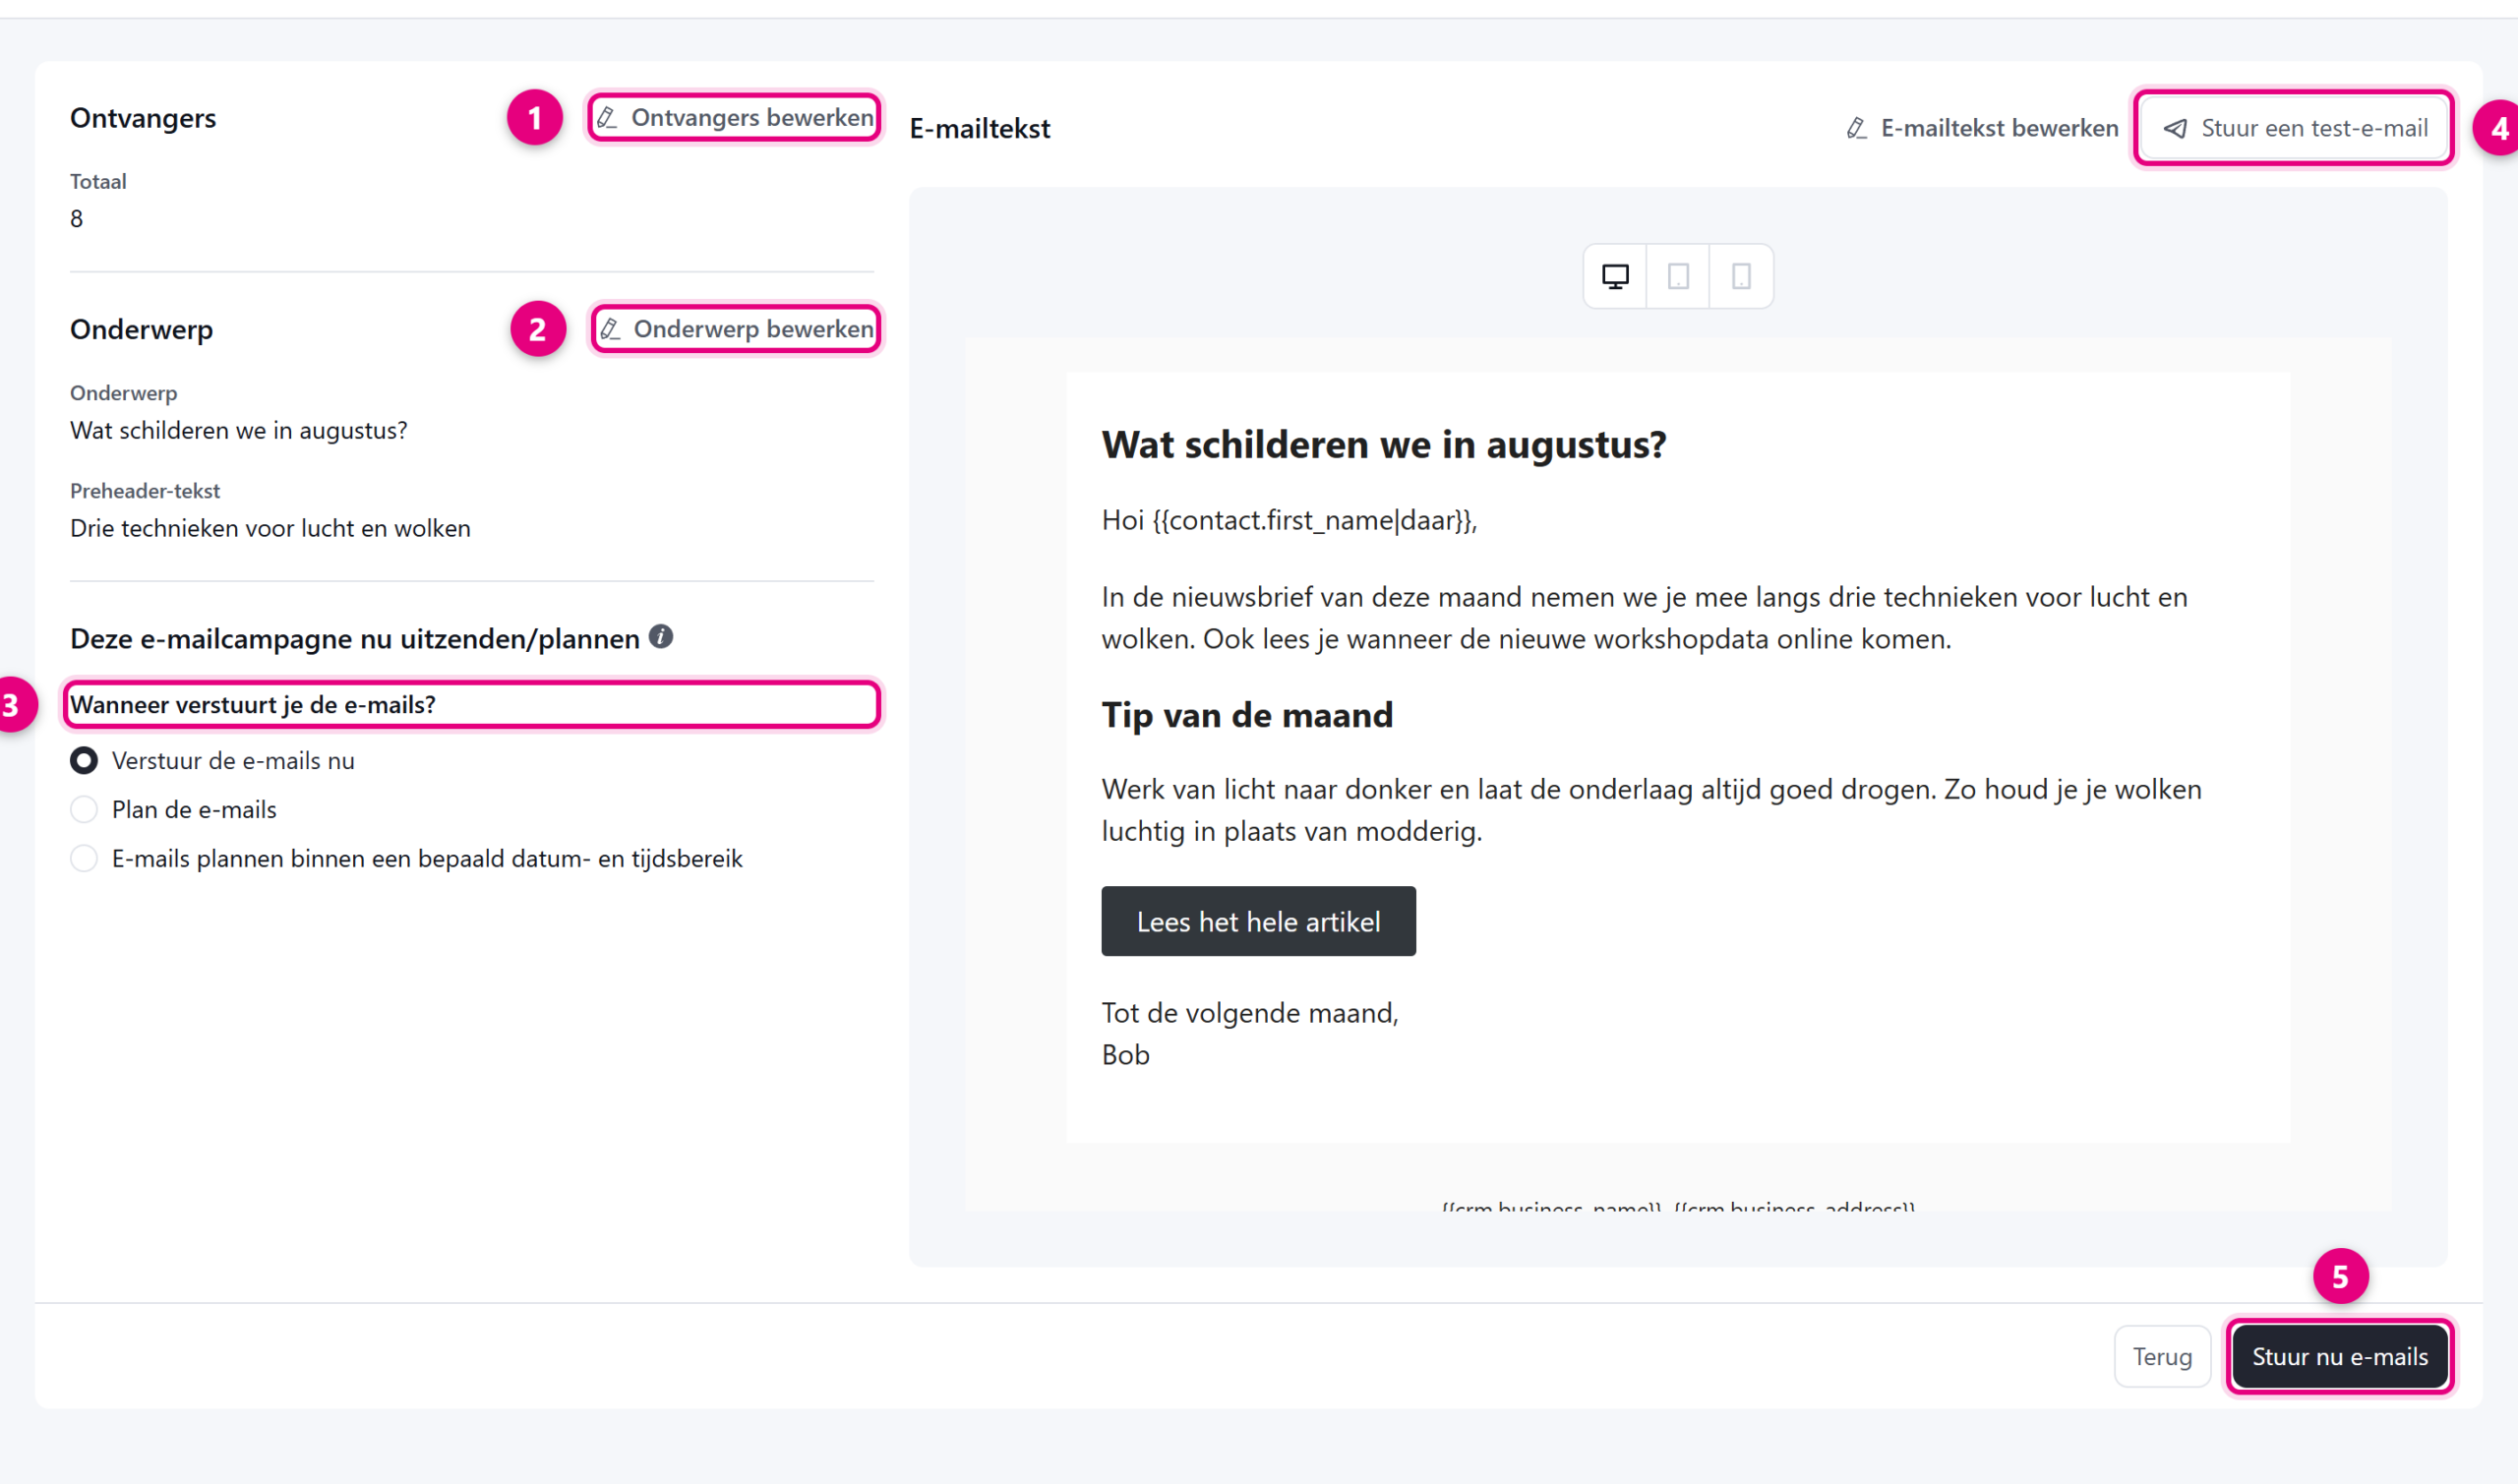
- On the left you see the number of recipients. If it is not right, click Edit recipients.
- Below that are your subject and pre-header, with Edit subject to change them.
- Under When do you send the emails? you choose the moment. Send the emails now sends immediately. Schedule the emails sets it up for a date and time you choose. Schedule emails within a date and time range spreads the send over several hours. That last option is worth using on larger lists, because one big spike is less good for deliverability.
- On the right is a preview of your email, with buttons to switch between the desktop, tablet and phone view. Send a test email lets you send one final test from here.
- Is everything correct? Click Send emails now. If the campaign is scheduled, this button is called Schedule.
Your next newsletter: copy the previous one #
You never have to rebuild the layout. Simply copy last month’s mailing and change only the text.
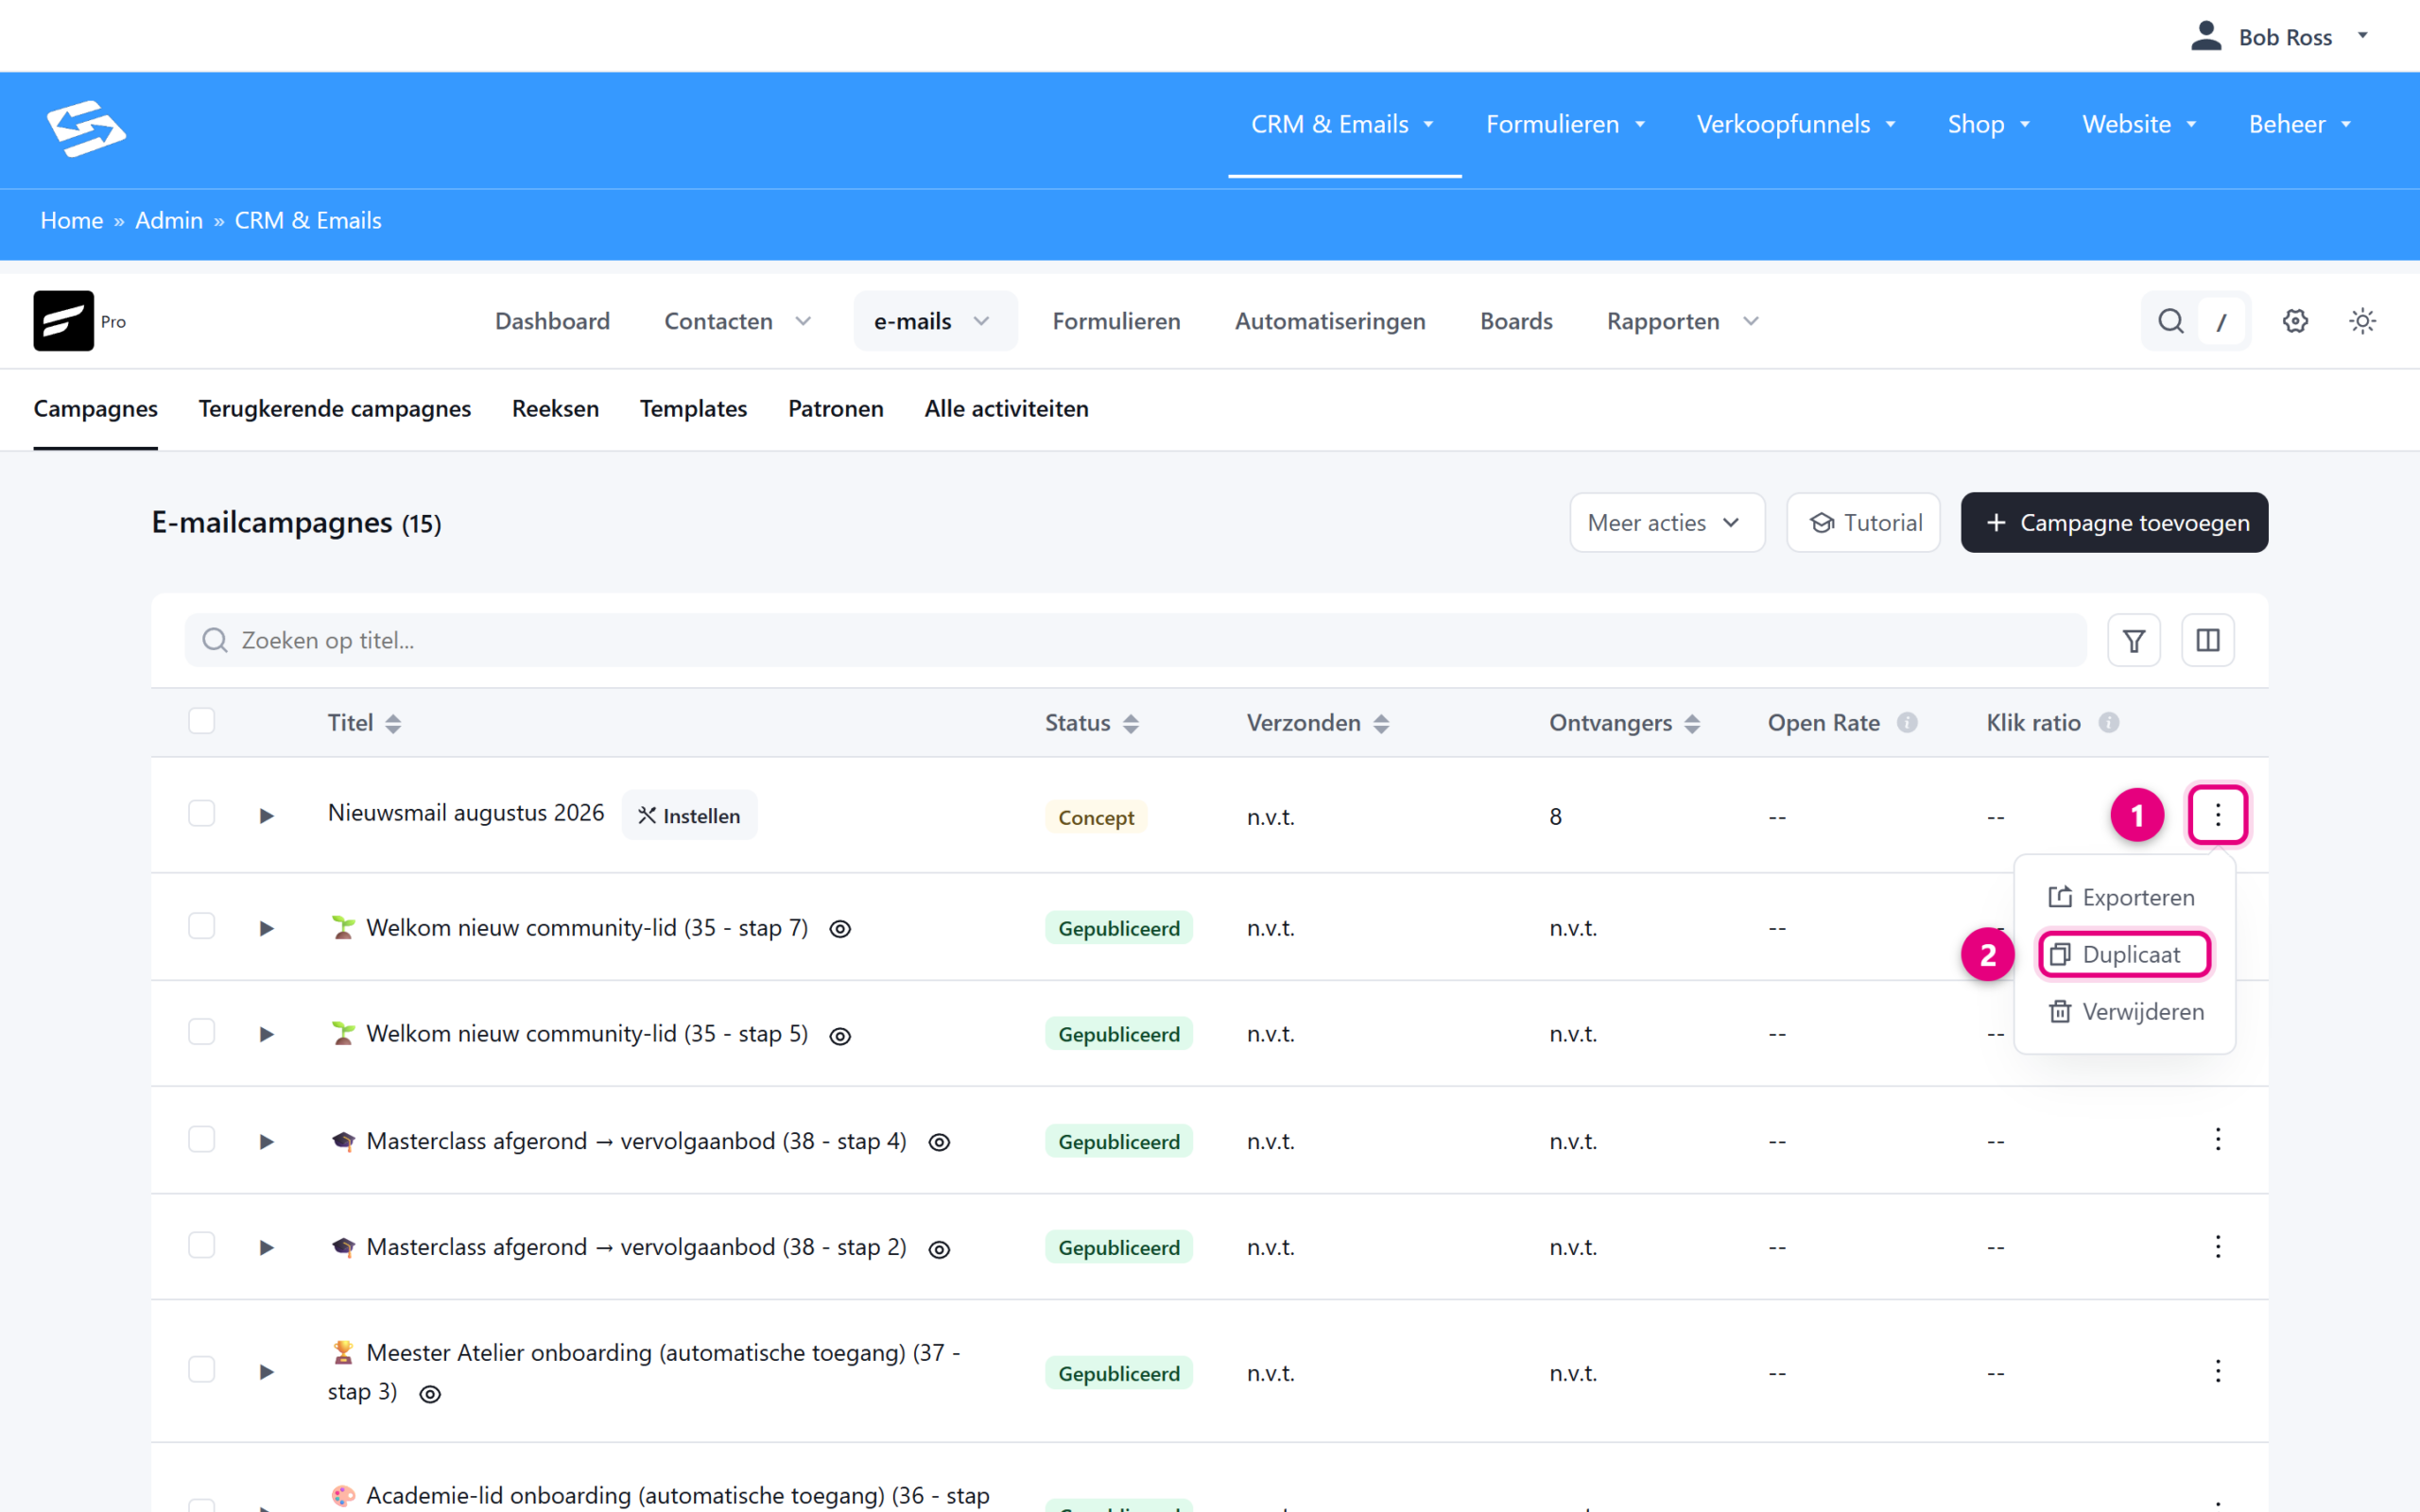
- In the campaign overview, click the three dots on the far right of the campaign you want to reuse.
- Choose Duplicate. You get a new campaign with the same content and layout, as a draft. Give it a new title, adjust your text and subject and work through the four steps again. Export downloads a copy as a file and Delete removes a campaign.
Sending automatically every month #
If you send the same kind of mailing at a fixed moment each time, you can have it repeated with a recurring campaign:
- Go to CRM & Emails → emails → Recurring campaigns.
- Click Add recurring campaign.
- Compose your email and choose your recipients, just as for an ordinary campaign.
- Set the repetition (weekly, monthly or another interval).
- Activate the campaign.
Note: with a recurring campaign the same email goes out every time. If you want different content each month, use an ordinary campaign and copy it each time.
Key points #
- Always include an unsubscribe link. That is a legal requirement. By default it sits in the footer below your email. See Unsubscribe links in email templates.
- Send your newsletter to yourself as a test first. The unsubscribe link does not work in a test email, which is normal.
- Spread the send over several hours on larger lists.
- After sending, review your statistics under CRM & Emails → emails → Campaigns. Click the downward arrow on the campaign and choose statistics. You then see how many people opened the email and what was clicked, among other things.
Frequently asked questions #
Can I schedule my newsletter for a later time? #
Yes. In the final step, choose ‘Schedule the emails’ and set a date and time. The campaign then goes out by itself at that moment.
Where do I specify the email I want to send? #
In the campaign itself. Once you have entered a title and chosen an editor, you go straight into the email. You do not need to create a separate email or sequence for it. To reuse your standard layout, click ‘Import / Use templates’ in the email editor.
What is the difference between a campaign, an automation and an email sequence? #
A campaign is a one-off mailing that you send or schedule yourself. An automation starts by itself as soon as someone does something, such as completing a form. An email sequence is a fixed series of emails sent one after another, which you can start from an automation.
How do I know how many people opened my newsletter? #
After sending, the campaign shows the open and click rate. More detailed figures are under CRM & Emails → Reports.
Can I have a newsletter sent automatically every month? #
Yes, with a recurring campaign. Do bear in mind that the same content is sent every time.


