Would you like control over how your website looks when it is shared on Facebook, LinkedIn, X (Twitter) or other platforms? Within Autorespond you can set this up precisely. These settings also help search engines such as Google understand your brand or person better through the so-called ‘Knowledge Graph’.
In this article we explain where to find these settings and how to use the various options.
Step 1: Navigating to the settings #
To start, go to the right screen in your Autorespond admin area.
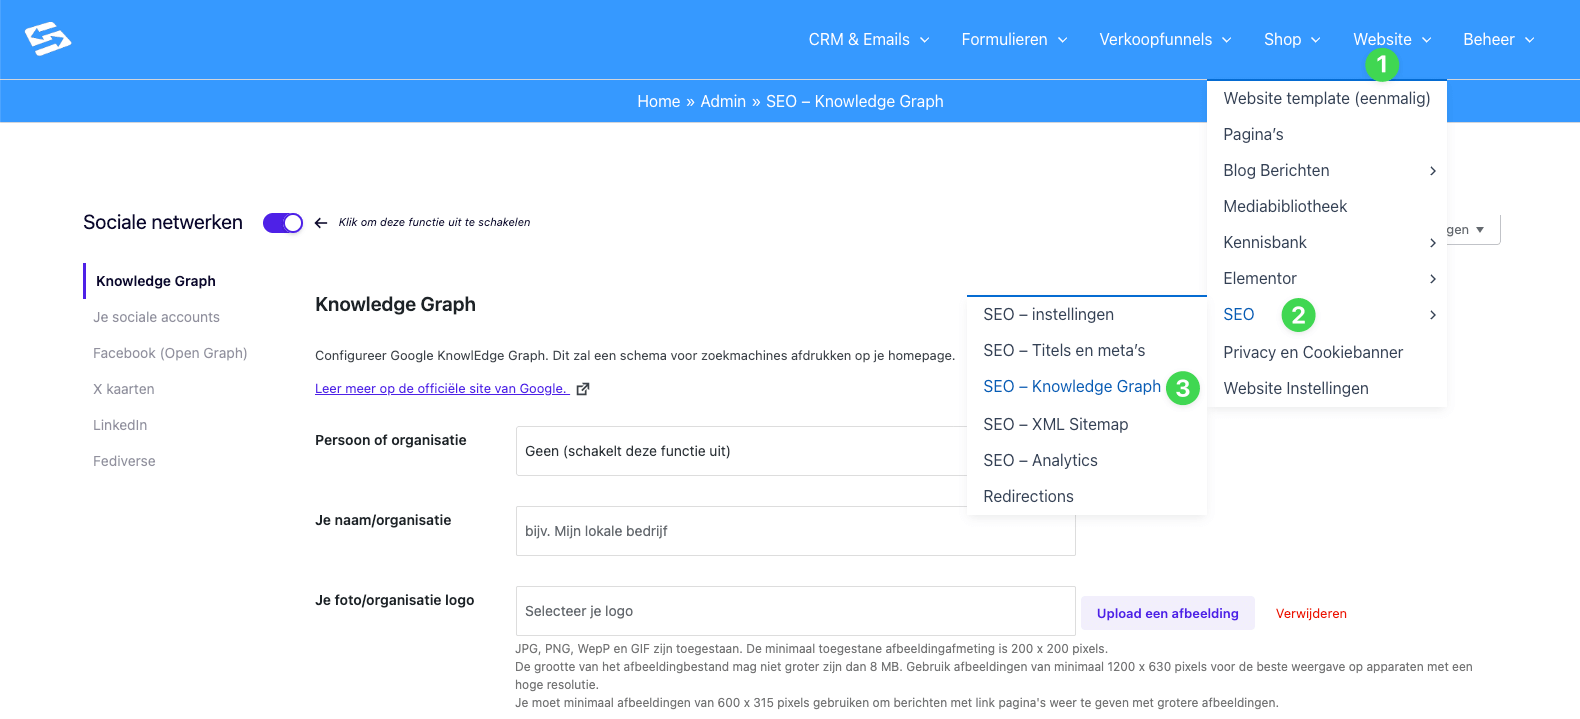
Follow these steps (see the green numbers in the image above):
- In the main menu at the top, click Website (1).
- In the drop-down menu, choose the option SEO (2).
- Then click SEO – Knowledge Graph (3).
You now reach the main screen for the social network settings.
Step 2: Setting up the Knowledge Graph #
The first tab you see is the Knowledge Graph. This sounds technical, but it is actually very simple: with it you tell search engines (such as Google) whether your website belongs to a person or an organisation. Google uses this information to show an information block about you or your organisation on the right-hand side of the search results.
In this screen you can fill in the following:
- Person or organisation: Indicate whether you are a company or a personal brand.
- Your name/organisation: Enter your company name or your own name here.
- Your photo/organisation logo: Upload your logo here.
- Tip: Use an image of at least 1200 x 630 pixels for the best result on all screens.
Step 3: Specific settings per network #
Besides the general Knowledge Graph, you can set specific preferences for each social network. On the left-hand side of the screen you see a menu for navigating through the various options.
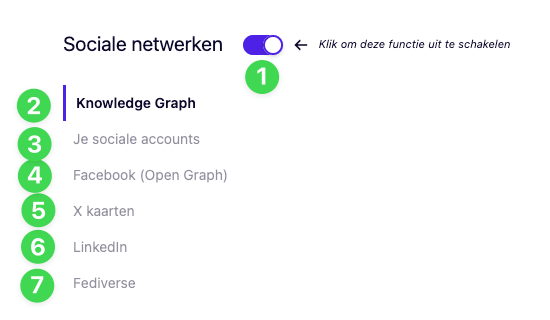
Below we explain what the various menu items (green numbers) mean:
(1) On/off toggle At the top you see a purple toggle. With it you can switch the entire social networks function on or off in one go. Make sure it is switched on to make use of the optimisations.
(2) Knowledge Graph This is the default screen you arrive on (as discussed in step 2). Here you manage the basic details for Google.
(3) Your social accounts Here you can enter the URLs of your profiles on the various platforms (such as your Instagram URL, YouTube channel and so on). This helps search engines link your website to your social media profiles.
(4) Facebook (Open Graph) Here you manage how your links look on Facebook (and other platforms that use ‘Open Graph’ data, such as LinkedIn and WhatsApp). You can, for example, set a default image that is shown when a page has no image of its own.
(5) X cards (Twitter Cards) X (formerly Twitter) uses special “cards” to show link previews. Here you can set whether you want a large image or a small summary to be shown when someone posts your link.
(6) LinkedIn Although LinkedIn often takes over the Open Graph settings (from point 4), you can check specific details for the professional network here.
(7) Fediverse Are you active on the Fediverse (for example Mastodon)? Here you find specific settings to let your site communicate properly with these decentralised networks.
Frequently asked questions (FAQ) #
Why is my new image not shown on Facebook straight away?
Social media platforms store images in their cache. If you have just changed an image in Autorespond, it can take a while before Facebook sees it. You can use the Facebook Sharing Debugger to force Facebook to fetch the new data.
What is the best size for the image I upload?
As indicated in the Knowledge Graph screen, we recommend a size of at least 1200 x 630 pixels. This keeps your image sharp on ‘retina’ screens and makes it large enough to be shown full width in timelines.
What happens if I switch off the toggle at (1)?
Autorespond then stops adding specific meta tags for social media to the source code of your website. When someone shares your link, the platform (such as Facebook) will try to pick a random image and piece of text from your page itself. That often gives a messy result. We recommend always leaving this function switched on.


