Finding your bookings in the Bookings overview (and why the screen looks empty) #
The Appointments module is an optional extension you can add to your Autorespond package. This module lets people book appointments online, comparable to Calendly. More information about this module
As soon as people start booking appointments with you, they all come together in one screen: Bookings. There you can see who booked, when, for which service and what that person filled in while booking. It is also the screen that causes the most confusion, because it opens with a filter that lets only a small part of your bookings through. This article walks you through the whole overview: where it is, how to make everything visible, how to filter and exactly what the detail view of a booking contains.
1. Where the Bookings overview is #
You will find the overview via Manage → Appointments. At the top of the module there is a separate bar with five items: Dashboard, Calendars, Bookings, Availability and, on the right, Settings. Click Bookings. The Dashboard only shows summaries (totals, your next meetings and the most recently booked meetings), whereas Bookings is the full list in which you can search, filter and open the details of each booking.
At the top right you choose how you want to see that list. There are two views: List view (bookings below each other, grouped by date) and Calendar view (the same bookings in a month, week or day calendar). Your choice is remembered, so if you land in the calendar next time while you expect a list, simply click List view again.
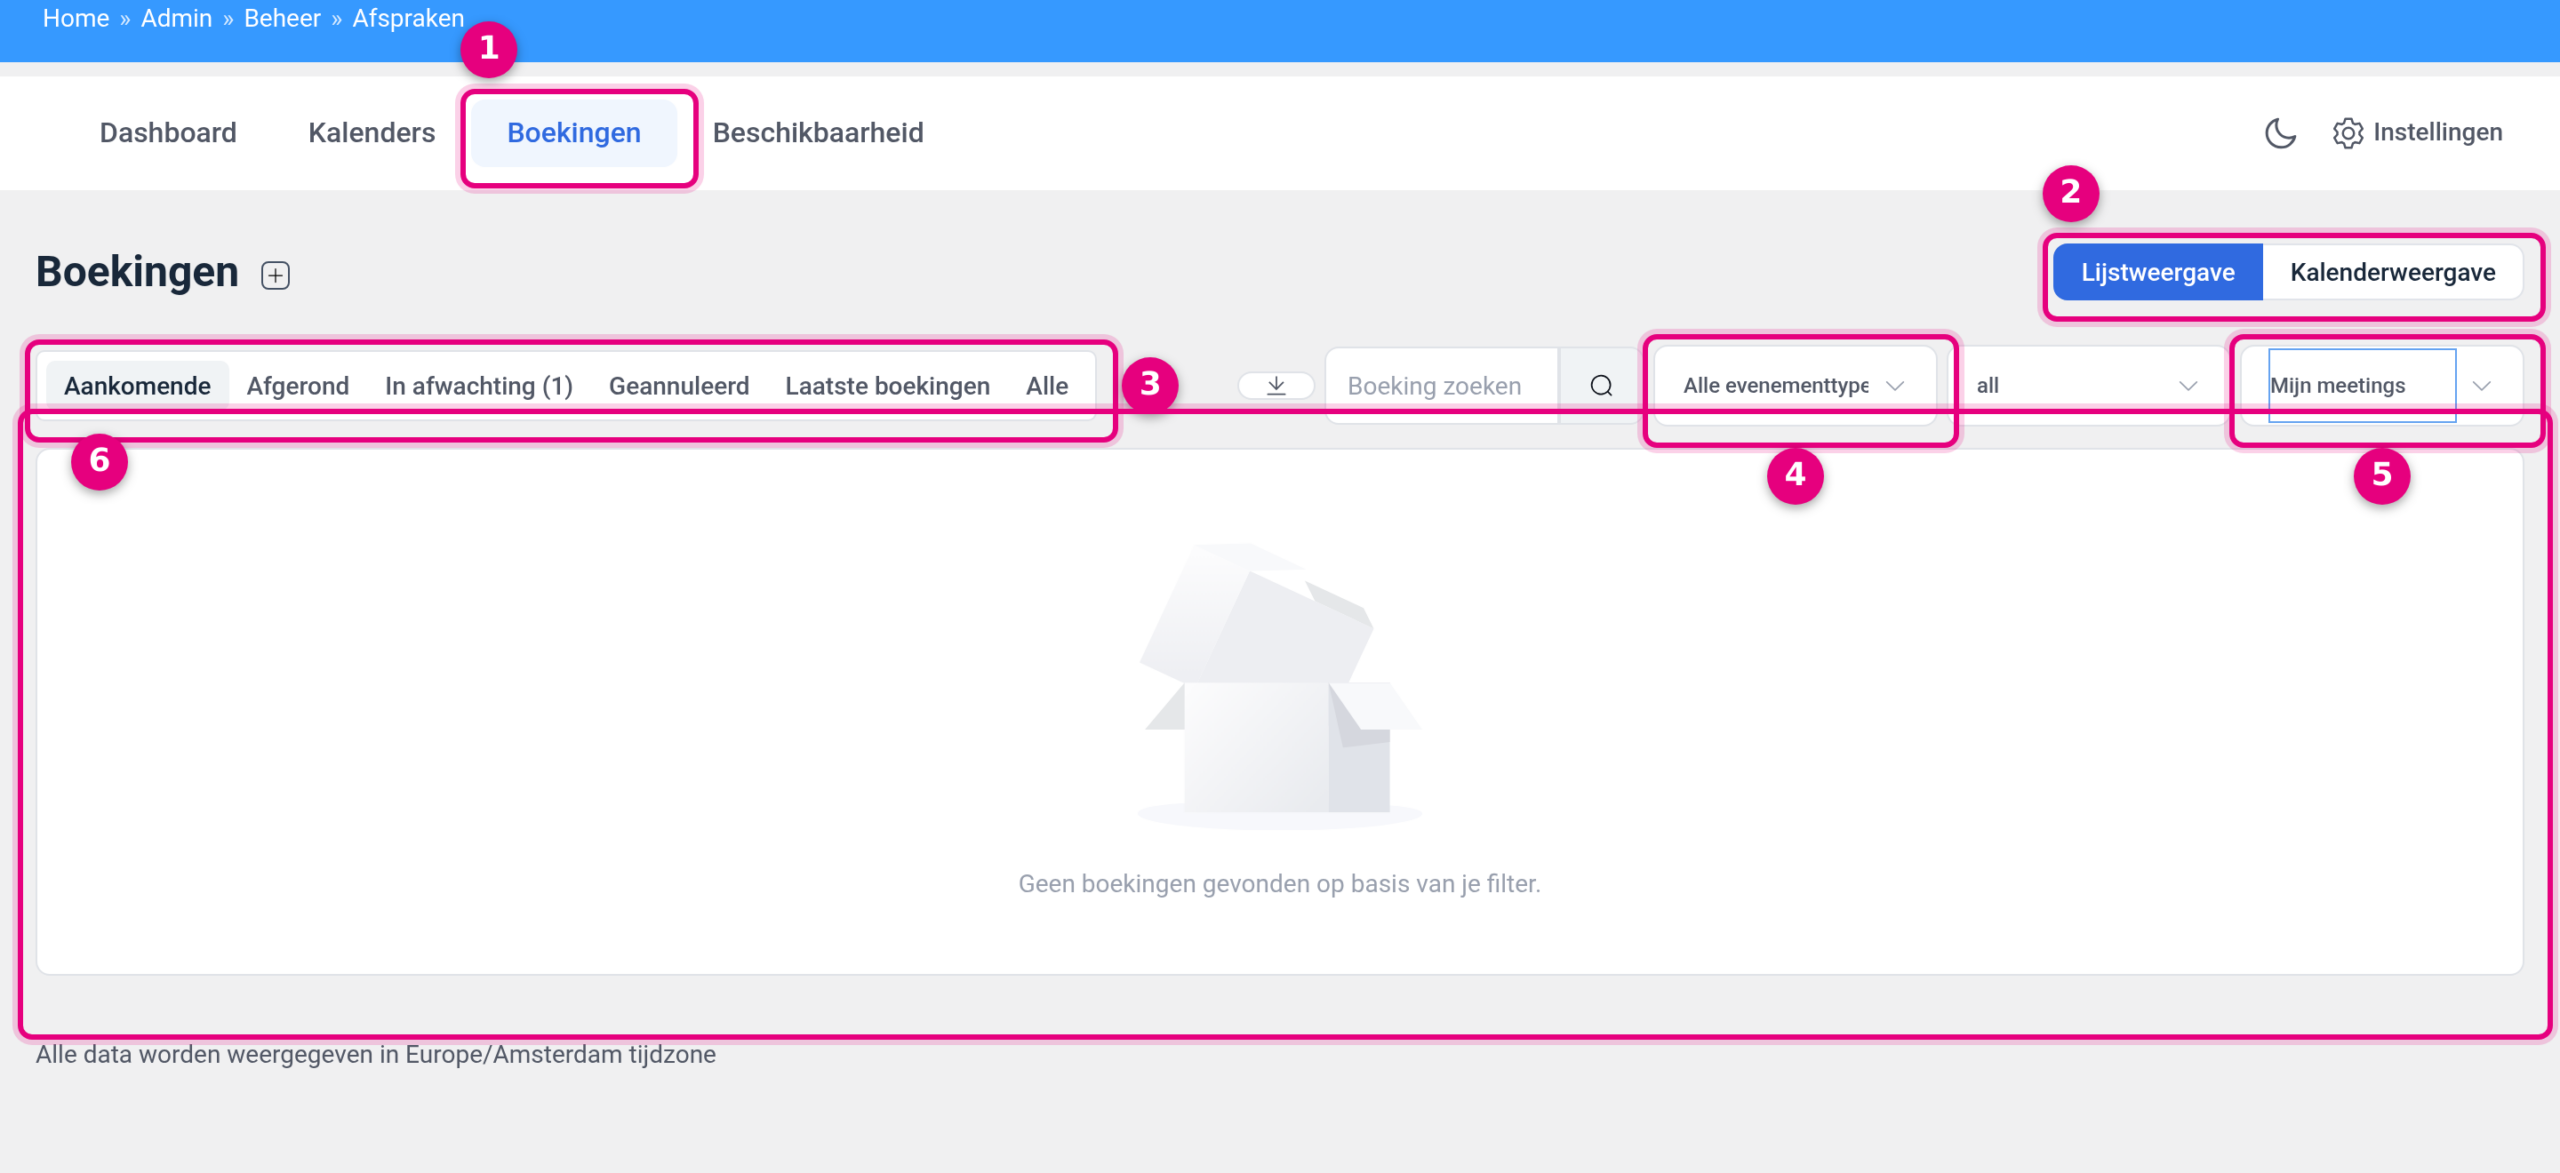
- Bookings in the bar of the Appointments module. Next to it are Dashboard (summaries), Calendars (your hosts and booking types) and Availability (your working hours).
- List view and Calendar view. Use these to switch between the list and the calendar.
- The status filters: Upcoming, Completed, Latest bookings and All. Depending on your bookings, Pending and Cancelled are added.
- The filter on event type, which is set to All event types by default.
- The host filter, which is set to My meetings by default. This field is the cause of almost every “I cannot see my bookings” report.
- The message No bookings found based on your filter. Note the last words: the overview does not say there are no bookings, but that nothing gets through your filters.
2. The pitfall: “My meetings” shows only your own bookings #
The host filter at the top right is set to My meetings by default. That means literally: only bookings for which the user you are currently logged in as is the host. In the Appointments module every booking belongs to a calendar, and every calendar belongs to one user. If someone books a conversation on a colleague’s calendar, on a shared calendar such as a meeting room, or on the calendar that was assigned to another user during setup, then that other user is the host. You may well be the administrator, but you are not the host, so “My meetings” shows nothing.
This is how you change it:
- Go to Manage → Appointments → Bookings.
- At the top right, click the field that shows My meetings.
- Choose All meetings to see the bookings of all calendars together.
- If you would rather look at one calendar, choose the name of that calendar in the same list.
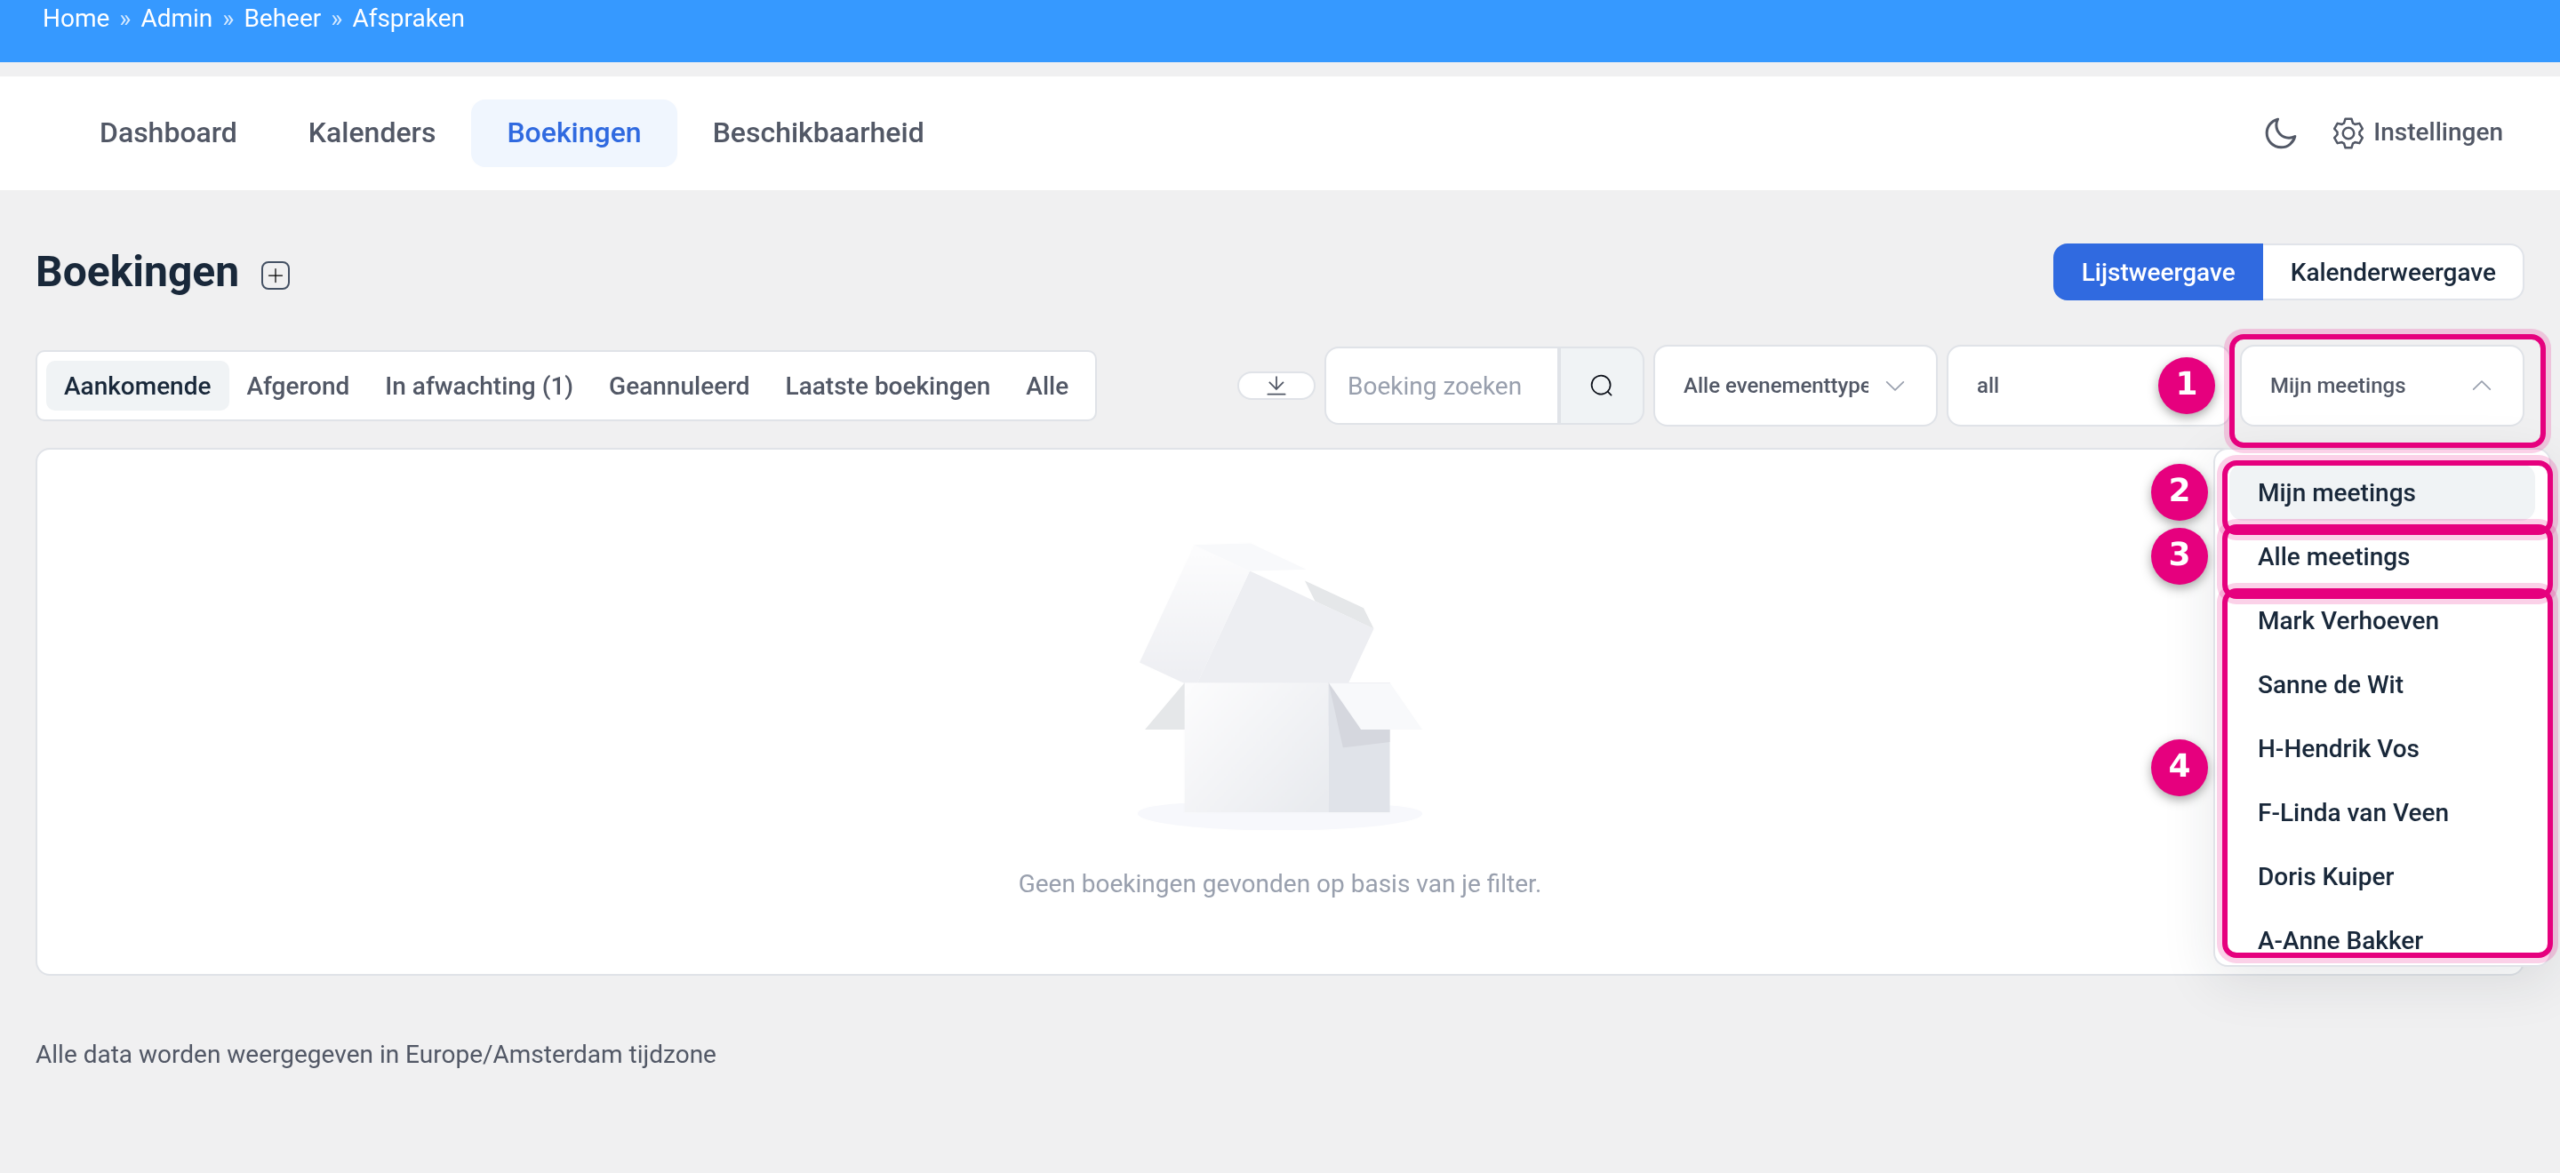
- The host filter. One click on this field expands the list.
- My meetings: only bookings for which you are the host yourself. This is the default setting.
- All meetings: all bookings from all calendars together. This is the setting that guarantees you miss nothing.
- Below that you find each calendar separately, with the name the calendar has in the Calendars screen. Useful when you want to review exactly one calendar.
Two things to remember. The host filter does not keep your choice: if you open the screen again later, it is back on My meetings. And the Dashboard of the Appointments module does count everything, including bookings of other hosts. If you see a sizeable number of bookings on the Dashboard while the Bookings overview looks empty, that is exactly this difference.
Not sure which calendar a service belongs to? Then open Manage → Appointments → Calendars. There you see the name of the host per calendar, with the booking types that belong to that calendar underneath.
3. The status filters: Upcoming, Completed, Latest bookings and All #
The status filters are above the list on the left. They determine which period and which status you get to see:
- Upcoming: all appointments that still have to take place. This is the setting the screen opens with.
- Completed: appointments whose time has passed.
- Latest bookings: the most recently created bookings, regardless of whether they are in the future or the past. Useful for seeing what came in today.
- All: everything together, without distinction.
Two more tabs can appear, and only if bookings of that kind actually exist. Pending appears as soon as there are bookings still waiting for approval or payment, with the number in brackets. Cancelled appears as soon as a booking has been cancelled. So if a tab is missing, that is not a fault: there is simply nothing of that kind at that moment.
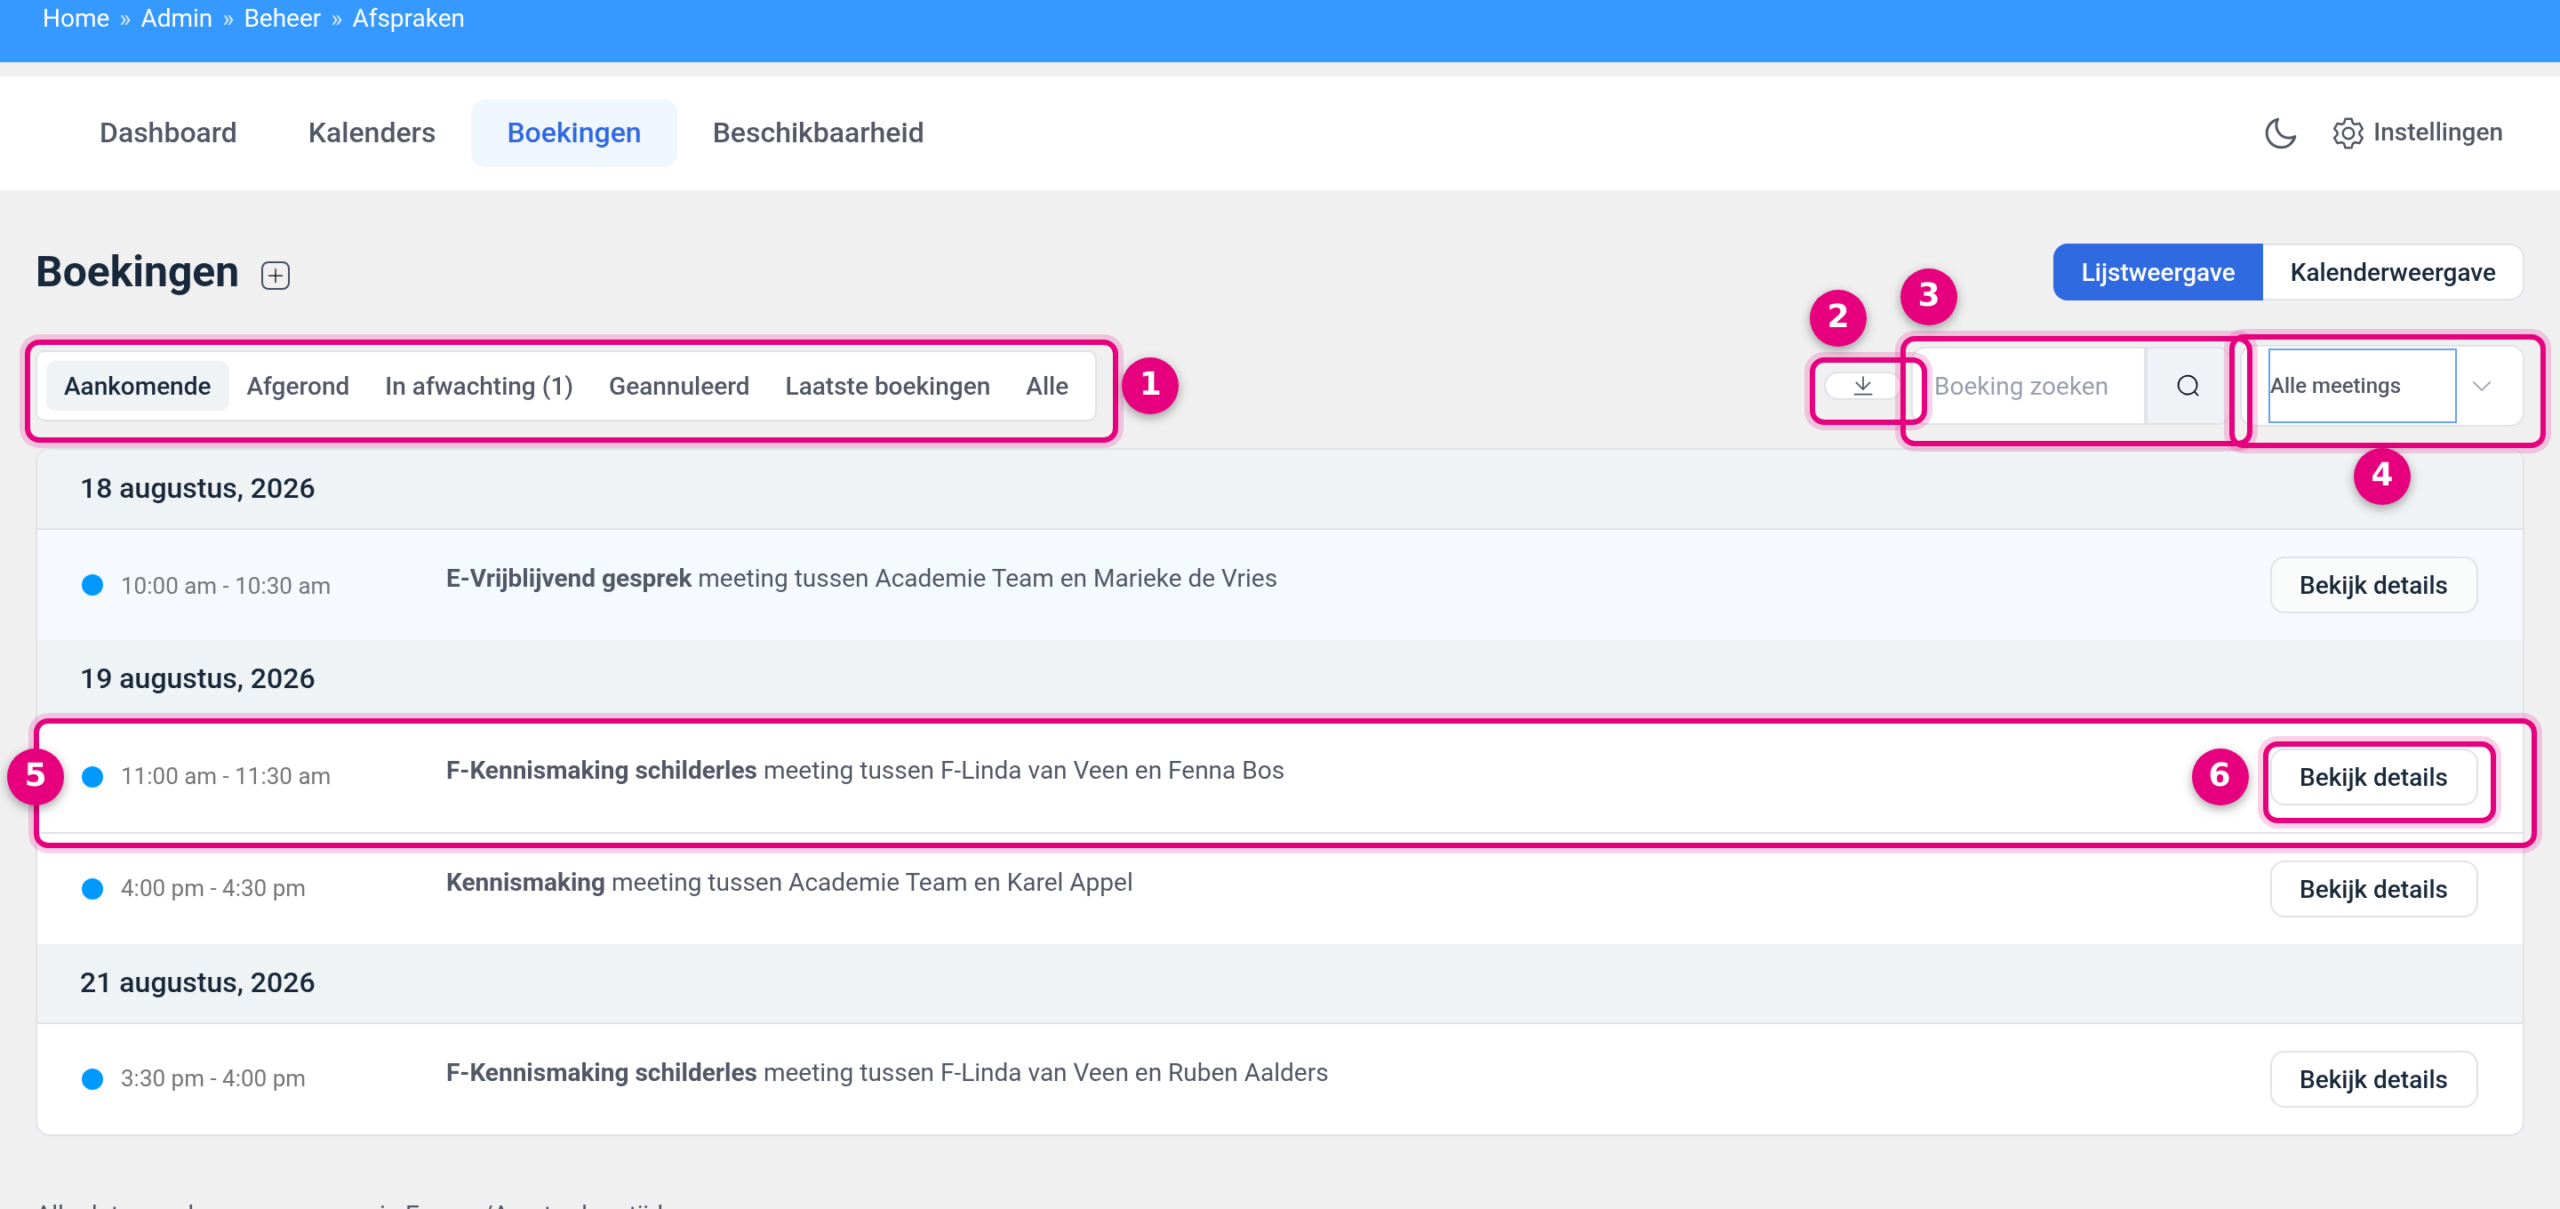
- The status filters. In this example there are six, because there are also pending bookings and one cancelled booking.
- The icon with the downward arrow: Export CSV. This downloads the bookings that pass your filters at that moment as a CSV file, for example to open in a spreadsheet.
- The Search booking field. Type a name or email address here and click the magnifying glass.
- The host filter, here set to All meetings.
- A booking row: the time slot on the left, next to it the name of the booking type and the sentence “meeting between [host] and [attendee]”. That way you can see at a glance who the appointment belongs to. The coloured dot in front is the colour set for that booking type.
- The View details button, which opens the full booking.
4. Filtering by event type (and why that filter sometimes disappears) #
Next to the host filter there is a filter on event type. That is not about the name of your service, but about the kind of appointment. The choices are: All event types, One-on-one, Group, Round robin and Collective. This lets you bring up only your group sessions in one click, for example.
Important to know: this filter is only visible when the host filter is set to My meetings. If you choose All meetings or one specific calendar, the event type filter disappears and only the host filter remains. So if you want to filter by kind of appointment, first set the host filter back to My meetings.
With My meetings there is a third selection field in between. In it you choose one of your own booking types, for example only your introductory calls. If the user you are logged in as has no booking types, that field stays empty and shows the technical value all. That is an untranslated part of the module and otherwise harmless: it simply means there is nothing to choose.
5. What you see under “View details” #
Click View details on a booking and you get to see the full booking. On the left a small list with the surrounding bookings stays in place, so you can jump to the next appointment with one click. At the top there is a coloured bar with the summary: the booking type, the sentence “meeting between [host] and [attendee]”, the date and time, and on the far right the status (Scheduled, for example).
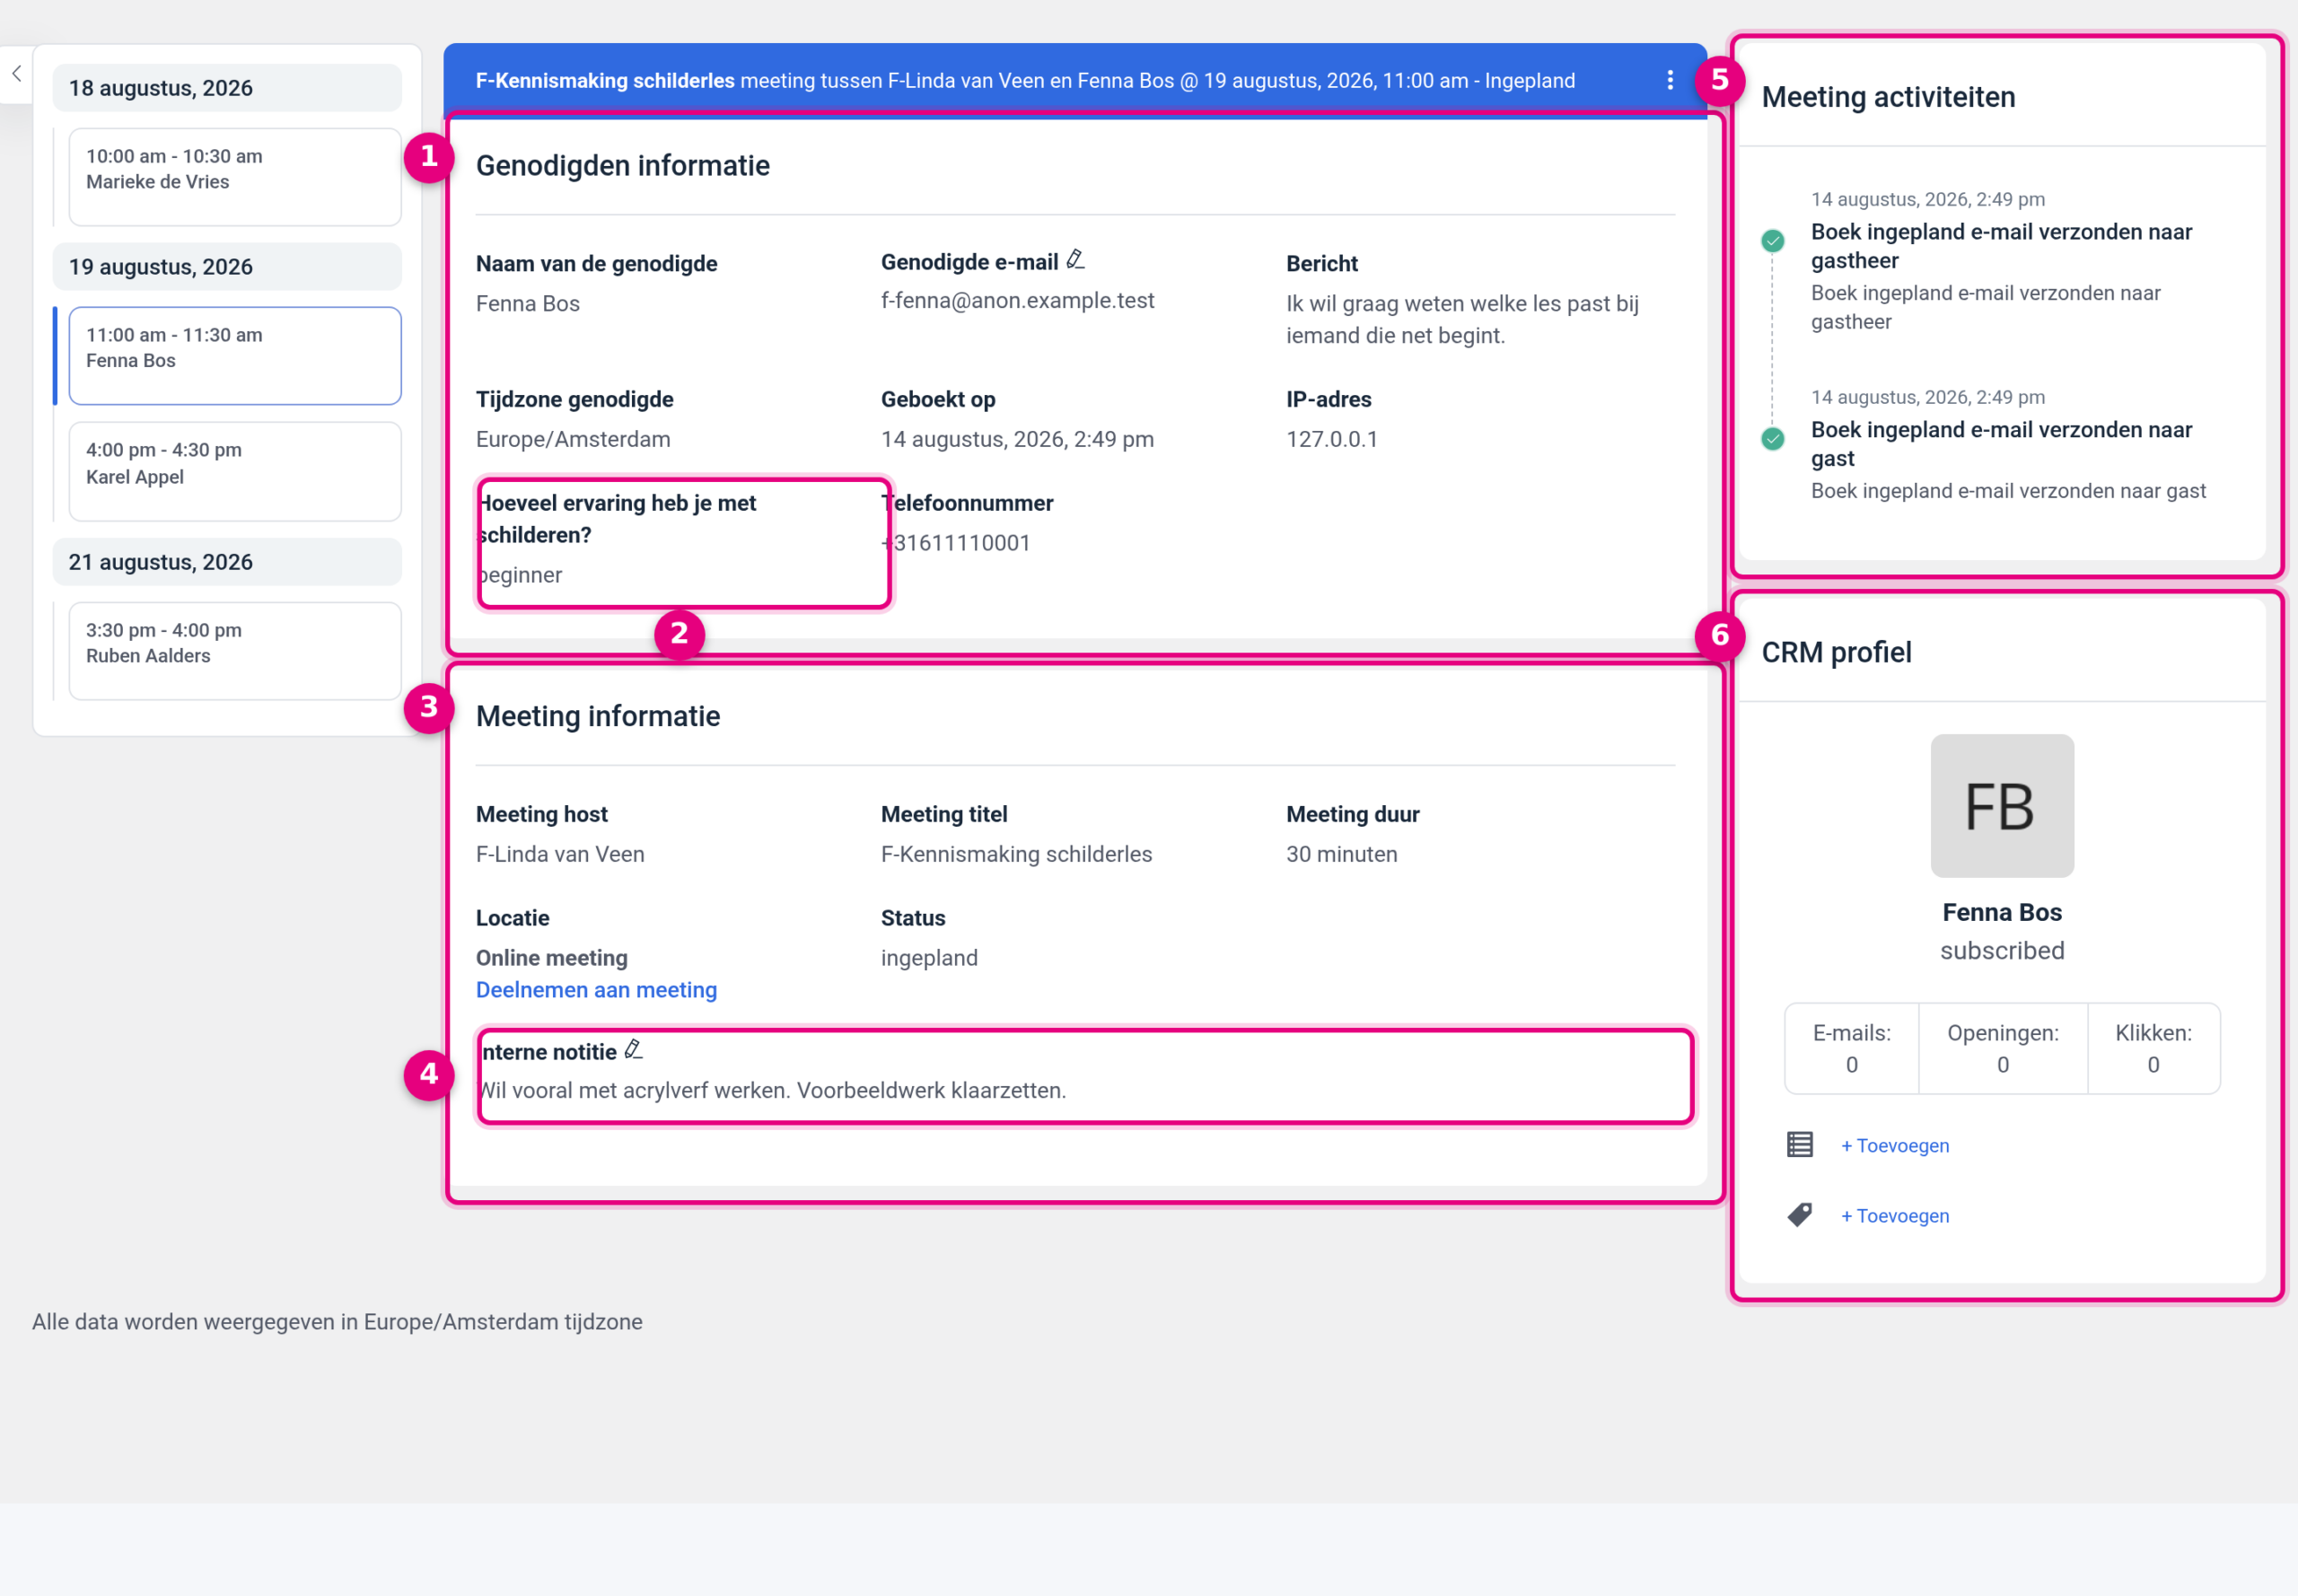
- Invitee information: everything the attendee filled in. By default these are Invitee name, Invitee email, Message (the reason or question supplied while booking), Invitee time zone, Booked on (the moment the booking was made) and IP address. Behind the email address there is a small pencil with which you can correct the address if someone made a typing mistake.
- Below that you find the answers to your own booking questions, each with the question as a heading and the answer underneath.
- Meeting information: the details of the appointment itself. Meeting host (the owner of the calendar), Meeting title (the name of the booking type), Meeting duration, Location (with the join link underneath if it is an online meeting) and Status.
- Internal note: a text field that only you and your colleagues see. Click the pencil to type. Use this for what you want to remember before or after the conversation, for example which material you need to prepare or what you agreed. The attendee sees none of this and it does not appear in the confirmation email either.
- Meeting activities: a timeline of what happened around this booking, with the date and time on each line. Among other things, you can read back which emails were sent, to the guest and to the host. Useful when someone says they did not receive a confirmation.
- CRM profile: the contact that belongs to this email address in your CRM. You see the name, the status of the contact and the counters for Emails, Opens and Clicks. With the two + Add buttons you put this contact on a list or give it a tag straight away, without having to leave the screen. If this block is not there, no CRM contact with that email address exists yet.
6. Finding the answers to your booking questions #
If you added extra questions to a booking type, for example a telephone number or a question about the attendee’s prior knowledge, the answers do not end up in a separate screen. You find them in the detail view of the booking, at the bottom of the Invitee information block, directly below the fixed fields. Each question is shown with the exact text as you set it, with the answer underneath.
This is how you get there in three steps:
- Set the host filter to All meetings or to the calendar that was booked, so that the booking appears in the list.
- Look up the booking by name or email address via Search booking, or browse to the right date.
- Click View details and read the answers under Invitee information.
If you want to see the answers of several bookings side by side, use the Export CSV button above the list. The export follows your current filters, so set the host filter and the status filter correctly before you export.
7. The Calendar view #
At the top right you switch to a calendar with Calendar view. There you see the same bookings, but in their place in the month, week or day. That works well when you want to see how full a week is or where there is still room. The host filter and the search field keep working, so the same applies here: if your calendar is empty, first check whether the host filter is set to All meetings.
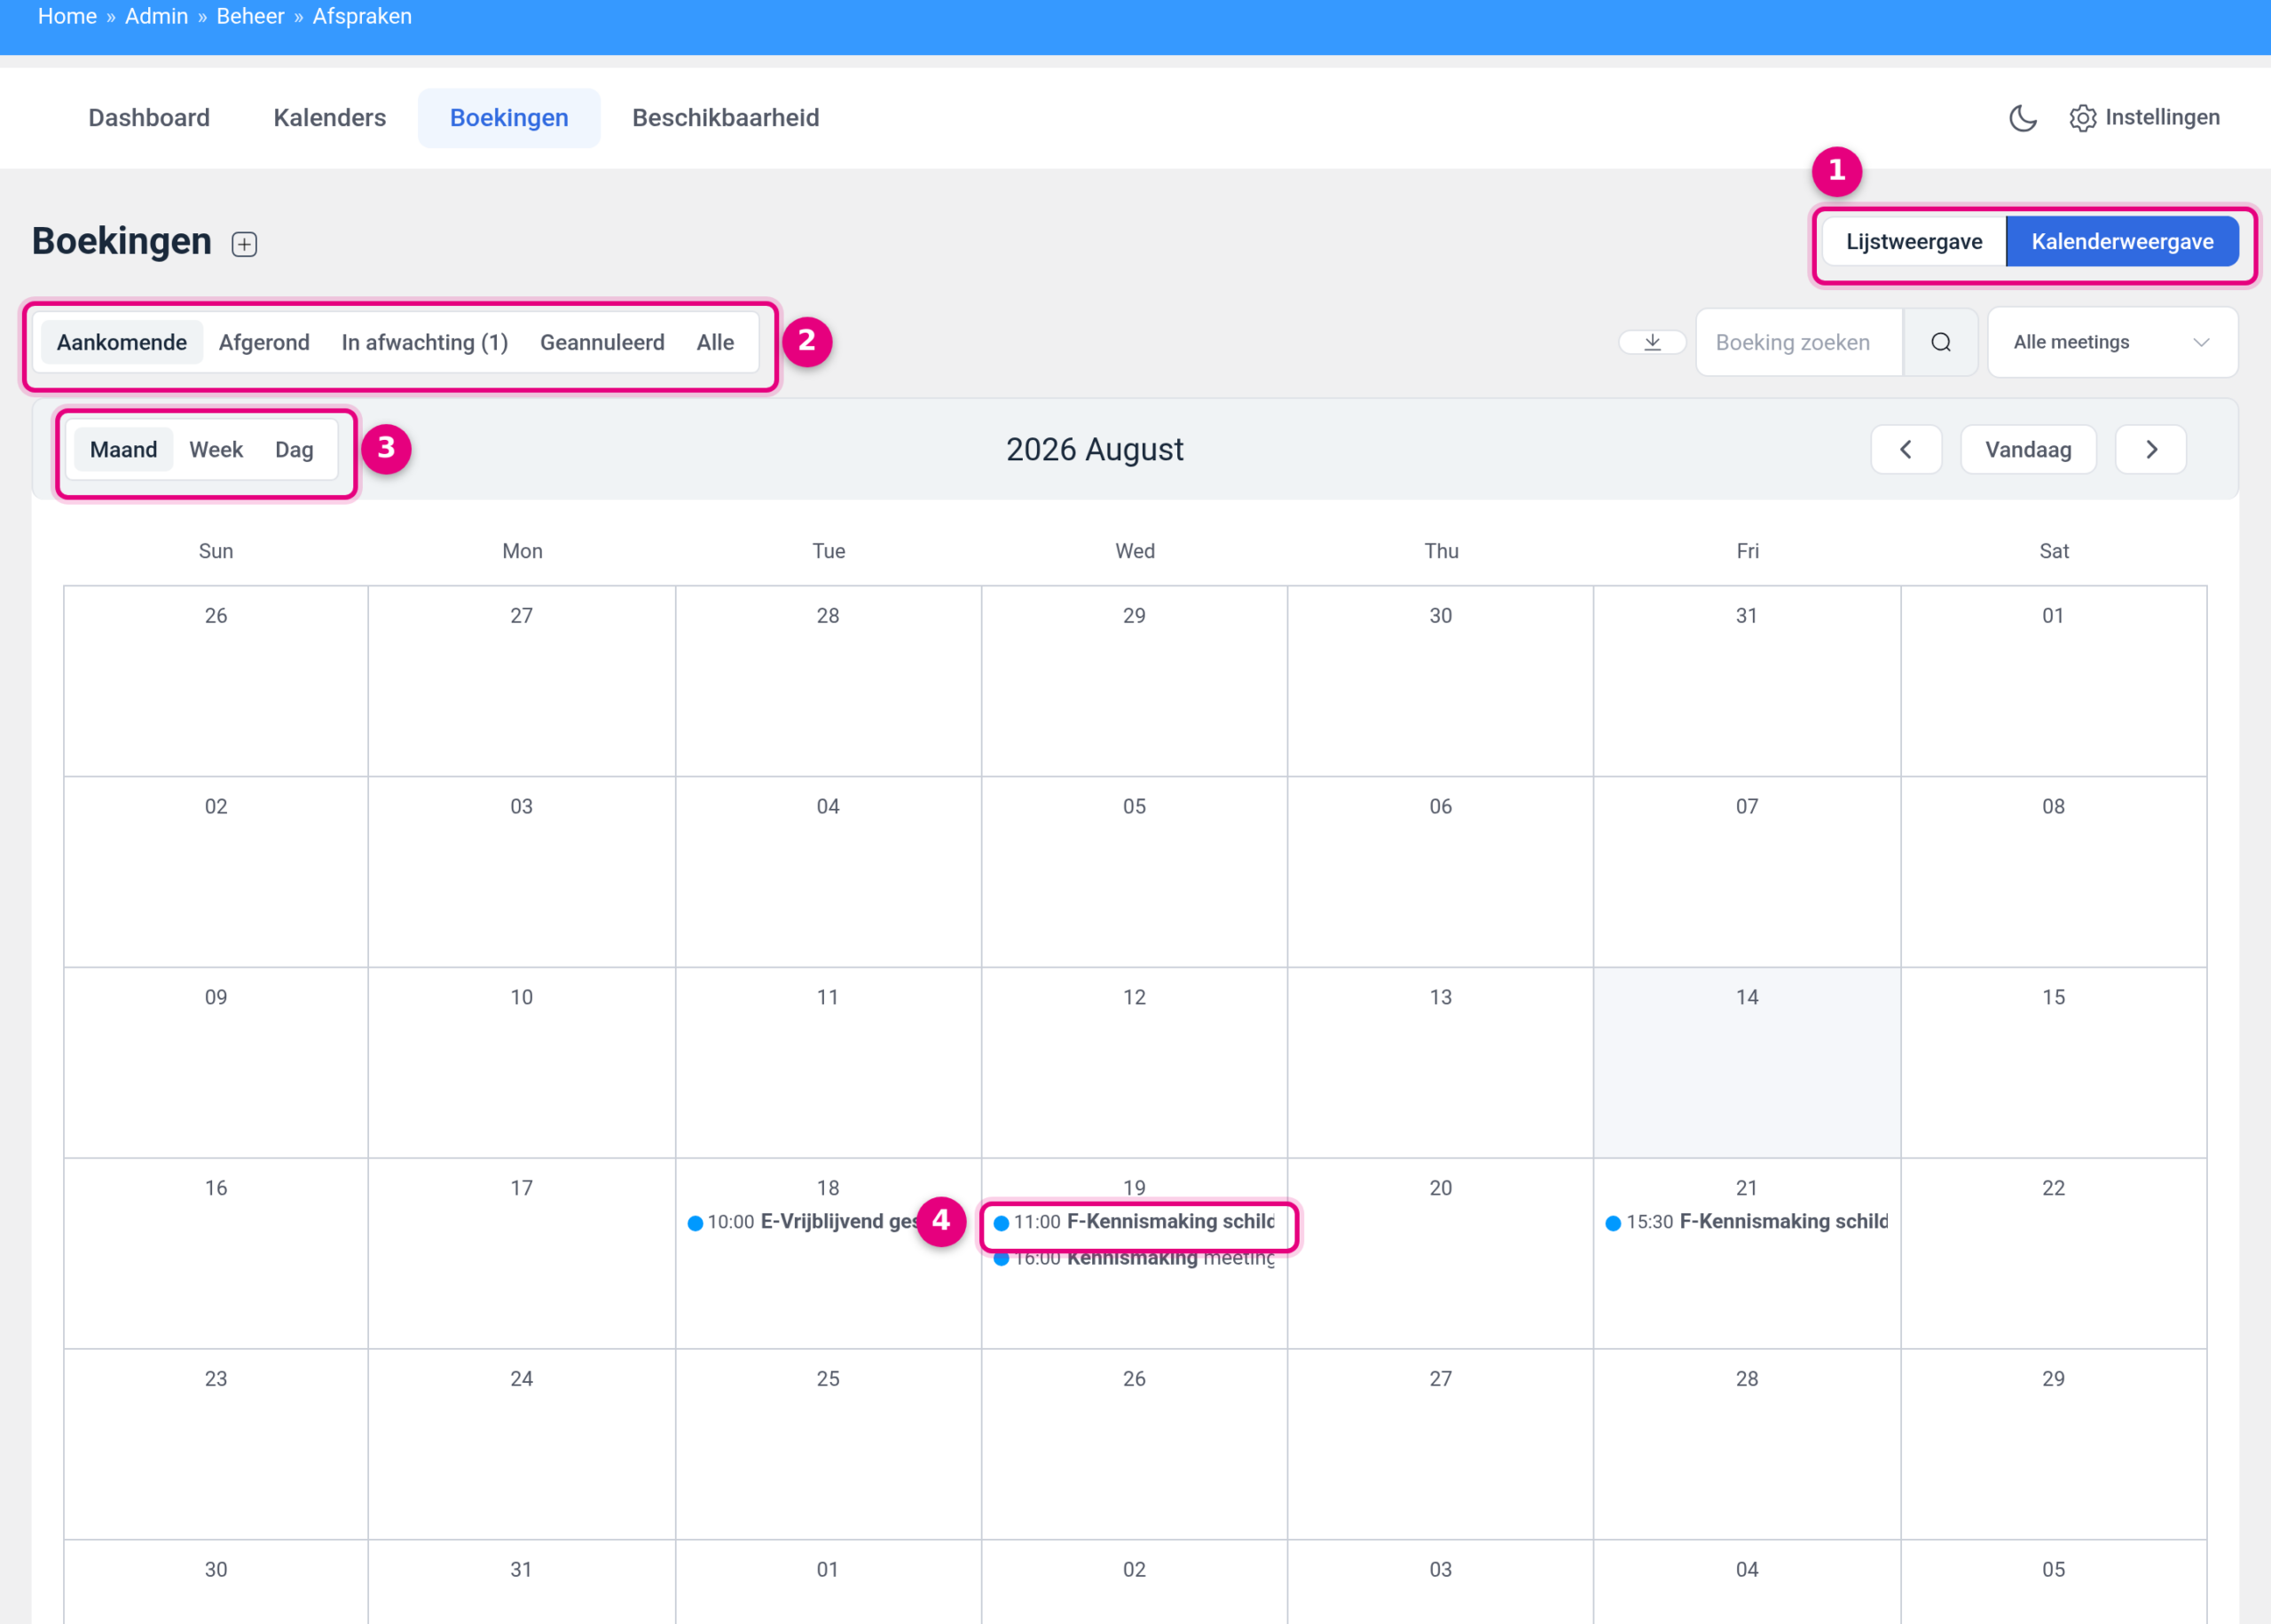
- The Calendar view button. With List view next to it you go back to the list.
- The status filters. Latest bookings is missing in the calendar, because a calendar works by date and not by the moment of booking.
- Month, Week and Day. On the right in the same bar are the arrows for browsing and the Today button to jump back to the current period.
- A booking in the calendar, with the start time and the name of the booking type. Click it to open the detail view.
One thing stands out in this screen: the month name and the day abbreviations are in English (Sun, Mon, Tue and so on). That is a part of the module that has not been translated yet. It has no effect on your bookings or on what your attendees get to see.
8. Good to know #
- A cancelled booking does not disappear. It leaves Upcoming and moves to the Cancelled tab, which only appears once such a booking exists. You can still open the booking as usual, including the timeline under Meeting activities.
- A completed booking is kept as well. As soon as the end time has passed, the appointment moves from Upcoming to Completed. All details remain, so months later you can still look back at what someone filled in.
- All times are shown in the time zone of your environment. At the bottom of the overview you can see which one that is. The time zone the attendee used is shown in the detail view under Invitee time zone.
- The connection with your CRM makes sure that anyone who books with you is created as a contact automatically, so that you can then tag them, put them on a list or include them in an automation. How to set that up is described in Connecting appointments to the CRM: creating contacts automatically on a booking. The CRM profile block in the detail view is where you see the result.
- If you cannot find a booking anywhere, not even under All meetings and on the All tab, check in the host filter whether the calendar that was booked is still listed. If that calendar is missing from the list, it has been disabled or deleted and you can no longer find the related bookings through that filter either.
Related articles #
- Creating your first calendar and booking type in the Appointments module
- Sharing your booking link: one service or all your services on one page
- Setting your availability: working hours, buffers, minimum notice period and daily maximum
- Setting up confirmation and reminder emails for your appointments
- Adding appointments manually in the Appointments module
- Connecting appointments to the CRM: creating contacts automatically on a booking
- Setting up group events in the Appointments module
- Making several meeting rooms bookable with a maximum capacity
- Setting up multiple booking durations in the Appointments module
- Setting up paid appointments with automatic checkout
- Connecting Zoom to the Appointments module for automatic meetings
- Connecting your calendar to the appointment scheduler


