Customising the booking form: which questions your customer is asked #
The Appointments module is an optional extension you can add to your Autorespond package. This module makes it possible to have appointments booked online, comparable to Calendly. More information about this module
Anyone who books an appointment with you fills in a name, an email address and a short explanation by default. For many conversations that is just a little too little: you also want a phone number in case the online connection falters, the name of the company, or you want to ask about the subject in your own words. You arrange that per booking type in the Question settings tab, without having to change anything on your website. This article shows you where that screen is, how to edit or hide an existing question, how to add questions of your own and where the answers end up afterwards.
1. Where the booking questions are #
The questions belong to one booking type, so to one service. If you have an introductory call and an advice session, you set the questions for both separately. This is how you reach the right screen:
- Go to Manage → Appointments in the menu.
- Click the Calendars tab at the top. You see a block per host with the individual booking types below it as cards.
- On the card of the service you want to change, click the Edit button.
- Click Question settings in the menu on the left.
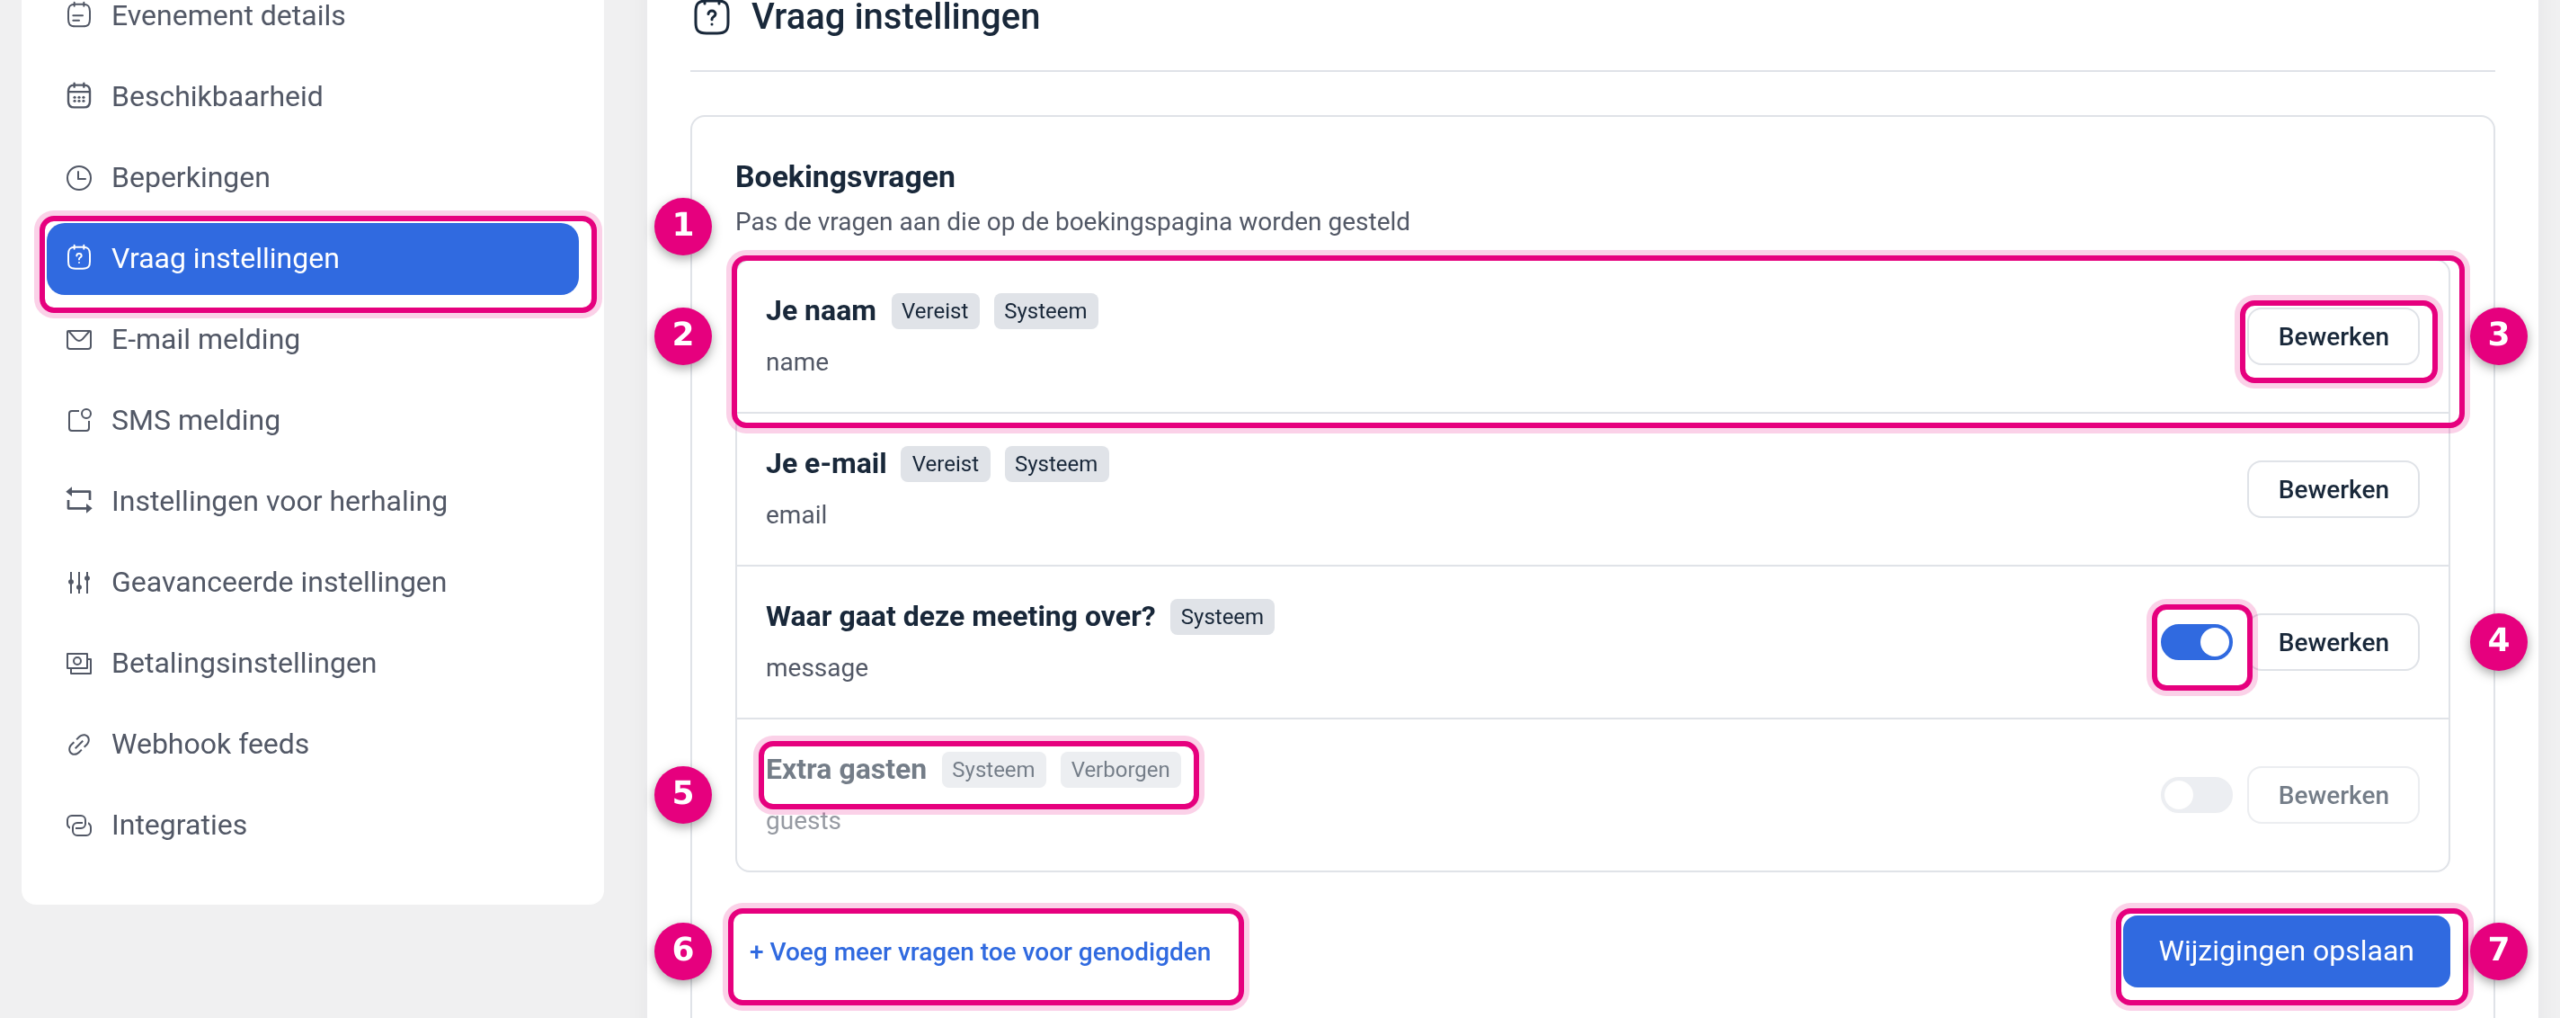
- Question settings. The tab in the left-hand menu of this booking type. Everything you change here applies only to this one service. Your other booking types keep their own questions.
- The question itself. In bold is the label your visitor gets to see. After it come the markers: Required means the field is required, System means it is a fixed field of the module. In grey underneath is the technical name of the field, here
name. That name stays the same, even if you change the label. - Edit. This opens the window in which you change the label, the placeholder text, the help message and the Required setting.
- The visibility toggle. When the toggle is on (blue), the question appears on the booking form. Switch it off and the question disappears from the booking page while you do keep it. With Your name and Your email you do not see this toggle: those two are always visible and always required.
- Additional guests. This question is off by default and therefore carries the marker Hidden. Switch the toggle on and your visitor can add extra email addresses while booking, which then receive the invitation.
- + Add more questions for invitees. This is how you create a question of your own, for example a phone number or a company name.
- Save changes. The final step of every change on this screen. If you do not save, your change will not be on your booking page tomorrow.
- Your name (technical name
name). Required and always visible. The module uses this name in the confirmation email and in your calendar. - Your email (
email). Required and always visible. The confirmation, the reminders and any change go to this address. - What is this meeting about? (
message). A multi-line input box in which your visitor can set out the subject. You may hide this question with the toggle, and you may put the label into your own words. - Additional guests (
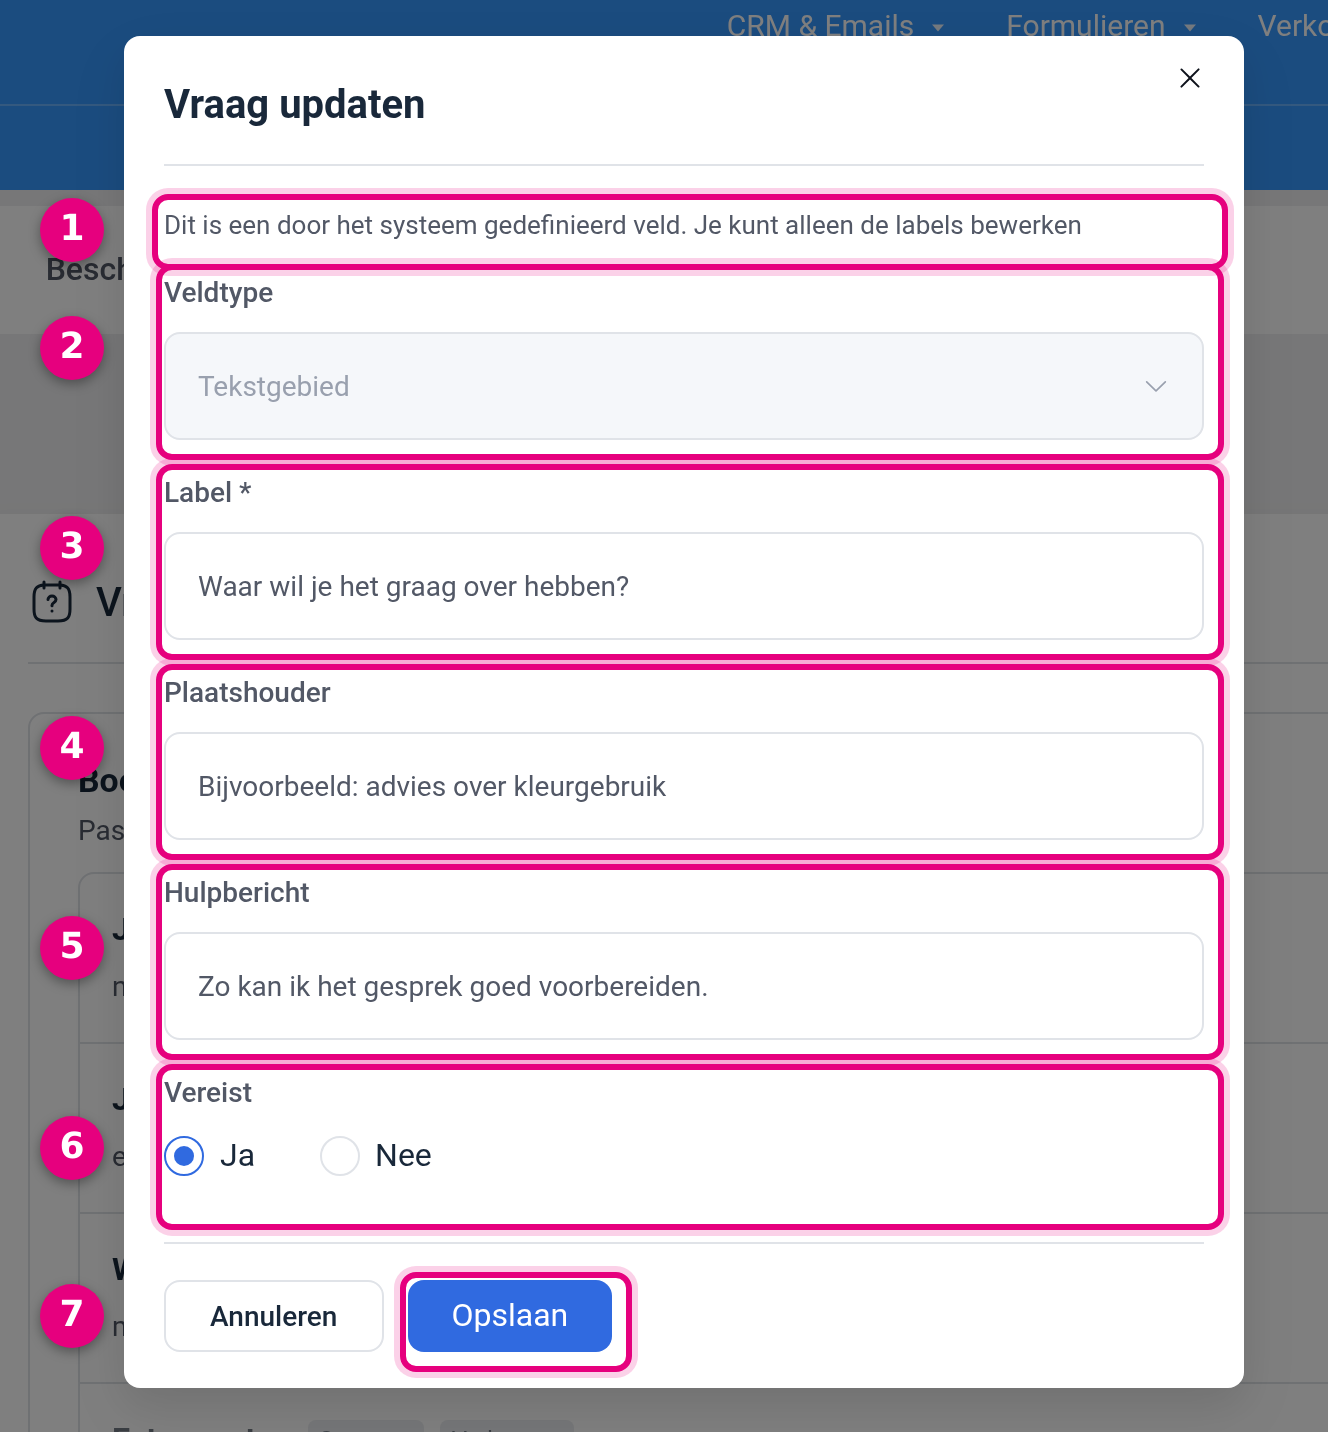
guests). Off by default. Switching it on makes sense if several people regularly join a conversation. - The notice on system fields. “This is a system defined field. You can only edit the labels.” You do not see this notice on questions of your own.
- Field type. Shown in grey and not editable. For this question it is Textarea: a multi-line input box. For your own questions too, the field type is fixed as soon as the question has been created.
- Label. The text your visitor reads above the input box. Here “What is this meeting about?” has been replaced by “What would you like to discuss?”. A label may not be left empty, hence the asterisk.
- Placeholder. The light example text inside the empty input box, which disappears as soon as someone types. Useful for giving an example answer. Not every field type has this option.
- Help message. A short explanation that stays in italics below the field, also while typing. Use this to explain why you are asking something.
- Required. Choose Yes to make the field required: your visitor then cannot complete the booking without an answer. Choose No to leave it optional.
- Save. This closes the window. Then also click Save changes on the main screen, otherwise your change is gone again after a reload.
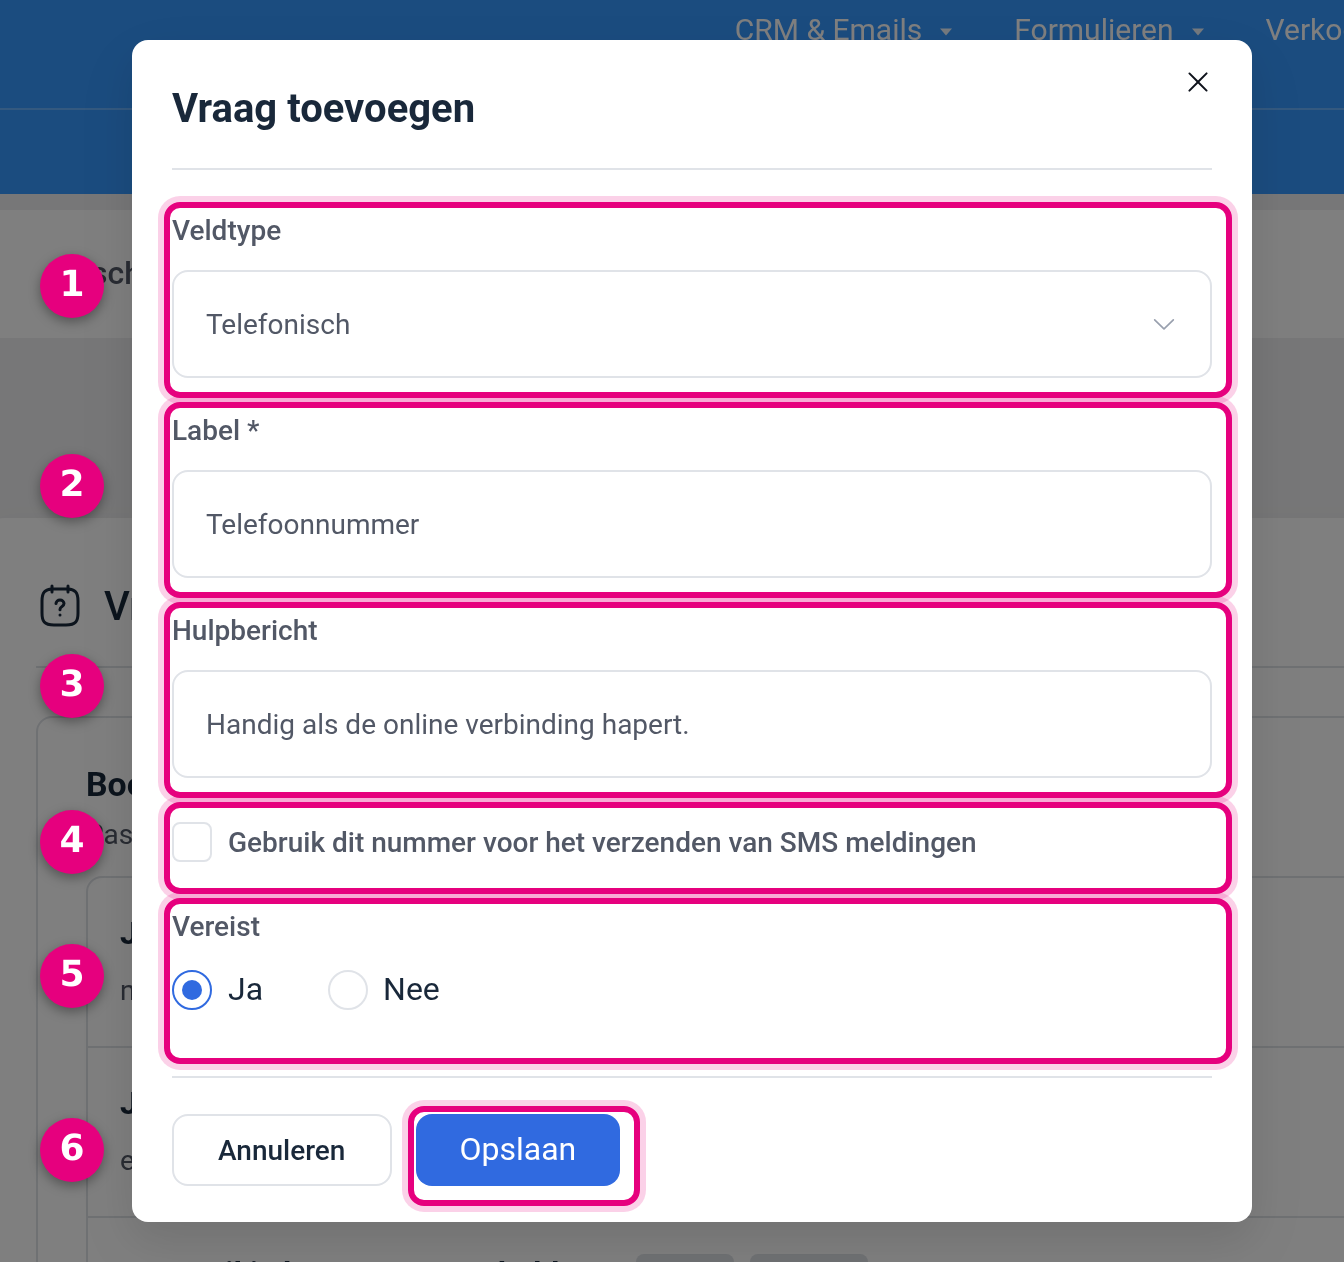
- Field type. Choose this first, because the rest of the window adapts to it. For a phone number you choose Phone: your visitor then gets a dropdown for the country plus an input field for the number.
- Label. The question as your visitor reads it, for example “Phone number”. This label also comes back later with the booking.
- Help message. The short explanation below the field, here “Useful if the online connection falters.” With personal details in particular, a sentence like this helps prevent drop-offs.
- Use this number for sending SMS notifications. This tick box appears only with the Phone field type. Switch it on only if you use the SMS notifications of the module; if you ask for the number just for yourself, leave it off.
- Required. On Yes your visitor has to fill it in, on No they may skip it.
- Save. The question is added at the bottom of the list. Then click Save changes on the main screen.
- Email and Text: a single line of text, where Email also checks that the address is valid.
- Textarea: a multi-line input box, suitable for an explanation.
- Number: digits only, for example for a number of attendees.
- Phone: a country selector plus a phone number.
- Radio, Select and Multi select: let your visitor choose from answers that you provide. With these types an extra field Options appears in the window, with the button + Add new option.
- Checkbox and Checkbox group: a single tick box or a row of tick boxes where several answers are allowed at once.
- Date: a date picker, for example for a preferred start date.
- File: your visitor uploads a file, for example a photo or a document.
- Hidden: a field your visitor does not see, but which is sent along. Useful for recording which page someone booked from.
- Terms & conditions: a consent tick box with your own text, for example for your cancellation terms.
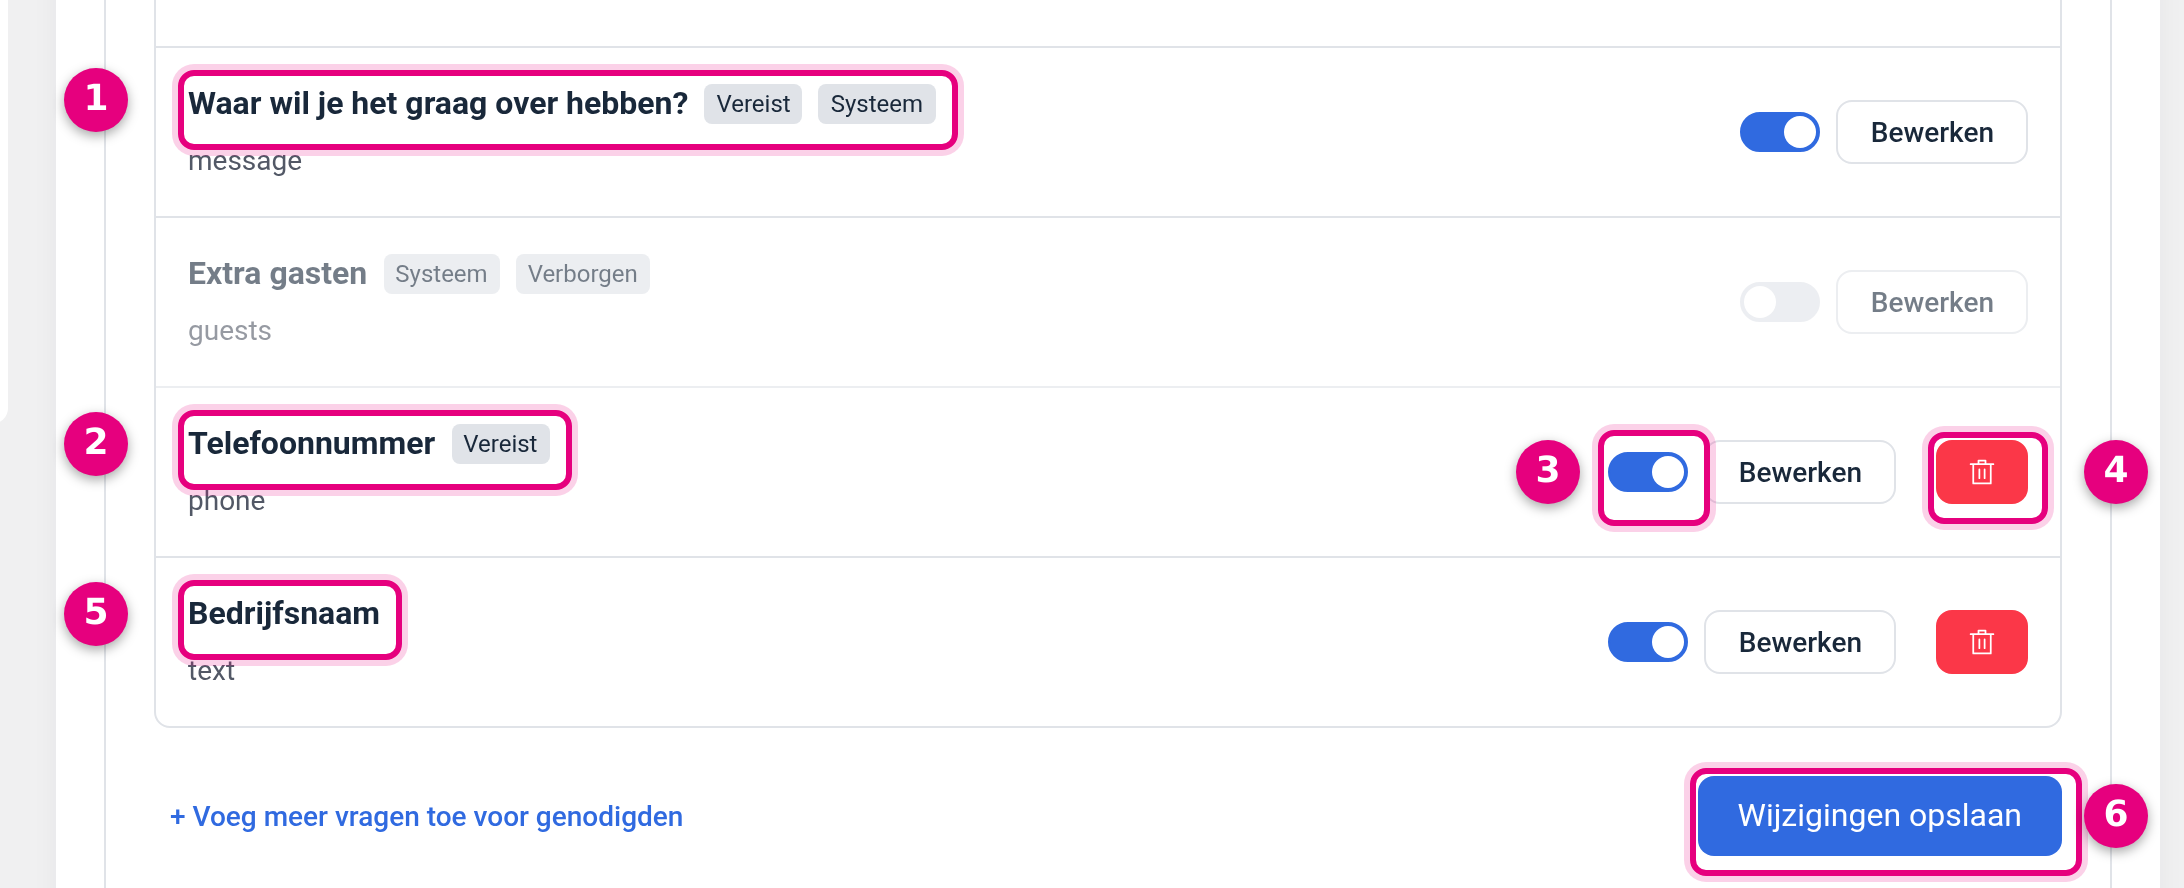
- The edited system question. The new label now appears in the list, but the marker System remains and the technical name stays
message. - Your own question. Phone number with the marker Required and the technical name
phoneunderneath. - The toggle. You can switch your own questions off temporarily too, for example if you do not need company details for a certain period.
- The red bin. Only your own questions have this button. Deleting is permanent, so if you are still in doubt, use the toggle instead.
- An optional question. Company name carries no Required marker: your visitor may leave the field empty.
- Save changes. After adding or deleting a question you click here once more as well.
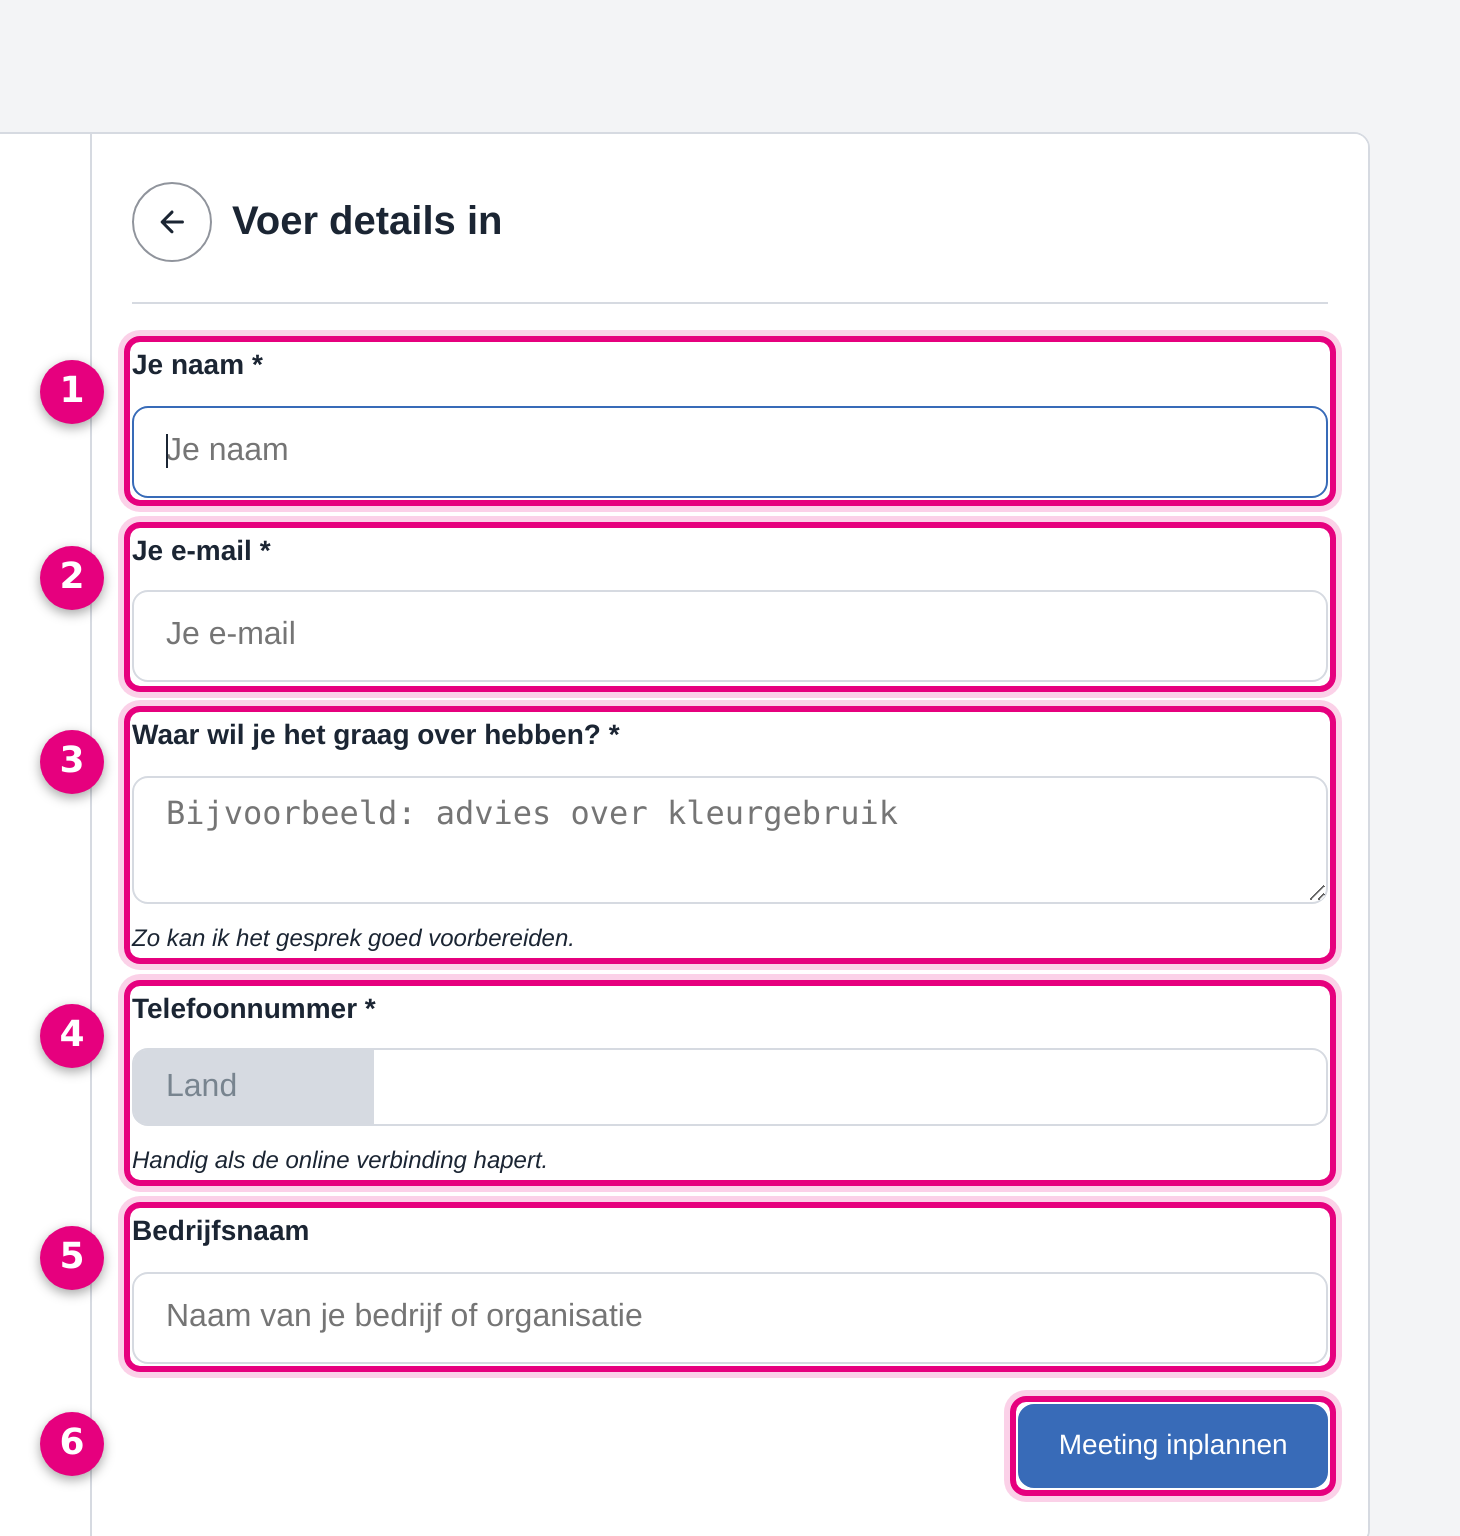
- Your name. Always present and required. The asterisk after the label indicates that the field has to be filled in.
- Your email. Also always present and required. The confirmation goes to this address.
- The edited question. Your new label sits above the box, the placeholder is light grey in the empty box and the help message sits below it in italics.
- Your own question Phone number. With the Phone field type your visitor first gets a dropdown of countries and next to it the input field for the number. If no country is chosen, the form reports that the field is not complete yet.
- Company name. Without an asterisk, so optional. Your visitor can skip the field.
- Schedule meeting. This is how your visitor records the appointment. If a required answer is missing, they stay on this screen and the form points out the empty field.
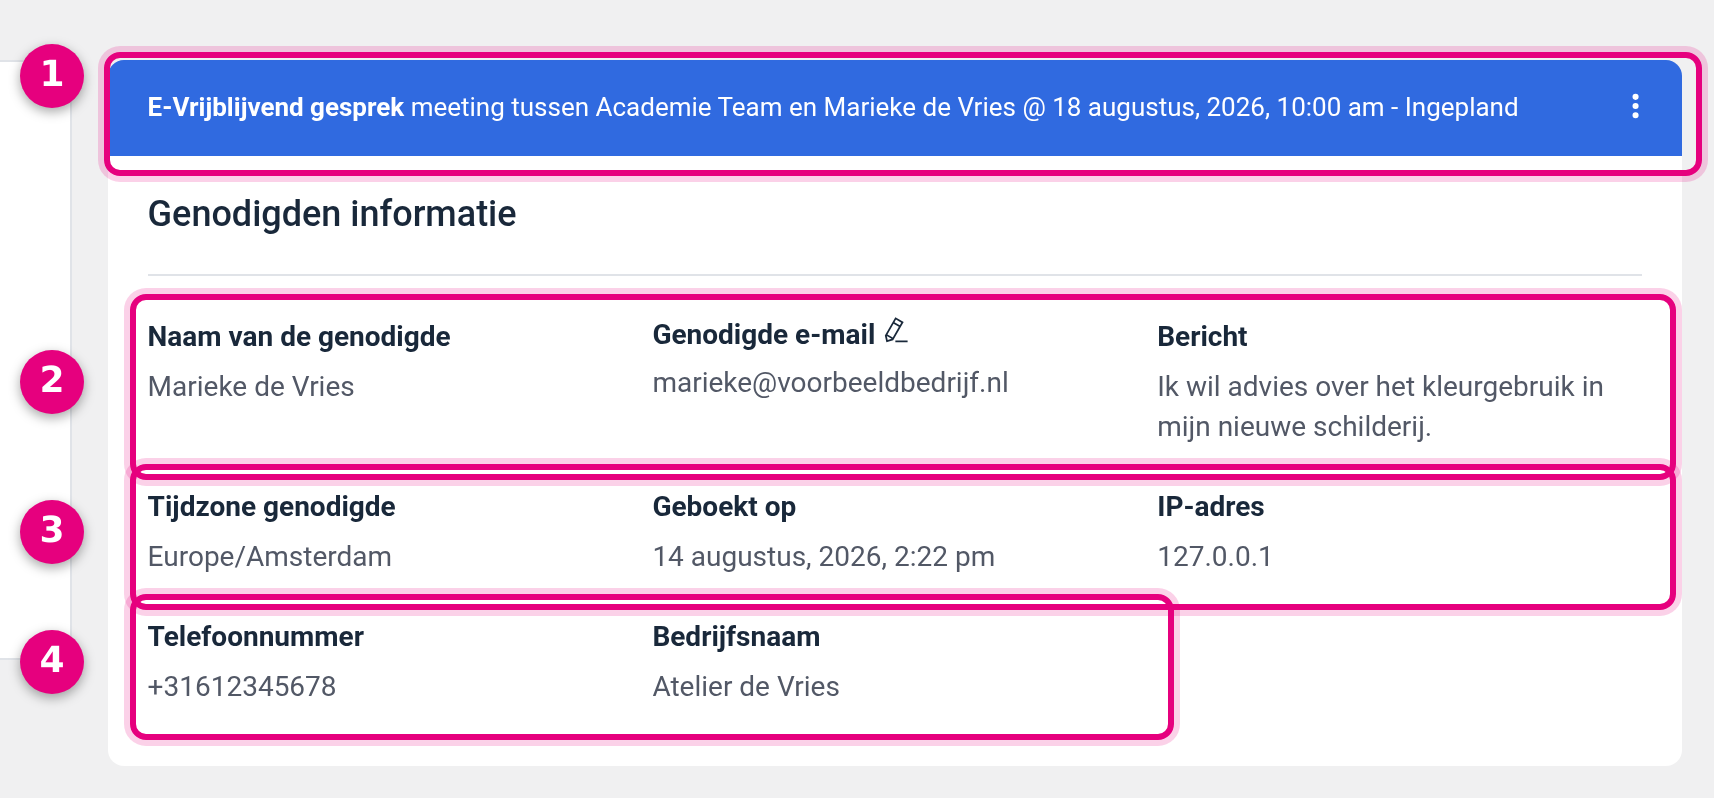
- The bar at the top. It holds the booking type, the name of the host, the name of the attendee, date and time, and the status of the appointment.
- The first row of answers. The name, the email address and the answer to the question about the subject. Note: that answer always appears here under the fixed heading Message, even when you have changed the label on the booking page.
- Details the module records itself. The time zone of your visitor, the moment they booked and the IP address. You do not need to add these as a question.
- Your own questions. Phone number and Company name appear with the label you set, with the answer underneath.
- Questions belong to one service. If you ask the same question on several booking types, you add it to each type separately.
- The field type is fixed. After saving you can no longer change the type. If you chose the wrong type, delete the question and create it again with the right type.
- Hiding is safer than deleting. The toggle takes a question off the form without losing the settings. The bin is permanent.
- Keep the form short. Every extra required question is an extra hurdle. Ask only what you really need in order to prepare for the conversation and set the rest to No under Required.
- Do not forget Save changes. The window with Save only closes the question itself. Only Save changes on the main screen puts it on your booking page.
- Sharing your booking link: one service or all your services on one page
- Connecting appointments to the CRM: creating contacts automatically on a booking
- Connecting your calendar to the appointment scheduler
- Setting up multiple booking durations in the Appointments module
- Setting up group events in the Appointments module
- Making several meeting rooms bookable with a maximum capacity
- Setting up paid appointments with automatic checkout
- Adding appointments manually in the Appointments module
- Connecting Zoom to the Appointments module for automatic meetings
You then arrive at the screen below. At the top is the heading Booking questions with the explanation “Customise the questions asked on the booking page”. Below it the questions are listed one under the other, each in its own card.
2. The default questions and what the System marker means #
Every new booking type starts with four questions. They all carry the marker System: these are fixed fields of the module that you can edit and (partly) hide, but cannot throw away.
At the bottom of the same screen there is a second block, Other questions, with the explanation “Customise the fields for cancelling and rescheduling bookings”. It holds Cancellation reason and Reschedule reason. Those two do not belong to the booking form itself, but to the screens your visitor gets when cancelling or rescheduling an appointment. You can change their text with Edit as well.
3. Editing an existing question, making it required or hiding it #
Click Edit on the question you want to change. A window called Update question opens. On a system field there is a notice at the top saying that you may only edit the labels; the field type is fixed.
If you do not want to ask a question at all, use the toggle in the card instead of the window. The question then disappears from the booking page and gets the marker Hidden in the overview. System questions can only be hidden, not deleted: with Your name and Your email even that is impossible, because without a name and an email address the module cannot record an appointment.
4. Adding a new question #
Click + Add more questions for invitees below the list. A window called Add question opens, which looks the same as the window above. The difference is that you may now choose the field type. In the example below a required phone number is added.
The Field type dropdown holds these fourteen types:
5. Your own questions in the overview #
After saving, your own questions sit below the system questions in the same list. The buttons show you the difference between a system question and a question of your own straight away.
6. What the form looks like to your visitor #
Open your own booking link in a new browser window to see the result. Your visitor first chooses a date and a time and clicks Next. The form then appears with the heading Enter details, holding exactly the questions you set and in the same order.
7. Where to find the answers #
The answers are stored with the booking itself. Go to Manage → Appointments and click the Bookings tab. There, click the appointment you want to view. The block Invitee information holds all the details together.
Your visitor sees the same answers again on the confirmation screen after booking, below their own appointment details. That way they can check straight away whether they made a mistake.
If you want a booking to create or update a contact in your CRM as well, you switch that on for the same booking type via Integrations → Add new integration → FluentCRM Integration. How to set up that connection is described step by step in Connecting appointments to the CRM: creating contacts automatically on a booking. The answers to your own questions are always kept with the booking itself as well.


