Multiple hosts and team members: who manages which calendar #
The Appointments module is an optional extension that you can add to your Autorespond package. This module lets people book appointments online, comparable to Calendly. More information about this module
If you work with several practitioners, teachers or advisers, you want everyone to have their own calendar and you want to decide for yourself who may see and manage which bookings. The Appointments module is built for exactly that: every host gets their own calendar with their own booking types, and a few tick boxes decide who else may look along. In this article you build that up step by step, from the second host to the access permissions of your colleagues, and you see exactly where to be on screen.
1. The model: one host is one user with one calendar of their own #
Go to Manage → Appointments and click the Calendars tab. There you see a separate block for each host. Such a block is the calendar of that one person or room, and below it are the booking types that belong to that host: the individual services visitors can book, each with its own duration, its own questions and its own link.
Important to know before you continue: a host is always linked to a user of your environment. When you create a host, this is stated literally: “A user can have one calendar with multiple events. Select a user who does not have a calendar yet”. So one user has one calendar, and you can put as many booking types on that calendar as you like. If you want two separate calendars, you also need two user accounts.
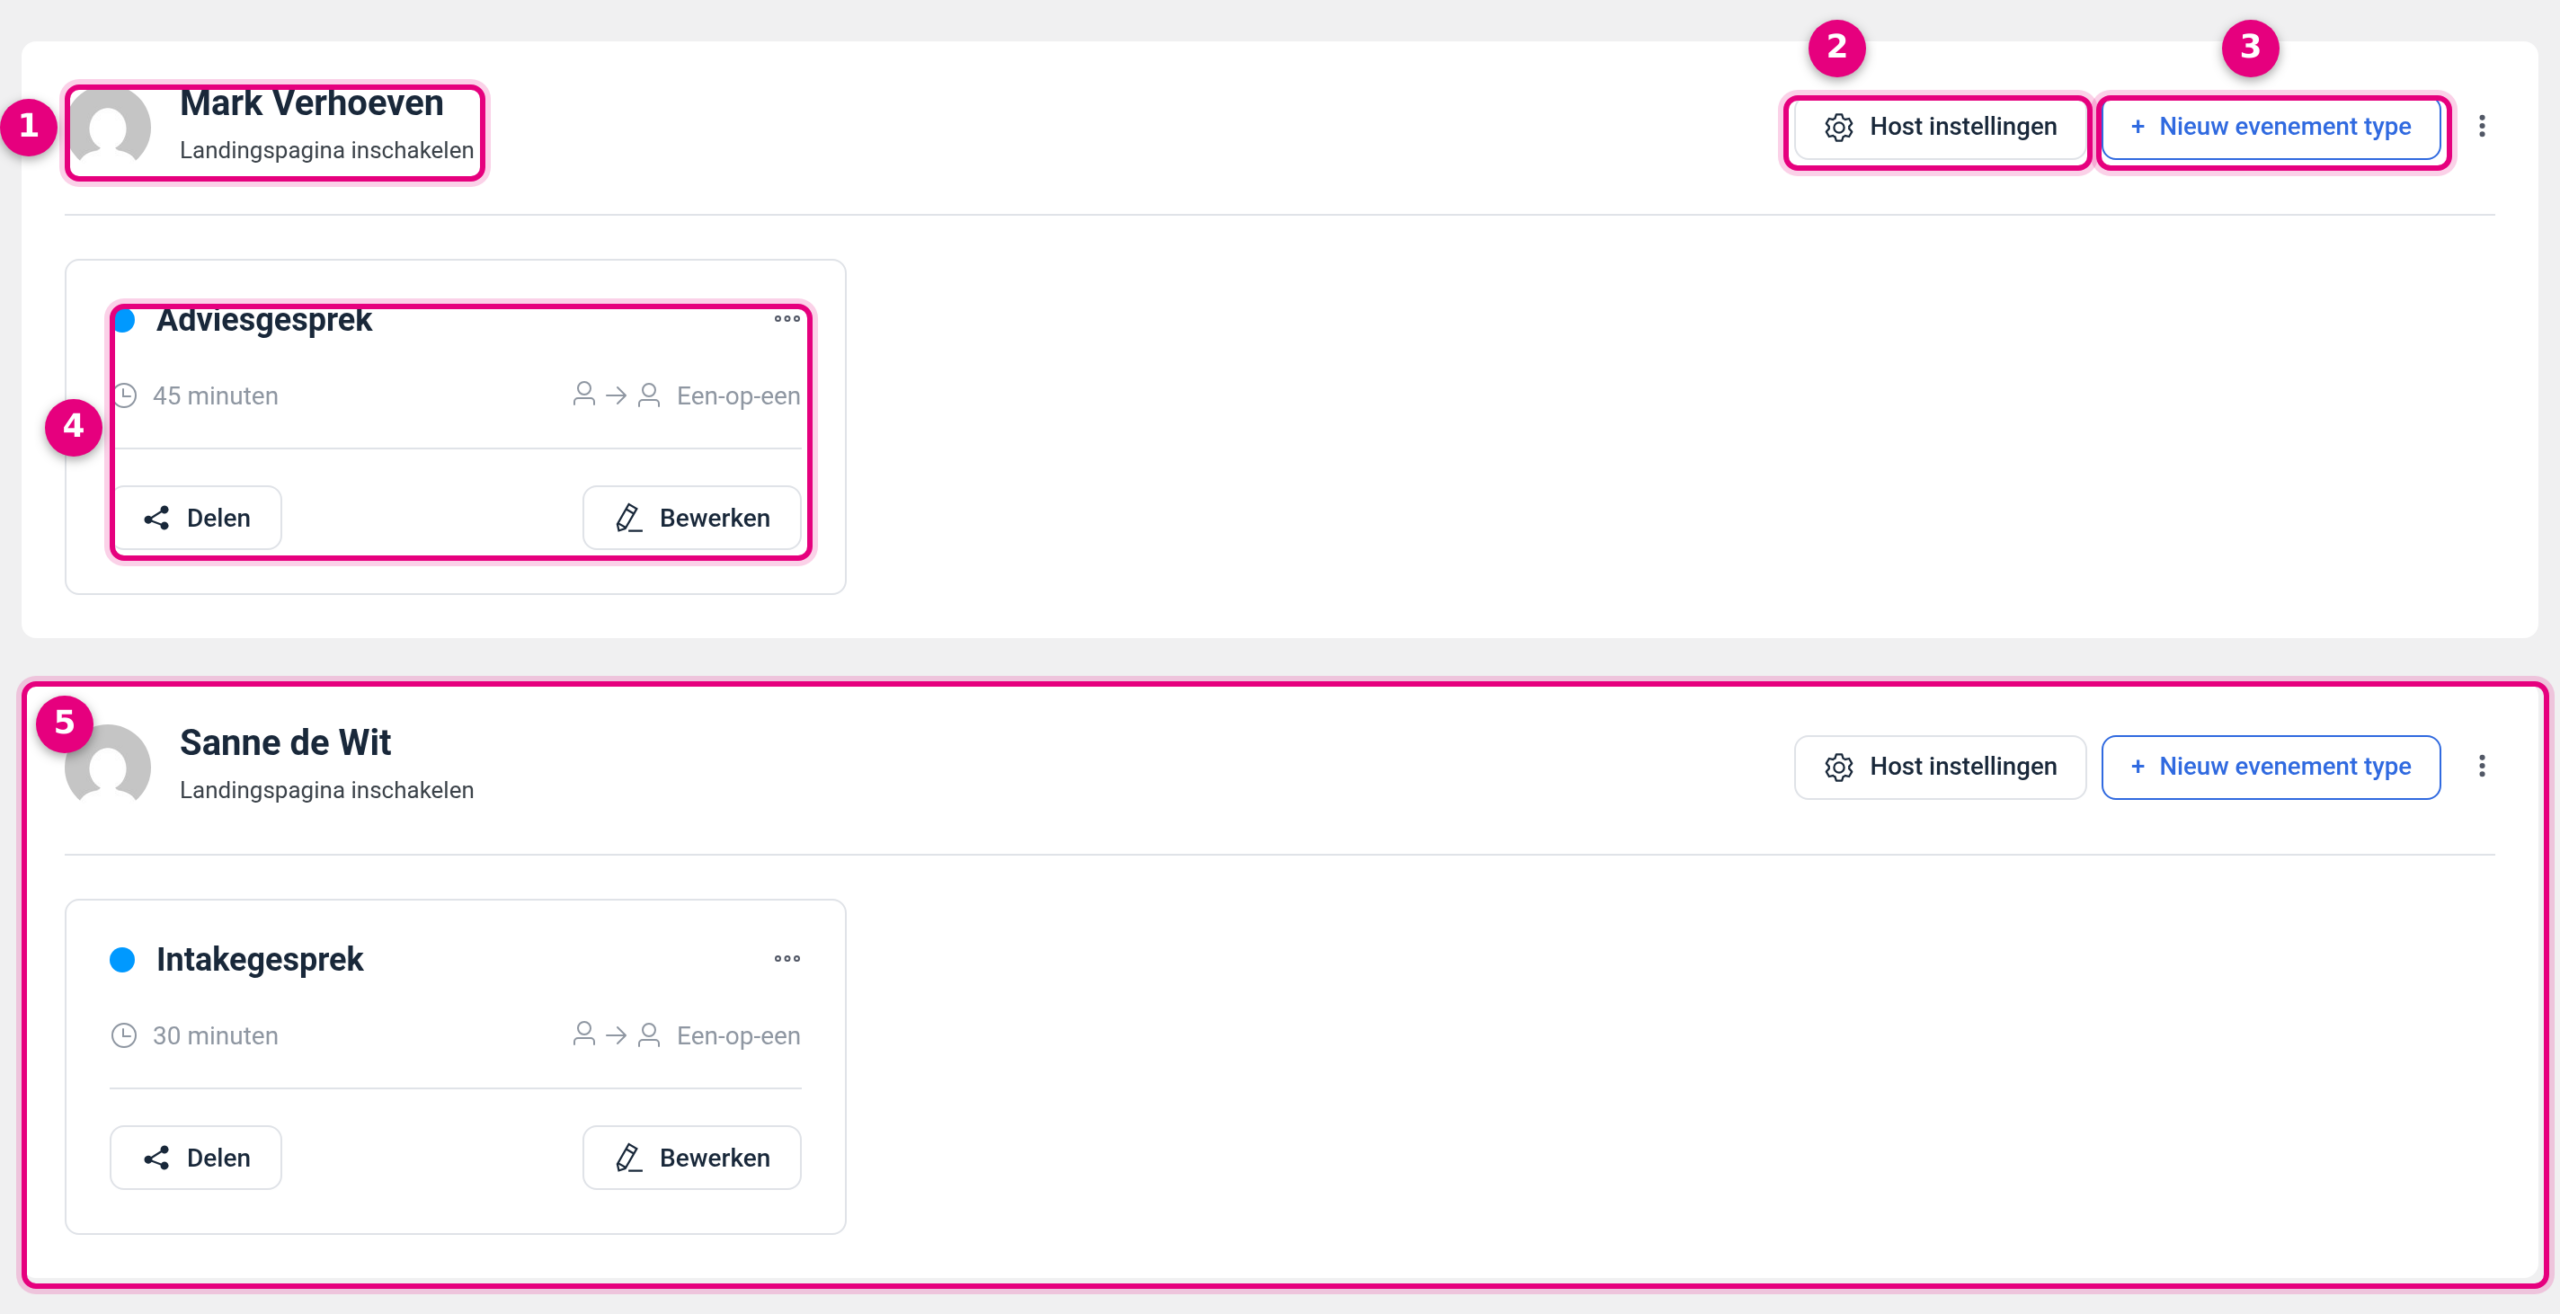
- The name of the host. This is the calendar itself. If there is an address below the name that starts with
https://, the shared calendar page of this host is switched on. If it says Enable landing page, as in this example, the landing page function for this calendar is switched off and the booking links of this host do not work yet, not even those of the individual booking types: your visitor then ends up on the home page of your site without any error message. So switch the function on first and only share your links afterwards. You can read how that works in Sharing your booking link: one service or all your services on one page. - Host settings. Behind this are the settings of this calendar: among other things the name, the time zone and the settings of the landing page. Everything you change here applies to this one host only.
- New event type. This is how you add an extra service to this host. A booking type therefore always sits under one host, never under the whole environment.
- The card of a booking type. You see the name, the duration and the kind of appointment (One-to-one or Group, for example). Share picks up the booking link of this one service and Edit opens its settings.
- The block of the second host. Exactly the same structure, but completely separate from the first. Its own booking types, its own availability, its own links. They share nothing with each other unless you set that up explicitly.
A host does not have to be a person, by the way. You can create a treatment room or meeting room as a host in exactly the same way. You can read how to do that, including a maximum capacity, in Making several meeting rooms bookable with a maximum capacity.
2. Adding a second host #
You give a new colleague their own calendar through the + New button at the top right of the Calendars tab. Behind that button is a small menu with three choices.

- + New. The button at the top right of the Calendars tab. To its left are a filter button and a search field for searching your events, useful as soon as you have a lot of booking types.
- Add host. This creates a new calendar for a user. This is the choice you need for an extra practitioner or team member.
- Add team. This creates an appointment that several hosts belong to. Step 5 explains exactly what that involves.
- One-off event. Intended for an appointment that takes place only once, instead of a service that can be booked on an ongoing basis.
If you choose Add host, the Add new calendar host panel slides into view on the right.
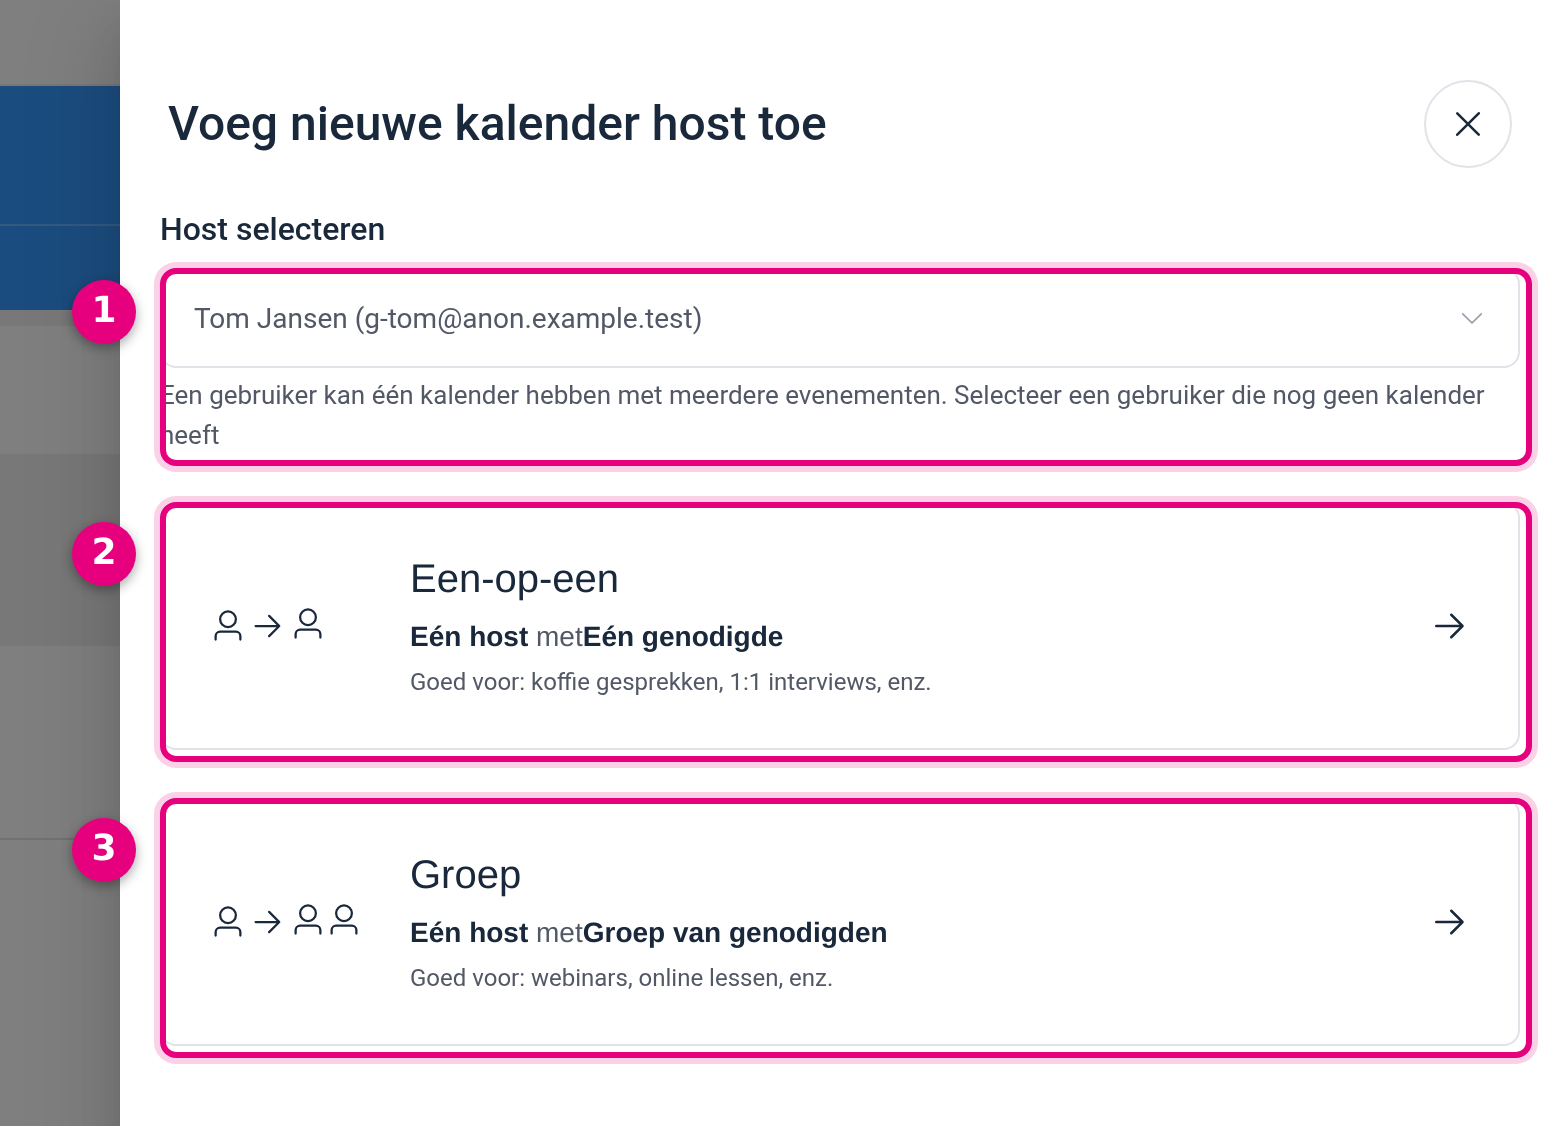
- Select host. Click in the field and type part of the name to search. You see the name and the email address for each user, so that you do not pick the wrong one when names are identical. Below the field is the line “A user can have one calendar with multiple events. Select a user who does not have a calendar yet”. Users who already have a calendar are greyed out and cannot be clicked, and users who only have the Subscriber role do not appear in this list.
- One-to-one. One host with One invitee. The panel adds: Good for: coffee chats, 1:1 interviews, etc. This is the ordinary personal appointment and usually the right choice for a practitioner’s first booking type.
- Group. One host with Group of invitees, with the explanation Good for: webinars, online classes, etc. Choose this if several people may sign up for the same time slot. You can read how to set that form up further in Setting up group events in the Appointments module.
As soon as you make a choice here, you go straight on to the Event details screen, where you fill in the name of the service, the duration, the location and the time zone and click Continue. After that you set the weekly hours of this host. Those steps are the same as for your very first calendar and are described in detail in the article Creating your first calendar and booking type in the Appointments module.
What has been created: on the Calendars tab there is a new block with your colleague’s name, with the booking type you just made below it. That host has their own Host settings button, their own availability and their own booking links. The landing page of the new host is switched off by default, which is why a fresh host shows the link Enable landing page instead of a calendar address.
3. Giving team members access to the Appointments module #
A calendar of your own is one thing, access to the module is something else. You arrange that in one place: go to Appointments → Settings and click Team in the left-hand column. At the top is the description “Give team members access to FluentBookings for calendar and booking management.”
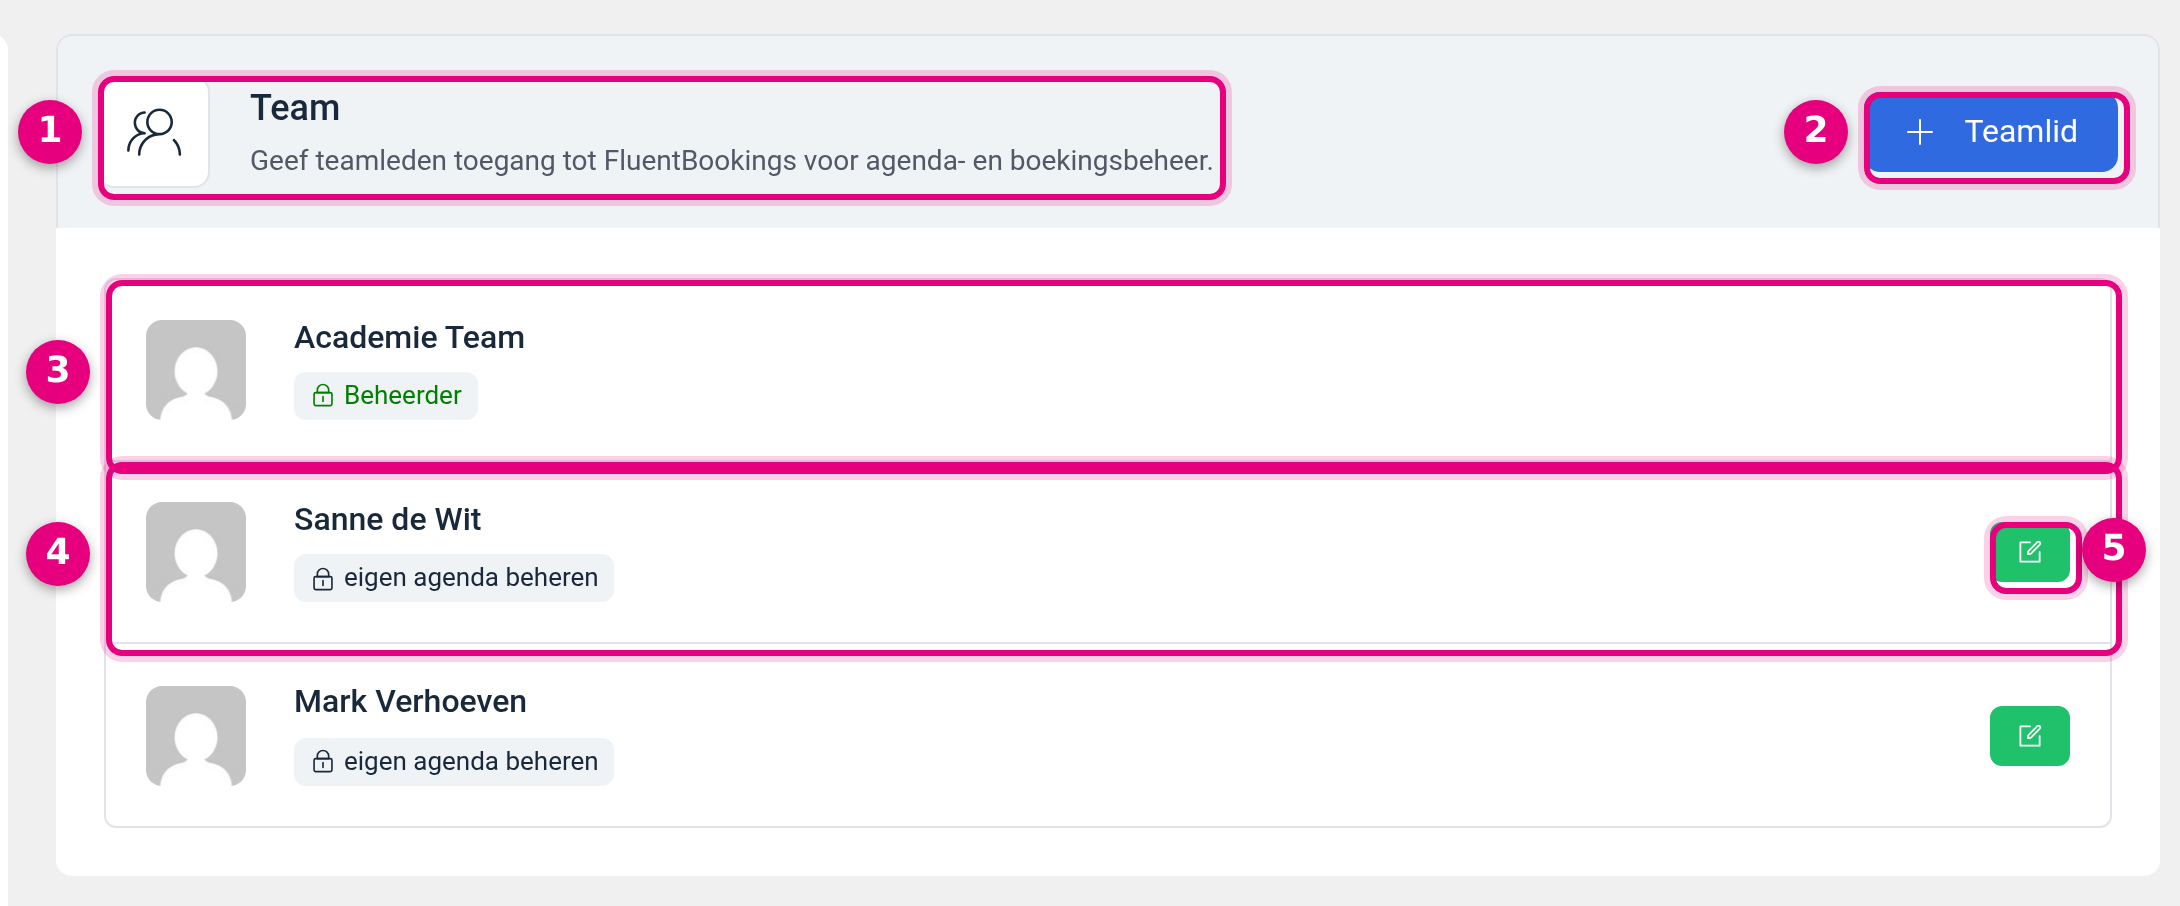
- The description of this screen. This states what this screen is about: access to the module for calendar and booking management. Everything you set here applies to the entire Appointments module.
- + Team member. This adds someone to this list and lets you decide straight away what that person may do.
- A member with the Administrator label. This green label belongs to the administrator of the environment. There is no edit button on this row: the access of an administrator cannot be changed here.
- A member with the manage own calendar label. This is the basic level: that person manages their own calendar, their own booking types, their own bookings and their own availability. Everyone you created as a host in step 2 automatically appears in this list with this label.
- The green edit button. This reopens the permissions of this team member so you can tick or untick what that person may do on top of the basics.
If you click + Team member, the Add team member panel appears. That is where the actual choice is made: who, and with which permissions.
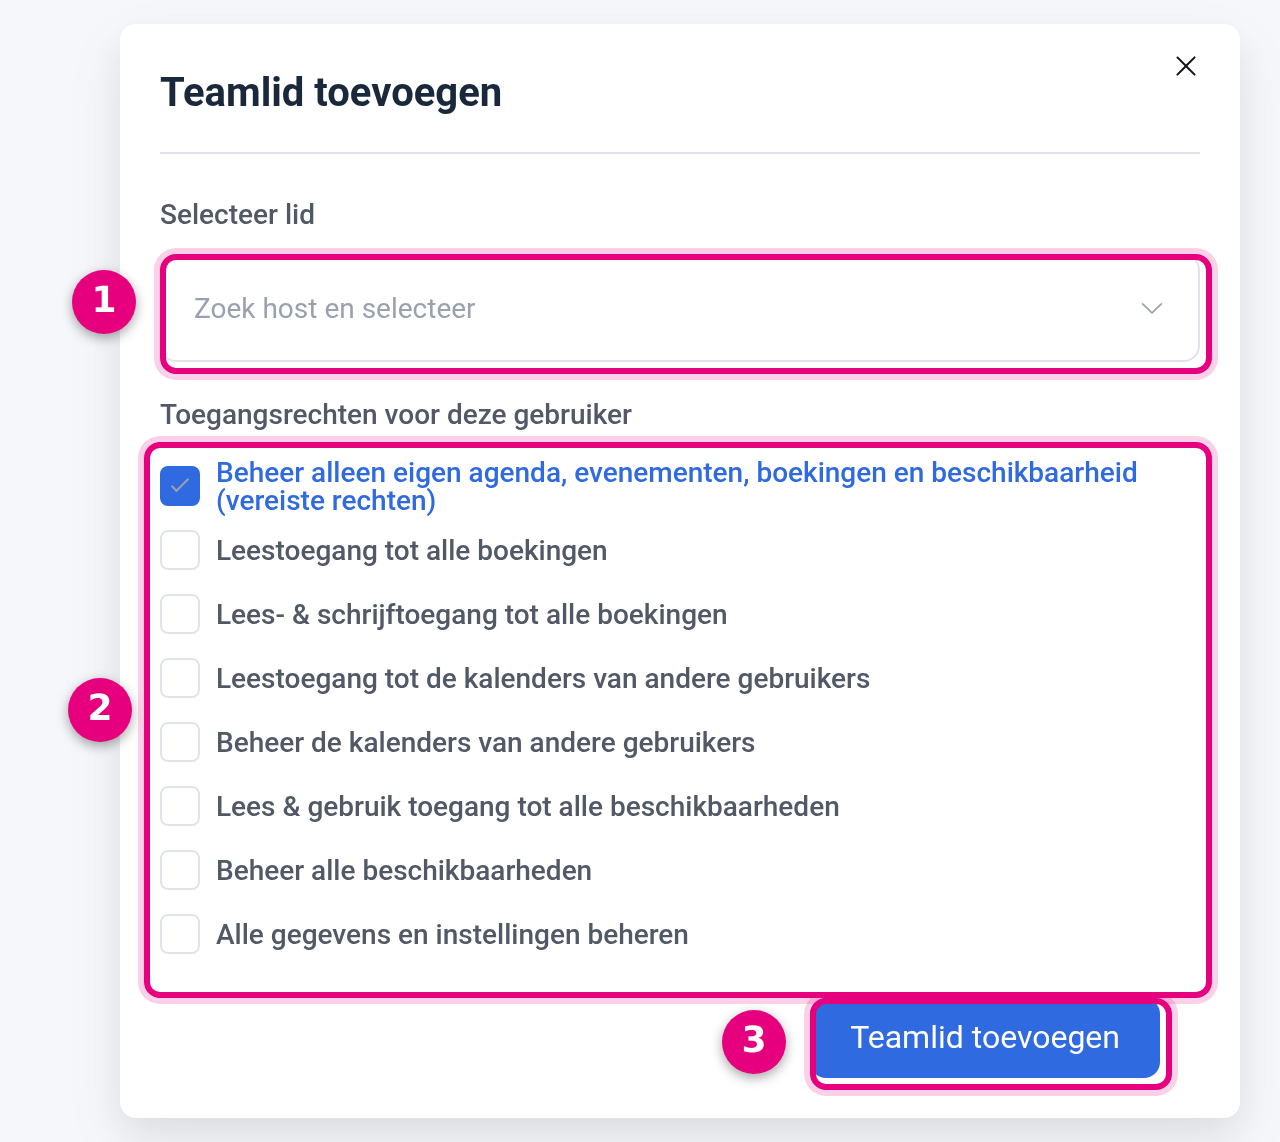
- Select member. This field shows the text Search host and select. Type part of the name and choose the right person from the list.
- Access permissions for this user. The eight tick boxes with which you decide what someone may do. They stack: you start with the basic permission and tick extra permissions on top of it independently of each other. Below you find what each tick box says and what it means.
- Add team member. The button that records your choice. As long as you do not click it, nothing changes about this person’s access.
The eight permissions you see in this panel, from low to high:
- Manage own calendar, events, bookings and availability only (required permissions). This tick box is fixed on and is the basic level of every team member. That person works in their own calendar only.
- Read access to all bookings. Looking along with the bookings of the whole environment, without changing anything in them. Useful for an assistant or a receptionist who wants to see who is coming in today.
- Read & write access to all bookings. As well as looking along, also changing other people’s bookings.
- Read access to the calendars of other users. Viewing the calendars and booking types of colleagues.
- Manage the calendars of other users. Changing those calendars and booking types as well. Only give this to people who really set up other people’s calendars.
- Read & use access to all availabilities. Viewing and using existing availability schedules, for example to link a shared opening hours schedule to a booking type of your own.
- Manage all availabilities. Changing those schedules as well, including the schedules of colleagues.
- Manage all data and settings. The widest permission: everything within the module, including the settings. Keep this for the one or two people who really manage the module.
A useful rule of thumb: give only the basic permission by default, and tick something extra only once someone runs into a limit. That way your colleagues’ calendars stay theirs, and you keep the overview.
4. What a team member sees in Bookings #
This is the question that comes back most often: a colleague logs in, goes to Appointments → Bookings and says there are no bookings. Usually the screen is simply correct, the filter is just set differently than expected. At the top right of the Bookings tab there is a host filter, and it is set to My meetings by default.
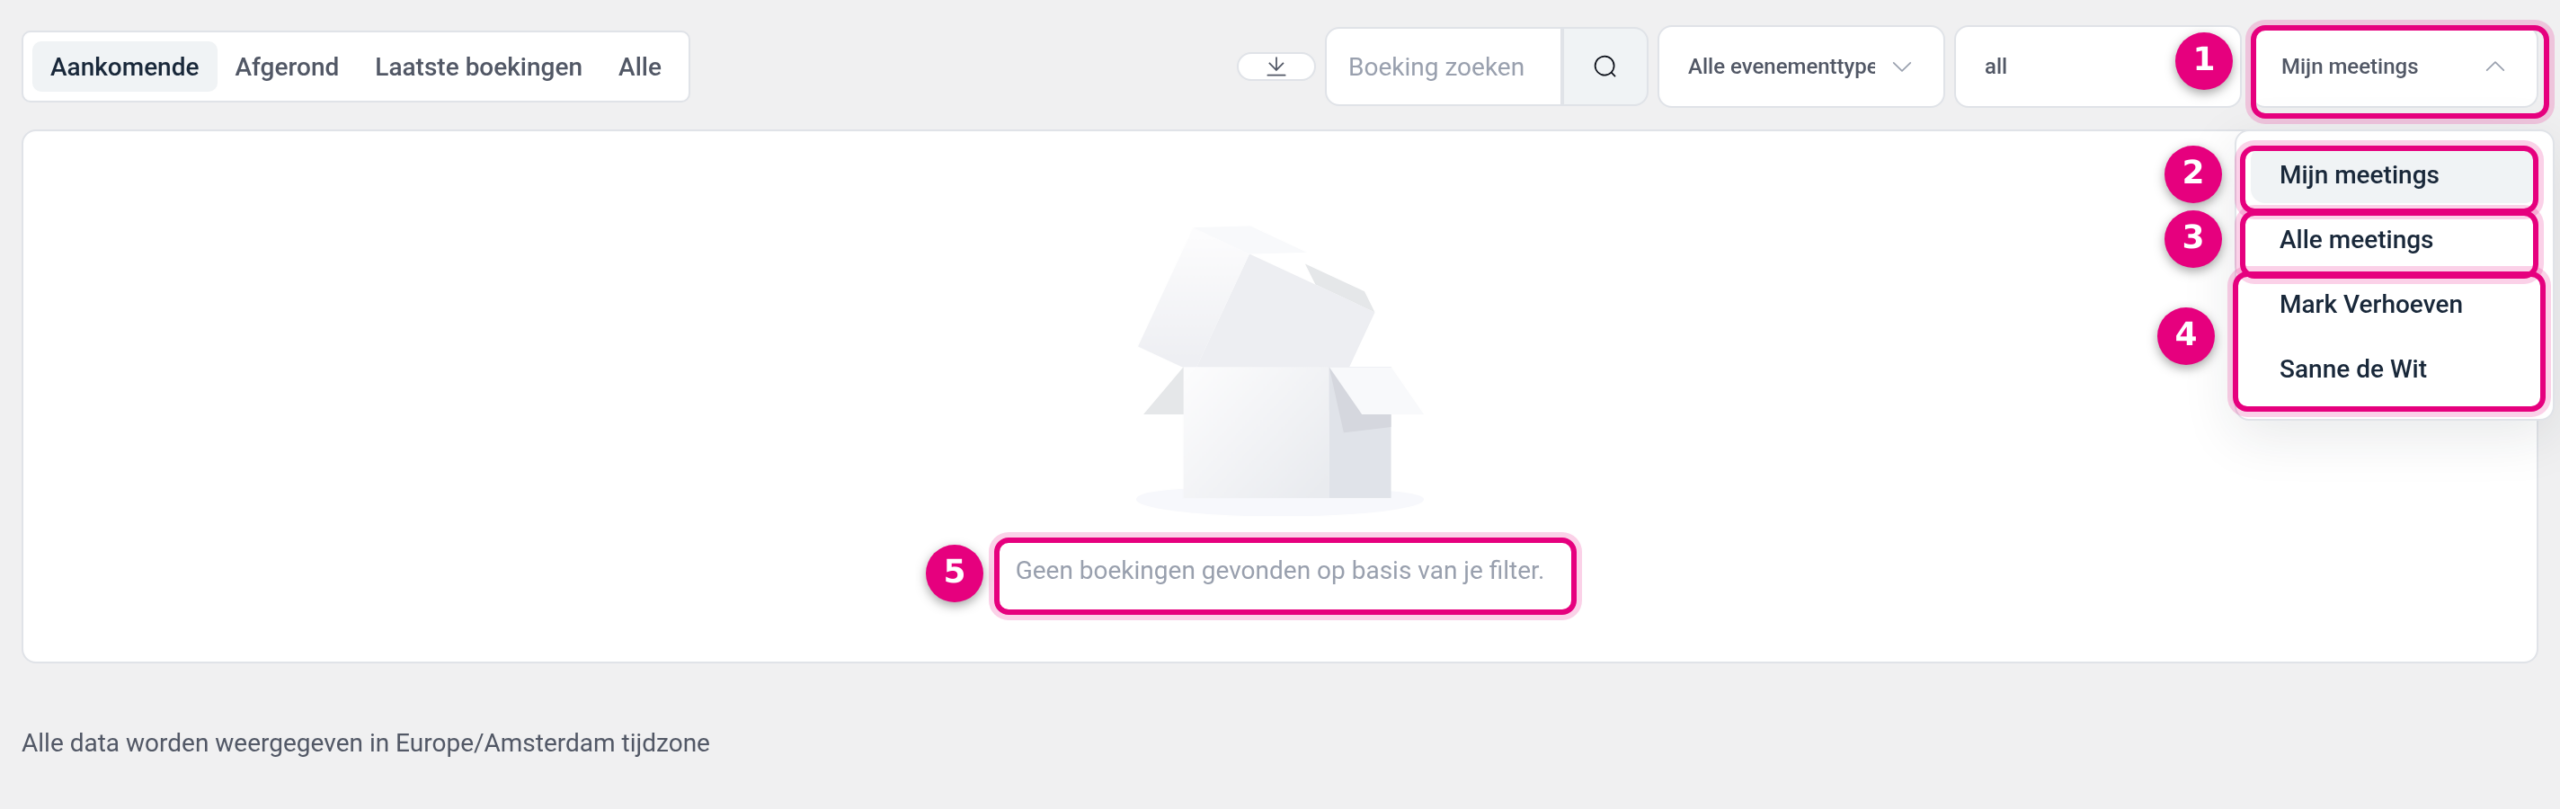
- The host filter. The last dropdown in the filter bar, on the far right. To its left are a search field and the All event types filter, with which you filter on the kind of appointment: One-to-one, Group, Round robin or Collective.
- My meetings. The default setting. You then only see the appointments for which you are the host yourself. If you do not have a calendar of your own, or no bookings yet, the list stays empty.
- All meetings. All appointments of all hosts together. This is the setting you want when you are looking for the overview of the whole practice.
- The individual hosts. Below the two general choices, every host is listed by name. Choose one to view exactly the calendar of that person or room.
- The message with an empty list. It says “No bookings found based on your filter.” The last four words are the clue: there is not nothing, your filter is simply excluding everything. So always check the host filter first, and the Upcoming, Completed, Latest bookings and All tabs on the left of the bar.
There is a second reason why a colleague sees little, and it is at least as important. A team member with only the basic permission has just one choice in this filter: My meetings. The All meetings option and the names of the other hosts are not among them. That same team member also sees only their own block on the Calendars tab and has no Settings tab. That is not a fault, that is exactly what the basic permission does. If you want someone to see the appointments of colleagues too, step 3 has the Read access to all bookings permission for that, and for viewing the calendars themselves the Read access to the calendars of other users permission.
If you would rather put an appointment in a colleague’s calendar by hand, after a phone call for example, Adding appointments manually in the Appointments module explains how that works.
5. Add team: one appointment with several hosts #
As well as individual hosts, the module also has teams. Where an ordinary booking type always sits under one host, a team links several hosts to the same appointment. You find it through the same button as in step 2: + New → Add team. A panel with the title Add new team then slides into view.
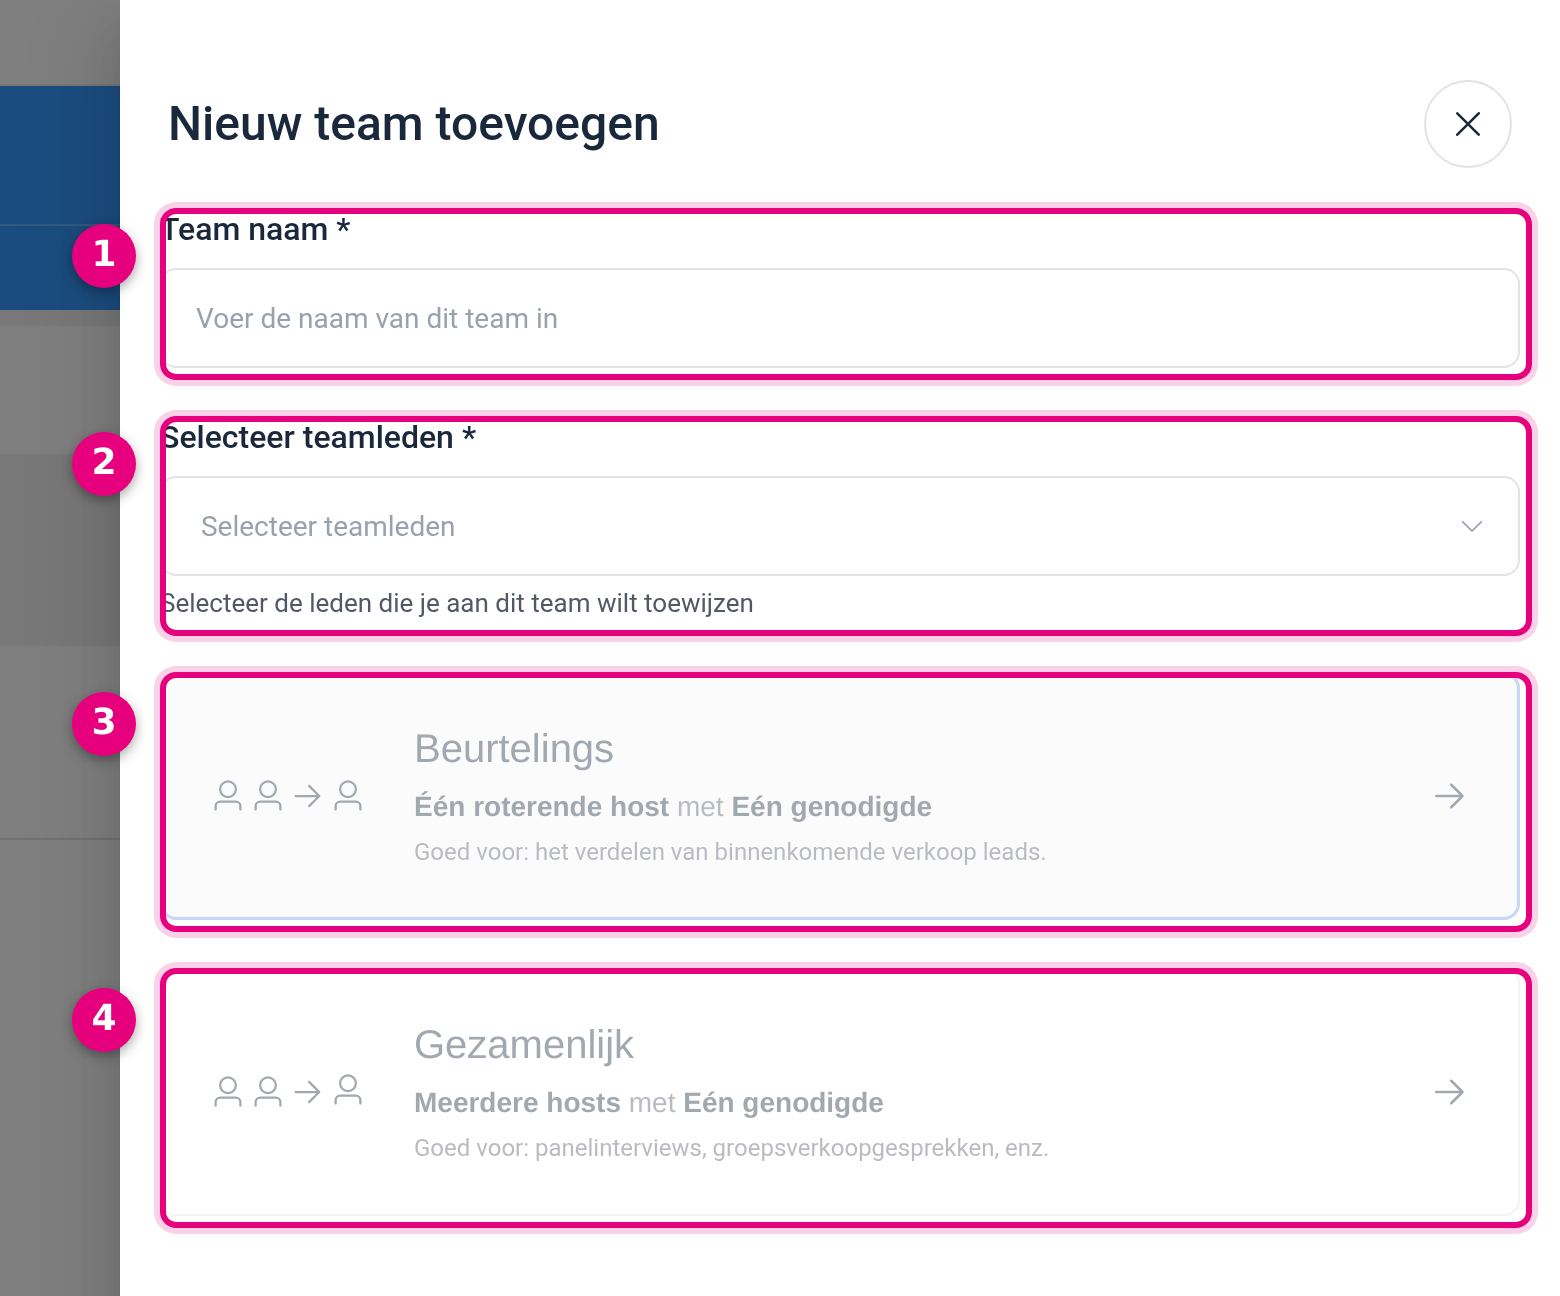
- Team name. A required field with the text Enter the name of this team. Choose something recognisable, because you will see this name again in your overview later.
- Select team members. Also required, with the explanation “Select the members you want to assign to this team”. This list only contains people who already have a calendar of their own. If you want to add someone to a team who is not listed yet, first make that person a host according to step 2.
- Round robin. One rotating host with One invitee, with the explanation Good for: distributing incoming sales leads. The appointment goes to one of the team members, with the turn rotating. This is the form for a shared intake line where it does not matter who takes the appointment.
- Collective. Multiple hosts with One invitee, with the explanation Good for: panel interviews, group sales calls, etc. Here all selected hosts attend the same appointment together.
The two choice blocks stay greyed out as long as the name and the team members have not been filled in. So fill those in first and only then click the form you want. Both forms then also appear in the All event types filter on the Bookings tab, next to One-to-one and Group, so that you can filter precisely on team appointments later.
6. Good to know #
- An account first, then a calendar. A new employee first needs a user account in your environment. You create that through Manage → Users → Add user. Only after that can you choose that person as a host in step 2. Users who only have the Subscriber role are not in the host list.
- One user, one calendar. If you accidentally chose the wrong user, you cannot select that person again as long as that calendar exists. Users with a calendar are greyed out in the list.
- Every host has their own calendar page. As well as the links of the individual booking types, you can share one page per host showing all of their services. How you switch that on and which booking types appear on it is described in Sharing your booking link: one service or all your services on one page.
- Availability is set per host. Every host has their own working hours. What you set for one colleague changes nothing for another. The explanation about working hours, buffers and a daily maximum is in the article Setting availability: working hours, buffers, minimum notice period and daily maximum.
- Emails are also set per booking type. You set confirmations and reminders at the booking type of the host concerned, not centrally for the whole environment. The article Setting up confirmation and reminder emails for your appointments works that out.
Related articles #
- Sharing your booking link: one service or all your services on one page
- Making several meeting rooms bookable with a maximum capacity
- Setting up group events in the Appointments module
- Adding appointments manually in the Appointments module
- Setting up multiple booking durations in the Appointments module
- Connecting your calendar to the appointment scheduler
- Connecting Zoom to the Appointments module for automatic meetings
- Setting up paid appointments with automatic checkout
- Connecting appointments to the CRM: creating contacts automatically on a booking


