Advanced settings for a booking type: approval, redirects and custom text #
Your booking type is ready, but you want something extra: an appointment that only becomes final after you have given your approval, an attendee who is sent to a page of your own after booking, or a button on your booking page with wording that suits you. All of those options exist, but they sit on a tab that is easily overlooked: Advanced settings. In this article you will see where that tab is, which options it holds and what each setting does, both for you and for the visitor who books an appointment.
The Appointments module is an optional extension you can add to your Autorespond package. This module makes it possible to have appointments booked online, comparable to Calendly. More information about this module
1. Where to find the Advanced settings #
All the settings in this article belong to one booking type. If you have several services under the same calendar, you set them per service. This is how to get there:
- Go to Manage → Appointments and click the Calendars tab.
- Find the card of the booking type you want to change and click Edit. You arrive on the Event details tab.
- Click Advanced settings in the left-hand column.
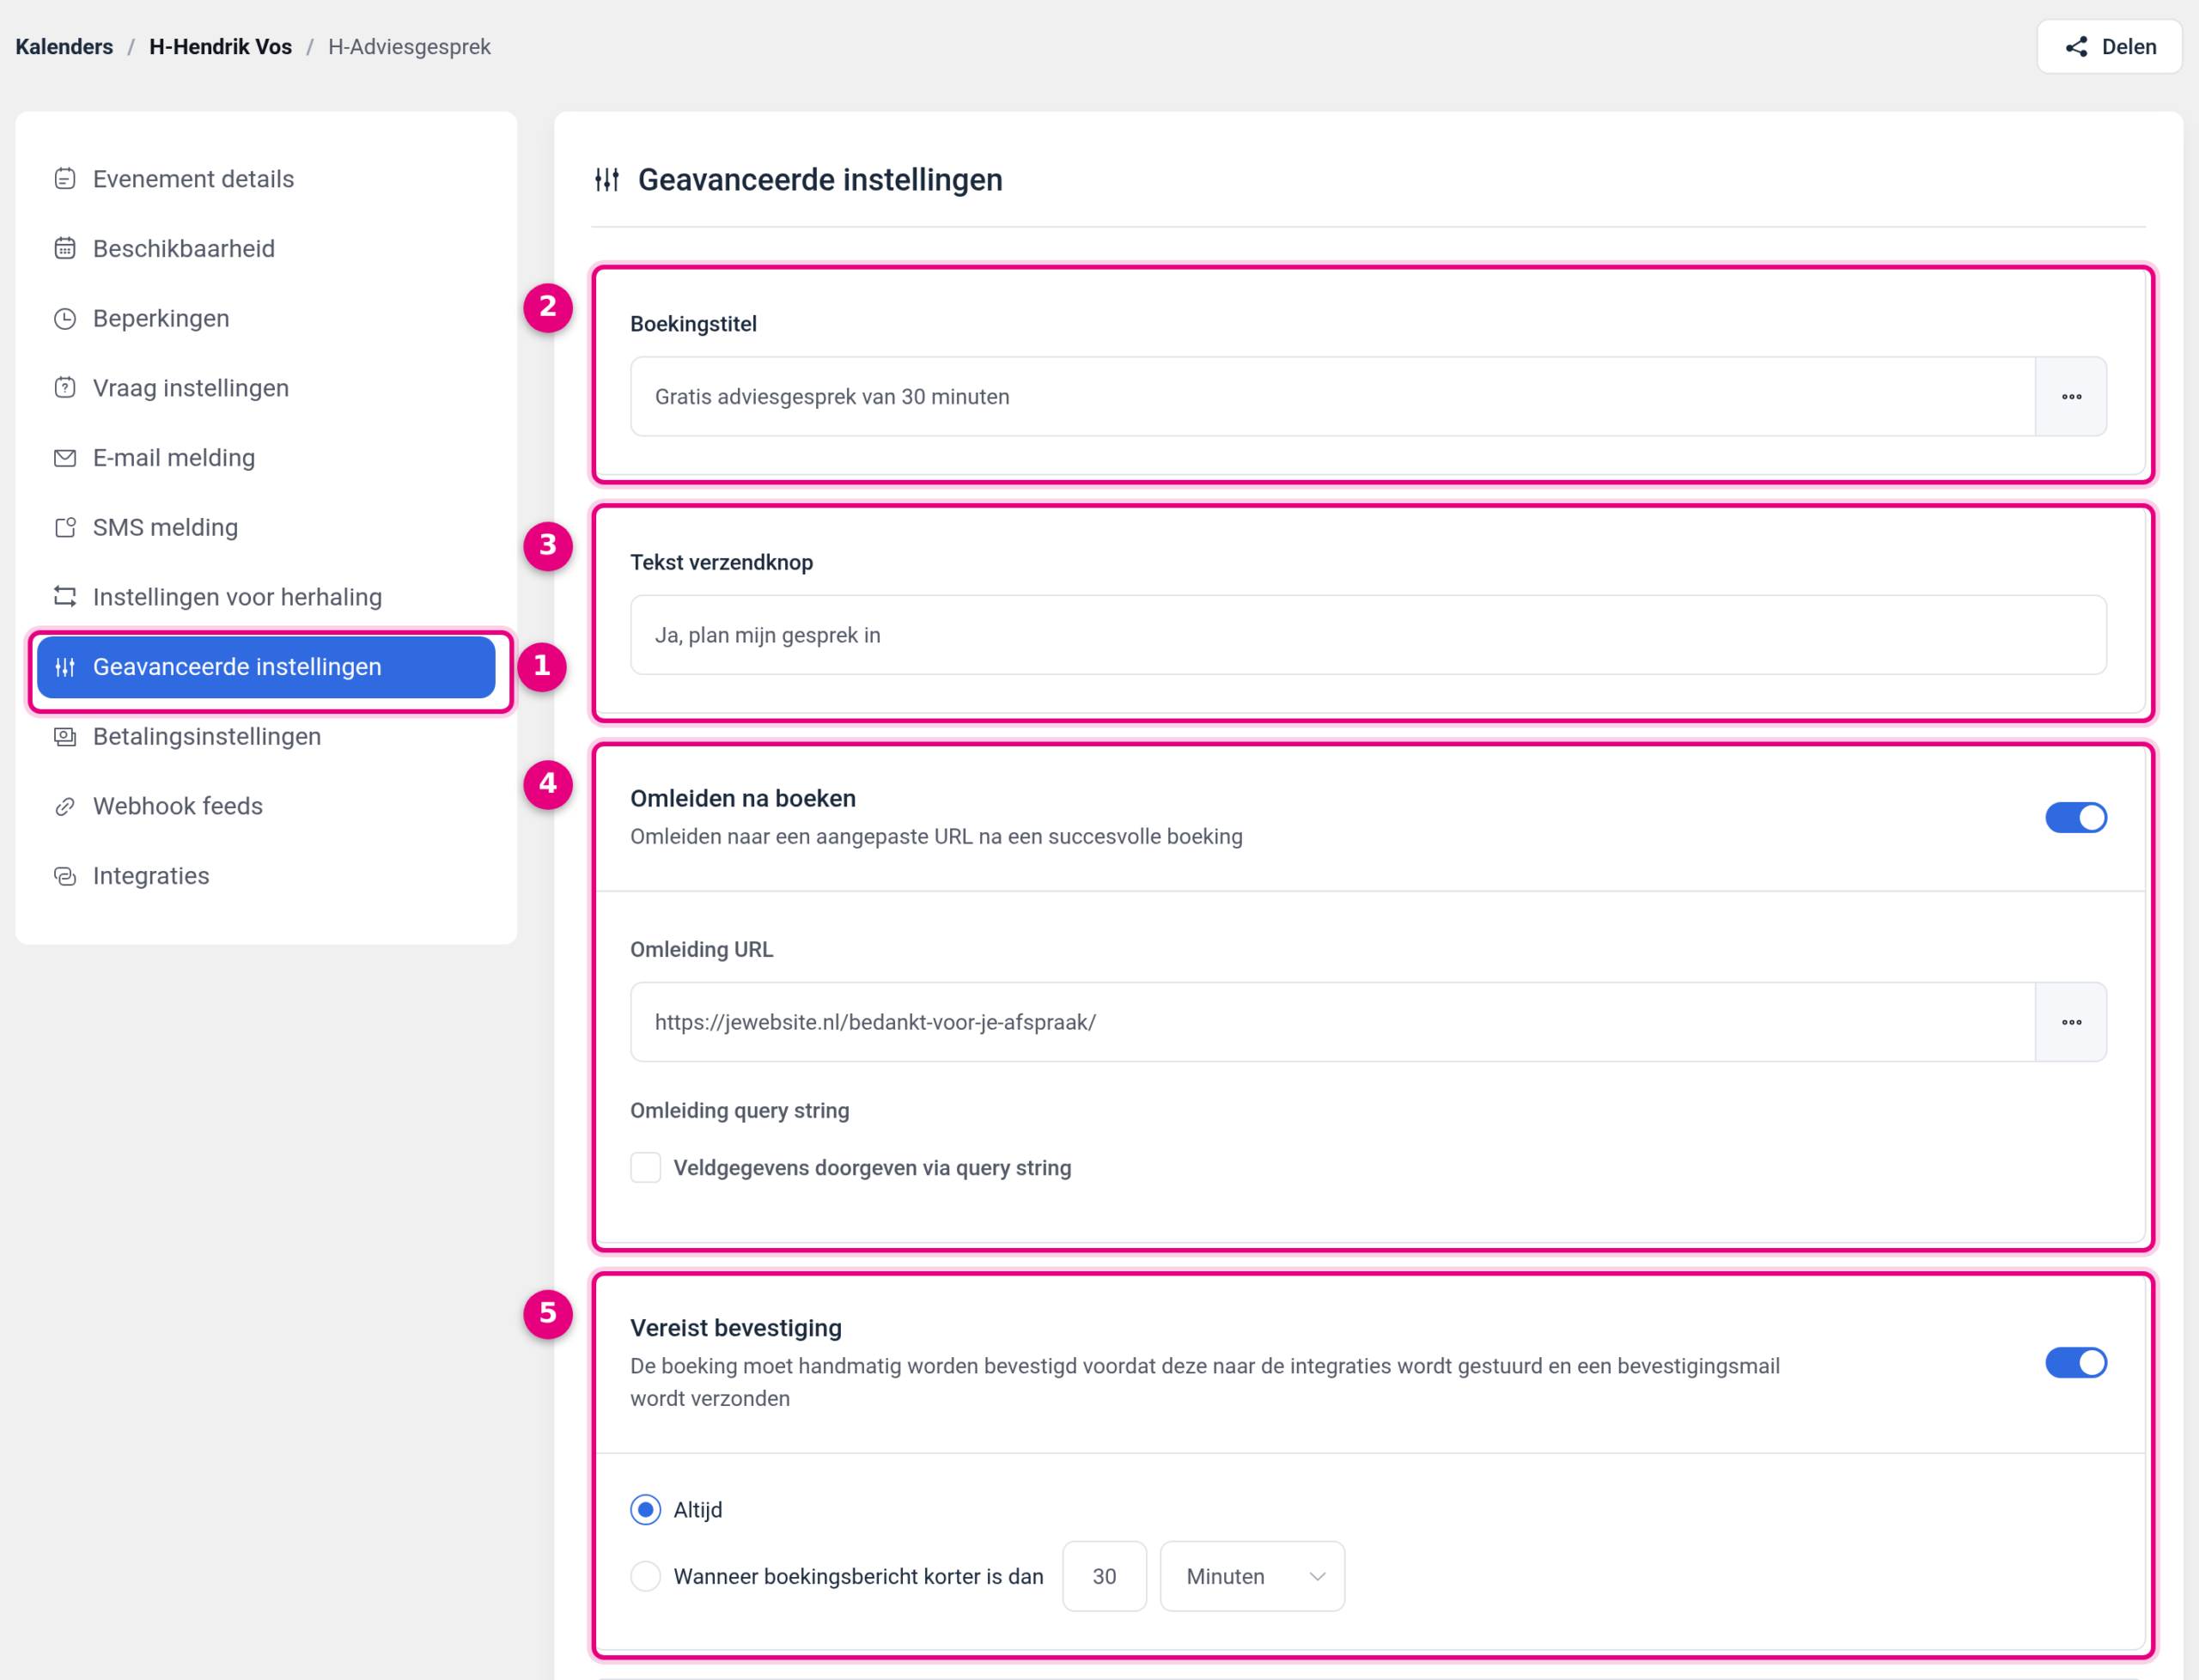
- Advanced settings. The tab itself, at the bottom of the row of tabs for this booking type. Above it are Event details, Availability, Limits, Question settings, Email notification, SMS notification and Recurrence settings; below it Payment settings, Webhook feeds and Integrations. Everything you change on this tab applies to this booking type only.
- Booking title. The name the booking itself is given, so not the name of your service. If you leave this field empty, the module uses the default title that is shown in grey in the field. See section 5.
- Submit button text. The text on the button with which the visitor makes the appointment final. If you leave this empty, it reads Schedule Meeting. See section 5.
- Redirect after booking. When you switch this toggle on, two extra fields appear: Redirect URL (the page the attendee goes to after booking) and Redirect query string with the checkbox Pass field data through query string. See section 4.
- Requires confirmation. This means you have to approve a booking manually first. When you switch it on, two radio buttons appear: Always or When booking notice is less than with a number and a unit of time behind it. See section 3.
2. The rest of the same tab #
Scroll further down and you will find three more toggles and the block for the landing page.
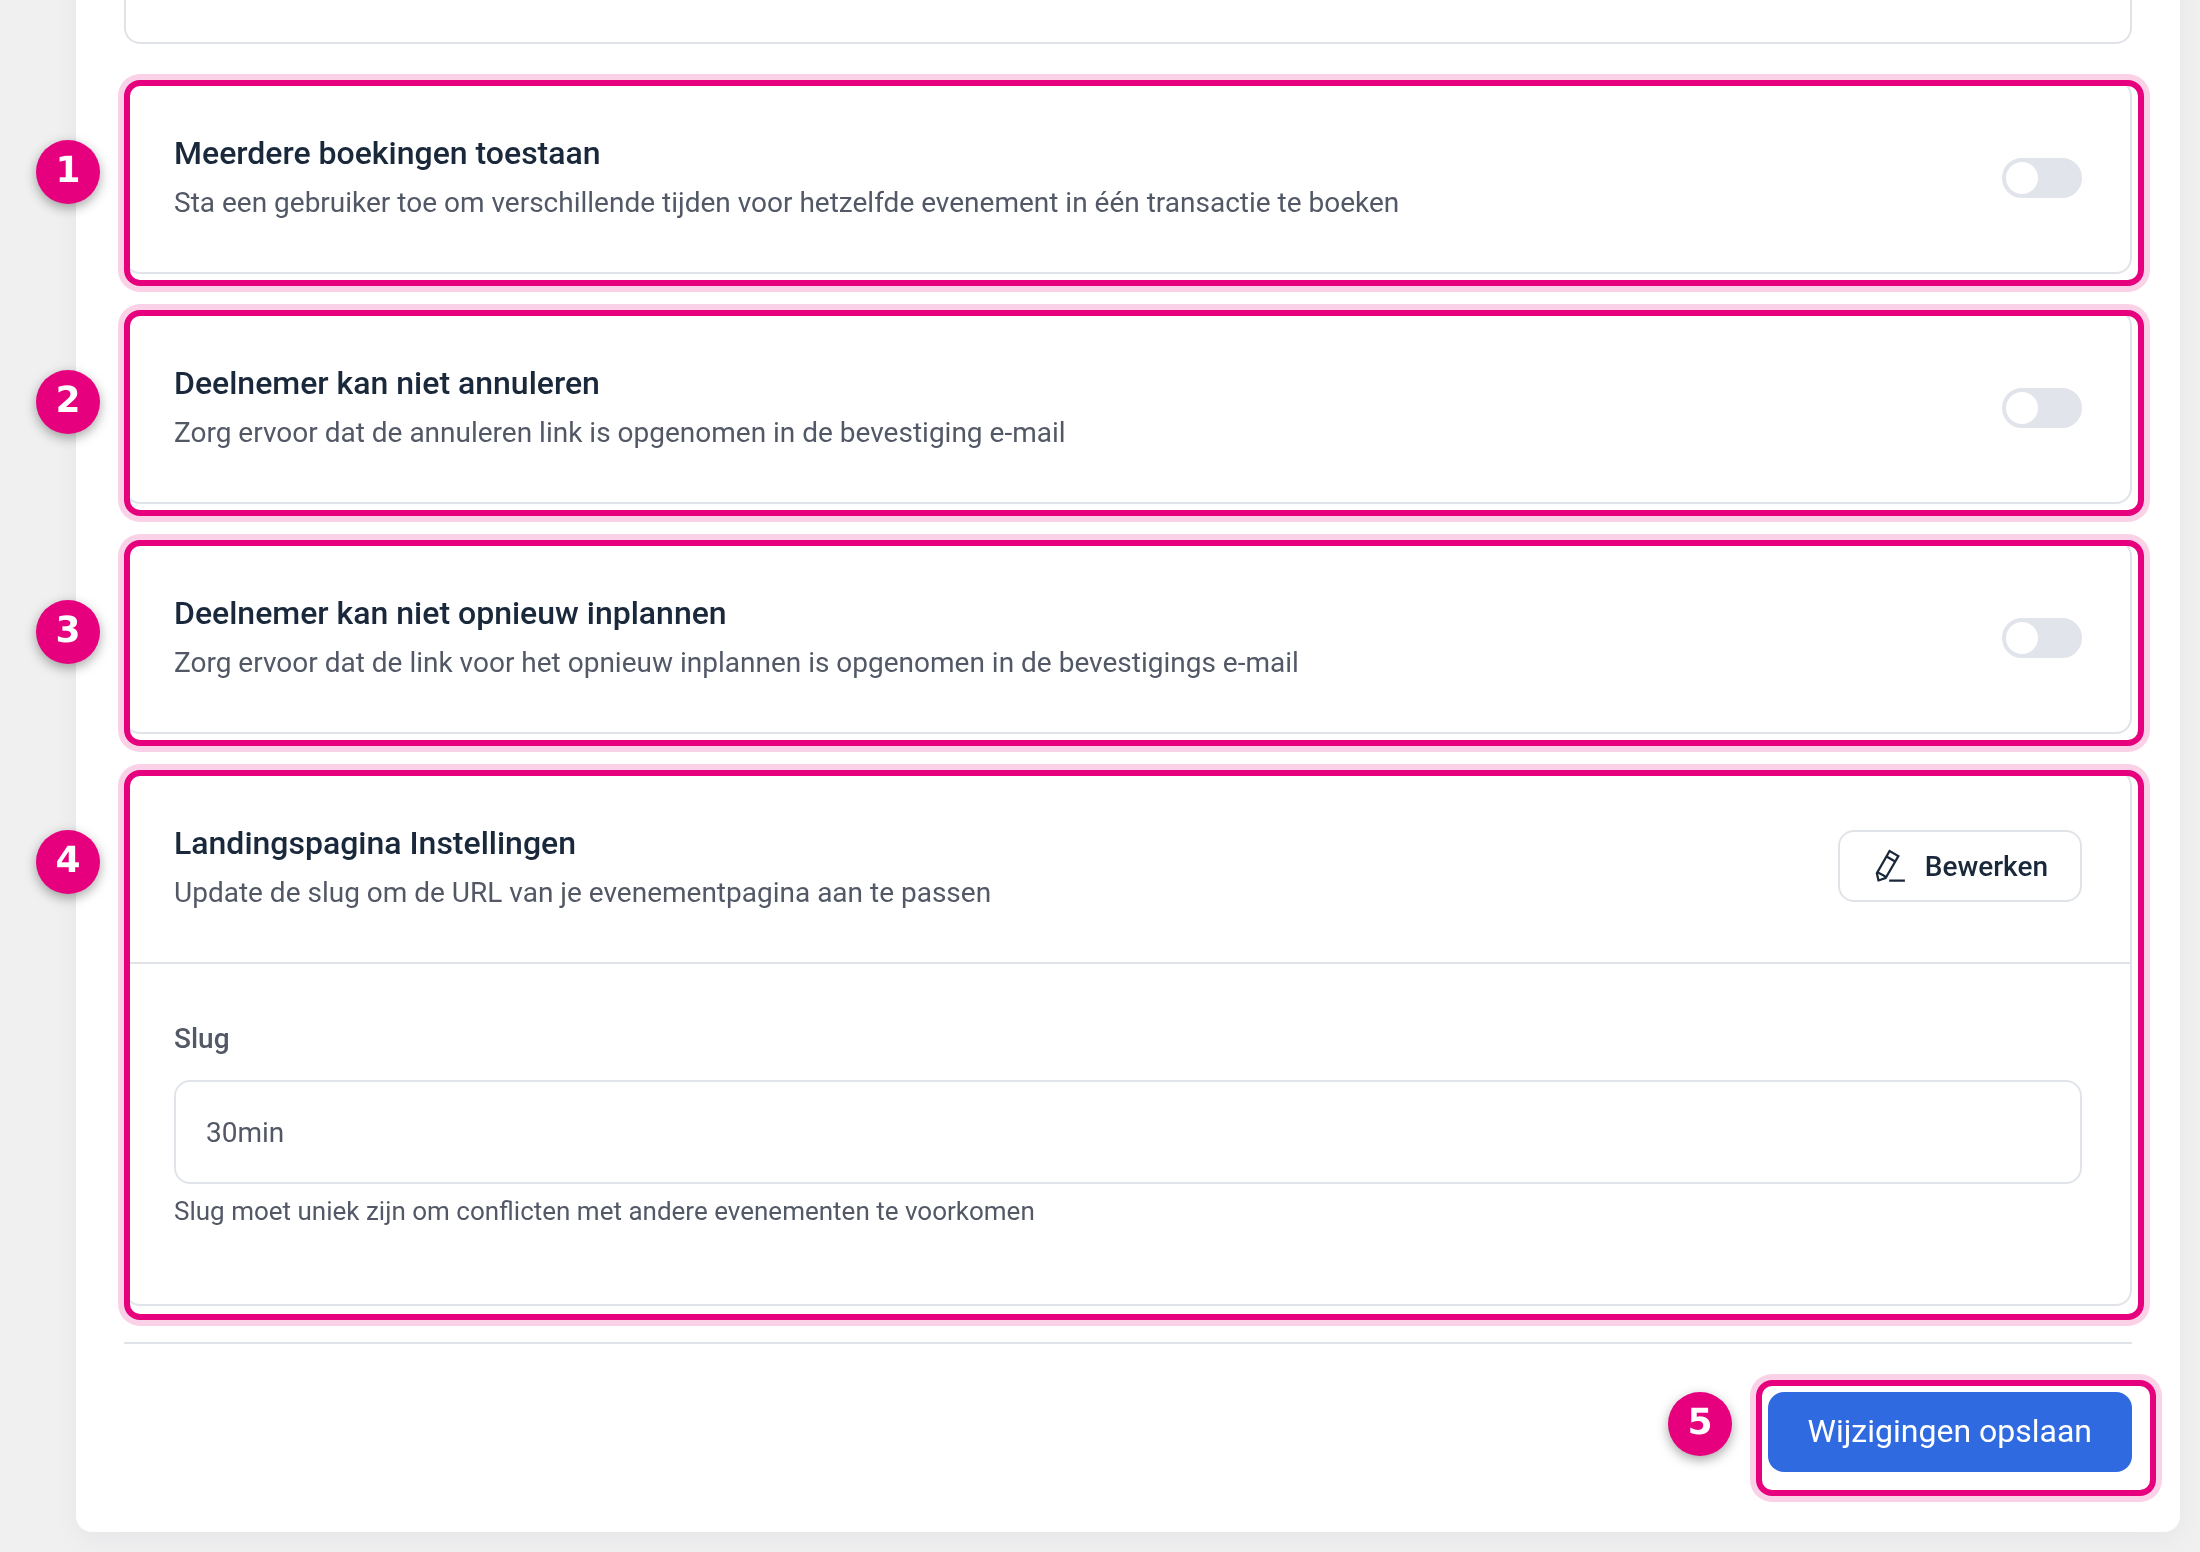
- Allow multiple bookings. With the description “Allow a user to book different times for the same event in one transaction”. Useful when someone wants to lock in several moments for the same service at once, for example a series of coaching sessions.
- Attendee cannot cancel. When this toggle is off, the attendee may cancel the appointment through the Cancel link. When you switch it on, that link disappears from the confirmation screen. Only switch it on if you really do not want people to cancel by themselves, because otherwise those cancellations reach you by email and you have to process them yourself.
- Attendee cannot reschedule. The same principle, but for the Reschedule link, with which the attendee moves the appointment to another time.
- Landing Page Settings. Click Edit and the Slug field opens. The slug is the last part of the web address of your booking page. Underneath it is the warning that the slug has to be unique. See section 7.
- Save changes. Without this click nothing happens. This button saves all the settings on this tab in one go.
3. Approving bookings yourself with Requires confirmation #
By default an appointment is final as soon as someone picks a time on your booking page. If you want to check first whether it suits you, switch on Requires confirmation. The booking then arrives as a request and only becomes a real appointment after you click Confirm.
- Open the Advanced settings tab of your booking type.
- Switch on the toggle at Requires confirmation.
- Choose Always if you want to approve every single booking. Choose When booking notice is less than if you only want to step in for requests that come in at short notice; then enter the number and pick the unit of time next to it (for example 30 and Minutes). Bookings that are further in the future simply go through straight away.
- Click Save changes at the bottom.
What the attendee sees #
From that moment on, your booking page shows an extra line in the left-hand column, next to the duration and the location.
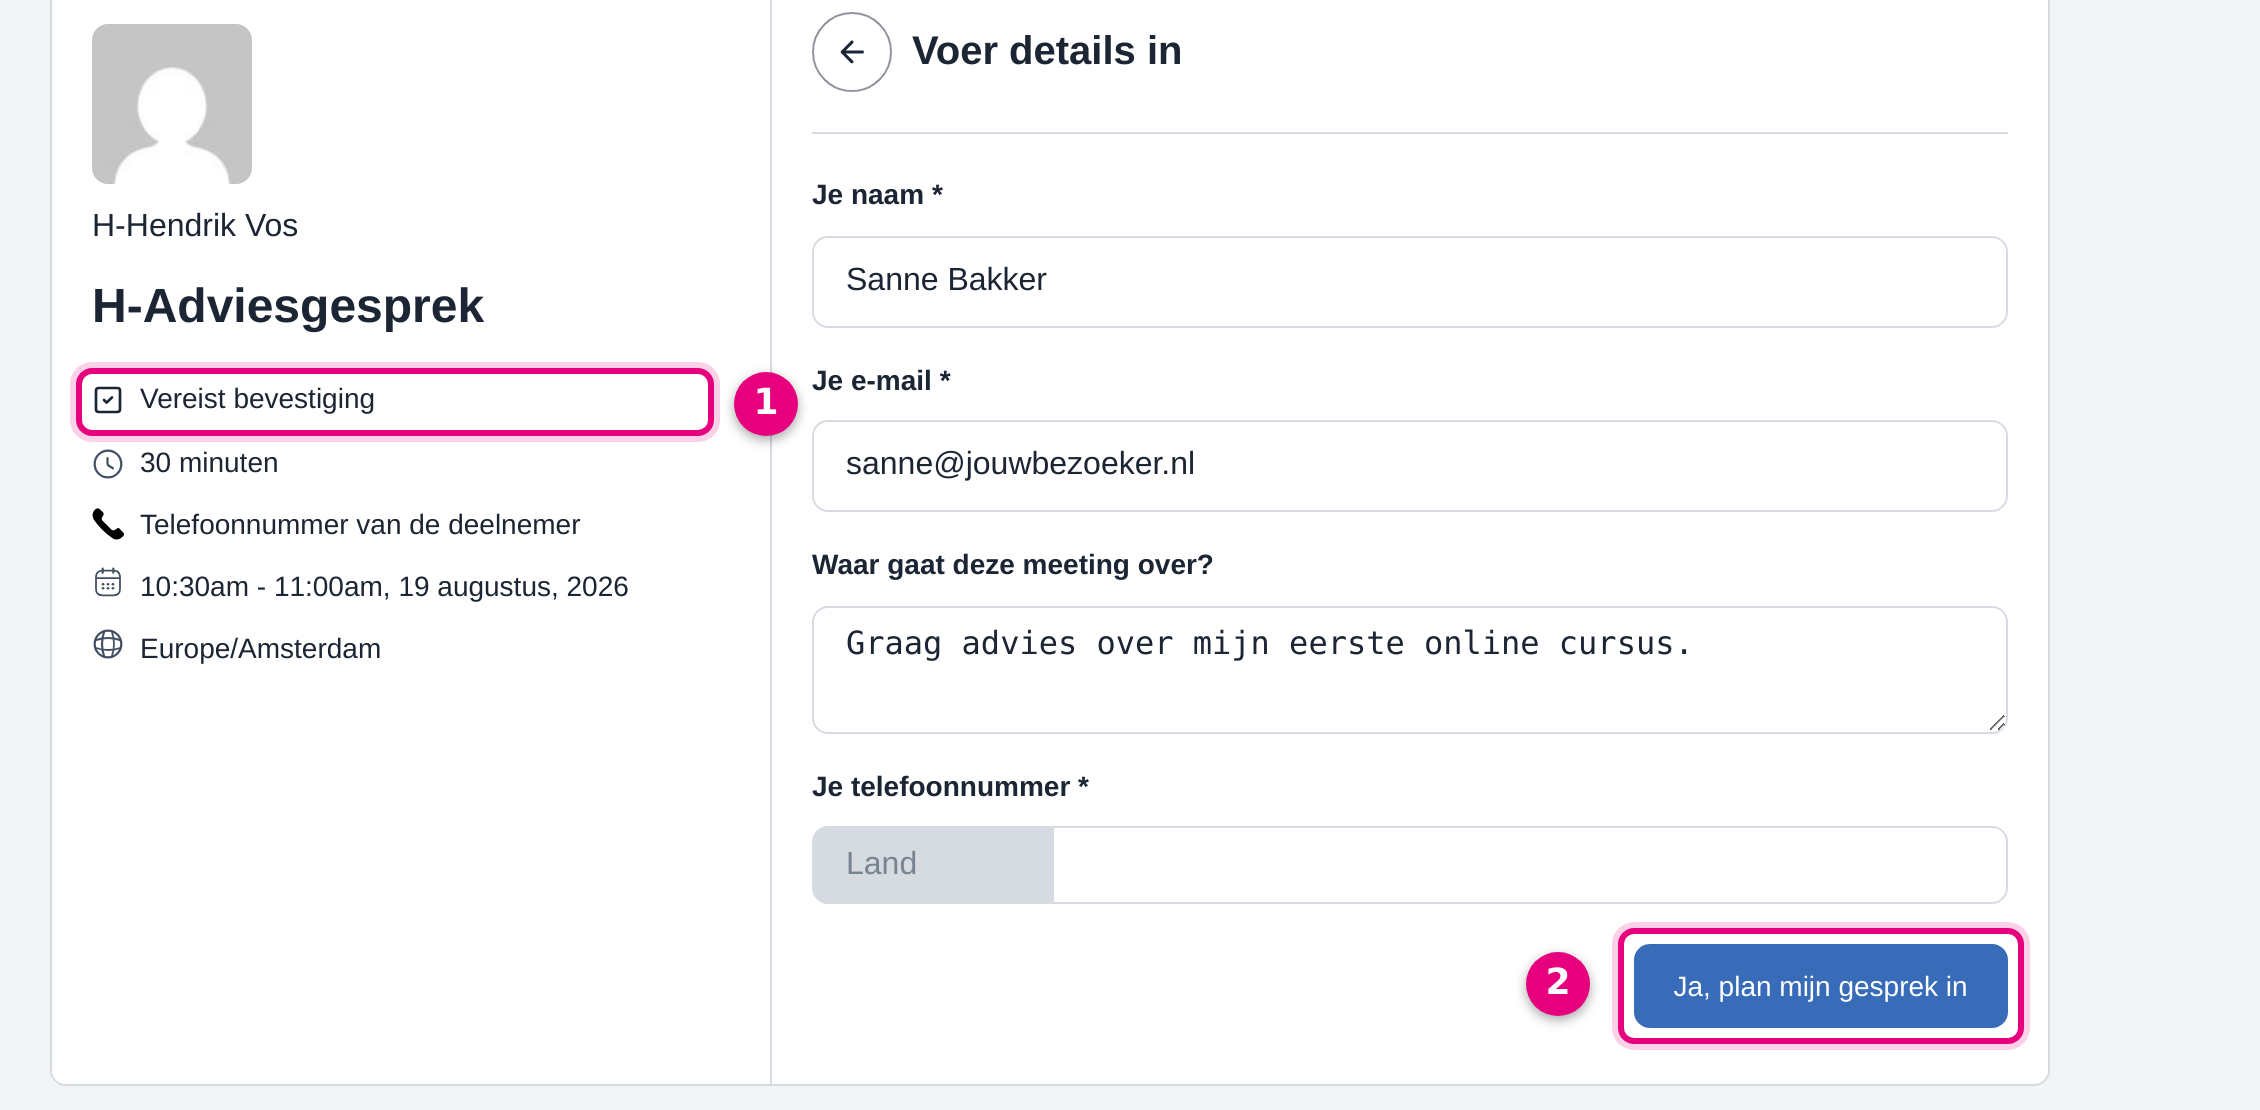
- Requires confirmation. This line appears automatically as soon as you switch the setting on. It tells the visitor in advance that the chosen time is not final yet.
- The submit button. In this example it reads “Yes, schedule my call” instead of the default text. Section 5 explains how to set that up.
After the visitor has clicked the button, the confirmation screen appears. That screen looks different from the one after an ordinary booking.
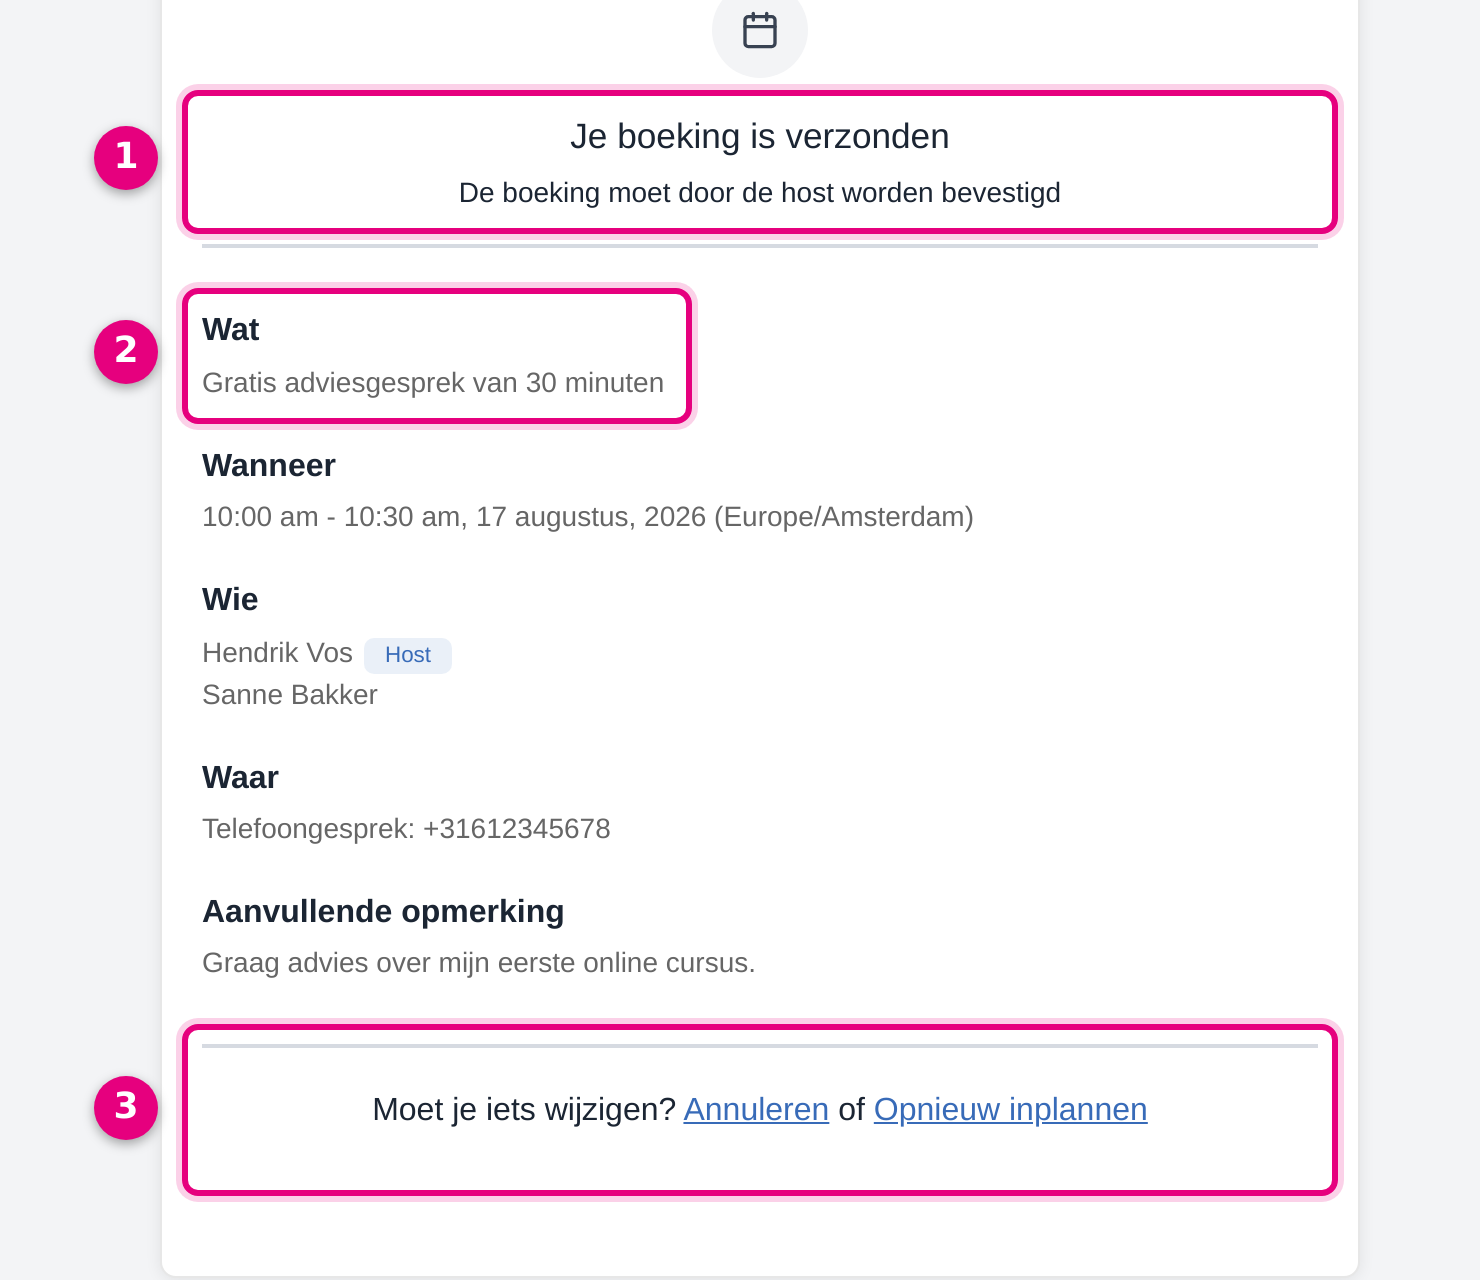
- Your booking is submitted with underneath it The booking needs to be confirmed by the host. On a booking type without this setting, an ordinary confirmation of the appointment appears here.
- What. This shows the booking title from section 5. Below it follow When with the date, time and time zone, Who with you as host and the attendee, Where with the chosen location and Additional note with whatever the attendee has filled in.
- Need to change something? With the links Cancel and Reschedule. These links disappear as soon as you switch on the toggles from section 2.
What you receive #
A request that is still waiting for approval does not sit with your ordinary appointments. Go to Manage → Appointments and click the Bookings tab. As soon as a request is open, an extra Pending tab appears there with the number behind it. Click that tab and click View details on the request.
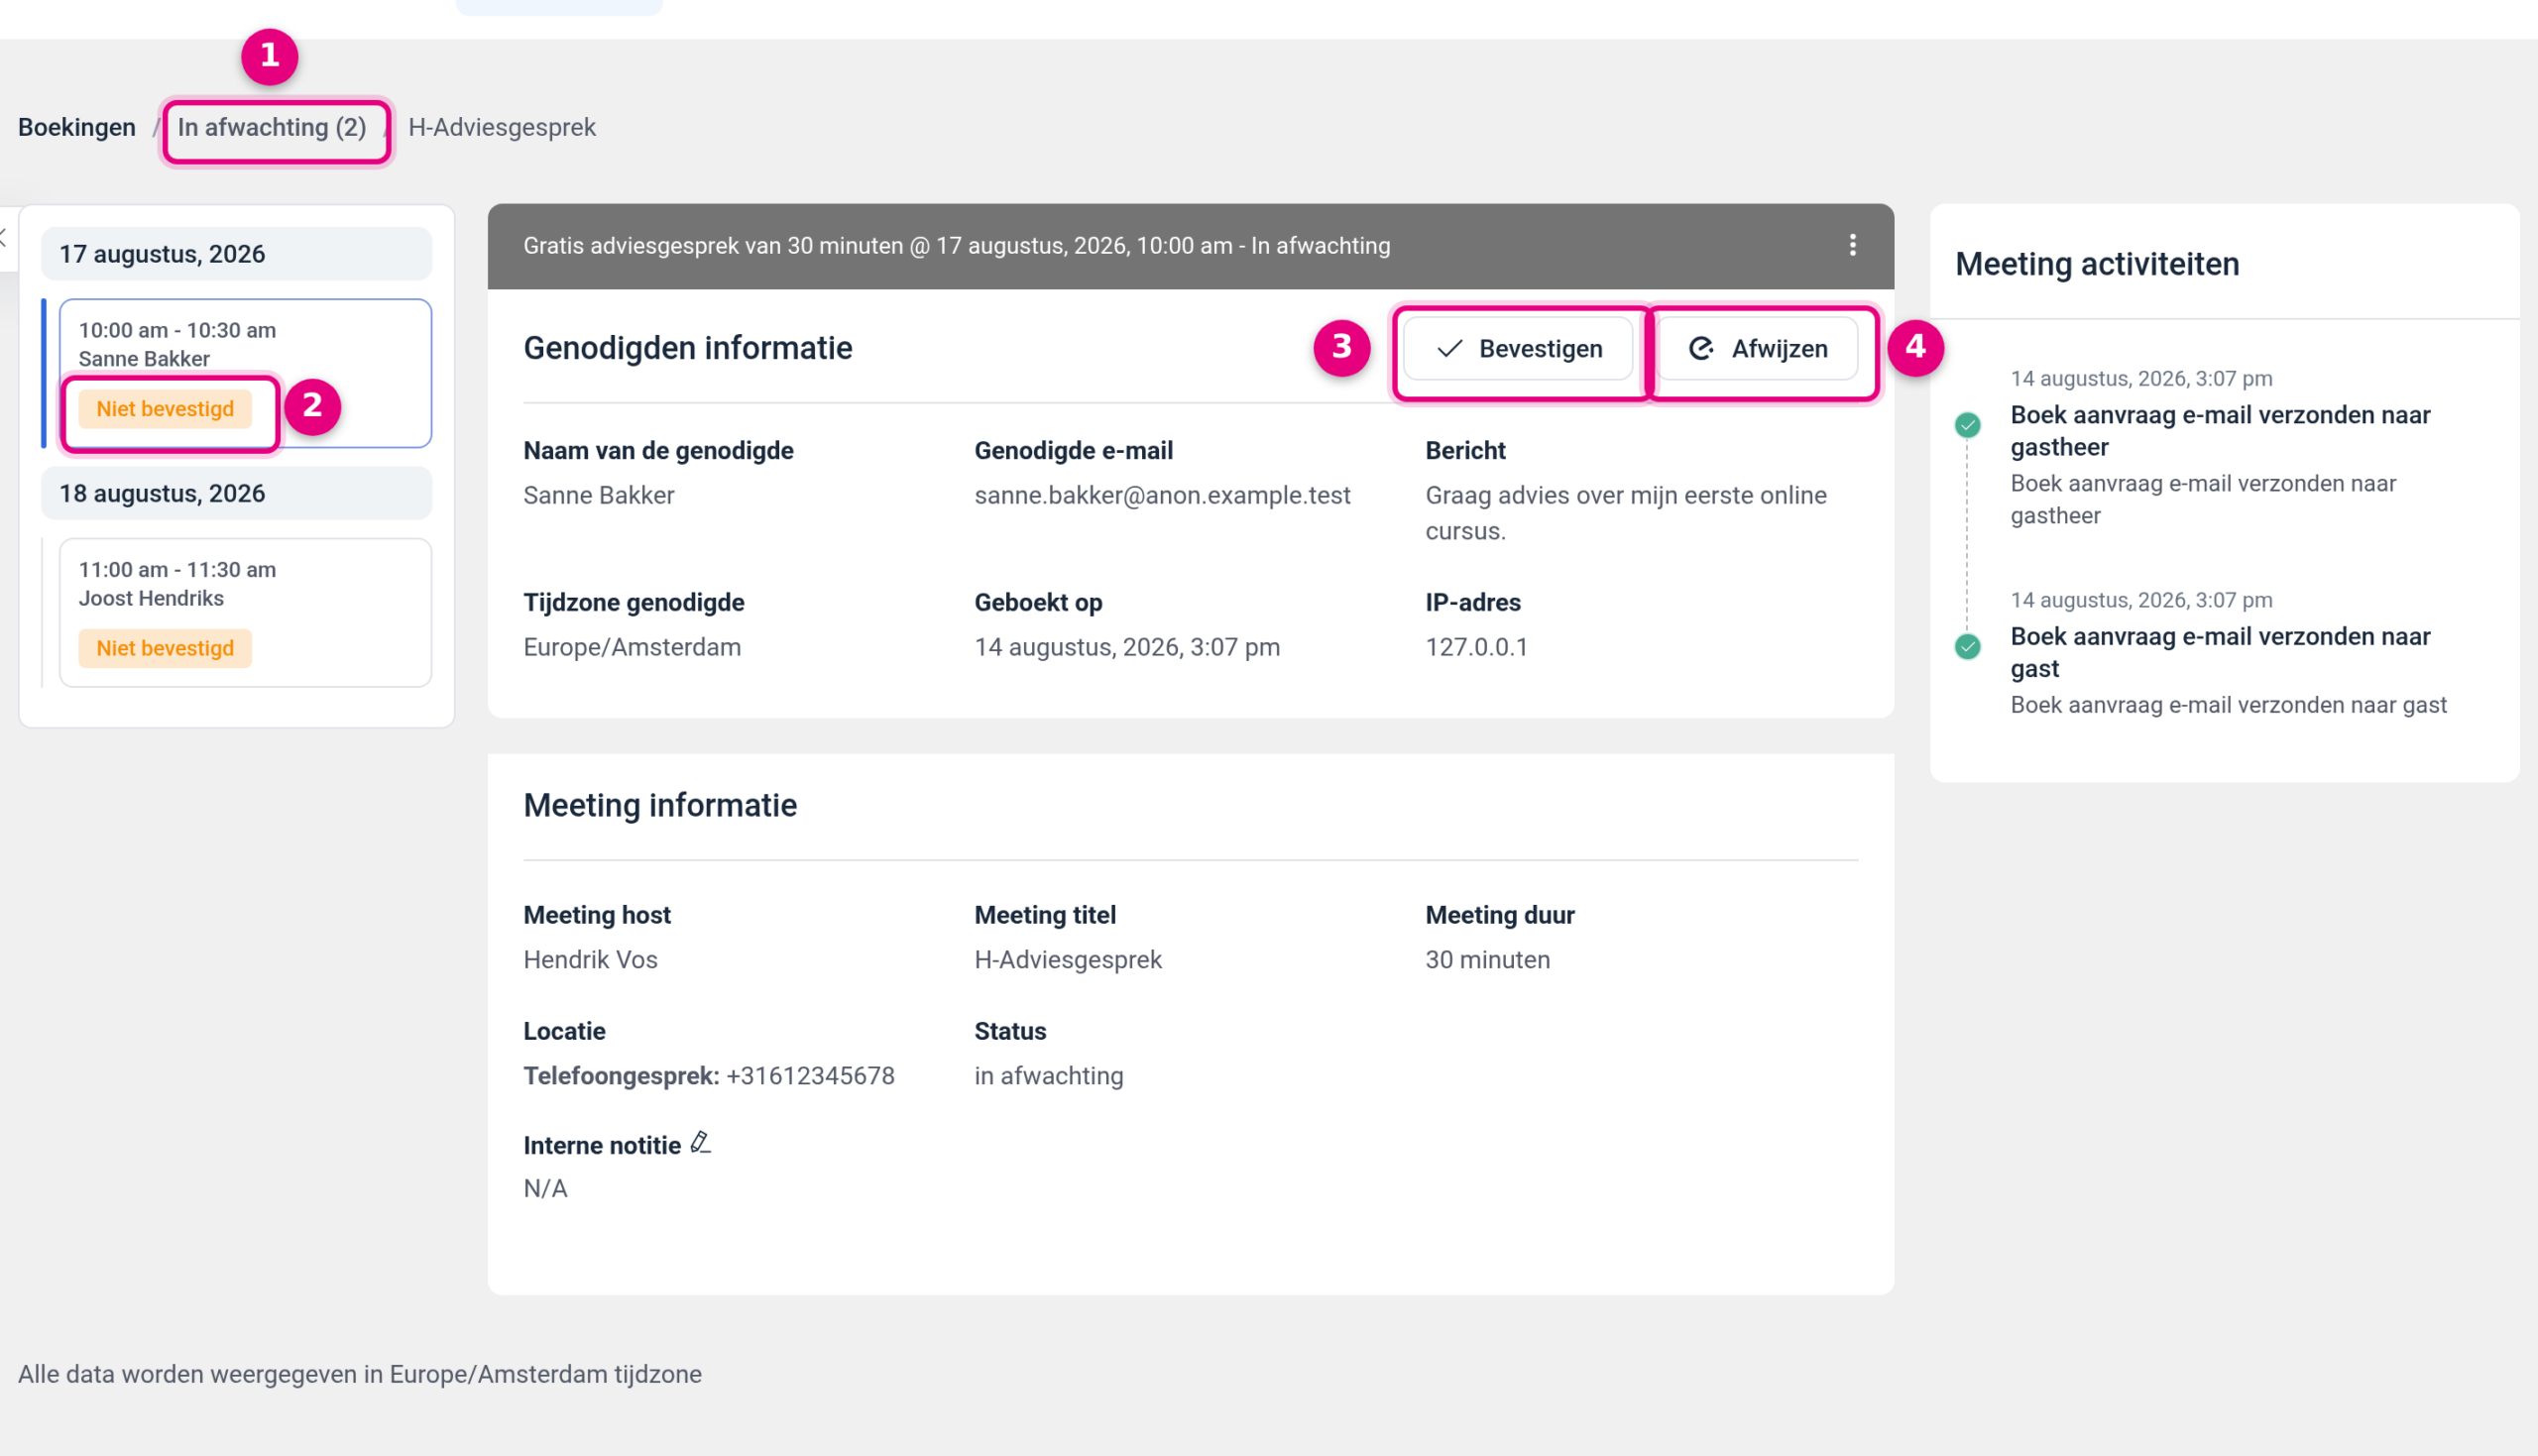
- Pending. The extra tab with the number of open requests. So look here, and not under Upcoming: a request that has not been approved yet does not count there.
- Unconfirmed. The orange label on every request in the left-hand column. Further along in the screen, Status says the same in words: pending.
- Confirm. This approves the request. Only at that moment does it become an ordinary appointment, the confirmation goes out to the attendee and the connections with your other components are carried out.
- Reject. This turns the request down. The time slot becomes available again for someone else.
On the right of the same screen you will find the Meeting activities. There you can read back which messages have been sent, for example “Booking request email sent to host” and “Booking request email sent to guest”. You will also find the details of the attendee, the message left behind at the time of booking and the Internal note in which you can record something yourself.
The emails that go with approval #
When you switch on Requires confirmation, different emails go out than with an ordinary booking. The Email notification tab of the same booking type has a separate block Other notifications for this, with three messages:
- Booking approval request to host (email to organiser): the signal to you that a request is waiting.
- Booking confirmation (email to attendee): the message the attendee receives after you have clicked Confirm.
- Booking rejected by organiser (email to attendee): the message that goes out on Reject.
Go through these three messages once and adjust the wording to your own style, because they are used for this booking type only. How to open and edit an email, and which fields you can use, is explained in Setting up confirmation and reminder emails for your appointments.
4. Redirect after booking: sending people to a page of your own #
With Redirect after booking you send the attendee to a page of your own after booking, for example a thank-you page with a video or a follow-up offer. This is how you set it up:
- On the Advanced settings tab, switch on the toggle at Redirect after booking.
- At Redirect URL, enter the full web address of your page, so including https://, for example https://yourwebsite.com/thank-you-for-your-appointment/.
- If you want the submitted details to be passed on to that page, tick Pass field data through query string. The details are then added behind the web address. Leave this box unticked if your page does nothing with them.
- Click Save changes.
What the attendee misses as a result #
Important to know: the attendee no longer arrives on the confirmation screen from section 3. So they no longer see what exactly has been booked, on which date and at which time, in which time zone, at which location, and they no longer have buttons to Cancel or Reschedule. If you use Requires confirmation as well, they also miss the notice that the booking still has to be confirmed by you.
Our advice is therefore the same as for an order in the shop: leave the default page in place, unless you have a good reason to replace it. That trade-off is described in detail in A thank-you page of your own after purchase (and why the default page is usually better). If you do want to show something extra, consider a middle course: put your follow-up offer in the confirmation email of this booking type, or include the date, the time and the option to cancel on your own page.
5. Changing the wording: Booking title and Submit button text #
There are two text fields at the top of the tab. They do something quite different, so pay attention to which one you fill in.
- Booking title. The name of the booking itself. You see it again on the confirmation screen of the attendee at What, and in your own Bookings overview as the title above the appointment. If you enter nothing, the module uses the default title that is shown in grey in the field; that title is built from the name of your service, your own name and the first name of the attendee. A title of your own such as “Free 30-minute advice call” reads more comfortably.
- Submit button text. The text on the button with which the visitor locks in the appointment, right at the bottom of the booking form. If you enter nothing, it reads Schedule Meeting. Wording in your own words, for example “Yes, schedule my call”, makes that final step that bit more personal.
What the visitor notices of this is shown in the two images in section 3: the button text sits at the bottom right of the booking form and the booking title sits on the confirmation screen at What. Note: neither field changes the large heading on your booking page. That heading is the name of your booking type and you change it on the Event details tab, at Event name. After making a change, do not forget to click Save changes.
6. Settings that apply to all your booking types #
A few things are not set per booking type, but once for the whole module. Go to Manage → Appointments and click Settings at the top right. You then land on Global settings, with a menu on the left in which General comes first.
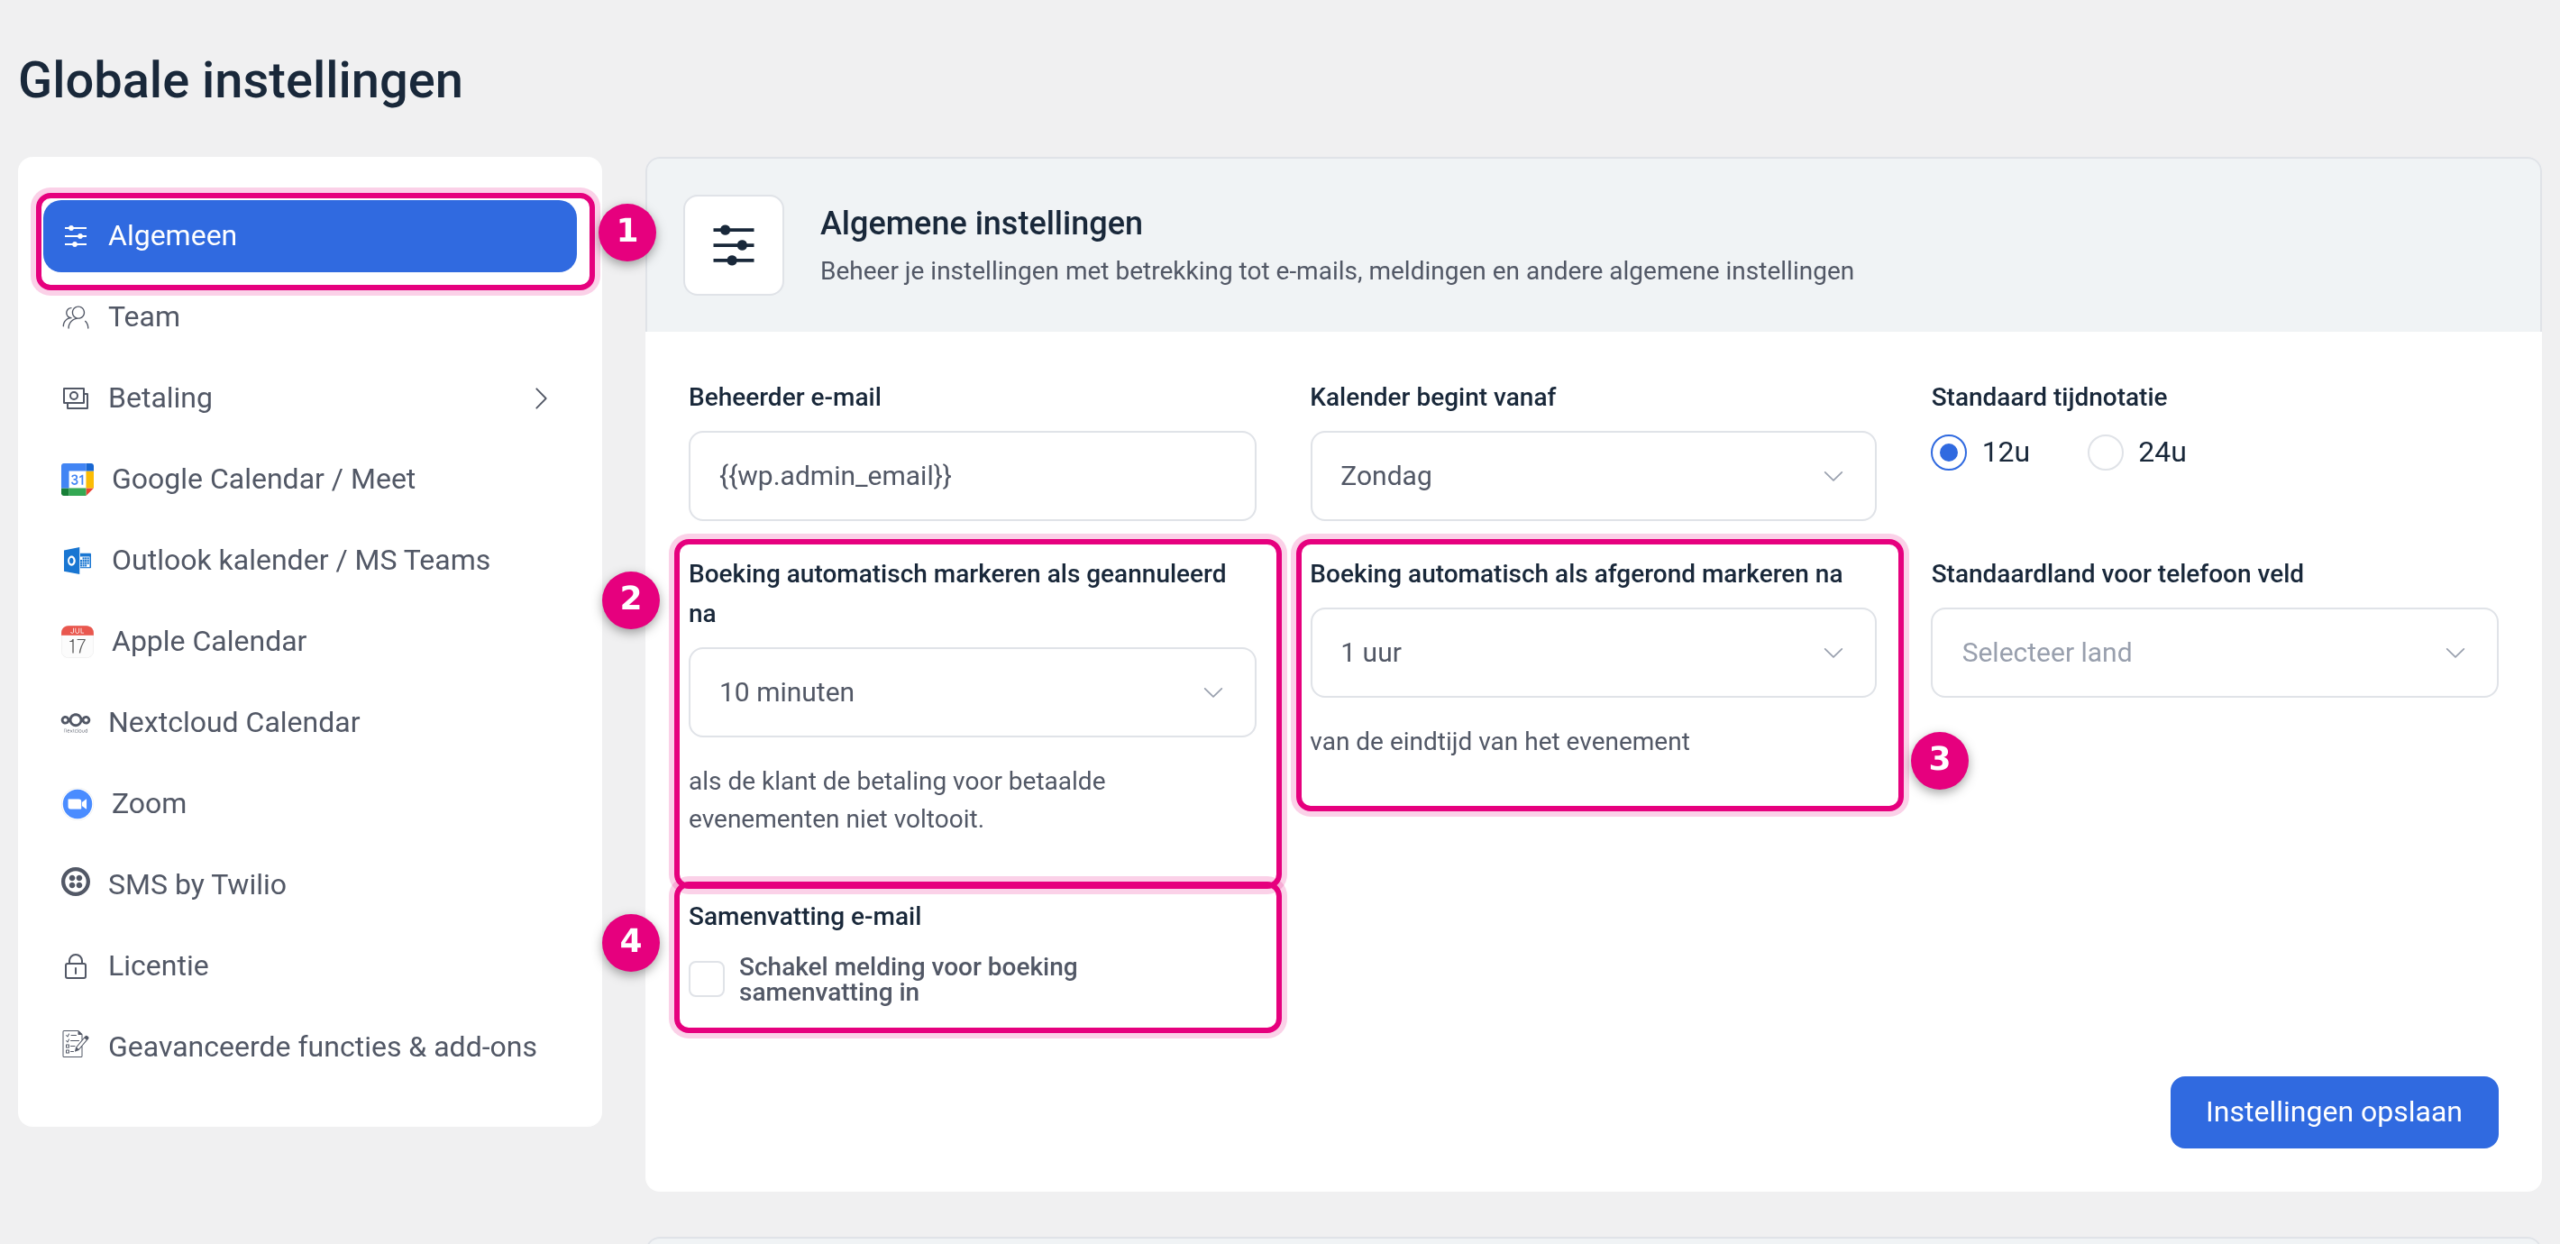
- General. The first section in the left-hand menu. Below it are Team, Payment, the connections with external calendars and Zoom, among others. The same General section also holds Admin email, Calendar starts from (the day your calendar starts on), Default time format (12h or 24h) and Default country for phone field at the top.
- Automatically mark booking as cancelled after. This only concerns paid appointments. If someone does not pay within this period, the booking lapses automatically and the time slot becomes available again. The description underneath says it literally: “if the customer does not complete the payment for paid events”.
- Automatically mark booking as completed after. How long after the end time of the appointment the booking automatically gets the status completed. Useful, because it moves an appointment from your list of upcoming bookings to your list of completed bookings by itself.
- Summary email. With the checkbox Enable booking summary notification you periodically receive an overview email of your bookings instead of only separate notifications per booking.
If you scroll further down the same page, below the email settings there is another block Theme with the description “This only applies to your public landing pages”. There you choose between System default, Light and Dark. System default means the page adapts to the preference the visitor has set on their own device; with Light or Dark you fix the appearance for everyone. Each of these three blocks has its own Save settings button, so save the block in which you changed something.
7. Good to know #
- The slug of your landing page has to be unique. Under Landing Page Settings → Edit you will find the Slug field, with underneath it the message that the slug has to be unique to prevent conflicts with other events. The module makes up that slug itself based on the duration of your service, so two booking types of thirty minutes get almost the same slug. Change it to something recognisable, and make sure that you then also share the right link. How to copy the link of a single service is explained in Sharing your booking link: one service or all your services on one page.
- If you change the slug, your booking link changes. Links you shared earlier, in an email or on your website, will then point to an address that no longer exists. So update them after you have changed the slug.
- If your landing page does not work, check the host settings as well. If Which booking forms to display? is set there to Only selected active booking types, a service that is not ticked cannot be reached through its own link either. There is no error message: your visitor ends up on the home page of your site. What to do about that is explained in Sharing your booking link: one service or all your services on one page.
- Everything on this tab applies per booking type. If you have several services, you set approval, redirects and wording separately for each service. Only the settings from section 6 apply to everything at once.
- Does your booking type not exist yet? Then start with Creating your first calendar and booking type in the Appointments module and then set your working hours through Setting your availability: working hours, buffers, minimum notice period and daily maximum.
Related articles #
- Sharing your booking link: one service or all your services on one page
- Connecting your calendar to the appointment scheduler
- Setting up multiple booking durations in the Appointments module
- Setting up group events in the Appointments module
- Setting up paid appointments with automatic checkout
- Adding appointments manually in the Appointments module
- Connecting appointments to the CRM: creating contacts automatically on a booking
- Connecting Zoom to the Appointments module for automatic meetings
- Making several meeting rooms bookable with a maximum capacity


