Cancelling and rescheduling appointments: by your attendee and by yourself #
A booked appointment rarely stays exactly as it was booked. Someone can no longer make it, you move a conversation a day later, or something else comes up. In the Appointments module an attendee can cancel and reschedule on their own by default, using the links in the confirmation email, and you can do the same yourself from the Bookings screen. In this article you will read where you switch that behaviour on and off, what your attendee sees exactly, how you do it yourself and which emails go out automatically.
The Appointments module is an optional extension you can add to your Autorespond package. This module lets people book appointments online, comparable to Calendly. More information about this module
1. What happens by default #
With a new booking type the attendee is allowed to cancel and to pick a different date and time. That does not run through an account or a customer portal: the attendee needs the confirmation email they receive after booking. At the bottom of that email is the line “Need to make a change?” followed by the links Reschedule and Cancel. Both links contain a unique code for that one booking, so they only work for that appointment.
That has a practical consequence too: if the attendee loses that email, they can no longer change anything themselves and will have to ask you. You can send the confirmation email again from the Bookings screen, or reschedule the appointment yourself. Step 5 explains how.
2. The two settings that determine the behaviour #
Whether an attendee may cancel or reschedule is arranged per booking type. Go to Appointments → Calendars, click Edit on the right booking type and open the Advanced settings tab. There are two cards below each other: Attendee cannot cancel and Attendee cannot reschedule. Note the wording: the toggle is on when you want to prohibit the attendee. If they are off, the attendee is allowed to do it.
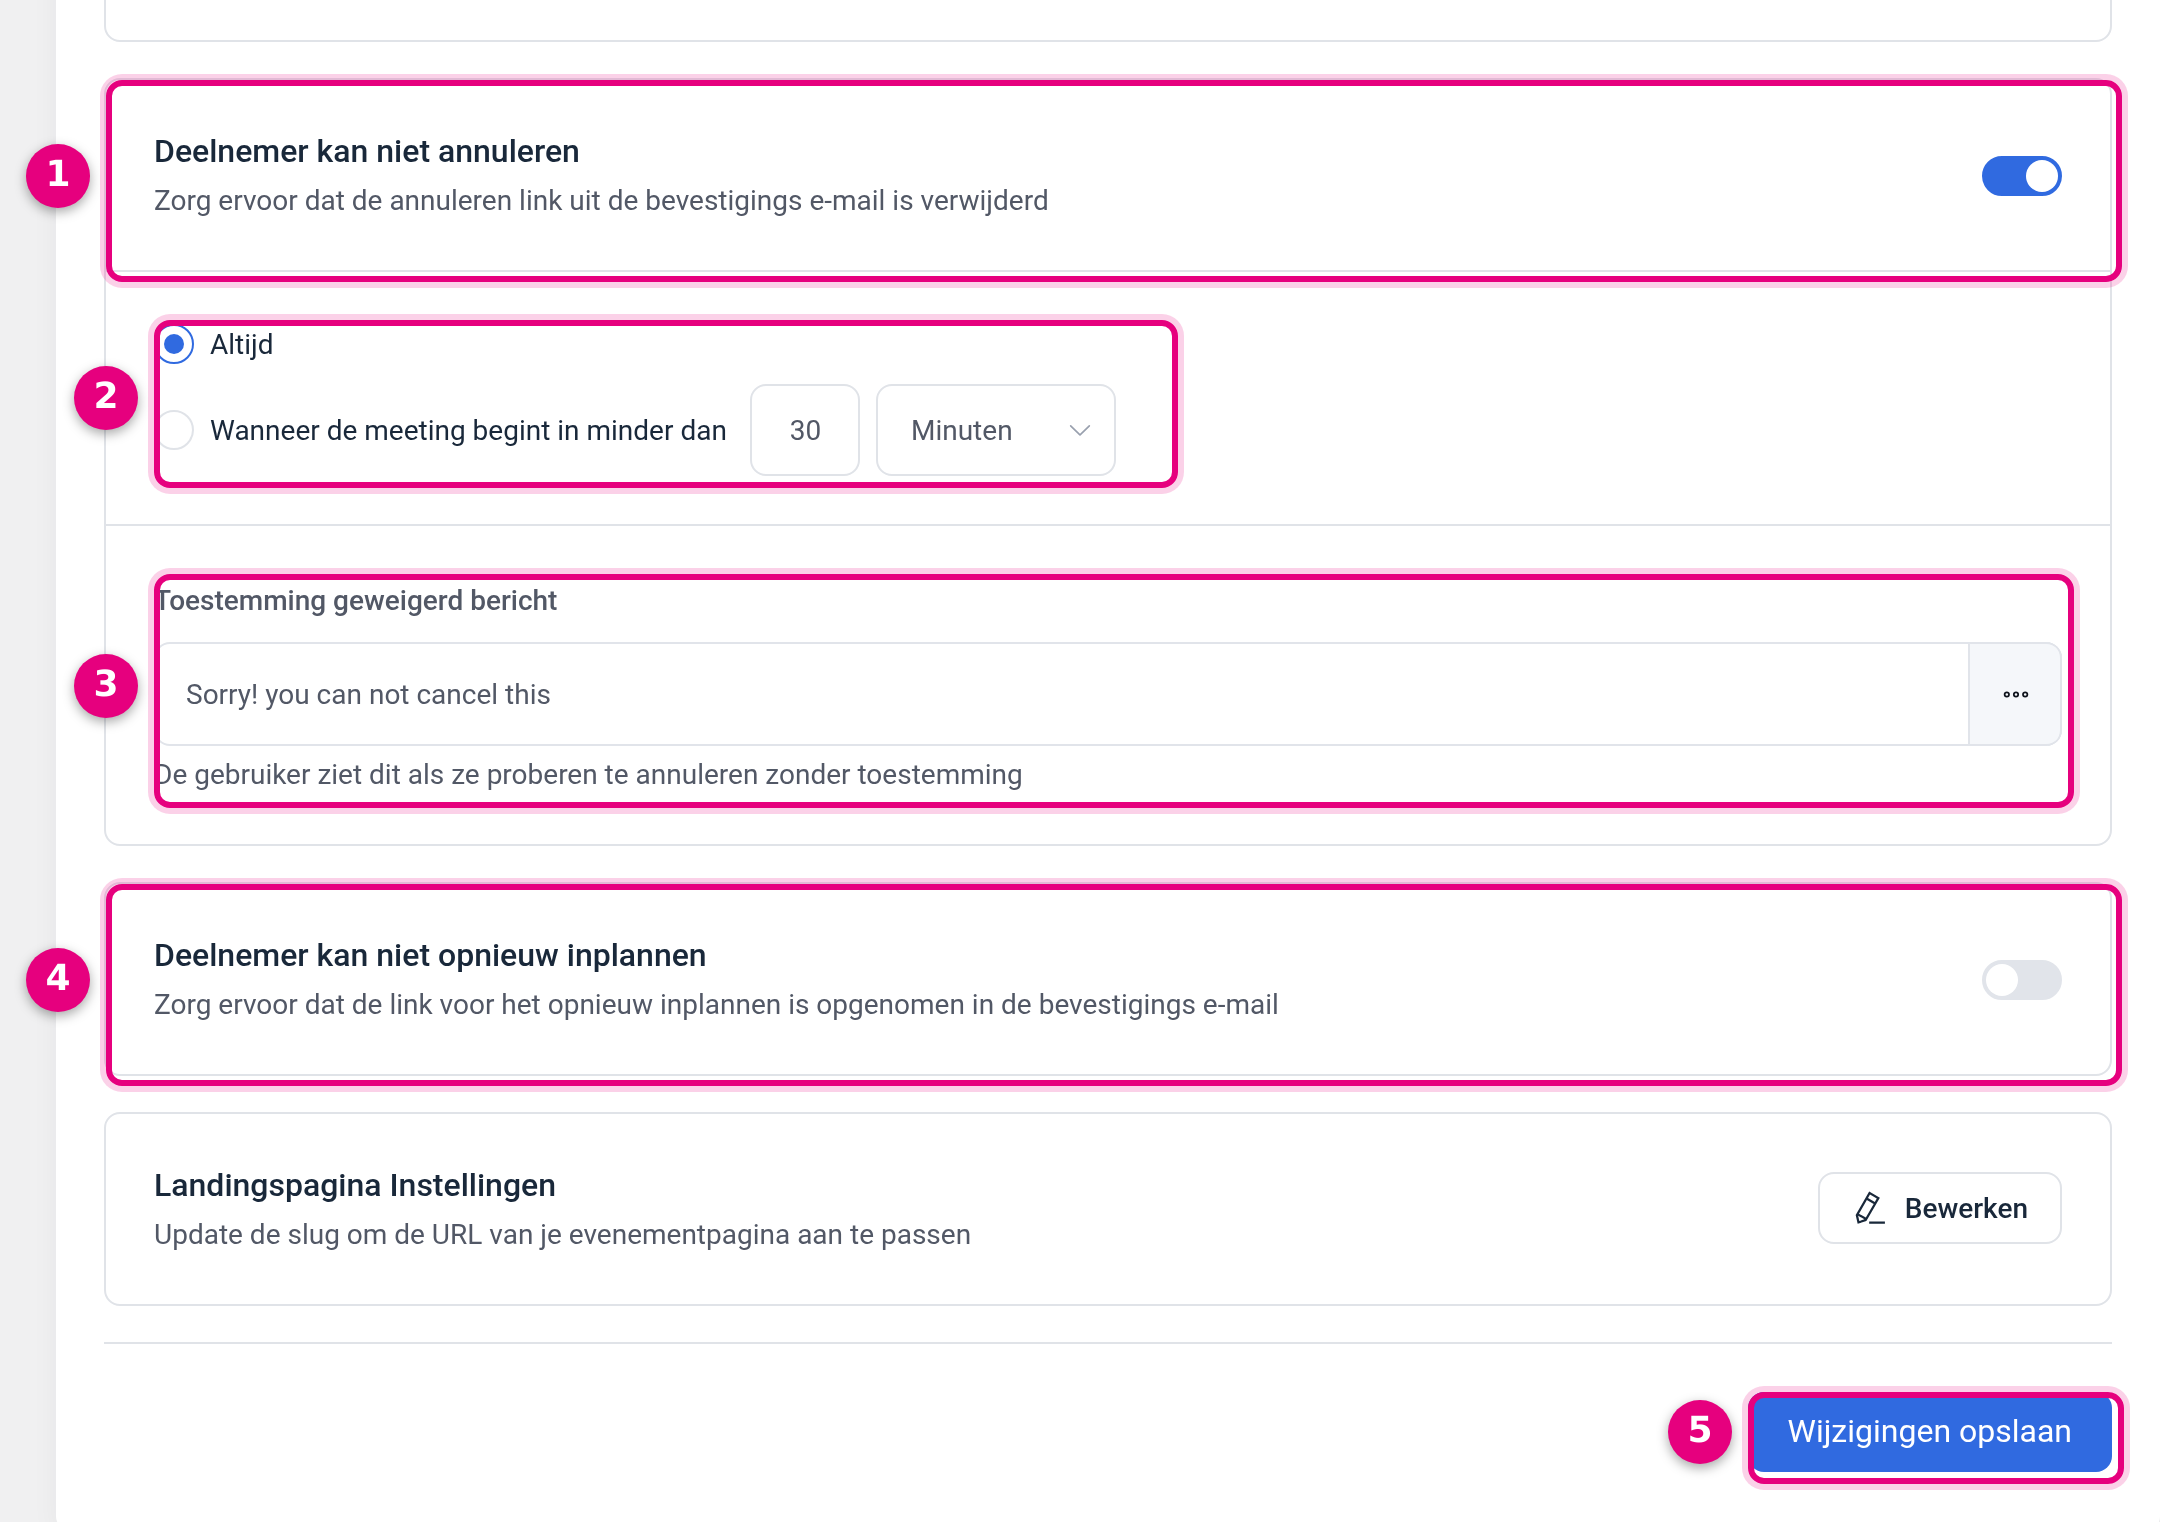
- Attendee cannot cancel. If this toggle is off, the attendee may cancel and the help text reads “Make sure the cancel link is included in the confirmation email”. If you switch it on, that help text changes to “Make sure the cancel link has been removed from the confirmation email” and the cancellation link disappears from the confirmation page the attendee sees after booking.
- Always or shortly before the appointment. As soon as you switch the toggle on, the choice Always or When the meeting starts in less than appears, with a number and the unit Minutes or Hours. The second option lets you build a more generous rule: cancelling is fine, but not within 24 hours of the appointment, for example. That is usually what you really want, because it keeps your calendar workable without locking the attendee down completely.
- Permission denied message. In this field you put the text the attendee sees if they still try to cancel, for instance because they dig up an old email. The help text below says it precisely: “The user will see this when they try to cancel without permission”. There is a default English text in it (“Sorry! you can not cancel this”), so replace it with your own sentence, for example: “You cannot cancel online within 24 hours of the appointment. Send us a message and we will sort it out together.”
- Attendee cannot reschedule. Exactly the same set-up, but for moving the appointment. Here too, after switching it on you get the choice Always or When the meeting starts in less than, plus your own message for anyone who still tries. You can use both settings independently: allow rescheduling but not cancelling, or the other way round.
- Save your changes. The settings only apply once you save, and they apply per booking type. If you have several services, walk through them one by one.
These settings say nothing about your own options. Even if the attendee may not do anything, you can still cancel or reschedule the appointment from Bookings.
3. How the attendee cancels #
The attendee clicks Cancel in the confirmation email and lands on a page headed Booking cancellation. The whole appointment is listed there once more: What, When, Who, Where and any comment left during booking.
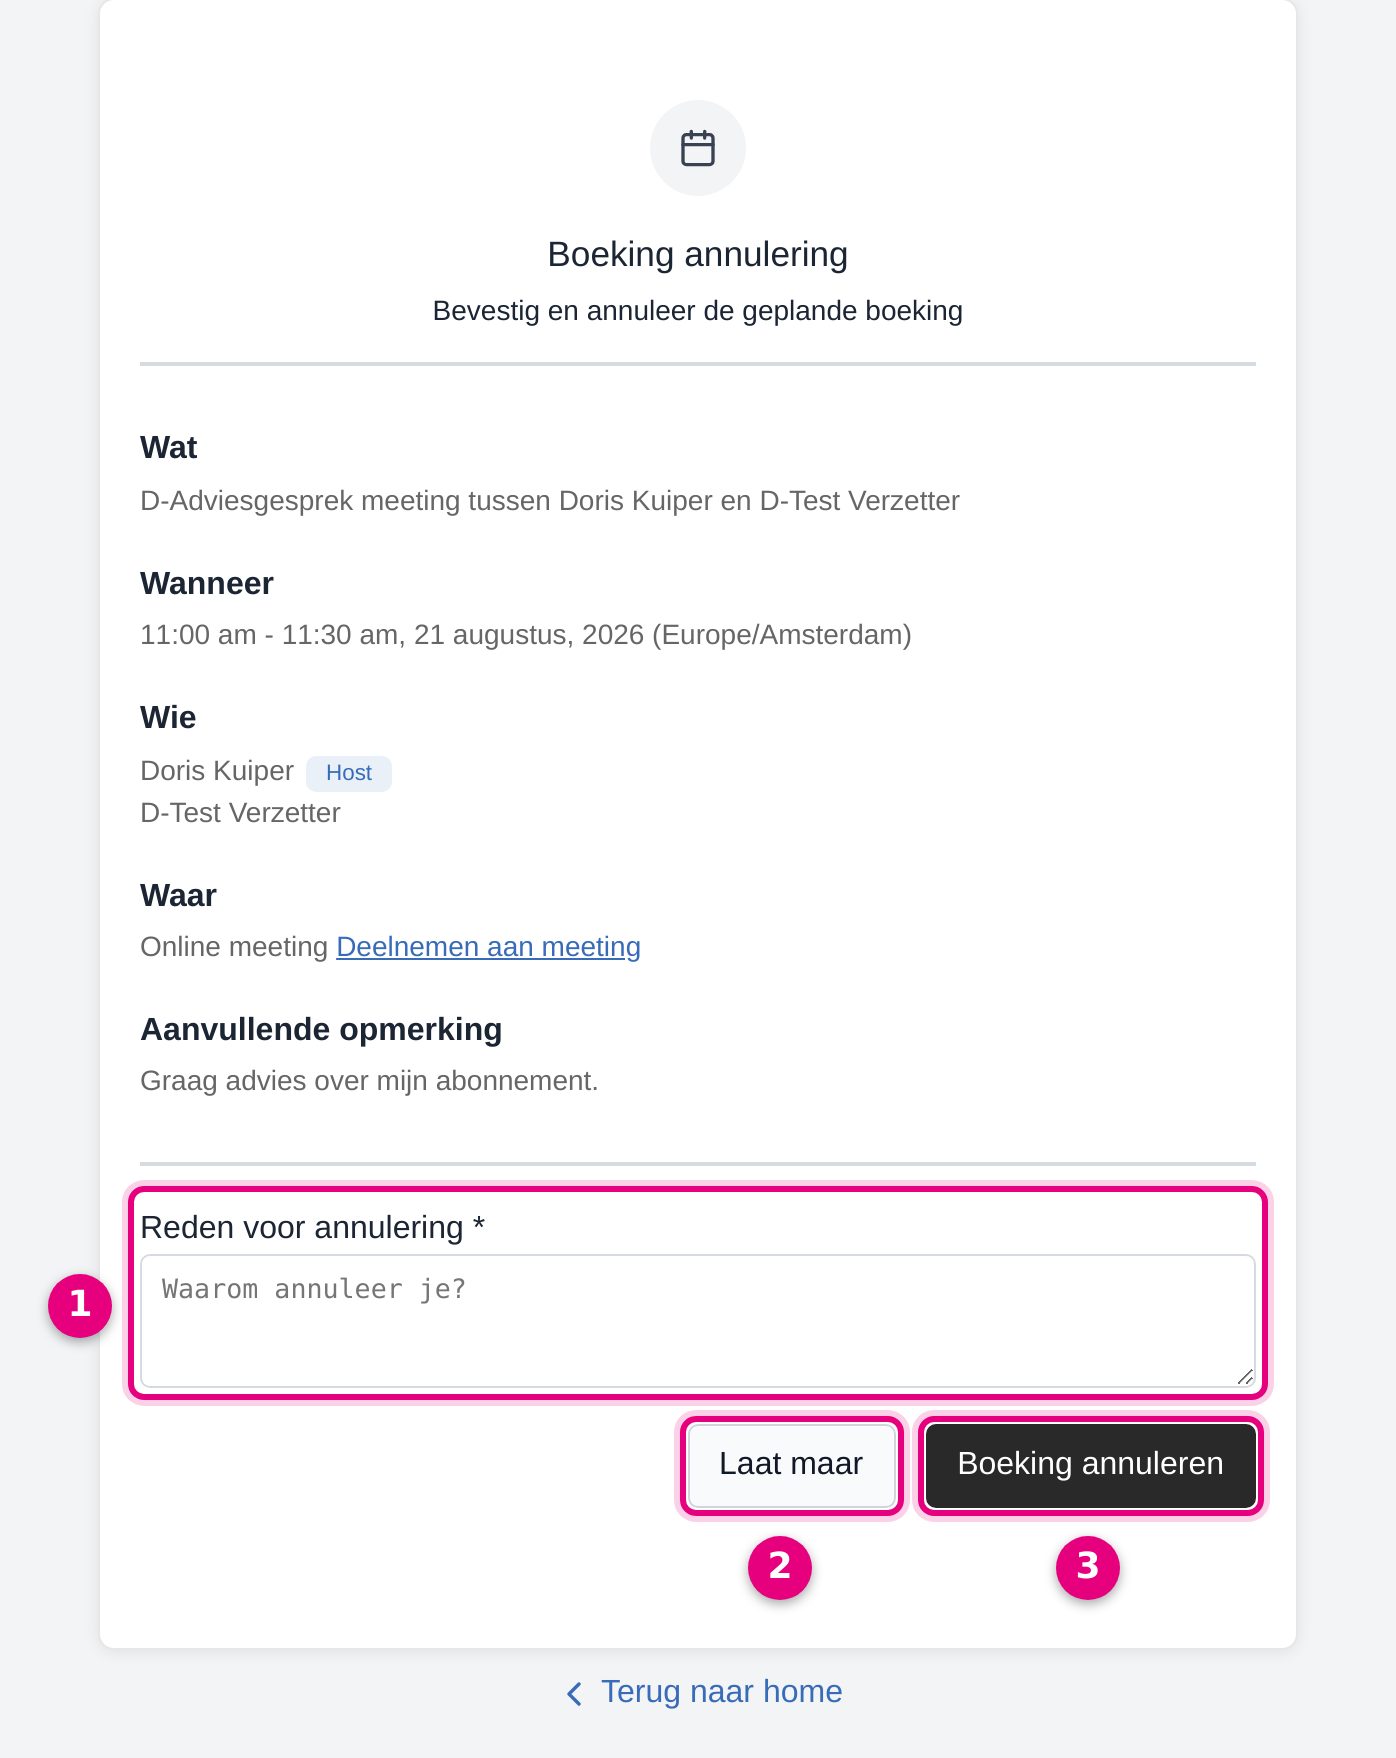
- Reason for cancellation. This field is on by default and is required, as the asterisk after the name shows. So the attendee always has to fill in something before they can continue. Step 7 explains how you adjust this field and where you read that reason back later.
- Never mind. The way out for anyone who clicked the link by accident. Nothing is cancelled.
- Cancel booking. This cancels the appointment definitively. The attendee immediately sees the confirmation “The meeting has been cancelled” on the same page.
What happens next: the booking does not disappear, but moves to the Cancelled tab in the Bookings screen and gets the status cancelled. The time slot becomes free again, so a next visitor can simply book that moment. You receive an email telling you the attendee has cancelled, including the reason given.
If you have set this booking type so that the attendee may not cancel, they see your own text from the Permission denied message field after clicking the button, and the appointment stays in place.
4. How the attendee reschedules #
If the attendee clicks Reschedule in the confirmation email, the same booking page opens as during the original booking, with a line at the top telling them which appointment they are moving. There they choose a new day and a new time from your availability and click Next.
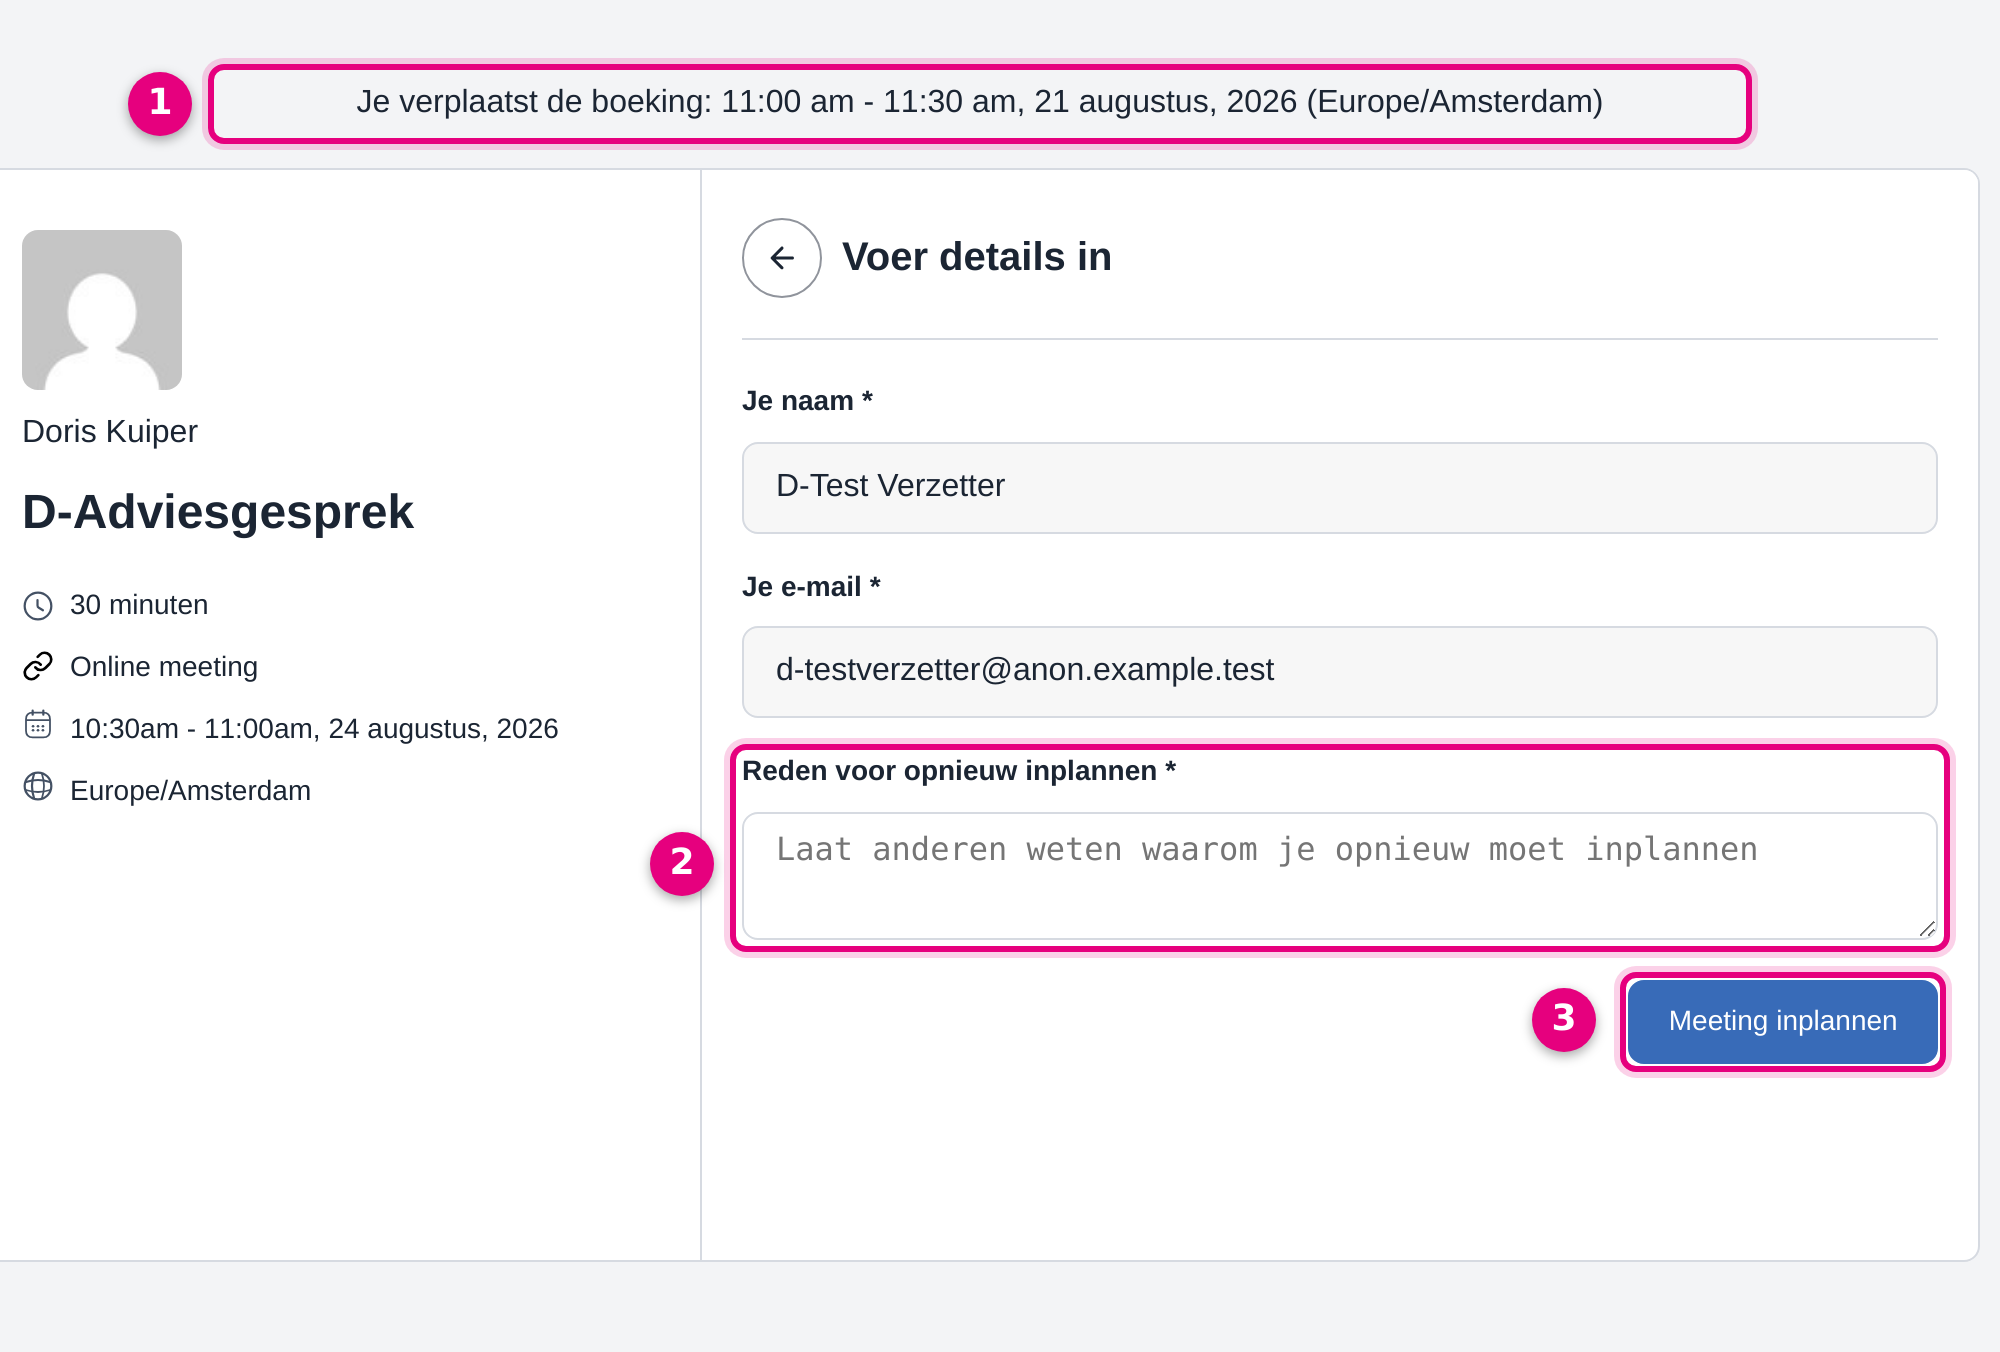
- You are rescheduling the booking. At the top is the appointment being moved, with the original date and time. That way the attendee knows for certain they have the right moment and are not accidentally booking a second appointment.
- Reason for rescheduling. On the Enter details screen the name and email address are already filled in and can no longer be changed. Only this field is still open, and it is required.
- Schedule meeting. With this the attendee confirms the new date and time. They then see the page “Your meeting has been rescheduled”, showing the new moment.
Important to know: rescheduling does not create a second booking. It remains the same appointment, which simply gets a different time. In the Bookings screen you see the line “Meeting rescheduled” under Meeting activities for that appointment, together with the previous date and time, so you can always look back at when the appointment originally stood. The old time slot becomes free again for others.
5. Cancelling or rescheduling yourself from Bookings #
Go to Appointments → Bookings and stay on the Upcoming tab. If you see nothing there, check the drop-down at the top right of the list: it is set to My meetings by default and then only shows appointments for which you are the host yourself. Choose All meetings or the name of the right host to see the rest as well. Then click View details on the appointment.
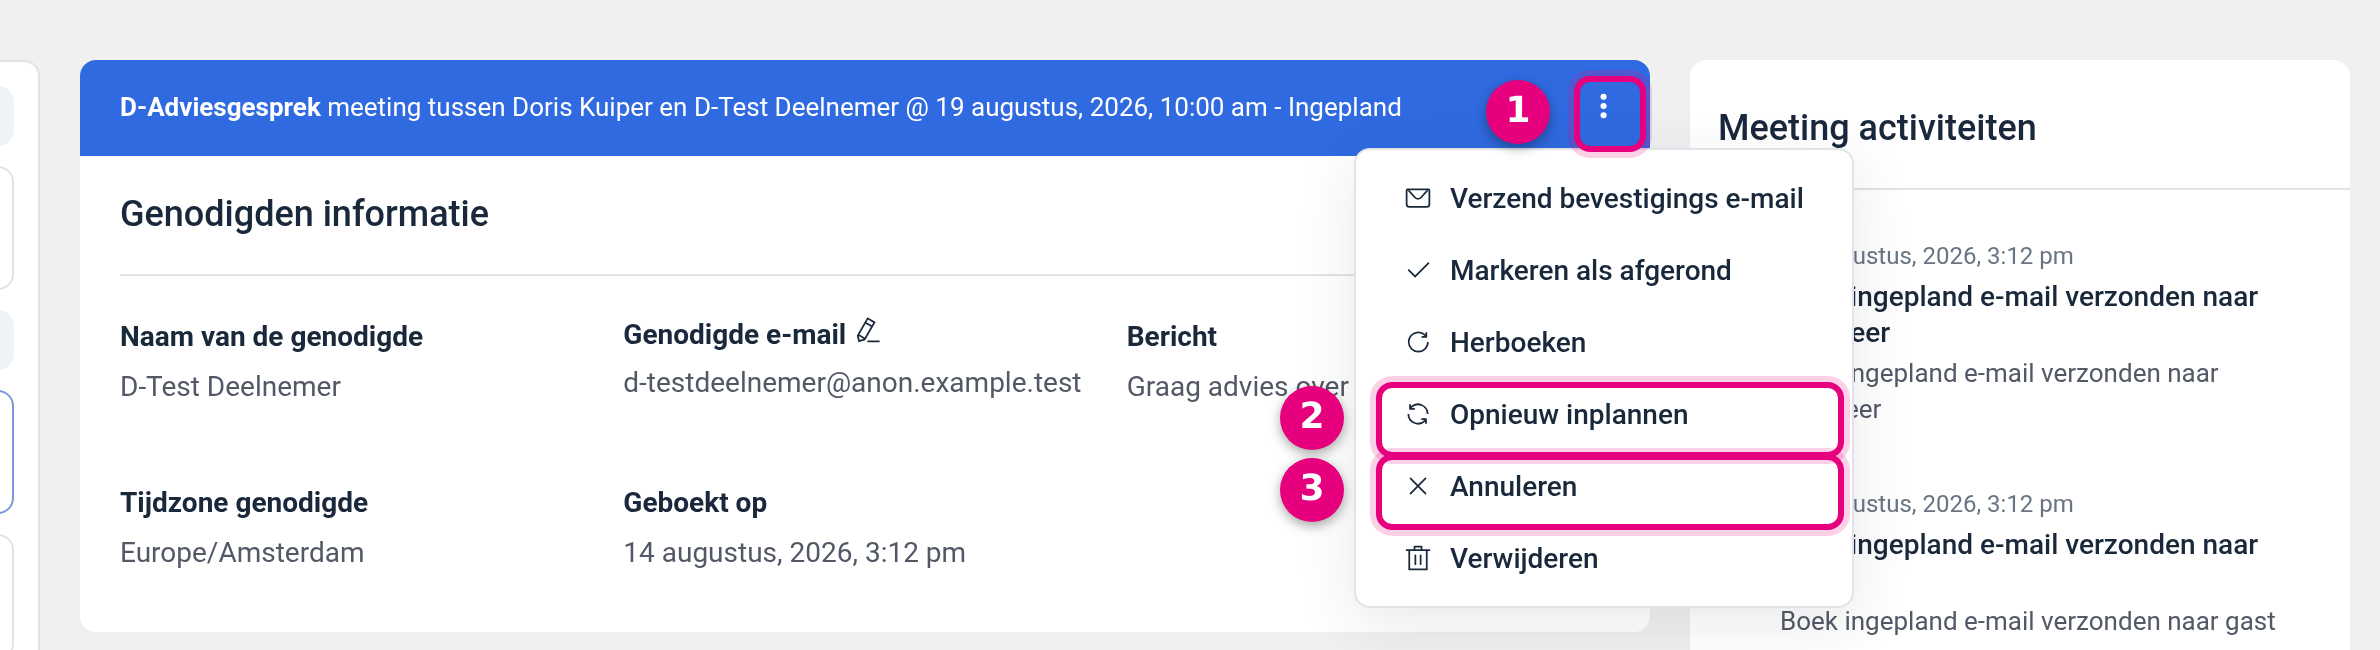
- The three dots. In the blue bar at the top of the booking there is a button with three dots on the right. The complete action menu sits behind it: Send confirmation email, Mark as completed, Rebook, Reschedule, Cancel and Delete.
- Reschedule. This opens exactly the same rescheduling page the attendee would see, in a new tab. There you pick a new day and time, fill in the reason and confirm with Schedule meeting. The attendee is then notified automatically with the new moment.
- Cancel. Here a Cancel meeting window appears first, showing the appointment, the attendee and the time, along with the sentence “Confirm that you want to cancel this event. A cancellation email will also be sent to the invitee.” You choose between No, do not cancel and Yes, cancel. You do not have to give a reason yourself here.
Two things often cause confusion here. Rebook is something different from Reschedule: it opens the Add new booking window, in which the attendee details are already prepared and you schedule an extra appointment. The existing booking stays in place. And Delete is something different from Cancel: cancelling sets the appointment to cancelled and keeps it findable in your overview, deleting really removes it. So in almost every case, choose Cancel.
For an appointment that has already been cancelled, the same menu only contains Rebook and Delete. Reschedule and Cancel apply only to appointments that still have to take place. If you want to set a new moment with the same attendee, use Rebook.
6. Which emails go out automatically #
There are four fixed email templates for cancelling and rescheduling, and all four are on by default. You will find them at the booking type on the Email notification tab, below the confirmation and reminder emails.
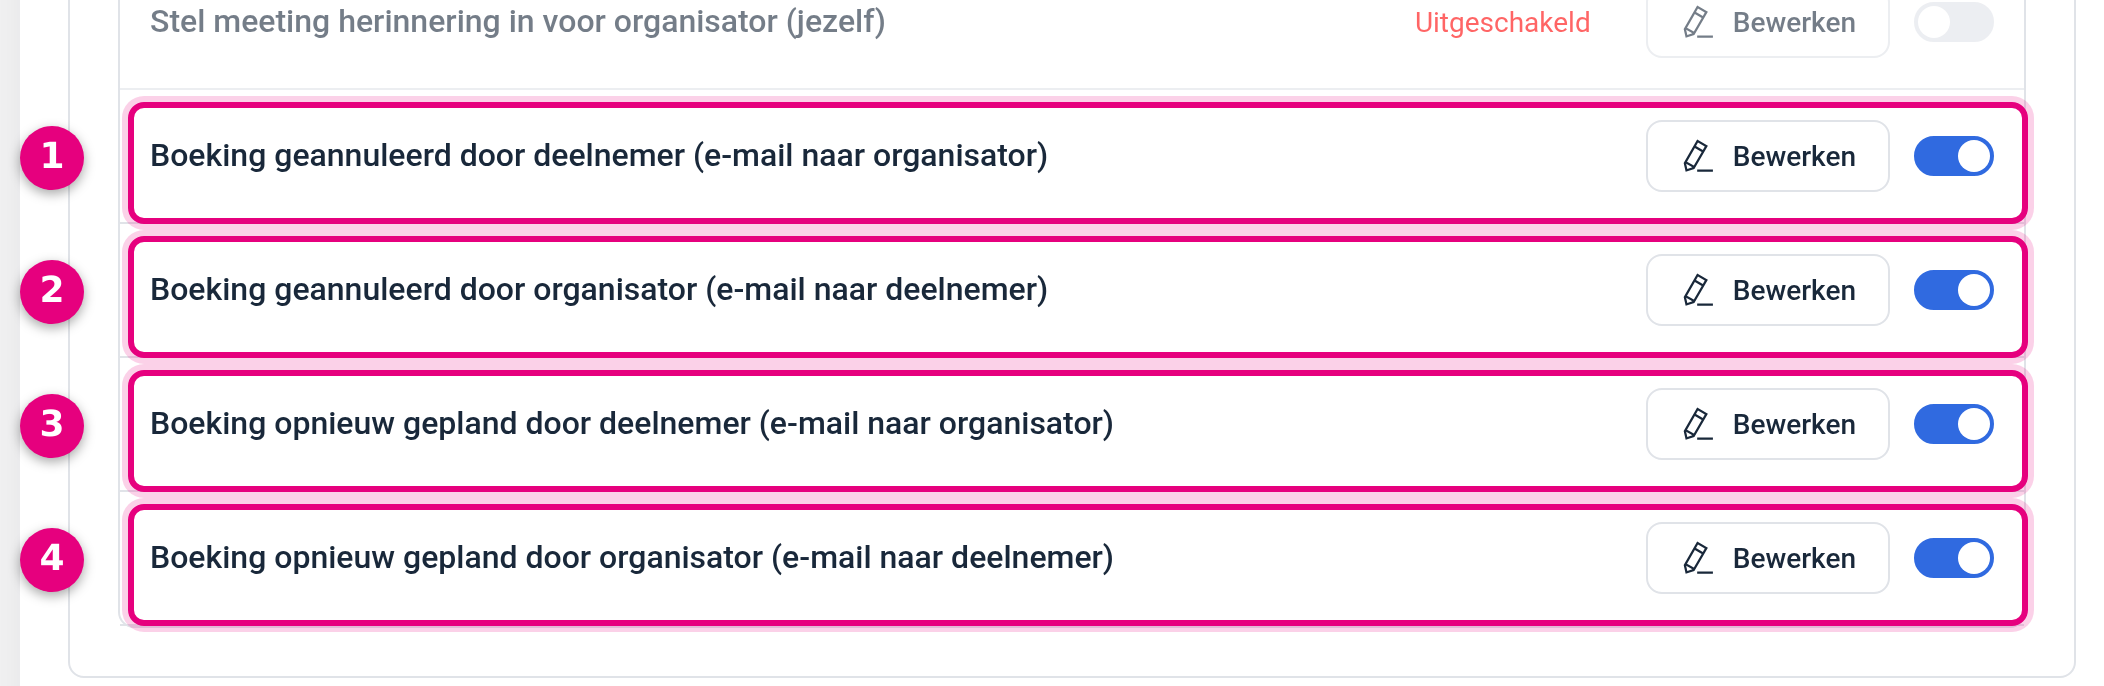
- Booking cancelled by attendee (email to organiser). This is your signal that someone has cancelled. The reason given is in this email.
- Booking cancelled by organiser (email to attendee). This one goes to the attendee the moment you cancel the appointment from Bookings.
- Booking rescheduled by attendee (email to organiser). Your notice that an attendee has moved the appointment, with the old and the new time and the reason given.
- Booking rescheduled by organiser (email to attendee). This one goes to the attendee when you move the appointment, with the new time and again the links to reschedule or cancel.
Click Edit to adjust the subject and the text. The toggle on the right switches the email off completely, for example if you prefer to send a personal message yourself. You adjust them exactly as you do with the confirmation and reminder emails, including working with shortcodes such as the attendee name and the time. That explanation is in Setting up confirmation and reminder emails for your appointments.
One thing to watch out for with a newly created booking type: the subject and the text of these default emails are still in English. So walk through them and put them in your own words before you share the booking link. If you clone an existing booking type, your texts simply come along.
7. The reason fields and where you read the reason back #
The two fields in which the attendee gives their reason are managed on the Question settings tab of the booking type. Scroll past the normal booking questions to the heading Other questions, with the explanation below it: “Customise the fields for cancelling and rescheduling bookings”.
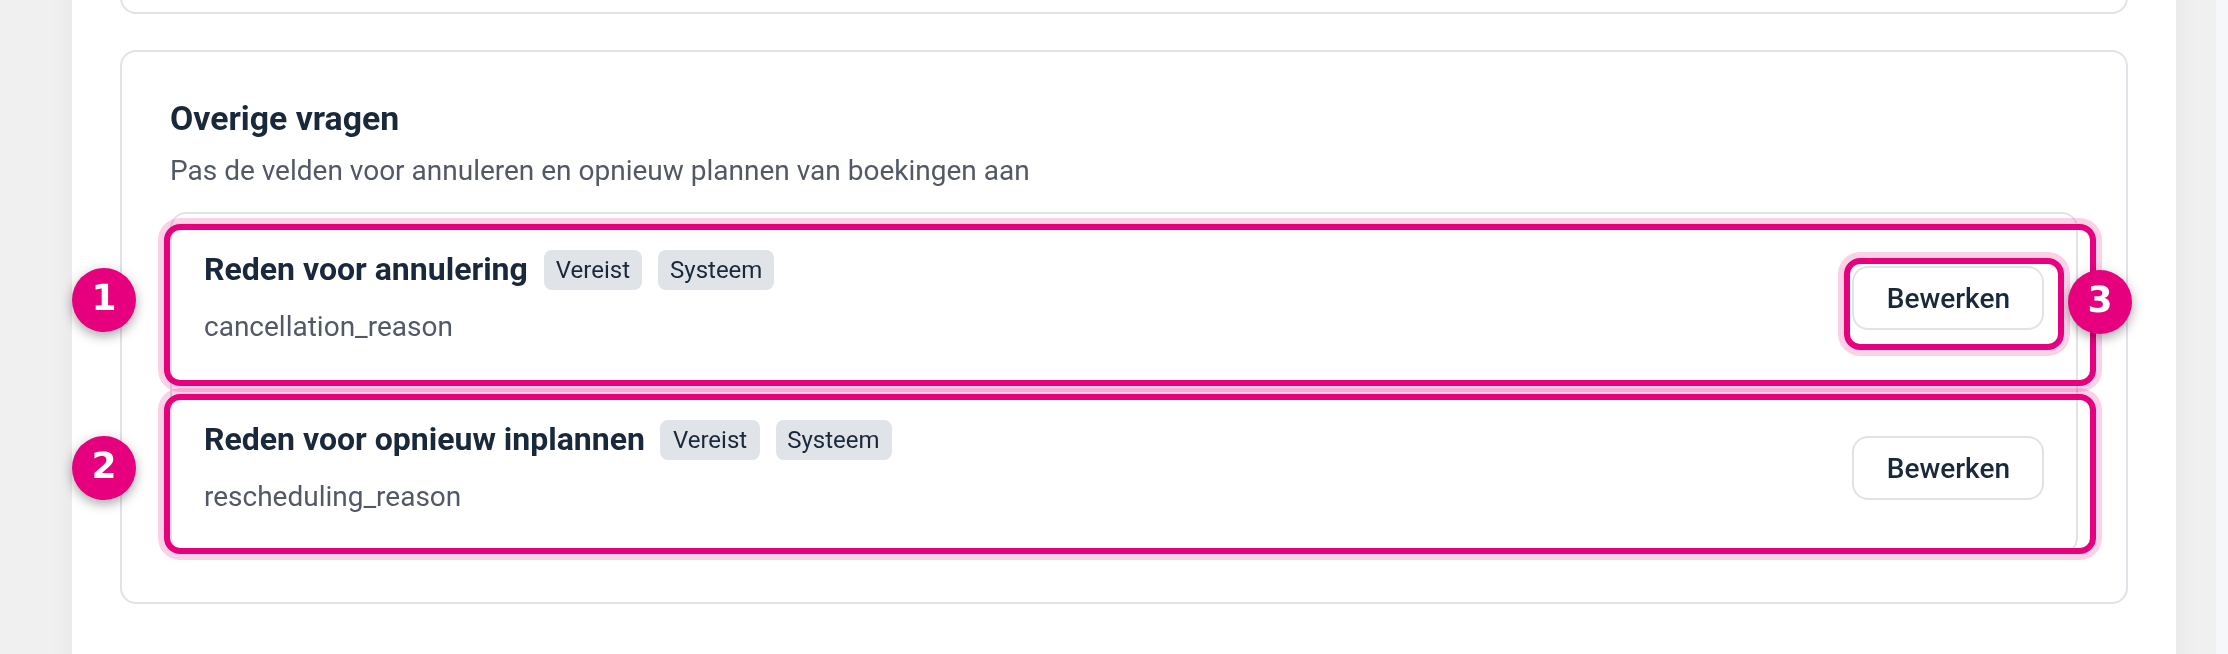
- Reason for cancellation. The field that appears on the cancellation page. The Required and System labels indicate that it is required and that it is a fixed field of the module, so you cannot throw it away.
- Reason for rescheduling. The same field, but for moving an appointment.
- Edit. With this you adjust the text of the field. Useful if you would rather ask something in your own tone, for example “What has come up? Then we can take it into account”.
You can read the cancellation reason back in two places. In the Bookings screen you open the cancelled appointment via View details; on the right, under Meeting activities, is the line saying the meeting has been cancelled, with the reason directly below it. That same reason is also in the email you receive as soon as someone cancels.
With rescheduling it works slightly differently. Under Meeting activities you do see the line saying the meeting has been rescheduled, with the previous date and time alongside, but the reason given is not shown there. You read that in the “Booking rescheduled by attendee” email. So keep those emails, or include a clear reference in that template.
8. Good to know #
- Your connected calendar comes along. If you have connected your own calendar, the calendar item is removed on a cancellation and moved to the new time on a reschedule. You do not have to do anything for that yourself. How to set up that connection is described in Connecting your calendar to the appointment scheduler.
- A connected Zoom meeting lapses as well. If you use Zoom as the location, the associated Zoom meeting is cancelled too when the booking is cancelled. See Connecting Zoom to the Appointments module for automatic meetings.
- A payment is not refunded automatically. With a paid booking type the payment simply stays as it is after a cancellation. If you want to refund, arrange that yourself in your shop or with your payment provider. See Setting up paid appointments with automatic checkout.
- Reminders move along. If a reminder email is switched on for this booking type, it is rescheduled after the move on the basis of the new time. So your attendee receives the reminder at the right moment and no longer for the old appointment.
- Settings apply per booking type. If you have an introductory chat, an advice session and a group session, you can choose per service what the attendee may do. For a short and free introductory chat, cancelling is perfectly fine; for a paid session you often want a limit shortly before the appointment.
- An appointment you add yourself behaves the same way. You can cancel and reschedule manually entered appointments from Bookings too. See Adding appointments manually in the Appointments module.
Related articles #
- Creating your first calendar and booking type in the Appointments module
- Setting up confirmation and reminder emails for your appointments
- Setting your availability: working hours, buffers, minimum notice period and daily maximum
- Sharing your booking link: one service or all your services on one page
- Adding appointments manually in the Appointments module
- Setting up paid appointments with automatic checkout
- Connecting appointments to the CRM: creating contacts automatically on a booking


