Some pages are not meant for everyone. Think of a members page, a course overview for buyers or a thank-you page with downloads. In Autorespond you control access to a page like that with tags from your CRM: only logged-in visitors with the right tag see the content, everyone else gets a tidy message or is redirected. In this article you set that up step by step and test the result.
Access control in Autorespond is based on WP Fusion, included in your package. Read the English documentation
How does tag-based access work? #
Every contact in your CRM can have tags, for example customer or Member: Academy. Access control links those tags to your website: for each page you specify which tag a visitor needs. So a visitor has to be logged in with an account that is linked to a CRM contact with the right tag. That way your customer data automatically determines who may see what, without separate passwords or membership plugins.
Step 1: set the access on the page #
Go to Website → Pages and open the page you want to restrict. Click the settings icon at the top right (the square next to the Publish button) so that the sidebar opens, choose the Page tab at the top of the sidebar and scroll down to the WP Fusion section.
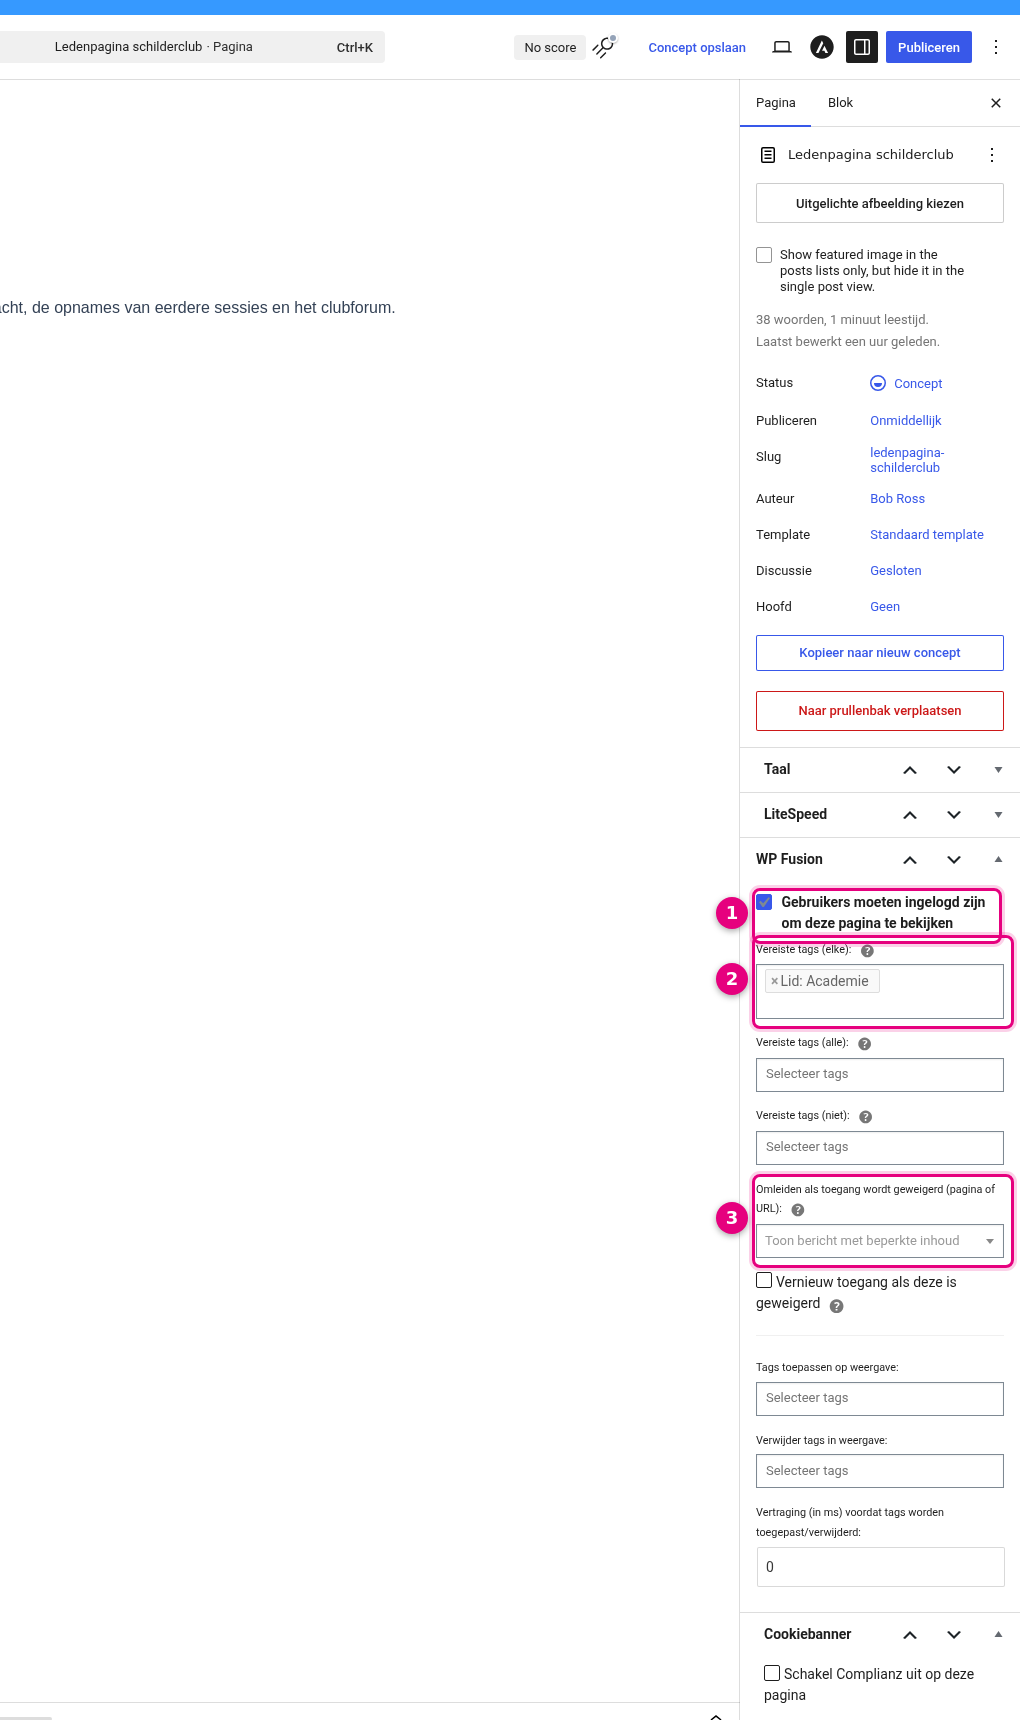
- Users must be logged in to view this page: tick this to switch on the protection for this page. The tag fields below it then become active. If you only want to require a login without a specific tag, simply leave the tag fields empty.
- Required tags (any): choose one or more tags here; the visitor needs at least one of them. In the example that is the tag Member: Academy. Below it there are two more variants: with Required tags (all) the visitor must have all the chosen tags, and with Required tags (not) you exclude people who do have a particular tag (for example a tag Cancelled).
- Redirect if access is denied: choose a page or URL that visitors without access are sent to, for example your sales page. If you leave this on Show restricted content message, the visitor stays on the page and sees the standard message from step 2. Further down the panel you will also find Refresh access if it has been denied (on a refusal, first checks the current tags in the CRM again) and Apply tags on view (automatically gives visitors a tag as soon as they view this page, optionally with a delay in milliseconds; handy for keeping track of who has seen your offer).
Then save the page with Save draft or Publish.
Step 2: check the default behaviour for the whole site #
What visitors without access see exactly is arranged centrally. Go to Administration → Access control and, on the General settings tab, scroll to the Content restriction section.
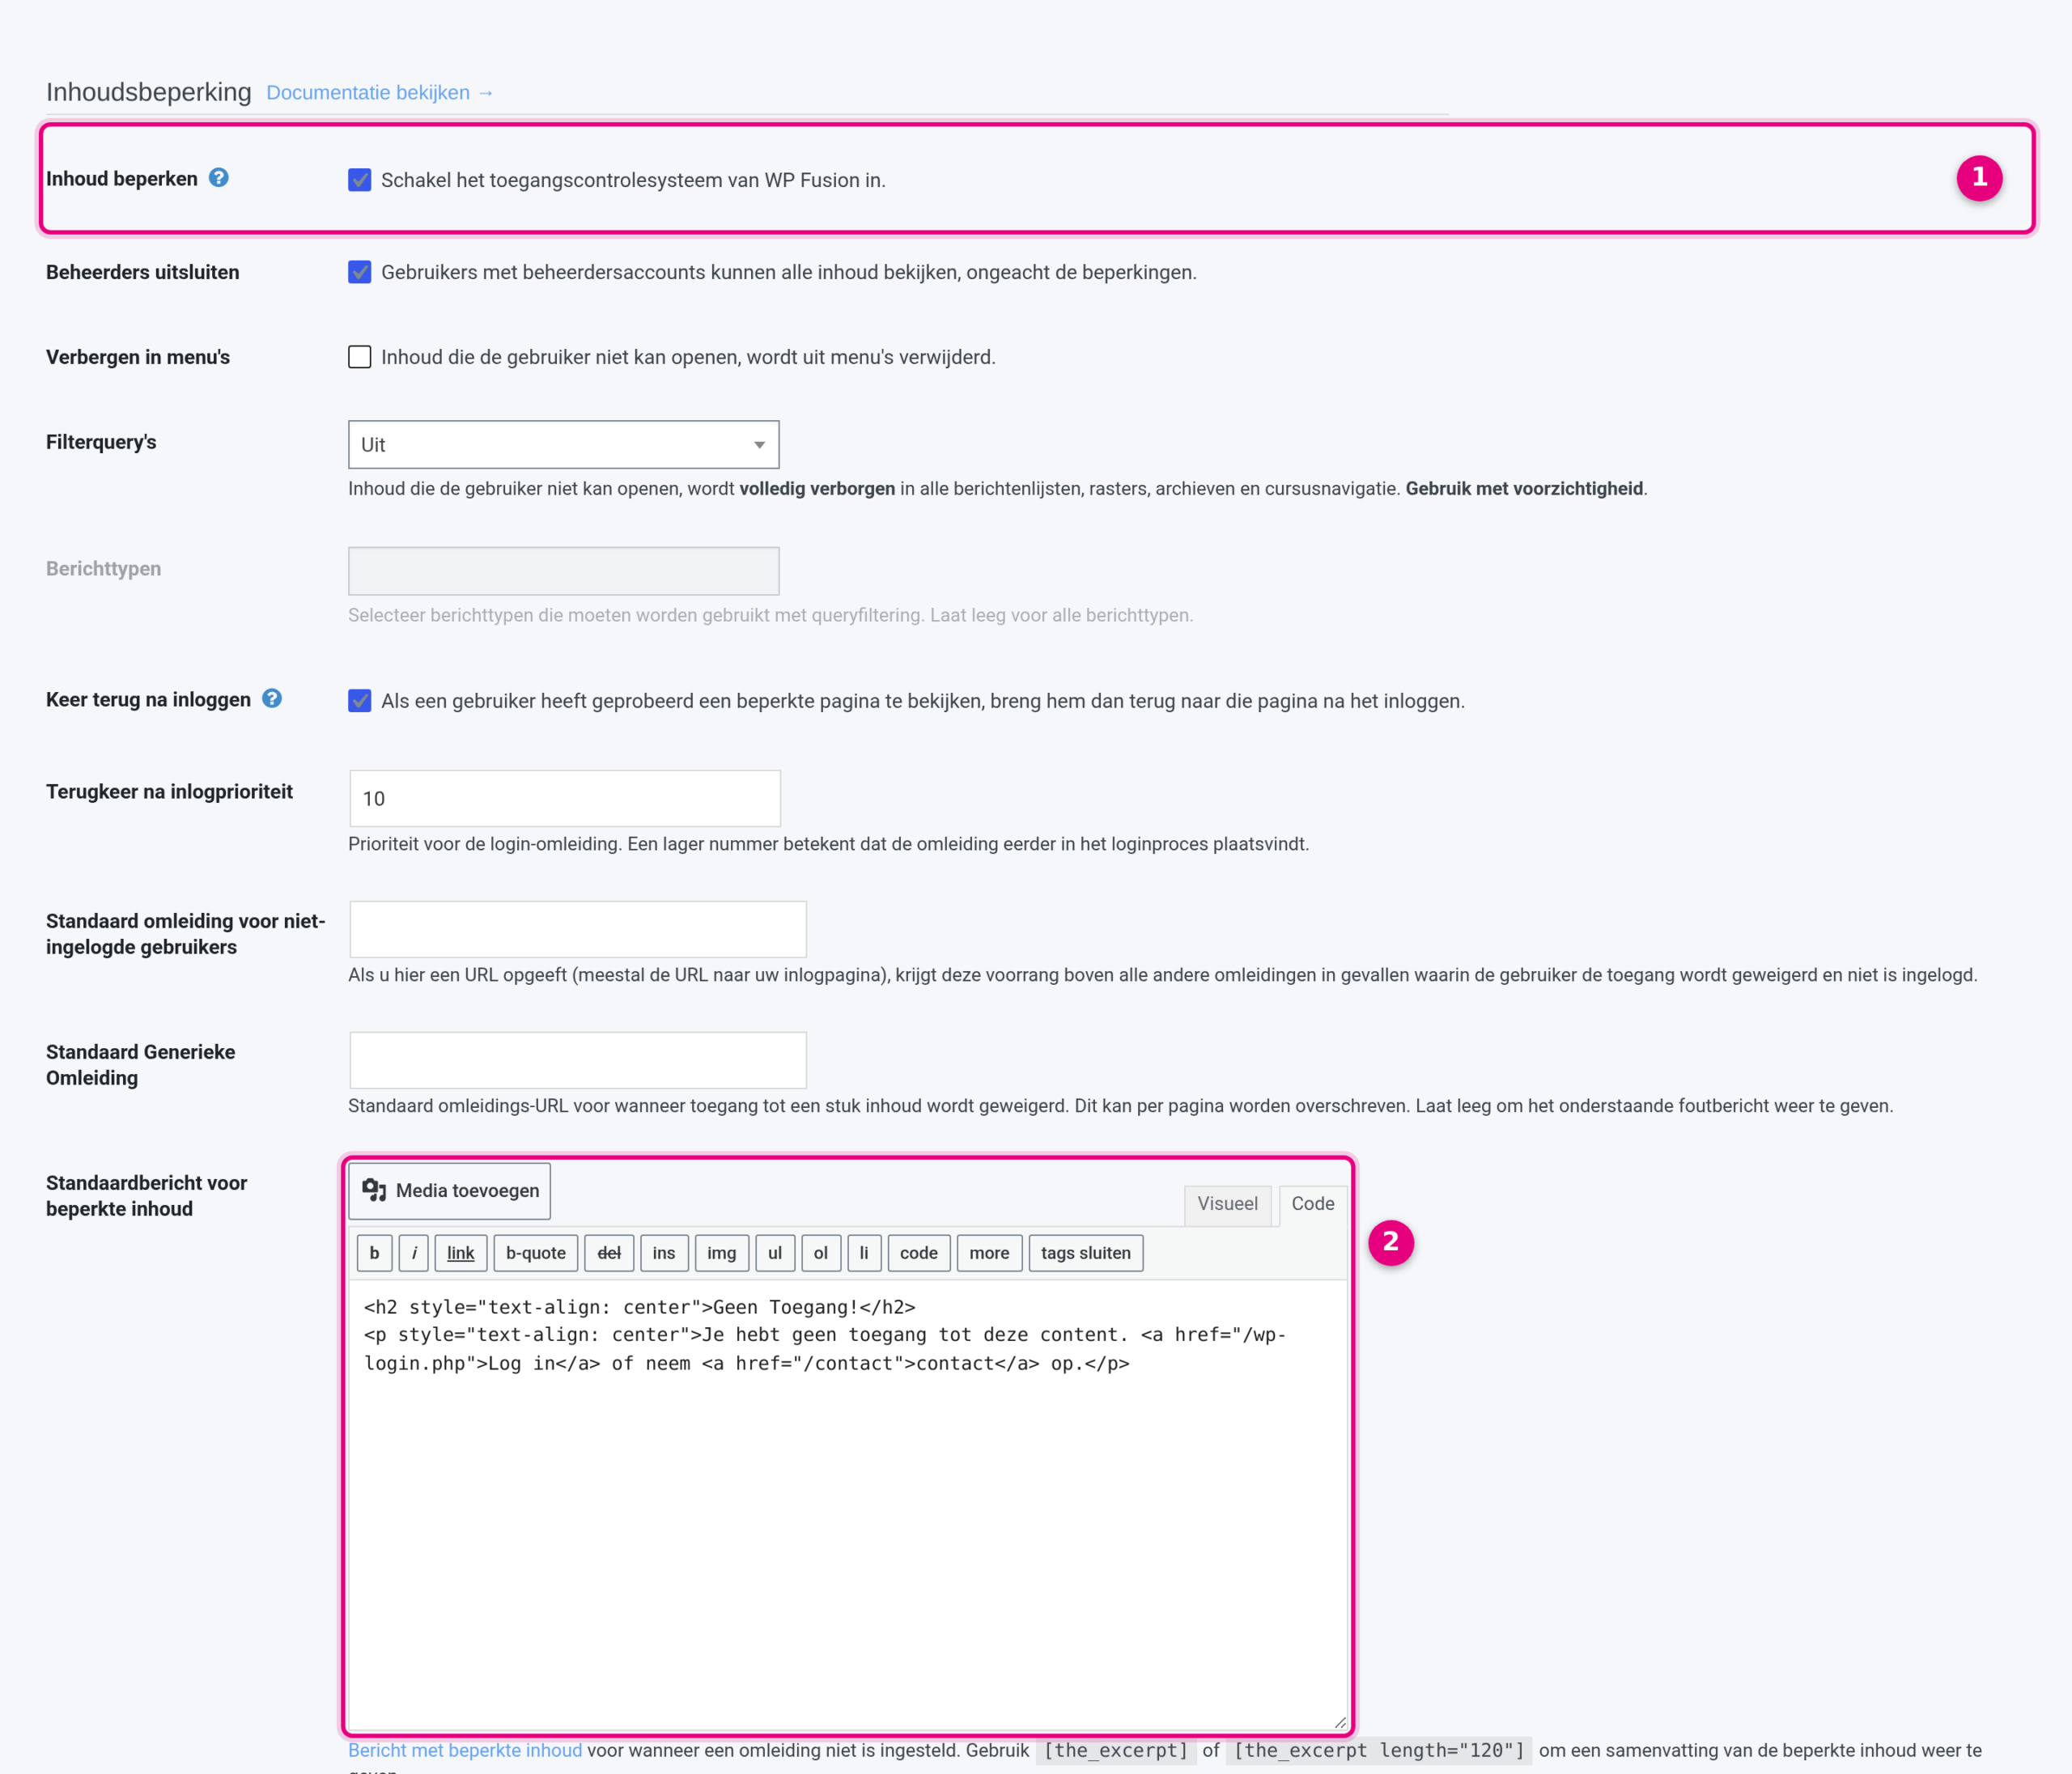
- Restrict content: the main switch of the access control system. It is on by default; if it is off, the settings on your pages are ignored. Directly below it is Exclude administrators: users with an administrator account always see all content, regardless of the restrictions. With Hide in menus, restricted pages disappear from the navigation for anyone without access, and with Filter queries they are also hidden completely in post lists, grids and course navigation (use that with care). Return after login makes sure someone is automatically returned to the page they tried to view after logging in. With the two redirect fields below that, you set a fixed default redirect for visitors who are not logged in, or for everyone without access.
- Default message for restricted content: this message appears in place of the restricted content when you have not set a redirect. Feel free to adjust the text; the Visual and Code buttons let you edit it as plain text or as HTML. Put the shortcode
[the_excerpt]in that message to show a short summary of the restricted page as a teaser.
How does someone get the required tag? #
Access is as flexible as the way the tag is assigned. The most common routes:
- Automatically on purchase: open the product in your shop and use the CRM tab on the product page with Successful purchase actions to assign a tag as soon as someone buys the product. See also creating a paid product with an automatic list link and follow-up email.
- Through an automation: in CRM & Emails → Automations, use the action Apply tag, for example after a form is submitted or a sequence is completed. See configuring automation actions.
- Manually: open the contact in the CRM and add the tag on the contact card. Handy for exceptions, such as free access you give away personally.
Testing #
Always test the protection after setting it up. Please note: do not do that with your administrator account, because administrators are excluded from all restrictions by default (the Exclude administrators setting from step 2) and therefore always see the page as normal.
- Publish the page (a draft page is not visible to visitors anyway).
- Open the page in a private or incognito window, without logging in. You now see the standard message, or you are redirected if you have set that up.
- Log in with a test account whose contact does not have the required tag. You should not get access now either.
- Give the test contact the tag in the CRM, reload the page and check that the content is now visible.


