In this guide we explain how to configure the cookie banner in your Autorespond environment and how to connect it to Google Tag Manager. With this integration you make sure that scripts (such as Google Analytics or marketing pixels) are only activated after a visitor has given the right consent.
Step 1: starting the configuration #
To begin, go to the cookie banner settings in the Autorespond administration.
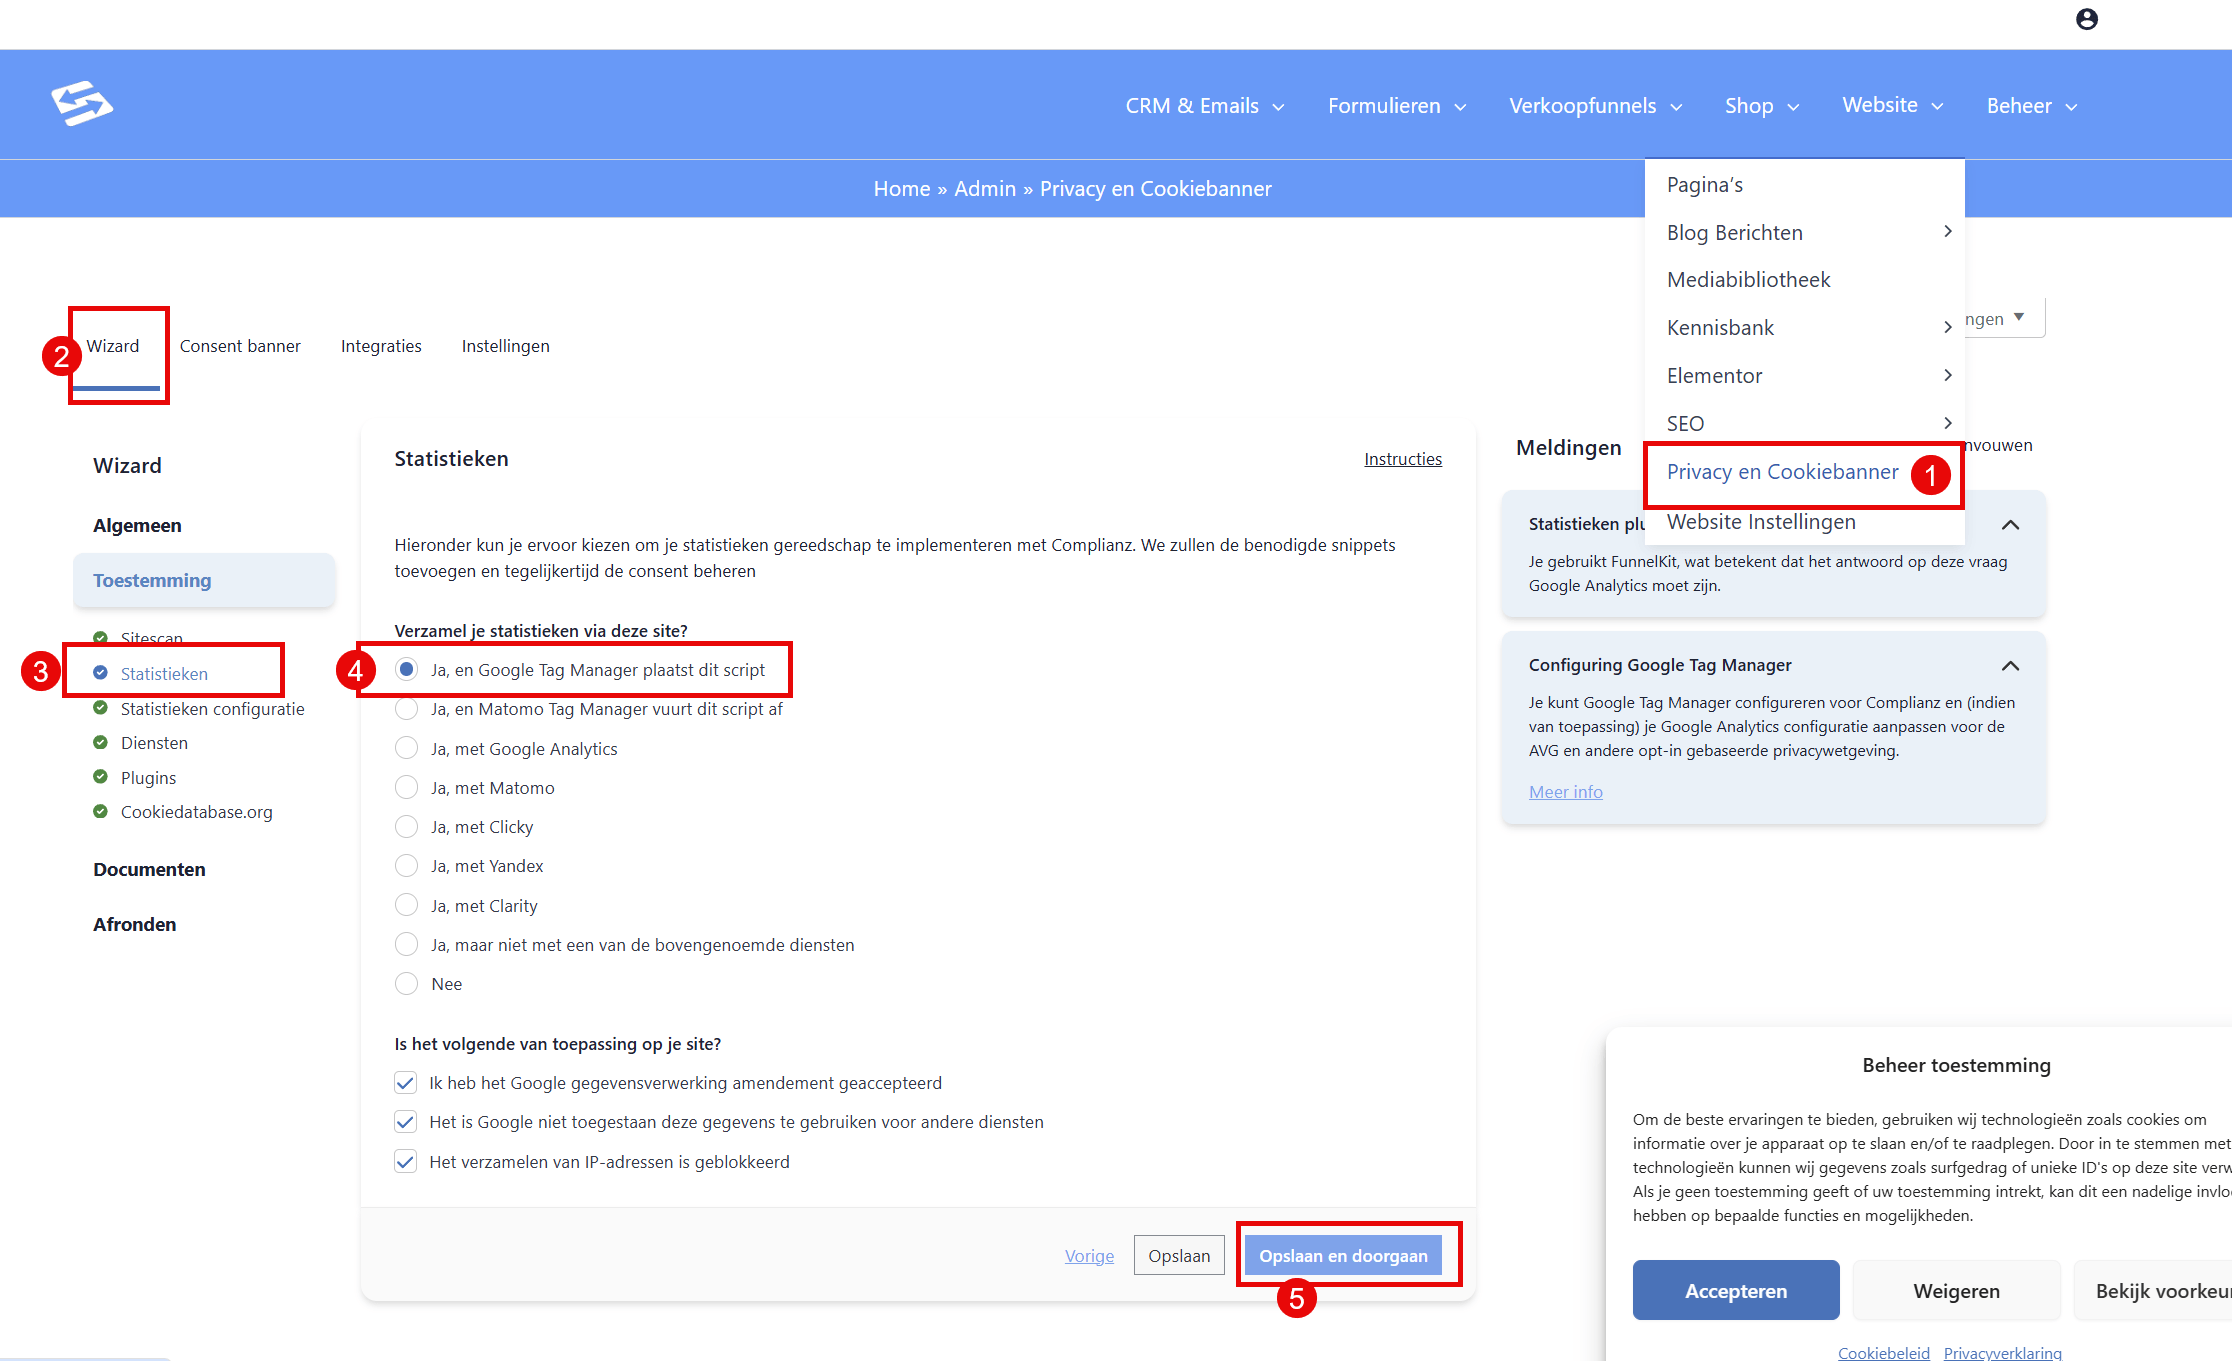
- In the menu, go to Website and select Privacy and Cookie banner (1).
- Then select the Wizard (2) to go through the configuration steps.
- In the overview on the left, click Statistics (3).
- Select the option: “Yes, and Google Tag Manager places this script” (4).
- Click Save and continue (5).
Step 2: asking for consent for statistics #
It is essential that the banner actually asks for consent before GTM activates the measurement scripts.
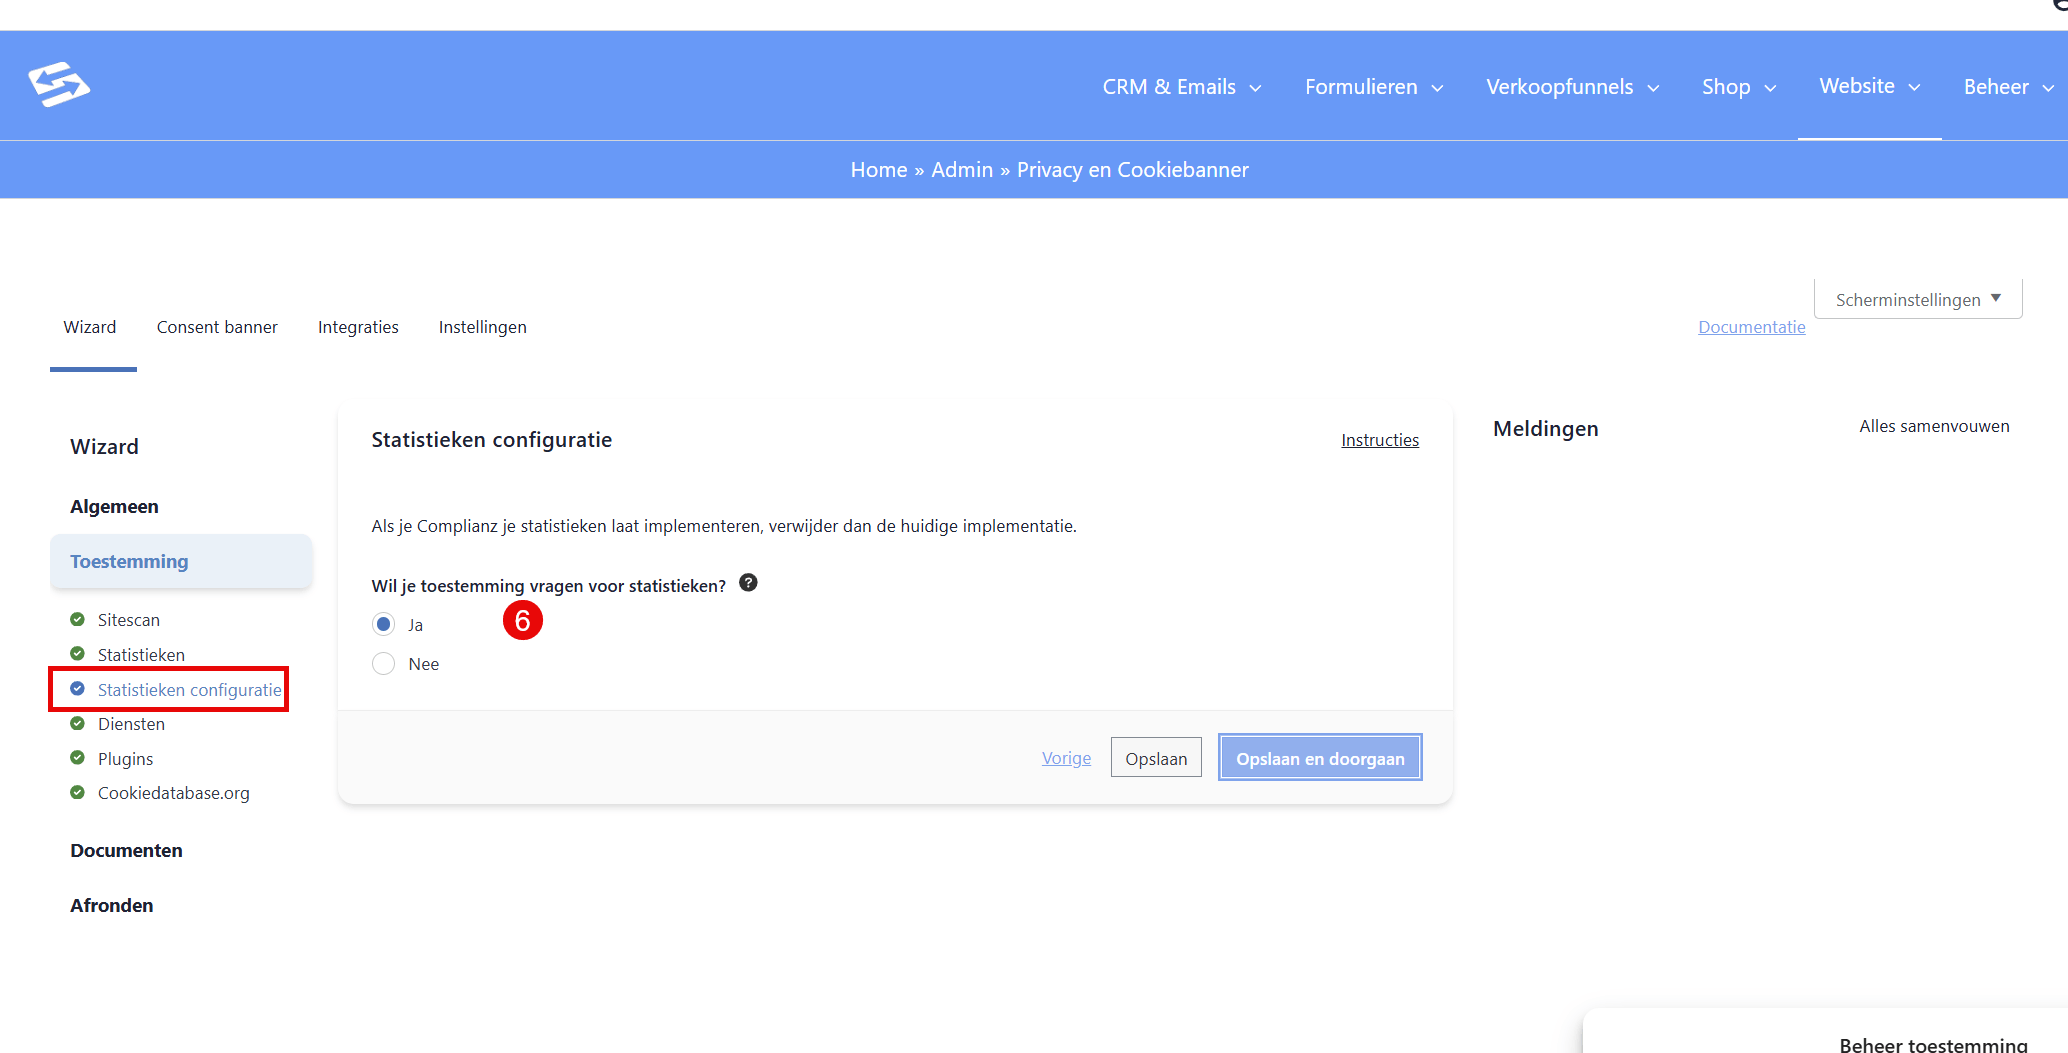
- On the left, click Statistics configuration.
- Select “Yes” (6) for the question whether you want to ask for consent for statistics. This is a requirement for a GDPR-proof setup.
- Click Save and continue.
Step 3: connecting to the Cookiedatabase #
To keep your cookie statement up to date automatically, we connect to the external cookie database.
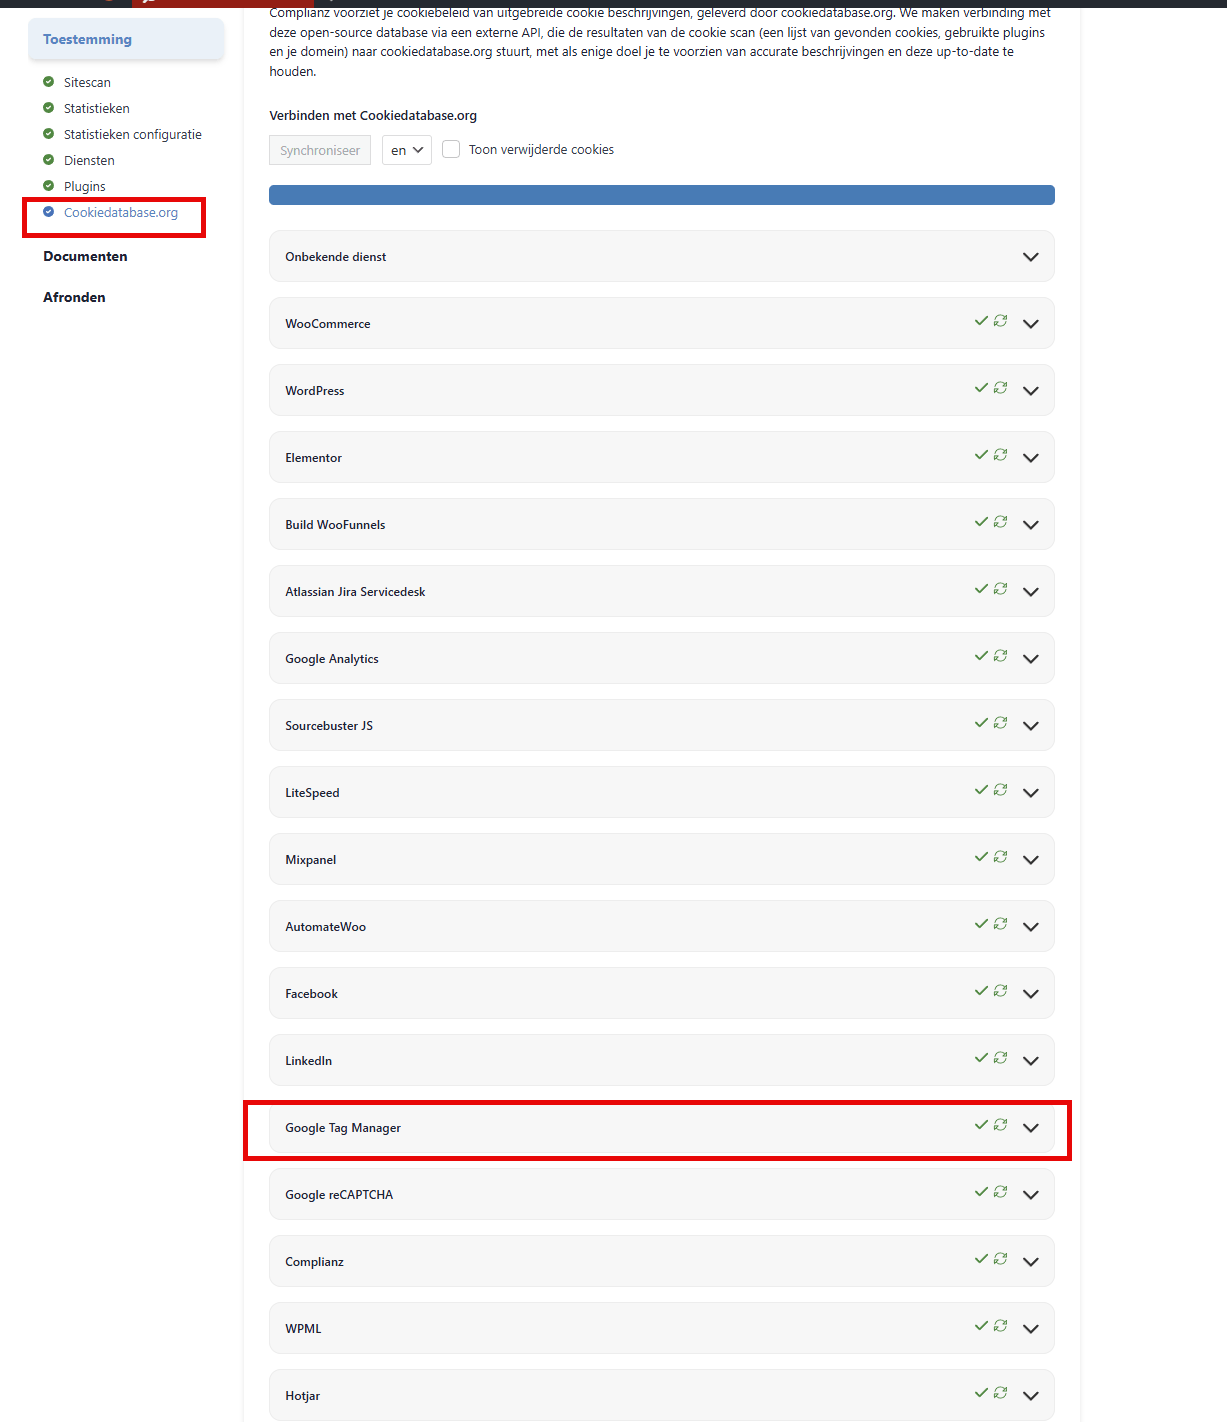
- Go to the Cookiedatabase.org section.
- Make sure the connection is made. In the list of services found you will now also see Google Tag Manager. This makes sure the right descriptions appear in your cookie banner.
Activating tags based on consent in Tag Manager #
It is important to understand the difference between the banner and Google Tag Manager:
- The banner: asks the visitor for consent (for example “Do you accept marketing cookies?”) and sends a signal.
- Google Tag Manager: receives that signal as a ‘custom event’ and decides on that basis whether a tag (such as a Facebook Pixel or Google Analytics) may be activated.
⚠️ Important disclaimer #
- You are responsible yourself for setting up Google Tag Manager correctly.
- In the steps below we link to a template file that can help you set up your Google Tag Manager container. These steps require working knowledge of Google Tag Manager.
- Autorespond takes no responsibility for the setup of your Google Tag Manager account. We can of course help you with setting up the cookie banner itself on your platform.
- Ask about Premium Support for additional help with technical issues like these.
1. The custom events #
As soon as a visitor makes a choice in the banner, a specific signal is sent to GTM. The most important events are:
cmplz_event_functional: for necessary functions (always active).cmplz_event_preferences: for preferences (such as language settings).cmplz_event_statistics: for analytics cookies (measuring visitors).cmplz_event_marketing: for tracking and advertising cookies.
2. Step by step: importing tags and triggers #
To automate this process within GTM, we use a pre-configured container file (.json).
- Download the file: Click here to download the GTM container (.json).
- Import into GTM: in Google Tag Manager, go to Admin > Import container.
- Configuration: select the file, choose a workspace and choose the Merge option. Then choose ‘Rename conflicting tags, triggers and variables’. Never overwrite your existing container.
- Linking tags: open a tag in GTM (for example GA4). Remove the ‘All Pages’ trigger and add the newly imported trigger that matches the category (for example the ‘Statistics’ trigger for Google Analytics).
- Publishing: click Submit (Publish) to put the changes live.
3. Important nuances for the GDPR & regions #
- GDPR: you may not load analytics tags on “All Pages”. You have to wait for the
cmplz_event_statisticsevent. - Opt-out regions (such as CCPA): there, tags are often loaded by default unless a user explicitly indicates they do not want that. The banner adapts to this based on the visitor’s location.
- Accept/deny banner: are you using a simple banner without categories? Then use
cmplz_event_marketingorcmplz_event_0for the ‘Accept’ button.
4. Checking the installation #
Use Preview mode in Google Tag Manager. Visit your site and look in the ‘Tag Assistant’. The tags for marketing or statistics should only appear under ‘Tags Fired’ after you have given consent in the banner.
Frequently asked questions (FAQ) #
Why are my statistics not being measured?
Check that the triggers in GTM are correctly linked to the tags. If the cmplz_event_statistics trigger has not been added, the tag will never fire.
Does Autorespond help with setting up my GTM account?
No, setting up specific tags, variables and triggers within your Google Tag Manager account falls outside our standard support. We only support the configuration of the banner that sends the signals to GTM.
What if I want to create my triggers manually?
That is possible. In GTM, create a new trigger of the type ‘Custom Event’ and use exactly the names from the list above (for example cmplz_event_marketing).
Where can I find more help with GTM?
For a detailed visual explanation of the import process, see this article about importing the Tag Manager container. For direct help with the setup, get in touch about our Premium Support.


